SAML v2 with Azure AD
This feature is only available in paid plans. Please visit our pricing page to learn more.
Configure SAML v2 for Azure AD/Microsoft Entra ID
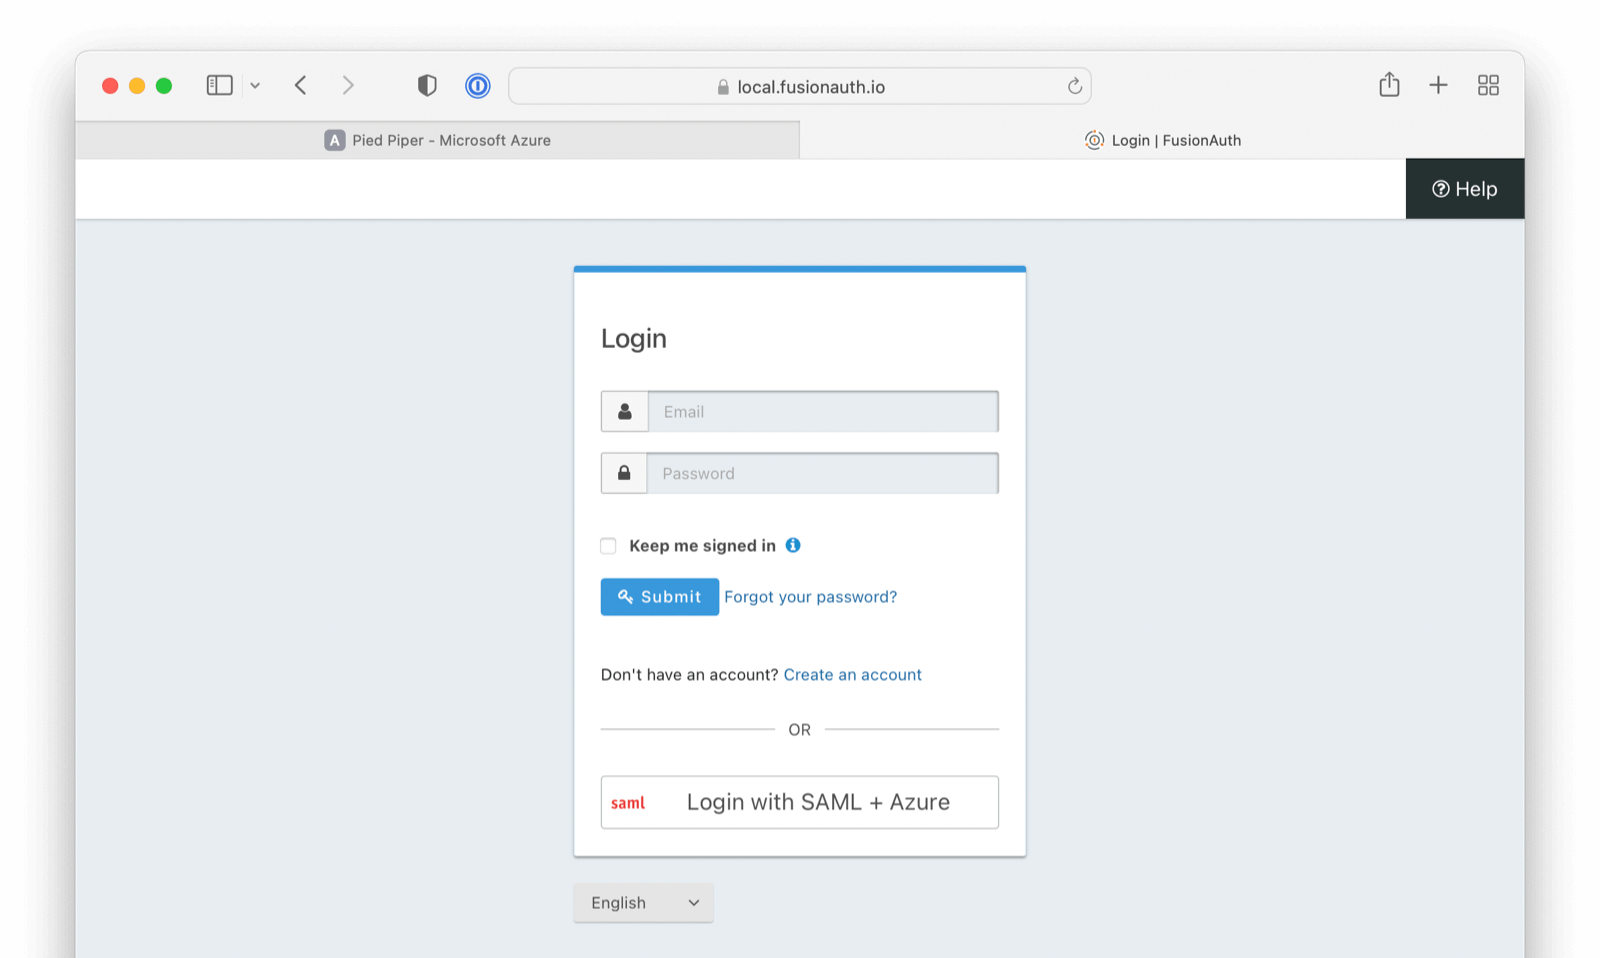
This documentation will guide you in configuring SAML v2 IdP for Azure AD/Microsoft Entra ID. In this case, FusionAuth will act as Service Provider (SP) to Azure AD (IdP). Functionally, the result will allow you to display a “Login with Azure AD” button on your FusionAuth login page and connect via SAML to Azure AD users/applications.
Azure AD is Microsoft Entra ID. But the usage of Azure AD is common. In this document, wherever you see Azure AD, rest assured we mean Microsoft Entra ID as well.
Create an Application in Azure
This guide uses SAML and Azure Single Sign-on functionality.
If you have already configured an Azure AD Enterprise application, skip this section. If you have not, please follow the brief steps outlined below:
- From the Azure account portal navigate to
Enterprise Applications. - At the top of the screen click on
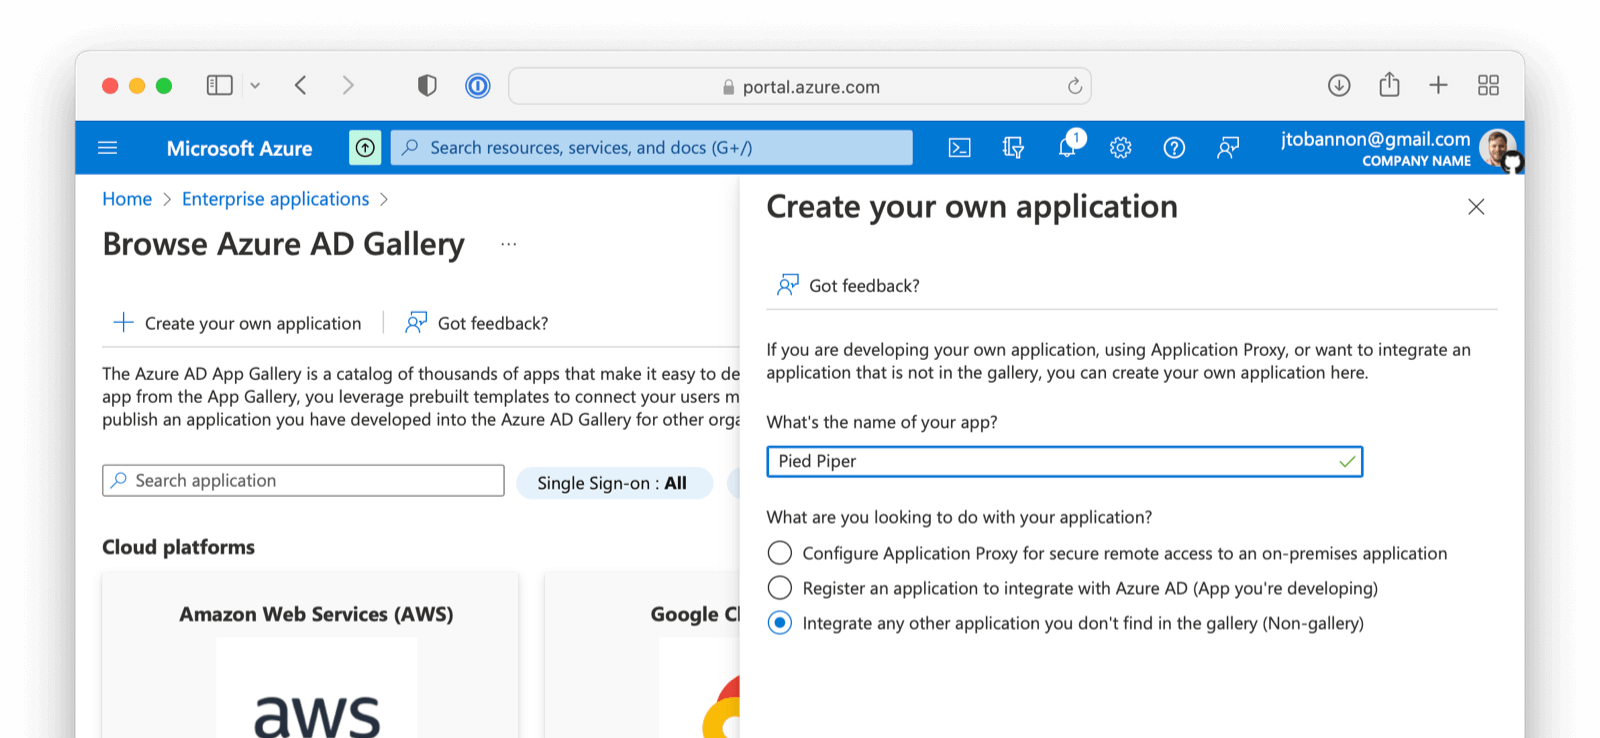
New application - Click on
Create your own application - Name the application
- Select the third option -
Integrate any other application you don't find in the gallery (Non-gallery). - Click
Create
Configure Your Azure Application
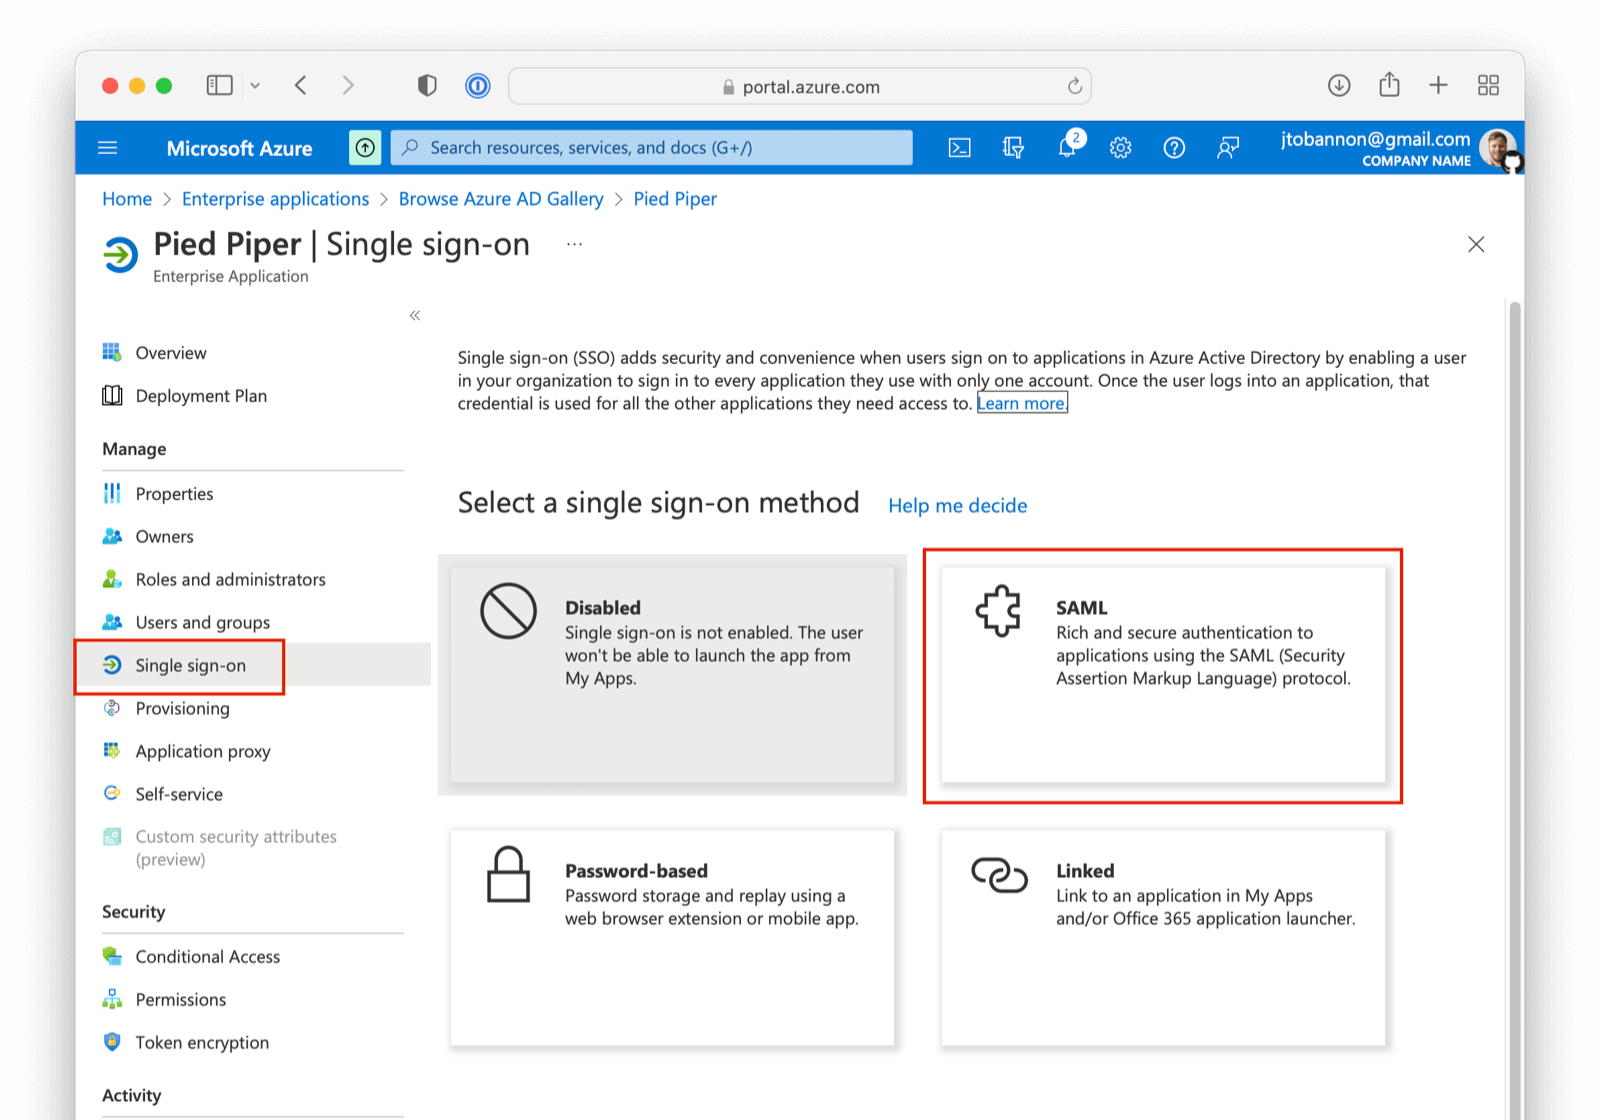
From your application home screen, click on Single sign-on. Select the SAML option.
There are five steps to configure Azure AD. However, there is a bit of a procedural dilemma. Before you can move forward, you need an Entity ID (in this case, this will be obtained from our FusionAuth IdP once created) so that Azure AD can generate a X.509 certificate. However, before you can create an IdP in FusionAuth to get the Entity ID, you need an X.509 certificate. The below steps will solve this problem by:
- Creating a “placeholder” X.509 certificate and importing this into Key Master.
- Making a SAML IdP in FusionAuth (Entity Id) with a placeholder certificate selected.
- Updating your Azure AD Enterprise application with values from your newly created IdP, thereby getting a valid X.509 certificate.
- Revisiting your SAML IdP in FusionAuth and updating with the correct X.509 certificate from the above step.
- Completing your integration.
If you already have a valid X.509 certificate, you can complete step two above using this valid certificate and skip a few of the steps below.
With that discussed, let us begin!
Import a “placeholder” X.509 Certificate
The first step is to import a “placeholder” certificate into Key Master.
-----BEGIN CERTIFICATE-----
MIIC1DCCAj2gAwIBAgIBADANBgkqhkiG9w0BAQ0FADCBhjELMAkGA1UEBhMCdXMx
DzANBgNVBAgMBkRlbnZlcjETMBEGA1UECgwKRnVzaW9uQXV0aDEWMBQGA1UEAwwN
RnVzaW9uQXV0aC5pbzETMBEGA1UECwwKRnVzaW9uQXV0aDEkMCIGCSqGSIb3DQEJ
ARYVcmljaGFyZEBwaWVkcGlwZXIuY29tMB4XDTIyMDcxNjA1MDc1N1oXDTIzMDcx
NjA1MDc1N1owgYYxCzAJBgNVBAYTAnVzMQ8wDQYDVQQIDAZEZW52ZXIxEzARBgNV
BAoMCkZ1c2lvbkF1dGgxFjAUBgNVBAMMDUZ1c2lvbkF1dGguaW8xEzARBgNVBAsM
CkZ1c2lvbkF1dGgxJDAiBgkqhkiG9w0BCQEWFXJpY2hhcmRAcGllZHBpcGVyLmNv
bTCBnzANBgkqhkiG9w0BAQEFAAOBjQAwgYkCgYEA2FmZJHJFVEM9JwFd6Za87T0Z
MtIL5djSFC/TBVqhCx15eauNGAV/RoulESA6qsI4LNrbJ8uEYDQa9UXAZCc9yRMa
e/+E5XAApV4K06duo+vKon5L21YZ7HxzjUfL3bhLqKvpFWCQkNrH0rxgPCGwzh7N
T24sFcKwaVvBdknm9i8CAwEAAaNQME4wHQYDVR0OBBYEFLdhYvqAwTBCEQsSZdKj
UVR57CwDMB8GA1UdIwQYMBaAFLdhYvqAwTBCEQsSZdKjUVR57CwDMAwGA1UdEwQF
MAMBAf8wDQYJKoZIhvcNAQENBQADgYEAIpQags/uHj0dyFcCtRcPeVEDUqBPZaGO
M9kbFiGATlMNX4OiDvMUKs7Ag9109o0iLWPvLBQrMDn87fSy6+MUXZRS4asjzJCp
5aVWSevI85H6xS8WXxFr21etaqfiE88Lw86gK5O4iKtMBtCnWA5iUc2EJ0citQ0G
Pk8ybmMP1r8=
-----END CERTIFICATE-----
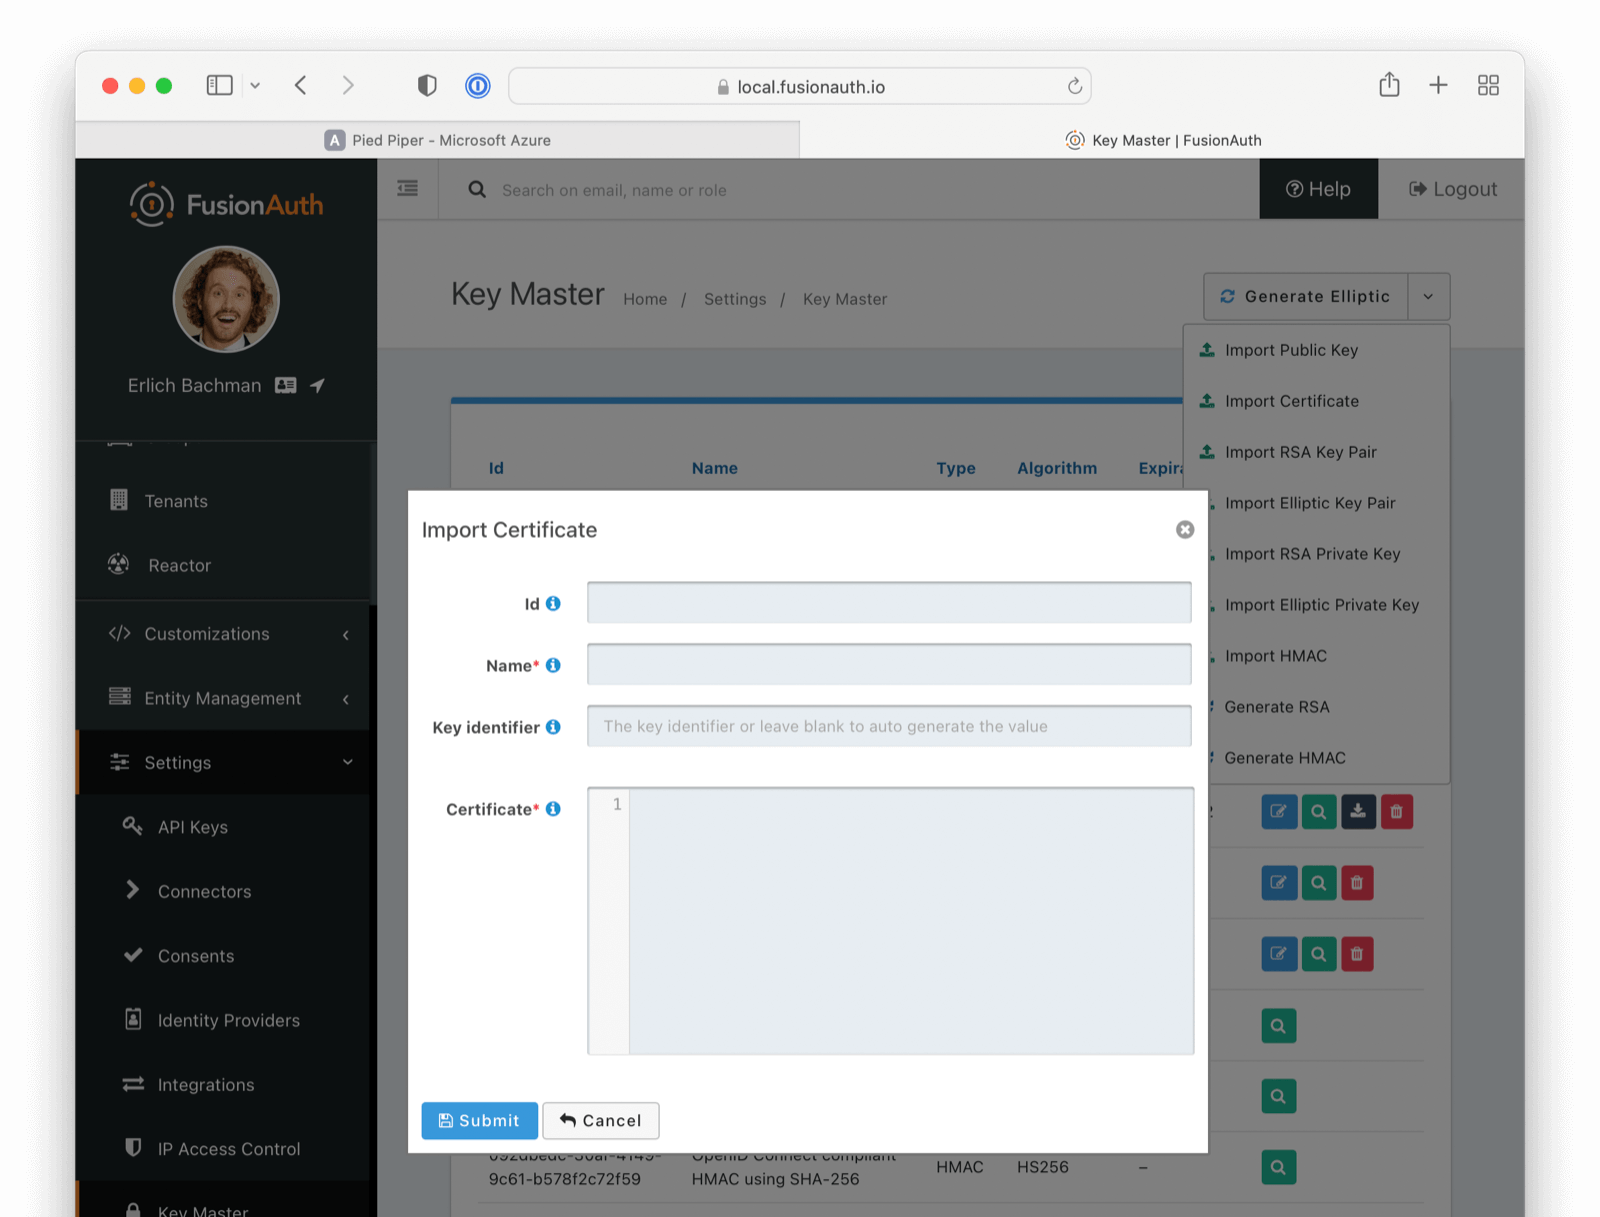
Using the above “placeholder” certificate, navigate to Settings -> Key Master and click Import Certificate.
After you configure Azure AD, you’ll get another X.509 certificate which will be the one actually used during a SAML login.
Create a SAML v2 Identity Provider
In the FusionAuth administrative user interface, navigate to Settings -> Identity Providers -> Add.
The identity provider you will be adding is a SAML V2 identity provider.
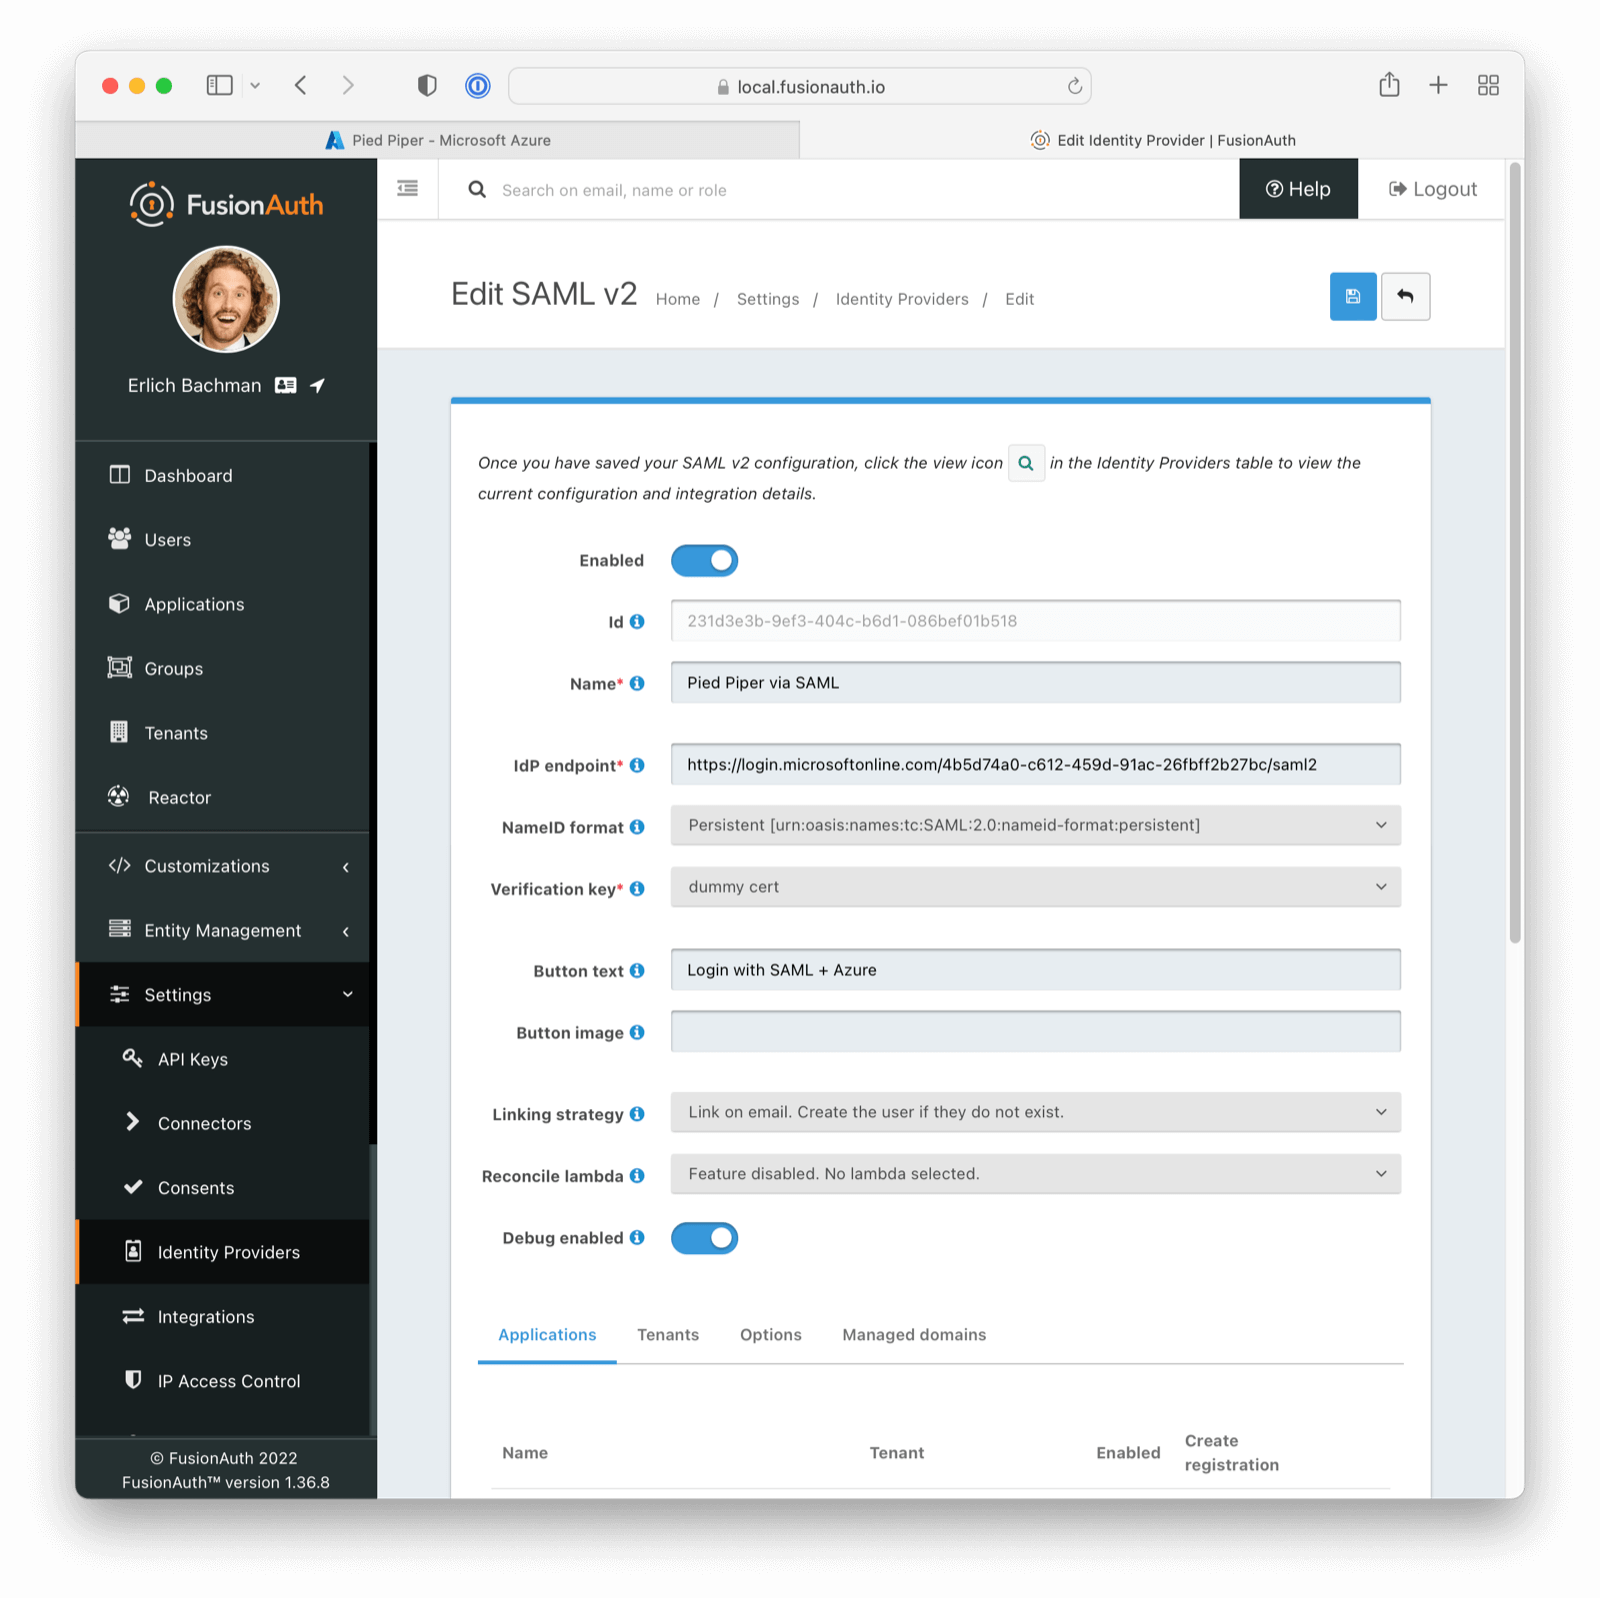
The following fields will need to be completed.
- Name . This is user-defined, so pick something that describes this connection such as “Pied Piper Azure AD”.
- IdP endpoint . This value can be obtained from your Azure AD Application as demonstrated below. You will want to copy the
Login URLvalue from Azure AD into this field.

- Verification key . For this value, use the placeholder certificate imported above. You will change this later.
Be sure to check Debug Enabled. This will ensure debug information is written to the Event Log, which you can see by navigating to System -> Event Log.
Remember to disable this option when running in production.
More information regarding the Event Log can be found below
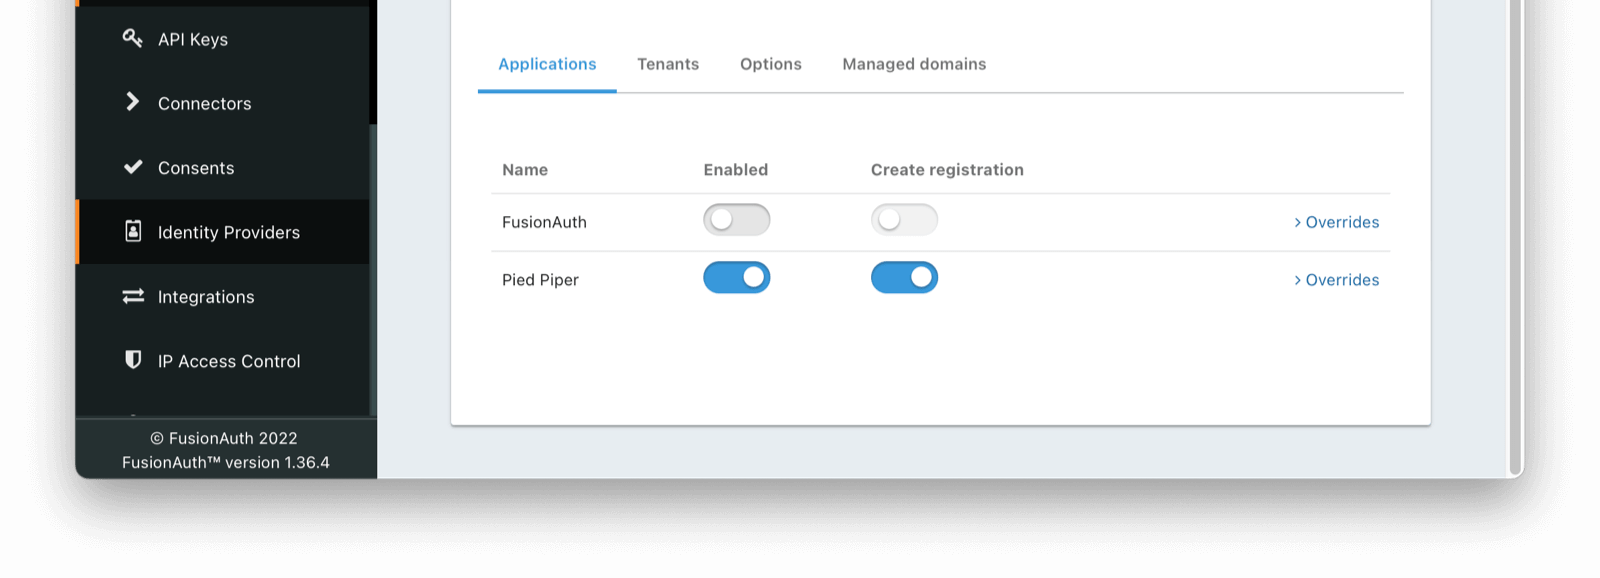
Lastly, navigate to the Applications tab in your SAML V2 Idp.
Enable this IdP for the appropriate Application.
Once saved, you may receive a CORS warning. Be sure to follow the onscreen instructions and this documentation.
Linking Options
If you are linking to a user on email, please configure the SAML IdP to find the email claim. This can be done by navigating to
Settings -> Identity Providers -> Your SAML IdP -> Editand then click on the Options tab. The mapping can be referenced in the Email Claim field as below

If you are using an existing Azure AD Application this email claim location may vary. Below is a demonstration of the email claim found in a default Azure AD Application.
http://schemas.xmlsoap.org/ws/2005/05/identity/claims/emailaddress
If you are unsure of the best mapping in this step, the Event Log will provide valuable guidance indicating how FusionAuth and Azure are connecting.
This claim can be found in the event log of a SAML auth handshake. In the case of a default Azure AD application, the email claim is nested under +
<AttributeStatement>
{/*  ... */}
    <Attribute Name="http://schemas.xmlsoap.org/ws/2005/05/identity/claims/emailaddress">
        <AttributeValue>*your*email*</AttributeValue>
    </Attribute>
{/*  ... */}
</AttributeStatement>
Finish Setup of Azure AD Application
With the FusionAuth Identity Provider set up, the next step is to input the newly created values into your Azure AD Application.
Navigate to your Azure AD application. Under step one, click on the pencil to edit.
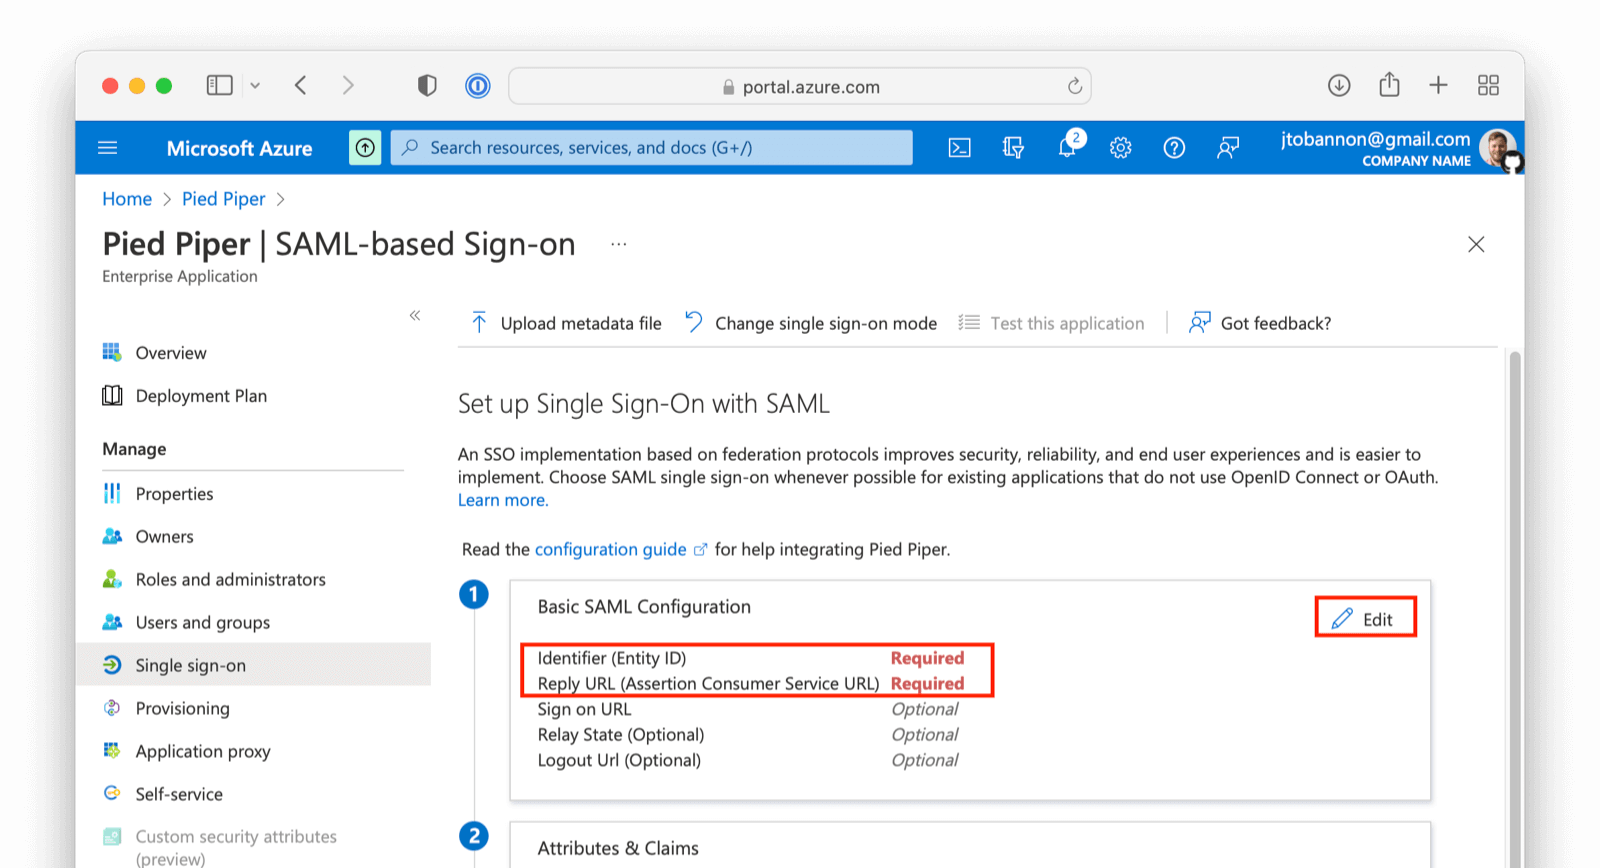
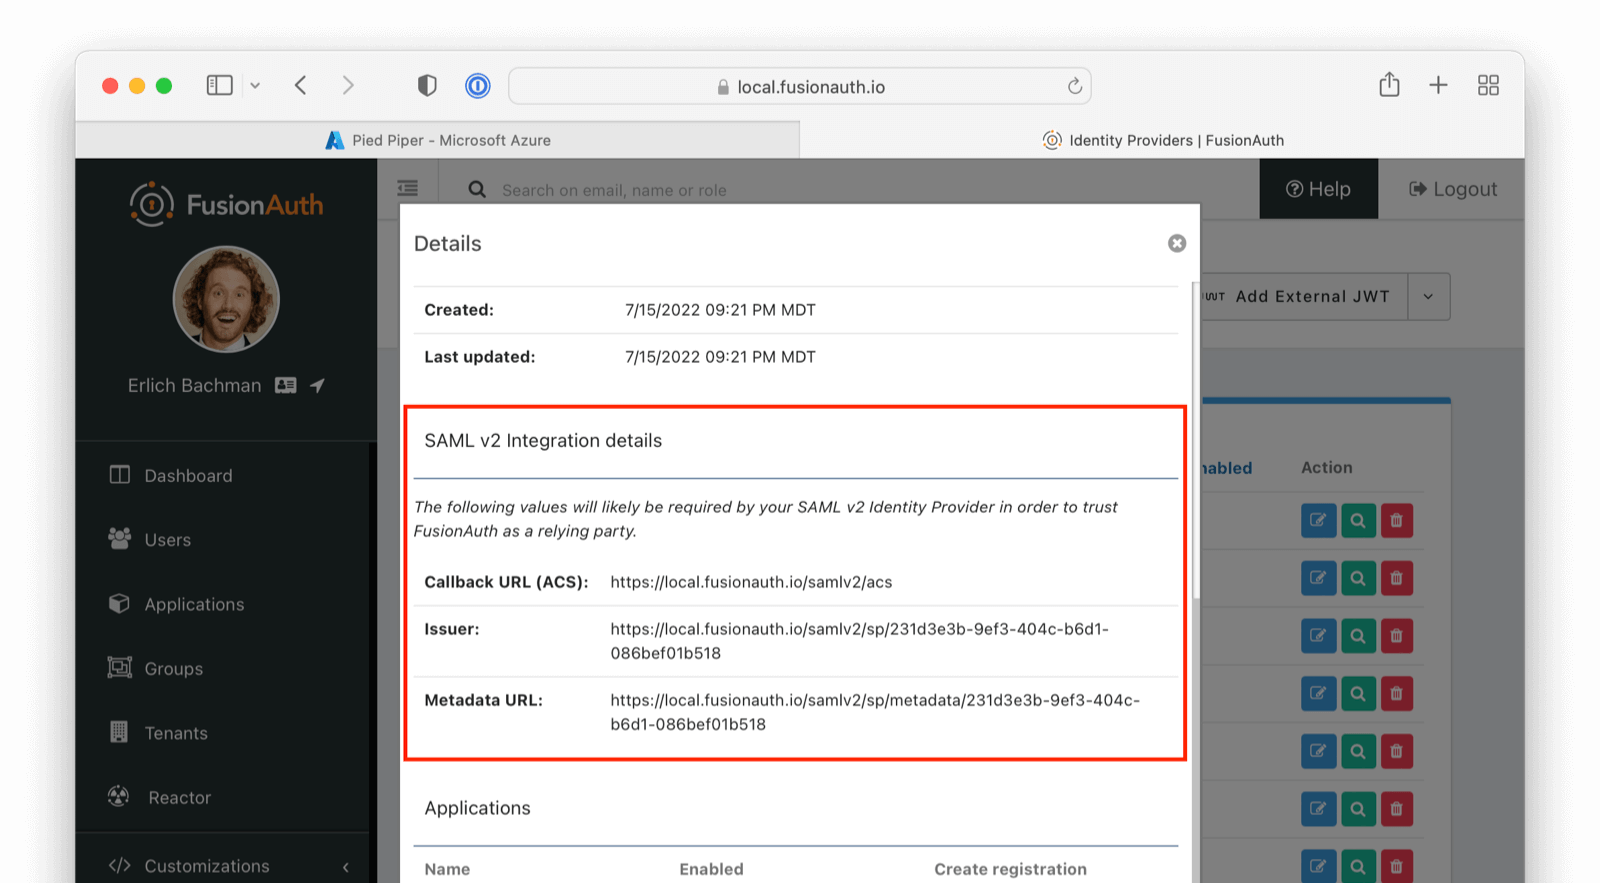
On this screen add the Entity ID and Reply URL . The Entity ID can be obtained by going to Setting -> Identity Providers and clicking on the magnifying glass in the row of your Identity Provider. This value is synonymous with the Issuer value in FusionAuth. Input the Entity and ACS value from FusionAuth into Azure AD.
Download and Import X.509 Certificate
Previously, you created and used a “placeholder” X.509 certificate. At this point, you can change this. From the overview of your SAML application in Azure AD, under step three, you should find a Certificate (Base64) to download.
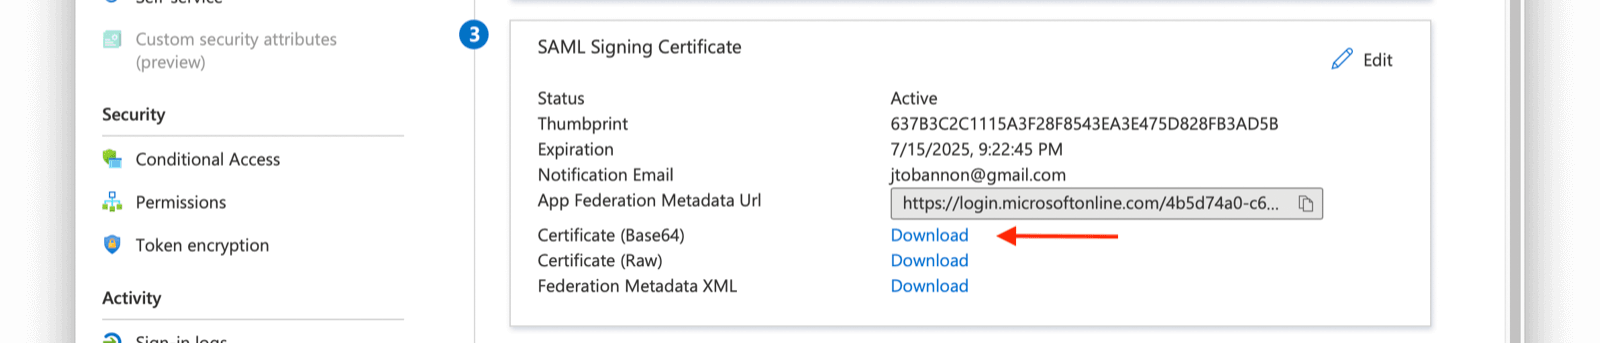
Next, import this certificate into Key Master (Settings -> Key Master -> Import Certificate). Leave the Key identifier property blank, as this will be autogenerated from the thumbprint in the existing certificate.
Update the certificate used on your IdP configuration (Settings -> Identity Providers -> your SAML IdP -> Verification Key) with this new X.509 certificate. You can also remove the “placeholder” certificate from Key Master once complete.
Leave the Key identifier property blank, as this will be autogenerated from the thumbprint of the existing certificate. Otherwise, FusionAuth will not be able to validate the signature of the AuthN response from Azure AD when using this integration.
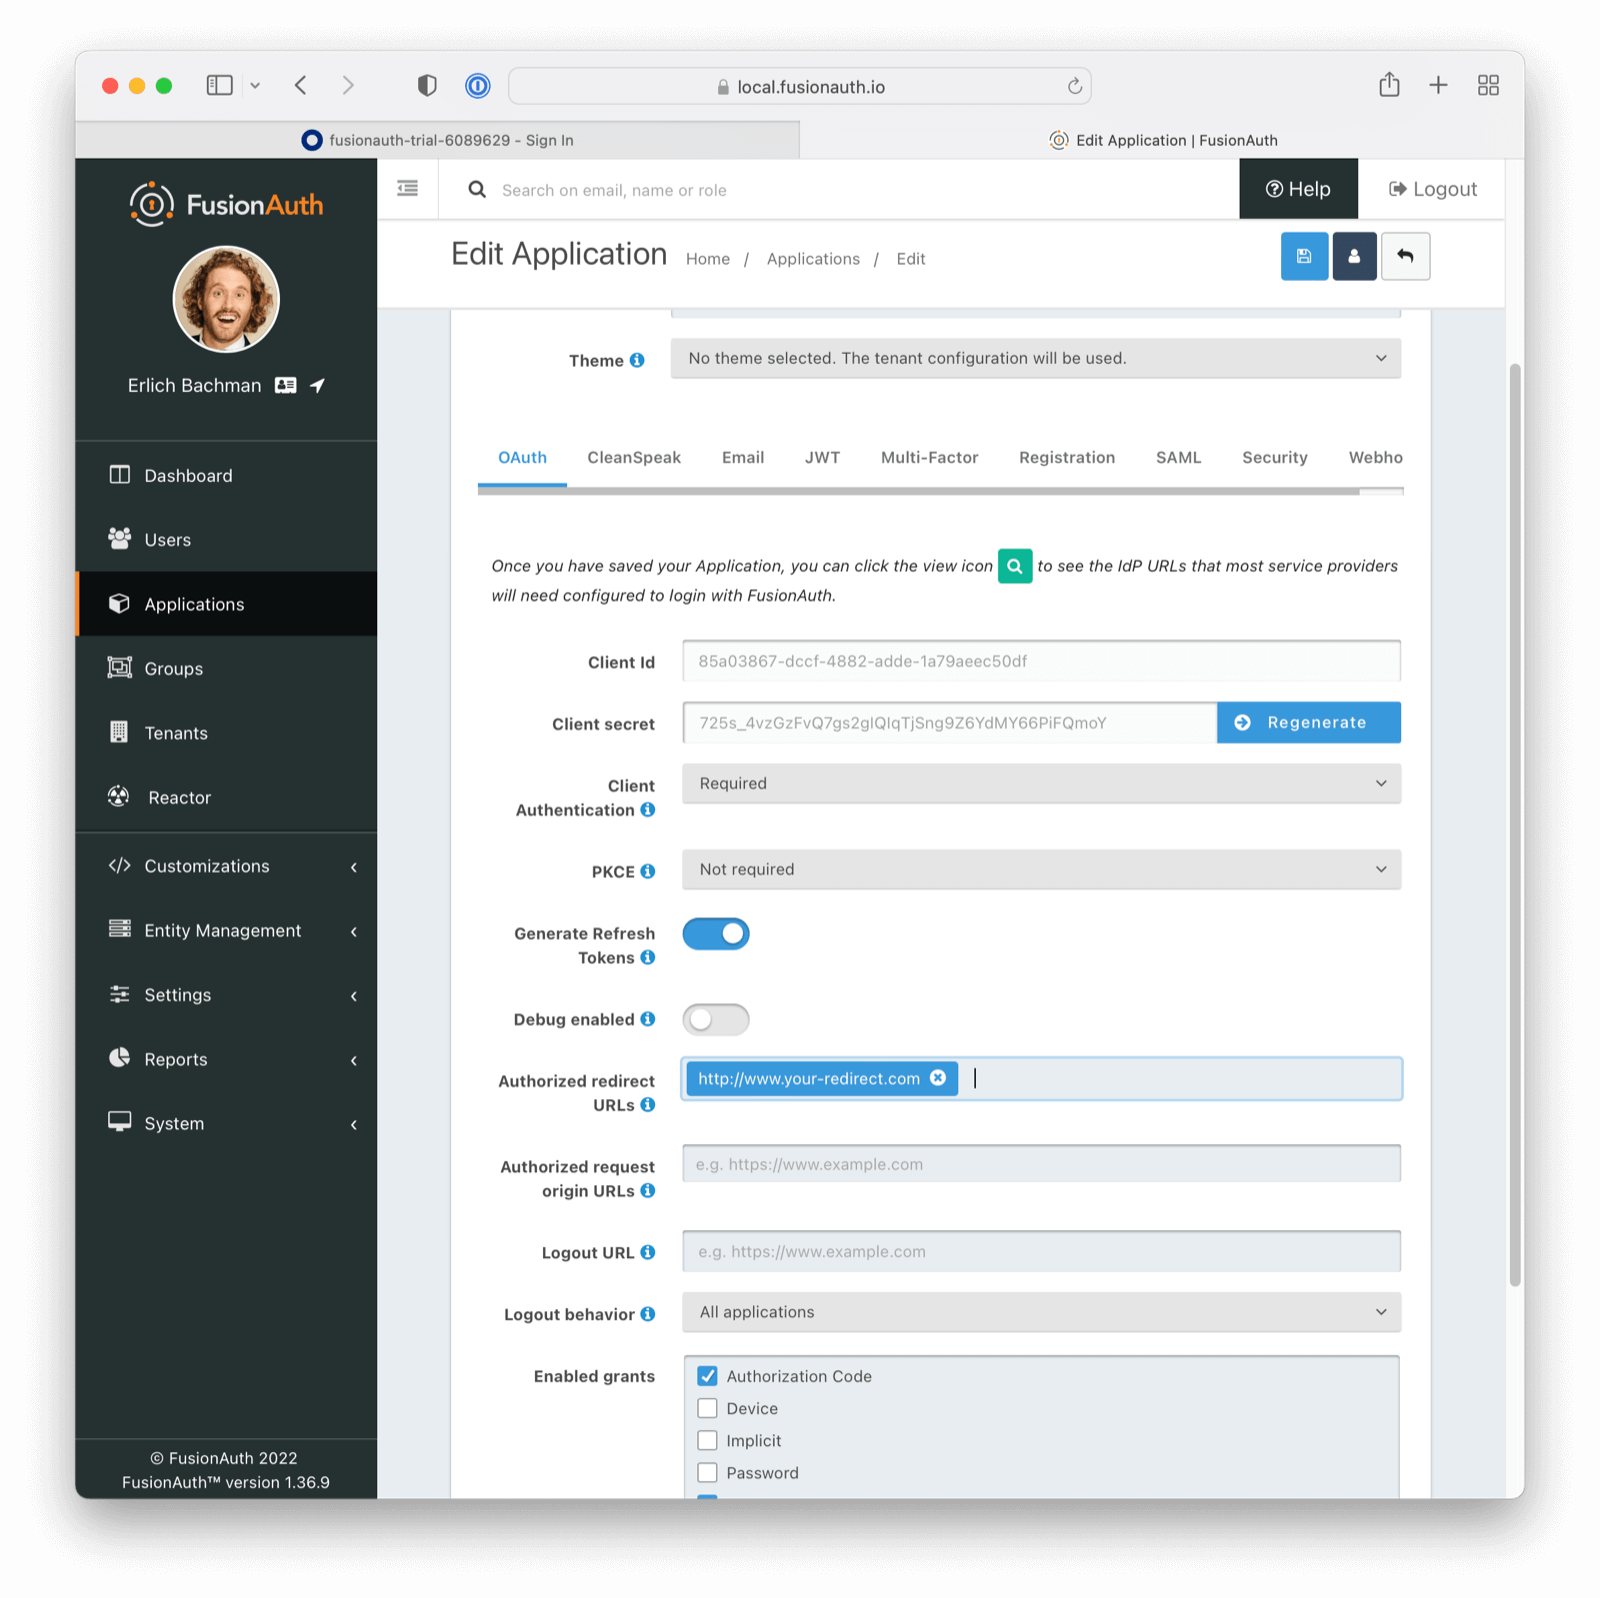
Configure the FusionAuth Application Redirect URL
You also need to configure where you will redirect users once they are complete with their Azure AD login.
This URL is where a user will end up after authentication and may be any value URL.
Navigate to Applications -> Your Application -> OAuth. Update the Authorized redirect URLs field as appropriate.
Ensure the Authorization Code grant is enabled.
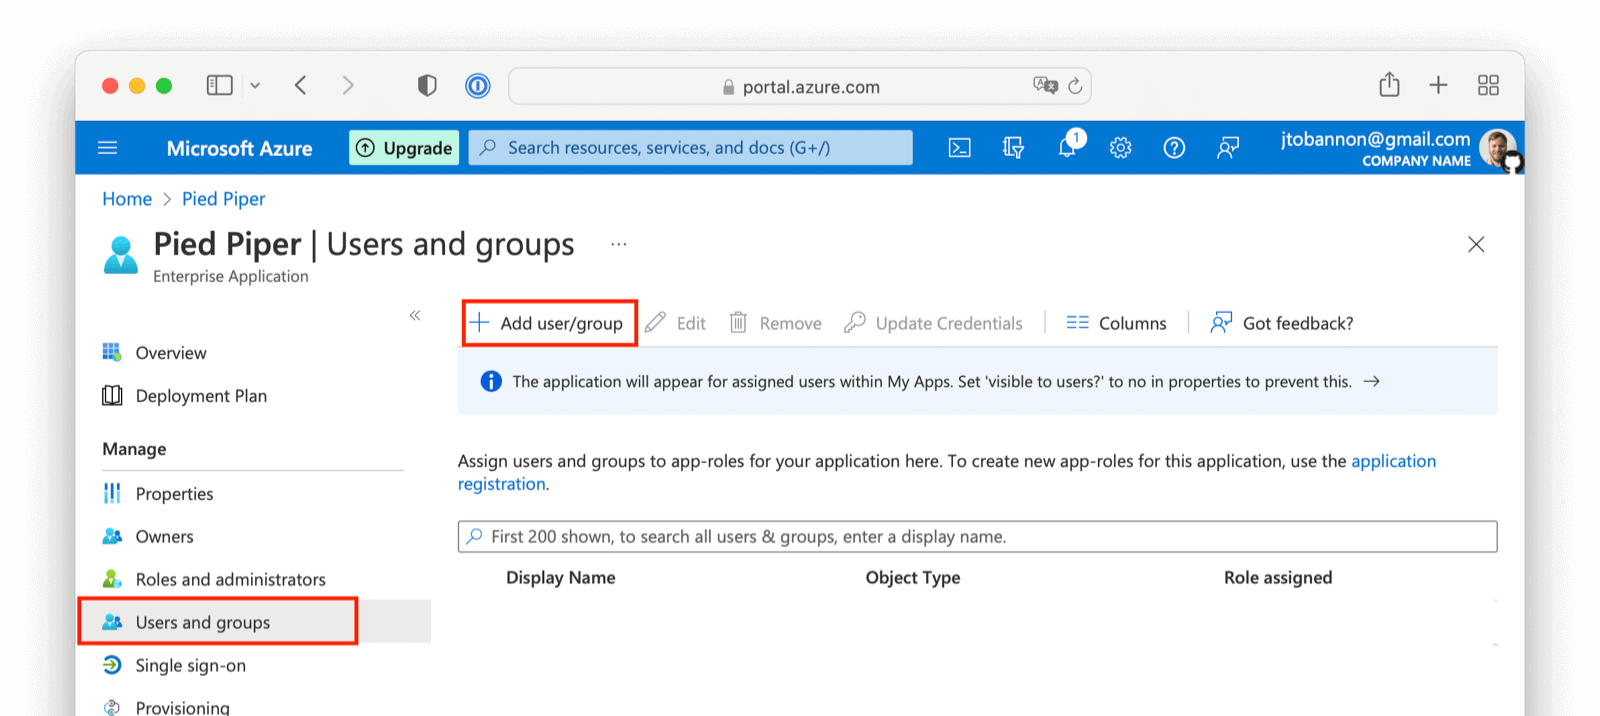
Assign Users
If you are using an existing Azure AD application with assigned users, you may skip this step.
Before you can complete your integration, assign Azure AD users to your Azure AD application. Add a user by navigating to Users and groups and clicking on the Add user/group button. Follow the instructions to select and add a user.
Complete the Login
At this point, what remains is to attempt a login. To test quickly, log into the FusionAuth administrative user interface. Navigate to Applications -> Your Application Click the View link (the magnify icon), then scroll to the OAuth2 & OpenID Connect Integration details section and look for the Login URL. Copy this.
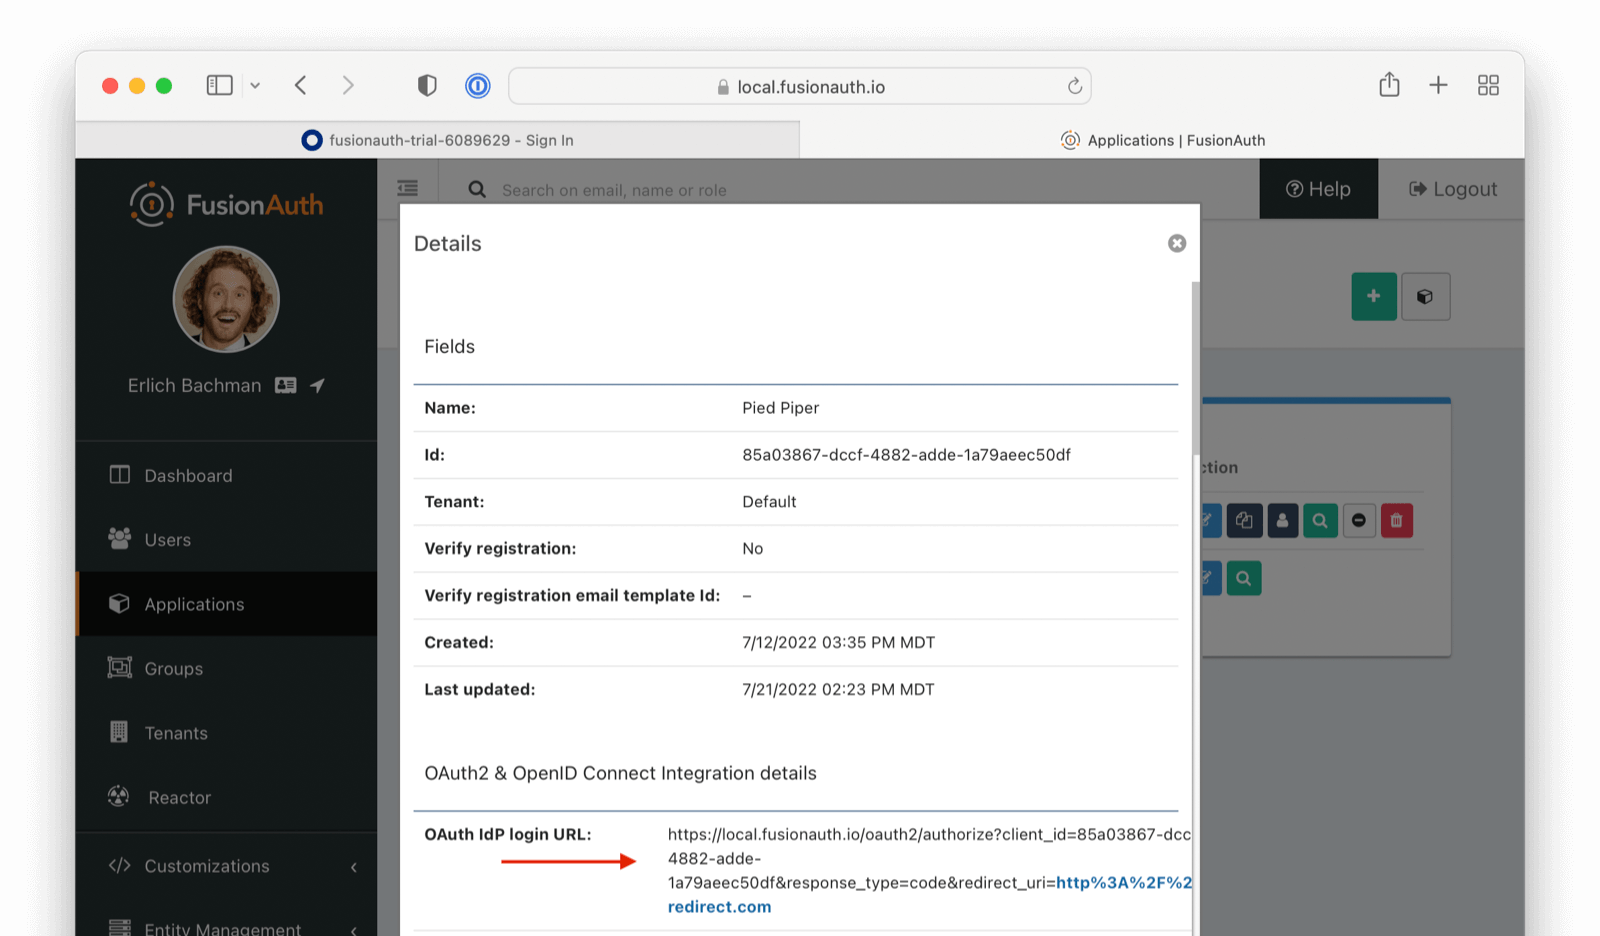
Open a new tab, paste in the login URL, and you should see your new SAML Azure AD IdP login button.
Click on that button, log in with one of the Azure AD users you configured above, and you should arrive back at your redirect URL.
If your integration fails, remember to review the Event Logs (System > Event Log)
More information regarding the Event Log can be found below: