Migration From WordPress
Overview
This document will help you migrate users from WordPress to FusionAuth.
This guide is a low-level, technical tutorial focusing on transferring password hashes, calling APIs, and preparing data when migrating users from WordPress. To understand how to plan a migration at a higher level, please read the FusionAuth migration guide.
Prerequisites
If you want to import user passwords in addition to user personal details, you need a basic understanding of how password hashing and salts work. FusionAuth has a hashing article that is a good starting point.
To follow this tutorial, you need:
- Node.js to run the migration scripts, and npm.
- FusionAuth. The easiest way to run it locally is to use Docker with the configuration file provided later in this tutorial.
Planning Considerations
Obtaining User Data
WordPress stores all users in a MySQL database. You will need access to the database to run a SQL extraction script.
Mapping User Attributes
The attributes of the User object in FusionAuth are well documented.
If there is an attribute in your WordPress user which cannot be directly mapped to a FusionAuth attribute, you can place it in the user.data field. This field can store arbitrary JSON values and will be indexed and searchable.
Social Logins
WordPress also provides integrations with other social login providers such as Twitter, Google or Facebook. Review the supported FusionAuth Identity Providers to ensure your social providers are supported.
If not supported explicitly, a provider may work with an OIDC or SAML connection. Otherwise, please open a feature request.
When migrating social logins, you may need to modify the switches of the WordPress import script. See Use the Script for more.
Migrating users with social logins such as Apple or Facebook requires that you have an existing user Id for that provider. What this unique user Id looks like depends on the particular social identity provider. The unique Id may be an email address, an integer, UUID, or a random string.
Configure the appropriate FusionAuth Identity Provider with the same values (client_id, etc) as the original user management system you are migrating away from.
Import users with the Import API, assigning each user with a social login a random password such as a UUID.
Your next step depends on whether the social login provider’s unique identifier is available as part of your migration data. If you have the social login provider’s unique identifier, for each user, use the Link API to create a link with the appropriate User Id, Identity Provider Id and Identity Provider User Id.
- The User Id is the Id of the recently created FusionAuth User.
- The Identity Provider Id is found on the corresponding Identity Provider API documentation. Look for identityProvider.id .
- The Identity Provider User Id is the existing social provider user identifier exported or otherwise extracted from the original system.
You do not need to migrate the social network token, which may or may not be accessible. During the first login of a newly migrated user, FusionAuth finds the unique user in the social login provider based on the migrated Identity Provider User Id, and completes the login. During this process, FusionAuth stores a token on the Link, if the social provider returns one. Depending on the configuration of the social provider, users may see a prompt asking if they want to allow FusionAuth to have access to user data such as email address.
IdP Linking Strategies are available since version 1.28.0. Before that version, users were linked on email.
If you do not have the social login provider’s identifier, you need to decide if you want to transparently link the two accounts, which is easier for the end user, or if you want to ask the user to manually link the accounts, which is more accurate, but may be confusing.
To transparently link the accounts, choose a linking strategy of Link On Email or Link On Username, which will create the user if they don’t exist. However, if the user has an email address at their social provider which differs from the email address that was used to sign up for your application and which you imported to FusionAuth, then two accounts will be created.
For example, if the user has a Google account richard@gmail.com, but signed up for your application with richard@fusionauth.io, then if you use the Link On Email strategy, two different accounts will be created, since FusionAuth is trying to match on email address and they don’t. The same holds true for usernames with the Link on Username strategy.
To prompt the user to link the accounts, choose a linking strategy of Pending, which will prompt the end user to sign into FusionAuth after they sign into the social provider, authoritatively linking the two accounts.
Here’s more information about IdP Linking Strategies.
Other Entities
There are often other important entities, such as connections or roles, that need to be migrated. There are usually fewer of these, so an automated migration may not make sense, but plan to move this configuration somehow.
Be aware that functionality may not be the same between WordPress and FusionAuth. This is different from user data; as long as you can somehow migrate a login identifier (a username or email) and a password hash, a user will be authenticated and successfully migrated. You can download FusionAuth before you begin a migration and build a proof of concept to learn more about the differences.
A partial list of what may need to be migrated for your application to work properly includes the following:
Identifiers
When creating an object with the FusionAuth API, you can specify the Id. It must be a UUID.
This works for users, applications, and tenants, among others.
Export Users
In this section, you create a sample WordPress database in Docker, understand where the user details are kept in the database, and export them with a SQL script.
Start WordPress
Create a directory for this project. In the directory, create a file called docker-compose.yaml and insert the code below.
# Source: https://hub.docker.com/r/bitnami/wordpress-nginx
version: '2'
services:
  mariadb:
    image: docker.io/bitnami/mariadb:11.2
    container_name: fawp_db
    ports:
      - '3306:3306'
    volumes:
      - './db:/bitnami/mariadb'
    environment:
      # ALLOW_EMPTY_PASSWORD is recommended only for development.
      - ALLOW_EMPTY_PASSWORD=yes
      - MARIADB_USER=wp
      - MARIADB_DATABASE=wp
  wordpress:
    image: docker.io/bitnami/wordpress-nginx:6
    container_name: fawp
    ports:
      - '80:8080'
      - '443:8443'
    volumes:
      - './wp:/bitnami/wordpress'
    depends_on:
      - mariadb
    environment:
      # ALLOW_EMPTY_PASSWORD is recommended only for development.
      - ALLOW_EMPTY_PASSWORD=yes
      - WORDPRESS_DATABASE_HOST=mariadb
      - WORDPRESS_DATABASE_PORT_NUMBER=3306
      - WORDPRESS_DATABASE_USER=wp
      - WORDPRESS_DATABASE_NAME=wp
volumes:
  mariadb_data:
    driver: local
  wordpress_data:
    driver: local
Open a terminal in the same directory as the file and run the code below to start a MariaDB and WordPress container.
mkdir db && mkdir wp && sudo chmod -R 777 ./db ./wp
docker compose up
This command creates two directories to hold the data for your WordPress and database files, shared with volumes in the Docker containers.
Browse to http://localhost/wp-login.php. Log in with username user and password bitnami. This is the default WordPress administrator configured in the Bitnami Docker image we used.
Add A New User
If you use WordPress as a user management system, you need to allow users to register themselves. To do this, browse to Settings —> General —> Membership. Enable Anyone can register and click Save Changes.
Log out at the top right of the page. Browse to http://localhost/wp-login.php.
Register a new user. Enter a username and email richard@example.com.
Explore The Users In The Database
Browse the database in any database IDE that can connect to MariaDB. DBeaver is a free, cross-platform IDE you can use.
Create a new MariaDB connection to localhost, port 3306, database wp, username wp, with no password needed. Open the connection and expand the database tables.
WordPress has two tables related to users: wp_users and wp_usermeta.
The wp_users Table
In wp_users, you will have data similar to the example below. This table holds identifiers and a password hash for each user.
| ID | user_login | user_pass | user_nicename | user_email | user_url | user_registered | user_activation_key | user_status | display_name |
|---|---|---|---|---|---|---|---|---|---|
| 1 | user | $P$BVrdsW/NUuXDi0Od0uUdk2SnJHHmQ01 | user | user@example.com | http://127.0.0.1 | 2024-02-21 07:09:20.000 | 0 | user | |
| 2 | richard | $P$B/kCzTMDV7ccClaRShJPz8suWQdKc5/ | richard | richard@example.com | 2024-02-21 10:52:53.000 | 1708512773:$P$BYELgLl.oz9lv.YRNp7ppBA1GxzOEY0 | 0 | a |
Unfortunately, neither the WordPress Codex nor the WordPress Developer Handbook gives definitions of the database fields and their meanings. To be certain of their purpose, you would need to read the WordPress source code, but the column definitions below seem obvious enough to trust.
- ID: A unique identifier for each user. It is an auto-incremented integer and serves as the primary key for the table.
- user_login: The user’s username used for logging in to WordPress.
- user_pass: The hashed password for the user.
- user_nicename: A URL-friendly version of the user’s username. It is used in the author slug URL.
- user_email: The user’s email address. It is unique for each user and used for account management and notifications.
- user_url: The URL of the user’s website. This field is optional and can be left blank.
- user_registered: The date and time when the user registered on the WordPress site. It is stored in the ‘YYYY-MM-DD HH:MM:SS’ format.
- user_activation_key: Used for storing a hash that is used to activate the user’s account or for password reset purposes.
- user_status: This field is deprecated and not used by core WordPress functions. It was originally intended for user status but is now typically left at its default value of 0.
- display_name: The publicly displayed name of the user. This name is shown on the site in places like author posts or comments.
The wp_usermeta Table
The wp_usermeta table holds all information about a user besides what is kept in the wp_users table. WordPress plugins can add their own data, too. Below is the data you should have in wp_usermeta.
| umeta_id | user_id | meta_key | meta_value |
|---|---|---|---|
| 1 | 1 | nickname | user |
| 2 | 1 | first_name | UserName |
| 3 | 1 | last_name | LastName |
| 4 | 1 | description | |
| 5 | 1 | rich_editing | true |
| 6 | 1 | syntax_highlighting | true |
| 7 | 1 | comment_shortcuts | false |
| 8 | 1 | admin_color | fresh |
| 9 | 1 | use_ssl | 0 |
| 10 | 1 | show_admin_bar_front | true |
| 11 | 1 | locale | |
| 12 | 1 | wp_capabilities | a:1:{s:13:"administrator";b:1;} |
| 13 | 1 | wp_user_level | 10 |
| 14 | 1 | dismissed_wp_pointers | |
| 15 | 1 | show_welcome_panel | 1 |
| 16 | 1 | session_tokens | a:1:{s:64:"ed6949d03244303edfd56de57f46b77a7300c2c62406ccde3b717b700c4fce4a";a:4:{s:10:"expiration";i:1708684580;s:2:"ip";s:10:"172.25.0.1";s:2:"ua";s:101:"Mozilla/5.0 (X11; Linux x86_64) AppleWebKit/537.36 (KHTML, like Gecko) Chrome/121.0.0.0 Safari/537. |
| 17 | 1 | wp_dashboard_quick_press_last_post_id | 4 |
| 18 | 1 | community-events-location | a:1:{s:2:"ip";s:10:"172.25.0.0";} |
| 19 | 2 | nickname | richard |
| 20 | 2 | first_name | |
| 21 | 2 | last_name | |
| 22 | 2 | description | |
| 23 | 2 | rich_editing | true |
| 24 | 2 | syntax_highlighting | true |
| 25 | 2 | comment_shortcuts | false |
| 26 | 2 | admin_color | fresh |
| 27 | 2 | use_ssl | 0 |
| 28 | 2 | show_admin_bar_front | true |
| 29 | 2 | locale | |
| 30 | 2 | wp_capabilities | a:1:{s:10:"subscriber";b:1;} |
| 31 | 2 | wp_user_level | 0 |
| 32 | 2 | default_password_nag | 1 |
The column definitions for the table are:
- umeta_id: A unique identifier for each meta entry. It is an auto-incremented integer and serves as the primary key for the table.
- user_id: The Id of the user the meta entry belongs to. It links to the Id column in the
wp_userstable. - meta_key: The name of the metadata field. WordPress uses this field to store various pieces of user-related information, such as administrative capabilities (
wp_capabilities), user roles (wp_user_level), and custom user meta added by themes or plugins. - meta_value: The value of the metadata field. The information here can vary widely depending on the meta_key. This field can store serialized arrays or strings, depending on the type of data being stored.
The wp_usermeta table uses an entity-attribute-value (EAV) model. Instead of having one column for each type of field to store for a user, new fields are added using key-value combinations.
Some things to note when deciding which fields you want to import to FusionAuth:
- Blank fields, like description, can be ignored.
- Fields that are specific to WordPress, like rich_editing , can be ignored.
- Some fields are PHP objects serialized into strings, like
wp_capabilitieswith valuea:1:{s:13:"administrator";b:1;}. This reads as: An array of one element containing a string of 13 elements and a boolean of value true. You will need to deserialize these when importing them. - Legacy fields, like
wp_user_level, can be ignored.
Here are some of the meta_key types you might find:
- wp_capabilities: Stores the roles assigned to a user in a serialized array. This determines what the user can and cannot do in WordPress.
- wp_user_level: A legacy way to define user roles and capabilities, primarily kept for backward compatibility. It represents the user’s role as a numeric level.
- rich_editing: Indicates whether the user prefers to use the visual rich editor when writing. The value is either “true” or “false”.
- syntax_highlighting: Indicates whether the user prefers to have syntax highlighting enabled in the code editor. The value is either “true” or “false”.
- comment_shortcuts: Indicates whether the user wishes to use keyboard shortcuts for comment moderation. The value is either “true” or “false”.
- admin_color: The color scheme the user has chosen for the admin dashboard.
- use_ssl: Whether the user prefers to use SSL when logging into the admin area. The value is either “0” (do not force SSL) or “1” (force SSL).
- show_admin_bar_front: Determines whether the WordPress admin bar should be displayed to the user when viewing the site. The value is either “true” or “false”.
- locale: The user’s preferred language locale for the admin dashboard.
- wp_dashboard_quick_press_last_post_id: The Id of the last post created using the “Quick Draft” dashboard widget.
- dismissed_wp_pointers: Tracks the admin pointers dismissed by the user to avoid showing them again.
- session_tokens: Stores the user’s session tokens for maintaining login sessions across different devices.
- wp_user-settings and wp_user-settings-time: Store user-specific settings for the admin area, such as the true or false status of checkboxes and the timestamp of the last settings update, respectively.
Export The Users In SQL
FusionAuth provides export and import scripts under a permissive open-source license. To get the scripts, clone the Git repository.
git clone https://github.com/FusionAuth/fusionauth-import-scripts
The wordpress directory contains all the scripts you need for this tutorial, and wordpress/exampleData has the output of the scripts.
Navigate to the wordpress/src directory.
cd fusionauth-import-scripts/wordpress/src
Install the required npm dependencies by running the following command.
npm install
Run the SQL script 1_exportWordpressUsers.sql in the fusionauth-import-scripts/wordpress/src directory against your WordPress database to export all the user data as JSON. View the output as text in DBeaver and save the json_result column to a file called users.txt.
If you have the mysql CLI installed, you can use a command similar to the one below to export user data from the database to the users.txt file. If you use the command to export the data, you will need to remove the column name json_result from the first line and any blank lines in the resulting users.txt file.
mysql -h 127.0.0.1 -P 3306 -u wp wp --raw < 1_exportWordpressUsers.sql > users.txt
The script exports the wp_users table as JSON with all wp_usermeta fields related to each user as an array called meta.
Your users.txt file should now have user data similar to the one in fusionauth-import-scripts/exampleData/1_wordpressExport/users.txt. Each row is JSON, but the file as a whole is not JSON. Each row must end with a comma and the file contents must be wrapped in brackets.
Copy your users.txt file into fusionauth-import-scripts/wordpress/src and run the code below.
node 2_convertTextToJson.mjs
Your output should be valid JSON and look like the file fusionauth-import-scripts/exampleData/1_wordpressExport/users.json.
Import Users
Now that the user details have been extracted from WordPress, you need to add a password hashing plugin to FusionAuth that supports the phpass hashing algorithm used in WordPress, map the WordPress fields to FusionAuth fields, and then import the users using a script.
Use A WordPress Password Hash Plugin For FusionAuth
The WordPress Phpass hashing algorithm is not natively supported by FusionAuth. However, FusionAuth allows custom plugins. There is a WordPress Phpass plugin accompanying this article in this GitHub repository.
The linked repository has multiple plugin projects. You need to build and install only the Password Hashing Plugins project.
Download and unzip the repository, or use Git in a terminal with the command below.
git clone https://github.com/fusionauth/fusionauth-contrib.git
Open the file fusionauth-contrib/Password Hashing Plugins/src/main/java/com/mycompany/fusionauth/plugins/ExampleWordPressPhpassPasswordEncryptor.java. The content of the file is shown below.
/*
 * Copyright (c) 2020, FusionAuth, All Rights Reserved
 *
 * Licensed under the Apache License, Version 2.0 (the "License");
 * you may not use this file except in compliance with the License.
 * You may obtain a copy of the License at
 *
 *   http://www.apache.org/licenses/LICENSE-2.0
 *
 * Unless required by applicable law or agreed to in writing,
 * software distributed under the License is distributed on an
 * "AS IS" BASIS, WITHOUT WARRANTIES OR CONDITIONS OF ANY KIND,
 * either express or implied. See the License for the specific
 * language governing permissions and limitations under the License.
 */
package com.mycompany.fusionauth.plugins;

import java.util.Random;
import com.mycompany.fusionauth.util.Base64Tools;
import io.fusionauth.plugin.spi.security.PasswordEncryptor;
import com.github.wolf480pl.phpass.PHPass;

public class ExampleWordPressPhpassPasswordEncryptor implements PasswordEncryptor {

  @Override
  public int defaultFactor() {
    return 8;
  }

  /**
   * @param password the plaintext password to encrypt, not in base64 as it comes from the user input
   * @param salt not the salt. rather give the full previous hashed password in its entirety
   *             encoded in base64. the salt is included in the hash. if this password has
   *             never been hashed before then leave salt as null.
   * @param factor should be 8 for wordpress
   * @return the encrypted password including the salt. salt does not need to be stored separately.
   */
  @Override
  public String encrypt(String password, String salt, int factor) {
    try {
        String previousHash = Base64Tools.decode64(salt);
        PHPass phpass = new PHPass(factor);
        if (previousHash == null)
          return Base64Tools.encode64(phpass.HashPassword(password));
        if (phpass.CheckPassword(password, previousHash))
          return Base64Tools.encode64(previousHash);
        return Base64Tools.encode64(getRandomPassword());
    }
    catch (Exception e) {
      throw new RuntimeException(e);
    }
  }

  String getRandomPassword() {
    return String.valueOf(new Random().nextInt(90000000) + 10000000);
  }

}
Most of the other hashing plugins in this project take a plaintext password and Base64 salt and return a Base64 hash. Phpass is more complicated. The salt is stored inside the hash, as is the hashing algorithm name. Thus the encrypt function needs to perform the password hash comparison inside the phpass algorithm to verify the user’s password is correct. The WordPress user import script you will use shortly saves the existing hash to the salt field. If the checkPassword function succeeds, then the encrypt function returns the existing salt. If it fails, the function returns a random number to ensure that the passwords will never match. Only if given a new password with no existing hash will encrypt return a new hash.
The factor parameter should always be 8.
There are two other files linked to this plugin that you shouldn’t need to alter:
fusionauth-contrib/Password Hashing Plugins/src/main/java/com/mycompany/fusionauth/plugins/ExampleWordPressPhpassPasswordEncryptorTest.java, which holds unit tests for the hasher.fusionauth-contrib/Password Hashing Plugins/src/main/java/com/mycompany/fusionauth/plugins/guice/MyExampleFusionAuthPluginModule.java, which makes the hasher file known to FusionAuth.
If you make another hash plugin, you will need to make your own test and add your plugin to the Guice file. This might be the case if your WordPress installation has overridden the default hashing algorithm.
The WordPress Phpass library uses specific prefixes in password hashes to indicate the algorithm and cost parameters.
- No prefix: Very old WordPress installations might use MD5 hashes. These hashes are 32 characters long and consist of hexadecimal characters.
- $P$ or $P$B: This prefix indicates phpass library. The $P$ indicates phpass, and the character following this prefix represents the cost parameter of the hash. The actual algorithm is a modified MD5 with multiple iterations to increase security. This is the algorithm the Java plugin discussed above uses and is the default in WordPress in 2024.
- $1$: This prefix indicates an MD5-based crypt hash processed with a Unix
crypt()function. - $2a$, $2x$, $2y$: These prefixes are associated with bcrypt.
- $5$ and $6$: These prefixes indicate SHA-256 and SHA-512 hashing respectively.
- $argon2i$, $argon2id$: These prefixes are for Argon2.
Build the Java plugin and add it to FusionAuth:
-
Open a terminal in the
fusionauth-contribdirectory and run the commands below to build a Docker container for Java, with the repository shared as a volume into the container.cd .devcontainer docker build -t javaimage . cd .. docker run -it --name javabox -v .:/workspace javaimage -
In the Docker container terminal that is now running, run the commands below.
cd "/workspace/Password Hashing Plugins" mvn clean install exit -
If you have Java installed locally, you can run the Maven command without Docker.
All tests should pass, and the plugin file should be available in Password Hashing Plugins/target/fusionauth-example-password-encryptor-0.1.0.jar.
Set Up FusionAuth And Deploy The Plugin
Now copy fusionauth-example-password-encryptor-0.1.0.jar to your FusionAuth plugins directory and restart FusionAuth.
If you are not already running FusionAuth or want to test this process on another instance, you can start FusionAuth in Docker.
- Open a new terminal in the
fusionauth-import-scriptsdirectory and run the code below.cd wordpress/fusionAuthDockerFiles docker compose up - FusionAuth will now be running and browsable at
http://localhost:9011. You can log in to the FusionAuth admin UI withadmin@example.comandpassword. The container is calledfa. - In the
fusionauth-contribterminal where you built the plugin, run the commands below to copy the JAR file into the FusionAuth containerpluginsdirectory.docker exec fa mkdir /usr/local/fusionauth/plugins docker cp "Password Hashing Plugins/target/fusionauth-example-password-encryptor-0.1.0.jar" fa:/usr/local/fusionauth/plugins/fusionauth-example-password-encryptor-0.1.0.jar - Finally, restart FusionAuth for it to detect the plugin. In the terminal where FusionAuth is running in Docker, press Ctrl + C to stop it, wait, and run
docker compose upagain.
Create Roles For Your Users
The two users you exported have the roles Administrator and Subscriber, as seen in the wp_capabilities meta field. Create the roles in FusionAuth. In a terminal in the fusionauth-import-scripts/wordpress/src directory, run the code below.
node 3_addRoles.mjs
Now in the FusionAuth admin interface, if you browse to Applications —> WordpressTestImportApp and click the Manage Roles button, you can see the roles have been added for your sample Application. This Application was created using a bootstrapping feature of FusionAuth called Kickstart, defined in fusionauth-import-scripts/wordpress/fusionAuthDockerFiles/kickstart/kickstart.json. When FusionAuth comes up for the first time, it will look at the kickstart.json file and configure FusionAuth to the specified state.
Prepare Users For Import To FusionAuth
The next script, 4_convertWpUserToFaUser.mjs, is the most important. It maps the fields of users.json to FusionAuth fields. You may wish to alter this script to change which fields are ignored, or where they are mapped.
The script uses stream-json, a JSON library that can incrementally read massive files with millions of users. It opens the users.json file for reading in the line new Chain([fs.createReadStream(inputFilename), parser(), new StreamArray(),]);. For more information, read https://github.com/uhop/stream-json. The processUsers() function calls getFaUserFromUser() to map the WordPress user to FusionAuth, and then saves them to an faUsers.json file.
The getFaUserFromUser() function does a few things:
- Maps as many matching fields from WordPress to FusionAuth as possible.
- Stores all WordPress user details that don’t map to FusionAuth in the
datafield. If there are details you want to include or exclude, alter thedataToIgnorelist at the top of the file. - Ignores empty fields and arrays.
- Uses the name we registered for the hashing algorithm in the Java plugin in
faUser.encryptionScheme = 'example-wordpress-phpass';. - Adds Registrations (a Role link between a User and an Application) for users. You will need to change these Ids to match those of your application when doing a real migration.
There are a few helper functions at the bottom of the file to extract keys and values from the WordPress wp_usermeta object and deserialize them from PHP. These are used when working with wp_capabilities.
Carefully read this function and make sure that the user information you need is imported correctly. If any information is not needed, you can comment out the related lines.
If you are uncertain about what a user attribute in FusionAuth does, read more in the user guide, as linked in the general migration guide recommended earlier.
In a terminal in the fusionauth-import-scripts/wordpress/src directory, run the script with the following command.
node 4_convertWpUserToFaUser.mjs
Use The Script
Now you have the users file faUsers.json and the WordPress Phpass plugin is installed. To import the users into FusionAuth, you need to run the Node.js import script.
In a terminal in the fusionauth-import-scripts/wordpress/src directory, run the command below.
node 5_import.mjs
This script uses the FusionAuth SDK for Node.js @fusionauth/typescript-client. It’s used only for a single operation, fa.importUsers(importRequest). For more information, read the FusionAuth Typescript Client Library documentation.
Finally, this script imports users individually. If this is too slow when running the production migration, wrap the importUsers() FusionAuth SDK call in a loop that bundles users in batches of 1000.
Verify The Import
If the migration script ran successfully, you should be able to log in to the WordpressTestImportApp application with one of the imported users. In the FusionAuth admin UI, navigate to Applications —> WordpressTestImportApp. Click the View button (green magnifying glass) next to the application and note the OAuth IdP login URL .
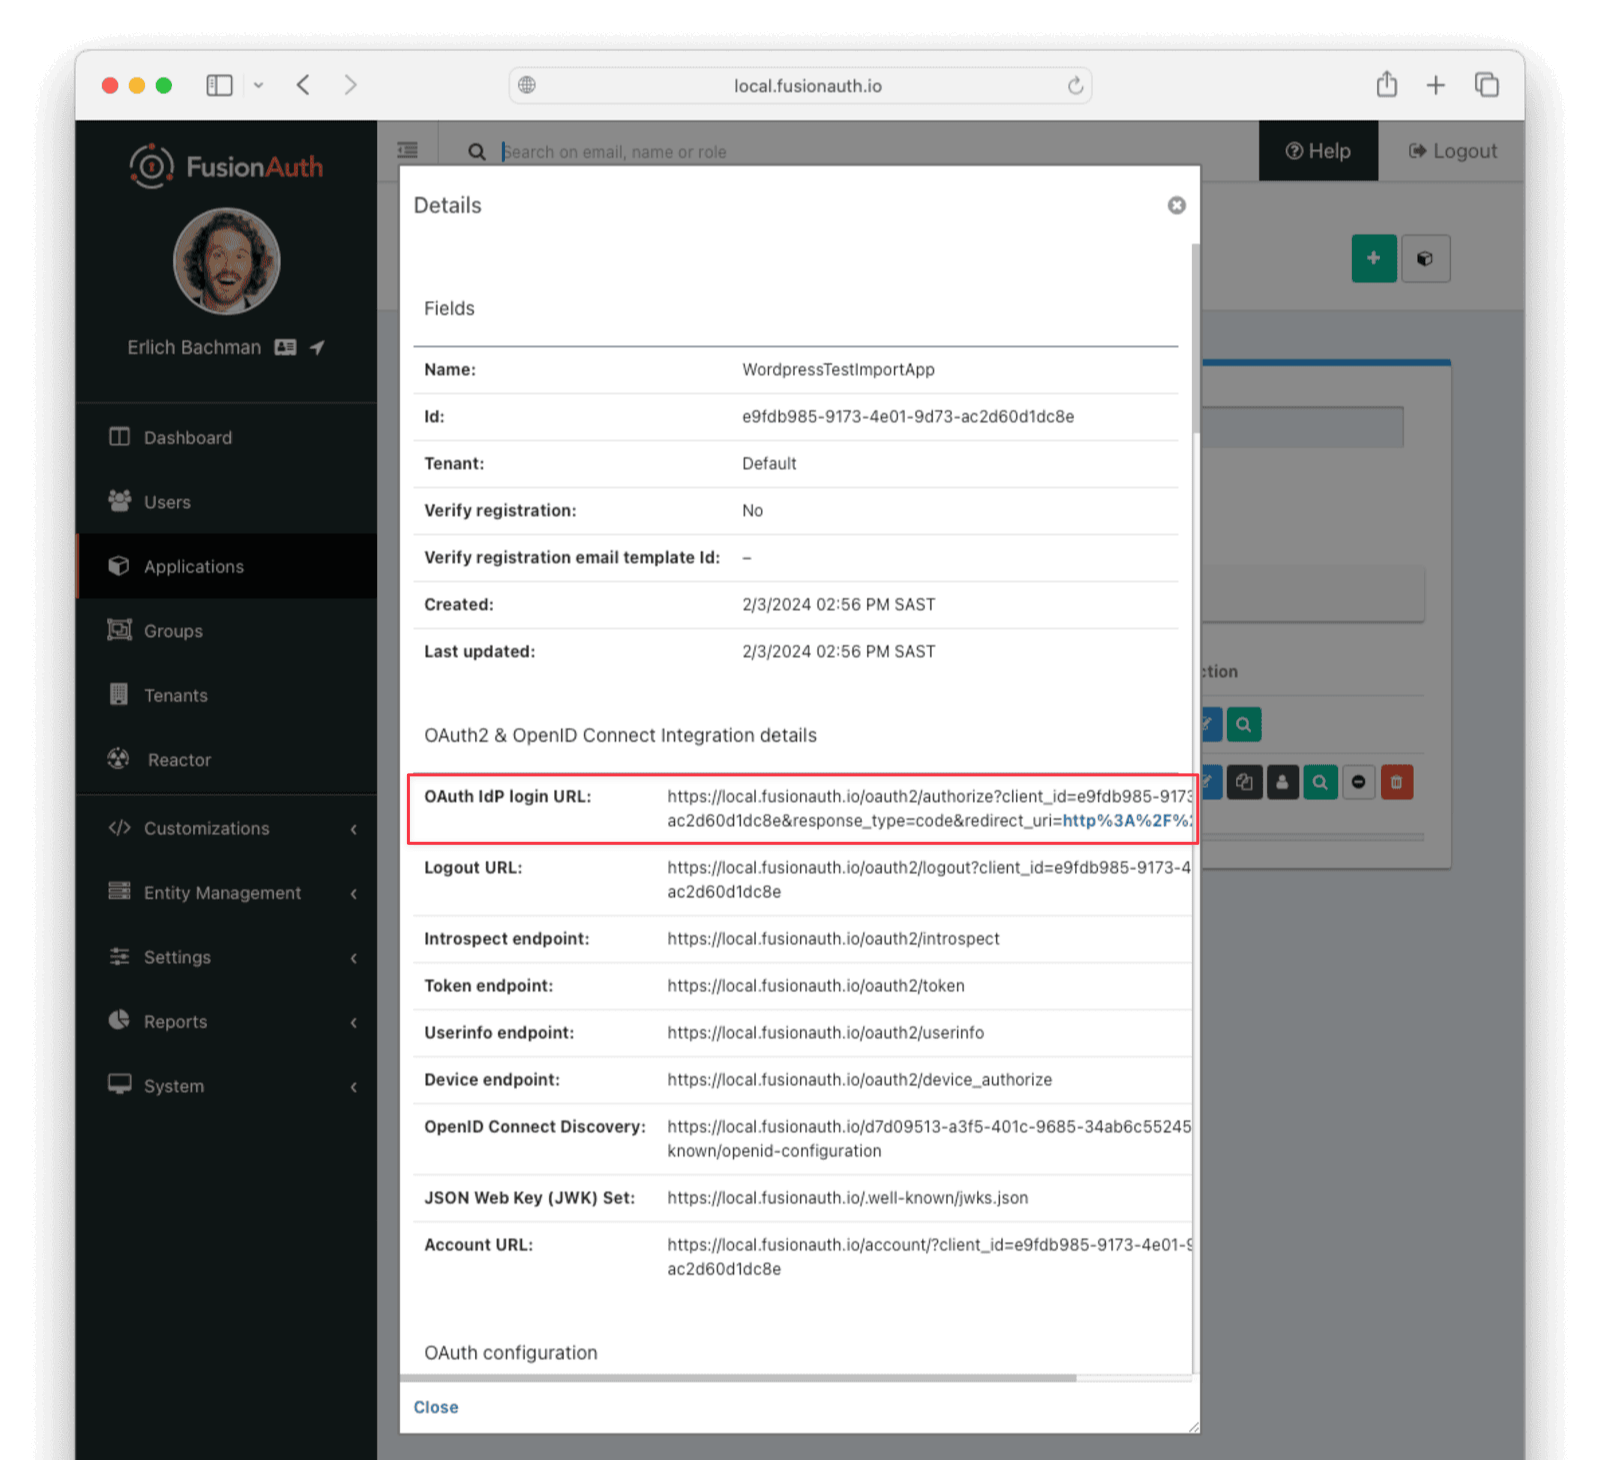
Copy this URL and open it in a new incognito browser window. (If you don’t use an incognito window, the admin user session will interfere with the test.) You should see the login screen. Enter username user@example.com and password bitnami. Login should work.
After a successful test login, the user will be redirected to a URL like https://example.com/?code=FlZF97WIYLNxt4SGD_22qvpRh4fZ6kg_N89ZbBAy1E4&locale=fr&userState=Authenticated. This occurs because you haven’t set up a web application to handle the authorization code redirect yet.
That is an important next step but is beyond the scope of this document. Consult the 5-minute setup guide for an example of how to do this.
Next, log in to the FusionAuth admin UI with admin@example.com and password password. Review the user entries to ensure the data was correctly imported.
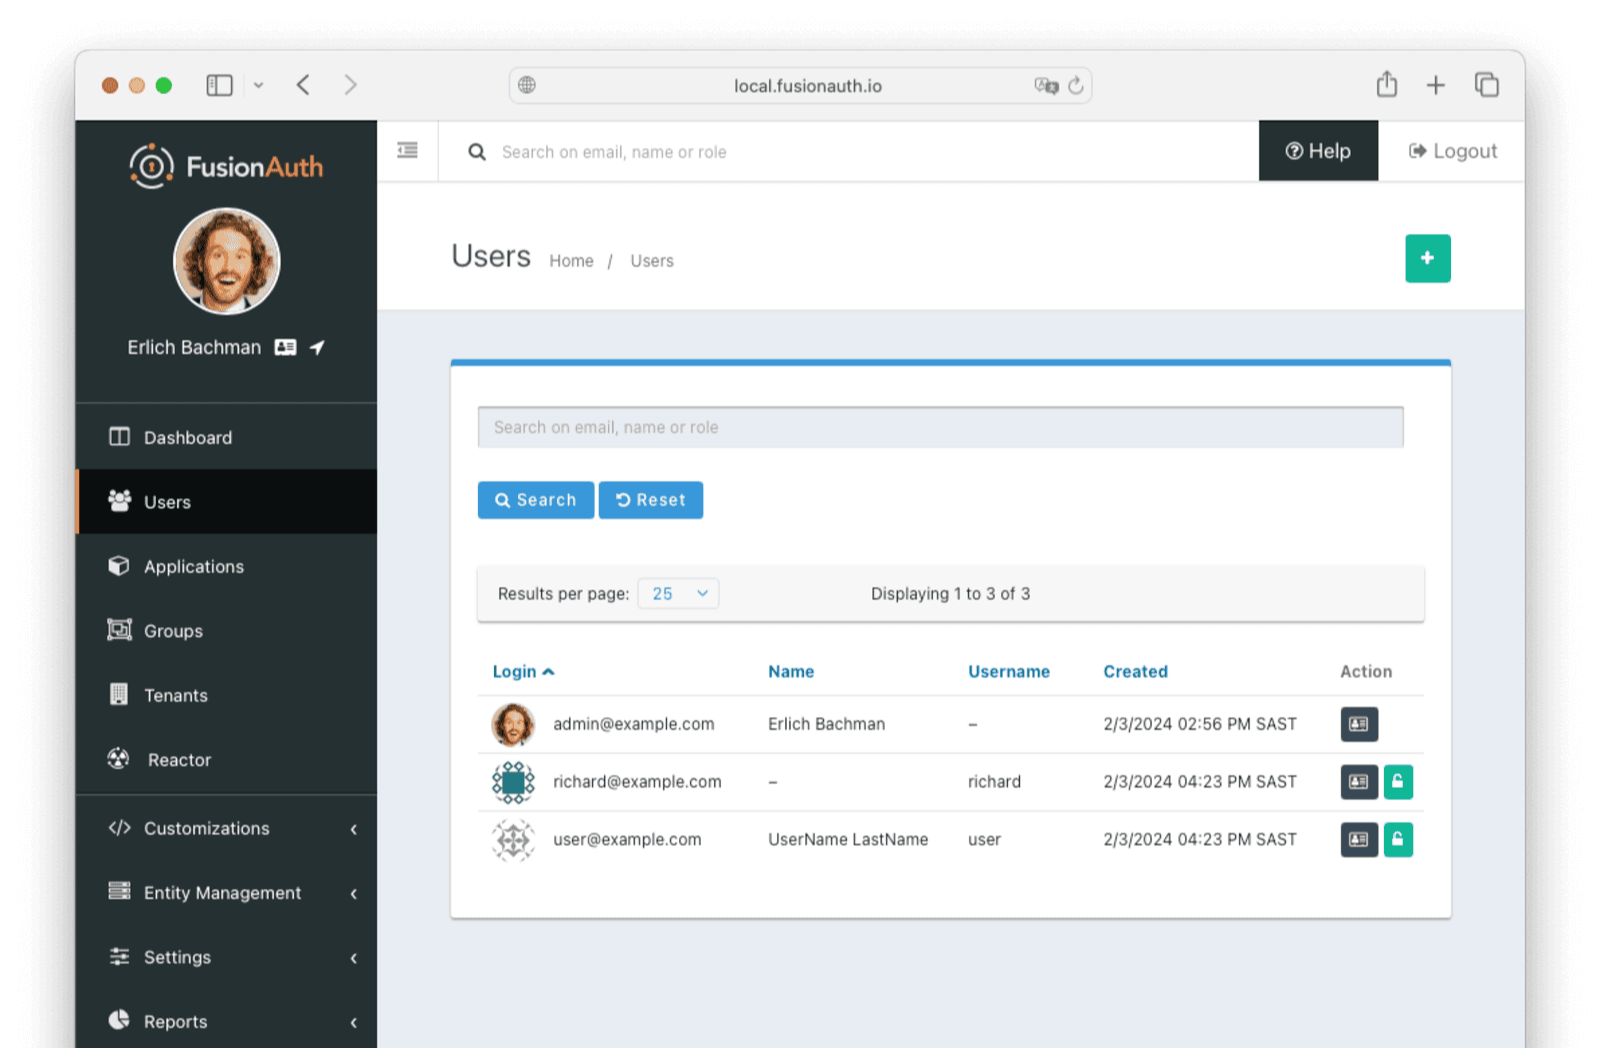
You can manage a user by clicking on the Manage button (black button) to the right of the user in the list of users to review the details of the imported user’s profile. In the Source tab, you can see all the user details as a JSON object.
Debug With The FusionAuth Database
If you have errors logging in, you can use the FusionAuth database directly to see if your users were imported, and check their hashes manually.
You can use any PostgreSQL browser. DBeaver will work. The connection details are in fusionauth-import-scripts/wordpress/fusionAuthDockerFiles/docker-compose.yml and .env.
In your database IDE, create a new PostgreSQL connection with the following details:
- URL:
jdbc:postgresql://localhost:5432/fusionauth - Host:
localhost - Port:
5432 - Database:
fusionauth - Username:
fusionauth - Password:
hkaLBM3RVnyYeYeqE3WI1w2e4Avpy0Wd5O3s3
Log in to the database and browse to Databases/fusionauth/Schemas/public/Tables. Tables identities and users will show you the login credentials and user personal information.
What To Do Next
WordPress Phpass uses a relatively old and weak hashing algorithm, though not terrible. You might want to rehash your users’ passwords on their next login with a stronger algorithm. To enable this setting, follow these instructions.
You now have your users migrated, or a plan to do so. Congratulations! What is next?
You need to migrate additional configurations, as mentioned in Other Entities . Since the type of configuration varies, it is hard to provide a full list of how to import these items, but the general pattern will be:
- Identify corresponding FusionAuth functionality.
- Configure it in your FusionAuth instance, either manually or by scripting it using the client libraries or API.
- Update your application configuration to use the new FusionAuth functionality.
Make sure you assign your users to the appropriate FusionAuth applications. You can do this either:
- As part of your import process by adding registrations at import time.
- After users have been migrated with the Registrations API.
You’ll also need to modify and test each of your applications, whether custom, open source, or commercial, to ensure:
- Users can successfully log in.
- The authorization code redirect is handled correctly.
- Users receive appropriate permissions and roles based on the JWT.
- The look and feel of the hosted login pages matches each application’s look and feel.
If your application uses a standard OAuth, SAML or OIDC library to communicate with , the transition should be relatively painless.
Additional Support
If you need support in your migration beyond that provided in this guide, you may:
- Post in our forums and get support from the community.
- Purchase a support plan and get expert help from the Engineering Team.