Advanced Registration Forms
Overview
Advanced registration forms let you build multi-step custom registration and admin user management forms for your applications.
What Are Advanced Registration Forms
Advanced registration forms let you build powerful, multi-step, custom registration experiences with no coding required.
You might be interested in this feature if you use the FusionAuth themed login pages for your application, and the default self service registration form doesn’t meet your needs. Whether you want to break a form up into multiple steps for a better user experience, gather user consents, or have the user provide app specific data, advanced registration forms can help.
If you are building your own login and registration pages using the APIs, you can still use the form builder in the administrative user interface, but you will have to generate the user facing HTML from the configured form data and recreate any front end logic. You may want to consider using the themeable hosted login pages instead.
How Do I Use Advanced Registration Forms?
This feature is only available in paid plans. Please visit our pricing page to learn more.
Here’s a video showing setup and use of the advanced registration forms feature.
To use advanced registration forms, you must:
- Create any needed custom form fields.
- Assemble predefined and custom form fields into steps, and steps into a form.
- Configure an application to use the form for self service registration.
- Theme the form (optional, but highly recommended).
What is the Difference Between Advanced and Basic Registration Forms
FusionAuth has two types of registration forms: basic and advanced. Both of these options allow you to enable self service registration in your application. The basic option is available in all plans of FusionAuth, including Community.
Basic registration is limited to a single step and offers minimal configuration. You may mix and match from the following user data fields:
- Birthdate
- First name
- Full name
- Last name
- Middle name
- Mobile phone
- Preferred languages
Any displayed fields can be required for successful registration. You can choose to use a username or an email for your login identifier. A password field is displayed and required.
This is a solid registration page; you can collect information and at the end the user will be associated with the application in FusionAuth and be able to sign in. The look and feel of the registration form can be themed. Validation is limited to having fields be required, though you can also implement additional validation in theme managed client side JavaScript.
Basic registration forms have a subset of the functionality of advanced registration forms. With advanced registration forms, in addition to registering a user to an application, you can also:
- Collect additional profile data and store it in FusionAuth.
- Validate any field on the server in a variety of ways, including matching a regular expression.
- Use more complicated fields, such as consents and confirmation fields.
- Break a registration process into a series of less imposing steps.
Set Up
To use advanced registration forms, you must have a valid license key. Please visit our pricing page to review paid plan options and buy a license.
Next, you need to activate the license. Before that, ensure that your FusionAuth instance has outbound network access. To activate, follow the steps outlined in the Reactor documentation.
Building an Advanced Form Registration Flow
Let’s create a form for a fictional real estate application. When someone registers, the application should collect the minimum home price and maximum home price that the user is looking at. You’ll also need to collect other, more typical, data, such as an email address. This guide will walk through creating a form to collect the following profile information:
- Password
- First name
- Phone number
- Free form geographic area where they are looking to buy
- Minimum house price
- Maximum house price
Some of these fields are available in every FusionAuth installation, but some are custom. Before you create a form, first create any non-standard form fields.
Create Form Fields
The following fields are available by default:
- Password
- First name
- Full name
- Mobile phone
- Birthdate
- Last name
- Username
- Middle name
If you need additional fields, you must create them. To do so, navigate to Customizations -> Form Fields . You’ll see a list of the above default fields, any existing custom fields and a button to create new ones.
You can mix and match any fields listed here on a form. If what you need is already defined, there’s no need for any custom form field creation. But if not, create a new form field.
Custom Form Fields
The real power of advanced registration forms comes when you add custom fields. You can add as many of these as you’d like.
You may store data in any of the predefined user fields such as user.fullName. But you can also use the data field on both the registration and the user objects to store data.
user.data is the right place to store information related to a user’s account which is not application specific. If you wanted information that multiple applications might use, such as a current mailing address, that would be best stored in the user.data field.
Store data related to a user’s account and specific to an application in registration.data. As a reminder, a registration is a link between a user and an application defined in FusionAuth.
Since you are building a real estate app, the minimum house hunting price point of the user is only useful to this application. Therefore, storing the data in registration.data is the right approach. If you were later to build a mortgage application, there would be different fields, such as loan amount sought, associated with that registration.
Now that you have decided where to store the custom profile data, you should create the fields.
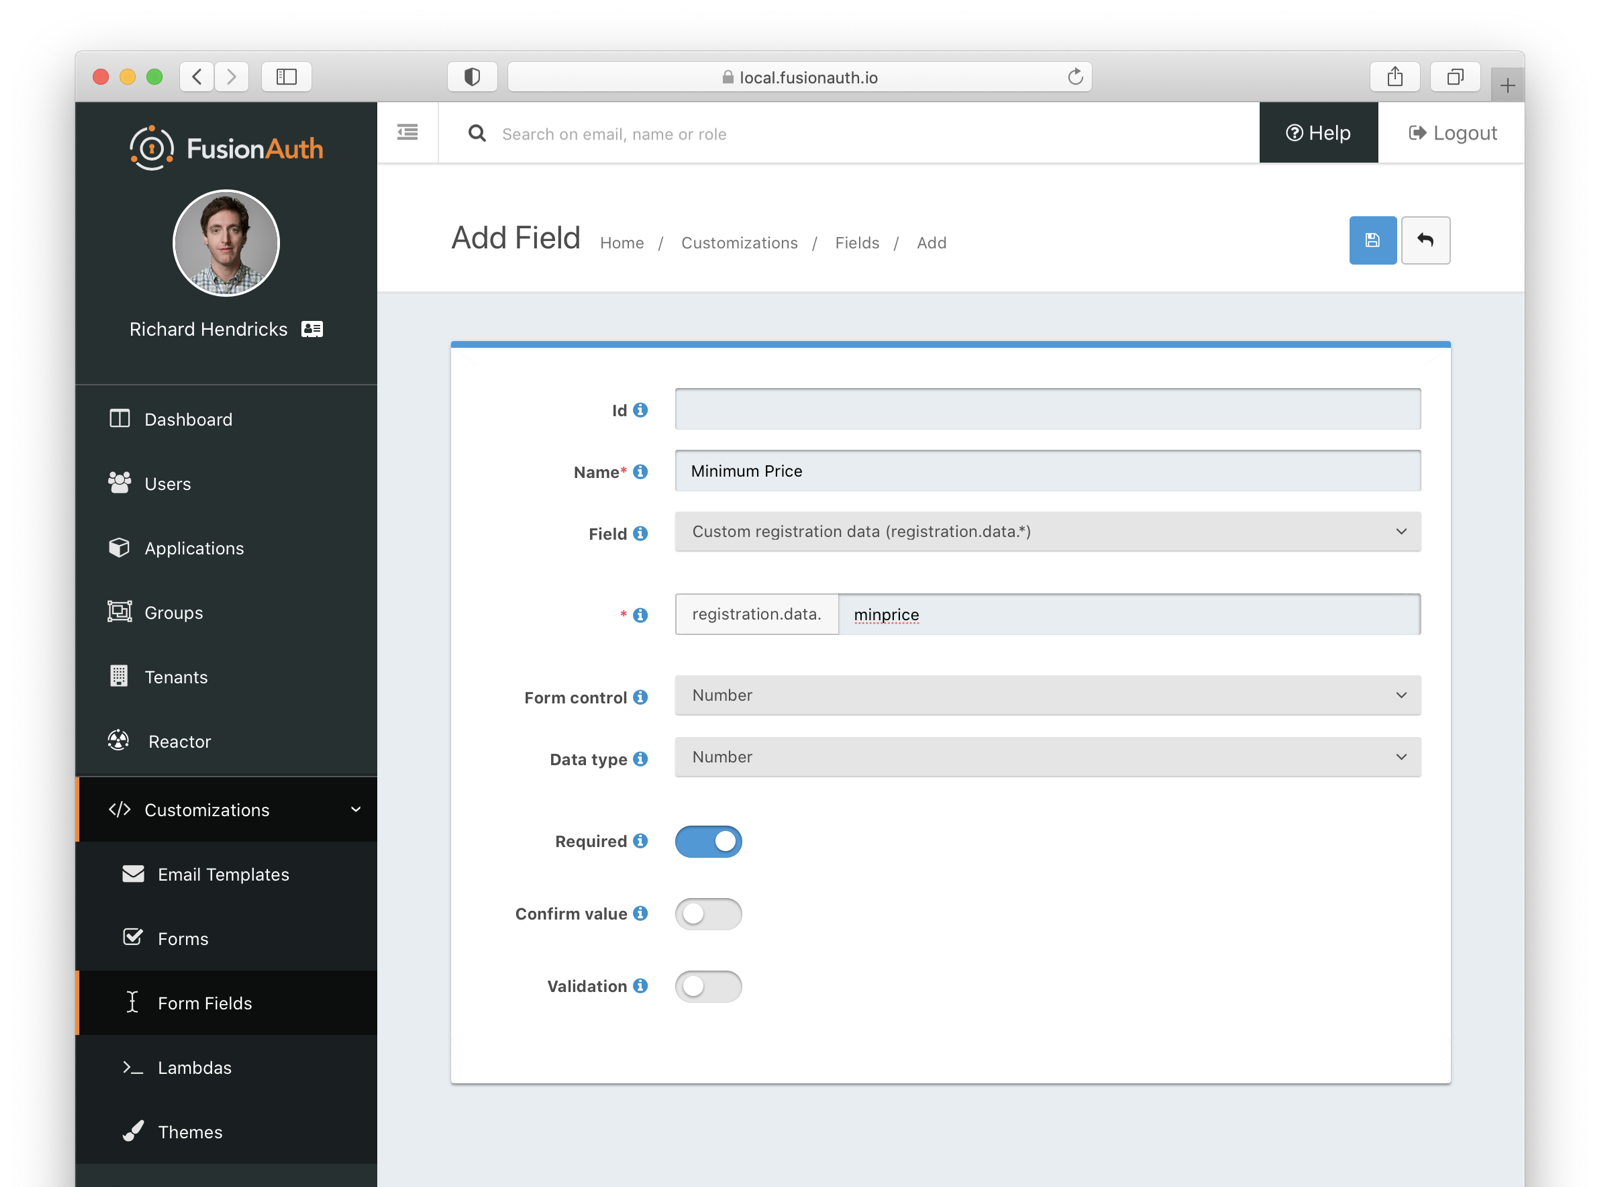
First, add a minimum price field. Configure the form field to have a data type of number and a text form control. The user’s minimum price point is really useful information. Make it required so that a new user can’t complete registration without providing a value. Here’s what it will look like before saving the configuration:
Add a maximum price field by duplicating the minprice field. Use a key of maxprice; keys must be unique within the data object, registration.data in this case. Change the name as well. All other settings can be the same as those of the minprice field.
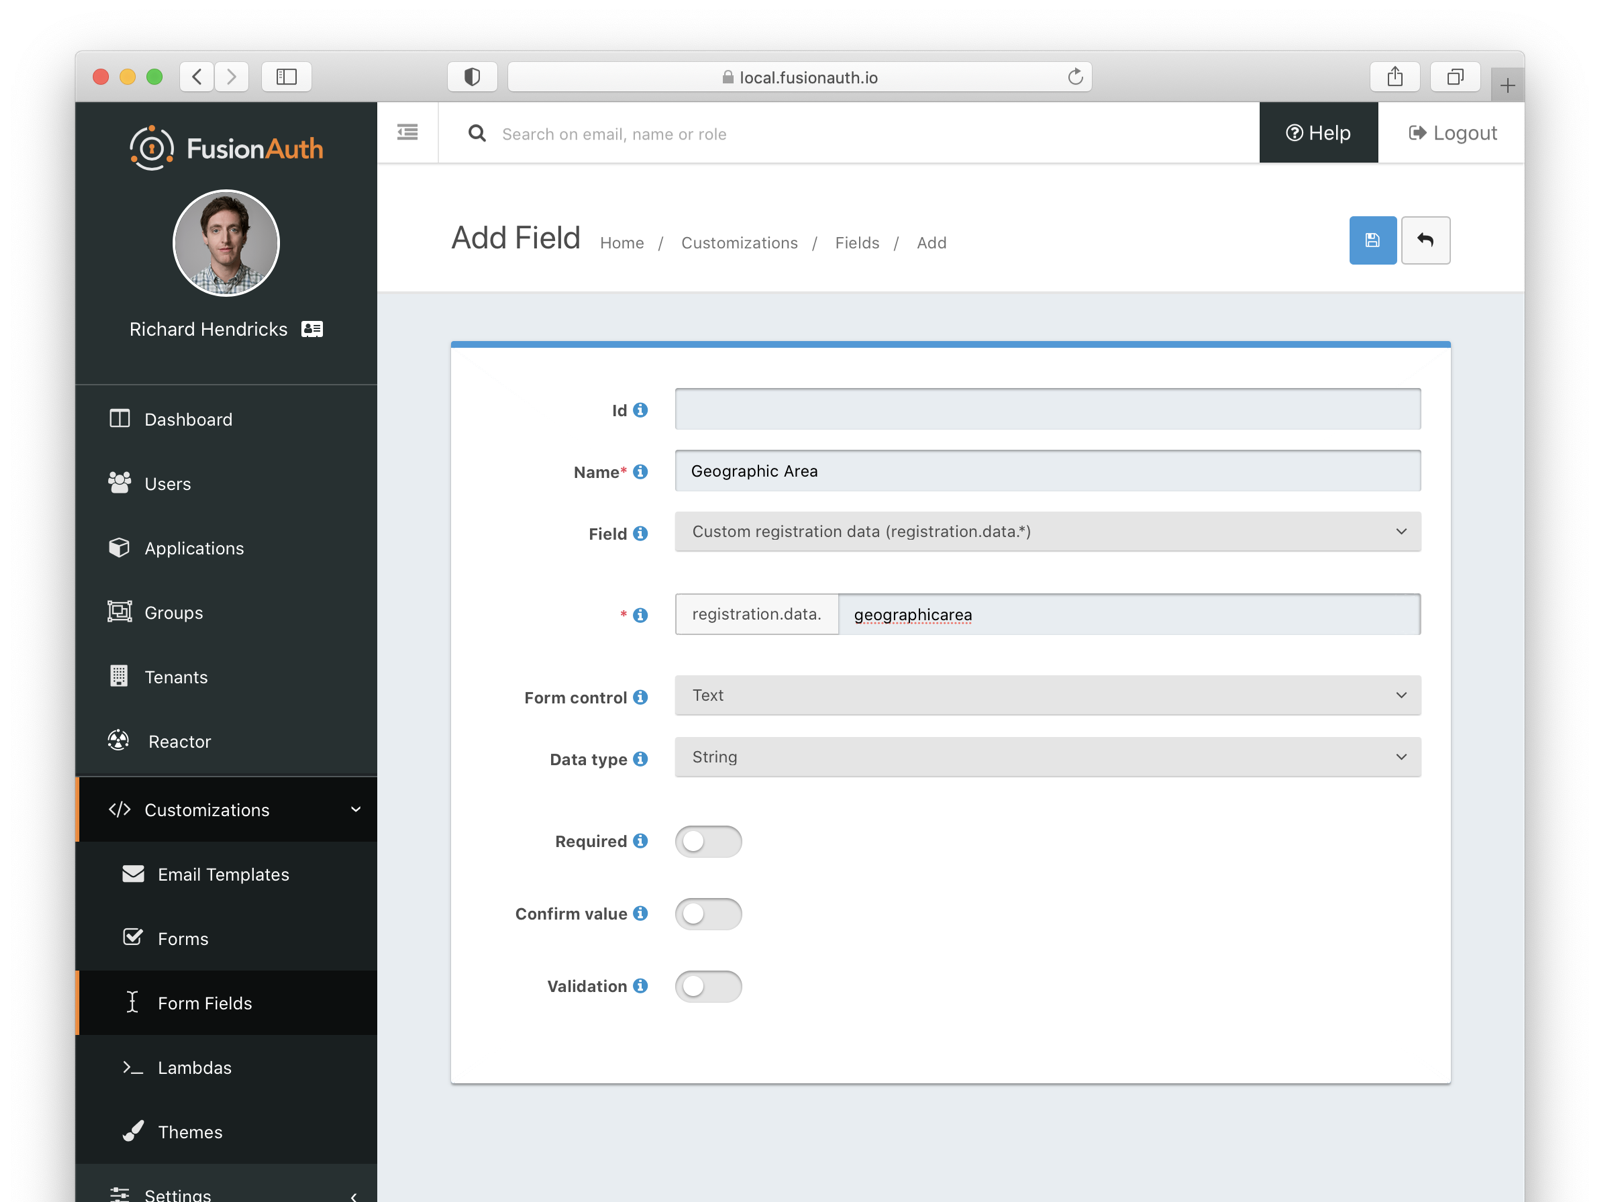
Finally, add a geographic search area custom field. The purpose of this field is to capture where the new user is looking to buy. It’ll be a string, but make it optional. Potential users might not have a good idea of where they’re interested in looking at homes.
After saving the above custom fields, if you view the list of fields, you’ll see the three new fields. They are now available for the advanced registration form you’ll build next. These custom fields can be used for future forms as well.
Create a Form
The next step is to assemble the form from the form fields. You can mix and match any of the standard, predefined form fields and your custom form fields.
Fields may appear in any order on the form. Arrange them in whatever order makes the most sense for your potential users. You may also add as many steps as make sense. It’s a good idea to group similar types of fields together into the same step.
When you create a new form, you’ll see a name field and a button to add steps:
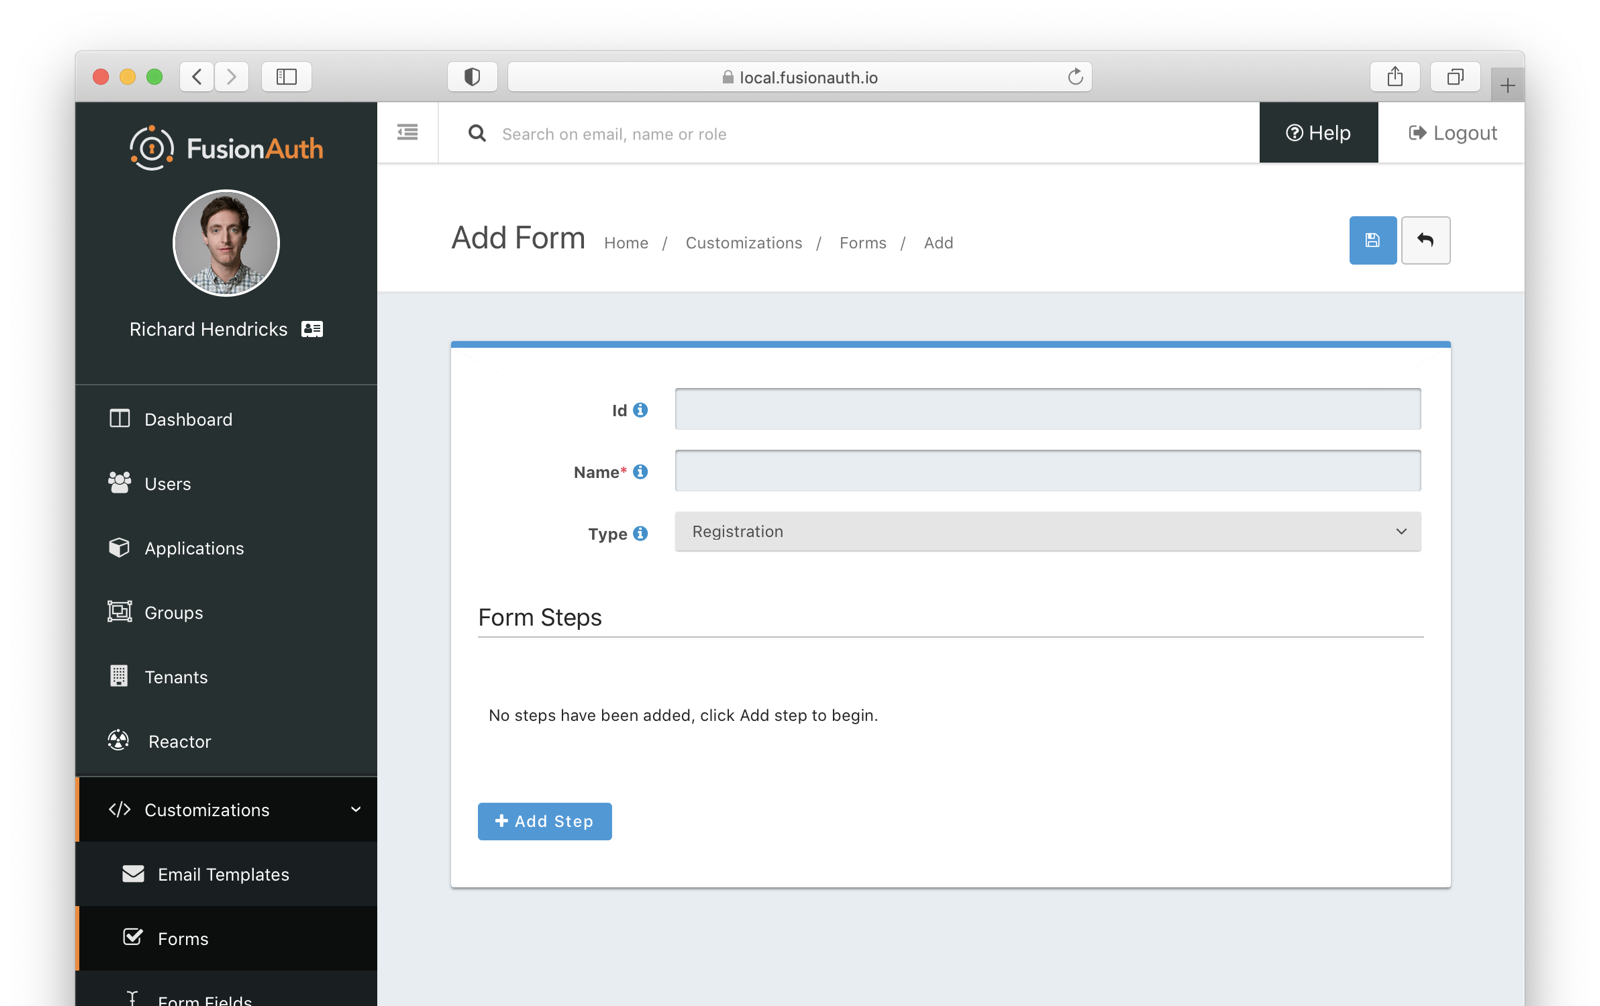
There are a few rules about advanced registration forms. Each form must have:
- At least one step
- Either an email or a username field in one of the steps
- A password field in one of the steps
- At least one field on each step
To begin building this real estate application form, navigate to Customizations -> Forms . Click the green + button to create a new form.
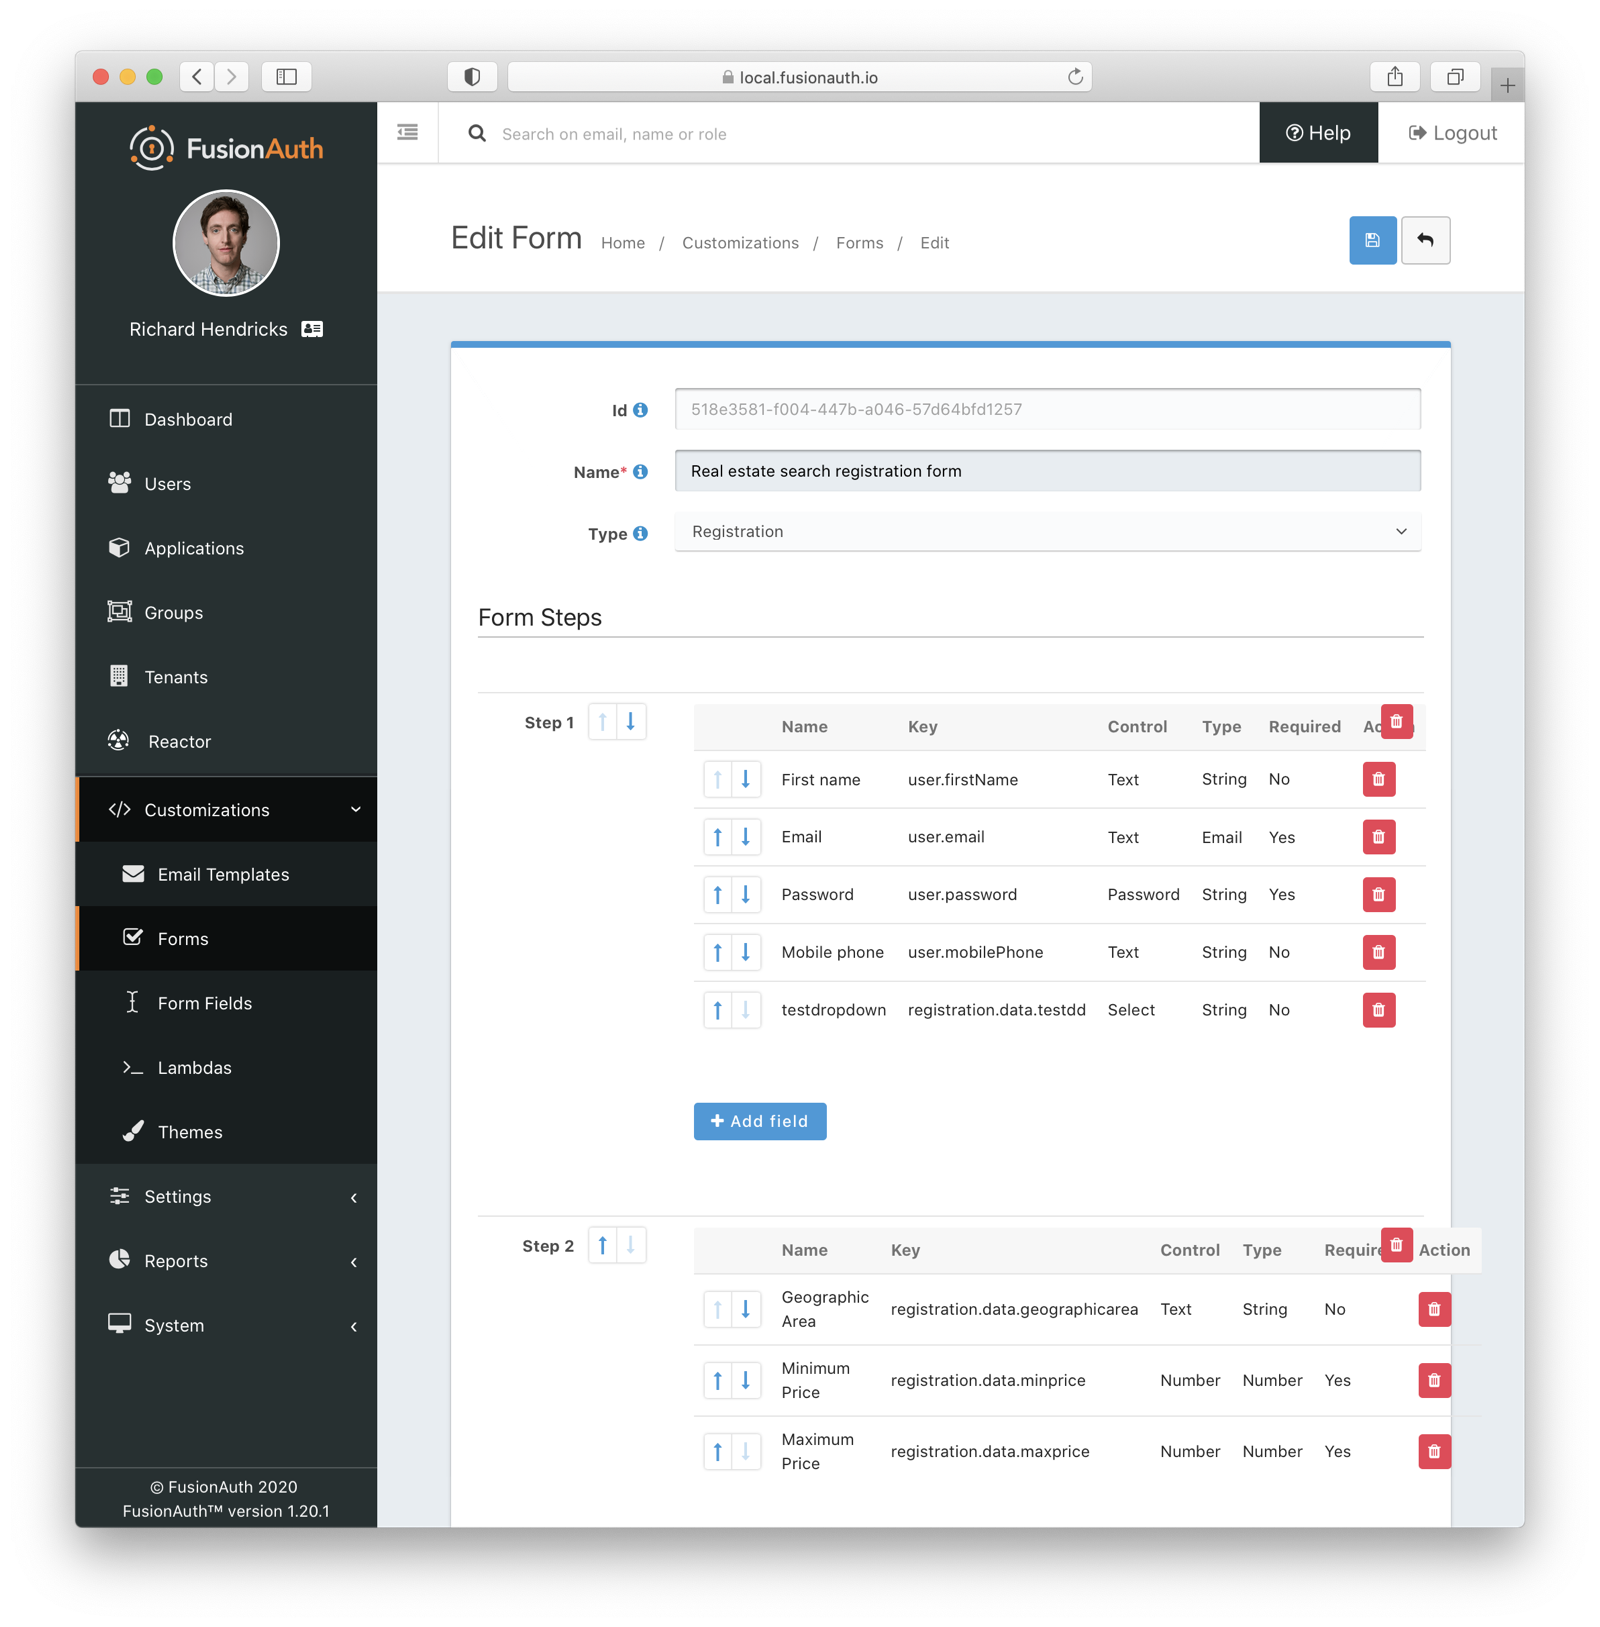
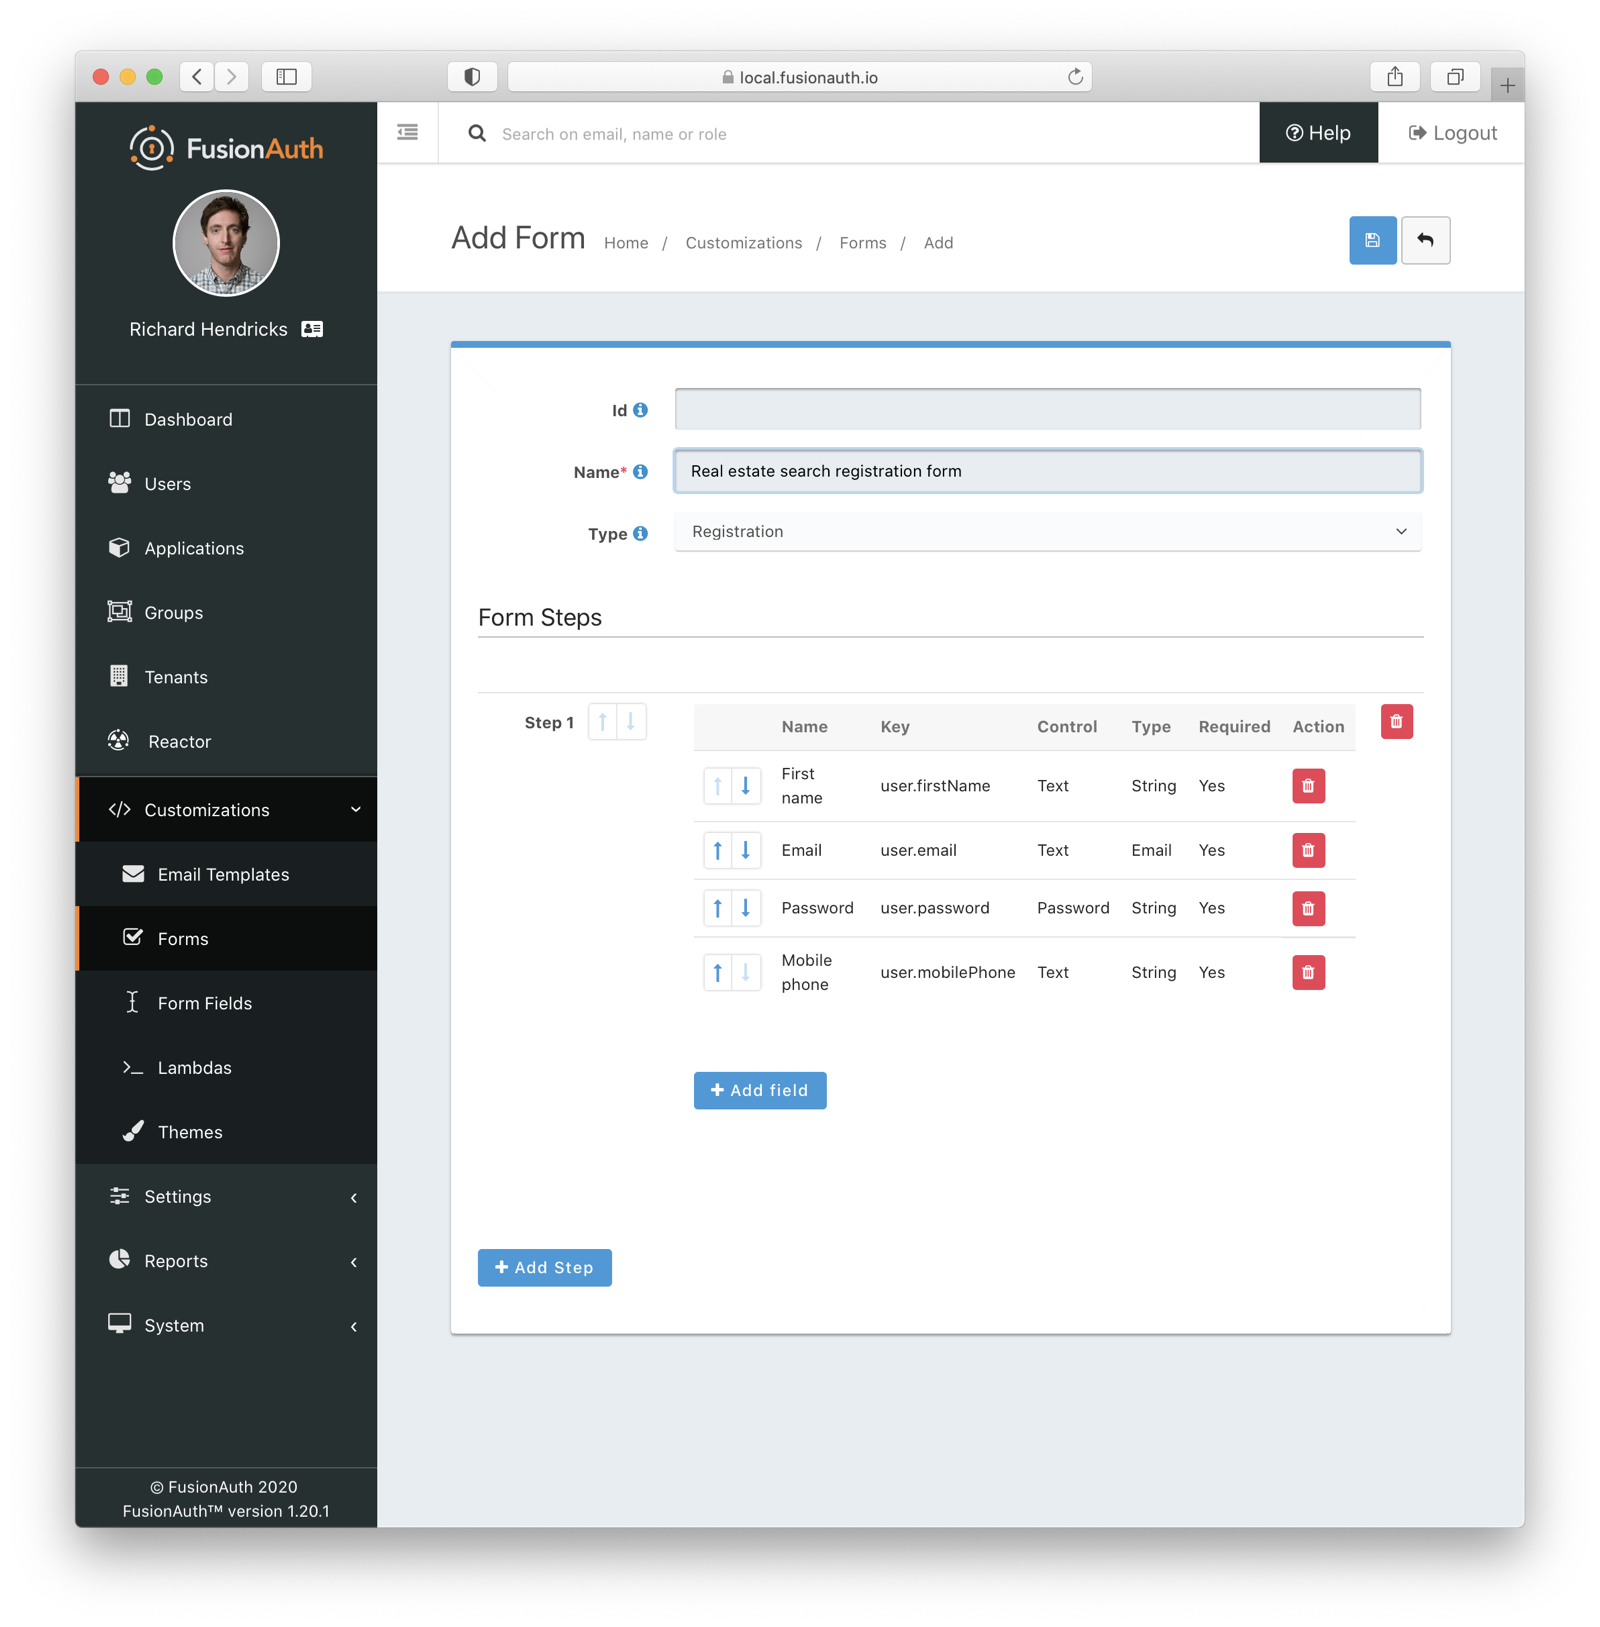
Add the first step and then the following fields:
- First name
- Password
- Phone number
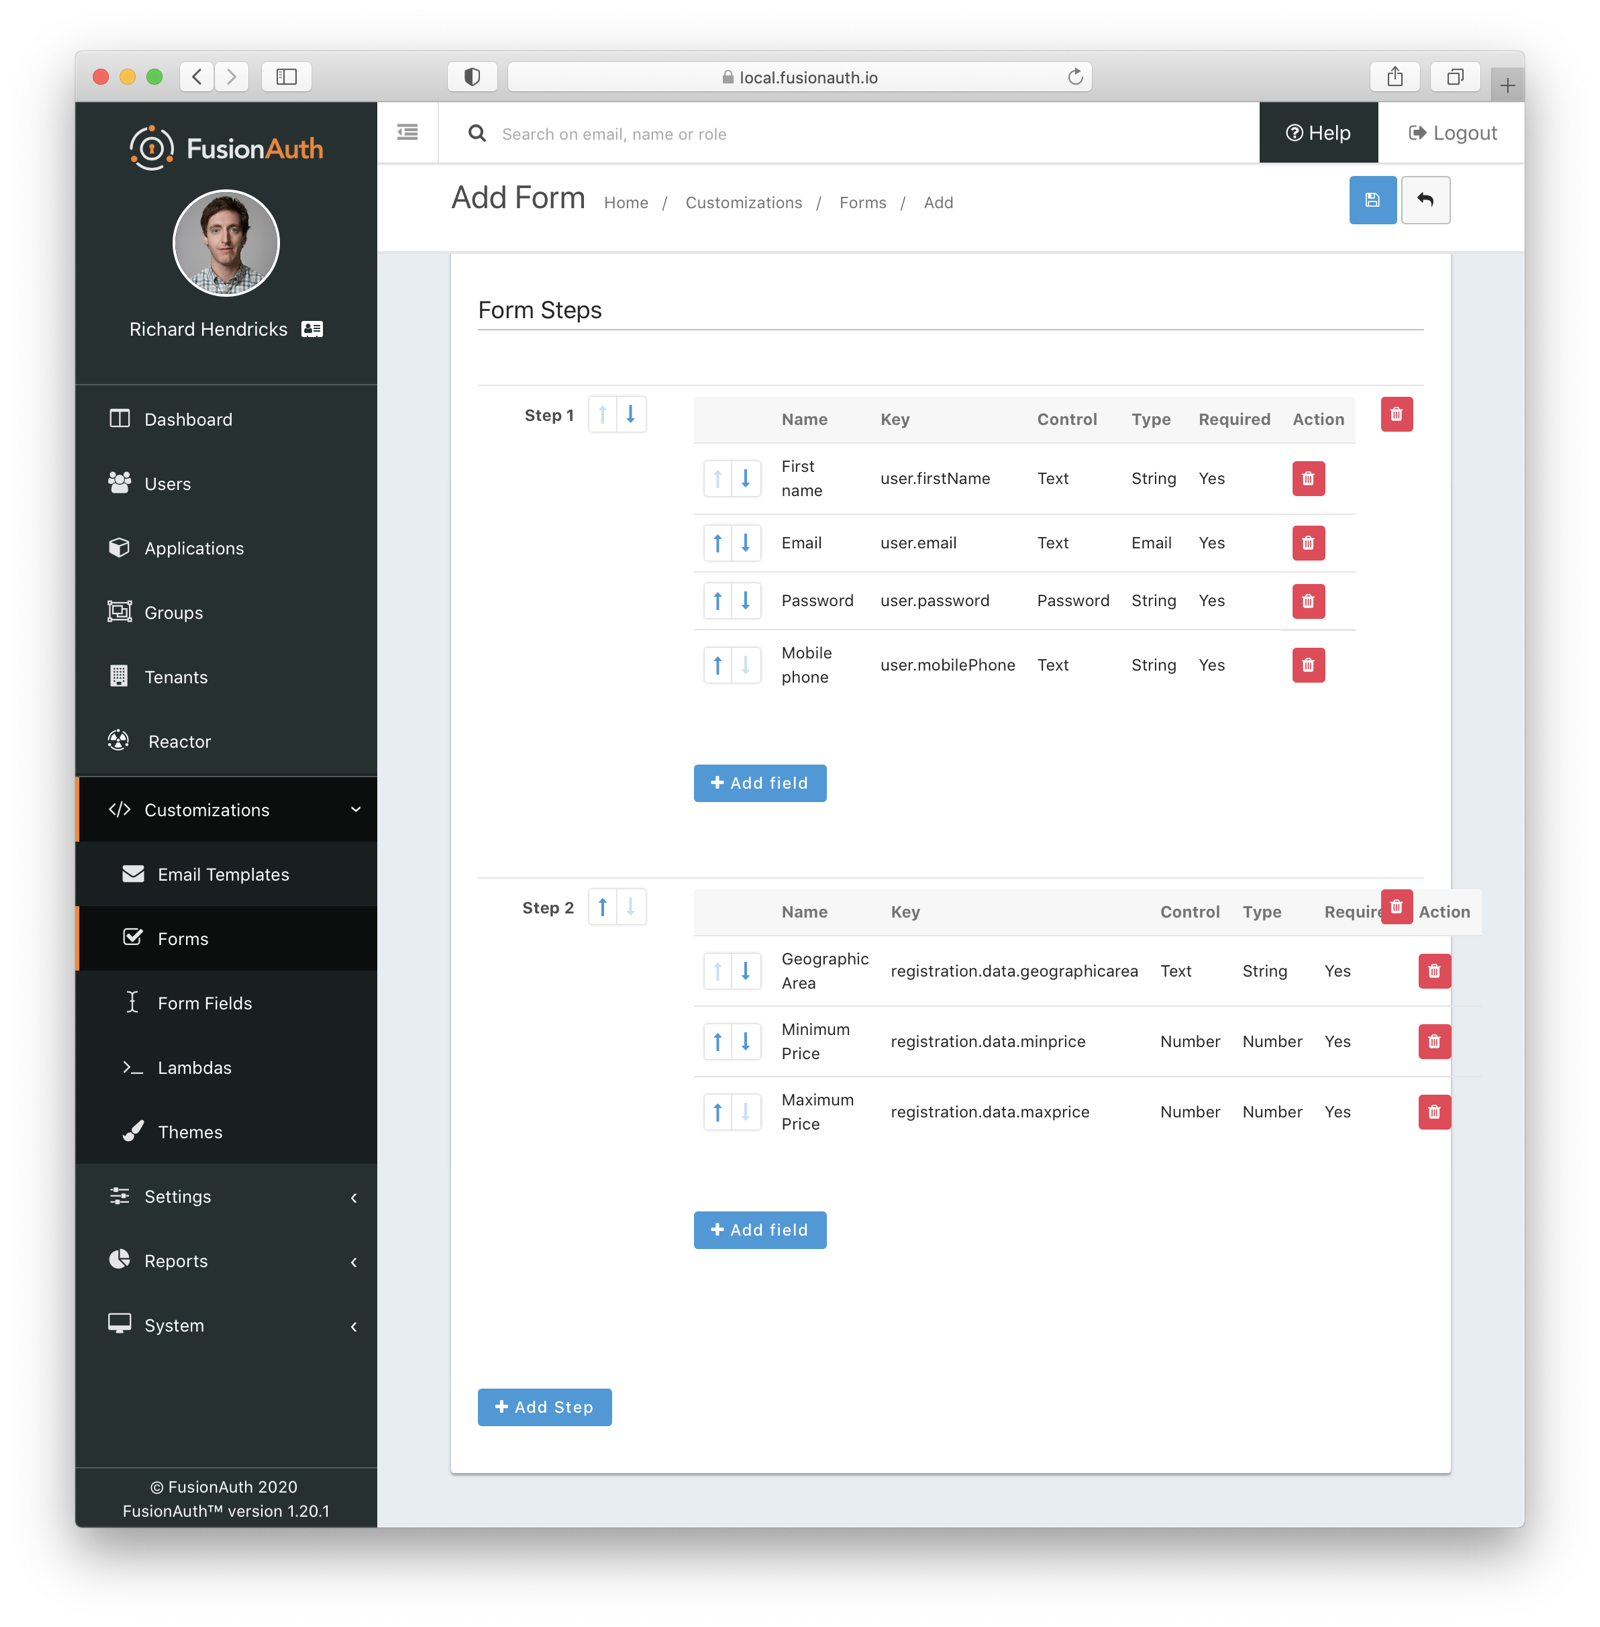
Create a second step. Add your custom house hunting parameter fields:
- Geographic area of interest
- Minimum house search price
- Maximum house search price
After you’ve added these fields to the form, feel free to rearrange the form fields within each step by clicking the arrows to move a field up or down.
The form configuration specifies steps and field display order within those steps. If you need to move a field between steps, delete it from one step and add it to another. To change field validation, return to the OAuth Configuration section and make your changes. When you’re done tweaking the form to your liking, save it.
Associate a Form With an Application
Once you’ve created an advanced registration form, the next step is to specify which applications should use this form. Forms can be reused in any application and any tenant.
In addition to specifying the registration form, you’ll need to configure a few other options. Assuming you are creating a new FusionAuth application, navigate to the Applications tab and add one. If you aren’t, you’ll need to tweak the settings of your existing application.
You must configure a redirect URL; this is where the user is sent when registration succeeds. Navigate to the OAuth tab of your application and enter a valid redirect URL. Though the specifics depend on your application settings, such as whether you require email verification, a user will typically be authenticated at the end of the registration process.
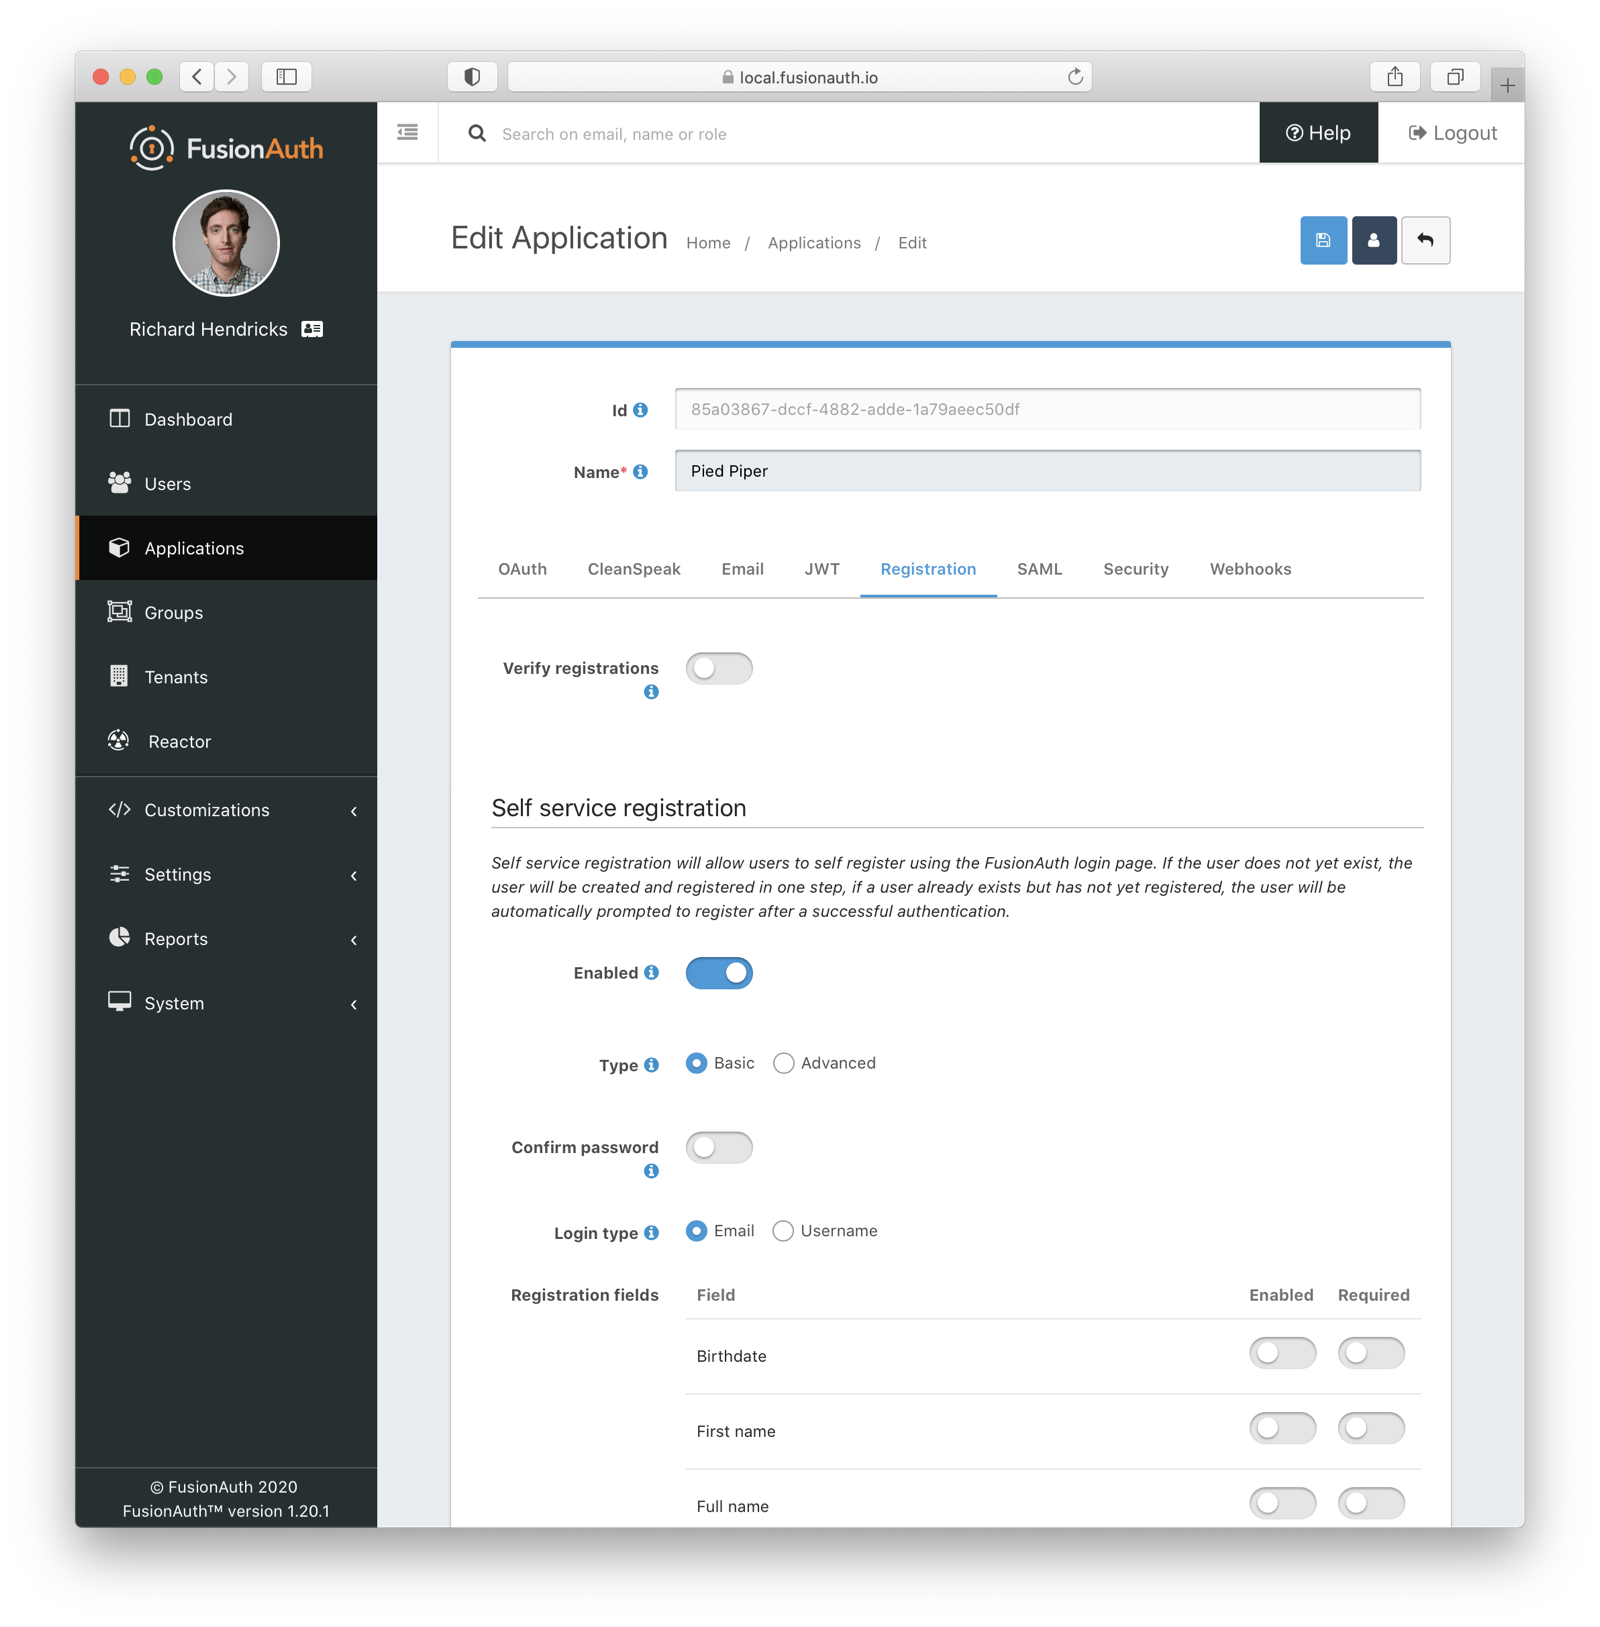
You must configure the application to allow users to register themselves. Otherwise, no users will be allowed to create their own accounts, which means they’ll never see the registration form. Navigate to the Registration tab and enable Self service registration . You configure the application to use your registration form by checking the advanced option and selecting the form you created above.
Return to the list of applications. Your form is ready to go. Once you have the registration URL, your users can sign up.
User Registration
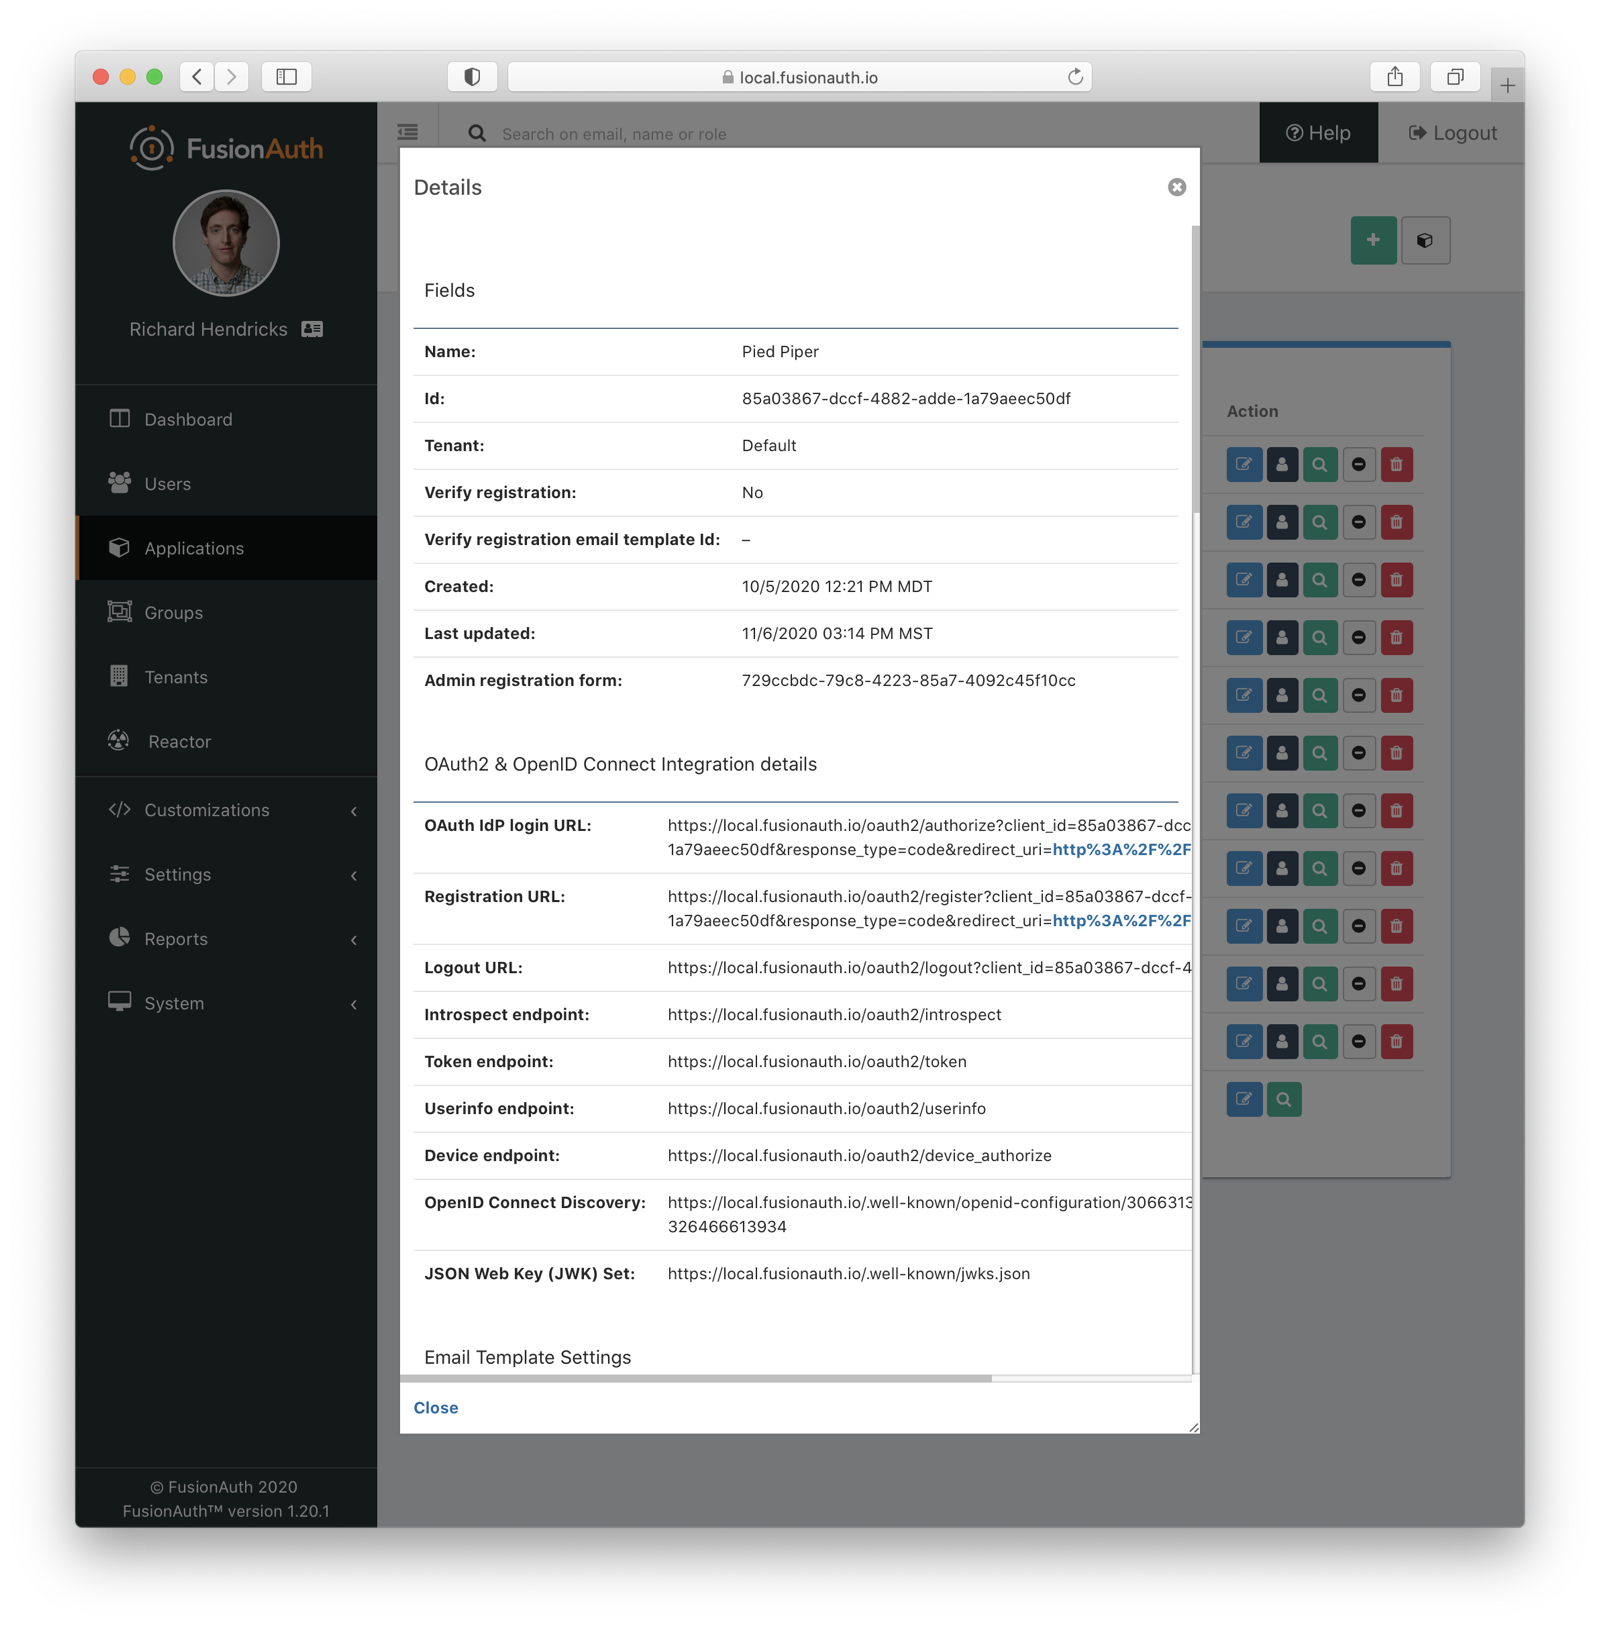
To find the registration URL, navigate to Applications and then view the application you created. Copy the Registration URL .
Now that you have the URL, open up an incognito window or a different browser and navigate to it. The first screen asks for your first name, email address, password and phone number. Each screen also shows how many registration steps there are.

The second screen displays the custom fields: the minimum and maximum home prices and your area of geographic interest. Click Register to complete your sign up. You’ll be sent to the configured redirect URL value and be signed in.
The Admin View
Sign into the administrative user interface and navigate to Users page. You should see a new account added with the data you filled out. If you go to the User data tab on the new user’s account details page, you’ll see the custom data as well:

Theming
The form you built has a few rough user interface elements. You can create a better user experience by theming the form.
Theming Setup
While you can make the changes outlined below in the administrative user interface, you can also manipulate the theme via the FusionAuth API. To do so, navigate to Settings -> API Keys and create an API key. Allow this API key to call all methods on the /api/theme endpoint, at a minimum.
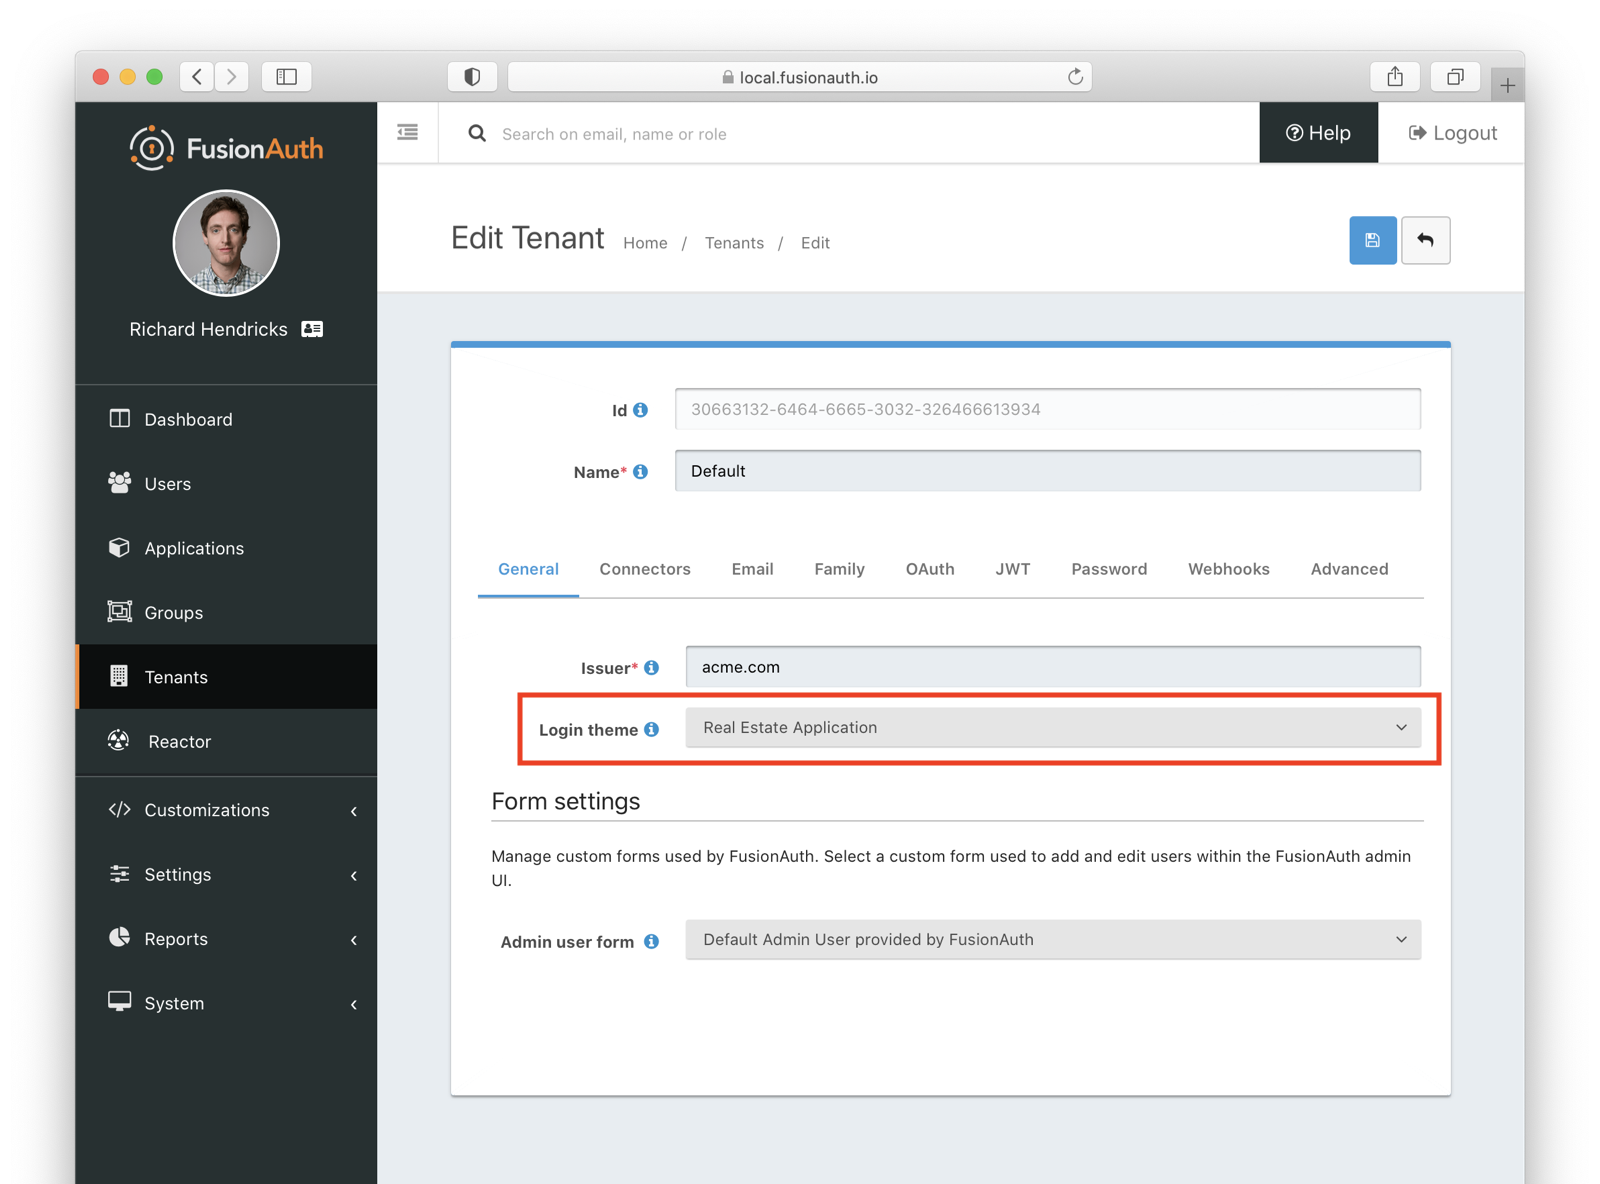
Next, create a new theme, since the default theme is read-only. Themes are assigned on a tenant by tenant basis, so you may either change the theme for the default tenant or create a new tenant and assign a new theme to it. This guide will do the former. To do so, navigate to Customizations -> Themes . Duplicate the existing FusionAuth theme. Rename your theme to something meaningful, such as Real Estate Application.
Navigate to Tenants and edit the default tenant. Go to the General tab and update the Login theme setting to the Real Estate Application theme.
Customizing a Theme
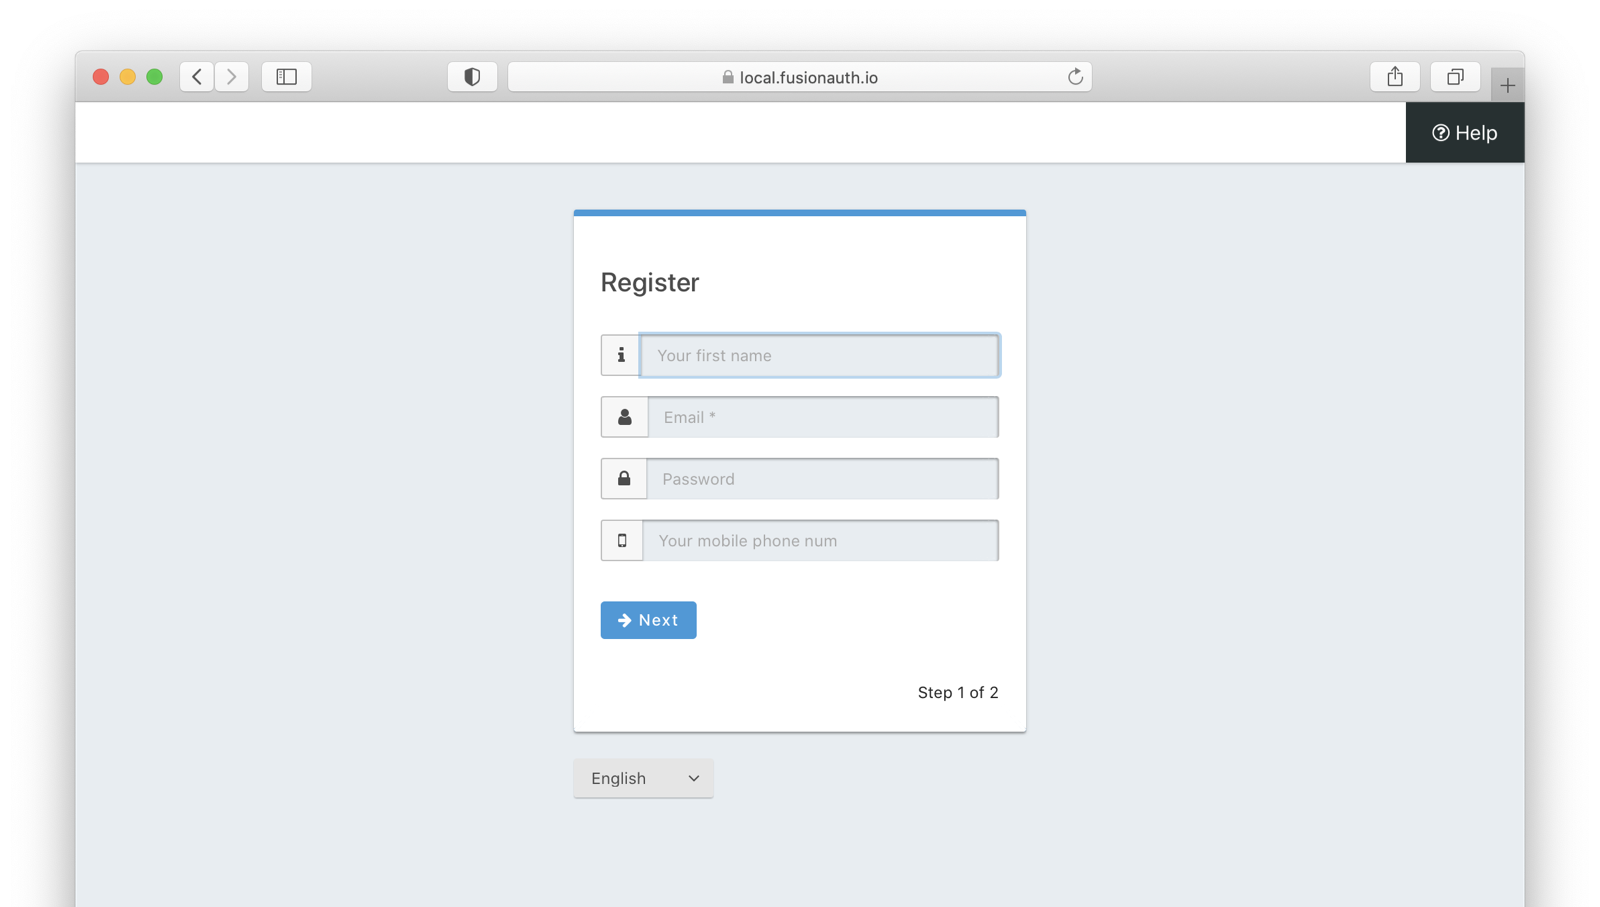
Customizing the theme gives you full control over what the user sees. As a reminder, here’s what the first step of the registration flow looked like with no theming:
You are going to add placeholders and labels, but there’s a lot more you can do; check out the theming documentation for more information.
Navigate to Customizations -> Themes . Find the theme you created above and copy the Id; it’ll be a GUID like 42968bbf-29af-462b-9e83-4c8d7c2d55cf.
Modifying a Theme Via API
To change placeholders or other messages to users such as validation errors, you must modify the messages attribute of a theme. These are stored in a Java properties file format by FusionAuth. You might want to use the API, as opposed to the administrative user interface, to change these messages if you plan to version control them or use automated tooling.
Scripts can help manage updating the messages via API. The below shell scripts assume you are running FusionAuth at http://localhost:9011; if not, adjust the endpoints accordingly. These scripts are also available on GitHub. To use them, you must have jq and python3 installed locally.
Retrieving a Theme File For Local Editing
To modify these messages, you will first retrieve the messages and store them in a text file. Below is a shell script which converts the JSON response from the API into a newline delimited file:
API_KEY=<your api key> # created above
THEME_ID=<your theme id>

curl -H "Authorization: $API_KEY" 'http://localhost:9011/api/theme/'$THEME_ID|jq '.theme.defaultMessages' |sed 's/^"//' |sed 's/"$//' |python3 convert.py > defaultmessages.txt
The convert.py script turns embedded newlines into real ones:
import sys

OUTPUT = sys.stdin.read()
formatted_output = OUTPUT.replace('\\n', '\n')
print(formatted_output)
Running this script after updating the API key and theme Id will create a defaultmessages.txt file in the current directory. This script downloads only the messages file, but could be extended to retrieve other theme attributes. The defaultmessages.txt file contents look like this:
#
# Copyright (c) 2019-2020, FusionAuth, All Rights Reserved
#
# Licensed under the Apache License, Version 2.0 (the \"License\");
# you may not use this file except in compliance with the License.
# You may obtain a copy of the License at
#
#   http://www.apache.org/licenses/LICENSE-2.0

# ...

# Webhook transaction failure
[WebhookTransactionException]=One or more webhooks returned an invalid response or were unreachable. Based on your transaction configuration, your action cannot be completed.
The file is approximately 200 lines in length so the above is an excerpt. Open it in your favorite text editor.
Modifying the Messages File
You are going to add both placeholders for the text input boxes as well as custom validation messages. To add the placeholders, add values to the Custom Registration section.
Maintaining sections in this file isn’t required since it’s not a .ini file. However, it’s a good idea to change only what is needed and not restructure the entire file. Upgrades to FusionAuth will add more properties and you will have to merge your changes in. Search for the section starting with Custom Registration forms.
The keys of the messages file must match the field keys for the registration form.
To add the placeholders for the custom and default input fields, add these lines:
# ...
user.firstName=Your first name
user.mobilePhone=Your mobile phone num
registration.data.minprice=Minimum home price
registration.data.maxprice=Maximum home price
registration.data.geographicarea=Where are you looking?
# ...
To add validation messages, search for # Custom Registration form validation errors. You’ll add the error messages there.
Each error message takes the form: [errortype]fieldname. Look at the Default validation errors section to see the list of valid errortypes. The field name is the keyname for the field. For example, to display a user friendly error message when required price range information is omitted or invalid, add these properties:
[invalid]registration.data.minprice=Please enter a number
[invalid]registration.data.maxprice=Please enter a number
[missing]registration.data.minprice=Minimum home price required
[missing]registration.data.maxprice=Maximum home price required
These messages are displayed to the user when the minimum or maximum prices are invalid. Because these fields have the number datatype, they are invalid any time the user input is not a number, but missing when the empty string is provided.
If any of the values added to defaultmessages.txt contain a double quote, escape it: \". Since the file will be eventually turned into a quoted JSON attribute and sent to the API, an unescaped double quote is invalid JSON and will cause the API call to fail.
Updating the Messages
After defaultmessages.txt has been changed, it needs to be converted to JSON and sent to FusionAuth. The following script updates a FusionAuth theme’s defaultMessages attribute:
API_KEY=<your api key>
THEME_ID=<your theme id>

FILE_NAME=out.json$$

awk '{printf "%s", $0"\\n"}' defaultmessages.txt |sed 's/^/{ "theme": { "defaultMessages": "/' | sed 's/$/"}}/' > $FILE_NAME

STATUS_CODE=`curl -XPATCH -H 'Content-type: application/json' -H "Authorization: $API_KEY" 'http://localhost:9011/api/theme/'$THEME_ID -d @$FILE_NAME -o /dev/null -w '%{http_code}' -s`

if [ $STATUS_CODE -ne 200 ]; then
  echo "Error with patch, exited with status code: "$STATUS_CODE
  exit 1
fi

rm $FILE_NAME
To load the new messages, run this script in the directory with the modified defaultMessages.txt file. Visit the registration URL in your incognito browser and see the changes:
Adding Form Labels
You can customize your field display more extensively by modifying macros used to build the registration form. You can edit these directly in the administrative user interface. Navigate to Themes and edit your theme. Click on Helpers and scroll to the bottom. You’ll be modifying the customField FreeMarker macro.
The macro is a series of if/then statements executed against every custom field as the user interface is generated. The macro examines each field definition and creates the correct HTML element. For instance, a password field will be rendered as an HTML input field with the type password.
To add a label to each field, after [#assign fieldId = field.key?replace(".", "_") /], add this:
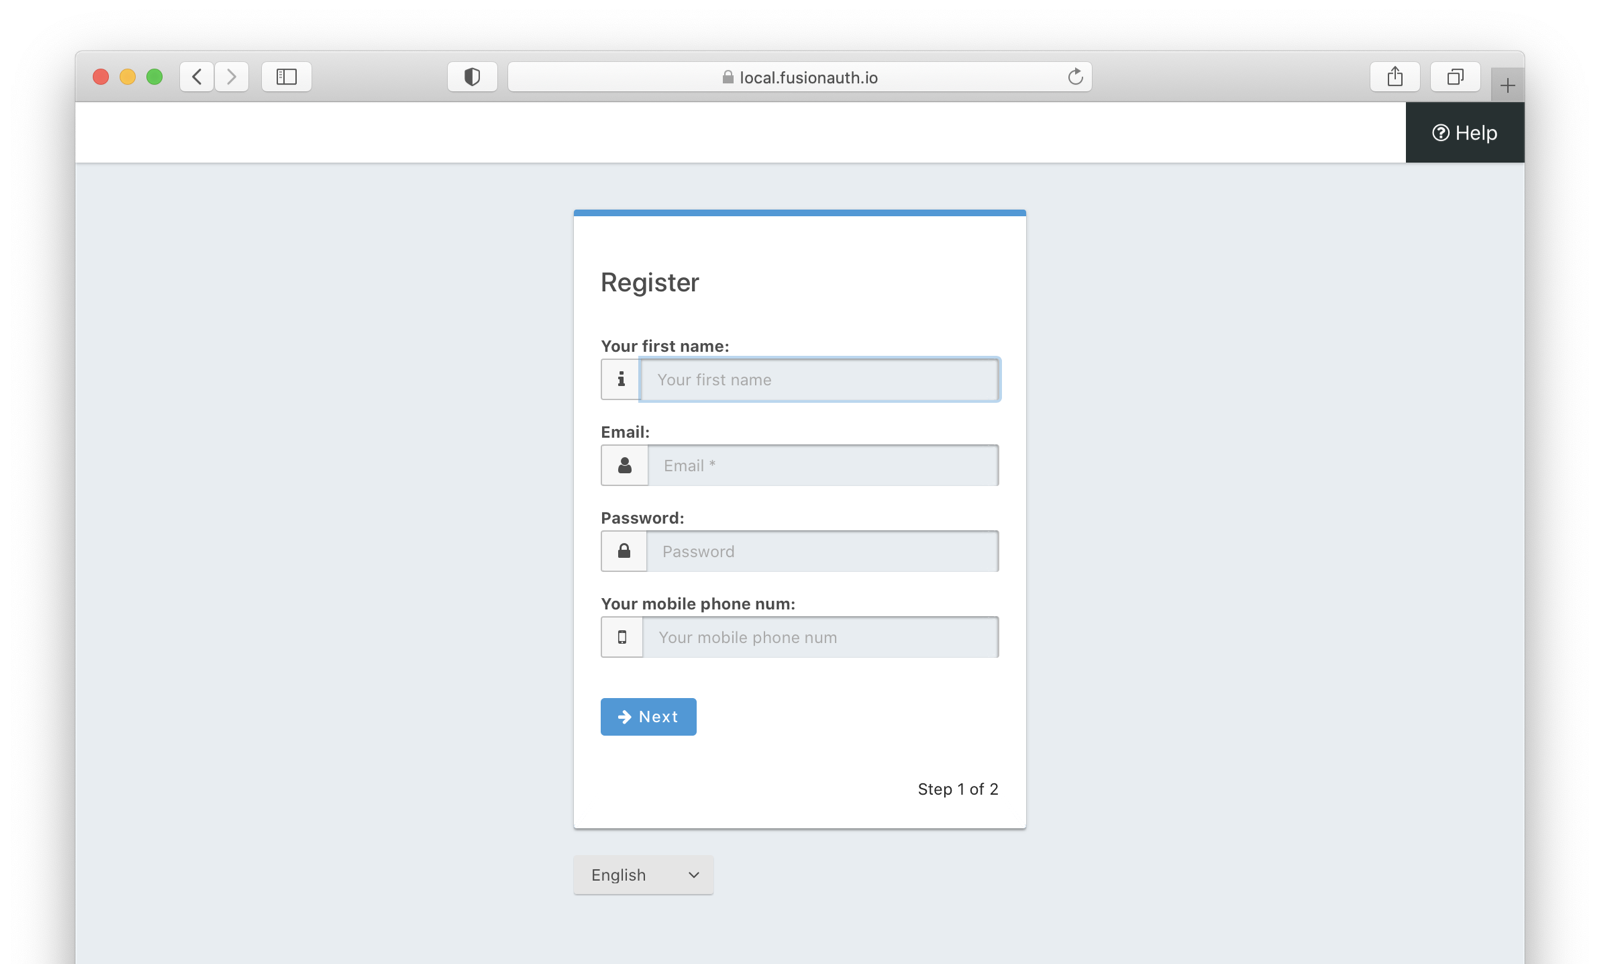
<label for="${fieldId}">${theme.optionalMessage(field.key)}:</label>Open an incognito window and go through the registration flow again. You should see labels for both steps. These label values are pulled from your message bundles.
This gives you a glimpse of the full flexibility of FusionAuth themes. You can use the power of Apache FreeMarker, ResourceBundles, CSS, and JavaScript to customize and localize these pages. Check out the theme documentation for more.
Reading the Data
The registered user’s profile data is available via the FusionAuth APIs, in the standard user fields, user.data, and registration.data. It is also available for viewing, but not editing, in the administrative user interface.
To enable users to modify their profile data, you’ll have to build a profile management application. The application will let users log in or register. After a user has been authenticated, it will display their profile information.
Because the application profile data, such as the home price ange, isn’t standard, you can’t use an OAuth or OIDC library to retrieve it. Instead, you must use the FusionAuth APIs. To do so, you’ll need to create an API key and then use either the API or one of the client libraries to access it.
This interface should be integrated with the rest of your application, but this guide will build an example in python and flask. You can view the example code here.
Creating an API key
Go to Settings -> API Keys . Create an API key. Configure these endpoints to be allowed:
/api/user/registration: all methods/api/form:GETonly/api/form/field:GETonly
Here’s the relevant section of the example application:
# ...

@app.route('/', methods=["GET"])
def homepage():
  user=None
  registration_data=None
  fields = {}
  if session.get('user') != None:
    user = session['user']
    fusionauth_api_client = FusionAuthClient(app.config['API_KEY'], app.config['FA_URL'])
    user_id = user['sub']
    application_id = user['applicationId']
    client_response = fusionauth_api_client.retrieve_registration(user_id, application_id)
    if client_response.was_successful():
      registration_data = client_response.success_response['registration'].get('data')
      fields = get_fields(fusionauth_api_client)
    else:
      print(client_response.error_response)
  return render_template('index.html', user=user, registration_data=registration_data, fields=fields)

# ...
This home page route examines the user object, which was returned from the successful authentication. It pulls off the sub attribute, which is the user identifier and looks something like 8ffee38d-48c3-48c9-b386-9c3c114c7bc9. It also retrieves the applicationId.
Once these are available, the registration object is retrieved using a FusionAuth client. The registration object’s data field is placed into the registration_data variable and passed to the template for display. The helper method, to be examined below in more detail, is also called and whatever it returns is made available to the template as the fields variable.
Here’s the get_fields helper method:
# ...

def get_fields(fusionauth_api_client):
  fields = {}
  client_response = fusionauth_api_client.retrieve_form(app.config['FORM_ID'])
  if client_response.was_successful():
    field_ids = client_response.success_response['form']['steps'][1]['fields']
    for id in field_ids:
      client_response = fusionauth_api_client.retrieve_form_field(id)
      if client_response.was_successful():
        field = client_response.success_response['field']
        fields[field['key']] = field
  else:
    print(client_response.error_response)
  return fields
# ...
This function looks at the form and retrieves ids of all fields on the second step: ['form']['steps'][1]. It then retrieves the configuration of each field.
The code then adds that form field configuration information to a dictionary, with a key of the field key. A field key looks like registration.data.minprice. This dictionary is used to build attributes of the update form, which is created later. This helper would need to be modified to loop over multiple steps if you had more than one step collecting profile data.
Here’s the update form processing route:
# ...
@app.route("/update", methods=["POST"])
def update():
  user=None
  error=None
  fields=[]
  fusionauth_api_client = FusionAuthClient(app.config['API_KEY'], app.config['FA_URL'])
  if session.get('user') != None:
    user = session['user']
    user_id = user['sub']
    application_id = user['applicationId']

    client_response = fusionauth_api_client.retrieve_registration(user_id, application_id)
    if client_response.was_successful():
      registration_data = client_response.success_response['registration'].get('data')
      fields = get_fields(fusionauth_api_client)
      for key in fields.keys():
        field = fields[key]
        form_key = field['key'].replace('registration.data.','')
        new_value = request.form.get(form_key,'')
        if field['control'] == 'number':
          registration_data[form_key] = int(new_value)
        else:
          registration_data[form_key] = new_value
      patch_request = { 'registration' : {'applicationId': application_id, 'data' : registration_data }}
      client_response = fusionauth_api_client.patch_registration(user_id, patch_request)
      if client_response.was_successful():
        pass
      else:
        error = "Unable to save data"
        return render_template('index.html', user=user, registration_data=registration_data, fields=fields, error=error)
  return redirect('/')
# ...
This code retrieves the user’s registration object. It updates the data object with new values from the profile update form, perhaps transforming a field from a string to a different datatype if required. Currently only the number type is transformed, but could be extended to handle boolean or other data types. After the object has been updated, a PATCH request is made. This updates only the data field of the user registration.
Here’s an image of the portal in action:
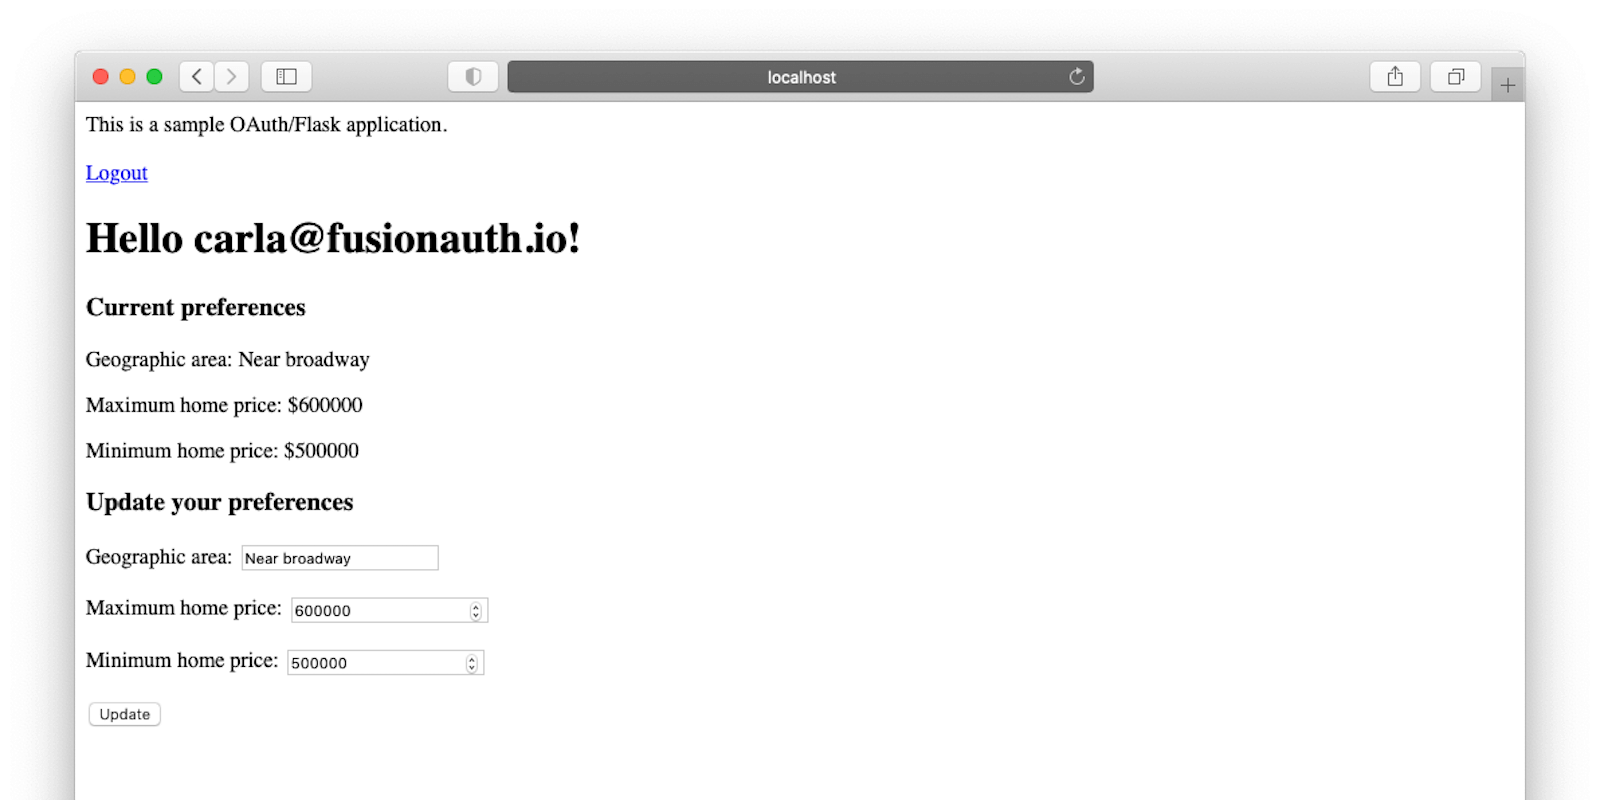
You can view the example code here, which includes templates and the login and registration links as well as the above profile modification code.
Editing User Data In The Admin UI
Available Since Version 1.20.0
Advanced user registration forms add custom data to your users’ profiles. However, what happens when that profile data needs to be modified? You can write code against the APIs to modify it, but using a custom admin form is easier. You don’t have to write any code, only configure a form or two.
There are two types of profile data:
- User data, which is associated with the user. This could be in standard fields such as
mobilePhoneor custom data fields inuser.data. - Registration data, associated with the user’s registration to an application. This could be in standard fields such as
rolesor custom data inregistration.data.
Each of these types of profile data has an admin form associated with it. Admin user forms are associated with the tenant and admin registration forms are associated with an application.
The default user and registration editing forms ship with FusionAuth and are implemented using this functionality. They can easily be replaced by your own custom forms suited to your business needs.
How To Use A Custom Admin Form
There are a few steps to using custom admin forms:
- Determine if you are going to create a custom registration form, user form or both.
- Consider data sources for each field of the profile. It could be user registration, API calls from other systems, or manually entered by an admin. Should some data be protected from admin modification?
- Create custom fields if needed. This is where you’d set the data type, form control and validation rules.
- Assemble the fields into a form, including possibly organizing them into sections.
- Update the tenant or application, as appropriate, to use the form.
Let’s walk through each of these.
Custom Registration Form or Custom User Form
To determine if you are going to create a custom admin registration form, custom admin user form or both, think about where the data should be stored.
If the profile information is useful for more than one application which the user might log in to, then the data should be stored on the user. You could put it in a custom field (user.data.somefield) or repurpose one of the standard user fields.
For instance, for the real estate search application built above, a boolean value indicating that someone is a current client would be good to store on the user. Data stored as user.data.currentClient would be helpful for many applications. Some examples of functionality you might build based on this value:
- For a search application, display additional information to current clients or add a CTA for past clients.
- For a mortgage application, display additional interest rate or program information.
- Trigger a welcome email when someone becomes a client.
If, on the other hand, your data is useful only to a specific application, associate it with a registration. An example of that is the registration.data.minprice field created above.
The minimum and maximum price points someone is searching for only apply to the real estate search application. Such data won’t be useful for other applications.
Profile Data Sources
Next, consider where the data will come from. You have three main source of profile data:
- The user registration; when a new user signs up
- API calls to modify the profile data using the User APIs or Registration APIs.
- The admin forms, used in the FusionAuth backend.
Think about what profile data will come from each source. For example, the user’s email address will typically come from their registration. The date of their closing might come from an external scheduling system. And the current client status should be set by a customer service rep or realtor.
When you know where each field is coming from, you can consider what kind of administrator modifications should be allowed. Some of this user profile data will be submitted by the end user and should be read-only for admin users.
An example of this would be a data sharing setting; does someone want their data shared with brokerage affiliated companies? Depending on your business rules, you may not want to expose this setting to your admins in the backend FusionAuth user interface. However, more typically, you’ll want to allow your admin users to modify most profile data.
There will also be fields which contain profile data not created at user registration time. Some of these may be created or updated by automated processes. Others, for example, a user.data.notes field, will be manually updated by admin users. This field can be used to capture information a user’s real estate needs. This field should be updated by customer service reps. New clients certainly won’t be providing this information about themselves on registration.
Create Custom Fields
If you want any fields in your custom admin forms which are not part of a user registration form you’ve created, such as the notes field mentioned above, you’ll need to create a custom field for that data. To do so, navigate to Customizations -> Form Fields and add them.
Here’s an example of adding a user.data.notes field:
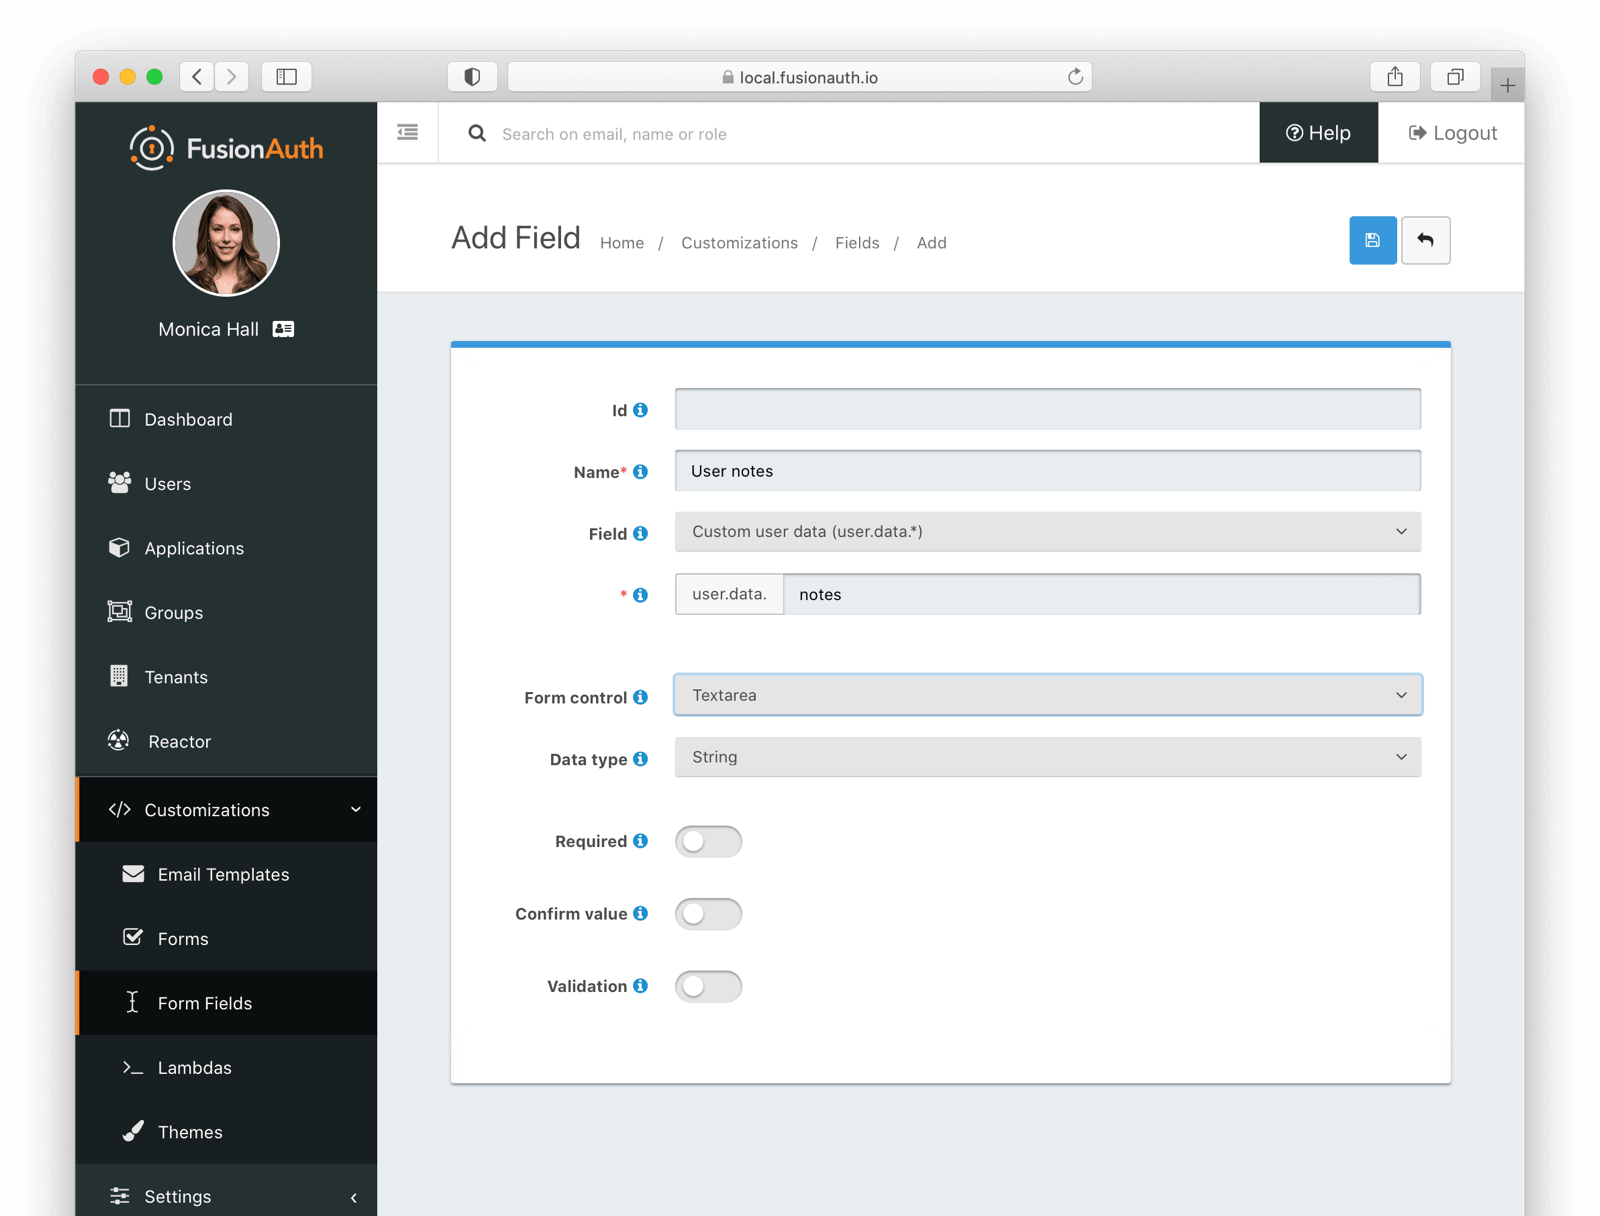
You may use any supported validation rules, form controls or data types.
Don’t forget to add the field names for any new fields to your theme’s messages file. Otherwise users in the administrative user interface will see a field name like user.data.notes instead of User notes.
Build the Forms
Next, build the forms. You can use any of the custom or standard form fields previously created.
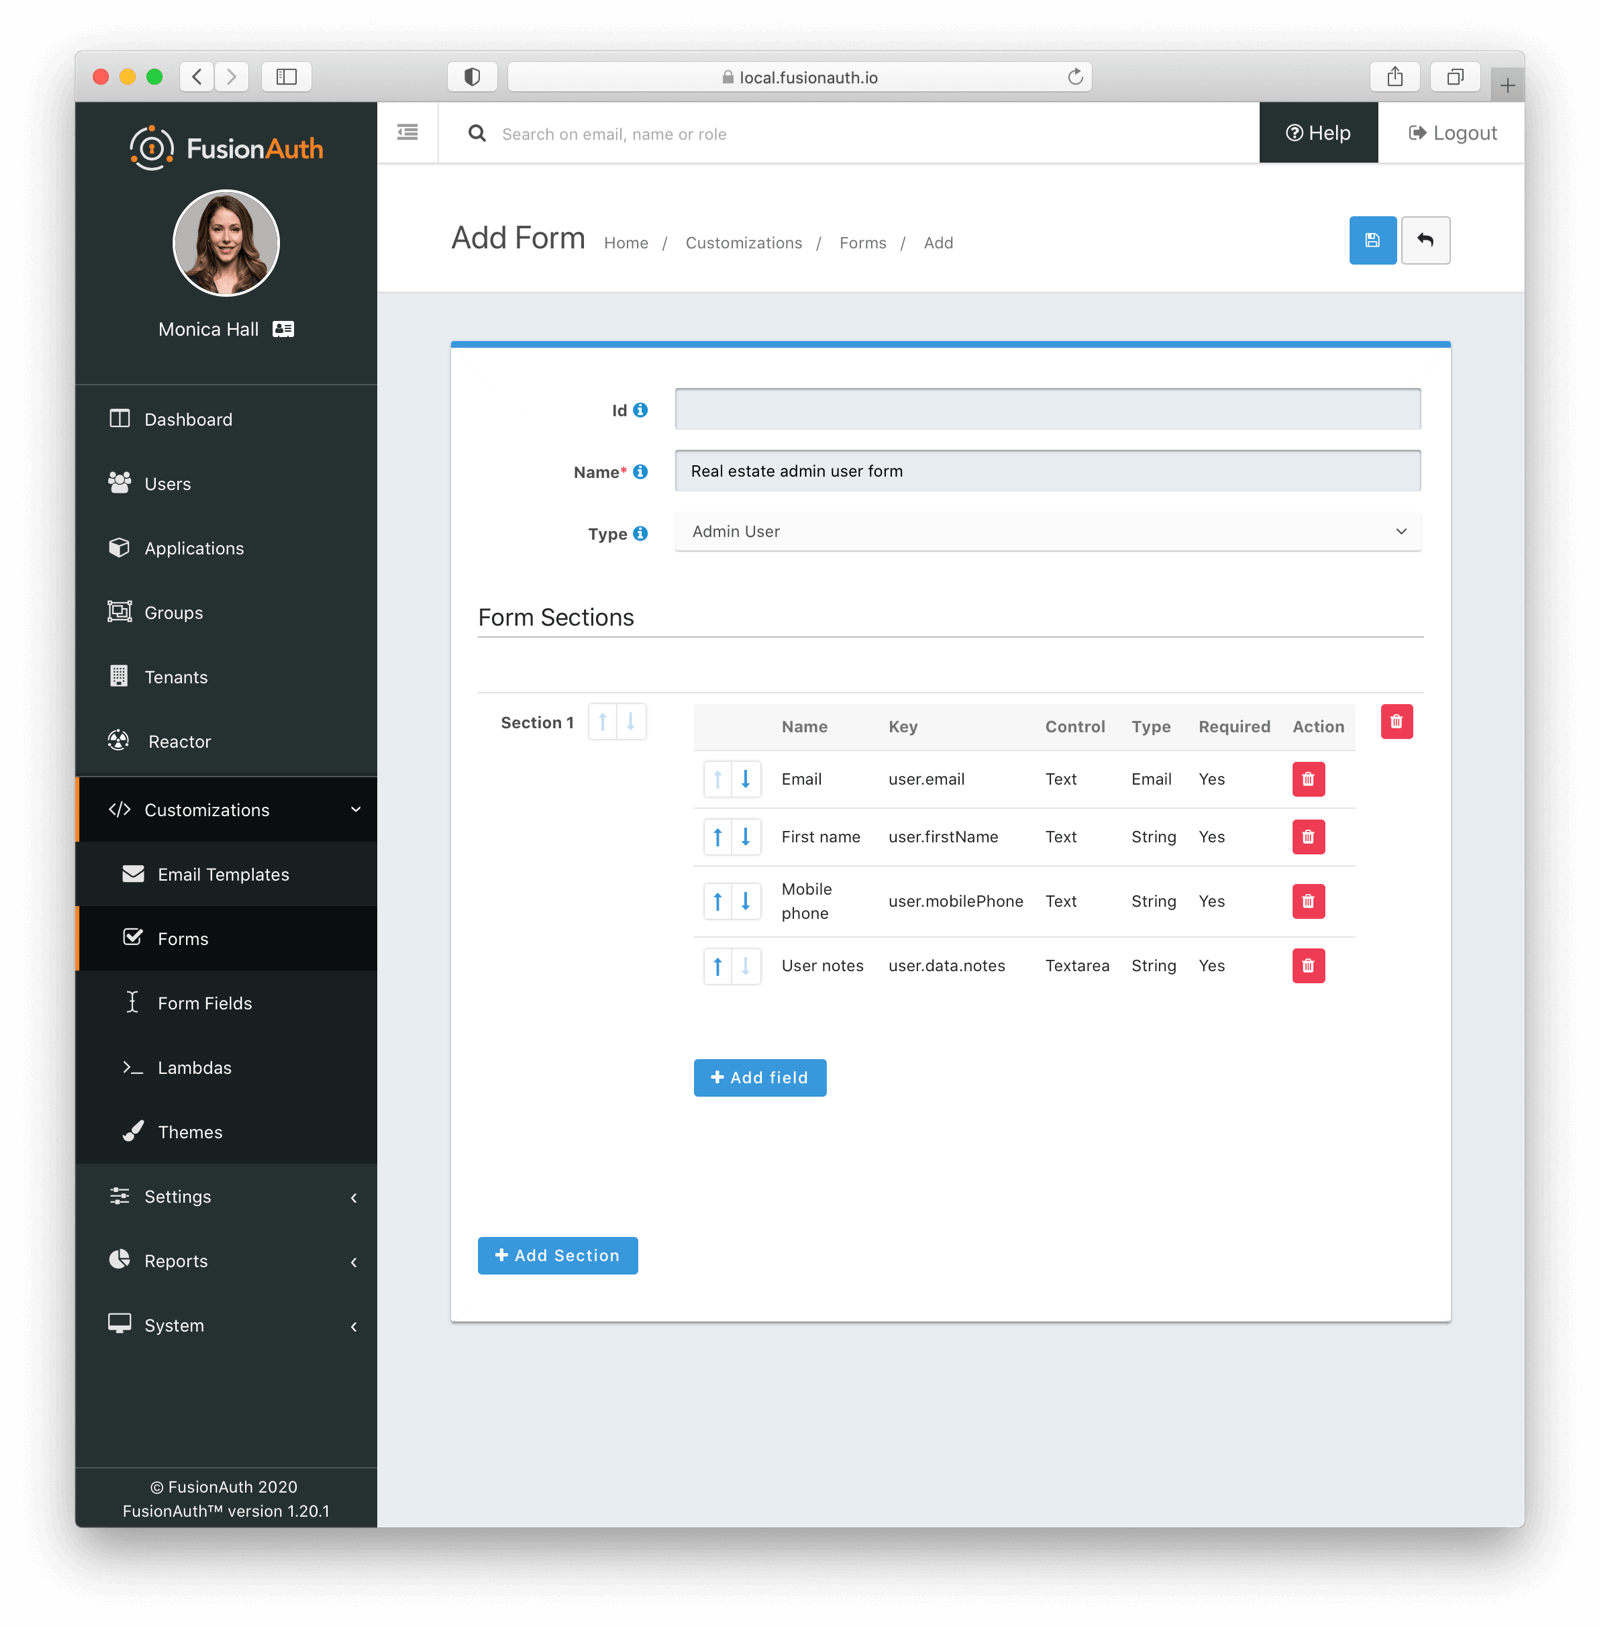
First, let’s add an admin user form. Navigate to Customizations -> Forms and add a new form. Make sure that the Type is set to Admin User.
Add your form fields and order as needed. Multiple sections help organize the data if you have a large number of fields and want them logically grouped. Here we’ll just add the fields we added for user registration as well as our new, admin only, notes field. You’ll end up with a form looking similar to this:
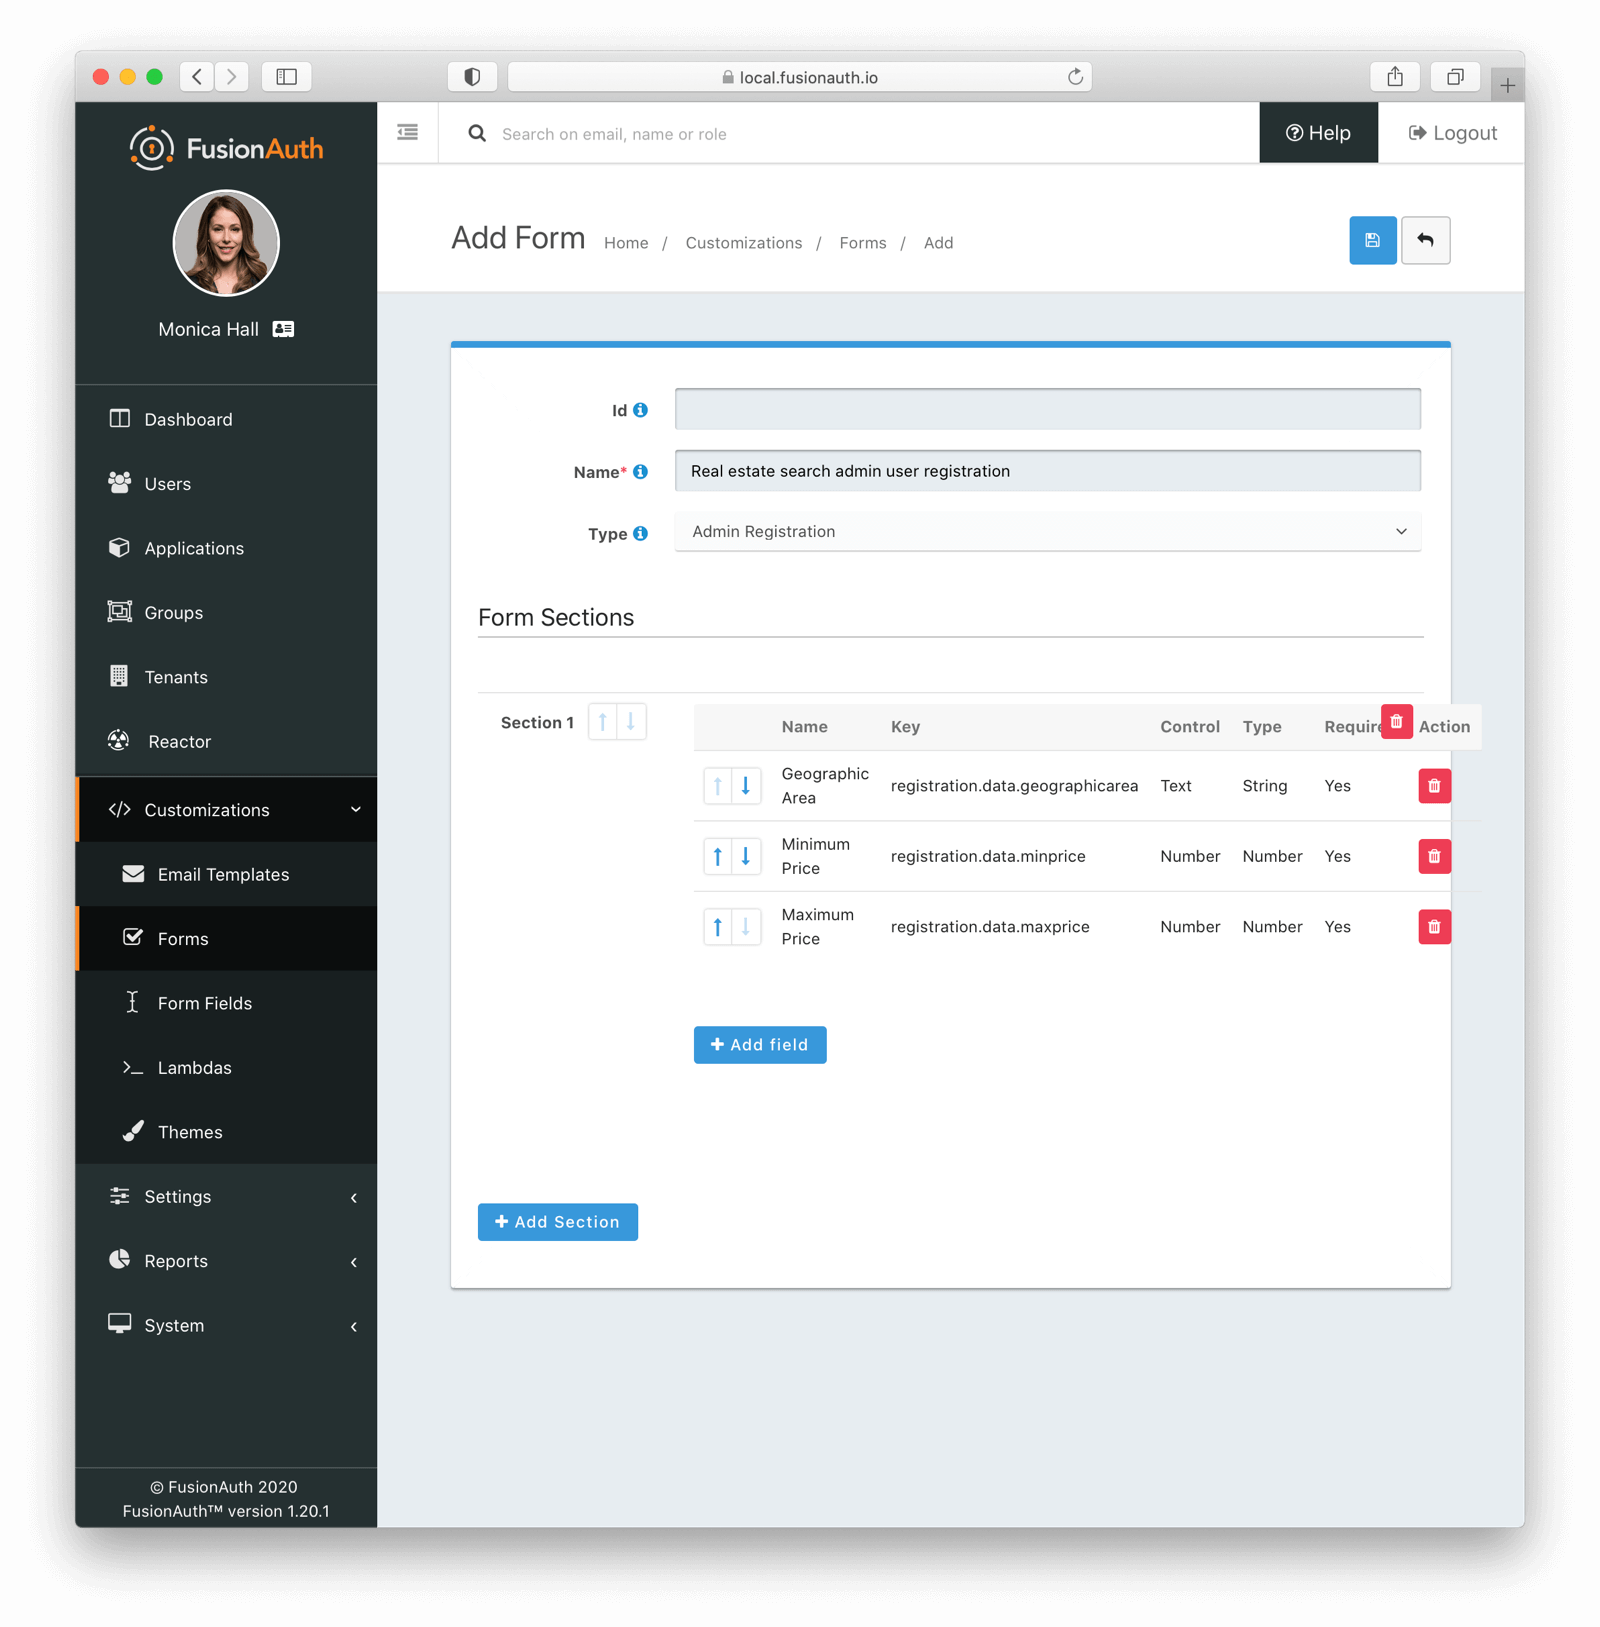
Next up, let’s create a custom admin registration form. This will only apply to the real estate search application. To add this form, navigate to Customizations -> Forms and add a new form. Make sure that the Type is set to Admin Registration.
Add your form fields, ordering them as needed. Add multiple sections if desired. Again, this is typically a good idea if you have a large number of fields and want to logically group them. Below, the three custom registration fields added for user registration have been added to this form: Geographic Area, Minimum Price and Maximum Price. If you are doing the same, you’ll end up with a form looking similar to this:
Next up, you’ll need to associate the admin user form with the tenant, and the admin registration form with the application.
Associate the Form(s)
If your form is an admin user form, modify the tenant settings. If, on the other hand, it is an admin registration form, modify the application. In both cases, you can use either the administrative user interface or the API to make the updates. Below you’ll see how to make the changes with the administrative user interface.
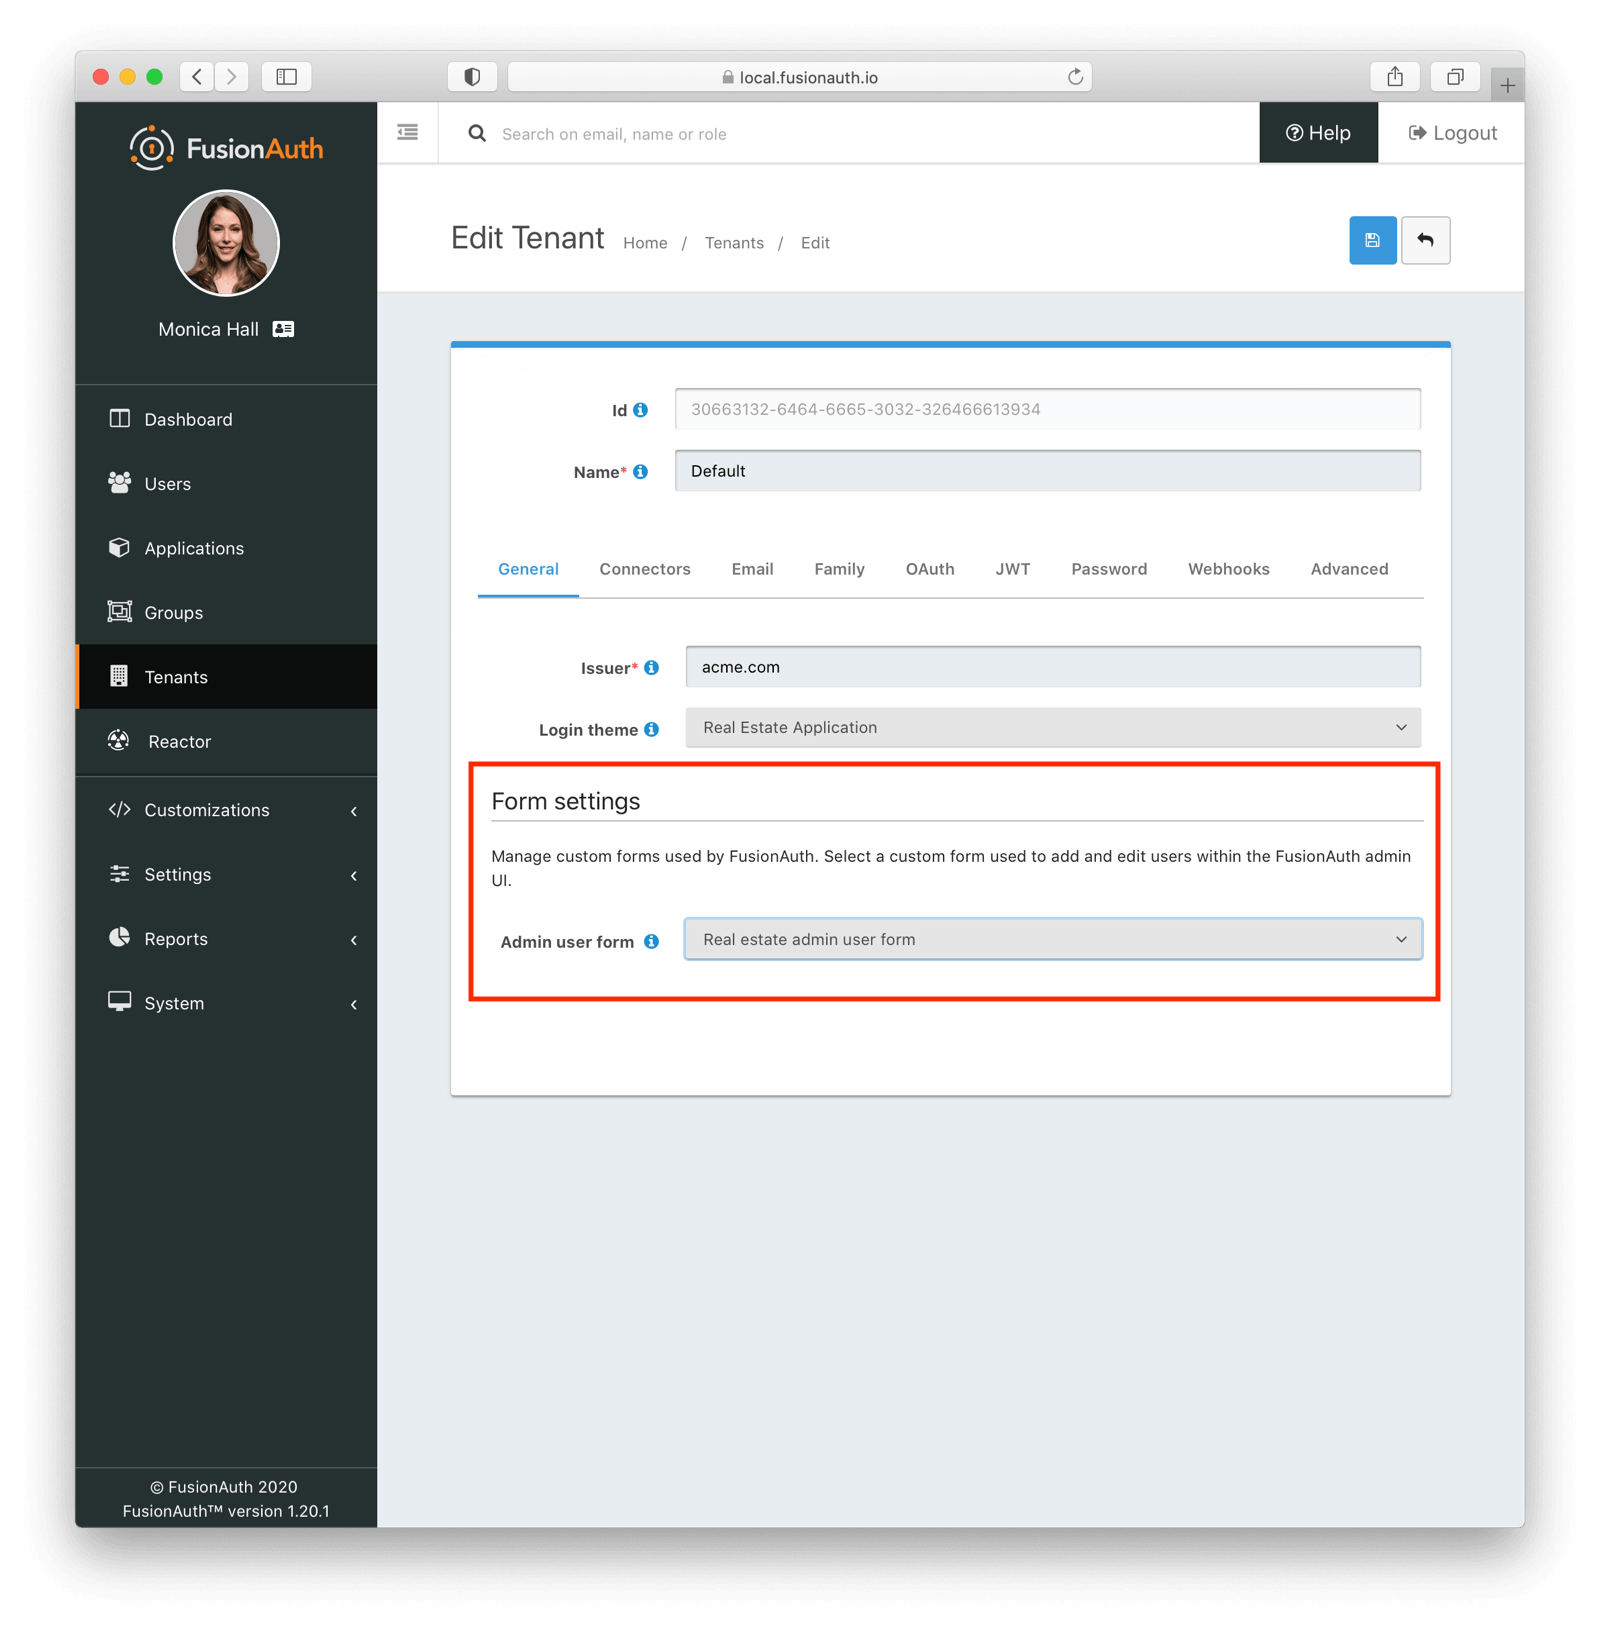
To change the form used to edit users, navigate to Tenants -> Your Tenant -> General -> Form Settings . Then chose your custom form as the Admin user form :
To change the admin registration form, navigate to Applications -> Your Application -> Registration -> Form Settings . Then chose your custom form as the Form value:
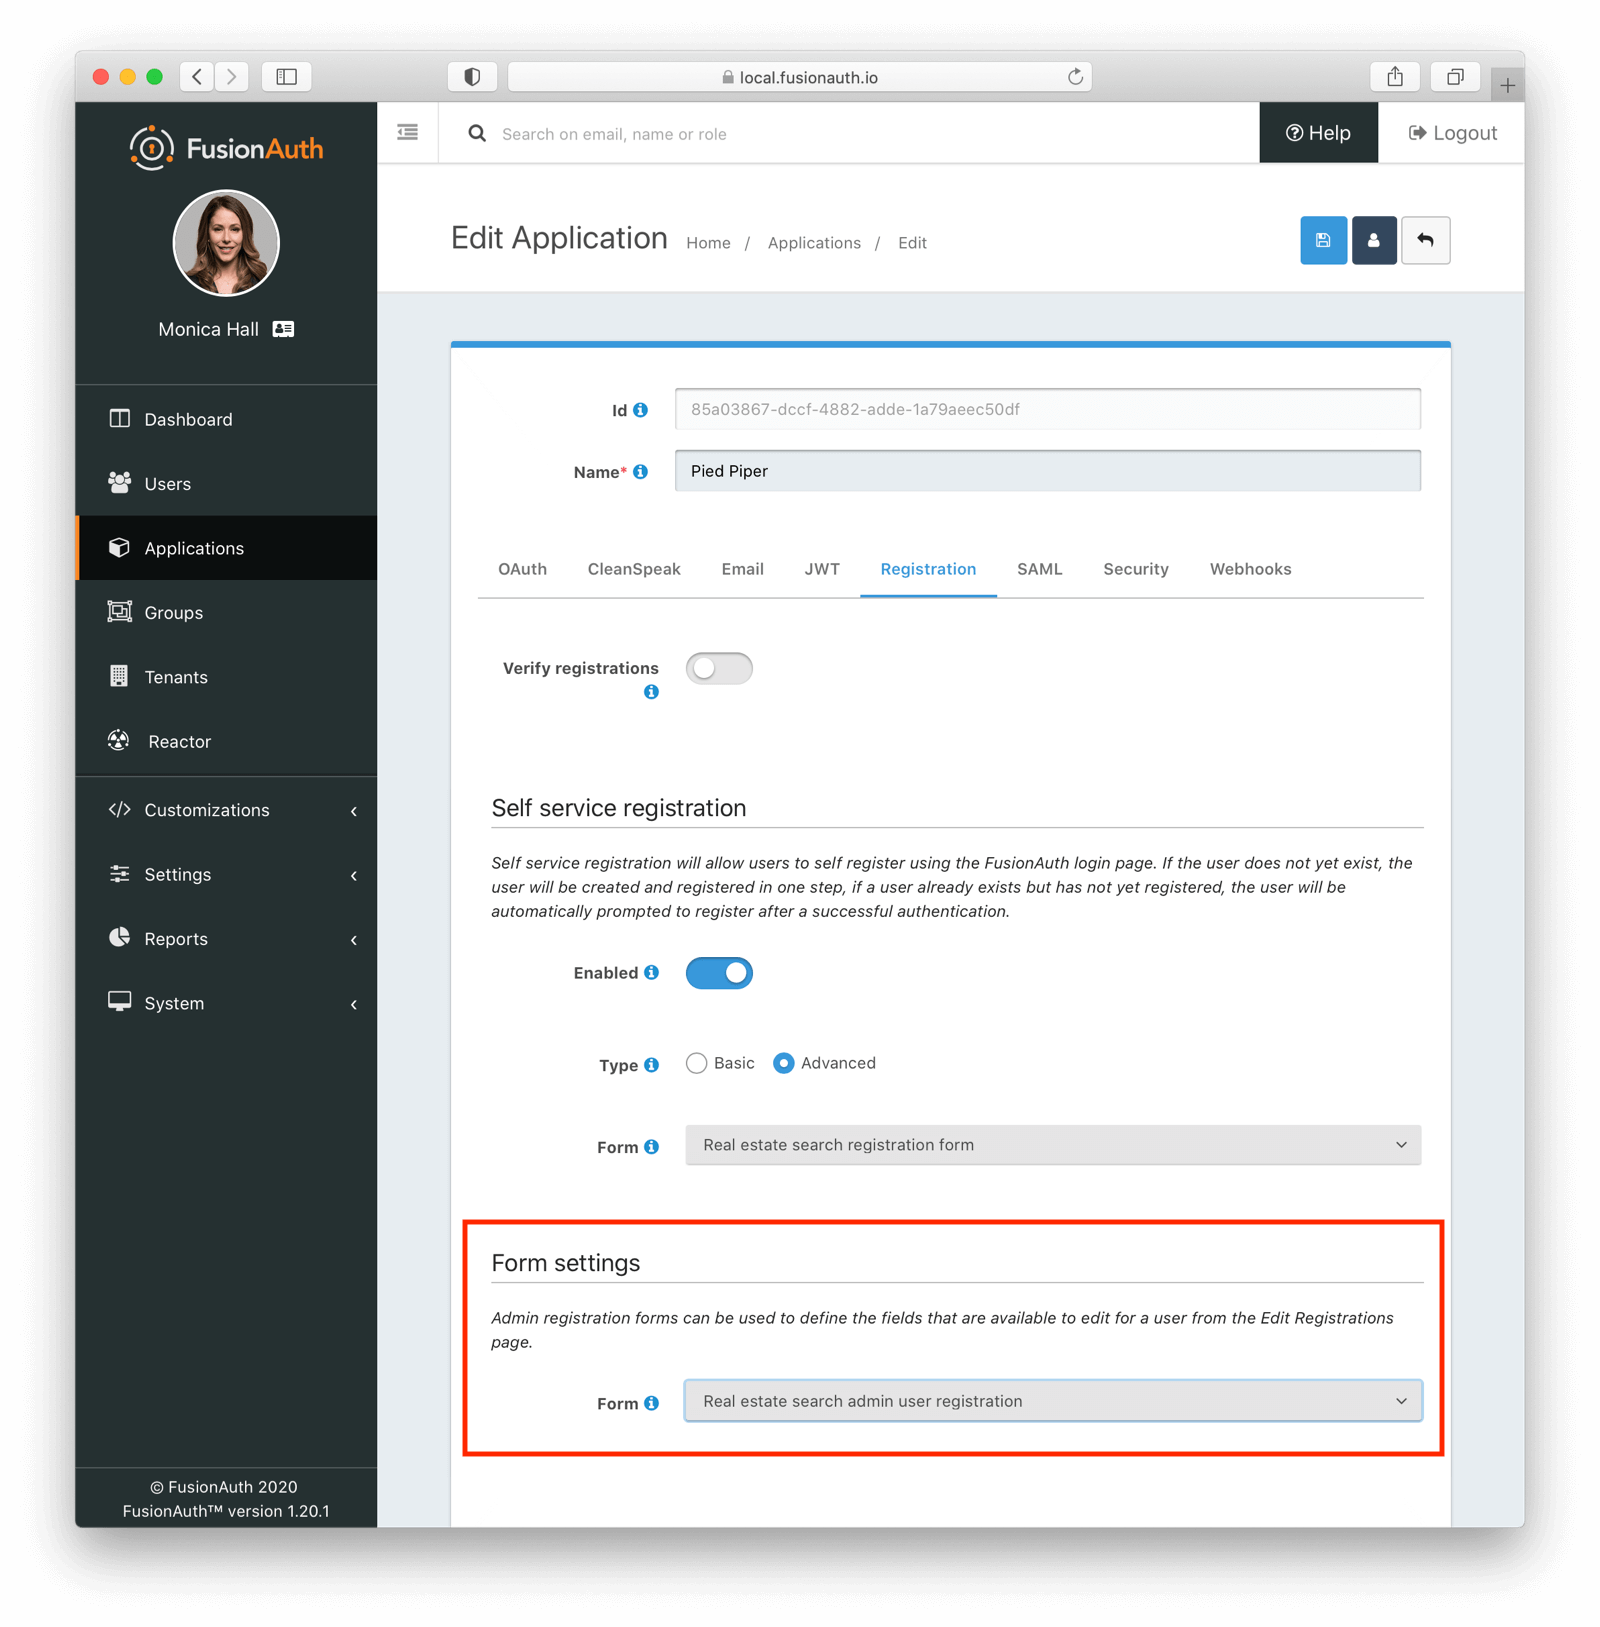
Once you’ve configured these forms, see how it looks for an admin user to edit a user or a registration by, well, editing a user or registration. These forms will be used both for editing users or registrations as well as adding new users or registrations. Any time you are accessing a user or registration from the FusionAuth administrative user interface, the specified form is used.
Limiting User Access to the FusionAuth UI
Using custom admin forms lets users access the FusionAuth web interface to manage custom user and registration data. But perhaps you don’t want to expose all of the FusionAuth administrative user interface and configuration settings to employees who only need to be able to update user profile data?
FusionAuth roles to the rescue! The FusionAuth application has over 25 roles which offer fine grained control over its functionality. Whether you want to let people only manage themes or webhooks, consents or lambdas, roles let you lock down access.
Let’s build a user account which will only have user management access. After adding the account, if needed, edit the account’s FusionAuth registration and give them the user_manager role. With this role, they’ll be able to add and update users, but nothing else. To prevent privilege escalation, they won’t be able to modify their role or anyone else’s, however.
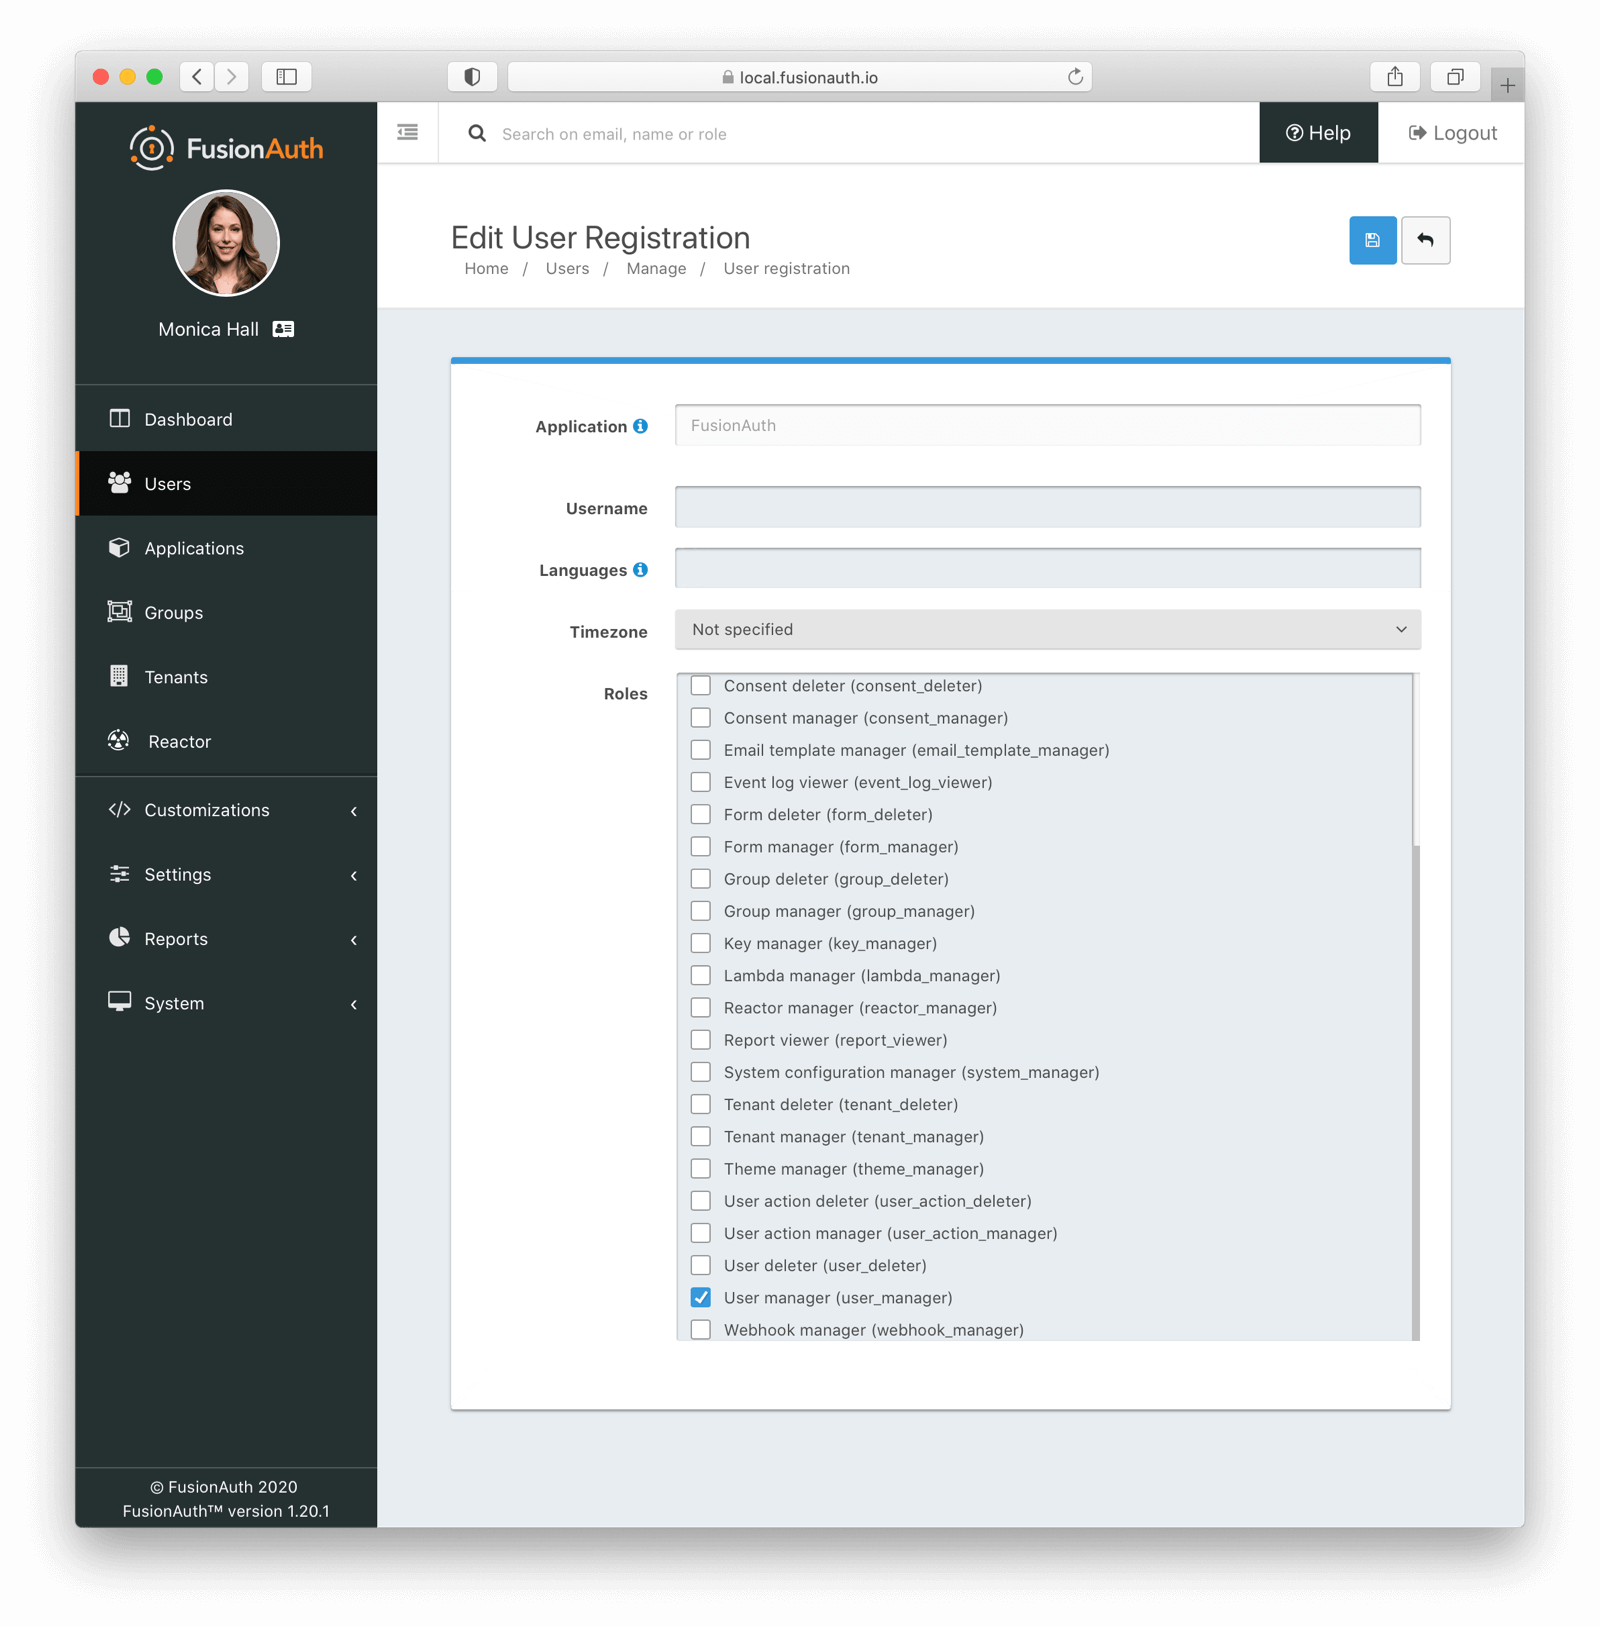
Check the user_manager checkbox and save the user. Next time they log in to the FusionAuth interface, they’ll see only what they have permissions for:
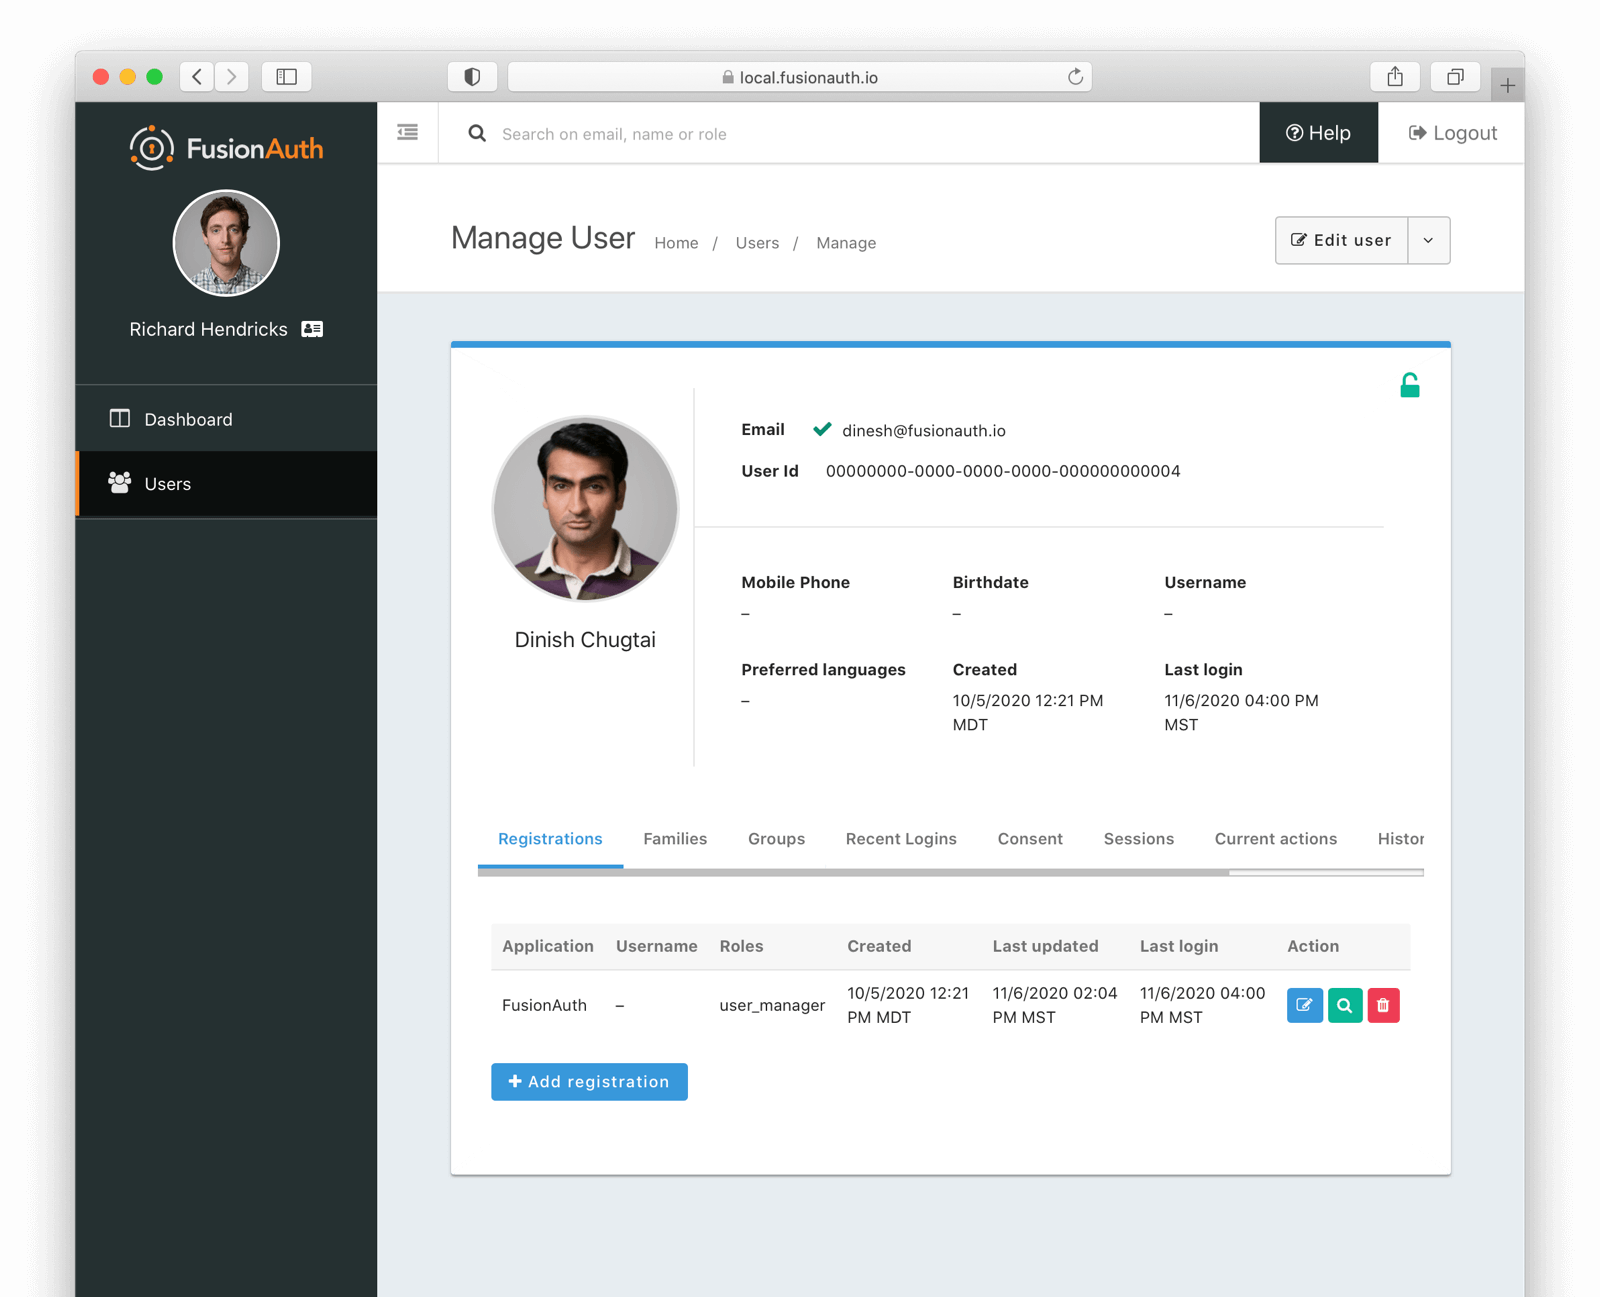
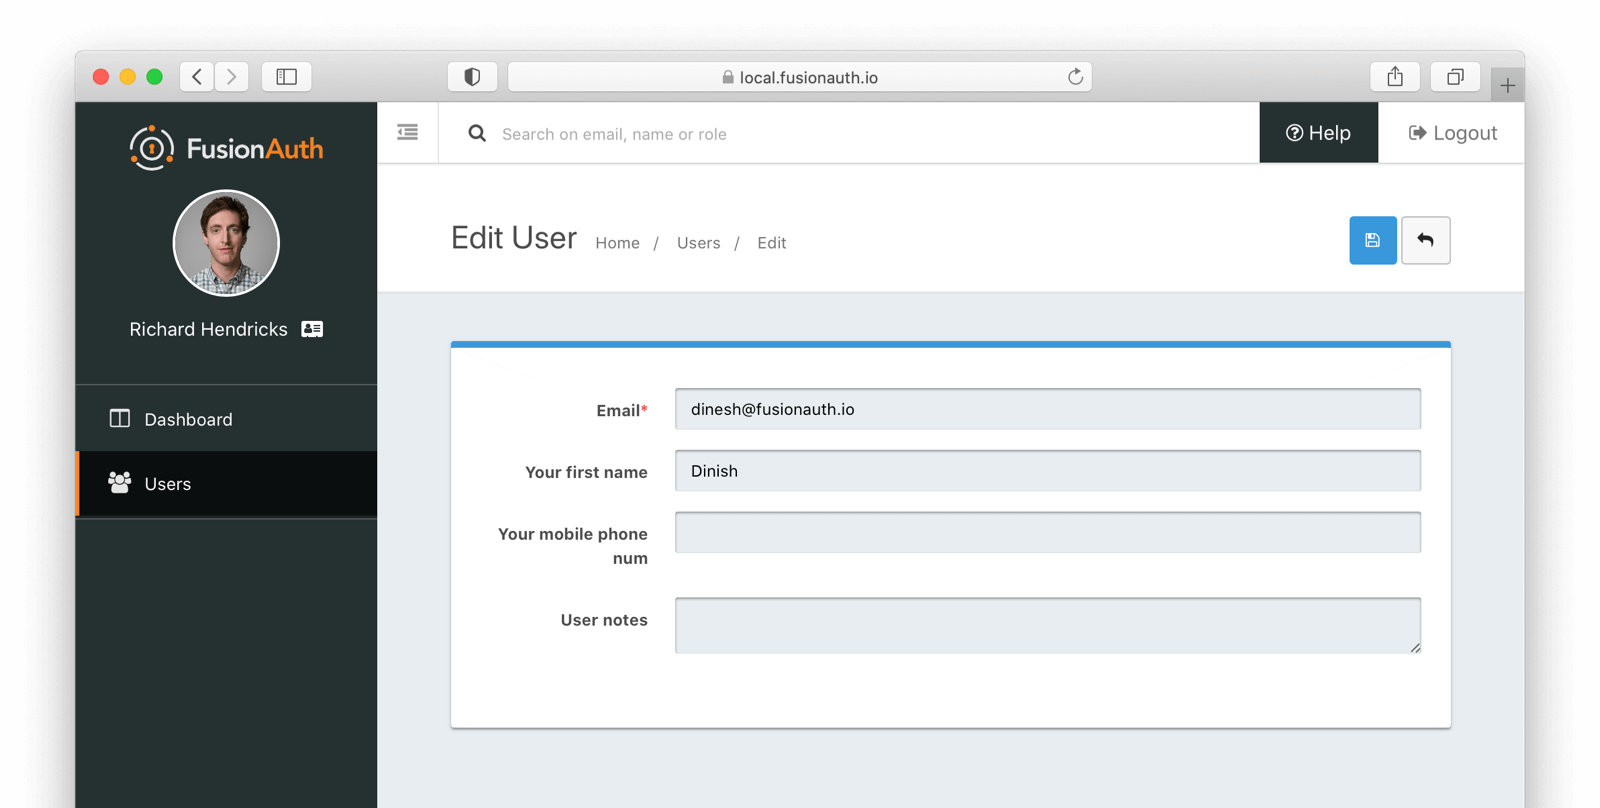
Log out of your admin account and sign into this user manager account. When you edit a user, you can see the edit screen shows the fields you added to the form above:
The same is true for adding or editing a registration for the application:

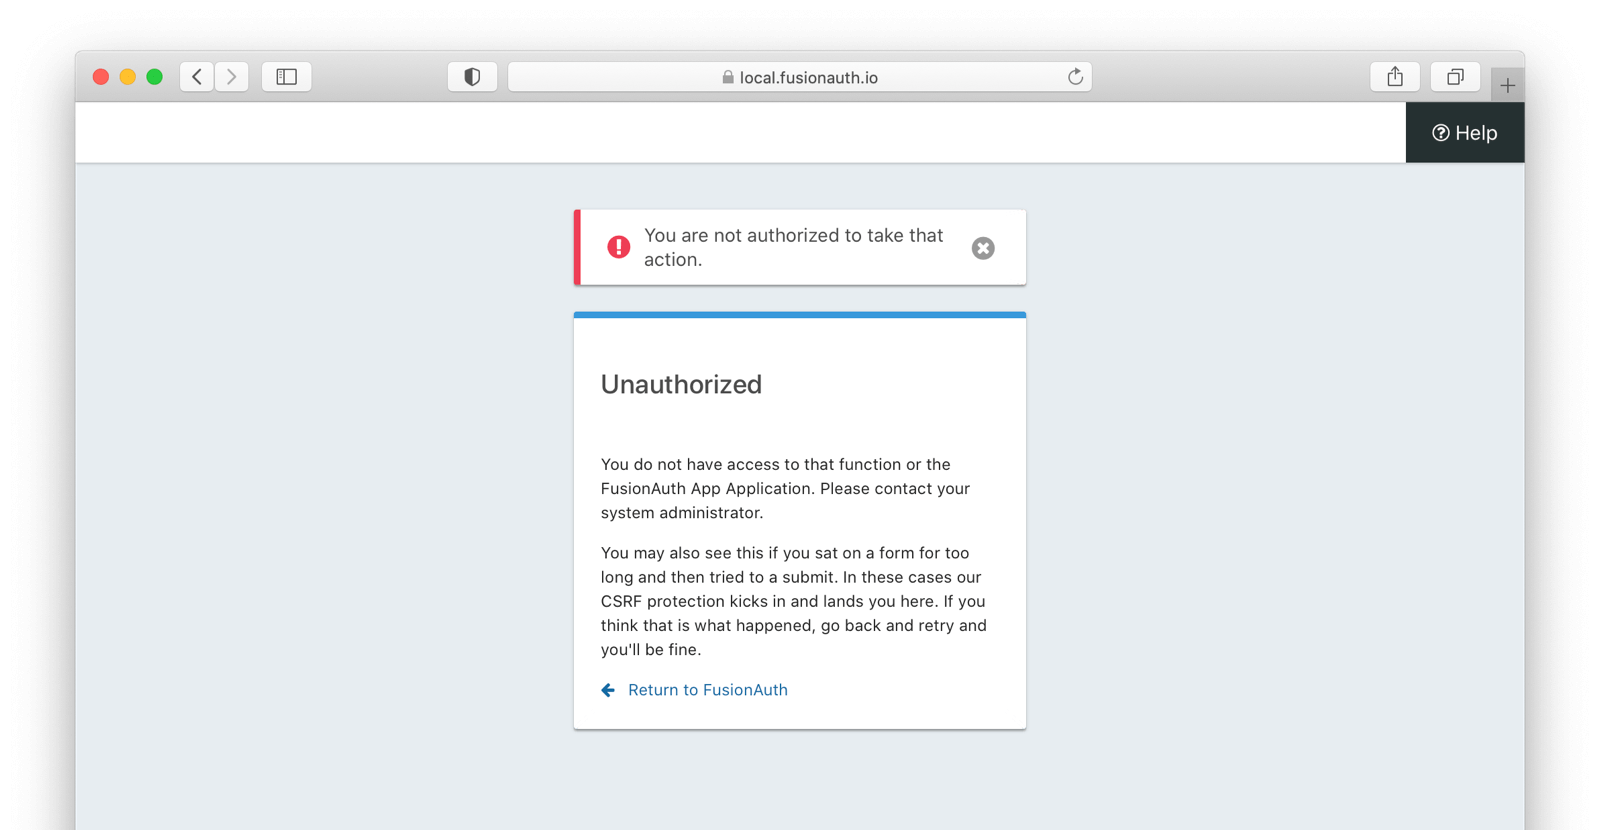
If a user manager edits the URL to try to access other admin areas, they’ll see a message letting them know that access is not authorized:
Using the API to Manage Forms
You can use the form fields and forms APIs to manage advanced registration forms. Using the API allows for migration of form configuration between environments as well as the dynamic creation of registration forms for new applications.
For instance, if you had a private labelled application, you might want to allow an administrator to control which fields were required at registration without allowing them access to the FusionAuth administrative interface. Building a custom interface and calling the FusionAuth APIs to assemble the registration form and associate it with the application would accomplish this.
Consents
To associate an existing consent with a field, select a field of Self consent. See the Consent APIs for more information on user consents. Consents are rendered as a checkbox to the user in the registration from.
The consent field will have a name automatically generated based on the consent identifier. For example: consents['dd35541d-e725-4487-adba-5edbd3680fb8']. However, it can be referenced in the theme files. To add a label for the above consent, add this line to your messages file:
consents['dd35541d-e725-4487-adba-5edbd3680fb8']=I consent to sharing my data with affiliated companiesEmail Localization
Emails are localized based on the user preferred language attributes. Learn more here about the different ways FusionAuth localizes content.
Using advanced registration forms, you can set this attribute on registration. FusionAuth will then localize any initial emails, such as a password setup or email verification email.
To do so, add a custom field to your form setting the user.preferredLanguages field. You can use the default one that ships with FusionAuth, as below.
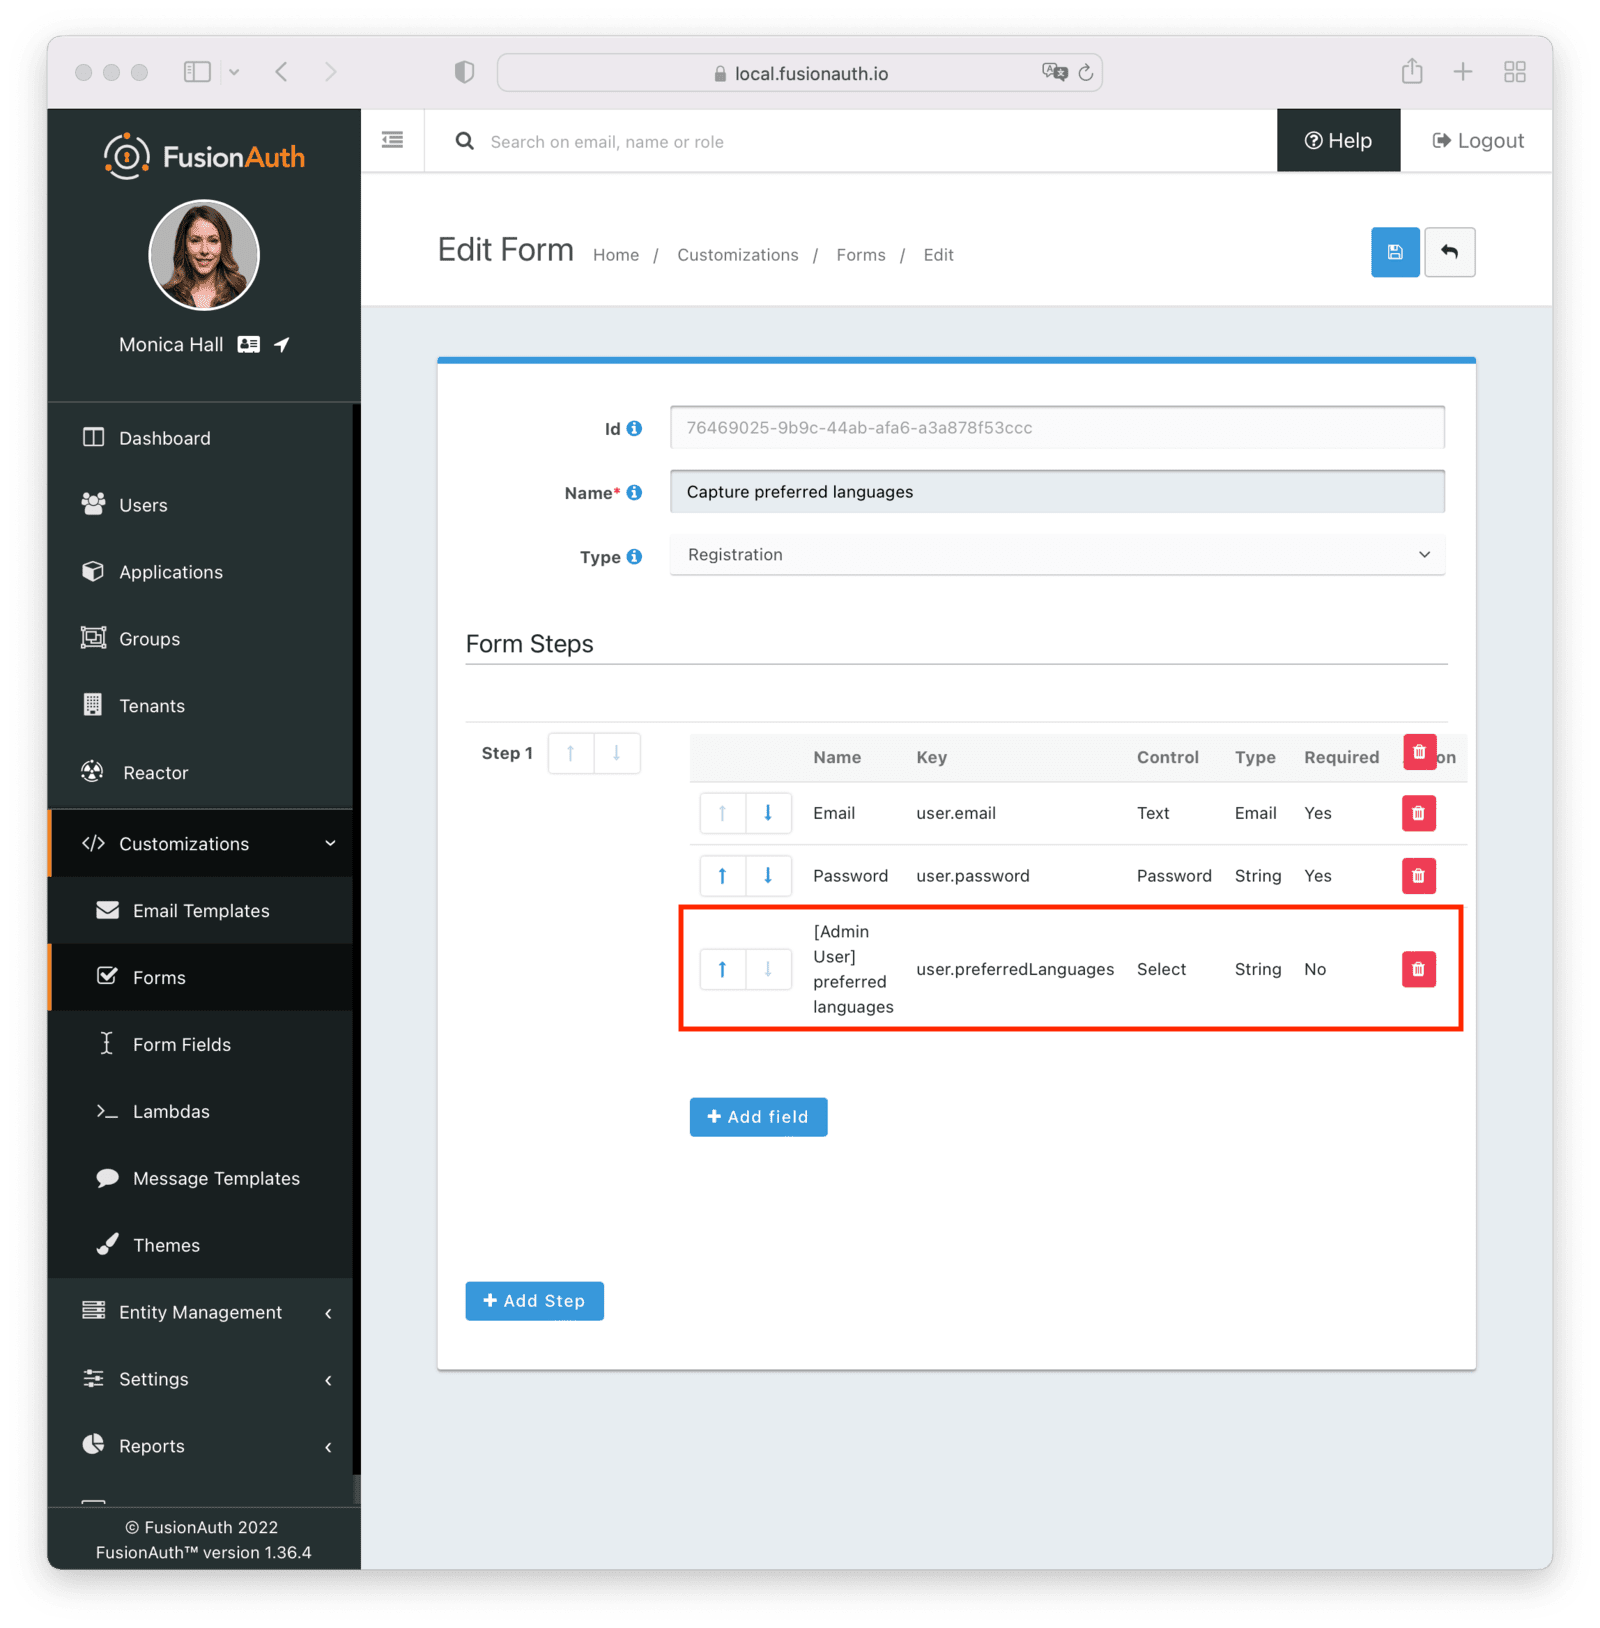
This will build a select box with a list of all supported locales. If you’d prefer to limit it to a certain subset, copy the default field and edit the allowed values.
You may also add this as a hidden field and set it via JavaScript if you’d rather not display the dropdown.
Form Fields and Validation
Making sure user registration data meets your quality requirements is important. FusionAuth provides multiple ways to validate user input during the registration process.
Any validation failure will prevent the user from moving past the current registration step. The theme controls the location and display of error messages. All validation for advanced registration forms are either browser native or server side. If you’d like to add client side validation, you may inject JavaScript validation libraries and code into your login templates.
Form Control
If your field uses a form control with a limited set of options, such as a radio button or select dropdown, the user will be forced to choose from that set of options.
Form field control options are documented in the form field API documentation.
Data Type
You can configure a form field to use one of the non-String data types. Doing so means the form field will require the user to enter data acceptable to that data type. For instance, if a form field has a data type of Number, any non-numeric value will result in an error message.
Form field data type options are thoroughly documented in the form field API documentation.
The Required Attribute
If a field is configured to be required , a valid value must be provided. Otherwise an empty string is a valid value.
The Confirm Value Attribute
If a field is configured to have a Confirm value , a second input field of the same type and control will be added to the form. This confirmation field will be displayed just below the original field, but the location can be customized by modifying the theme.
The form will fail validation unless the same value is entered in both fields.
Regular Expression Validation
If Validation is enabled, a regular expression must be specified. The user input will be matched against the regular expression and validation will fail if it doesn’t match. See the Java Regular Expression documentation for more information on how to build such a regular expression.
Lambda Validation
If you need to perform more complex validation of the registration form, use this lambda Self-Service Registration Validation lambda. If you are on a plan which includes HTTP Lambda Connect, you can also make fetch calls to external APIs if needed to validate a registration.
Special Considerations
Searching on User Data
All data stored in the registration.data and user.data fields is indexed if you are using the Elasticsearch search engine. You may use the User Search API to search against these values.
For example, if you wanted to find all the users with a minprice value between 50000 and 100000, you could use this Elasticsearch query:
Example JSON for the query parameter to search for users with a given house hunting price range
{
  "bool": {
    "must": [
      {
        "nested": {
          "path": "registrations",
          "query": {
            "range": {
              "registrations.data.minprice": {
                "gte": 50000,
                "lte": 100000
              }
            }
          }
        }
      }
    ]
  }
}
Adding Required Fields Later
Once you enable self service registration, the authentication flow is:
Authorize -> Complete Registration -> RedirectEvery time a user authenticates using the hosted login pages, FusionAuth ensures their registration is complete.
If you add a required field to the application’s registration form after users have registered, the next time one of the users authenticates using the hosted login pages, they’ll be sent to the registration form to fill out the required field. The OAuth complete registration template will be used in this scenario.
If you have required registration fields and the user authenticates via a single sign-on method, such as Google or SAML, and all the required fields are not provided, then the user will be dropped into your registration form.
You can avoid this for users logging in with an Identity Provider by providing all required profile fields in a lambda.
Modifying an Existing Form Field
You cannot change the underlying field, control or data type of an existing form field. Other attributes may be modified.
If you need to change the data type or form control of a field, create a new one. Duplicate the form field and update the form to use the duplicate.
Changing data types for the same underlying key into registration.data or user.data is problematic if you are using Elasticsearch and may require manual updates of the index. It is recommended that you change the key name if you must change the data type of a form field.
For example, if you wanted to modify the real estate search form to have the minimum price be a drop down instead of a numeric input field, duplicate the existing form field and modify the control. Then update the form to use the new form field.
Registration With Other Identity Providers
If you have an advanced registration form, but allow for a user to register with an external identity provider, such as Facebook or Active Directory, FusionAuth will drop the user into the registration flow after the external provider returns.
Assume you’ve enabled the Facebook identity provider and allowed for registration with that provider. Also, assume you’ve created a registration form with three steps. The first step contains optional fields, and the second step contains required fields.
After a user signs up with Facebook, they’ll be dropped back into the registration flow on the second step. They’ll be required to complete the registration from the second step onward before they are fully registered.
Hidden Fields
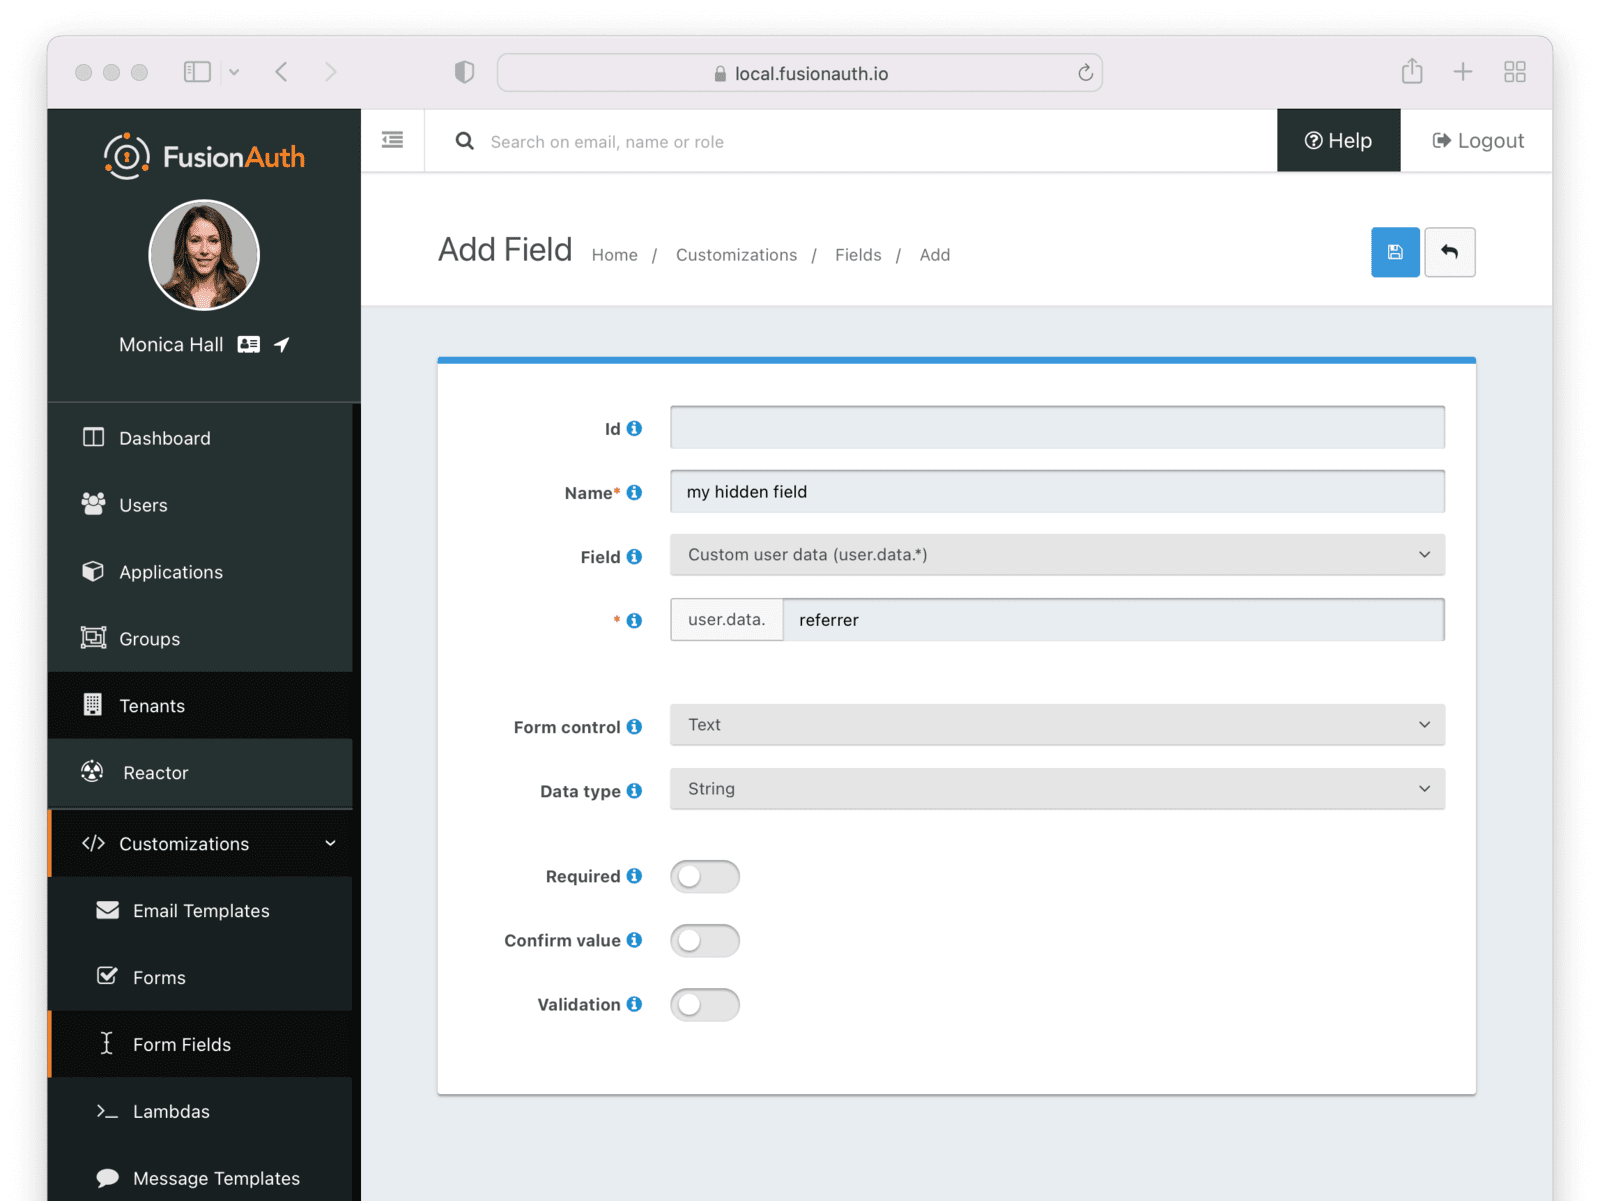
You may create form fields in an advanced registration form that capture information about a user, such as a referrer, using hidden fields.
To do so:
- create the form field. You can set the cont
- add it to the form
- modify your theme to not display the form field
Modify the Freemarker code which generates the registration form to do this. The customField macro generates the HTML, so you could modify it like so:
Generating a hidden field
[#if field.key == "user.data.referrer"]
  <input id="user_data_referrer" type="hidden" name="user.data.referrer">
[/#if]
Note that the field Id has all periods replaced with underscores. That is expected by the form processing logic.
Set the field value using JavaScript:
Setting a hidden field
document.getElementById("user_data_referrer").value = "value";Self-Service Registration and Registrations
When you enable self-service registration for an application and a user who does not have a registration for that application successfully logs in to that application, the user will automatically be registered for that application, and have a registration added.
Let’s walk through a scenario. Suppose you have three applications:
- Hooli Jobs
- Pied Piper Video Chat, which has self-service registration enabled
- Pied Piper Email Service, which does not have self-service registration enabled
User richard@piedpiper.com has a valid account, and has a registration for the Hooli Jobs.
When Richard tries to log into Pied Piper Video Chat, he is able to log in. He is automatically registered for this application, since self service registration is turned on for it. Therefore the applicationId claim is present in the token and any default roles are associated with his account.
When Richard tries to log into Pied Piper Email Service, he is able to log in, since he has a valid account in the tenant. But Richard is not registered for the application. Therefore no roles are associated with him and the applicationId claim is not present.
You can read more about authentication vs authorization and registrations.
Customizing The Admin UI Forms
You can also use custom form fields and forms to tailor your admin UI.
The User Form
This form is what you see when you are adding or editing a user in the admin UI. This is configurable at the Tenant level.
If you need to capture and validate custom data, you can do so by creating a form field, by navigating to Customizations -> Form Fields . You should create any needed fields before you create a form. Otherwise you can use the standard form fields.
Create a form, by navigating to Customizations -> Forms . Select Admin User as the type. Add the needed sections and fields.
You should modify your theme to add labels for these custom fields for proper display in the admin UI. For example, if you added a field stored in user.data.favoriteColor, you’d add the following key to the messages file of your theme to add a label of Favorite Color to the field in the admin UI.
user.data.favoriteColor=Favorite ColorThis field is not localizable, so you’ll only need to modify the default messages file. Learn more about modifying the messages file in your theme.
You can also add a tooltip by adding a related key to the messages file:
{tooltip}user.data.favoriteColor=A user's favorite color. This is used to generate a custom logo with the correct color scheme.Configure the FusionAuth admin UI to use these forms by navigating to Tenants -> Your Tenant -> General and then to the Form settings section. Set the Admin user form field to your new form.
Learn more in the Tenant documentation.
The Registration Form
This form is what you see when you are adding or editing a user registration to an application using the admin UI. This is configurable at the Application level.
If you need to capture and validate custom data, you can do so by creating a form field, by navigating to Customizations -> Form Fields . You should create any needed fields before you create a form. Otherwise you can use the standard form fields.
Create a form, by navigating to Customizations -> Forms . Select Admin Registration as the type. Add the needed sections and fields.
You should modify your theme to add labels for these custom fields for proper display in the admin UI. For example, if you added a field stored in registration.data.backgroundColor, you’d add the following key to the messages file of your theme to add a label of Desired Background Color to the field in the admin UI.
registration.data.backgroundColor=Desired Background ColorYou can also add a tooltip by adding a related key to the messages file:
{tooltip}registration.data.backgroundColor=The desired background color. This will be used in the application and should be a hex code.This field is not localizable, so you’ll only need to modify the default messages file. Learn more about modifying the messages file in your theme.
Then, configure the FusionAuth admin UI to use these forms by navigating to Applications -> Your Application -> Registration and then to the Form settings section. Set the Admin Registration field to your new form.
Learn more in the Application documentation.