Apple
Overview
Available since 1.17.0
Adding a Sign in with Apple button to FusionAuth is straightforward and this guide will walk you through the steps necessary to collect the configuration details from your Apple Developer account to enable this social login.
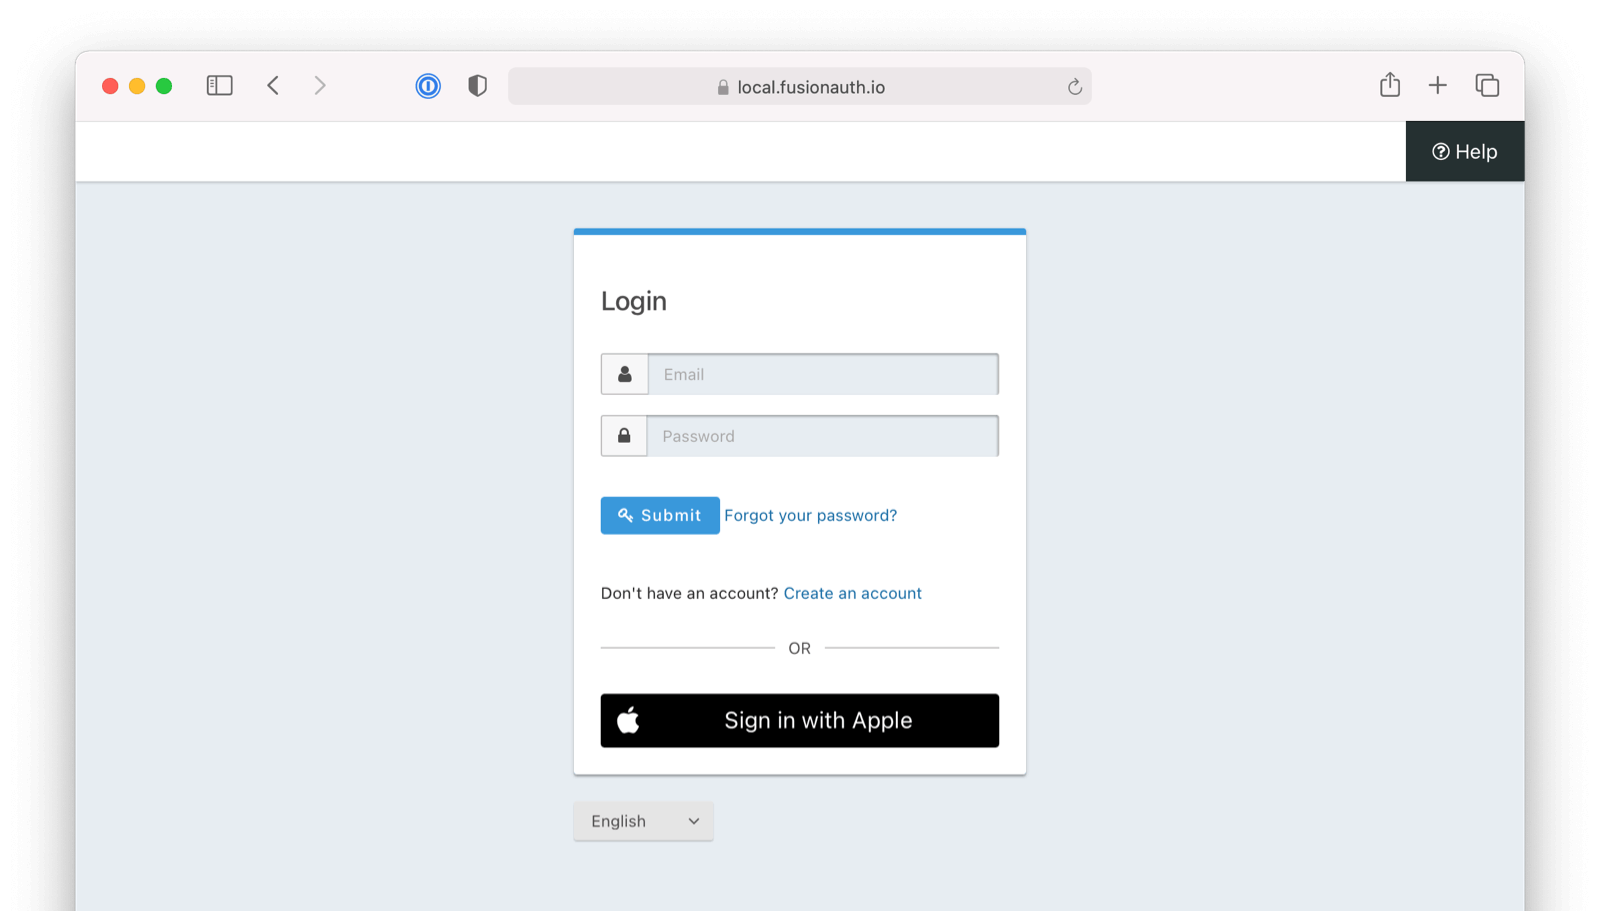
Once you have completed this configuration, you will be able to enable the “Sign in with Apple” login button for one or more FusionAuth applications. Below is an example login page with the Apple Identity Provider enabled.
Here's a diagram of the login flow between:
- the user
- your application
- FusionAuth and
- a remote identity provider such as Apple
Logging In Using Apple
Although this looks complex, the user only sees a few screens, such as the FusionAuth login screen, the Apple login screen, and your application.
Create an Apple Developer Account
Ensure you have an Apple Developer account and then navigate to your Apple Developer account.
If you do not yet have an Apple Developer account, please do this now. Once you have logged in to Apple and obtained access to your Apple Developer account, continue to the next step.
Configure your Apple Developer Account
If you already have an App ID, Services ID, and key configured for Sign in with Apple, you can use these existing values. If you have yet to configure your Apple developer account for Sign in with Apple, complete the following steps.
Register a New App ID
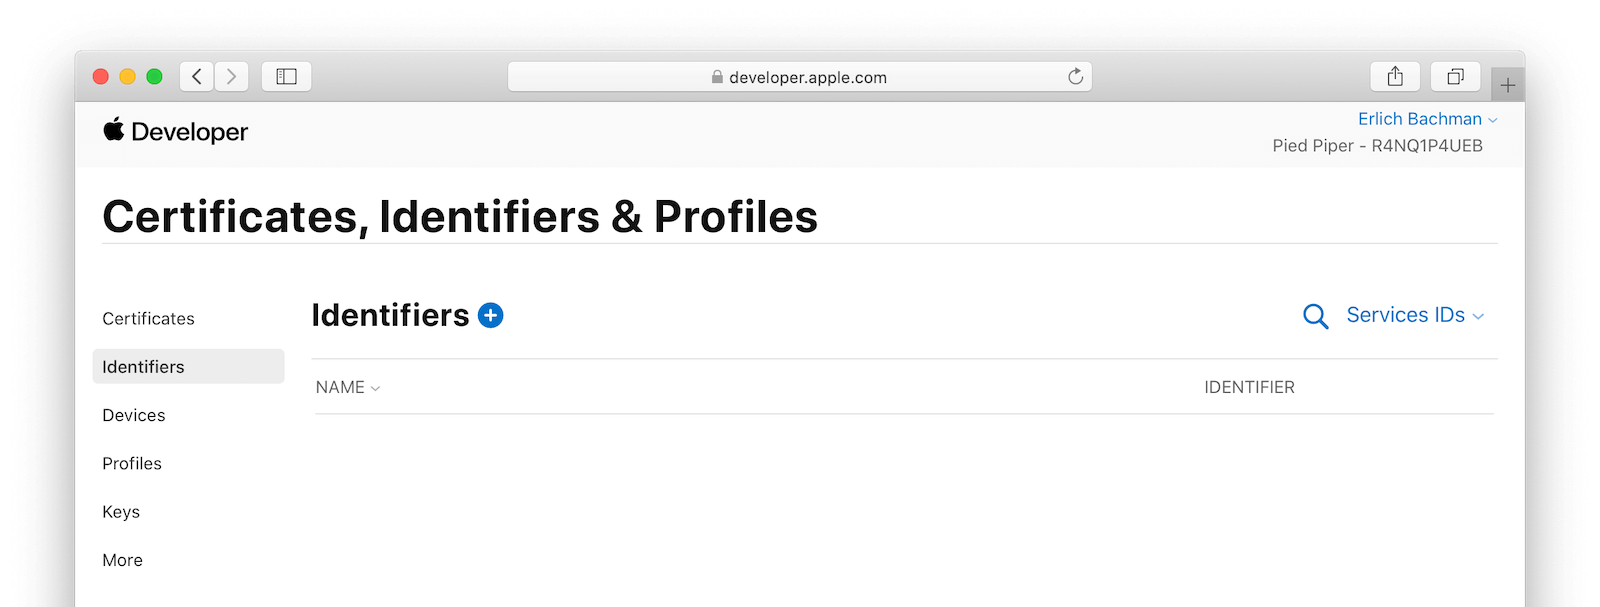
From your Apple Developer account, navigate to Certificates, Identifiers & Profiles and select Identifiers from the left column. Click on the plus icon to add a new identifier.
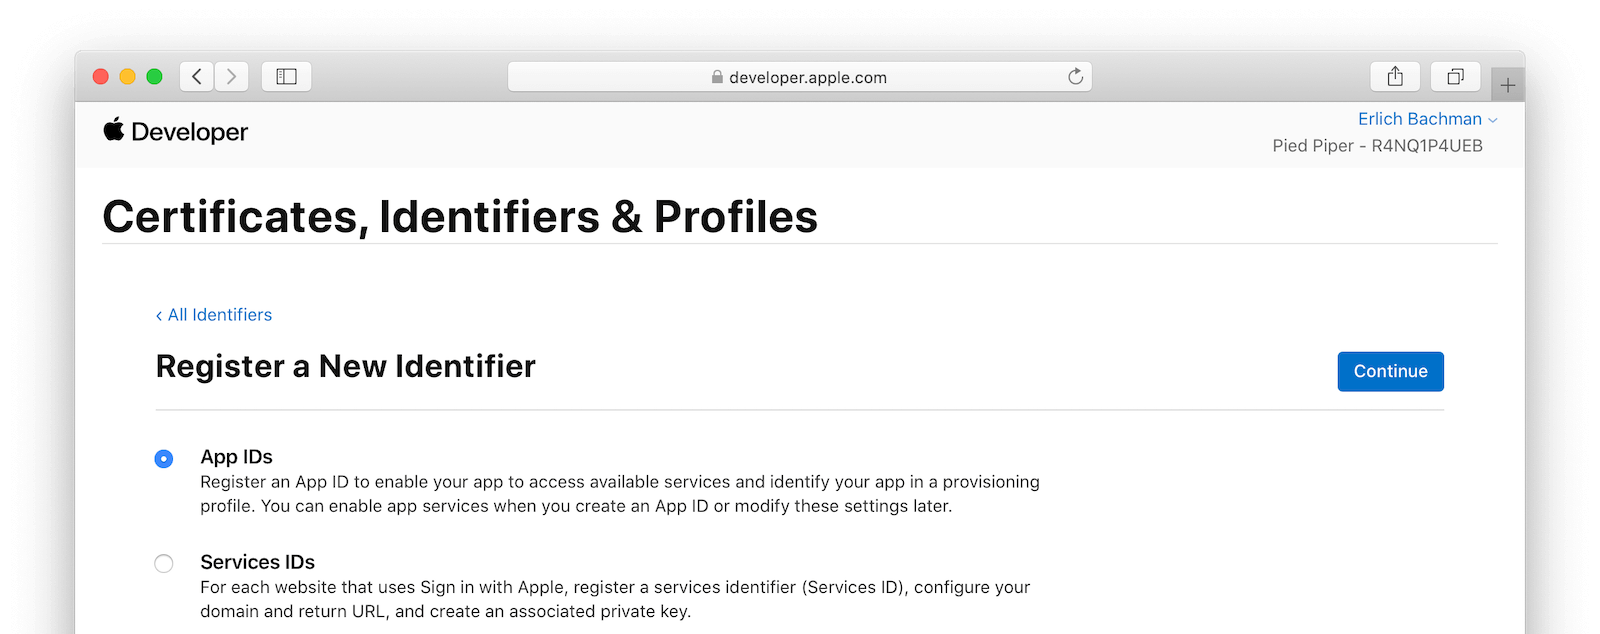
Select App IDs and click Continue. On the next panel, select type as App and click Continue. On the next panel, fill in the Description field, specify the Bundle ID, and select Sign in with Apple from the list of capabilities. Click Continue. On the next panel confirm your selection, make a note of the App ID Prefix (Team ID), and click Register. Select App IDs and click Continue. On the next panel, select type as App and click Continue. On the next panel, fill in the Description field, specify the Bundle ID and select Sign in with Apple from the list of capabilities. Click Continue. On the next panel confirm your selection, make a note of the App ID Prefix (Team ID), and click Register.
Register a New Services ID
From your Apple Developer account, navigate to Certificates, Identifiers & Profiles and select Identifiers from the left column. Click on the plus icon to add a new identifier.
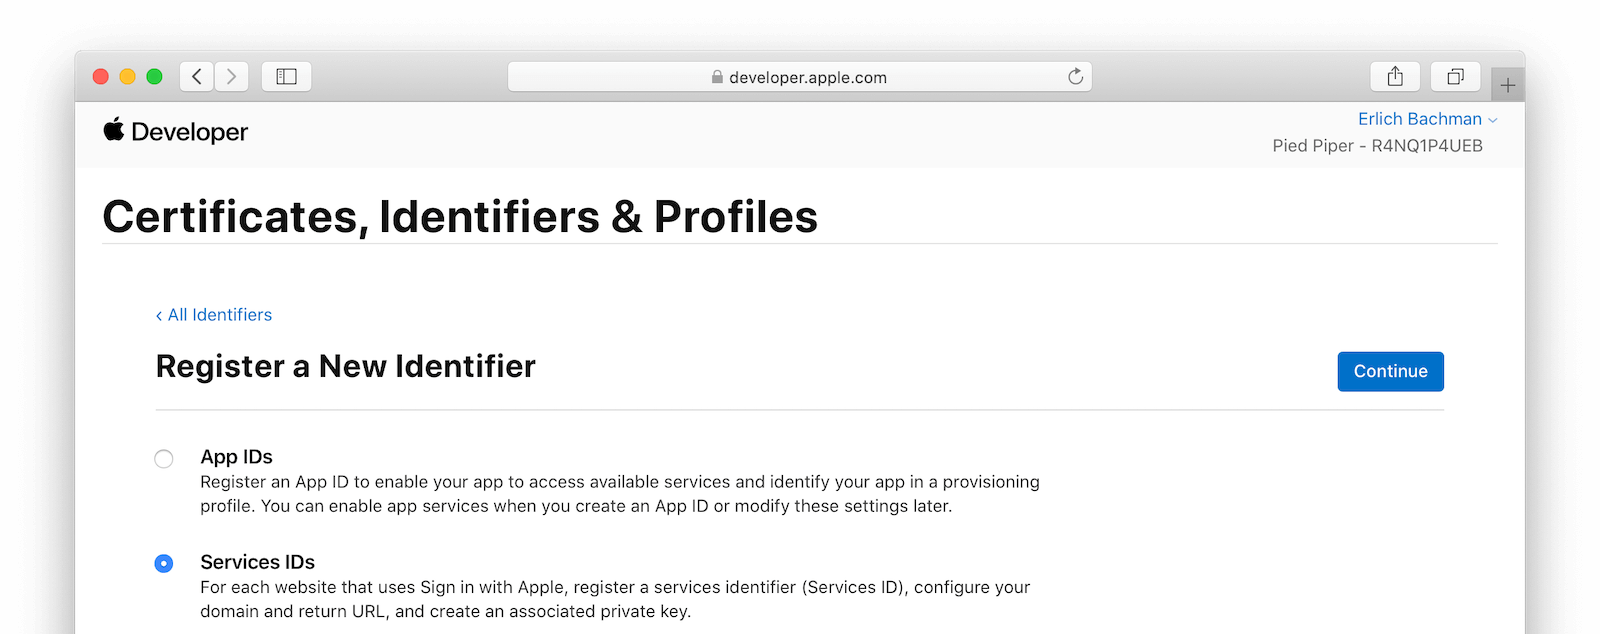
Select Services IDs and click Continue. On the next panel, fill in the Description and Identifier fields and click Continue. Complete this step by clicking “Register” on the following panel.
Edit your newly created Services ID, then enable and configure Sign In with Apple. Clicking the Configure button will open a Web Authentication Configuration panel. In this step, you will need to configure the application domain and Return URL of your FusionAuth service.
If you do not see the Domains and Subdomains and the Return URLs text input fields, click the plus icon next to Website URLs.
Next, enter your application domain and Return URL.
For example, if the FusionAuth URL is https://login.piedpiper.com then the origin would be login.piedpiper.com. The Return URL is the FusionAuth URL with a path of /oauth2/callback, so in this example, the return URL would be https://login.piedpiper.com/oauth2/callback. Note that Apple expects a secure (https) URL, so an http endpoint won’t work, even in development or test environments.
Additional domains and return URLs may be added at a later time too. Once you have completed this configuration, save your changes and click Continue. Confirm your changes to the Services ID by clicking “Save”.
Register a New Key
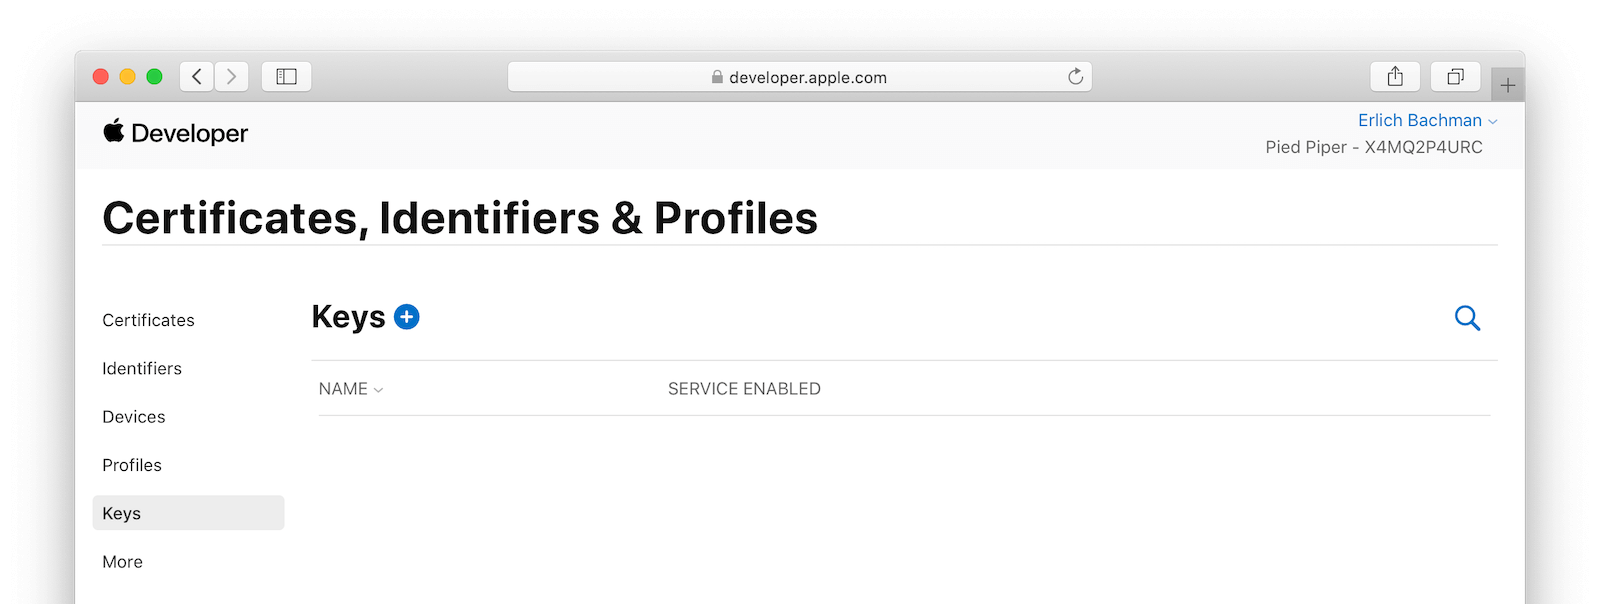
From your Apple Developer account, navigate to Certificates, Identifiers & Profiles and select Keys from the left column. Click on the plus icon to add a new key.
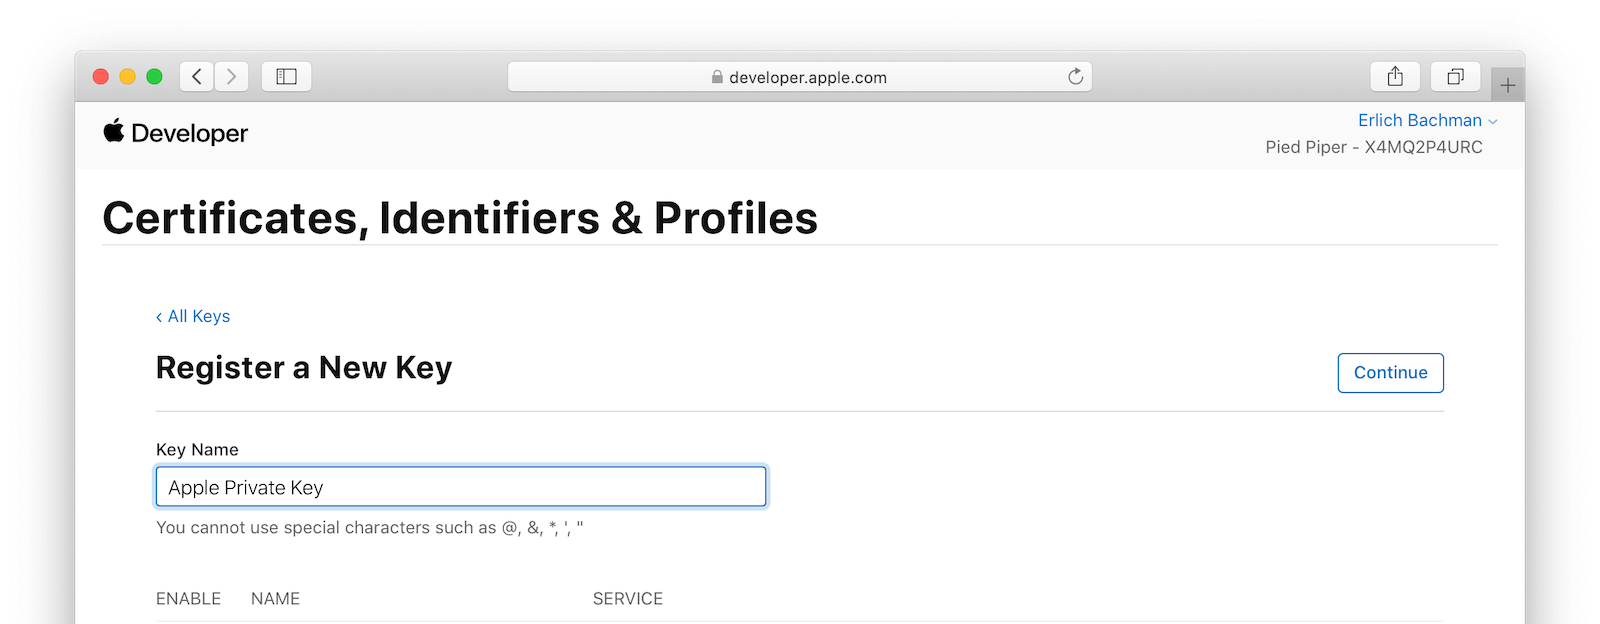
Enter a name for your key.

Enable the Sign in with Apple checkbox, and then click the Configure button.
On the next panel select the previously created App ID and click Save. Click Continue and then confirm key registration by clicking “Register”. When prompted to download the key, do so and make a note of the Key ID.
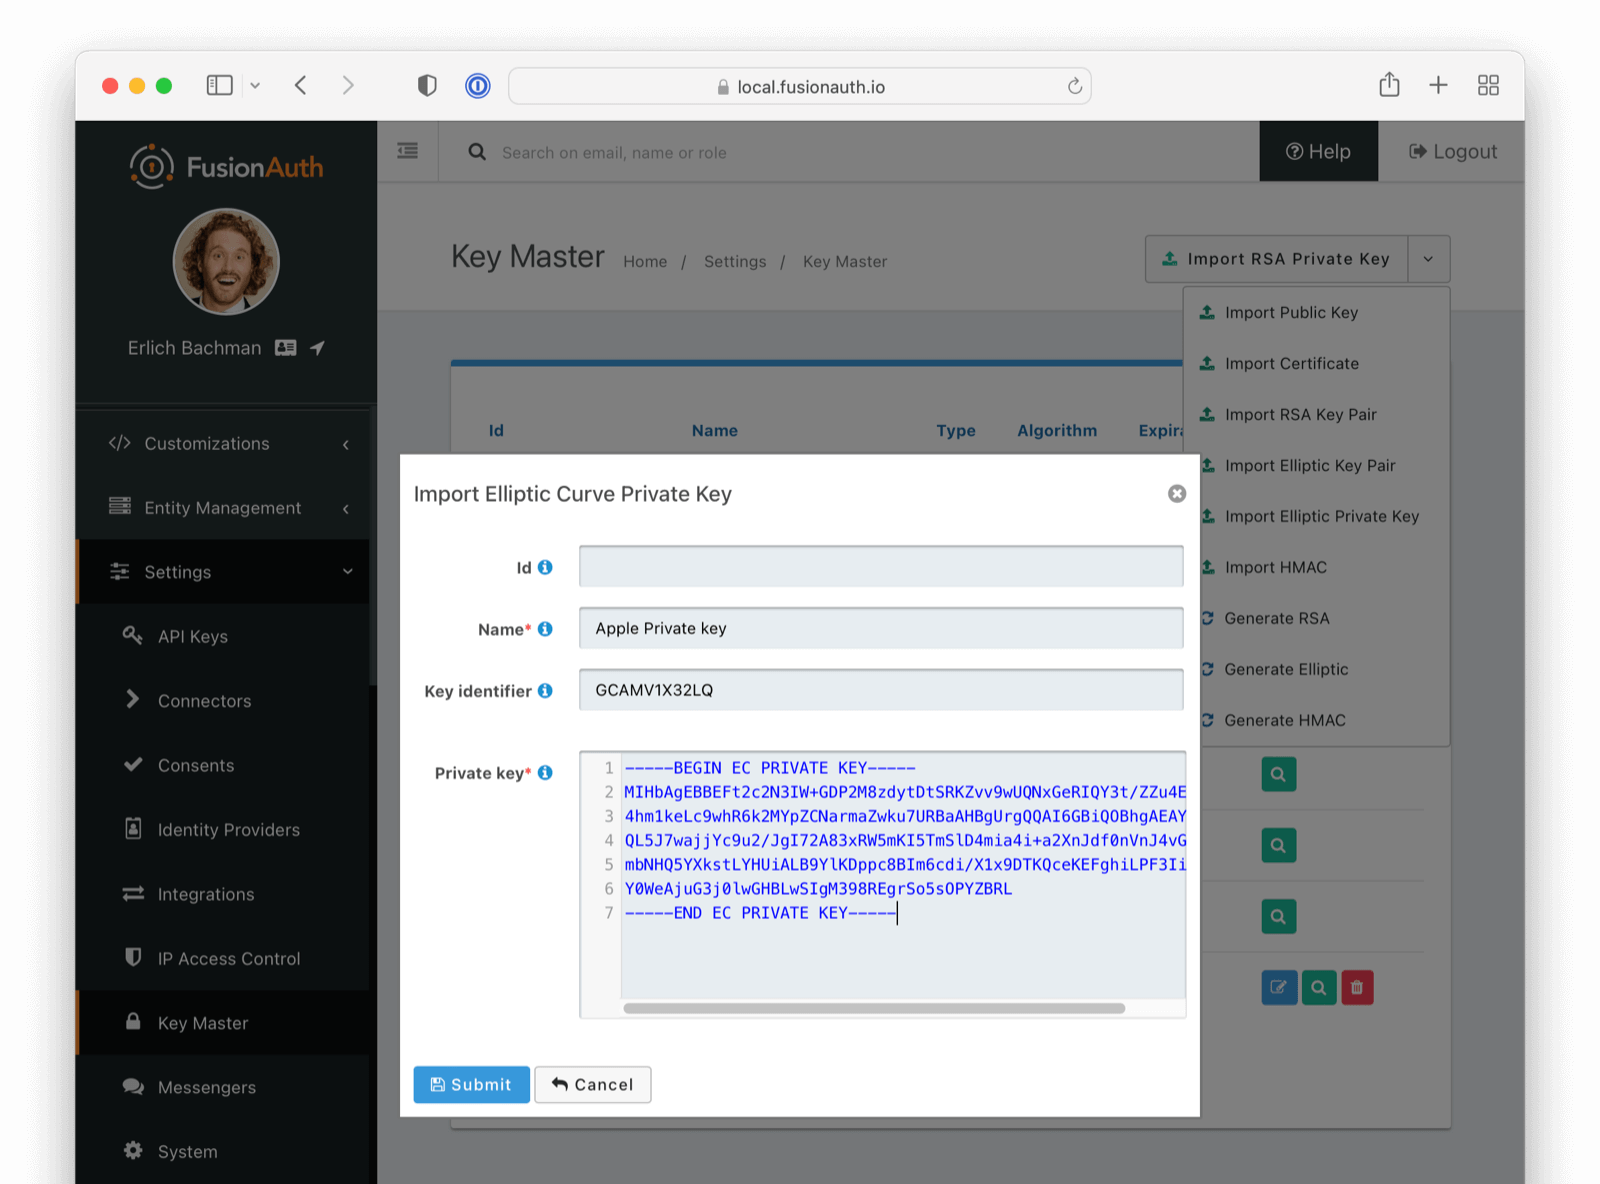
Import the Private Key
Now that we have completed the Apple application configuration, we can import the private key we collected in the previous step. Unless otherwise directed by Apple, you can assume the provided private key is using the Elliptic curve. To import the private key, navigate to Settings -> Key Master and select Import Elliptic Private Key from the actions in the top right.
Make sure you use the Key ID from the previous step for the Key identifier field.
Enter the Key ID from the previous step into the Key identifier field. Using a text editor, open the key file you downloaded in the previous step and copy the value into the Private key field.
Create an Apple Identity Provider in FusionAuth
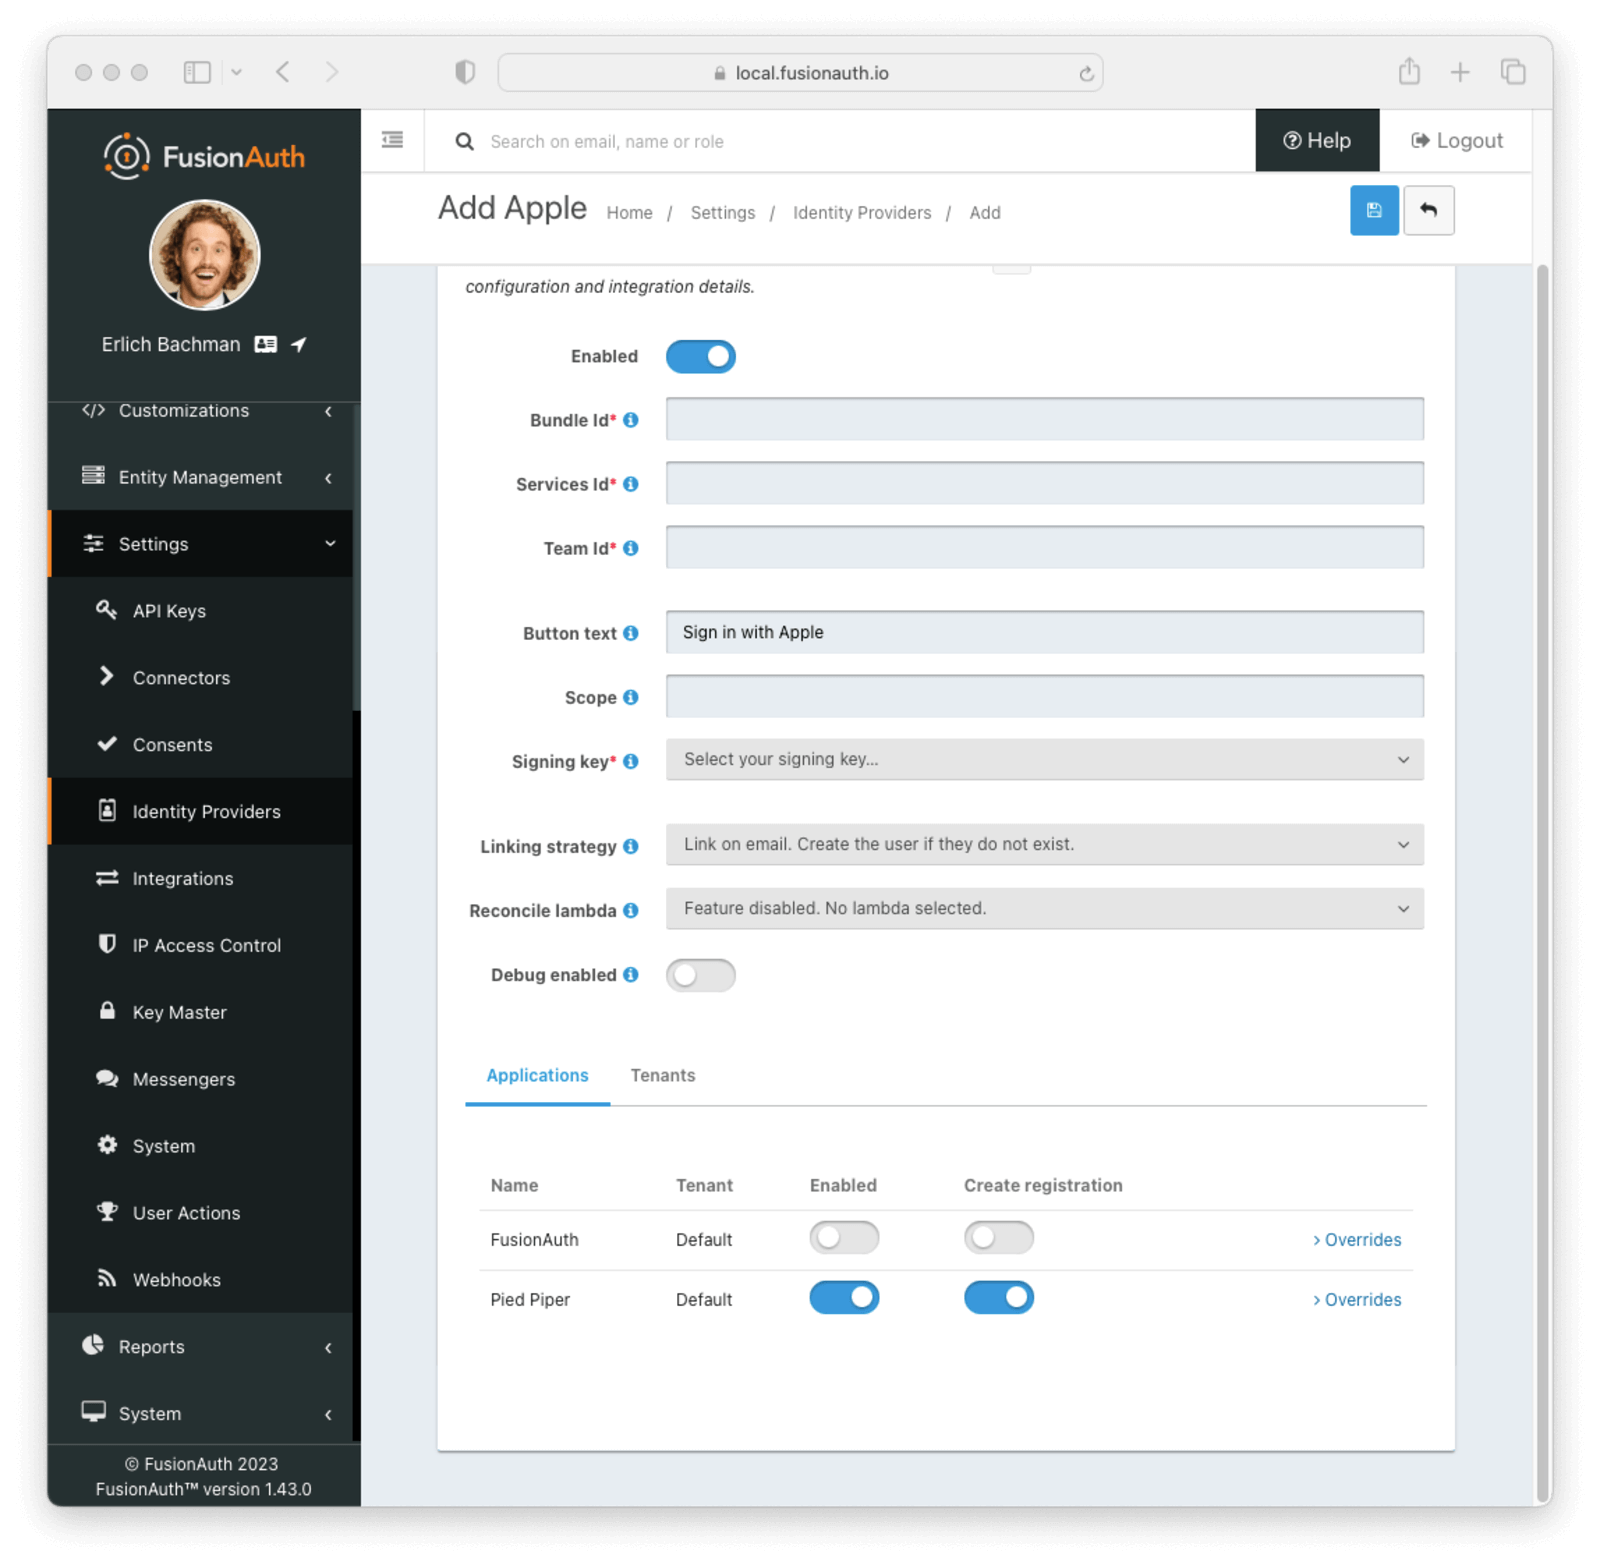
The next step is creating an Apple Identity Provider in FusionAuth. Switch to your FusionAuth portal and navigate to Settings -> Identity Providers and click Add Apple from the top right selection button.
This will take you to the Add Apple panel. Fill out the required fields using the values from your Apple Developer account. The button text is also required but it will be defaulted to “Sign in with Apple”. You may optionally modify this default value.
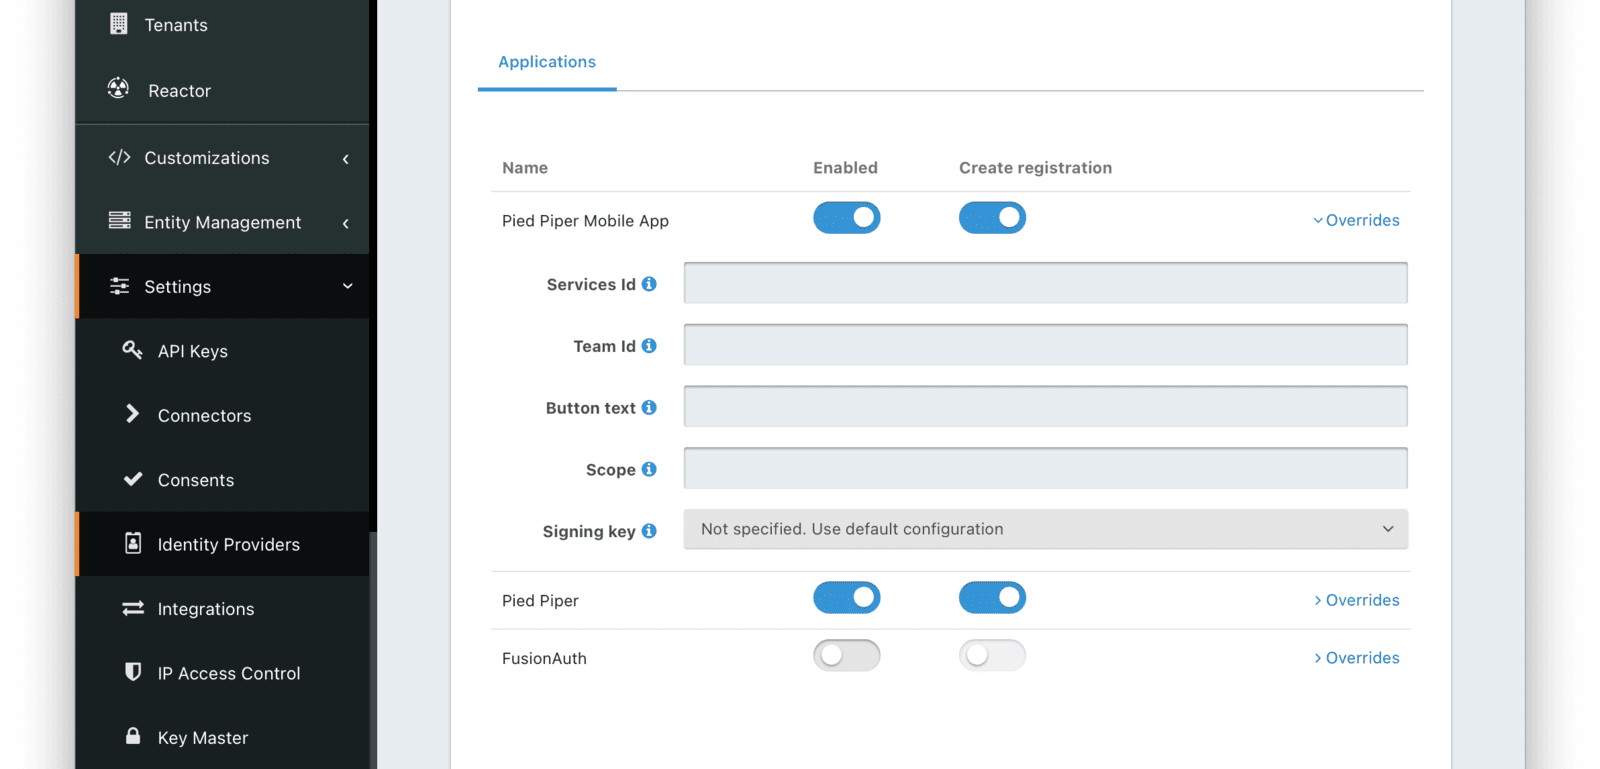
To enable this identity provider for an application, find your application name in the Applications configuration section at the bottom of this panel. You will always see the FusionAuth application, this application represents the FusionAuth administrative user interface. If you wish to be able to log into FusionAuth with this provider, you may enable this application.
In the following screenshot you will see that we have enabled this login provider for the Pied Piper application and enabled Create registration. Enabling create registration means that a user does not need to be manually registered for the application prior to using this login provider.
For example, when a new user attempts to log into Pied Piper using Apple, if their user does not exist in FusionAuth it will be created dynamically, and if the Create registration toggle has been enabled, the user will also be registered for Pied Piper and assigned any default roles assigned by the application.
If you do not wish to automatically provision a user for this application when logging in with Apple, leave Create registration off. You will need to manually register a user for this application before they may Sign in with Apple.
That's it, now the Sign in with Apple button will show up on the login page for the Pied Piper application.
Form Fields
Bundle IdAvailable since 1.43.0The Apple Bundle identifier found in your Apple Developer Account, which has been configured for Sign in with Apple.
From your Apple Developer account, navigate to Certificates, Identifiers & Profiles -> Identifiers -> App IDs
The configuration requires Bundle Id or Services Id . If Services Id is omitted, this field is required.
Services IdThe Apple Services identifier found in your Apple Developer Account, which has been configured for Sign in with Apple.
From your Apple Developer account, navigate to Certificates, Identifiers & Profiles -> Identifiers -> Services IDs
Available since 1.43.0 The configuration requires Bundle Id or Services Id . If Bundle Id is omitted, this field is required.
Team IdrequiredThe Apple App ID Prefix or Team ID found in your Apple Developer Account, which has been configured for Sign in with Apple.
From your Apple Developer account, navigate to Certificates, Identifiers & Profiles -> Identifiers -> App IDs
Button textrequiredThe text to be displayed in the button on the login form. This value is defaulted to “Sign in with Apple” but it can be changed to your preference.
ScopeThe optional scope value, which is a space-separated list of requested user attributes. You may request the User’s name, email, or both. If the linking strategy is set to Link on email, an email scope will be needed.
Example: name email
Signing keyrequiredThe private signing key provided by Apple, which will be used to sign the client secret when requesting an access token from Apple.
Linking strategyrequiredSee below for more detail. The linking strategy for the Apple provider. See Linking Strategies for more.
Reconcile LambdaA lambda can be used to map custom claims returned from Apple.
To configure a lambda, navigate to Customizations -> Lambdas .
Debug enabledEnable debug to create an event log to assist you in debugging integration errors.
Apple Private Mail Relay Configuration
When a user logs in with Apple, they will be provided an option to send their actual email address or an anonymous email address back to FusionAuth.
For example, if the user selects to use an anonymous email address, FusionAuth will receive an email address for that user that ends in @privaterelay.appleid.com. This email address may be used to communicate with the user, however it means that the email will be routed through Apple’s Private Email Relay service. To ensure your email is delivered, you will need to register your email domain and perform any necessary configuration with your SMTP service provider.
Some email service providers may provide documentation to assist you in making the necessary configuration changes. For example, the following article is provided by SendGrid to help you send email through Apple’s Private Email Relay.
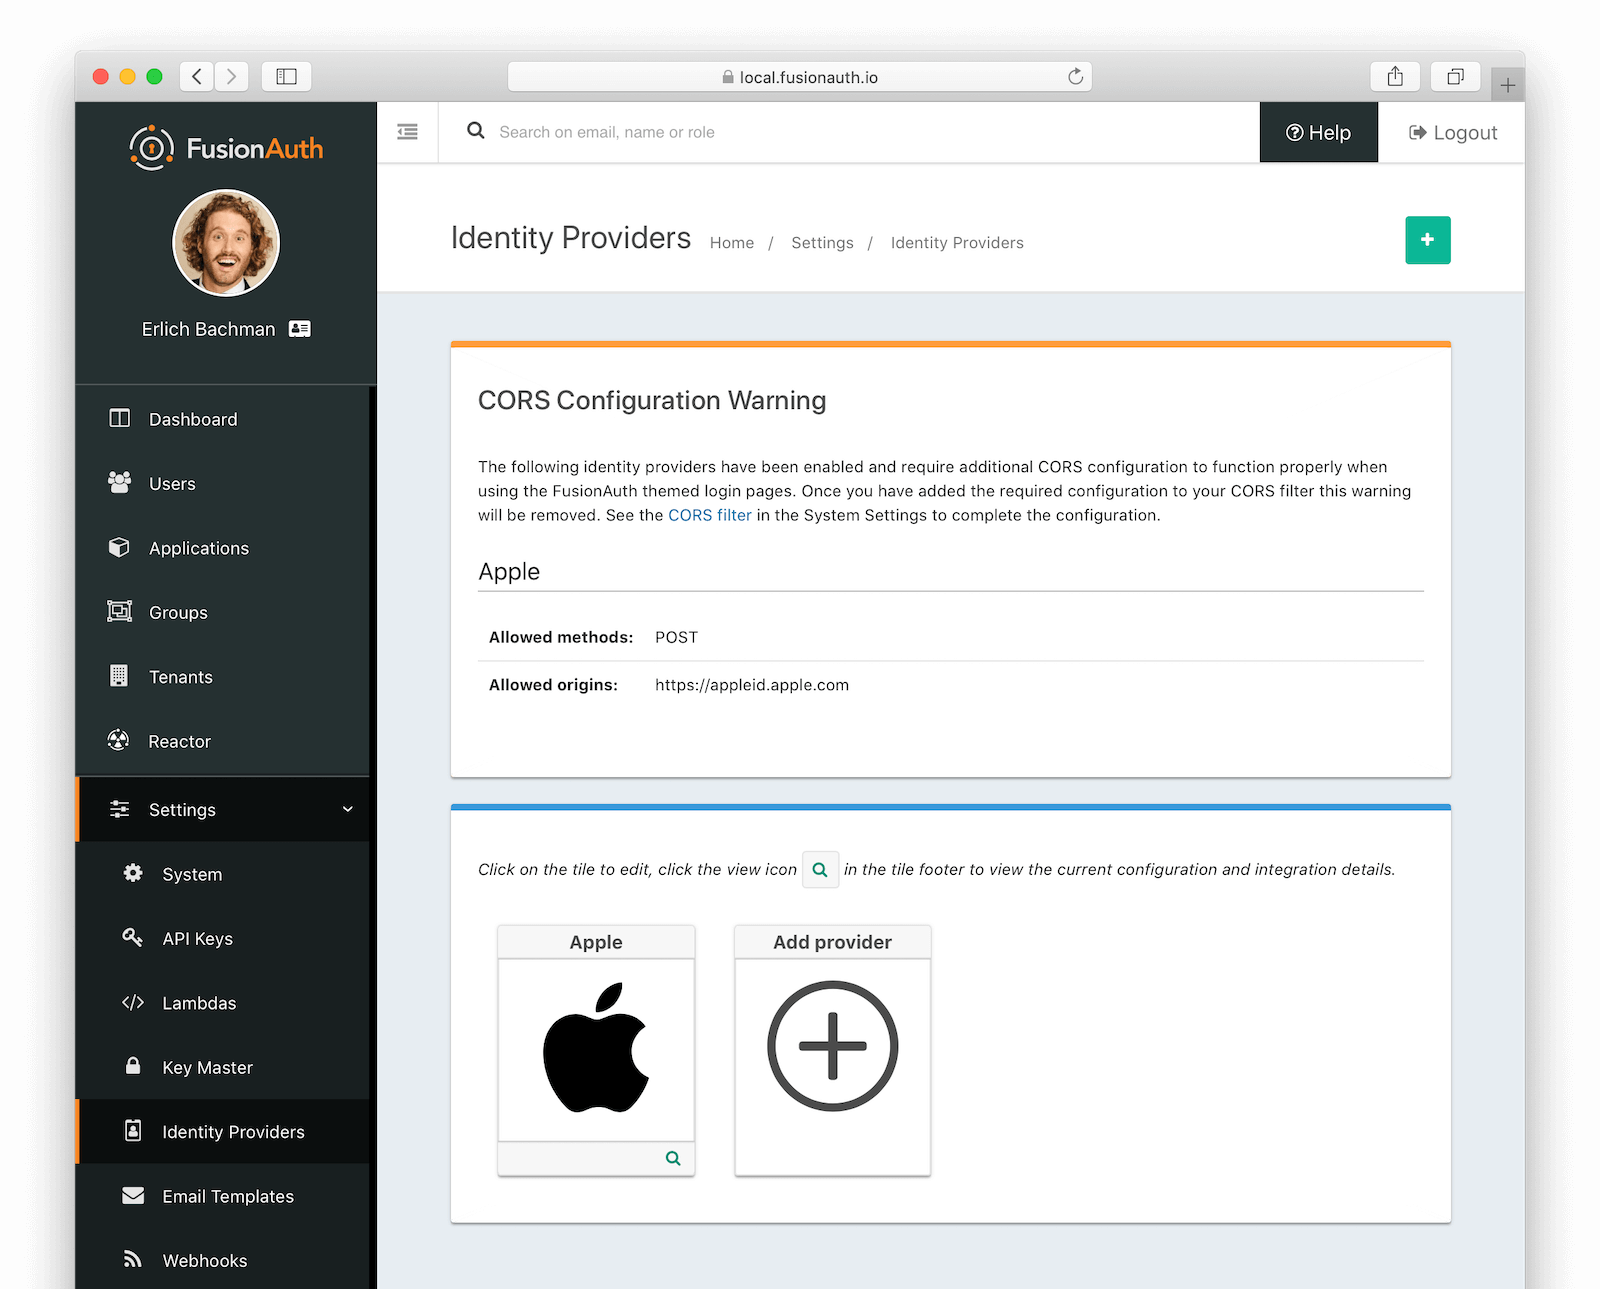
CORS Configuration
To complete the login request, Apple will make an HTTP POST request to the callback URL in FusionAuth. For this request to be allowed through the CORS filter you will need to navigate to Settings -> System -> CORS and add https://appleid.apple.com as an Allowed Origin in the CORS configuration.
Once you complete your Apple Identity Provider configuration, if your CORS configuration is not yet configured to allow the Apple login request to complete, you will be shown the following warning prompting you to complete the CORS configuration. See the CORS Filter reference for additional details on modifying the CORS configuration.
Troubleshooting CORS
If you receive a 403 status code in the browser console during login when using Safari, additional configuration is required. The redirect flow is slightly different between the browsers.
To resolve this issue, navigate to Settings -> System -> CORS and add the GET method to the Allowed methods .
Building Your Own Integration
If you are building your own login experience, you'll want to start the identity provider flow yourself and then complete the login.
You might do this if you are using the Login API rather than using the hosted FusionAuth login pages. Here's a diagram illustrating this login flow.
An Integration With The Apple Identity Provider Using The API
Completing the login is documented further in the API.
If you require a refresh token after completing the login, ensure Enable JWT Refresh is true in the application configuration. This is found in the administrative user interface by navigating to Applications -> Your Application -> Security -> Login API settings .
Supporting Web and Mobile
Starting with version 1.43.0, FusionAuth supports web and mobile Sign in with Apple using a single IdP configuration.
If you are using version 1.43.0 or later, follow the directions in Using Bundle Id. For versions prior to 1.43.0, follow the directions in Using Services Id with Application Overrides.
Using Bundle Id
Supporting Sign in with Apple from both web and mobile applications in version 1.43.0 or later no longer requires multiple applications.
- Services Id is the Apple Services ID used for web applications
- Bundle Id is the Apple Bundle ID used for native applications
Configure one or both of the Services Id and Bundle Id fields as needed. If you are only supporting a native app, use Bundle Id and leave Services Id blank. If only a webapp, use Services Id and leave Bundle Id blank. If your application is both a native and a web application, configure both the Bundle Id and Services Id fields.
You can still override the configuration for either field on a per-application basis.
The login API request from a native application needs to include data.isNativeApp with a string value of "true". This configuration will use the Bundle Id from the Apple IdP configuration rather than Services Id .
Using Services Id with Application Overrides
If you are supporting Sign in with Apple from both web and mobile applications prior to version 1.43.0, two configurations are required, with slightly different values.
- For web applications, the Services Id is the Apple Services ID.
- For mobile applications, the Services Id is the Apple Bundle ID.
However, you can’t have more than one Apple Identity Provider for a single application configuration.
To support both mobile and web users, create two applications in FusionAuth. Enable the Apple Identity Provider for each application. Finally, use the Overrides section to set the Services Id to the correct value.
You’ll typically register a user for both applications whenever a user signs in with Apple, which you can do using a User Registration Complete webhook.
Troubleshooting
Key Import Error
If you see the following error in the UI:
A request to the Apple Token API has failed. Unable to complete this login request.And this error is logged in the Event Log:
Status code [400] Error response is { "error" : "invalid_client" }Ensure that you have imported the private key provided by Apple into FusionAuth using the Key ID specified in the Apple Developer Account dashboard.
If you import with the default behavior, FusionAuth will generate an identifier. The generated key identifier will not match the value expected by Apple and the integration will fail with the above error.
If you encounter this error, re-import the private key with the correct Id to ensure the key identifier is set correctly.
Scope Error When Using The Link on Email Strategy
If you choose Link on email for a linking strategy and see this UI error:
"An email address was not provided for the user. This account cannot be used to login, unable to complete this login request."Please confirm that you have requested the email scope. See configuration reference here.
Note that if you specify the email scope, but a subsequent configuration error causes a full login / user creation to fail, you may still see the above error. This is because Apple only sends the user’s email address on the first login, and only the user ID on subsequent authentication requests. To solve this, reset access to your app on your Apple device. You can do this by navigating to Phone Settings -> Apple Id -> Password & Security -> Apple ID logins -> Your App -> Stop using Apple ID . If you are using macOS, navigate to Preferences -> Apple Id -> Password & Security -> Apple ID logins -> Your App -> Stop using Apple ID . Then try to log in again and the email address should be sent.