SAML v2 & Zendesk
Overview
Zendesk allows customers to sign into their Zendesk accounts using a SAML identity provider. This document covers the configuration necessary to get Zendesk working with FusionAuth as the identity provider using SAML v2.
We’ll also set up roles in FusionAuth to automatically grant agent dashboard access in Zendesk. Here’s a video showing the integration process:
Prerequisites
This document assumes you have a running instance of FusionAuth and a working Zendesk application. You will also need admin accounts for both to configure them correctly.
Additionally, you’ll need to know your Zendesk URL. It may be something like: https://fusionauth-example.zendesk.com where fusionauth-example is your registered domain. We’ll use that value for this document, but please replace it with your Zendesk URL.
Finally, you’ll need a FusionAuth user that you will use to sign into Zendesk. You can use an existing user or create a new user for this purpose.
Configure FusionAuth
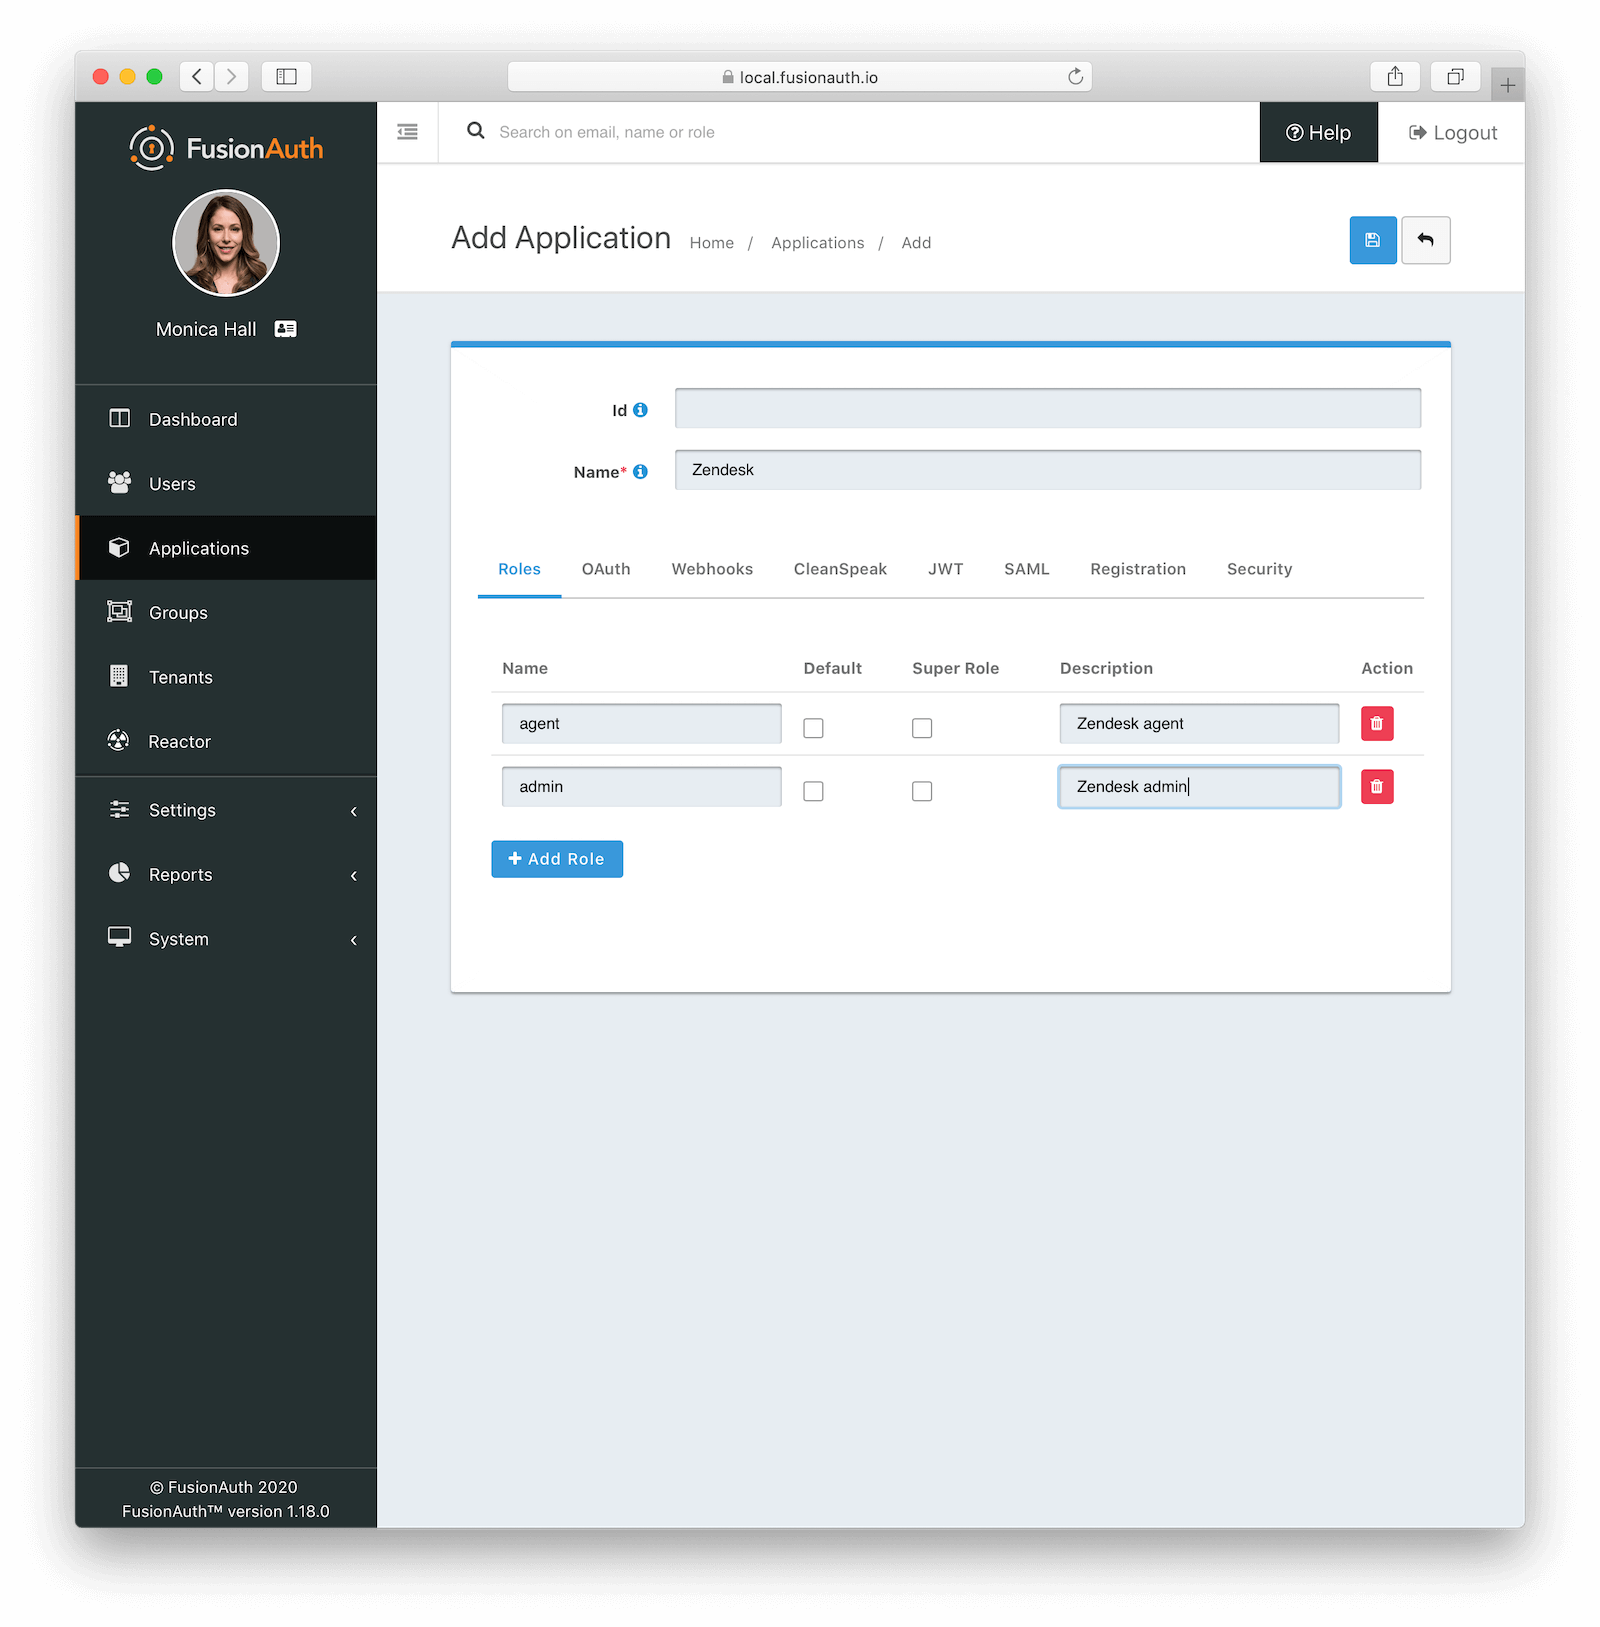
First, we want to create a new application named, Zendesk, in FusionAuth. Navigate to Applications and create an application with the following two roles:
agentadmin
When you are done, your screen should look like this just before saving. The role descriptions are optional but may be helpful to provide. Once you have confirmed the values, save the new application.
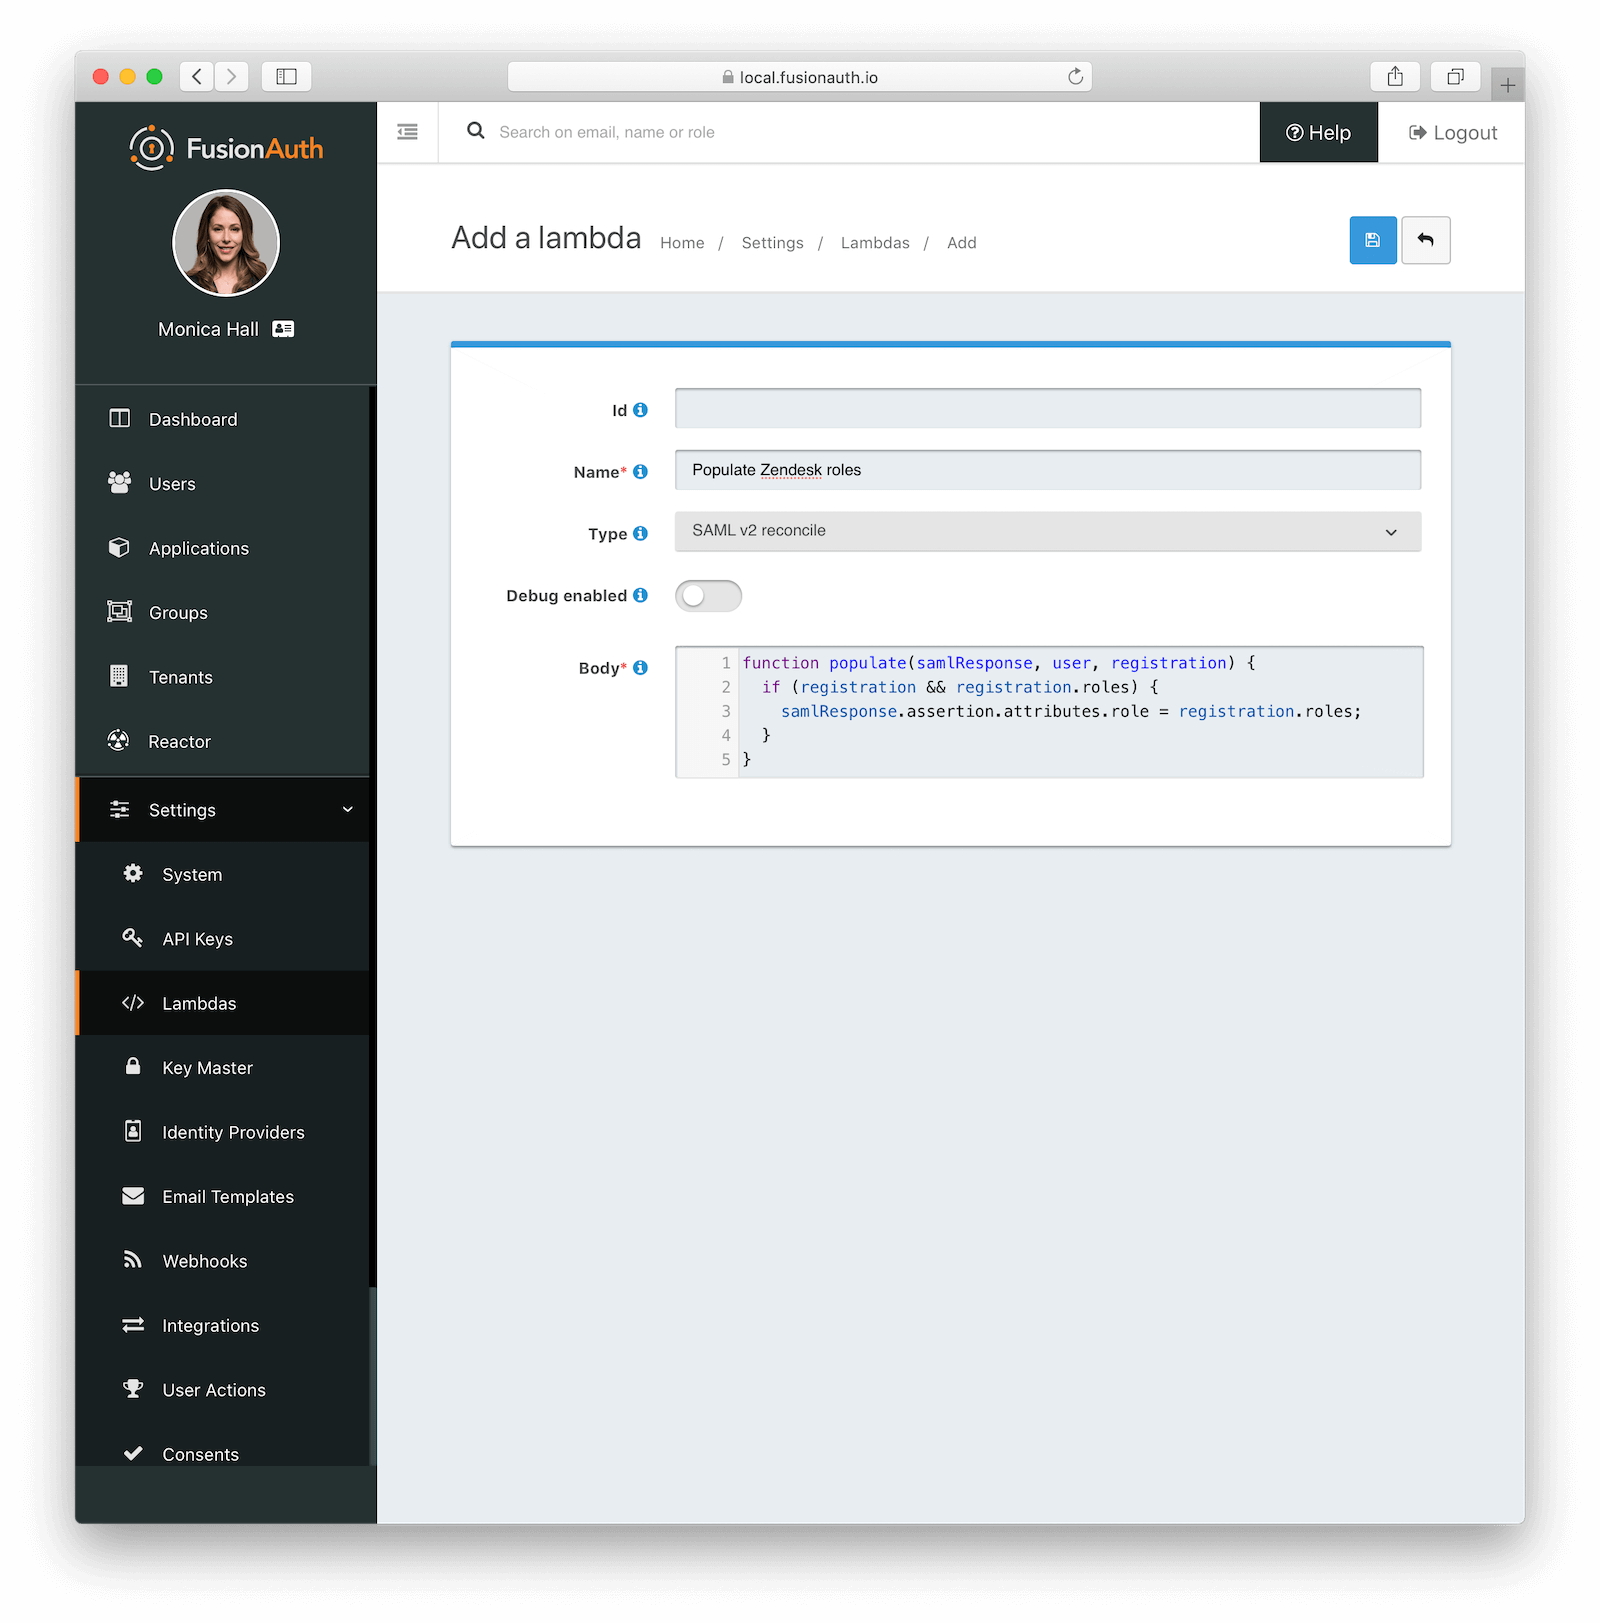
Next, we’ll create a lambda to take FusionAuth role information and populate the SAML assertion that Zendesk will receive. Navigate to Settings -> Lambdas and click the add button.
- Name the lambda
Populate Zendesk roles. - Set the type to
SAML v2 populate. - Add the following function body:
function populate(samlResponse, user, registration) {
  if (registration && registration.roles) {
    samlResponse.assertion.attributes.role = registration.roles;
  }
}
When this lambda function is executed, it will set the users’ roles in the SAML assertion to the roles found in the registration. These roles are the ones assigned by FusionAuth for the Zendesk FusionAuth application. If no roles are assigned, Zendesk treats the user as an end user, not an agent or an admin.
Click save, and then return to the Zendesk FusionAuth application by navigating to Applications
- Edit the application.
- Go to the SAML tab.
- Enable SAML.
To configure SAML, use the following settings, replacing fusionauth-example with your actual Zendesk domain.
- Issuer :
https://fusionauth-example.zendesk.com, note that there is no trailing slash. - Audience : Leave this blank.
- Callback URL (ACS) :
https://fusionauth-example.zendesk.com/access/saml/ - Logout URL : A location that users should be sent to after they sign out of Zendesk.
- Signing Key : Either select an existing key or let FusionAuth create a new one.
- XML signature canonicalization method :
Exclusive with comments - Response populate lambda : Choose the previously created lambda named
Populate Zendesk roles.
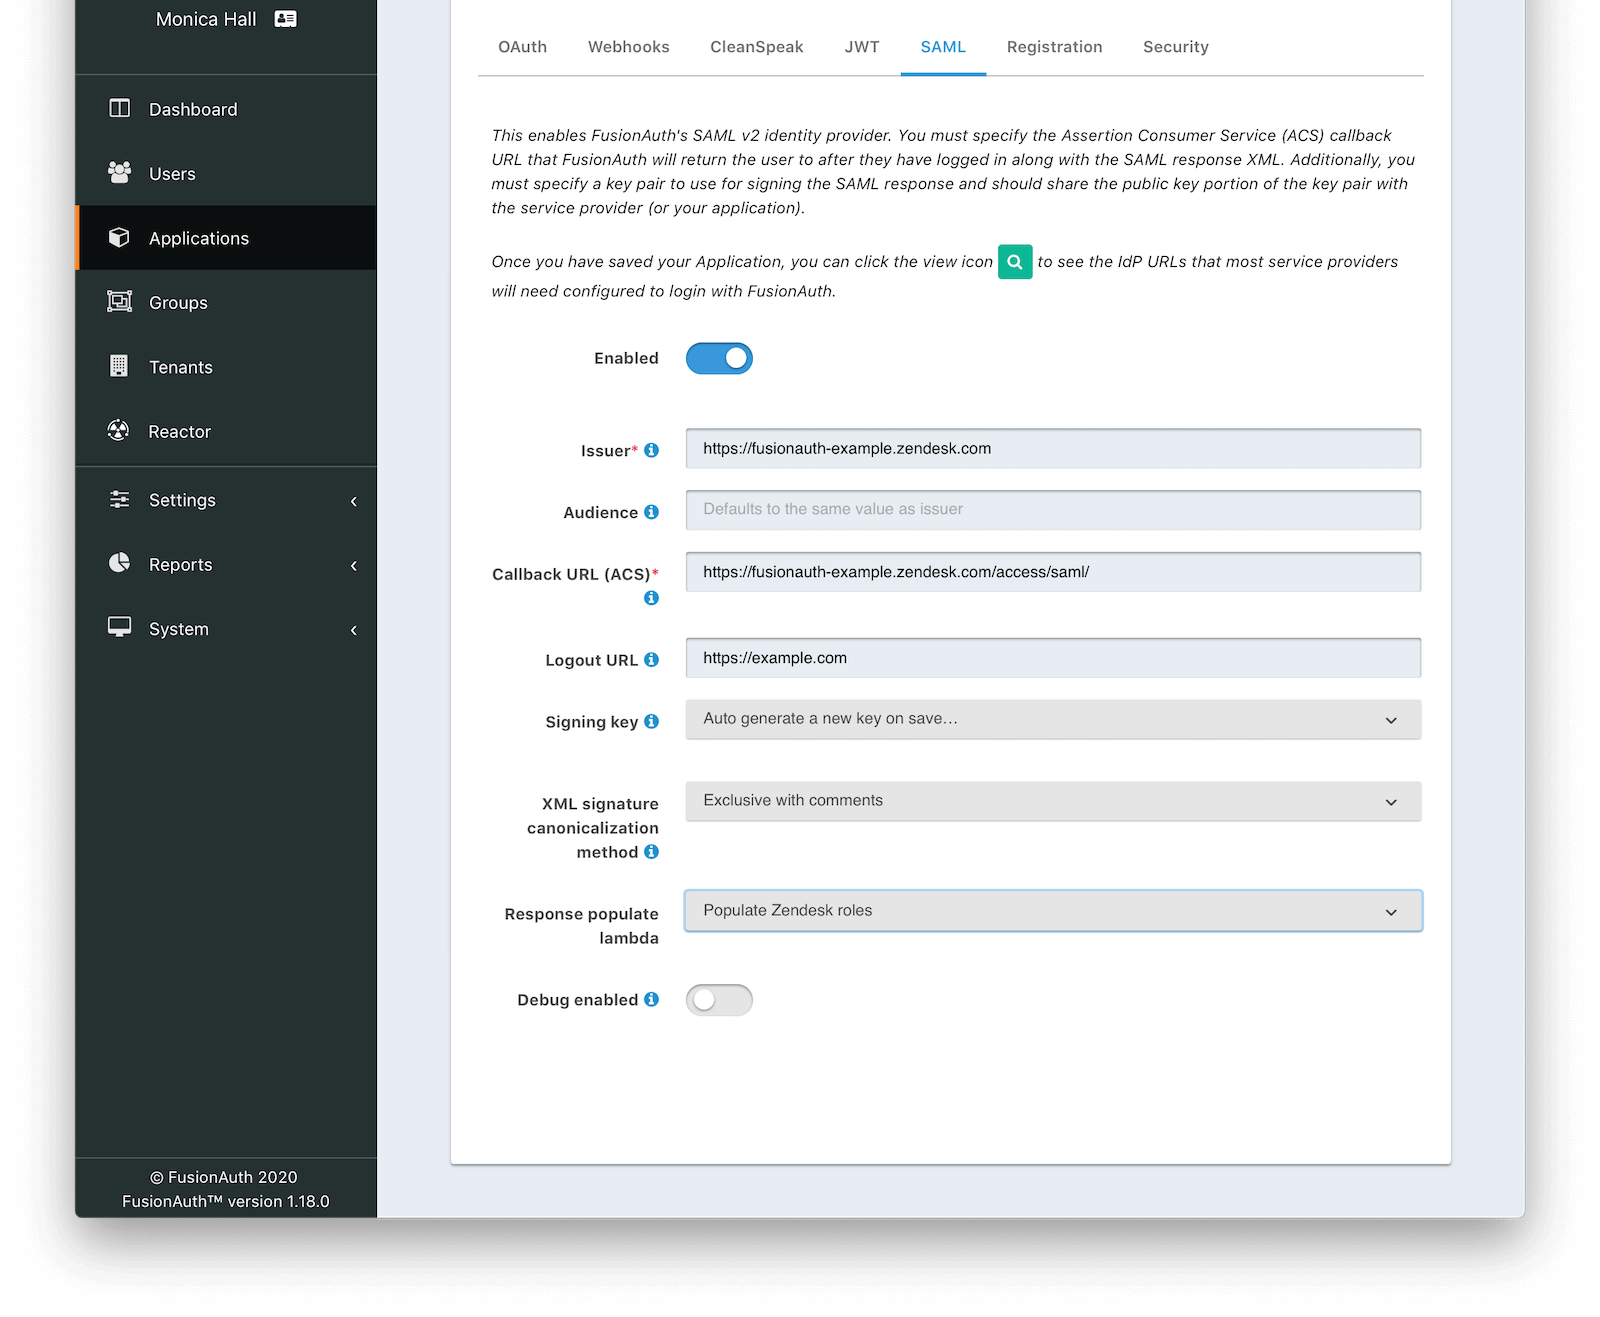
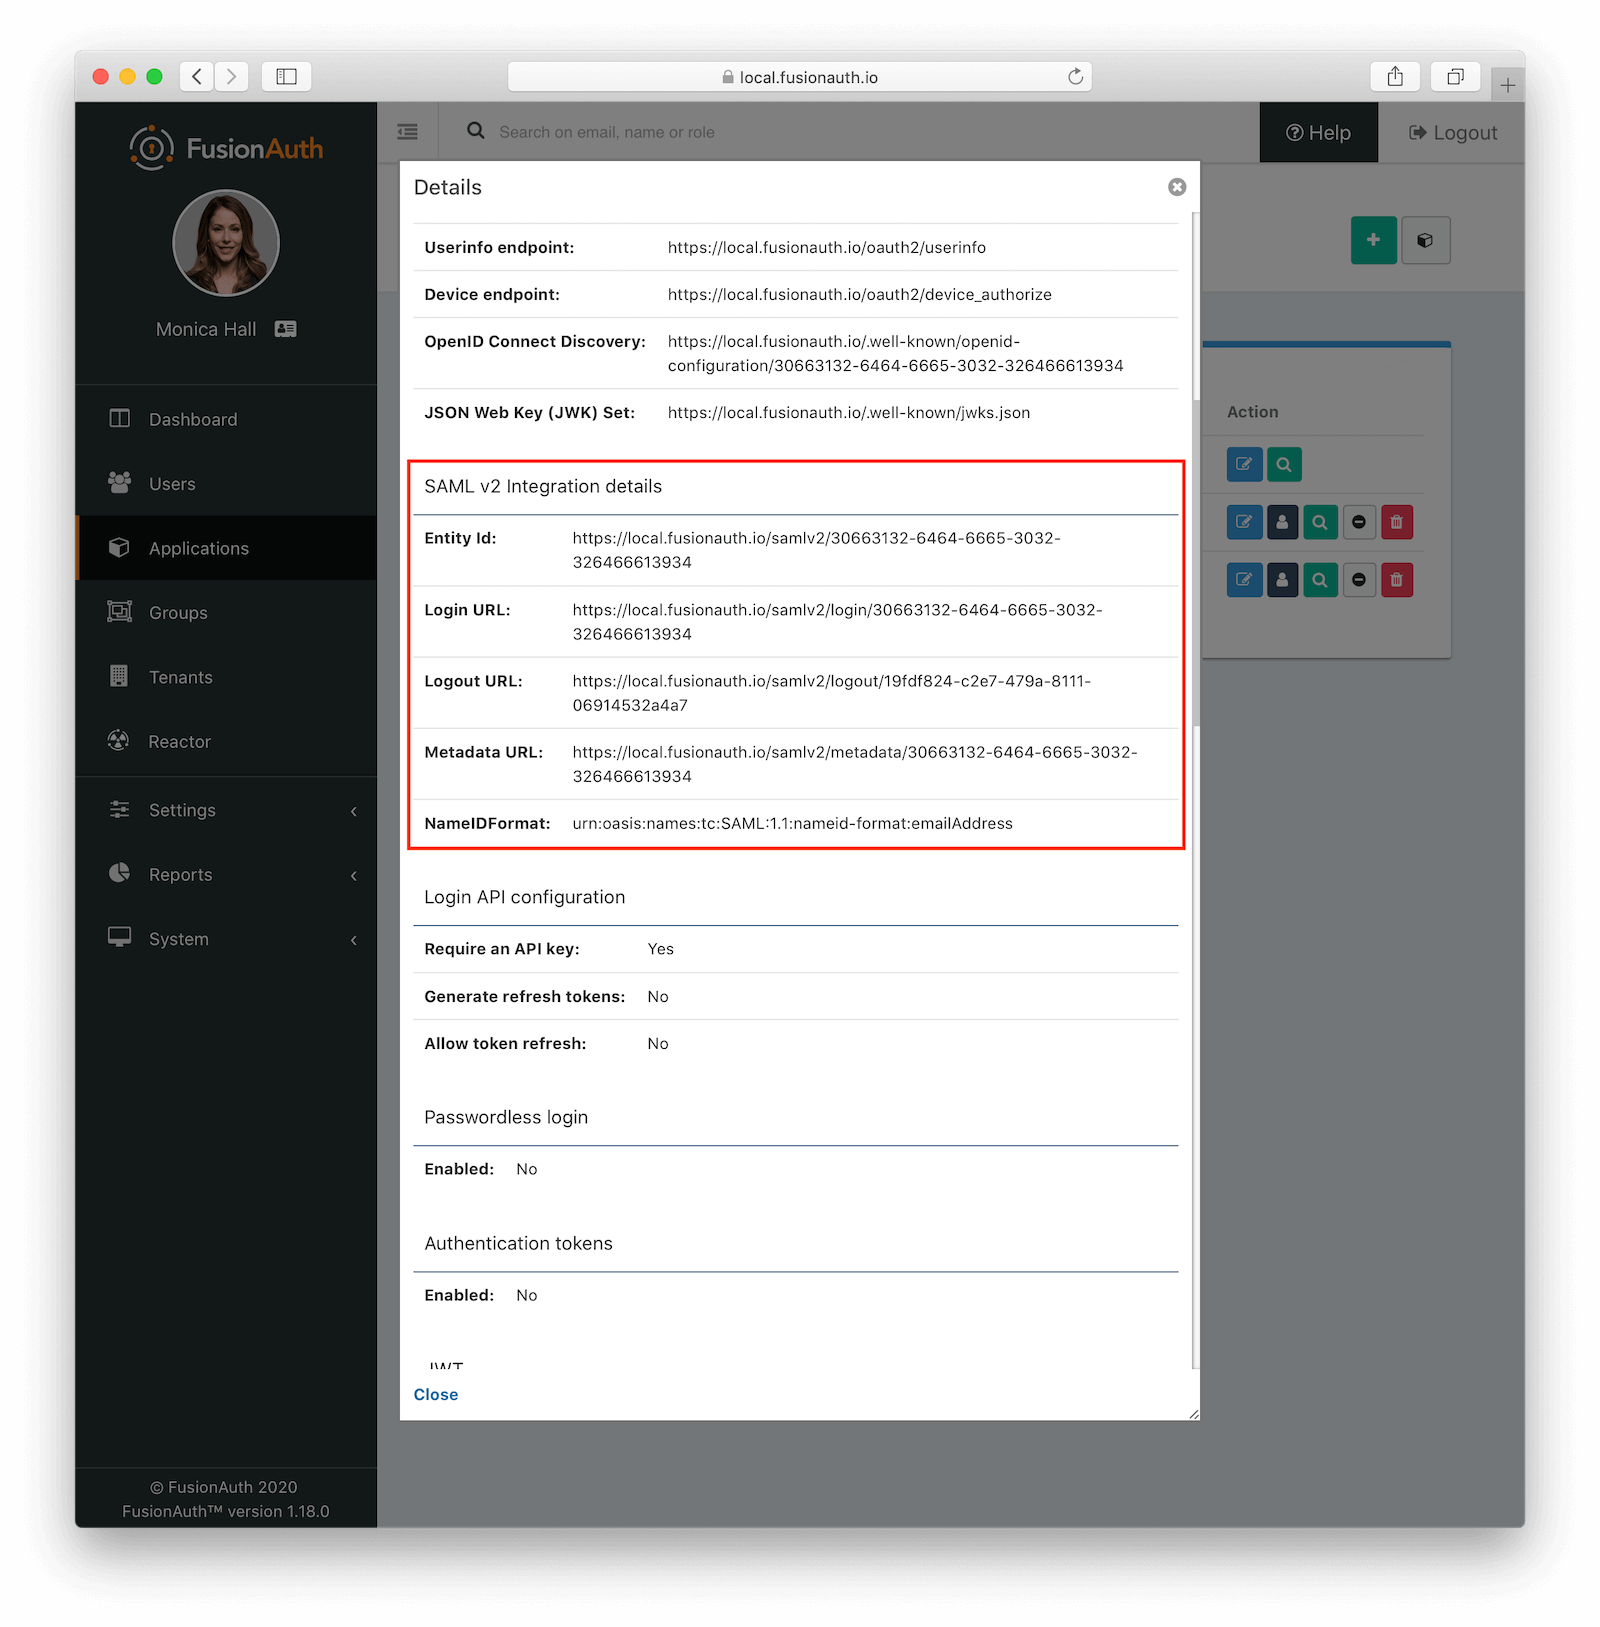
Click save. Now view the application configuration and scroll down to the SAML v2 Integration details section. Copy the following information:
Login URLLogout URL
Next, navigate to Users to edit the user you have previously set up or create a new one. Create a registration to add that user to the Zendesk application and give them the appropriate role. If you don’t give them an admin or agent role, they’ll default to a user Zendesk role.
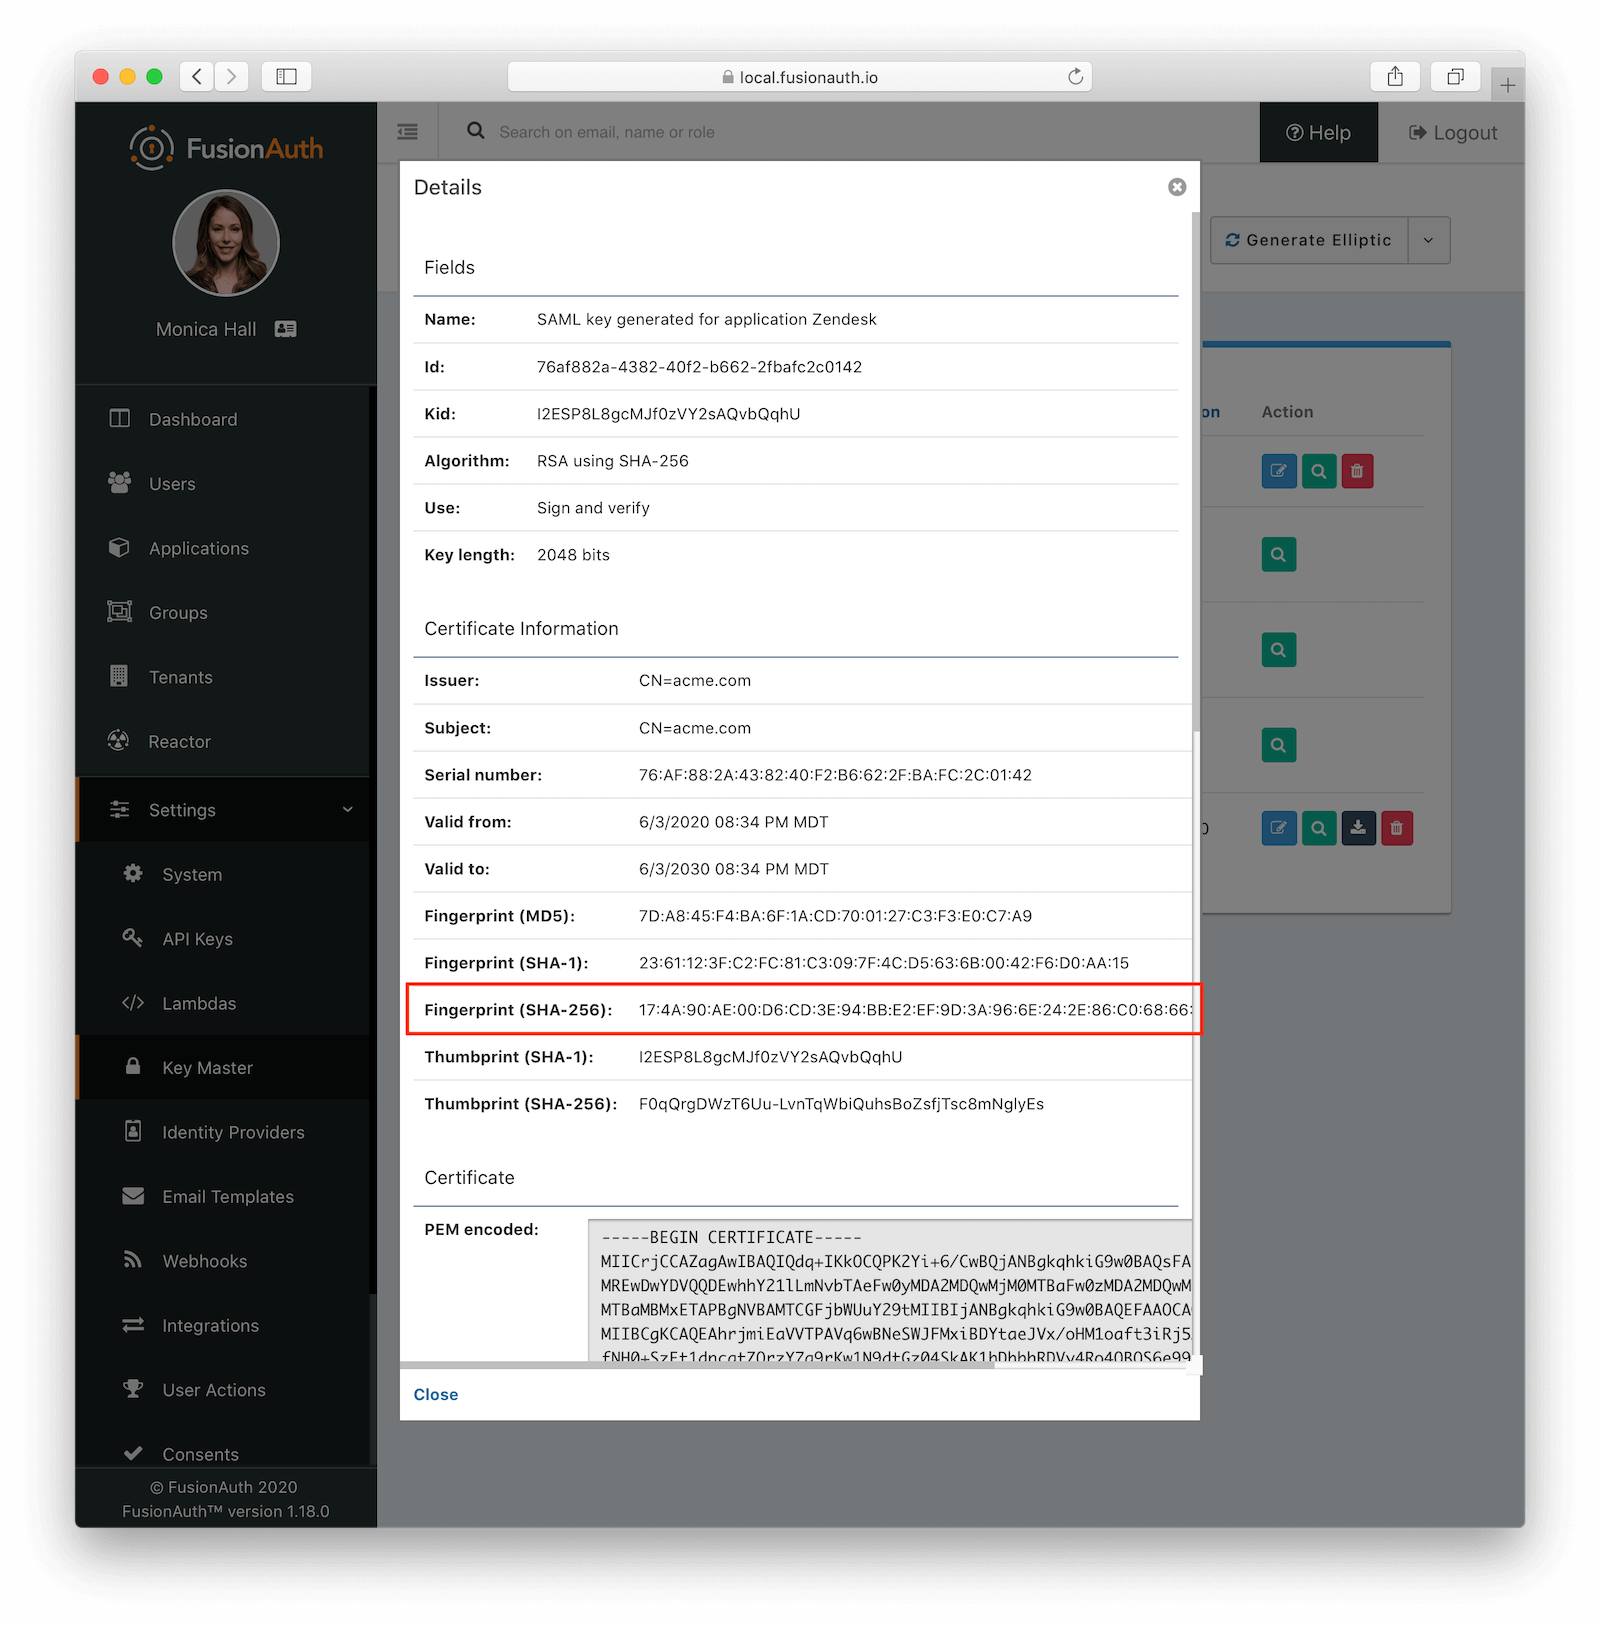
Finally, go to Settings -> Key Master and view the Signing Key you created or chose. Copy the Fingerprint (SHA-256) value. This will be something like FF:74:12:A5:40:67:E9:90:24:FC:95:07:FC:B7:E6:36:9B:26:75:6B:24:9D:3E:49:0A:43:4D:BC:03:00:DD:AA.
Configure Zendesk
The general Zendesk SSO instructions are worth reading.
To configure Zendesk to use FusionAuth to manage your users, head to your application’s security center, then to the Single sign-on section. This is a direct URL to that section: https://fusionauth-example.zendesk.com/admin/security/sso
Enable SAML, then configure it.
- The SAML SSO URL is the
Login URLpreviously copied. - The Remote Logout URL is the
Logout URLpreviously copied. - The Certificate fingerprint is the
Fingerprint (SHA-256)value previously copied.
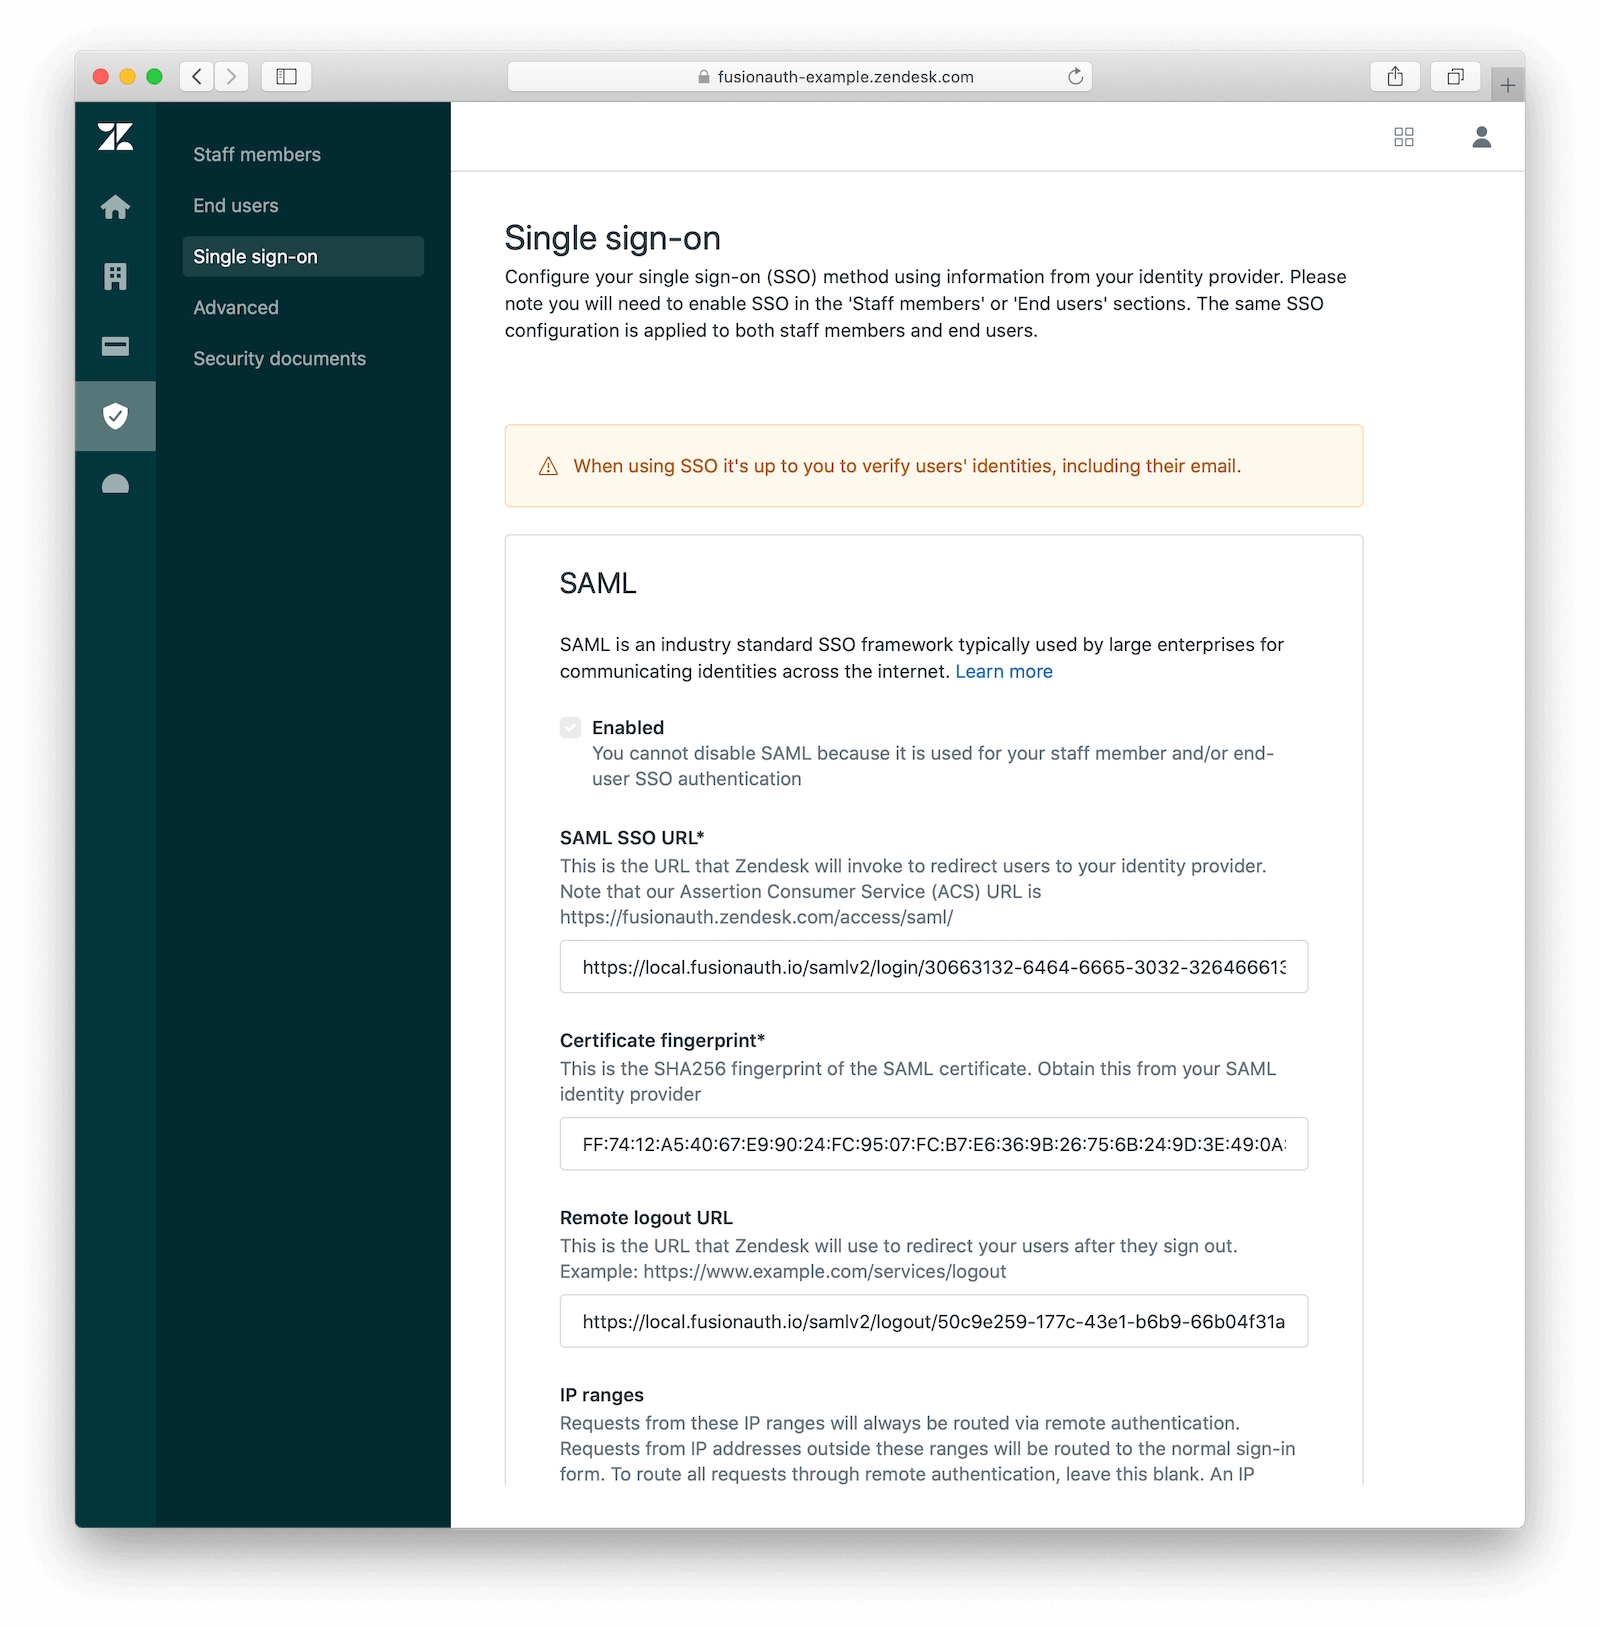
Save the SAML configuration. The next step is to allow users to log in using the SAML integration. You can choose to let end users, staff, or both use single sign-on.
Proceed to the Staff members section. Check External authentication and select Single sign-on. You should see that SAML is enabled. Save the configuration.
Navigate to the End users section. Check External authentication. You should see that SAML is enabled. Save the configuration.
You can also uncheck Zendesk Authentication in these two sections to ensure that users are managed only in FusionAuth.
Log in
Open a different browser and go to your Zendesk URL: https://fusionauth-example.zendesk.com/.
Enter the user credentials previously configured in FusionAuth.
You should arrive at a screen appropriate to the role of the user (Help Center for end users, the Zendesk dashboard for others).
Troubleshooting
Admin users will be able to access their dashboard at https://fusionauth-example.zendesk.com/access/normal should FusionAuth be unavailable for any reason. There’s more information at the Zendesk help center.
Ensure that the Issuer setting has no trailing slash and exactly matches your Zendesk URL.
Make sure you are connecting over TLS. All Zendesk-bound traffic must be secure.
When troubleshooting, turn on SAML debugging at the application level and lambda debugging for the populate lambda. Use console.log statements in the lambda if needed.
New users are assigned the Zendesk user role if they have no FusionAuth role. By default, such users are sent to the Zendesk Help Center after sign in, which is not enabled by default in new Zendesk accounts. If this is the case, you’ll get an error message.
If you have reached the license limit for your Zendesk account and you try to authenticate with a new user with the agent role, you’ll be automatically logged out by Zendesk and arrive back at the FusionAuth login screen with no error message displayed.