Themes
FusionAuth themes allow you to customize the hosted login pages and other user workflows such as forgot password. In FusionAuth you may create one to many themes and assign a theme per tenant or application so that you can customize the user experience for different users.
Starting in version 1.51.0 you can use the Simple Theme Editor to quickly and easily style FusionAuth with no code.
Customization Levels#
FusionAuth theme customization is only useful if you are using the hosted login pages. Using the hosted login pages has a number of advantages. By doing so, FusionAuth handles the complexity of a number of different auth related use cases. These use cases include, but are not limited to, the following:
- Log in
- Log out
- Registration
- Forgot password
- Email verification
- Phone number verification
- Changing a password
- Two-factor authentication
- Magic link passwordless authentication
- WebAuthn/passkey passwordless authentication
- Password expired
- Account lockout by administrative decision or failed attempts
- Password validation failed
- Breach password detection
- Federated login with IdPs such as Google and Microsoft Active Directory
- Advanced self service registration forms
- Prompting for consent to requested OAuth scopes
- Linking between IdP accounts and FusionAuth accounts
- Multi application logout (OAuth front channel logout)
If you are not using the hosted login pages, you are responsible for creating the user interface for the login and other experiences.
In contrast, if you are using the hosted login pages, you can customize at two different levels.
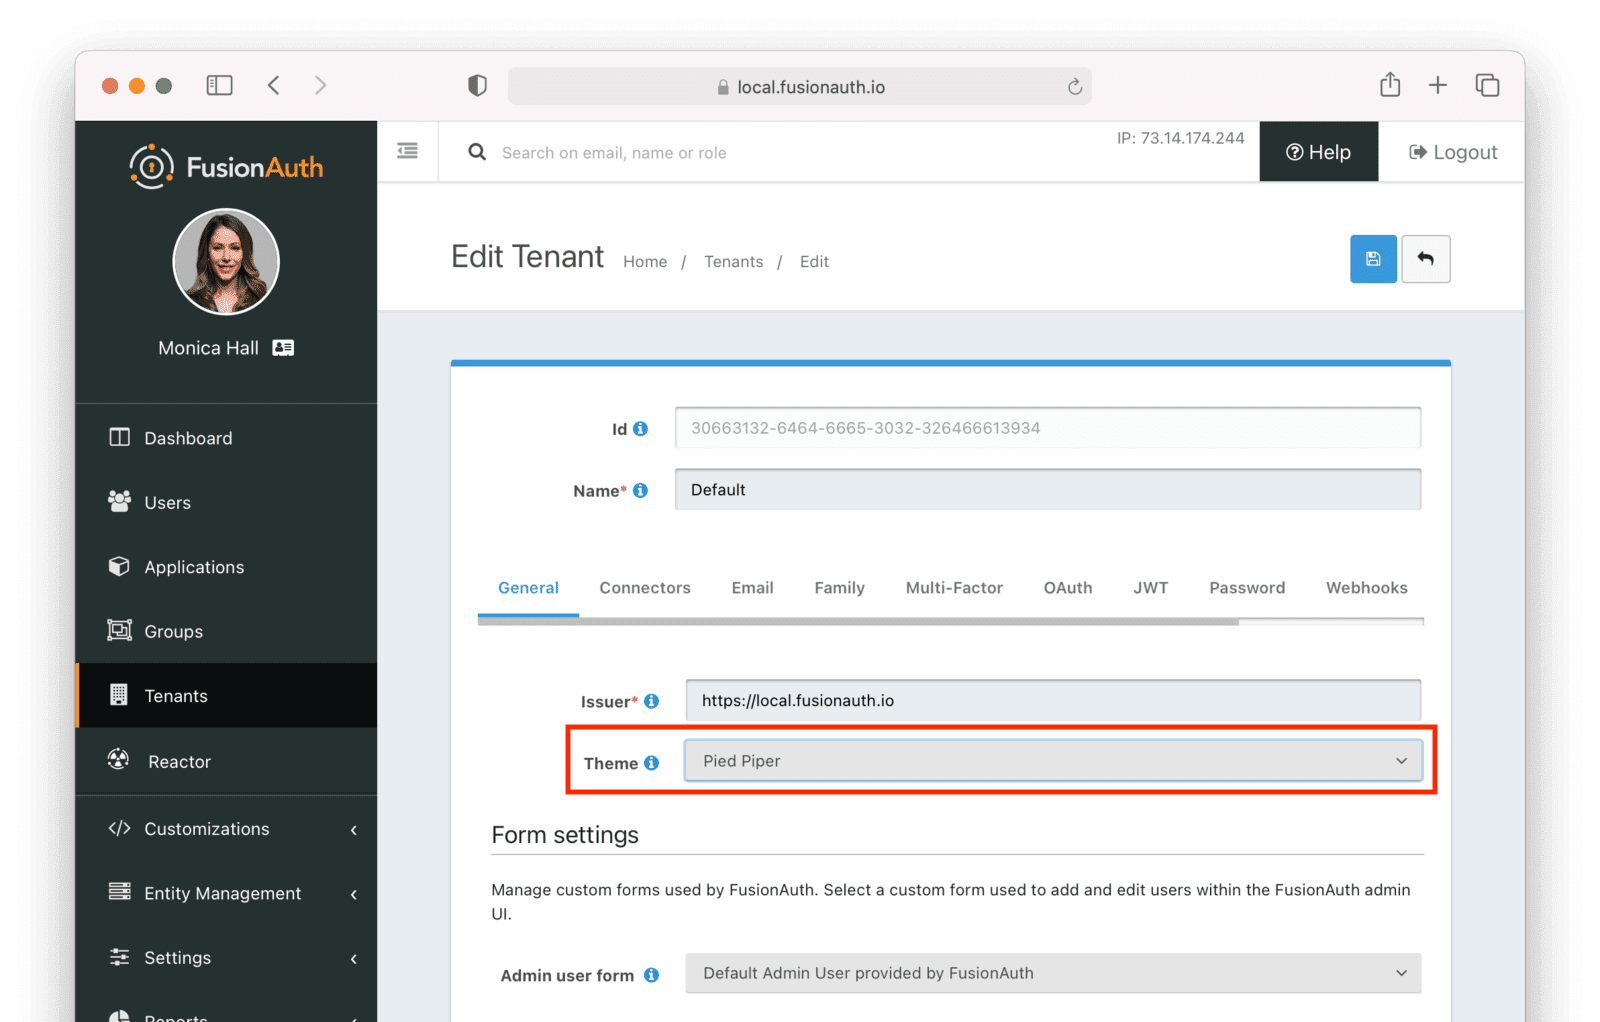
The first is the tenant. Learn more in the Apply a Theme section.
The second is the application. There are two options for applying a theme at the application level:
- Use a tenant theme and use freemarker to switch on the
client_idparameter. Review each template and ensure that you serve different content for different applications based on the Id. This is a good option if your needs are simple and you are willing to commit to the maintenance burden. - Use application themes. This is a paid feature. Learn more about application specific themes. This is a better choice if you have more complicated theming needs.
Create a Theme#
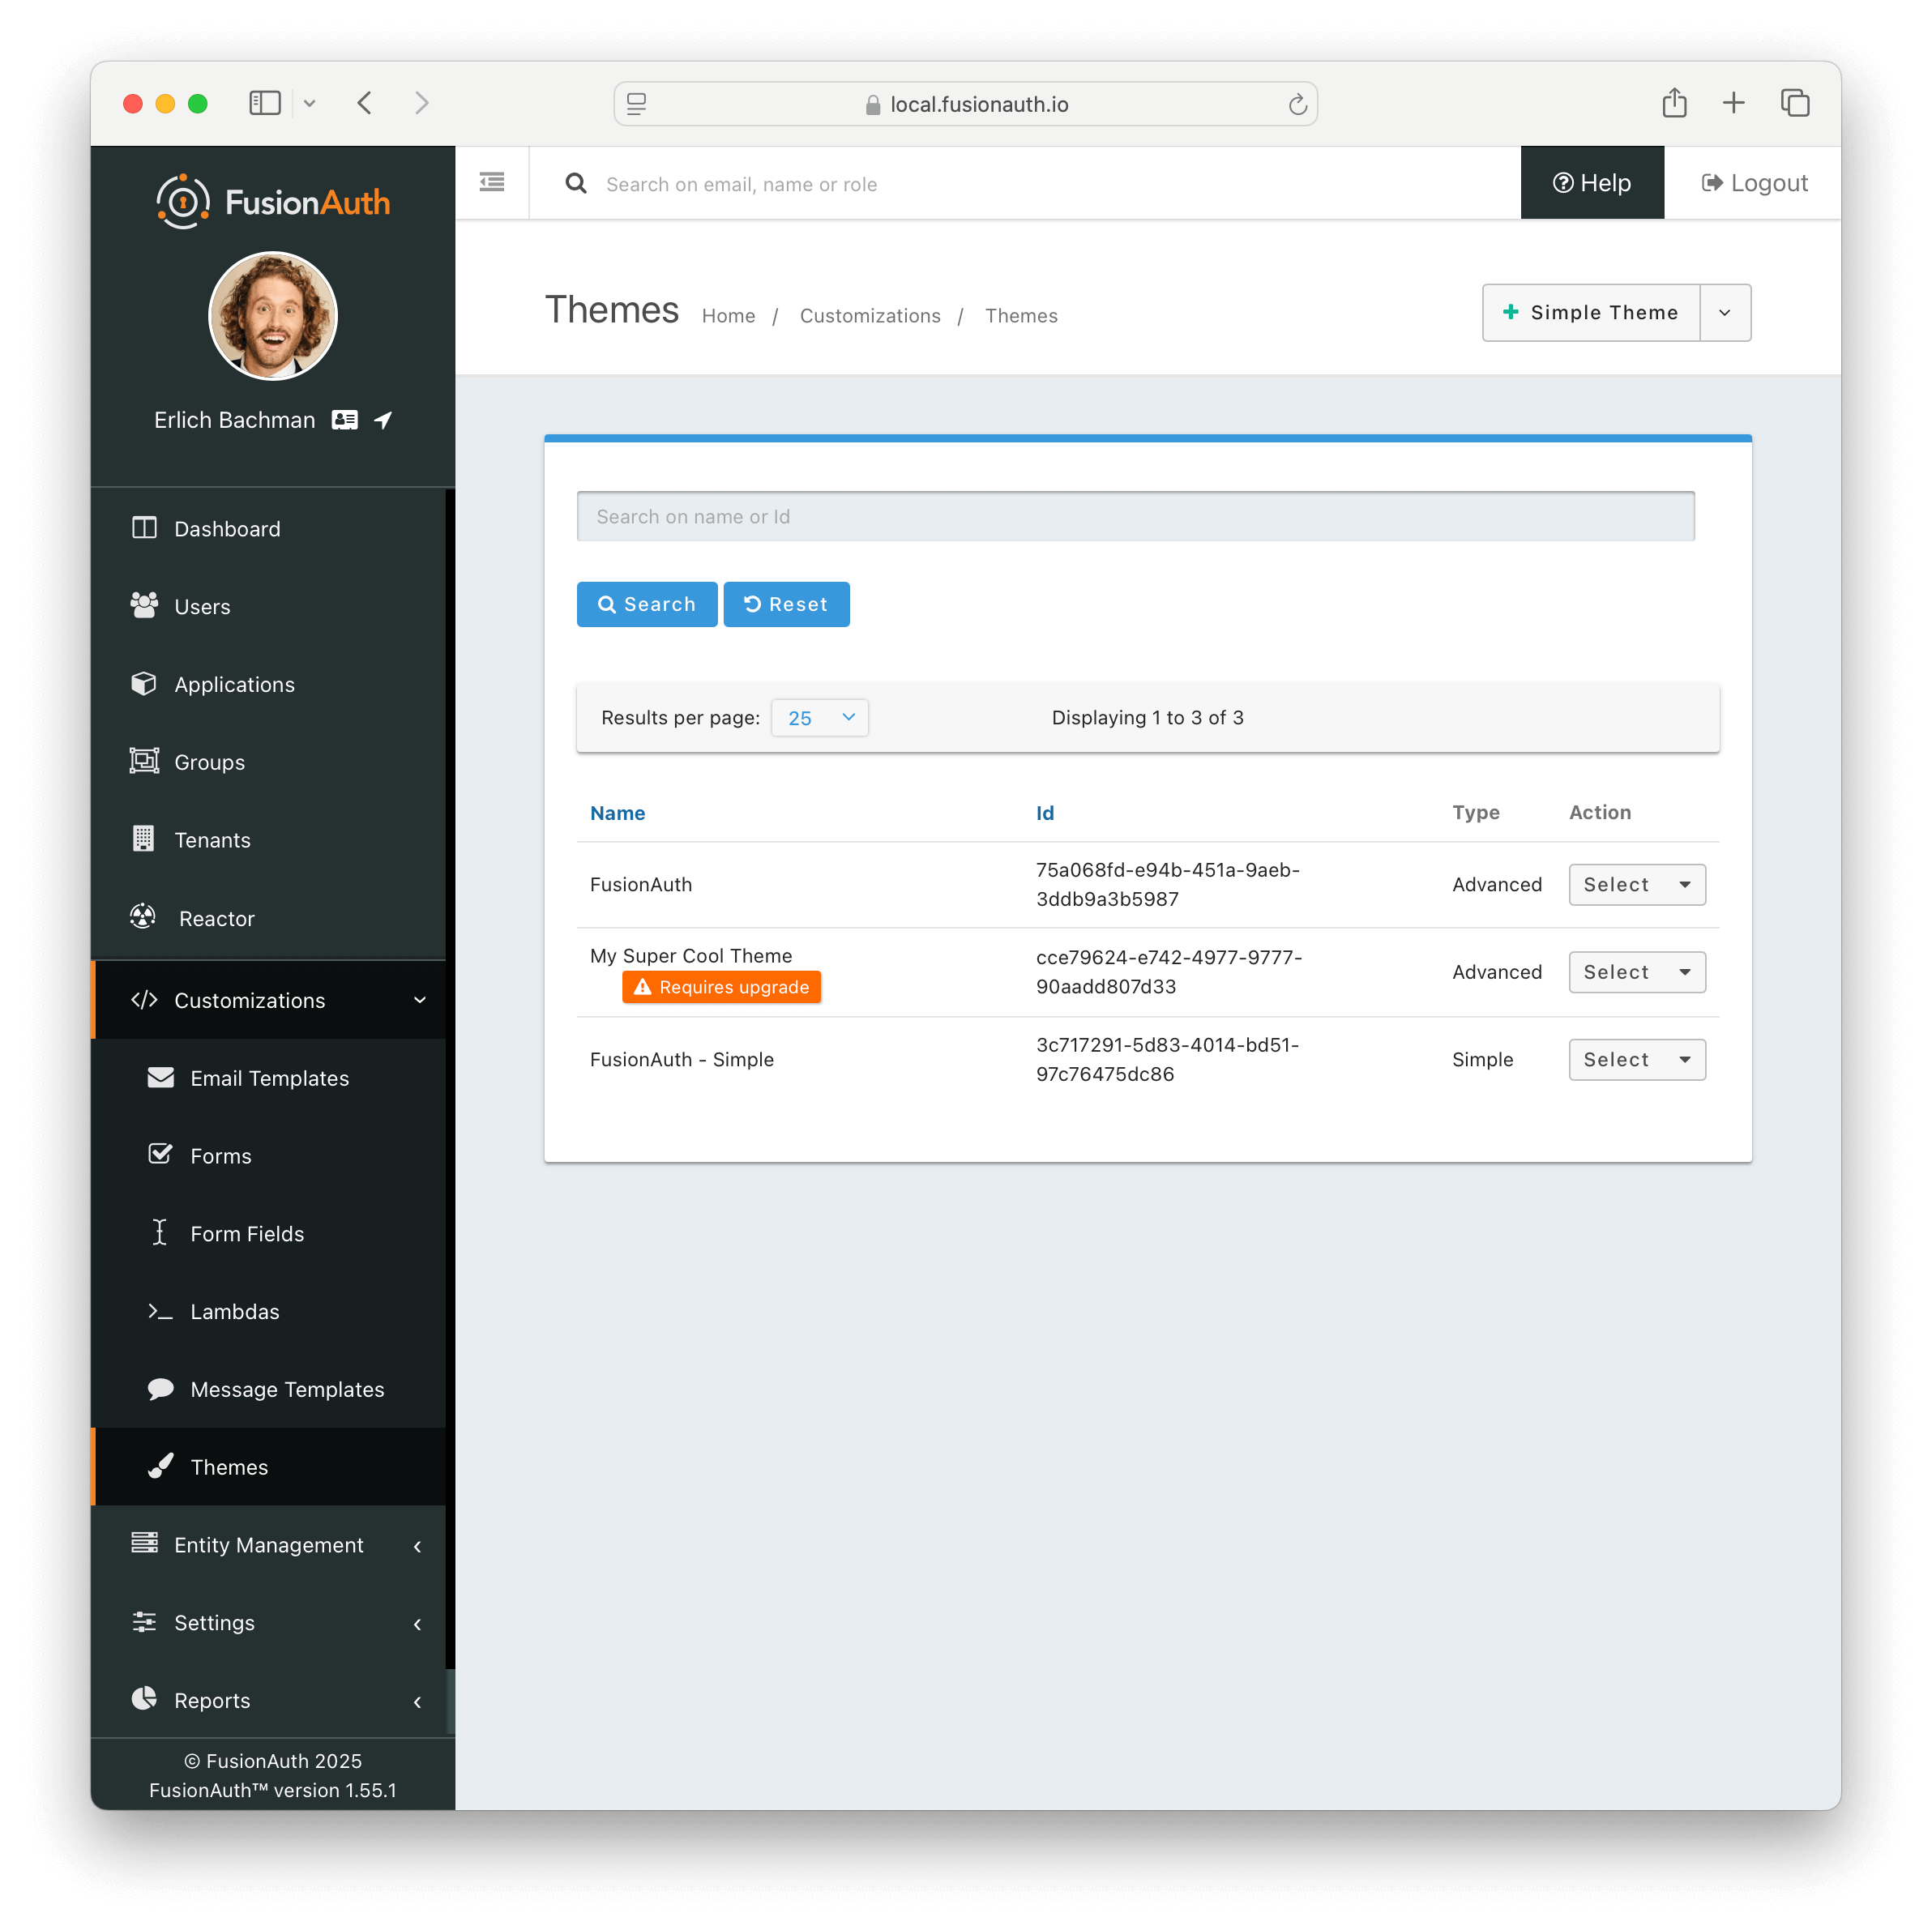
You have three options for creating a theme:
- The Simple Theme Editor
- The Advanced Theme Editor
- The Themes APIs or other scripting solution like the SDKs or Terraform
Here's a table with the relative strengths and weaknesses of the different approaches.
| Option | Good For | Challenges | Documentation |
|---|---|---|---|
| Simple Theme Editor | Quickly creating a customized look and feel. Upgrading to a new version of FusionAuth, which may have additional templates, is simple. | Doesn't allow injecting JavaScript or pixel-perfect control. Limited control of layouts of the page. | docs |
| Advanced Theme Editor | Full control of every aspect of the look and feel, including moving or reordering fields on the page, adding custom JavaScript, and inserting multiple images | Can be complex to build, though there is some tooling. Complex to upgrade as new versions of FusionAuth come out. Requires knowledge of or willingness to learn Apache Freemarker. | docs |
| Theme APIs/SDKs | Automated application of themes across many tenants. Great if you are using a different templating language to generate many related themes and then uploading them. Good for CI/CD systems. | You still need to initially edit and review the templates somehow; that can be done with a local instance. | docs |
Apply a Theme#
You apply a theme by configuring either a Tenant or an Application to use the theme. Each theme may apply to multiple Applications or Tenants; however, each Tenant or Application may have only one theme.
To apply a theme to a Tenant, navigate to Tenants -> Your Tenant , then select the General tab. Select the appropriate theme and save the tenant. This will apply the theme to every application in that tenant, unless there is a theme specified for an application.
Note: To use application themes, you'll need a paid plan.
To apply a theme to an application, navigate to Applications -> Your Application , then select the appropriate theme.

Troubleshooting#
Theme Errors Preventing Login#
If you have modified a custom theme and it is causing errors preventing you from logging in to FusionAuth or the admin UI, you can override the use of the UI templates. This will render a form allowing you to log in. To do this:
- Open your browser and access your FusionAuth admin UI.
- This will redirect you to the broken
/oauth2/authorizepage. - Click in your browser's address bar and scroll to the end.
- Add the String
&bypassTheme=trueto the end of the URL and hit the Enter key.
This should render the default login page that ships with FusionAuth and allow you to log in and fix errors.
Default Theme Used Incorrectly#
Anytime a request is made to a themed page and FusionAuth is unable to identify the tenant, the default tenant will be used. This includes, but is not limited to:
- The root page
/when aclient_idortenantIdis not provided. - Any themed pages such as
/password/forgotwhen aclient_idis not provided. - Edge case error conditions where FusionAuth doesn't have context to determine the application or tenant.
If you see the default theme unexpectedly, ensure you are passing required parameters, such as the tenantId or client_id, to the page so that it can determine the applicable application or tenant. These parameters allow FusionAuth to determine the correct theme to display.
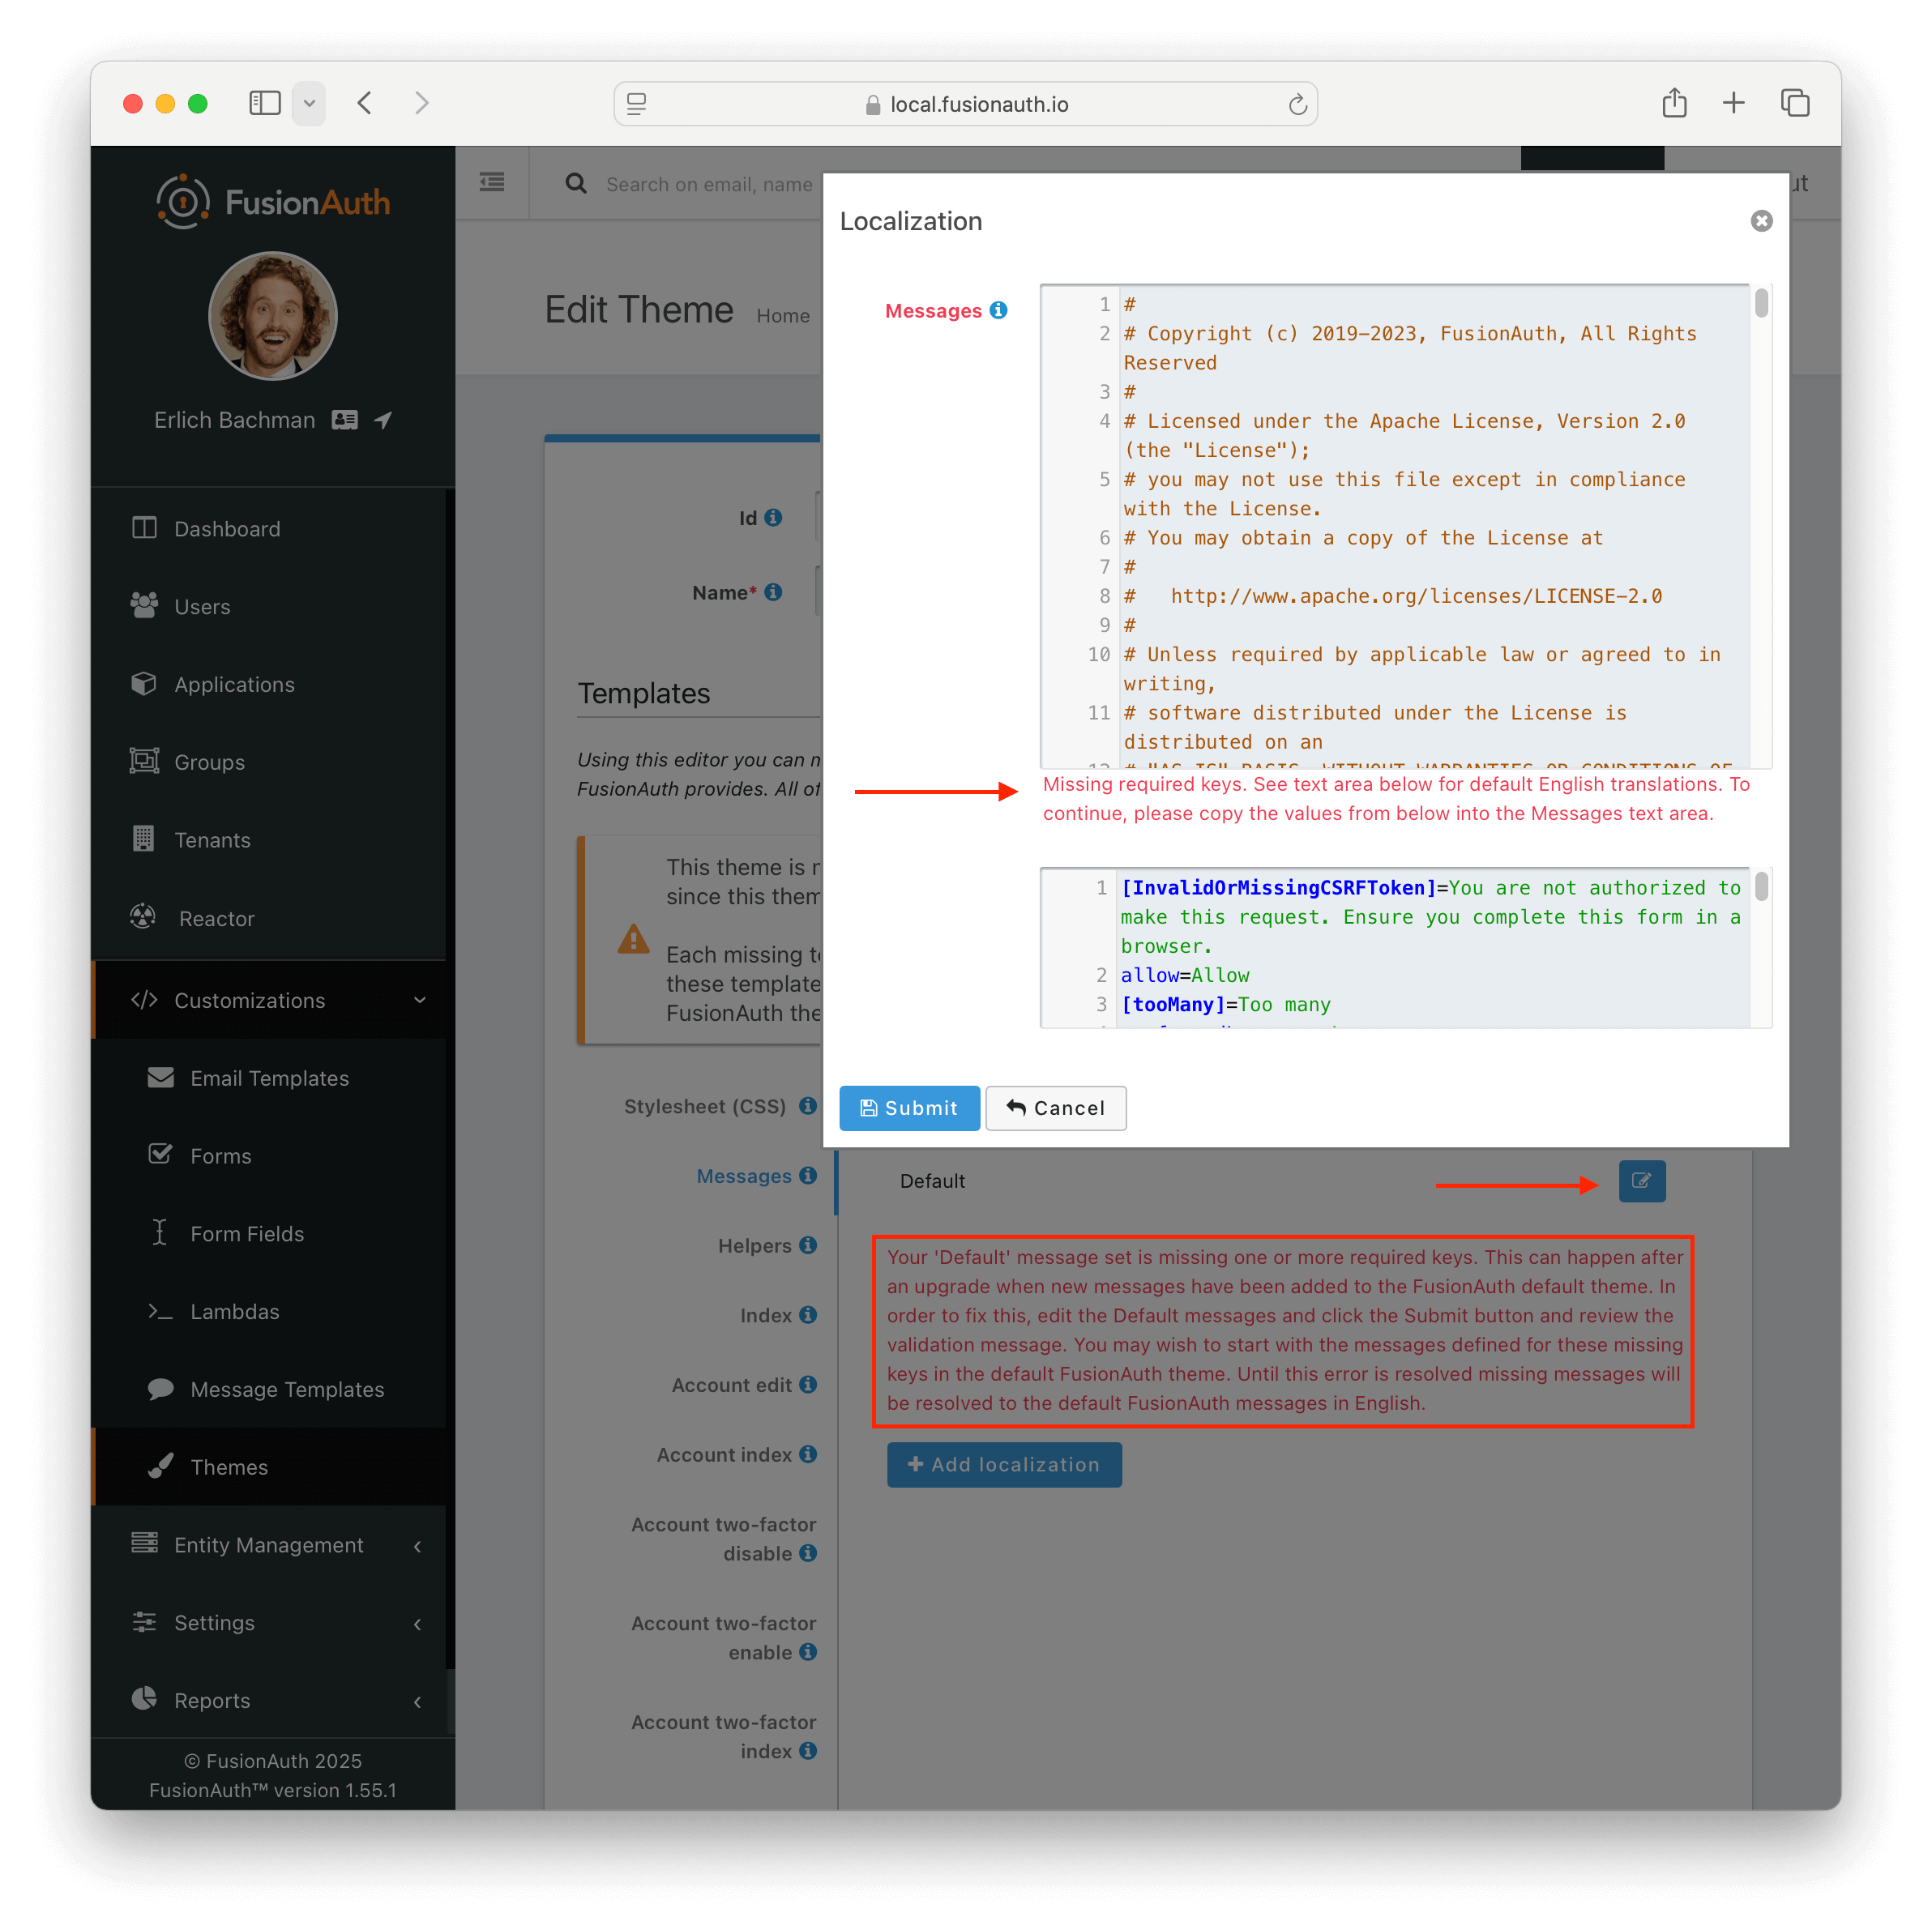
Theme Will Not Retain Change(s)#
If you have upgraded your version of FusionAuth and are using Advanced Theming, you may need to upgrade each theme.
On theme "save" in the UI, an orange icon will indicate specific pages needing attention and changes. You can click on each page, copy in the new theme, and start customizing.
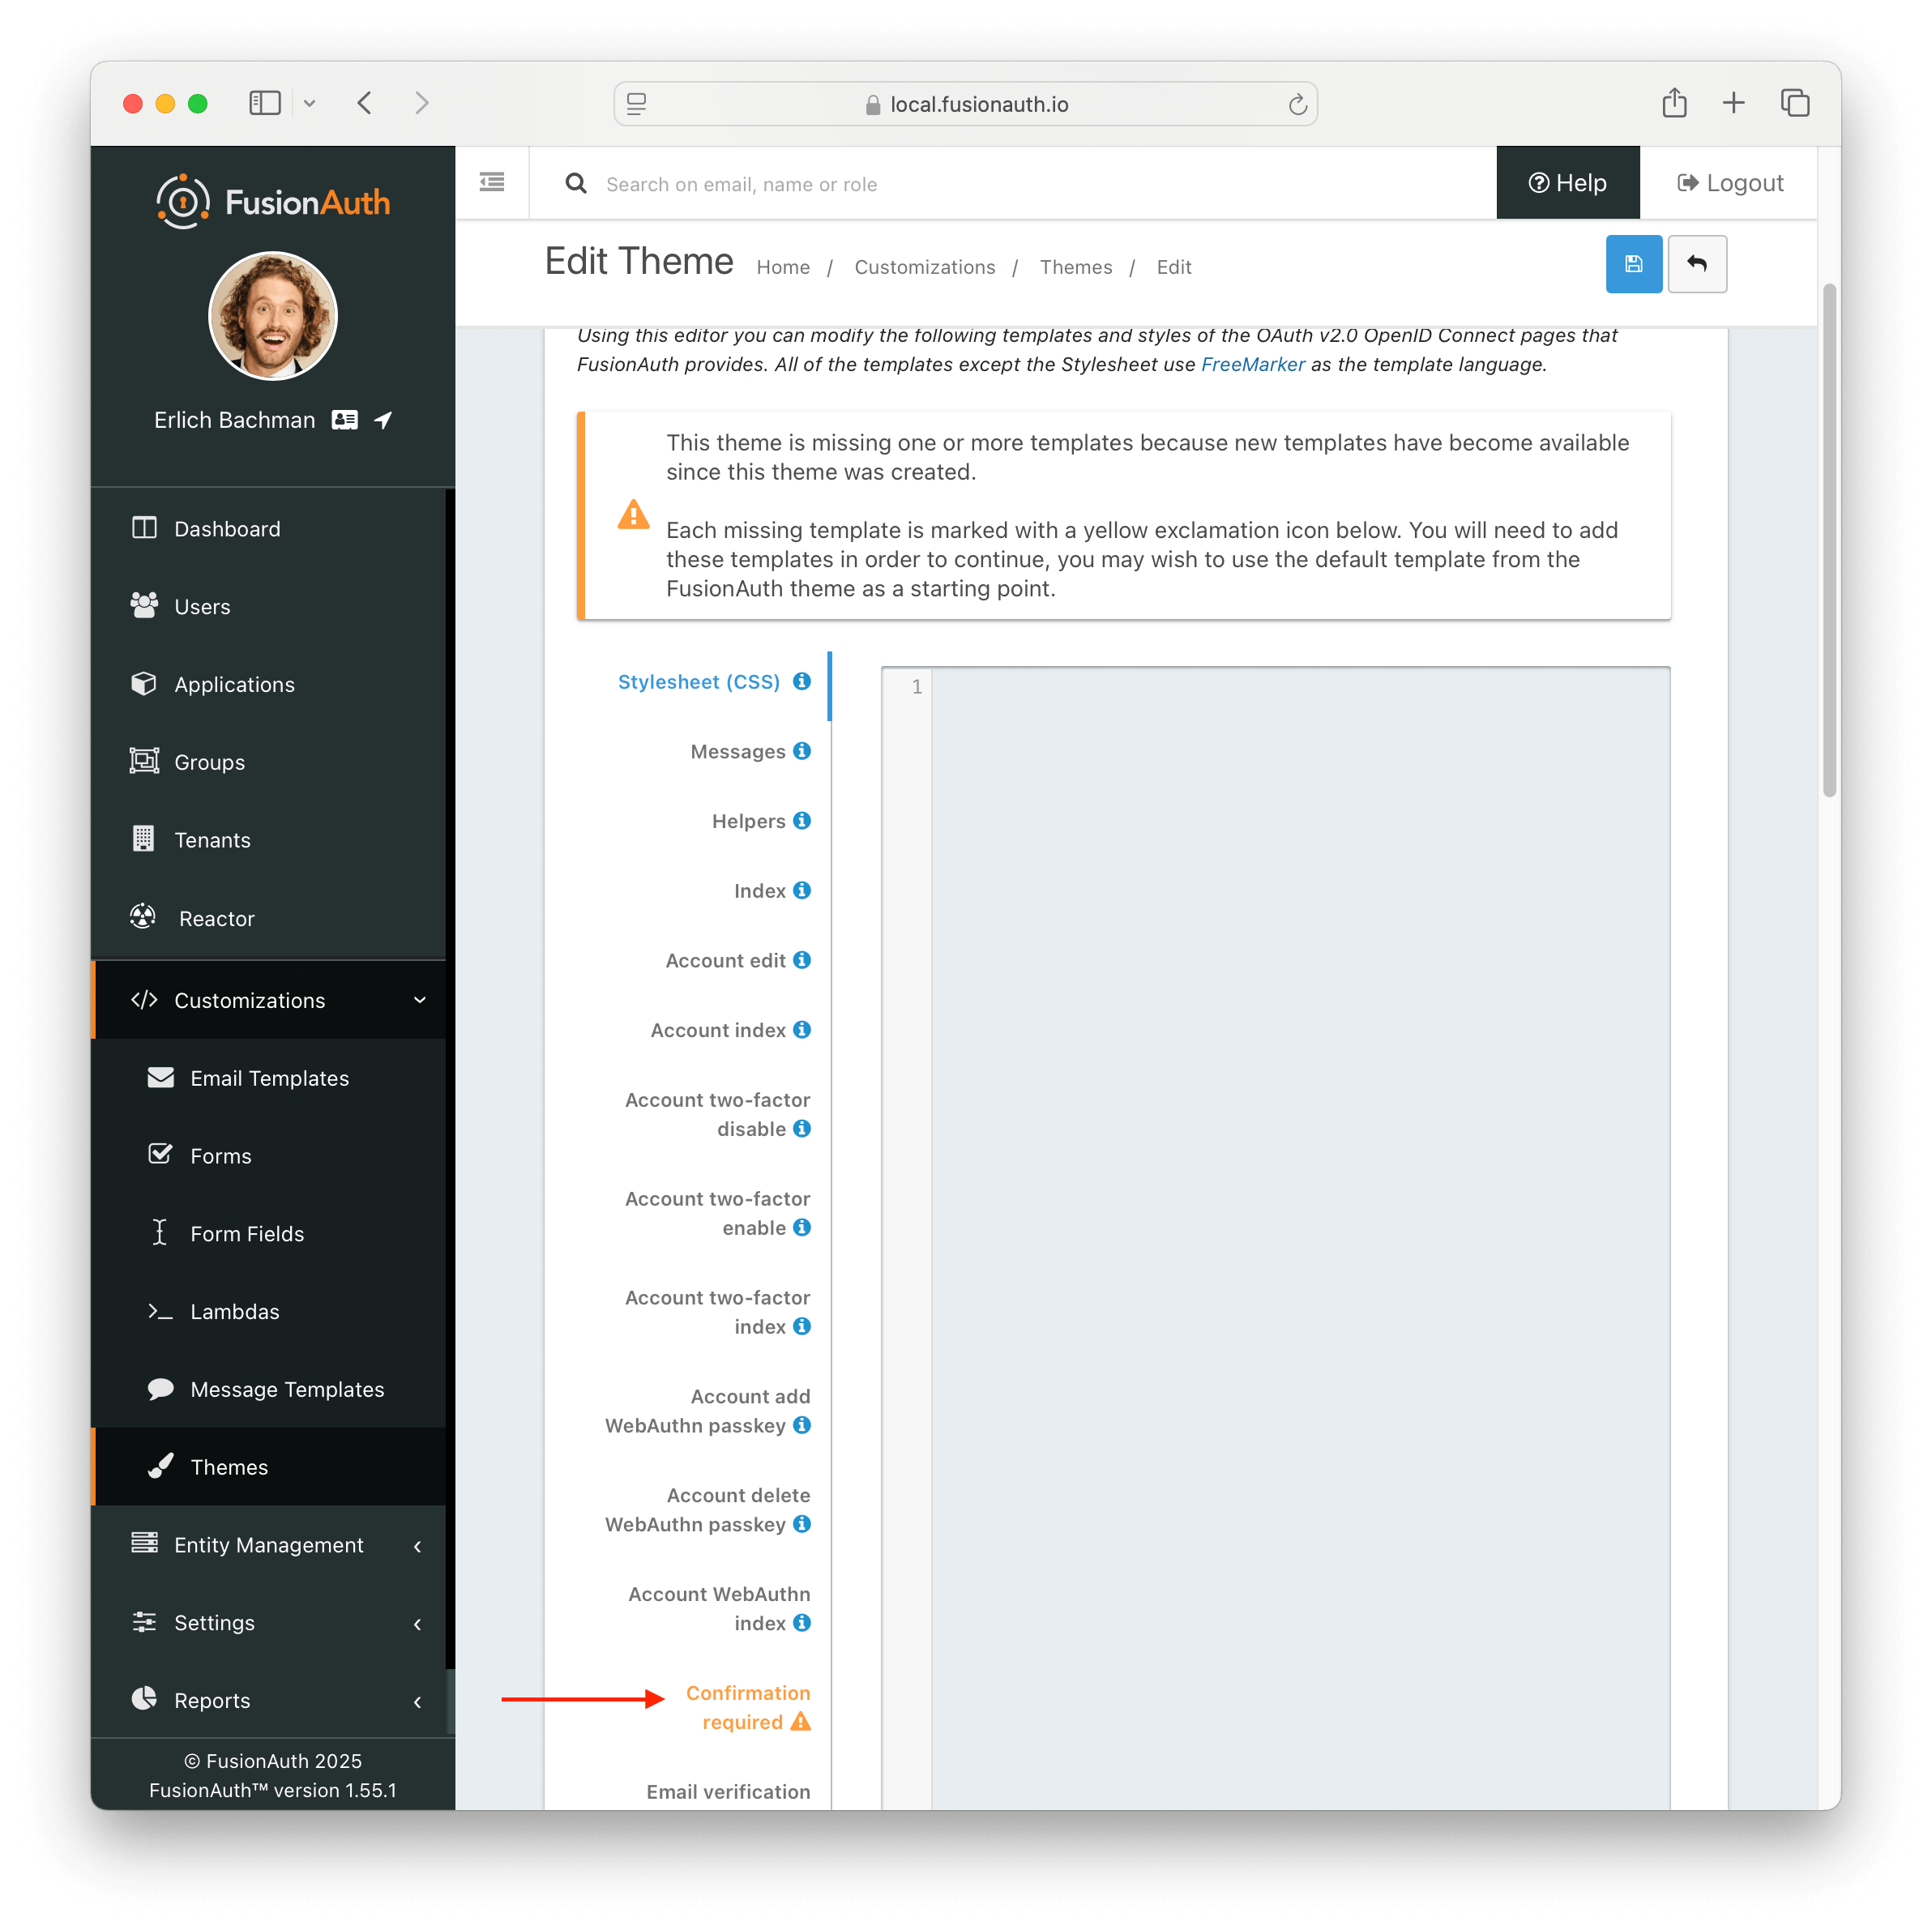
Additionally, in the messages bundle a validation notice will indicate the message keys to be added to support the newer FusionAuth version.
For more information about upgrading themes, see Upgrade an Advanced Theme.