fusionauth logo
search-interface-symbol
Downloads
Quickstarts
API Docs
SDKs
search-interface-symbol
talk to an expert
Log In
talk to an expert
Navigate to...
  • Welcome
  • Getting Started
    • Getting Started
    • 5-minute Setup Guide
      • Overview
      • Docker
      • Fast Path
      • Sandbox
    • Setup Wizard & First Login
    • Register a User and Login
    • Self-service Registration
    • Start and Stop FusionAuth
    • Core Concepts
      • Overview
      • Users
      • Roles
      • Groups
      • Registrations
      • Applications
      • Tenants
      • Identity Providers
      • Authentication/Authorization
      • Integration Points
    • Example Apps
      • Overview
      • Dart
      • Go
      • Java
      • JavaScript
      • .NET Core
      • PHP
      • Python
      • Ruby
    • Tutorials
      • Overview
      • Angular
      • C# .NET
      • .NET Core API
      • Express.js
      • Express API
      • Flutter
      • Java Spring
      • Laravel API
      • Python Django
      • Python Flask
      • React
      • Ruby on Rails
      • Ruby on Rails API
      • Vue.js
  • Installation Guide
    • Overview
    • System Requirements
    • Server Layout
    • Cloud
    • Cluster
    • Docker
    • Fast Path
    • Kubernetes
      • Overview
      • Deployment Guide
      • Minikube Setup
      • Amazon EKS Setup
      • Google GKE Setup
      • Microsoft AKS Setup
    • Kickstart™
    • Homebrew
    • Marketplaces
    • Packages
    • Database
    • FusionAuth App
    • FusionAuth Search
    • Common Configuration
  • Migration Guide
    • Overview
    • General
    • Auth0
    • Amazon Cognito
    • Duende IdentityServer
    • Firebase
    • Keycloak
    • Microsoft Azure AD B2C
    • Supabase
    • Tutorial
  • Admin Guide
    • Overview
    • Account Portal
    • CLI
    • Config Management
    • Editions and Features
    • Key Rotation
    • Licensing
    • Monitoring
    • Prometheus Setup
    • Proxy Setup
    • Reference
      • Overview
      • Configuration
      • CORS
      • Data Types
      • Hosted Login Pages Cookies
      • Known Limitations
      • Password Hashes
    • Releases
    • Roadmap
    • Search And FusionAuth
    • Securing
    • Switch Search Engines
    • Technical Support
    • Troubleshooting
    • Upgrading
    • User Support Guide
    • Vulnerabilities
    • WebAuthn
  • Login Methods
    • Identity Providers
      • Overview
      • Apple
      • Epic Games
      • External JWT
        • Overview
        • Example
      • Facebook
      • Google
      • HYPR
      • LinkedIn
      • Nintendo
      • OpenID Connect
        • Overview
        • Amazon Cognito
        • Azure AD
        • Discord
        • Github
        • Okta
      • Sony PlayStation Network
      • Steam
      • Twitch
      • Twitter
      • SAML v2
        • Overview
        • ADFS
        • Azure AD
        • Okta
      • SAML v2 IdP Initiated
        • Overview
        • Okta
      • Xbox
    • OIDC & OAuth 2.0
      • Overview
      • Endpoints
      • Tokens
      • OAuth Modes
      • URL Validation
      • Integrations
        • CockroachDB
        • Salesforce
    • Passwordless
      • Overview
      • Magic Links
      • WebAuthn & Passkeys
    • SAML v2 IdP
      • Overview
      • Aiven
      • Google
      • PagerDuty
      • SendGrid
      • Tableau Cloud
      • Zendesk
  • Developer Guide
    • Overview
    • API Gateways
      • Overview
      • Amazon API Gateway
      • HAProxy
      • Kong Gateway
      • ngrok Cloud Edge
    • Client Libraries & SDKs
      • Overview
      • Angular
      • Dart
      • Go
      • Java
      • JavaScript
      • .NET Core
      • Node
      • OpenAPI
      • PHP
      • Python
      • React
      • Ruby
      • Typescript
      • Vue
    • Events & Webhooks
      • Overview
      • Writing a Webhook
      • Securing Webhooks
      • Events
        • Overview
        • Audit Log Create
        • Event Log Create
        • JWT Public Key Update
        • JWT Refresh
        • JWT Refresh Token Revoke
        • Kickstart Success
        • Group Create
        • Group Create Complete
        • Group Delete
        • Group Delete Complete
        • Group Update
        • Group Update Complete
        • Group Member Add
        • Group Member Add Complete
        • Group Member Remove
        • Group Member Remove Complete
        • Group Member Update
        • Group Member Update Complete
        • User Action
        • User Bulk Create
        • User Create
        • User Create Complete
        • User Deactivate
        • User Delete
        • User Delete Complete
        • User Email Update
        • User Email Verified
        • User IdP Link
        • User IdP Unlink
        • User Login Failed
        • User Login Id Dup. Create
        • User Login Id Dup. Update
        • User Login New Device
        • User Login Success
        • User Login Suspicious
        • User Password Breach
        • User Password Reset Send
        • User Password Reset Start
        • User Password Reset Success
        • User Password Update
        • User Reactivate
        • User Reg. Create
        • User Reg. Create Complete
        • User Reg. Delete
        • User Reg. Delete Complete
        • User Reg. Update
        • User Reg. Update Complete
        • User Reg. Verified
        • User 2FA Method Add
        • User 2FA Method Remove
        • User Update
        • User Update Complete
    • Guides
      • Overview
      • Anonymous Users
      • Application Specific Email Templates
      • Authentication Tokens
      • Exposing A Local Instance
      • JSON Web Tokens
      • Key Master
      • Localization and Internationalization
      • Multi-Factor Authentication
      • Multi-Tenant
      • Passwordless
      • Registration-based Email Verification
      • Searching With Elasticsearch
      • Securing Your APIs
      • Silent Mode
      • Single Sign-on
      • Two Factor (pre 1.26)
      • User Actions
    • Integrations
      • Overview
      • CleanSpeak
      • Kafka
      • Twilio
    • Plugins
      • Overview
      • Writing a Plugin
      • Custom Password Hashing
    • User Control & Gating
      • Overview
      • Gate Unverified Users
      • Gate Unverified Registrations
      • User Account Lockout
  • Customization
    • Email & Templates
      • Overview
      • Configure Email
      • Email Templates
      • Email Variables
      • Message Templates
    • Lambdas
      • Overview
      • Apple Reconcile
      • Client Cred. JWT Populate
      • Epic Games Reconcile
      • External JWT Reconcile
      • Facebook Reconcile
      • Google Reconcile
      • HYPR Reconcile
      • JWT Populate
      • LDAP Connector Reconcile
      • LinkedIn Reconcile
      • Nintendo Reconcile
      • OpenID Connect Reconcile
      • SAML v2 Populate
      • SAML v2 Reconcile
      • SCIM Group Req. Converter
      • SCIM Group Resp. Convtr.
      • SCIM User Req. Converter
      • SCIM User Resp. Converter
      • Self-Service Registration
      • Sony PSN Reconcile
      • Steam Reconcile
      • Twitch Reconcile
      • Twitter Reconcile
      • Xbox Reconcile
    • Messengers
      • Overview
      • Generic Messenger
      • Twilio Messenger
    • Themes
      • Overview
      • Client-side Password Validation
      • Examples
      • Helpers
      • Kickstart Custom Theme
      • Localization
      • Template Variables
      • Tailwind CSS
  • Premium Features
    • Overview
    • Advanced Registration Forms
    • Advanced Threat Detection
    • Application Specific Themes
    • Breached Password Detection
    • Connectors
      • Overview
      • Generic Connector
      • LDAP Connector
      • FusionAuth Connector
    • Entity Management
    • SCIM
      • Overview
      • Azure AD Client
      • Okta Client
      • SCIM-SDK
    • Self Service Account Mgmt
      • Overview
      • Updating User Data & Password
      • Add Two-Factor Authenticator
      • Add Two-Factor Email
      • Add Two-Factor SMS
      • Add WebAuthn Passkey
      • Customizing
      • Bootstrapping Login
      • Troubleshooting
    • WebAuthn
  • APIs
    • Overview
    • Authentication
    • Errors
    • API Explorer
    • Actioning Users
    • API Keys
    • Applications
    • Audit Logs
    • Connectors
      • Overview
      • Generic
      • LDAP
    • Consents
    • Emails
    • Entity Management
      • Overview
      • Entities
      • Entity Types
      • Grants
    • Event Logs
    • Families
    • Forms
    • Form Fields
    • Groups
    • Hosted Backend
    • Identity Providers
      • Overview
      • Links
      • Apple
      • External JWT
      • Epic Games
      • Facebook
      • Google
      • HYPR
      • LinkedIn
      • Nintendo
      • OpenID Connect
      • SAML v2
      • SAML v2 IdP Initiated
      • Sony PlayStation Network
      • Steam
      • Twitch
      • Twitter
      • Xbox
    • Integrations
    • IP Access Control Lists
    • JWT
    • Keys
    • Lambdas
    • Login
    • Message Templates
    • Messengers
      • Overview
      • Generic
      • Twilio
    • Multi-Factor/Two Factor
    • Passwordless
    • Reactor
    • Registrations
    • Reports
    • SCIM
      • Overview
      • SCIM User
      • SCIM Group
      • SCIM EnterpriseUser
      • SCIM Service Provider Config.
    • System
    • Tenants
    • Themes
    • Users
    • User Actions
    • User Action Reasons
    • User Comments
    • WebAuthn
    • Webhooks
  • Release Notes

    Tailwind CSS

    Overview

    Tailwind CSS is a utility-first CSS framework for rapidly building custom user interfaces. If you are already using Tailwind CSS in your application, you can integrate it into FusionAuth.

    Prerequisites

    • Node.js 18 or later

    Setting up FusionAuth

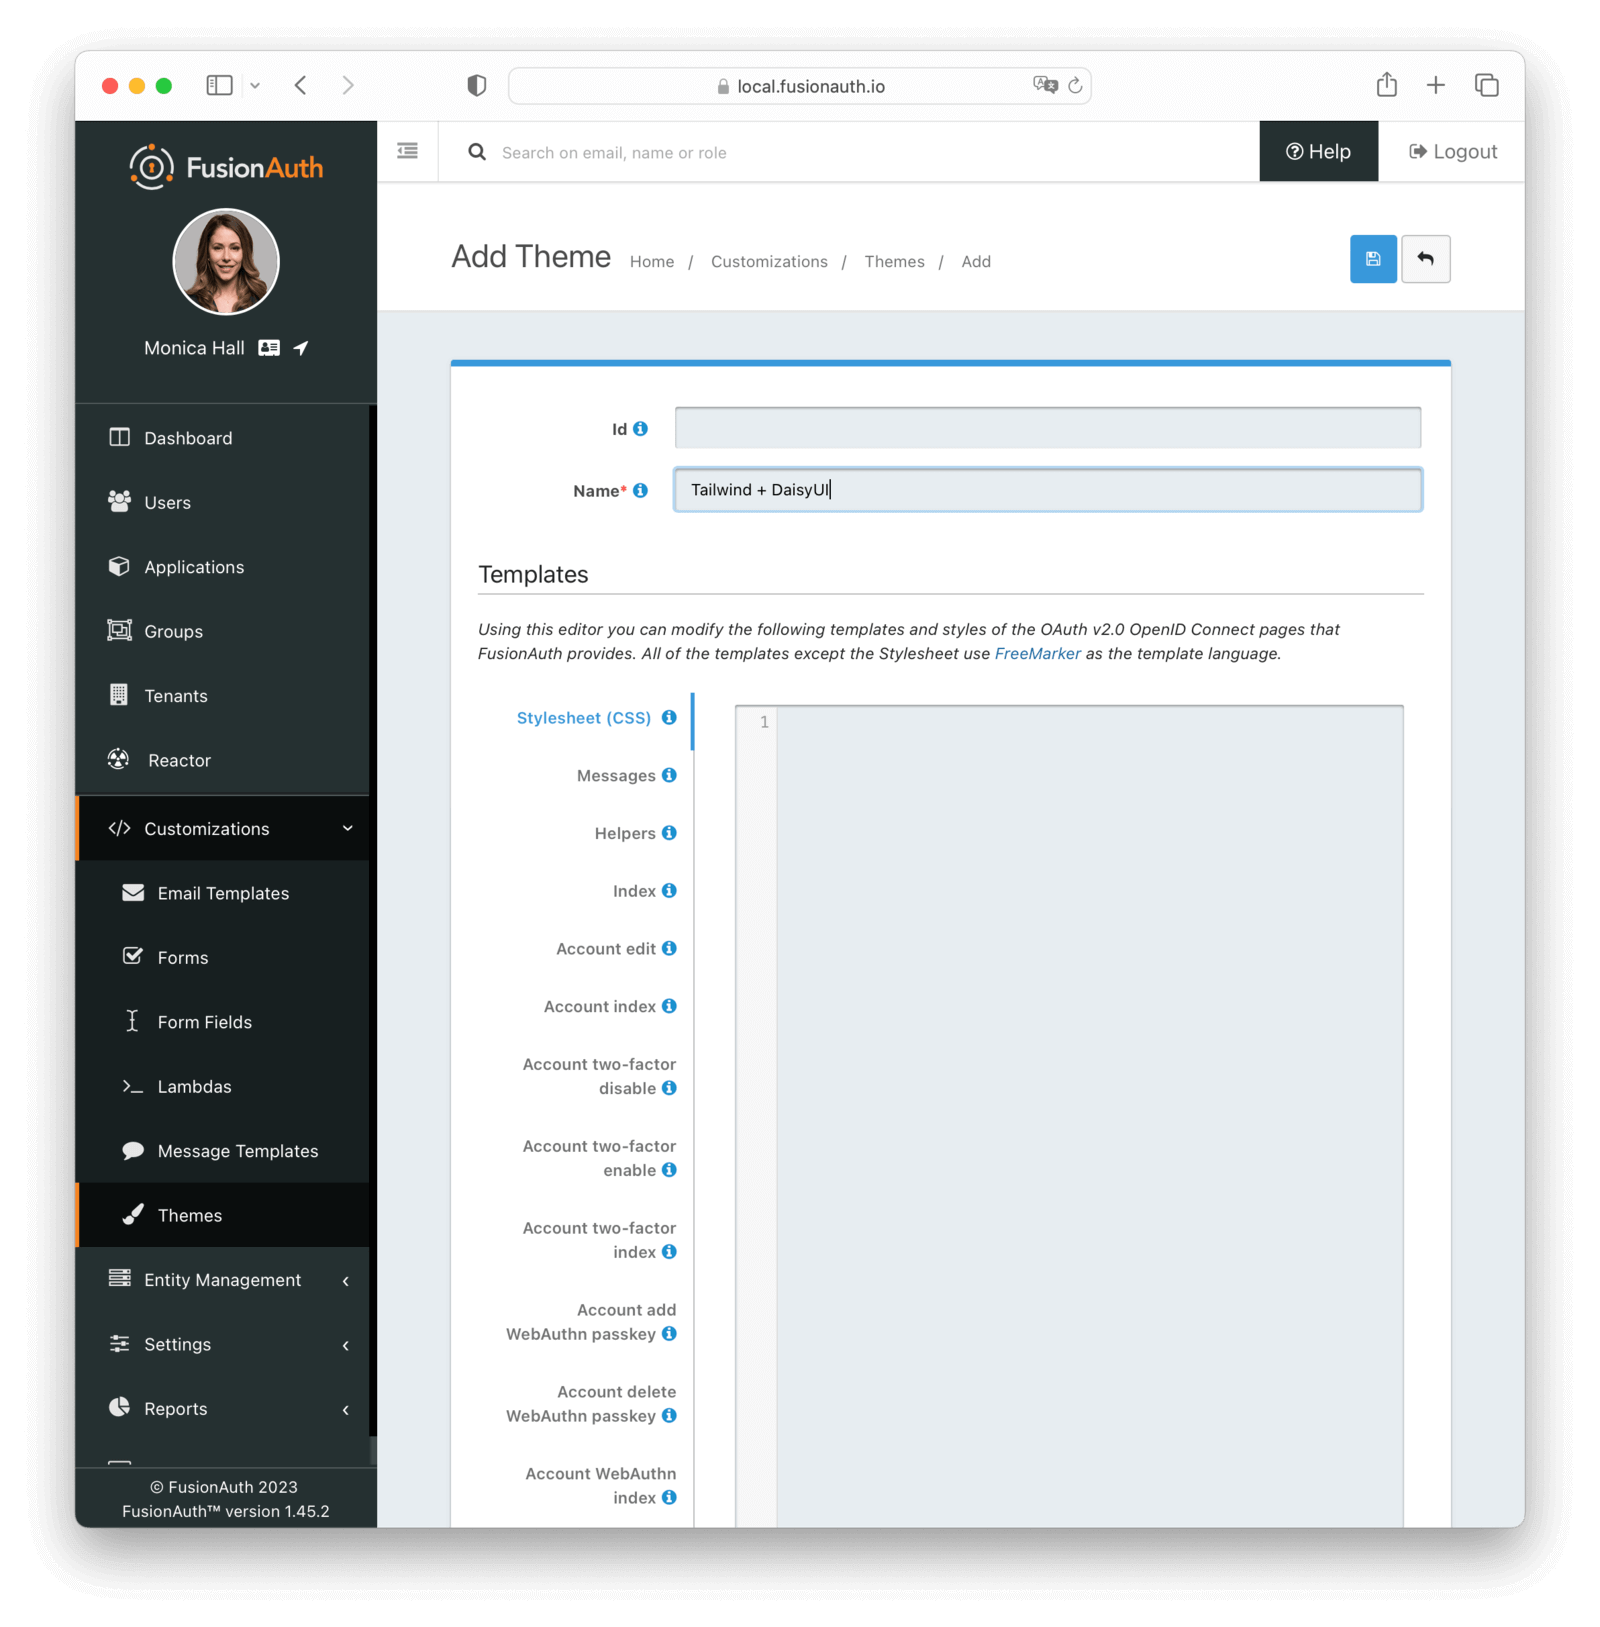
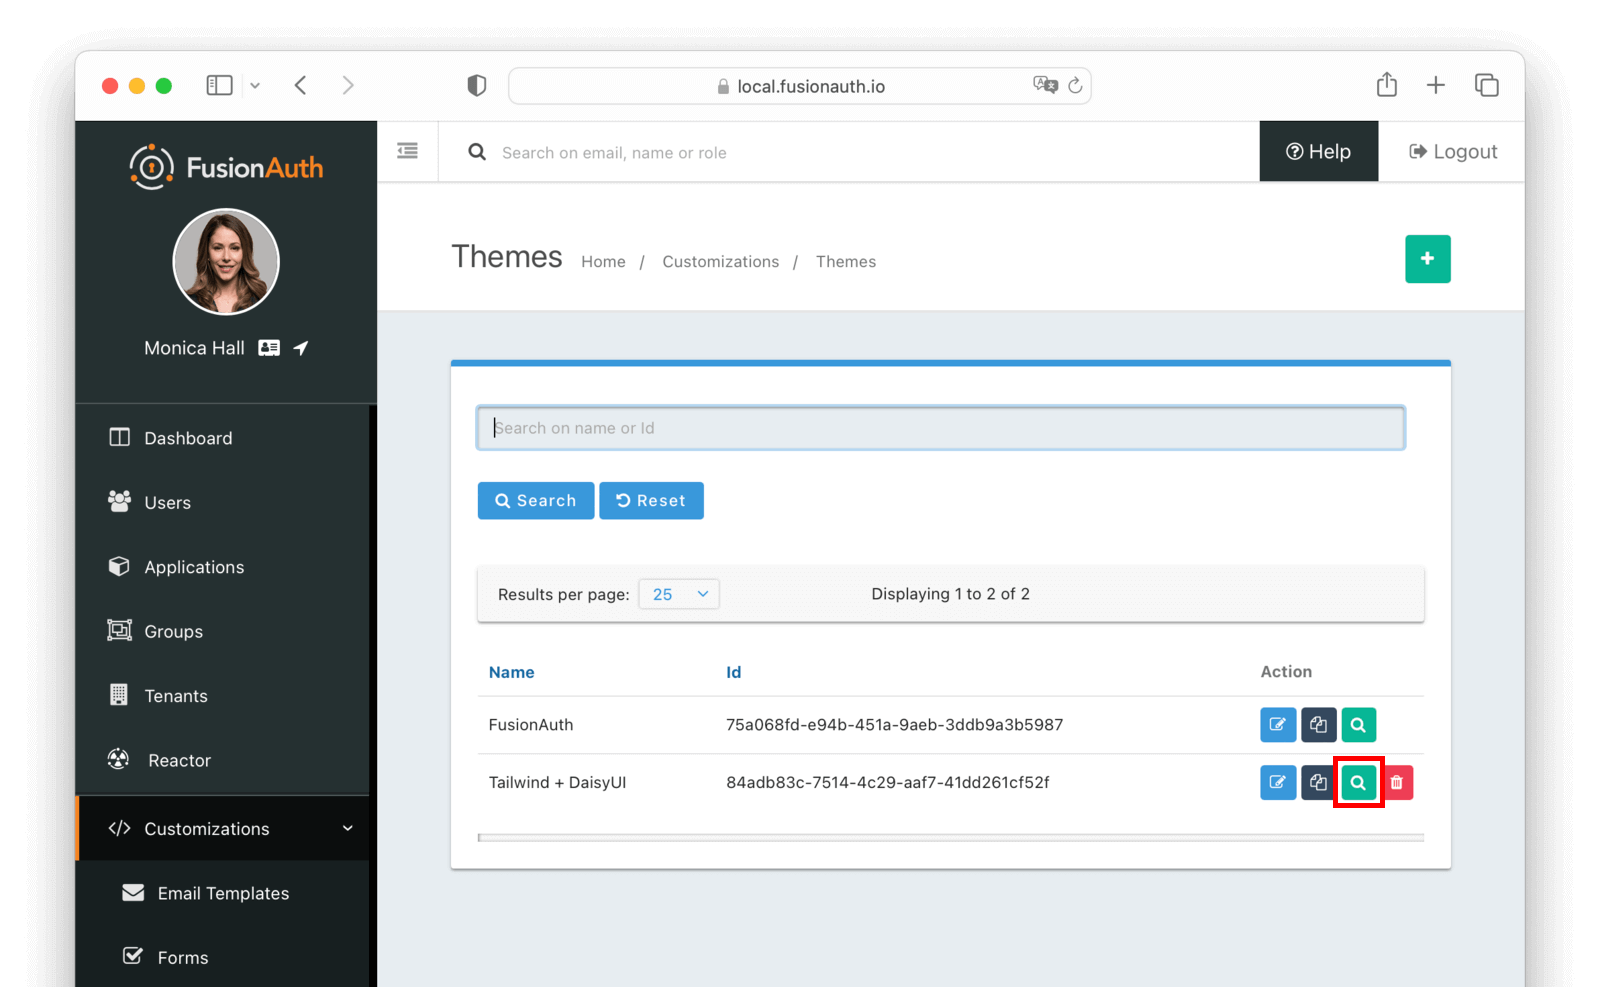
    Create a new theme by navigating to Customization → Themes and then click the Add button. Enter a Name for the theme and click the Save button.

    Create a theme

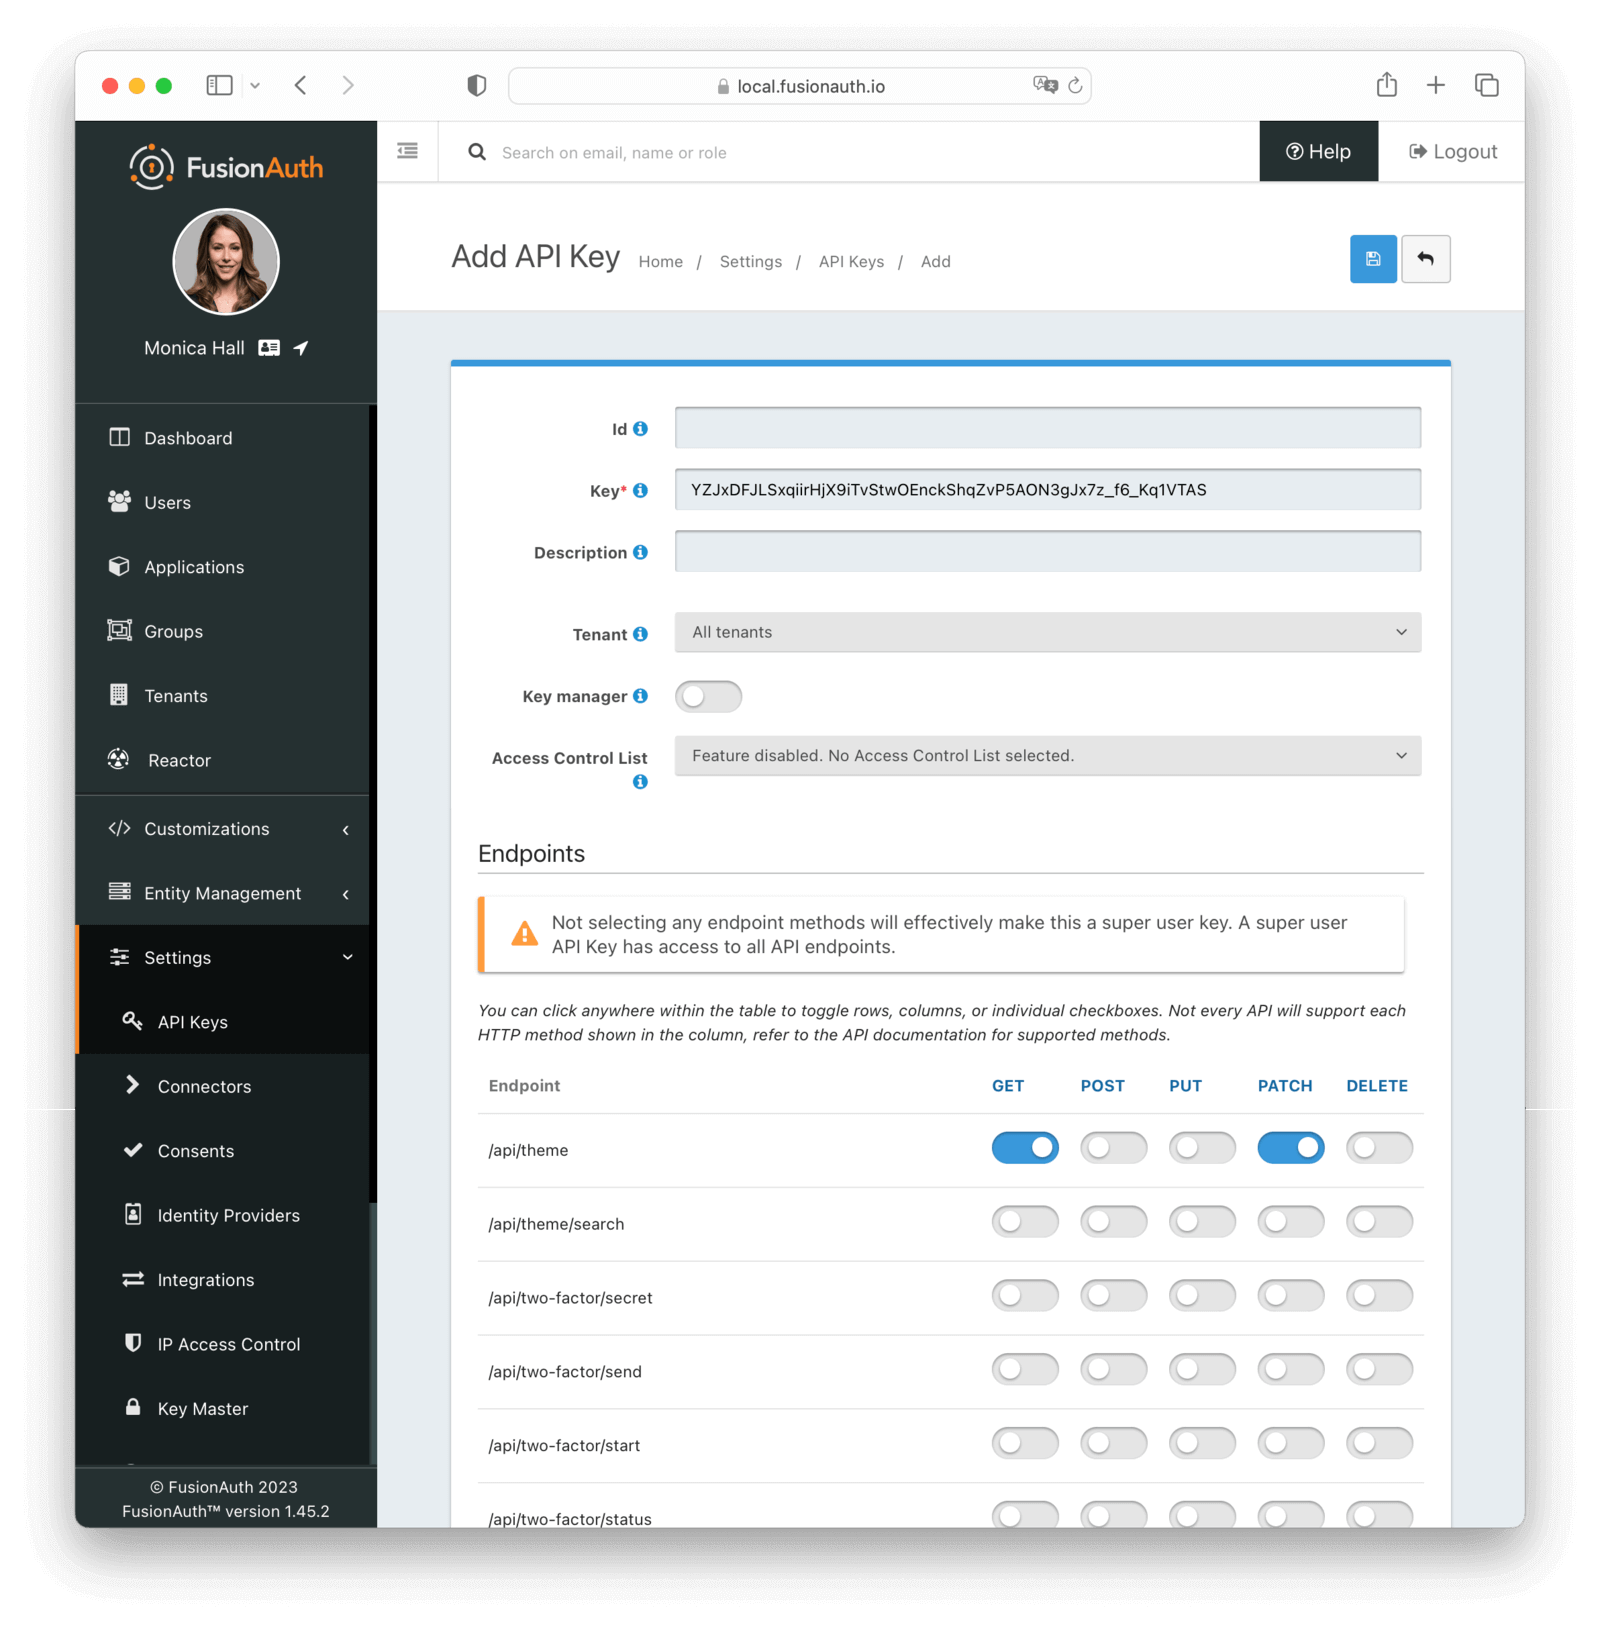
    Create a new API key with permissions to modify the theme. You can do this by going to Settings → API Keys. Then click the Add button and select GET and PATCH permissions for /api/theme/.

    Create an API key

    Installation

    To get started, we need to create a new node project with the FusionAuth CLI and Tailwind CSS installed:

    
    mkdir fusionauth-tailwind
    cd fusionauth-tailwind
    npm init -y
    npm install @fusionauth/cli tailwindcss@3
    npx tailwindcss init

    This will install the dependencies and create the tailwind.config.js file in the project root. You can customize the configuration as needed.

    Change the tailwind.config.js to handle the FreeMarker template files in the tpl directory:

    
    /** @type {import('tailwindcss').Config} */
    module.exports = {
      content: ['./tpl/*.ftl'],
      theme: {
        extend: {}
      },
      plugins: []
    }

    Create a new stylesheet input.css in the root directory:

    
    @tailwind base;
    @tailwind components;
    @tailwind utilities;

    This stylesheet will be used to import the Tailwind CSS base, components, and utilities. Additionally, you can add custom classes to this stylesheet as well.

    We can now download the theme from FusionAuth:

    
    npx fusionauth theme:download <themeId> -k <apiKey> -h http://localhost:9011

    Replace <themeId> and <apiKey> with the Id of the theme and API key you created in FusionAuth respectively.

    Currently, the theme is using the fusionauth-style.css hosted in the FusionAuth instance. This could conflict with our Tailwind CSS file. To fix this, we need to remove the following line from the tpl/helpers.ftl file. It should be around line number 85:

    
      <link rel="stylesheet" href="/css/fusionauth-style.css?version=${version}"/>

    Finally, we add two new scripts to the package.json file:

    
    "scripts": {
      "watch:tailwind": "tailwindcss -i ./input.css -o ./tpl/stylesheet.css --watch",
      "watch:theme": "fusionauth theme:watch <themeId> -k <apiKey> -h http://localhost:9011"
    },

    At this point, we have prepared the project to build the Tailwind CSS file and upload the theme to FusionAuth. To apply the changes in the helper.ftl file, run the following command:

    
    npx fusionauth theme:upload <themeId> -k <apiKey> -h http://localhost:9011

    Usage

    There are now two scripts that can be used to build the Tailwind CSS file and upload the theme to FusionAuth:

    • npm run watch:theme — watches the template directory for changes and upload the theme to FusionAuth

    • npm run watch:tailwind — watches the template directory for changes and rebuild the Tailwind CSS file

    If you start both scripts in separate terminal windows, you can edit the template files, which rebuild the Tailwind CSS file, and automatically upload the theme to FusionAuth.

    Now if we use a Tailwind CSS class in a template, it will be included in the CSS file:

    
    <div class="bg-gray-200">
      <h1 class="text-2xl">Hello World</h1>
    </div>

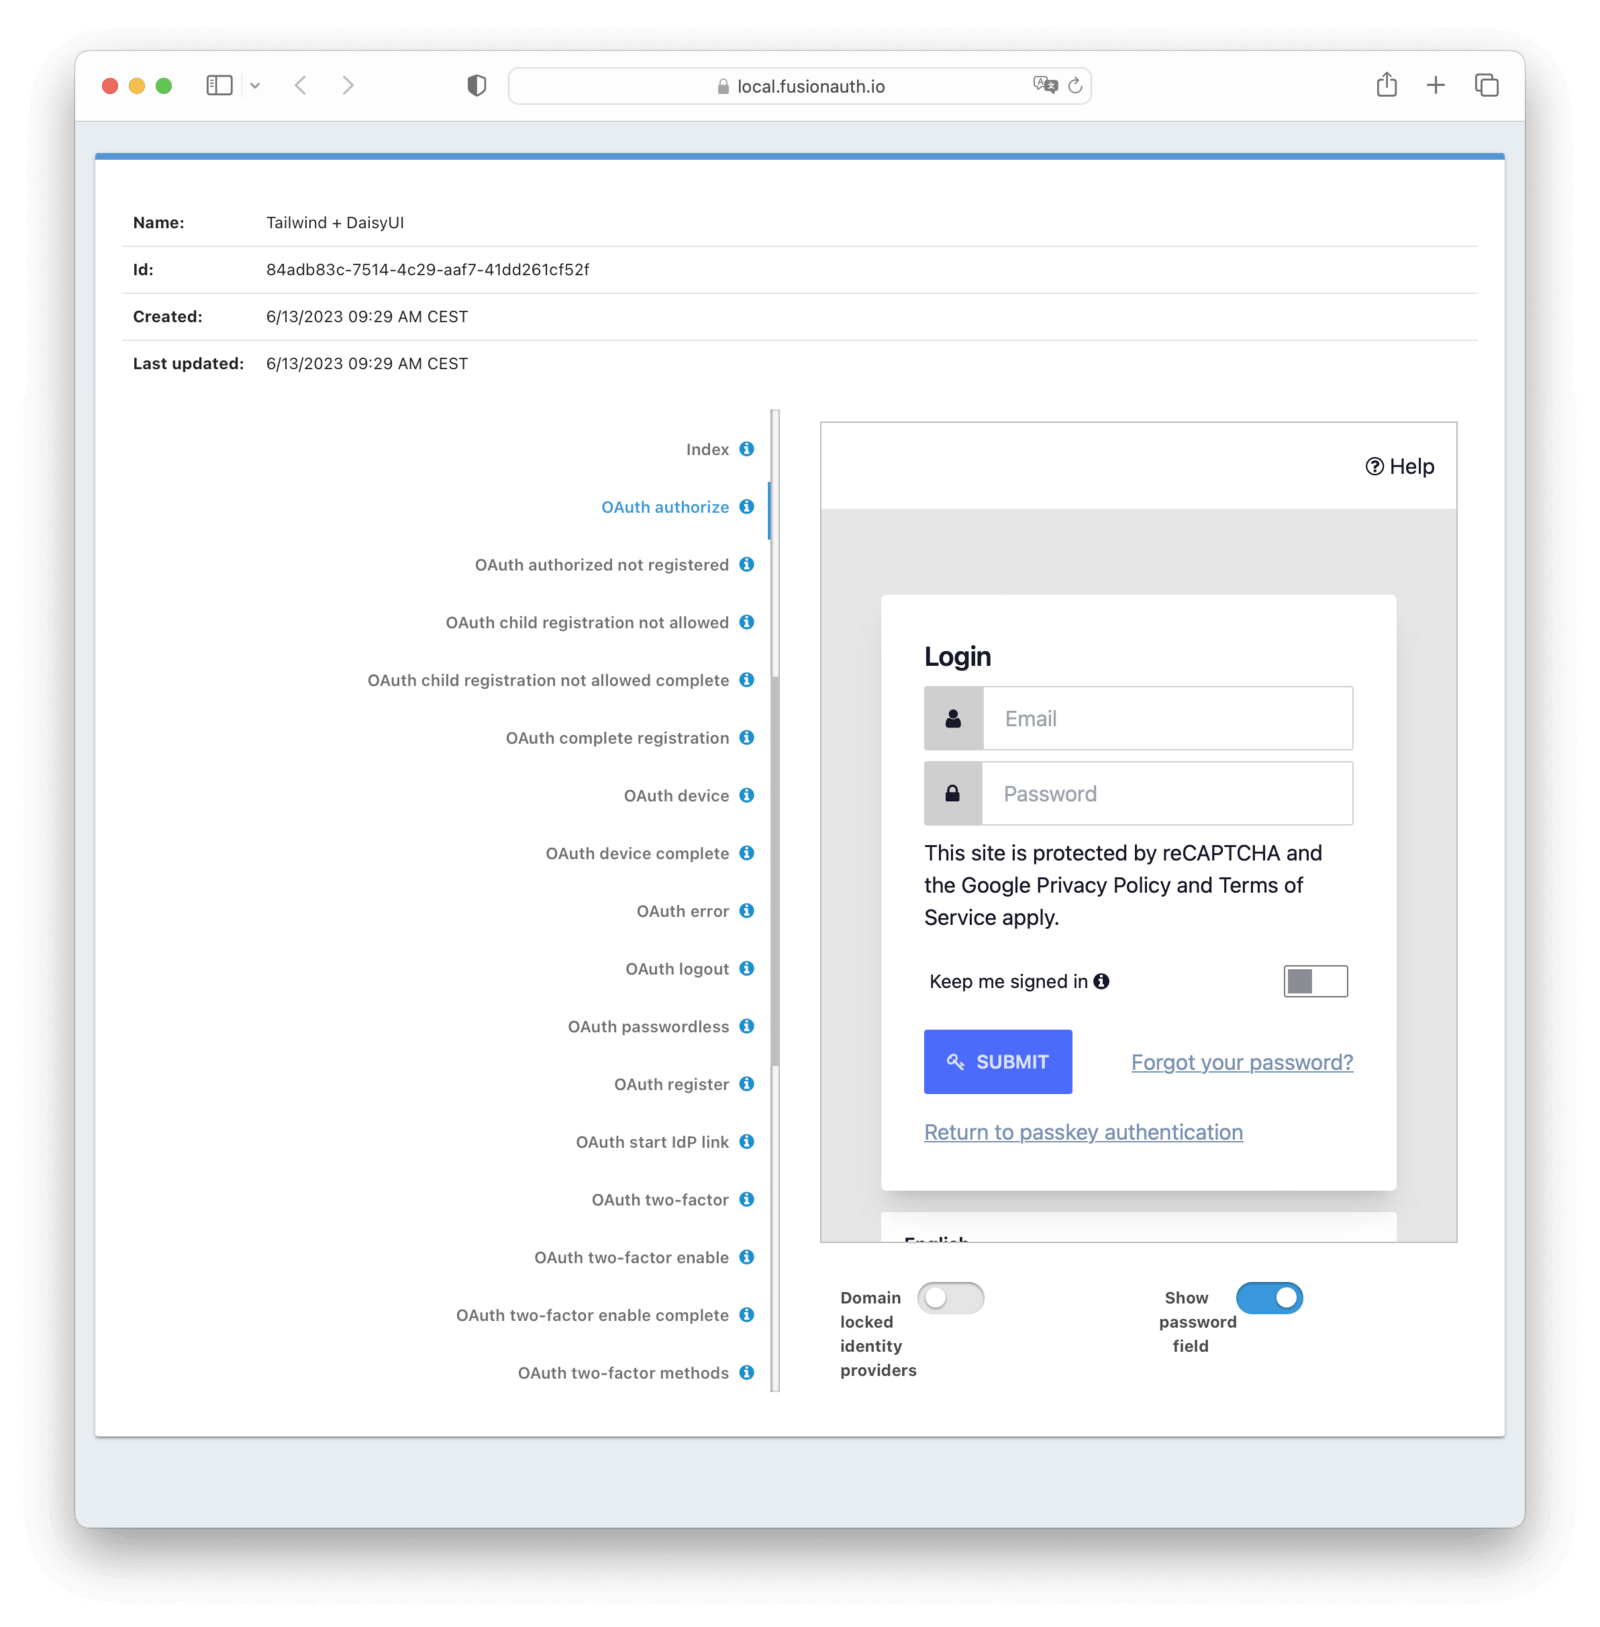
    To preview the changes, open FusionAuth, navigate to Customization → Themes. Choose your theme, then click Preview.

    Click preview Preview the theme

    Integrate DaisyUI

    There are many Tailwind CSS UI component libraries available. In this example, we are going to use DaisyUI.

    DaisyUI is a Tailwind CSS plugin that provides a set of pre-built components and utilities to build beautiful and responsive websites. It supports color theming, light and dark mode, and RTL.

    To integrate DaisyUI, install the plugin:

    
    npm install daisyui

    Then add the plugin to the tailwind.config.js:

    
    module.exports = {
      content: ['./tpl/*.ftl'],
      theme: {
        extend: {}
      },
      plugins: [
        require('daisyui')
      ]
    }

    Now you can use the DaisyUI components in the FreeMarker template files:

    
    <div class="bg-gray-200">
      <h1 class="text-2xl">Hello World</h1>
      <div class="p-4">
        <button class="btn btn-primary">Primary</button>
      </div>
    </div>

    For an example integration, see FusionAuth + Tailwind + DaisyUI Repository on GitHub.

    The example repository has light and dark mode setup, and includes updated templates for the following pages:

    • Log in

    • Log out

    • Registration

    • Forgot password

    In this repository, you could change the color scheme simply by updating the tailwind.config.js file:

    
    /** @type {import('tailwindcss').Config} */
    module.exports = {
      content: ['./tpl/*.ftl'],
      theme: {
        extend: {
            keyframes: {
                progressBar: {
                    "0%": {
                        width: "0%"
                    },
                    "100%": {
                        width: "100%"
                    }
                }
            },
            animation: {
                progressBar: "progressBar 10s ease-in 1"
            }
        }
      },
      plugins: [require("daisyui")],
    
      daisyui: {
          themes: [
              'corporate',
              {
                business: {
                    ...require("daisyui/src/colors/themes")["[data-theme=business]"],
                    'primary': '#c891f2'
                }
              }
          ],
          darkTheme: 'business'
      }
    }

    Or you can even create your own theme with the DaisyUI Theme Generator

    Conclusion

    This guide has shown you how to integrate Tailwind CSS into FusionAuth using the FusionAuth CLI. Additionally, we have shown how to integrate DaisyUI to build beautiful and responsive FusionAuth pages.

    References

    • Tailwind CSS

    • DaisyUI

    Feedback

    How helpful was this page?

    See a problem?

    File an issue in our docs repo

    Have a question or comment to share?

    Visit the FusionAuth community forum.

    © 2023 FusionAuth
    How-to
    Blog
    Expert Advice
    Download
    Release Notes
    Subscribe for developer updates