Amazon API Gateway
Amazon API Gateway is an AWS service for creating, publishing, maintaining, monitoring, and securing REST, HTTP, and WebSocket APIs at any scale. You can create APIs for AWS services or other web services.
You can configure Amazon API Gateway to handle authentication and authorization to a resource through JSON Web Tokens (JWTs) issued on behalf of a user by an identity provider.
In this document, you'll learn how to set up Amazon API Gateway and FusionAuth as the identity provider to protect a lambda function running on your AWS cloud instance.
Prerequisites#
- A FusionAuth instance running on a publicly accessible URL. You can spin up a basic FusionAuth Cloud instance or install it on any server. If you are not able to host FusionAuth on a public server, you can tunnel your local instance of FusionAuth through a tool like ngrok.
- An AWS account.
Exposing FusionAuth Publicly#
If your FusionAuth instance is already publicly available, you can skip this section.
If you are hosting FusionAuth locally and want to expose it publicly using ngrok, you can run the following command:
Exposing a local FusionAuth instance through ngrok
ngrok http 9011
This assumes your local FusionAuth instance is running on port 9011, which is the default for local FusionAuth installations.
Look for the Forwarding line in the output. It should look something like this:
Output forwarding address from ngrok
Forwarding https://7817-102-218-66-2.eu.ngrok.io -> http://localhost:9011
The forwarding address will be publicly accessible and you can use this to replace <YOUR_FUSIONAUTH_URL> in this tutorial.
Set Up FusionAuth#
Navigate to your FusionAuth instance.
First, you need to make sure the JWT issuer setting is correct. Navigate to Tenants -> Your Tenant and change the issuer to the URL of your FusionAuth instance. For example, https://local.fusionauth.io. Record this value, as we'll set it in the AWS Gateway API Authorizer later.
Next, you need to configure an application that will issue tokens to access the Amazon API Gateway project.
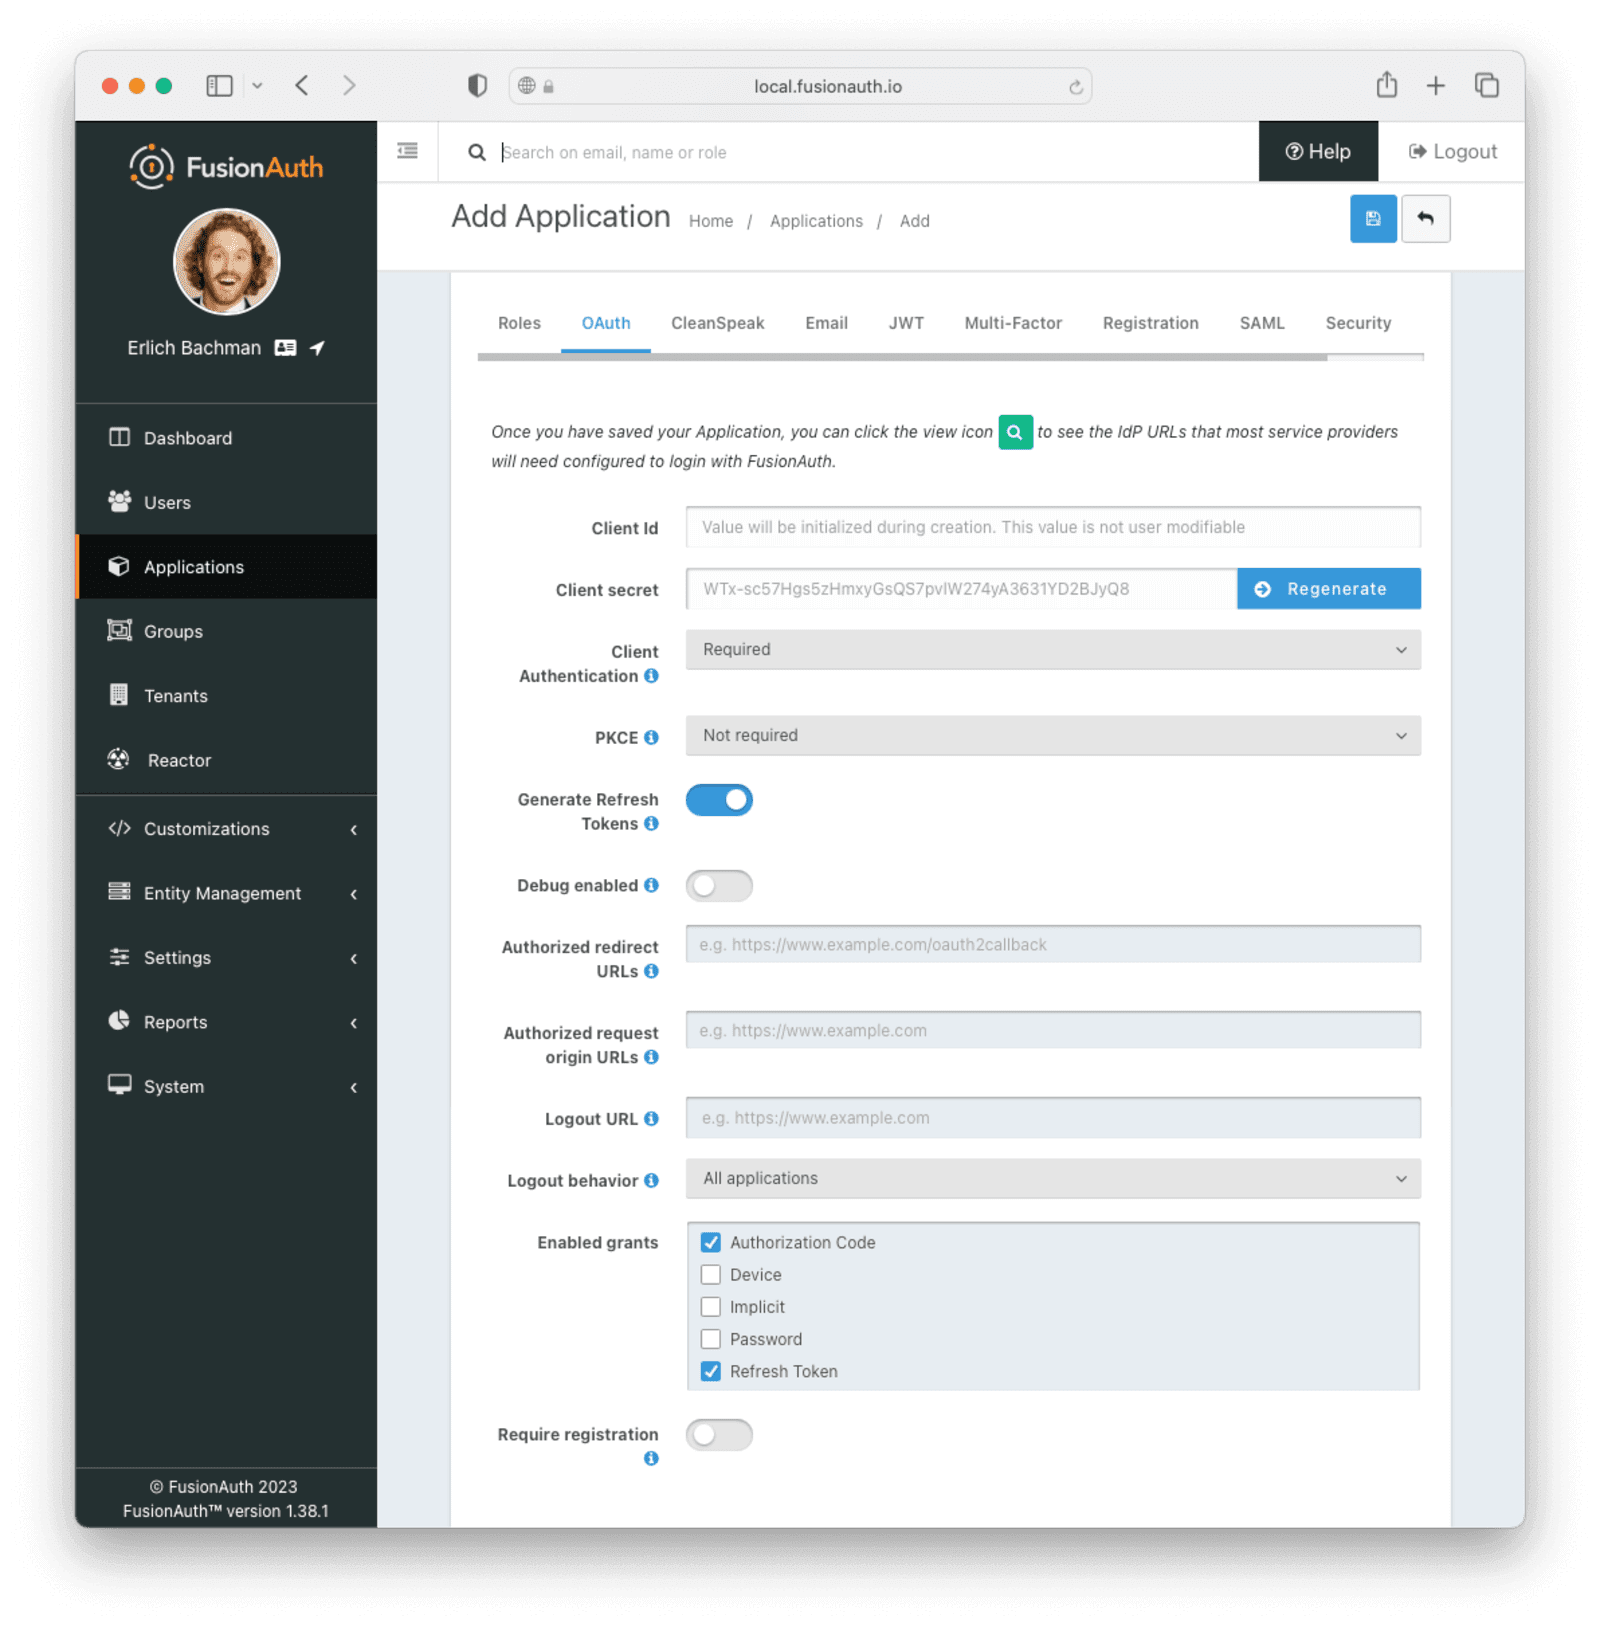
Navigate to Applications and create a new application. Fill out the Name field, then click the OAuth tab.
Make sure that the Enabled grants checkboxes have the Authorization Code and Refresh Token grants enabled.
Your application should look like this.
On the JWT tab, toggle the Enable application-level JWT override field and set the Access Token signing key and Id Token signing key to Auto generate a new key on save...
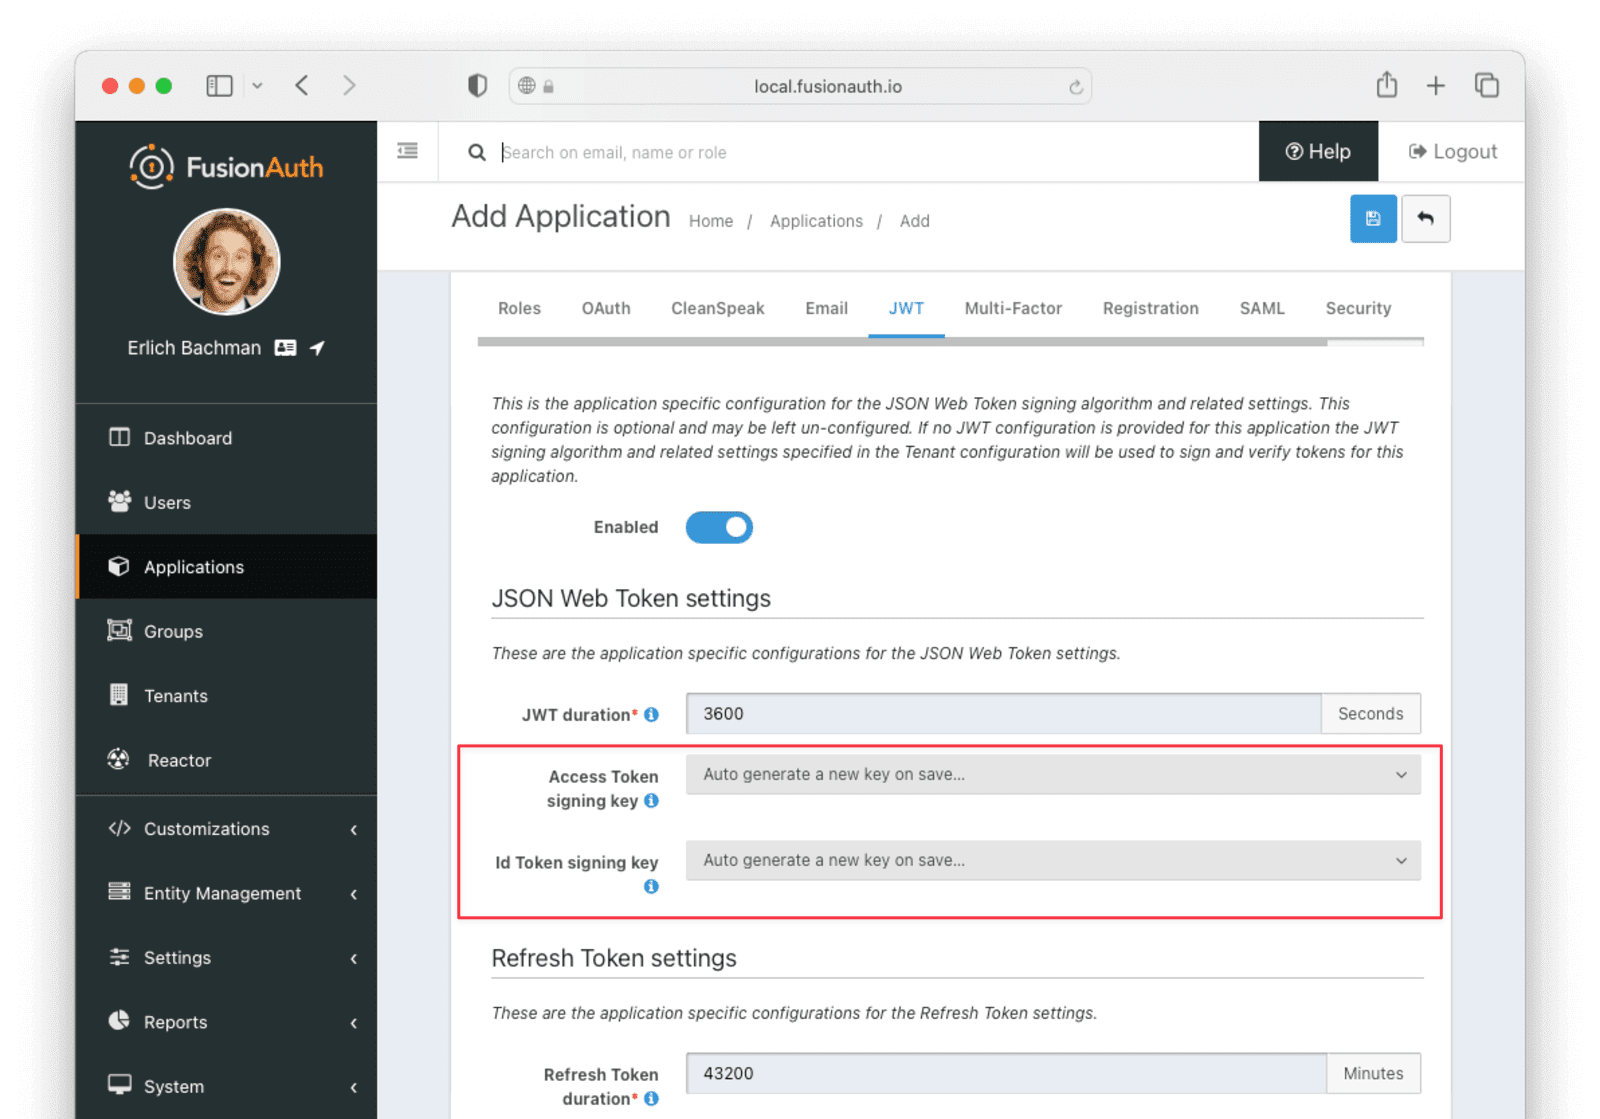
Click the Save button.
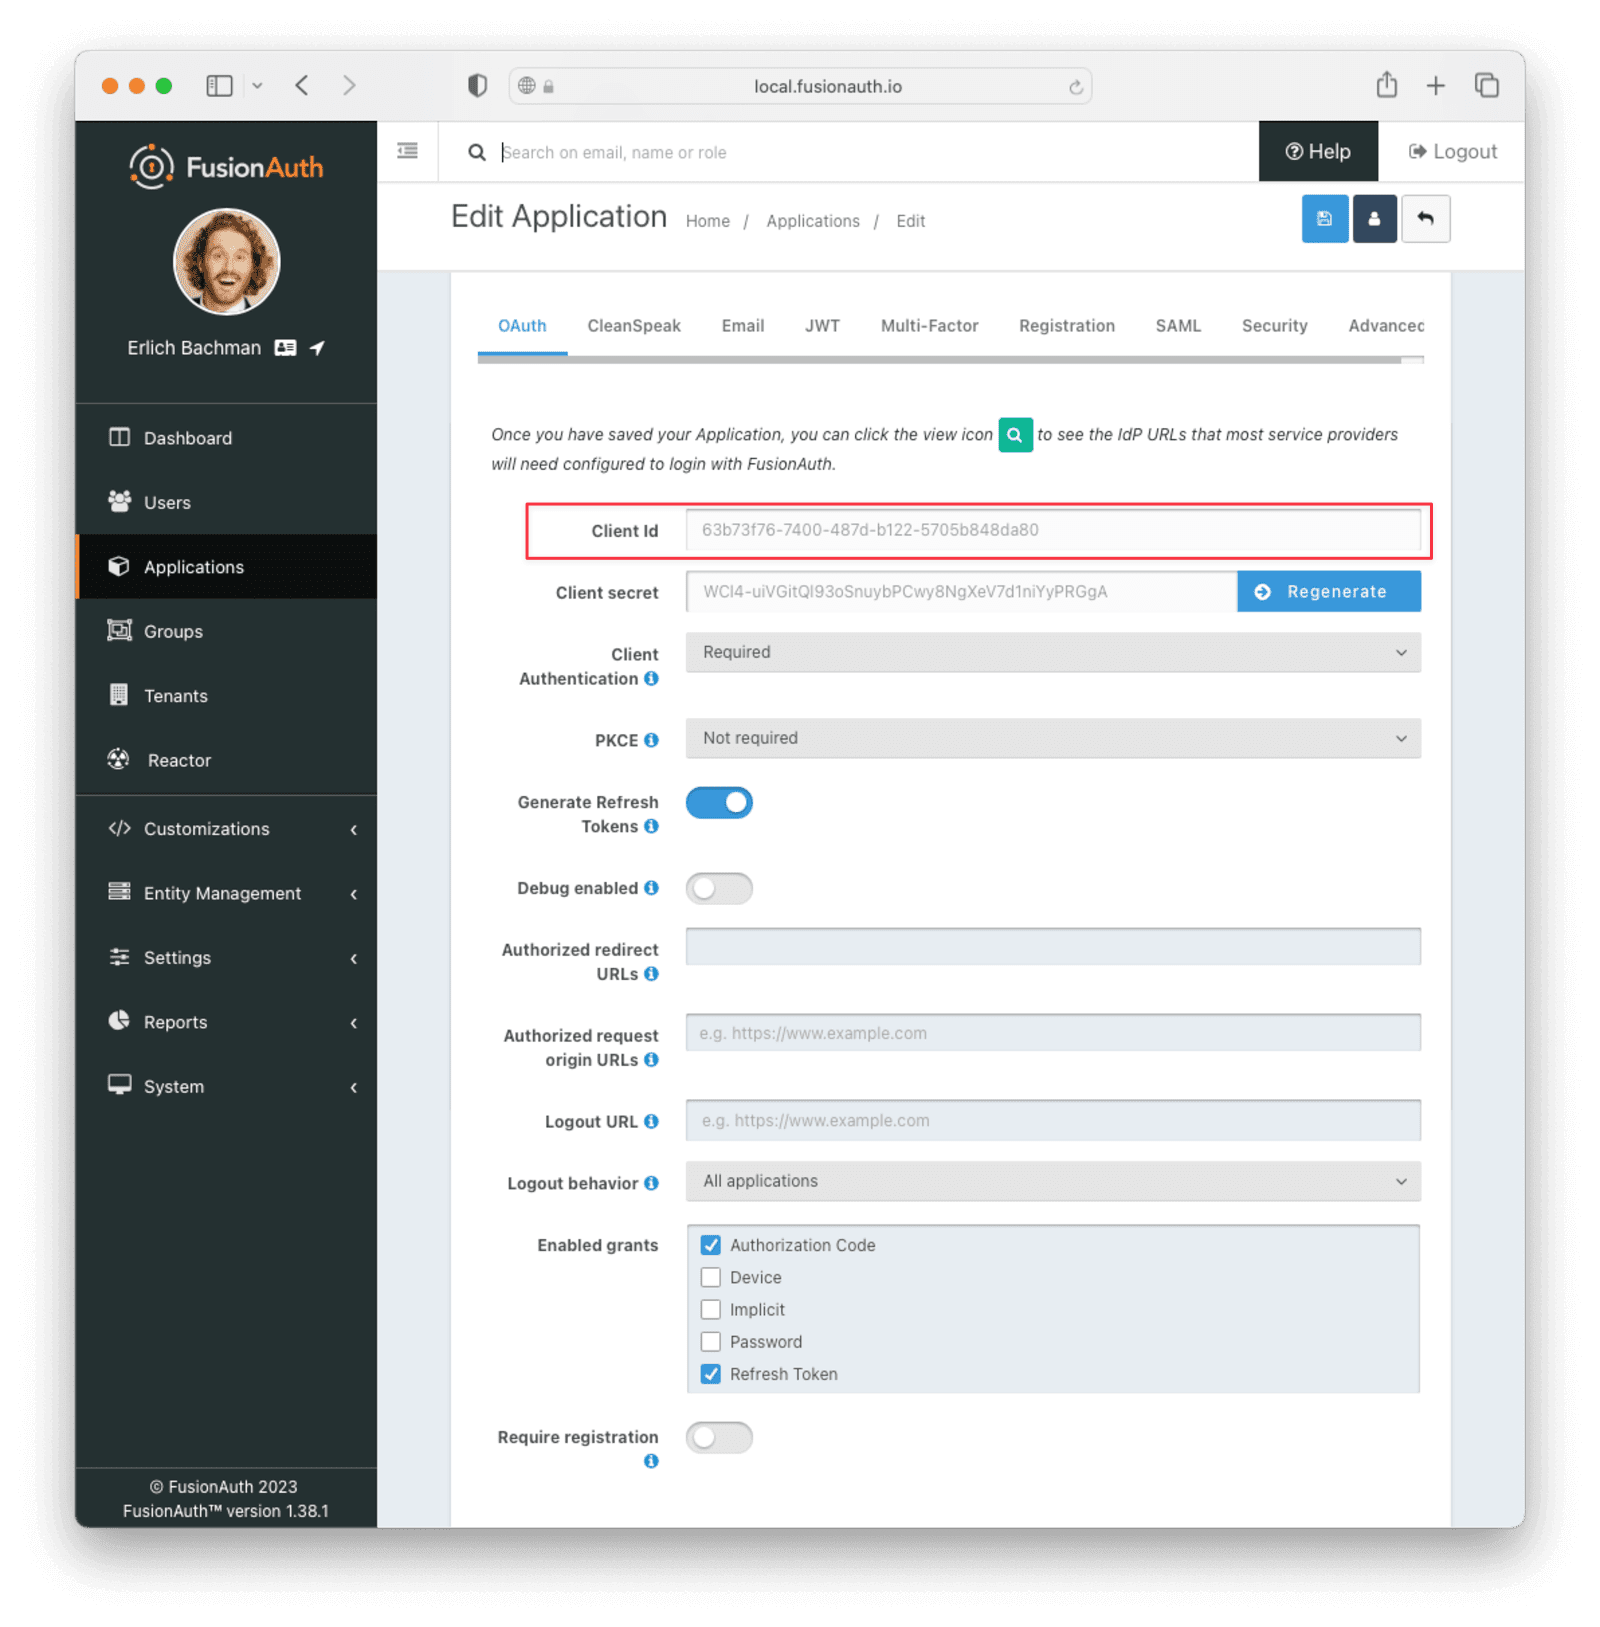
Edit the new application. You should see a value in the Client Id field. Copy it and put it in a text file. You'll use it in the Set Up AWS API Gateway step.
Set Up AWS API Gateway#
Navigate to your AWS Console or create an AWS account if you haven't got one already.
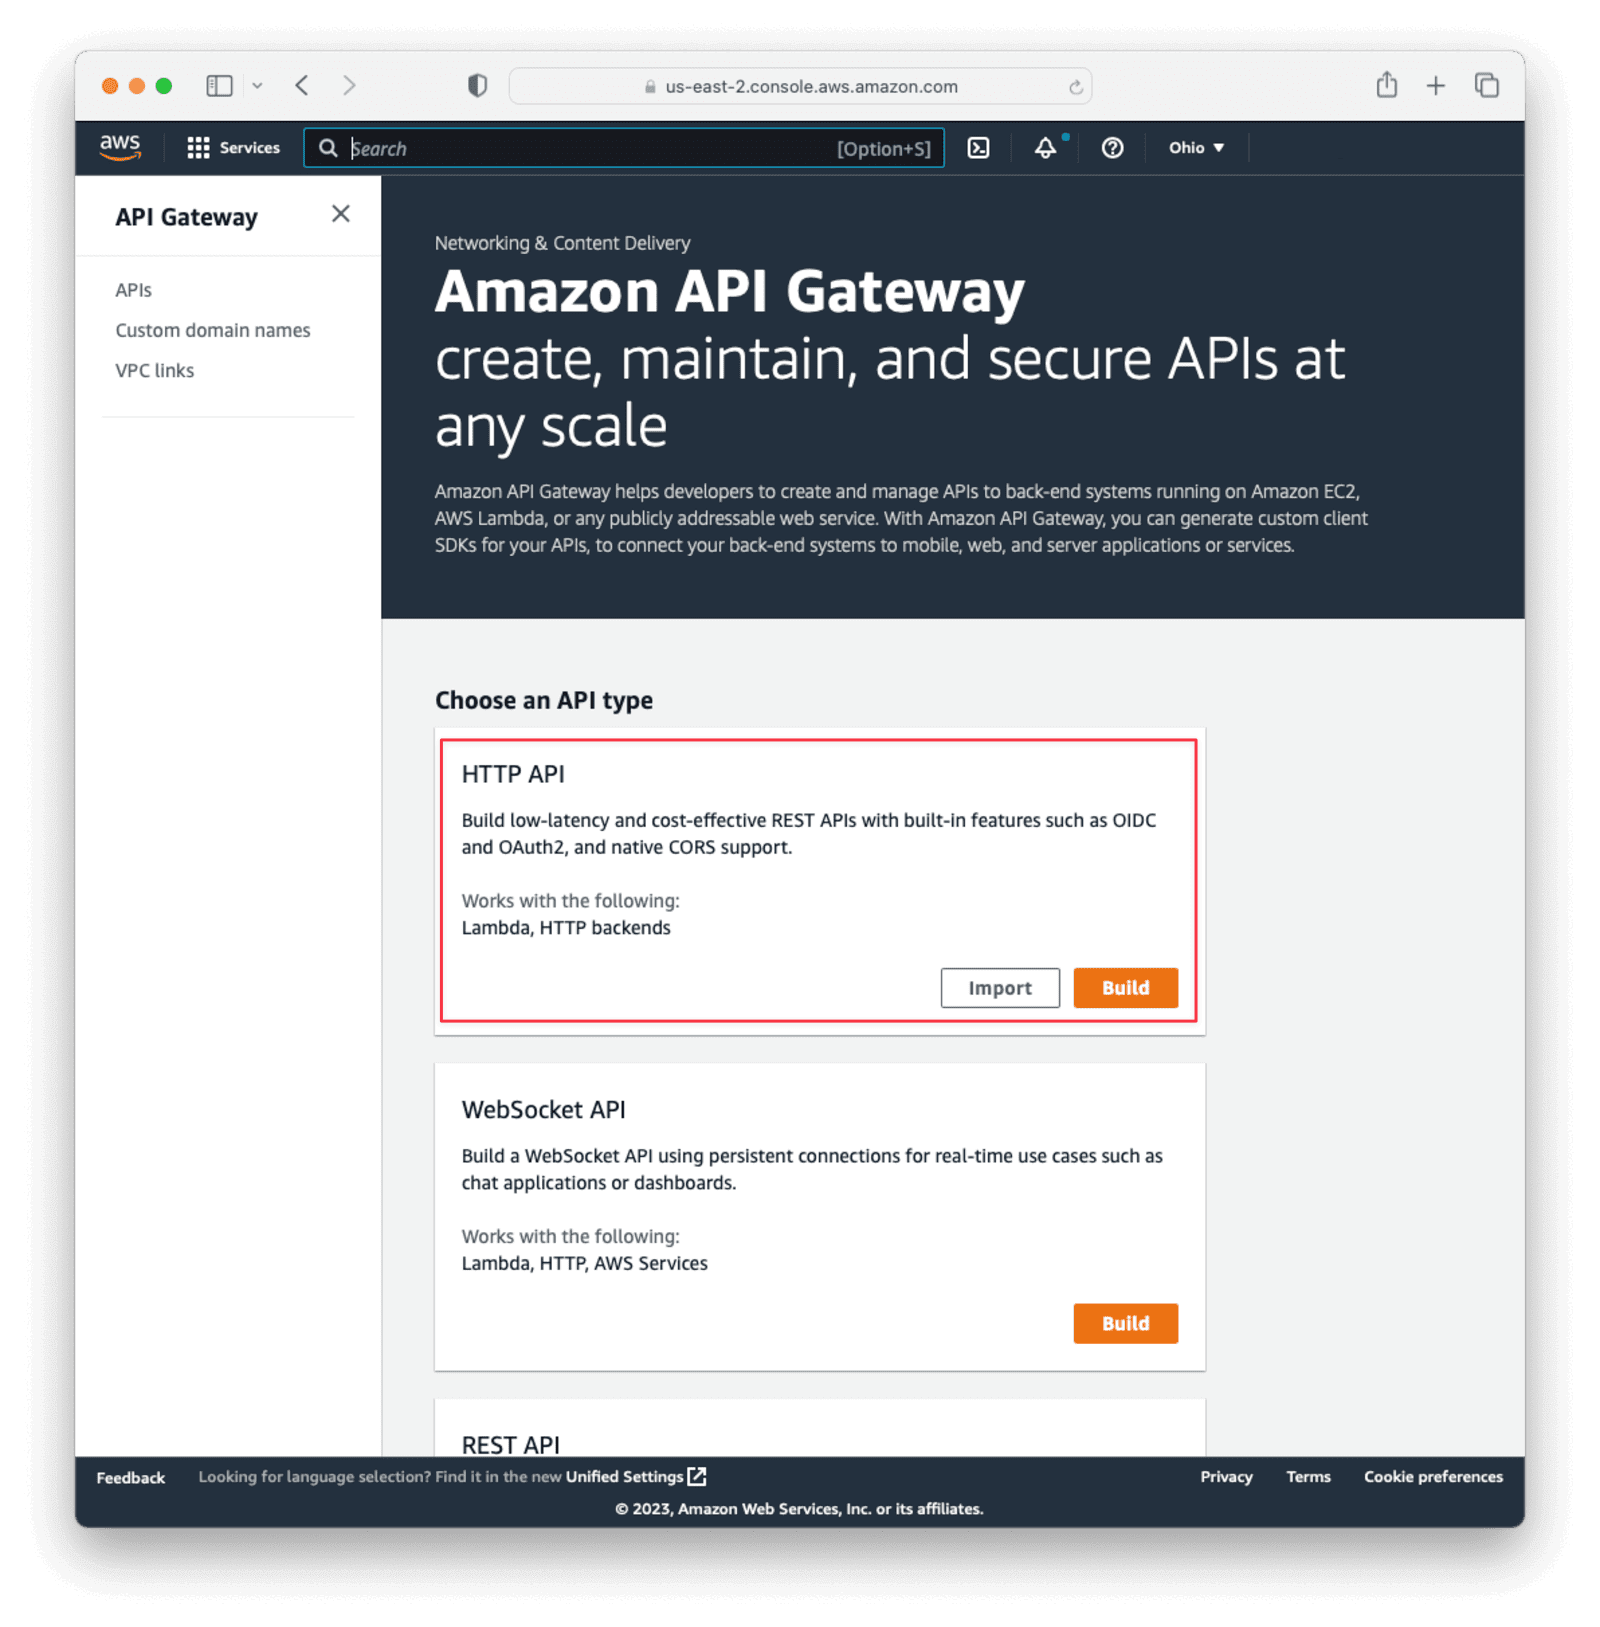
Search for API Gateway in the top bar and click it.
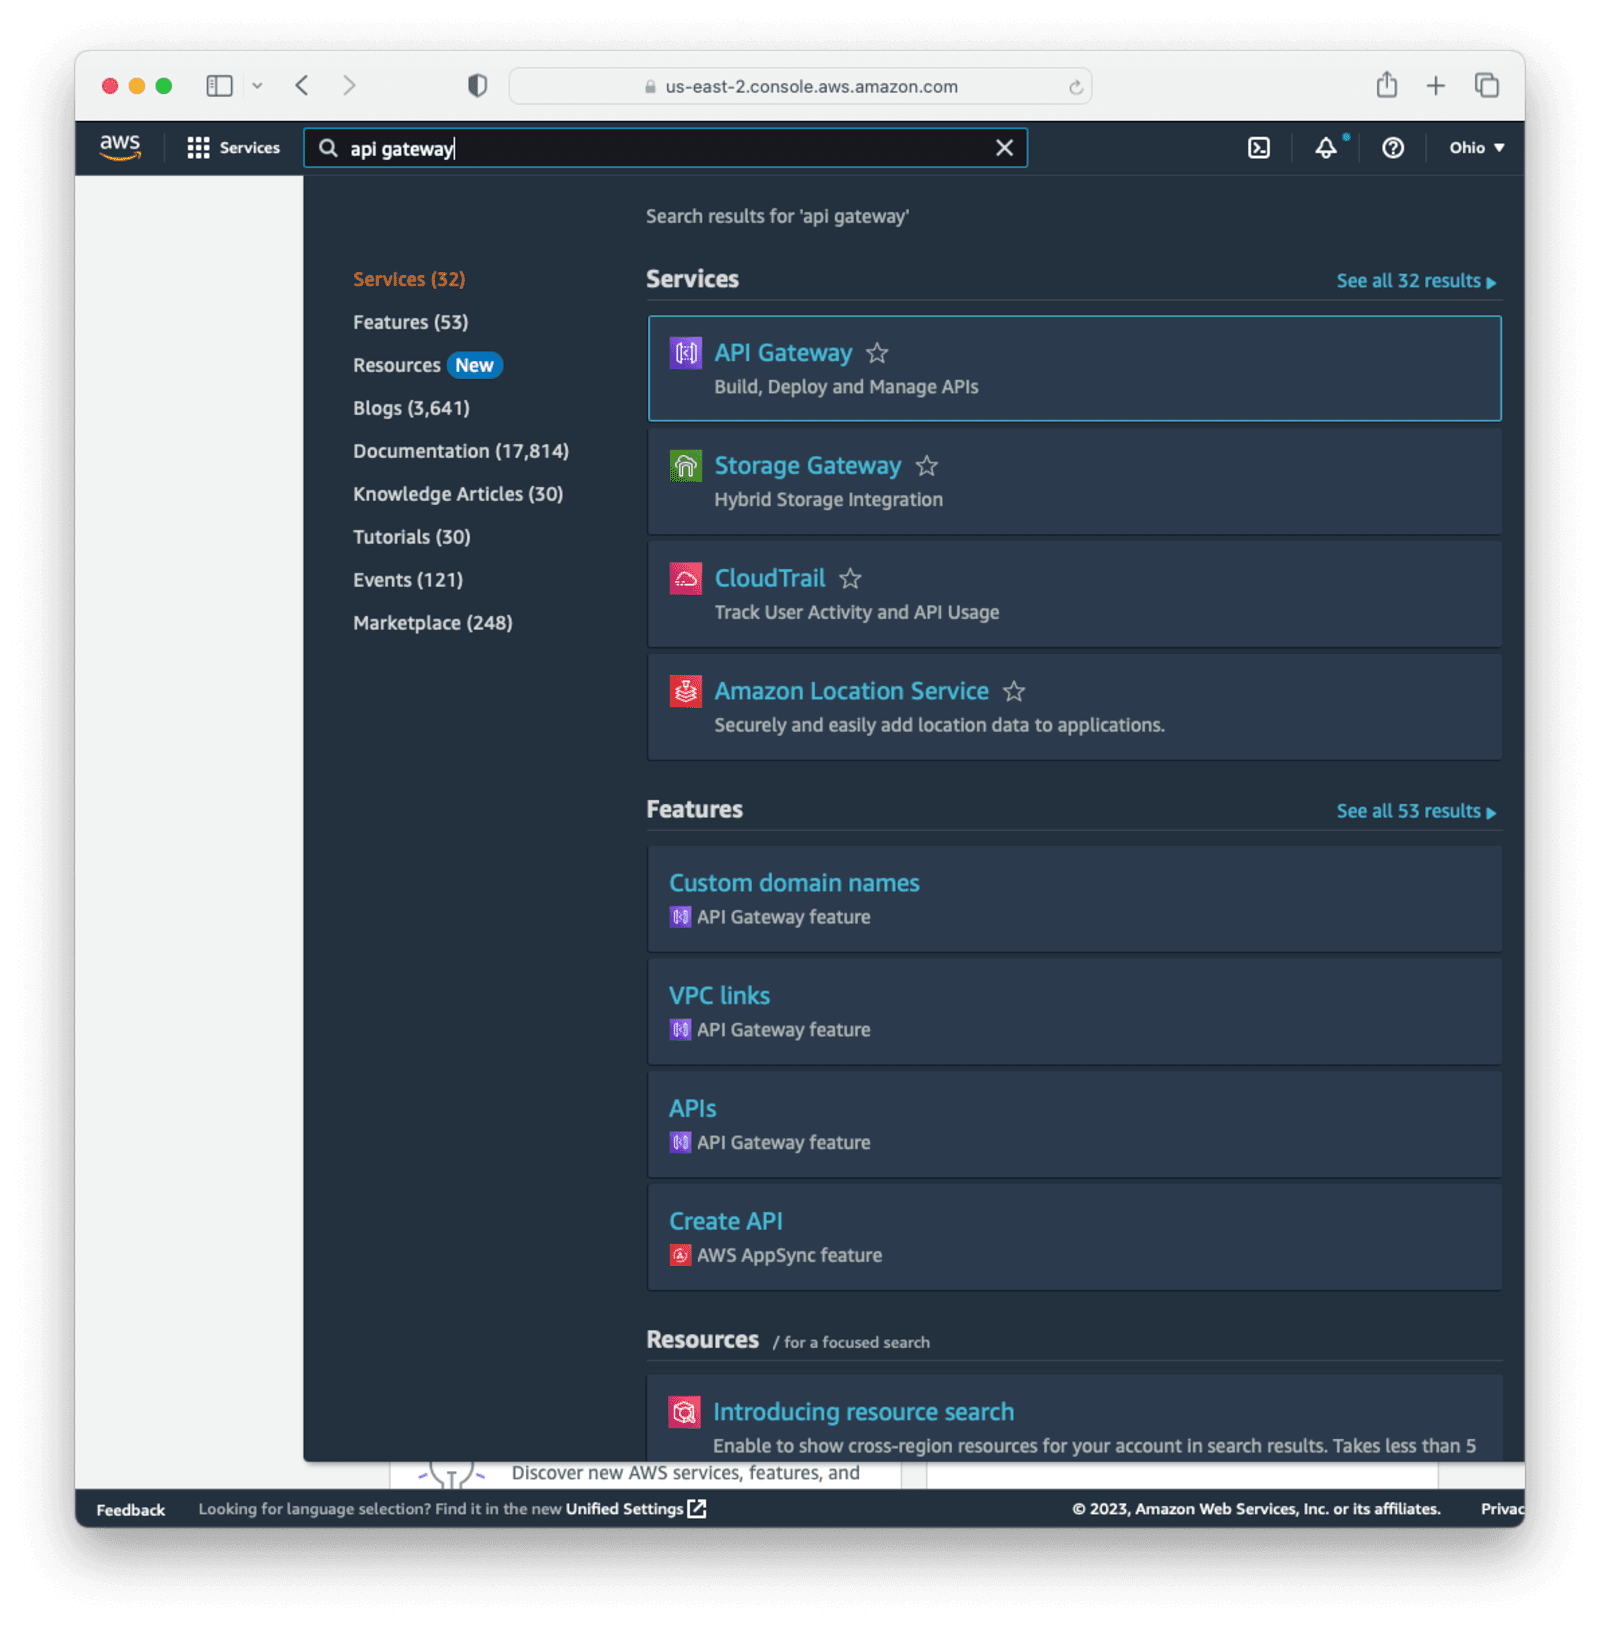
Select Build HTTP API from the API type list.
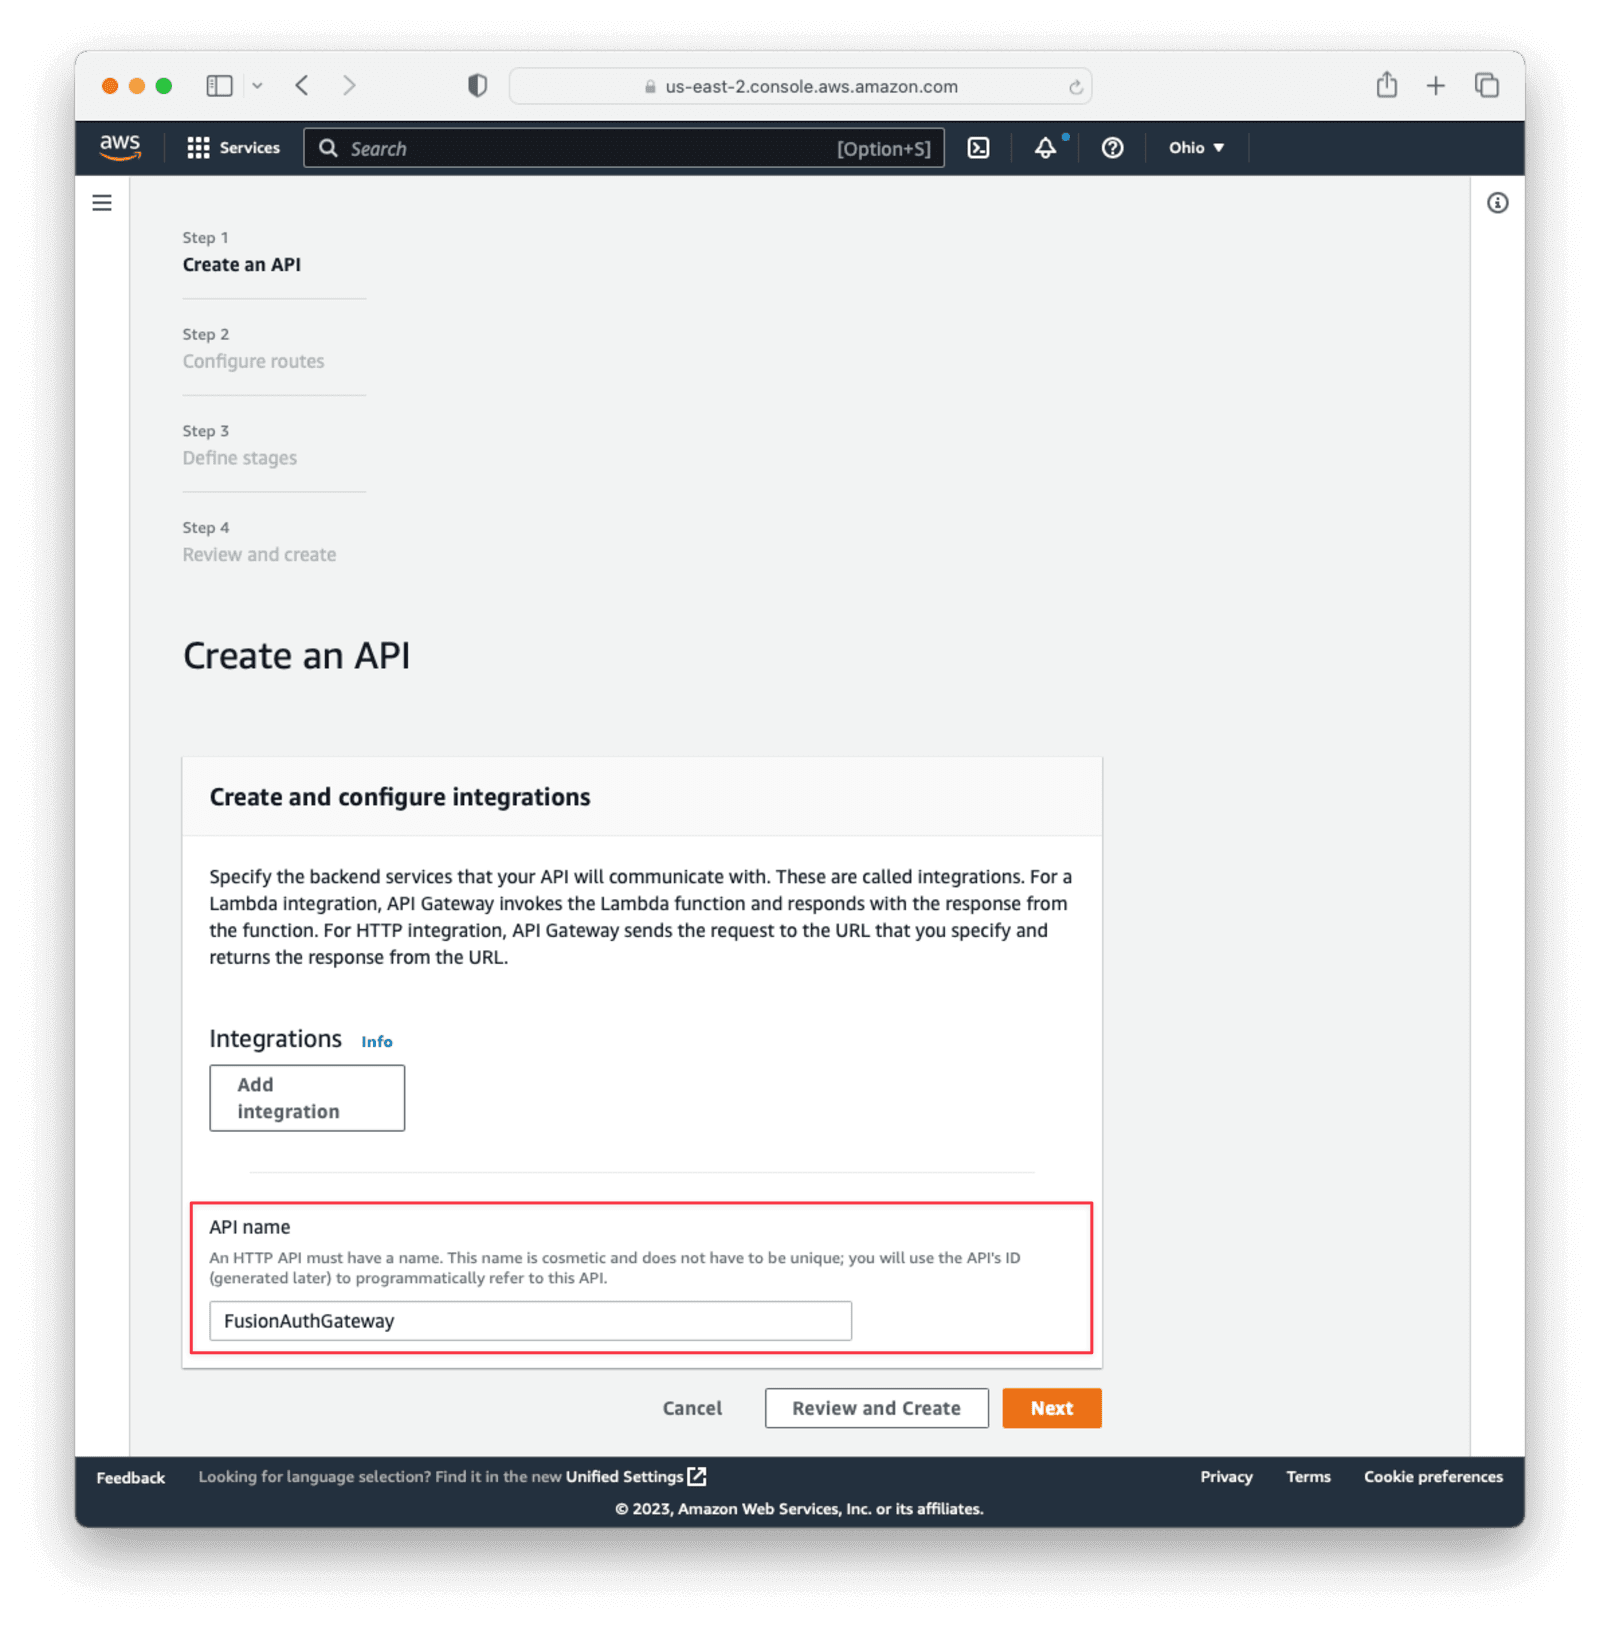
Name the API. This is for your description only, so it can be anything. Then click Next .
On the Configure Routes page, click Next without setting anything. We'll add the route via the lambda function we'll create in a bit.
On the Configure Stages page, click Next , leaving the defaults.
Finally, click Create on the Review and Create page.
A summary page for the API should appear. Copy the Invoke URL from the $default stage under the stages section. This will be the base URL for the API. We'll add a lambda function next, which will give us a route to call.
Create a Lambda Function to Secure#
In the main AWS search bar, search for and select lambda.
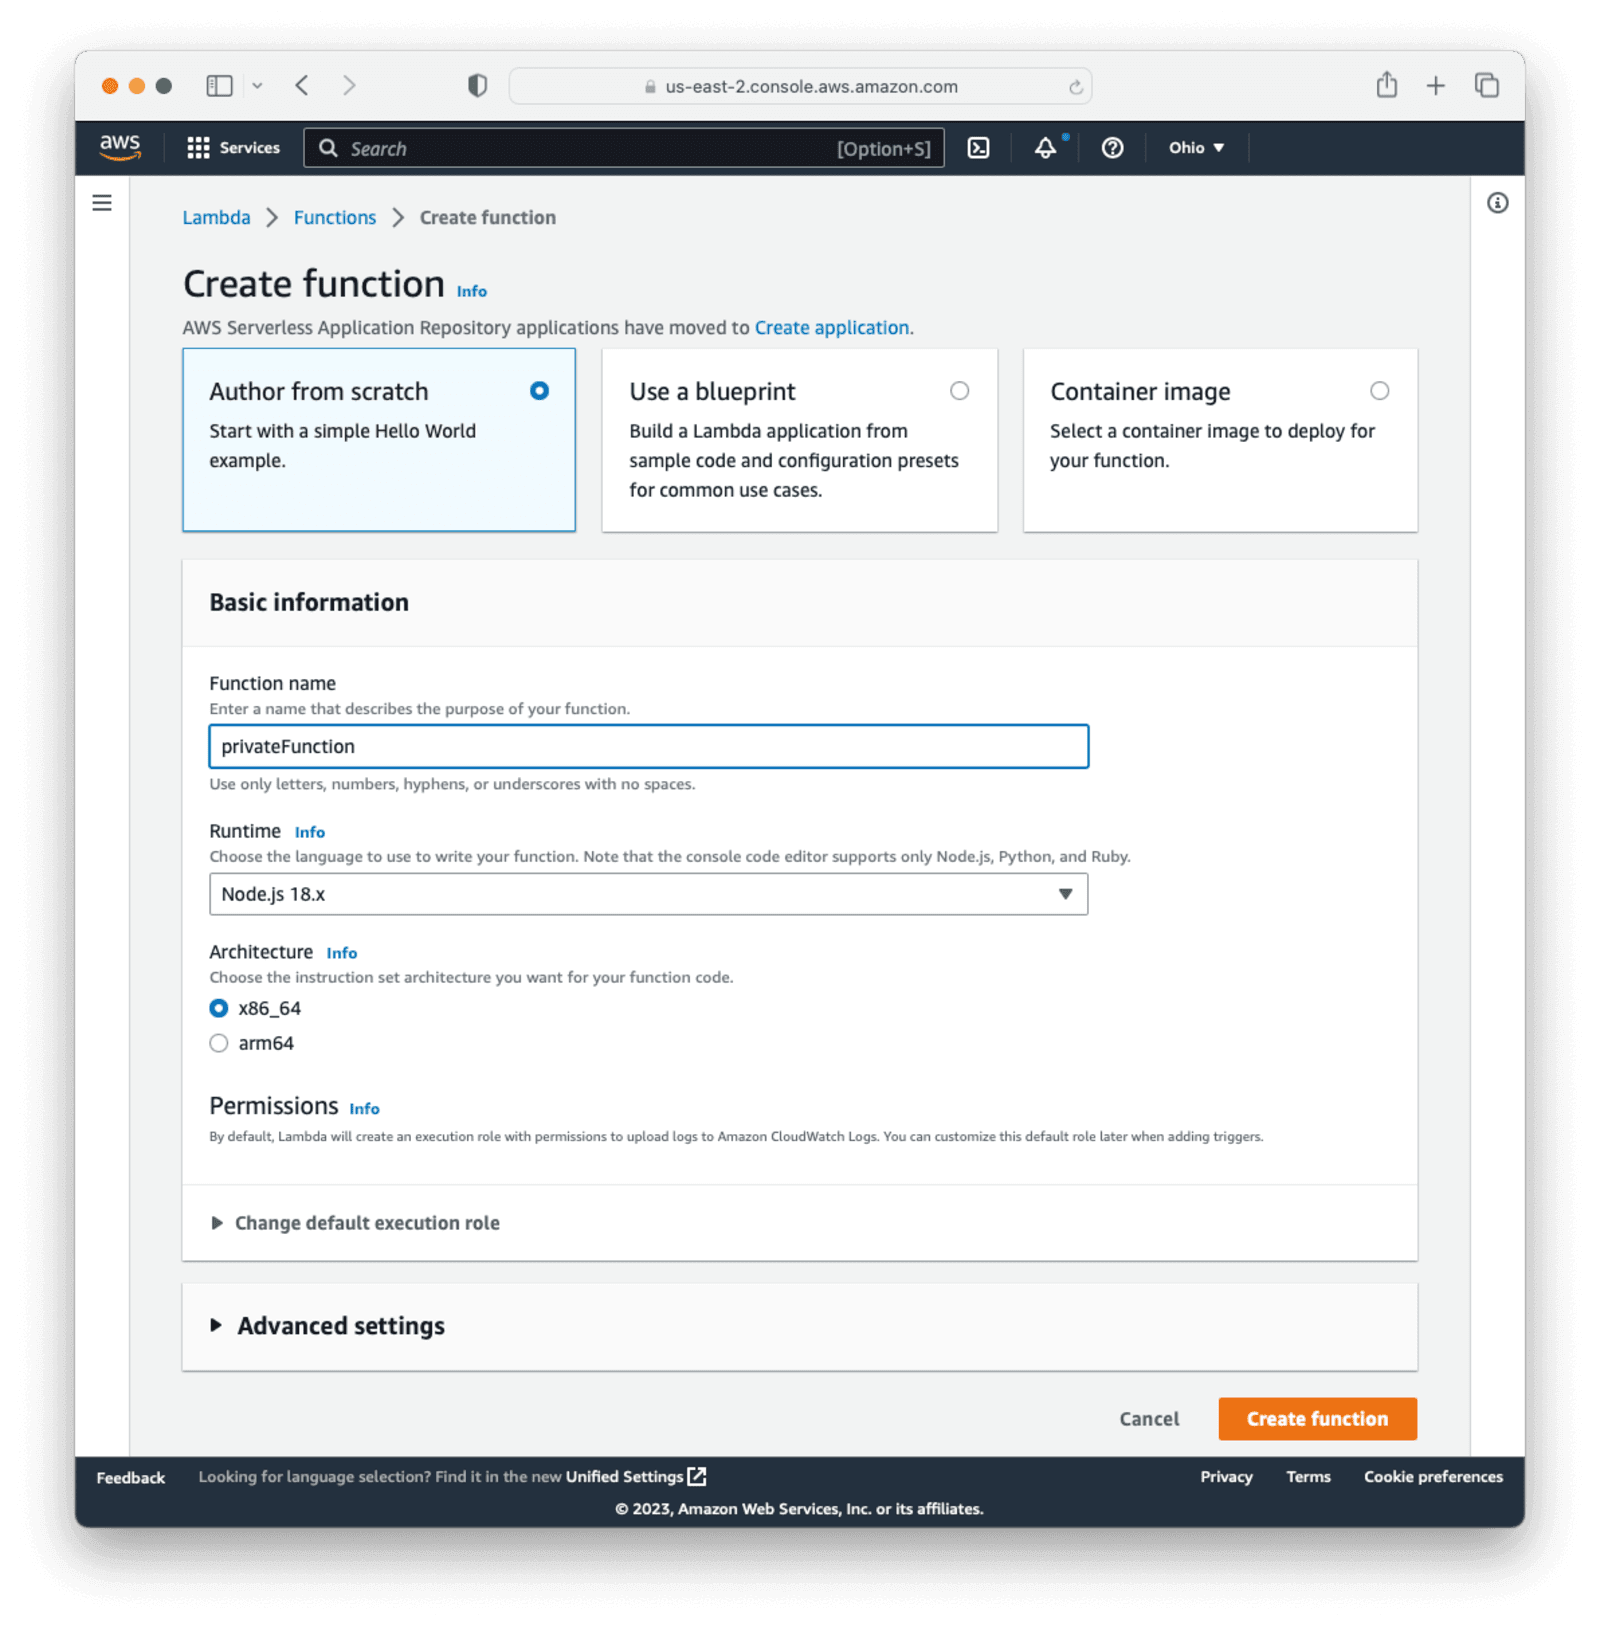
Click Create function to create a new lambda function. Name the function privateFunction and leave all the other options as the defaults. For the purposes of this document, the code you will add here is going to return all the user claims, but in a real-world situation, you would have business logic or functionality here. Click Create Function at the bottom of the page.
Under the Code tab for the lambda, click on the "index.mjs" file and replace the contents with the following code to return the claims found in the JWT:
Lambda function to reflect user claims
export const handler = async(event) => {
    const claims = event.requestContext.authorizer.claims;
    const response = {
        statusCode: 200,
        body: JSON.stringify(claims),
    };
    return response;
};
Then click the Deploy button to update the lambda.
Expand Function overview near the top of the page. Then click on Add Trigger .
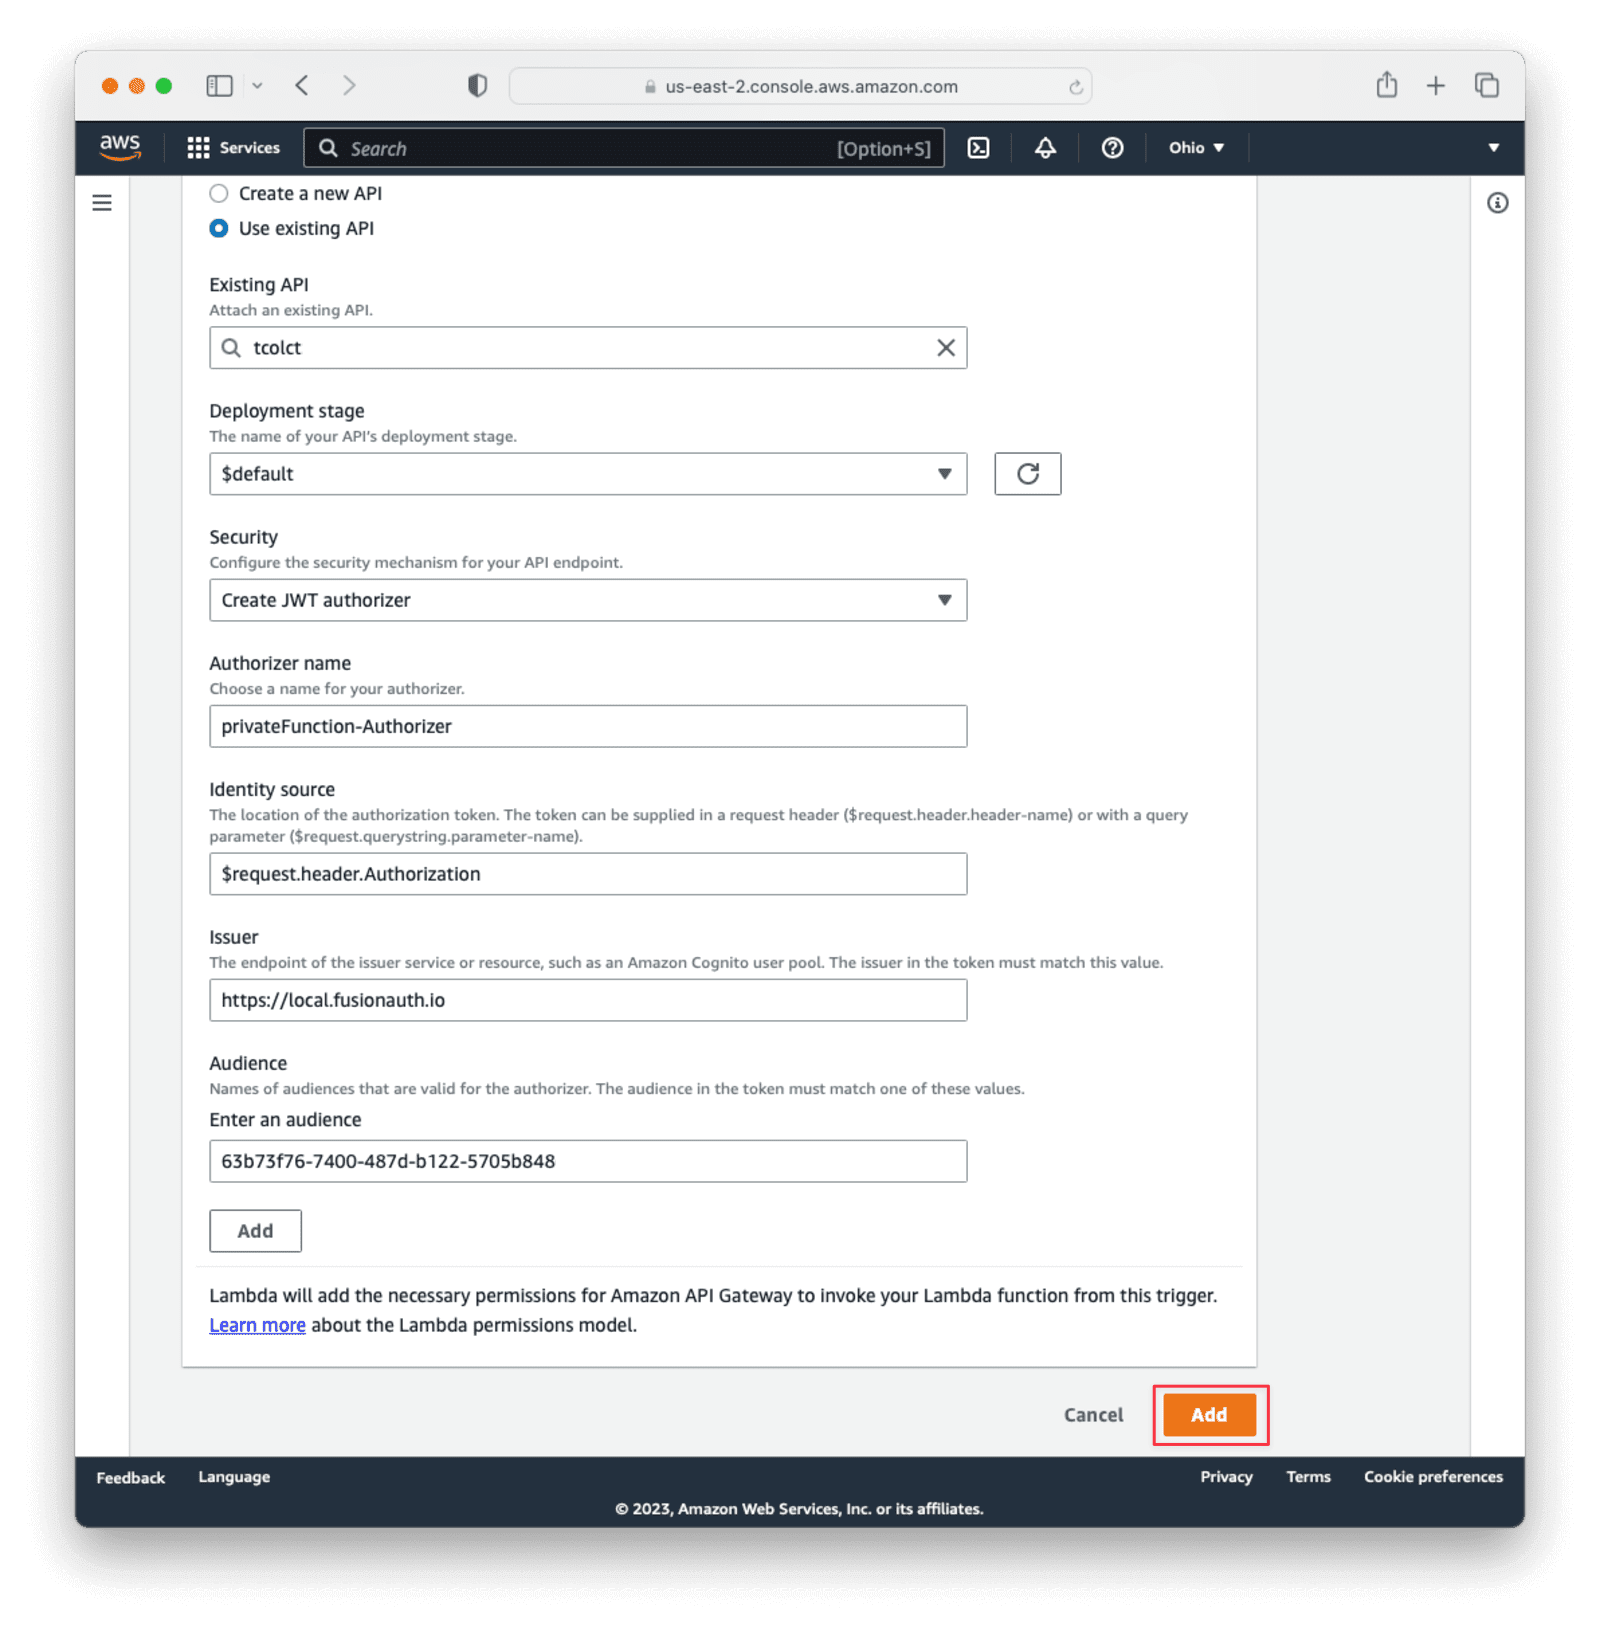
Under Trigger Configuration, choose API Gateway as the source. select Use an existing API and then select the API gateway set up earlier. Select the $default deployment stage.
Under Security, choose Create a JWT authorizer.
Set Identity source to $request.header.Authorization.
For API Gateway Issuer, set the value to be the same URL as you set for the Issuer in the FusionAuth Tenant configuration. Make sure that it is exactly the same, including trailing slashes, without any white space.
Under Audiences, paste in the Client Id from the FusionAuth application created earlier.
Then click the primary Add button at the bottom right of the screen.
After completing this, a new route will be added to your gateway API with the same name as the lambda: privateFunction. Combine the lambda function name with the "Invoke URL" value recorded earlier when setting up the API gateway to get the full URL.
Your full URL should look similar to this: https://w3miabt10d.execute-api.us-east-2.amazonaws.com/privateFunction.
If you call this route through a browser, Postman, or curl, you will receive a 401 HTTP status code and an Unauthorized message. We'll create a token next with FusionAuth to show how the route can be successfully called.
Testing With a Token From FusionAuth#
To access the secured lambda function, we'll need to get a valid token. Normally, your frontend app would use the Authorization Code grant which would redirect a user to FusionAuth to login, obtain a code, and then exchange that code for a token, using a framework of your choice. More on the Authorization Code grant.
For the purposes of this guide, we'll call the FusionAuth Login API on behalf of a user to create a token directly. This is a more straightforward means of getting a token, but the generated token will be similar with either process.
To use the Login API, there are a few settings that need to be changed on FusionAuth. In the side panel in FusionAuth, select Settings -> API Keys . Click the green + button at the top left to create a new key.
Give the key a meaningful description, like API Gateway Key. Select the Tenant that you created the FusionAuth application under (normally Default).
Then, under Endpoints, allow POST on the /api/login route. This key will only be allowed to call this endpoint with the POST method.
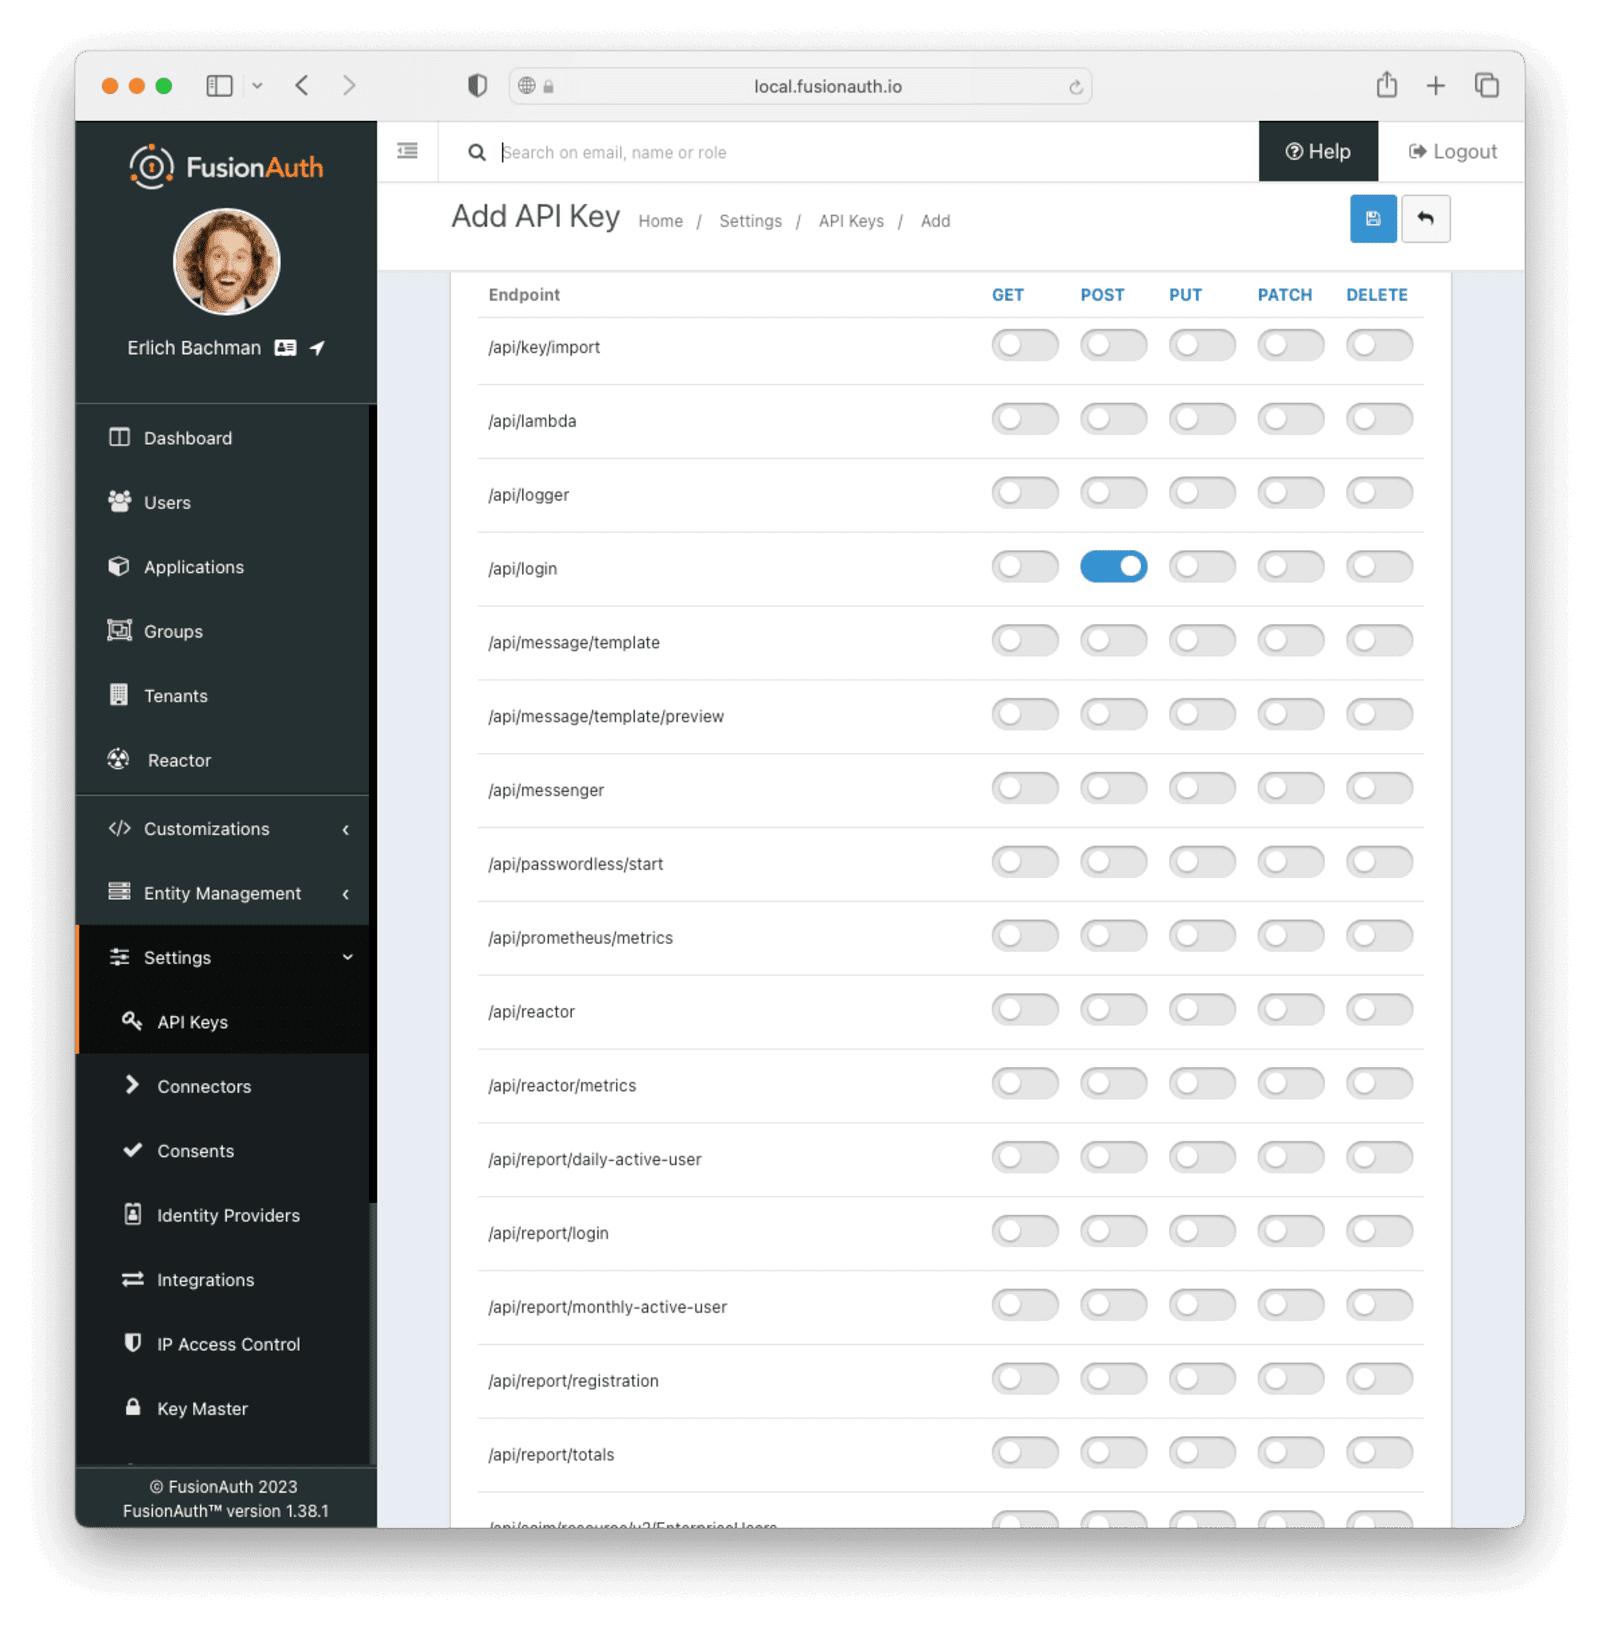
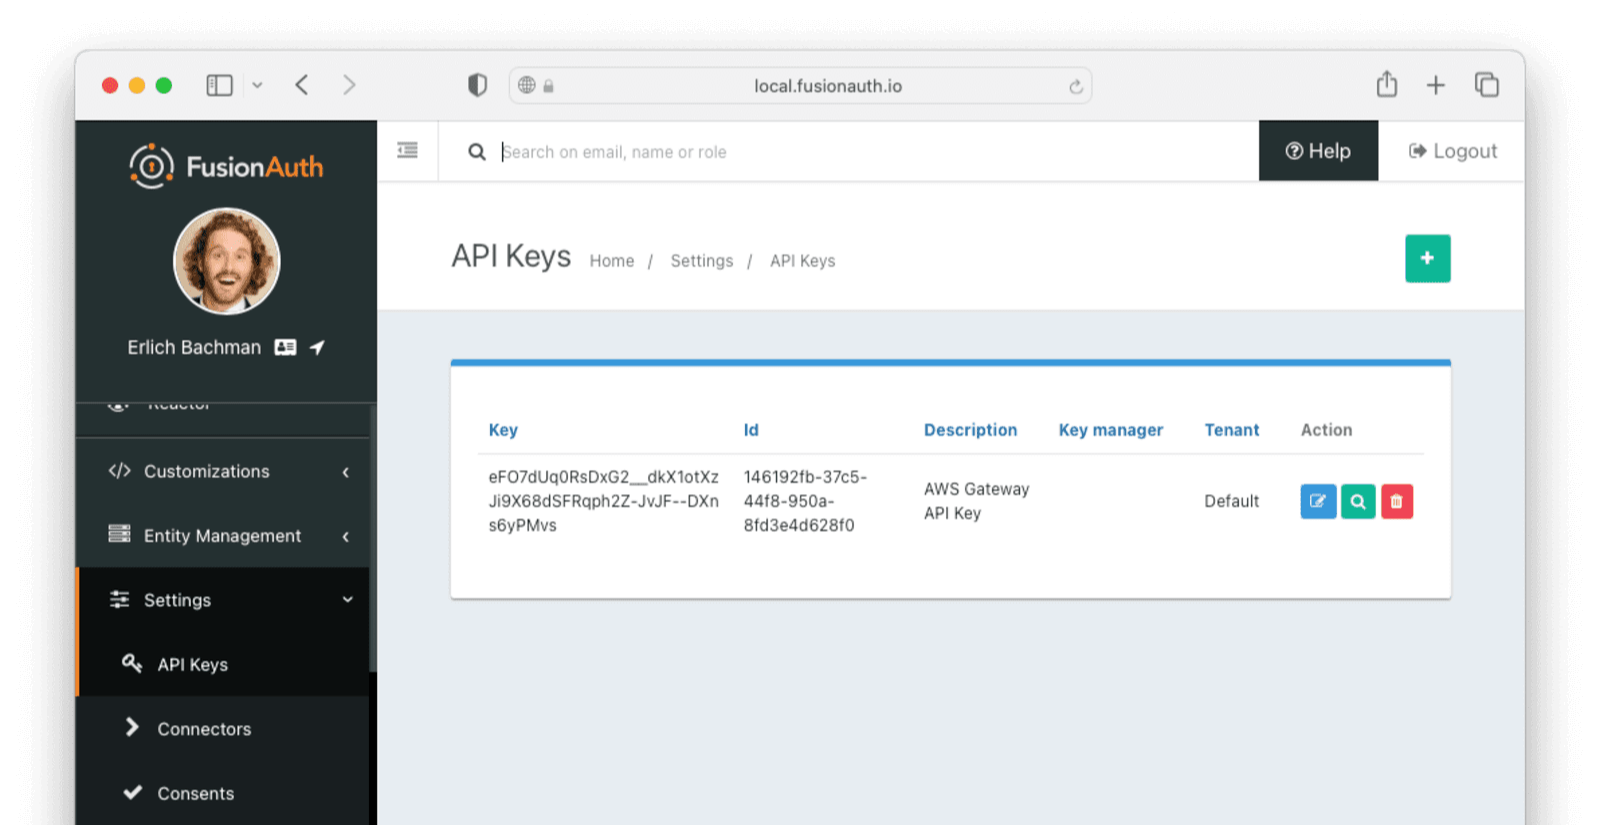
Save the API key. You should now see a list of all API keys. Click on the lock icon next to the key field for the key you just created and copy the API key for later use. Make sure you get the API key value and not the API key Id.
To test, you'll need to link a FusionAuth user to your application. You can either use the existing admin user you use to log into FusionAuth or create a new isolated user.
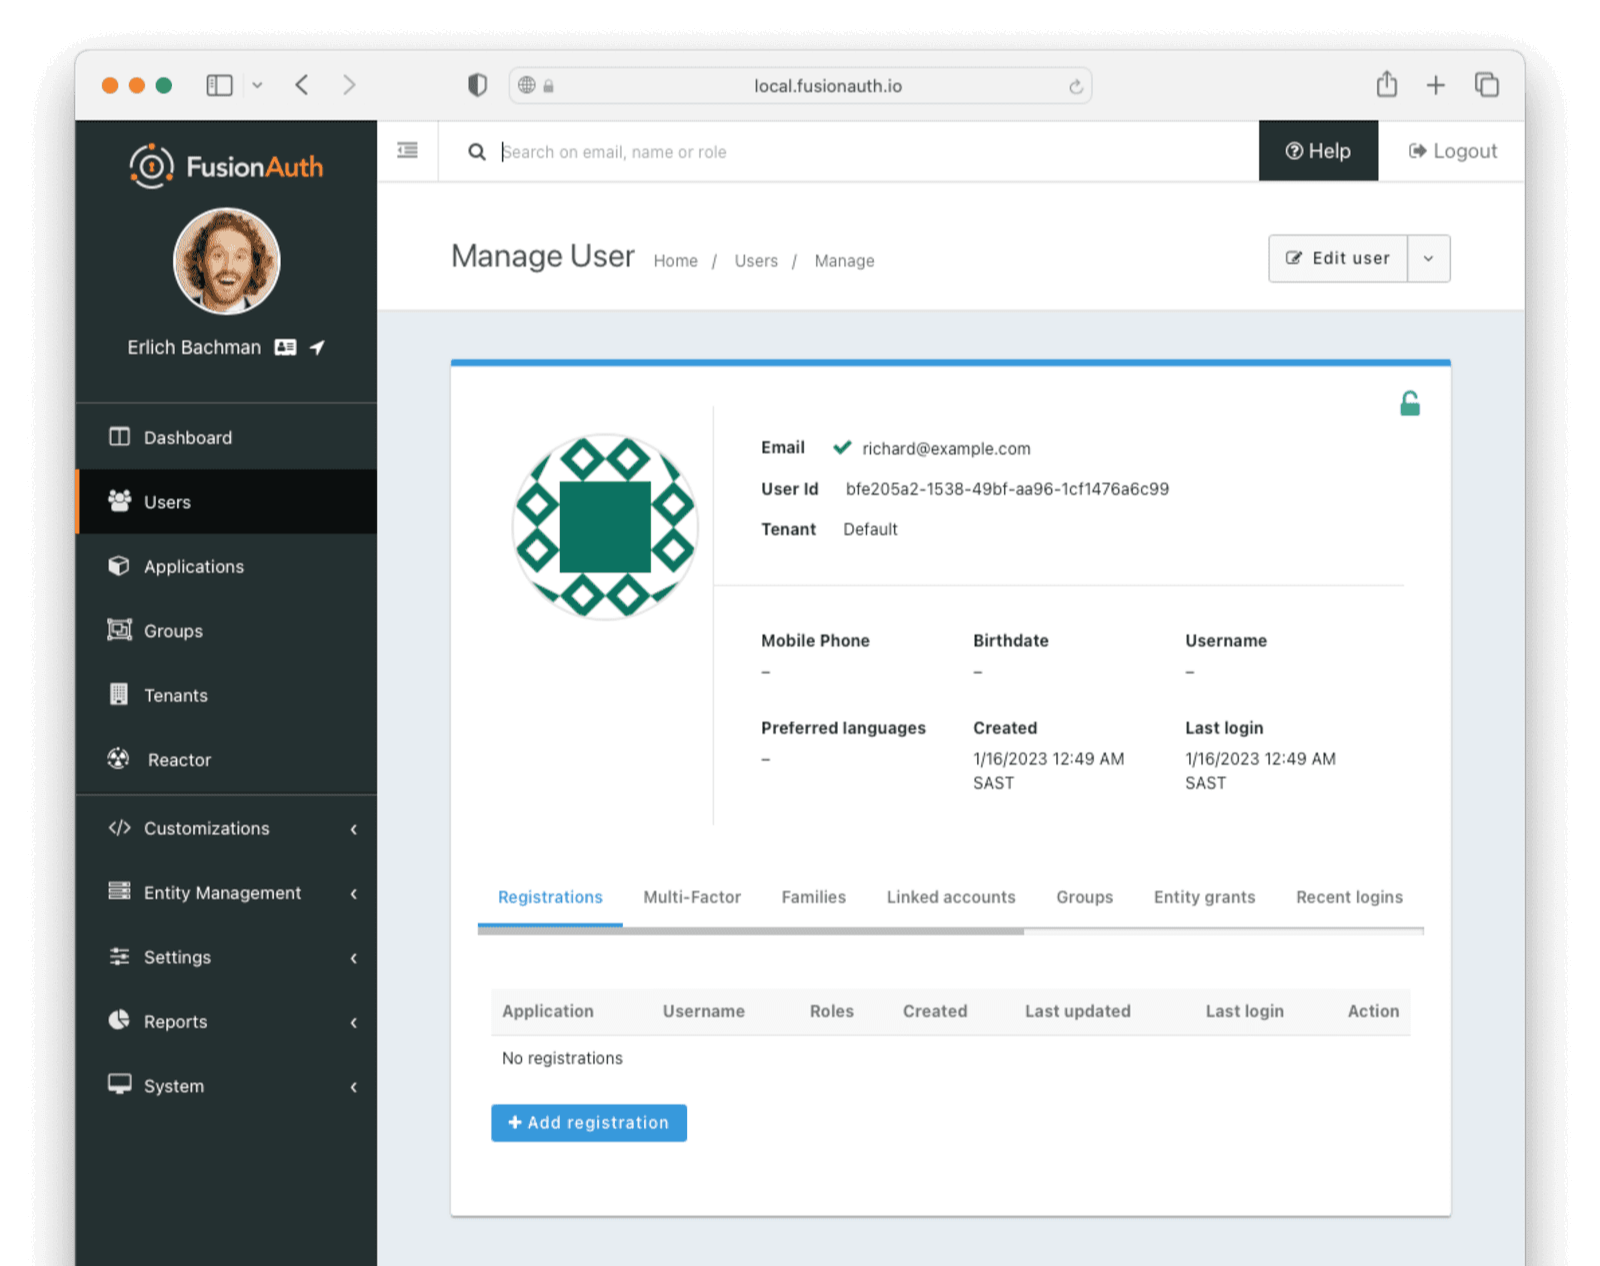
To link your existing user, navigate to the user list through the Users menu item in the sidebar. Find your user and click the Manage action button on the user. Click the Registrations tab. Click Add registrations and select the FusionAuth application you set up earlier.
Alternatively, to create a new user, navigate to Users in the sidebar and click the green + button at the top right of the screen to create a new user. Choose the appropriate tenant (usually default) and fill in the information. You can choose not to send an email to set up the password but rather set it directly when creating the user by toggling the Send email to set up password switch. Record this user email and password, as we'll use it to obtain a token.
After saving the user, click the Registrations tab. Click Add registrations and select the FusionAuth application you set up earlier.
Using curl or Postman, make a POST request to your FusionAuth instance's /api/login endpoint. This will return a JWT in the response.
The curl call should look like this:
curl command to obtain a JWT token
curl --location --request POST 'https://<YOUR_FUSIONAUTH_URL>/api/login' \
--header 'Authorization: <API_KEY>' \
--header 'Content-Type: application/json' \
--data-raw '  {
    "loginId": "<USER_EMAIL>",
    "password": "<USER_PASSWORD>",
    "applicationId": "<APPLICATION_ID>",
    "noJWT" : false
  }'
Where:
<YOUR_FUSIONAUTH_URL>is the URL of your FusionAuth installation.<API_KEY>is the API key created above, enabled for login.<USER_EMAIL>is the email address of the user added above.<USER_PASSWORD>is the password of the user added above.<APPLICATION_ID>is the Id of the FusionAuth application registered for the user.
The return response from FusionAuth should look similar to the following:
Login API Response
{
    "token": "eyJhbGciOiJSUzI1NiIsInR5cCI6IkpXVCIsImtpZCI6ImhDUjA4X3daR2s0OUFlYUFmRDY5ZmJKWmRGTSJ9.eyJhdWQiOiI2M2I3M2Y3Ni03NDAwLTQ4N2QtYjEyMi01NzA1Yjg0OGRhODAiLCJleHAiOjE2NzMzNjYyMDQsImlhdCI6MTY3MzM2MjYwNCwiaXNzIjoiaHR0cHM6Ly9mdXNpb25hdXRoLnJpdHphLmNvIiwic3ViIjoiMzk2MzAwMGYtNjg2ZC00MTY5LWI2MjgtOWM5YzQ1MzRiNzgwIiwianRpIjoiZDk3ZGIyZWYtZjExNS00ZDIxLWFlOTQtMDIyN2RmMGU4YzI5IiwiYXV0aGVudGljYXRpb25UeXBlIjoiUEFTU1dPUkQiLCJlbWFpbCI6ImJvYkBhd3MuY29tIiwiZW1haWxfdmVyaWZpZWQiOnRydWUsInByZWZlcnJlZF91c2VybmFtZSI6ImJvYmF3cyIsImFwcGxpY2F0aW9uSWQiOiI2M2I3M2Y3Ni03NDAwLTQ4N2QtYjEyMi01NzA1Yjg0OGRhODAiLCJyb2xlcyI6W10sImF1dGhfdGltZSI6MTY3MzM2MjYwNCwidGlkIjoiZjAwNGMxZmUtNDg0Yi05MDJjLWQ3Y2EtYmRiYzQ2NGRhMGI3In0.m7gzXhNLToPNVE1p5Vo2pLgP6WBcPNfS_zZJnJ81mdEgi6-orViz-tU8j0L8wva0-8KlMdy54cq_XjnDnYJ0aX90O4ZE_QVU5NuDDfzXH14wQtKQoIIydsB6ZvQoBt8JNFUHJb9ANLCGnfn6FVQKqPIzye18Gx_7wYSVokw3eLNFyzrq9dwOD5Q8V9gvZmXV2pTokQAtA7qFaadb2dIeFlSEB7wamKiZLXILjeWAeMbbvAAMQZWFh46UJjwr06QTd8PxQmRwDWWznJy1Vs8EAgZA4vkRSWnn3IbiaCtOaL1ANuEex6il7q32ahxj0Ncm9wn0DbDsQE9NB0CCNTSIhA",
    "tokenExpirationInstant": 1673366204805,
    "user": {
      "sampleuserdata" : "..."
    }
}
Copy the token value. This is a JWT, which we can use to access the API gateway function.
Now call the API gateway with the following curl command:
Calling the API Gateway endpoint with the JWT
curl --location --request GET 'https://<GATEWAY_URL>/privateFunction' \
--header 'Authorization: Bearer <JWT_TOKEN>'
Where:
<GATEWAY_URL>is the invoke URL saved earlier.<JWT_TOKEN>is the JWT from the/api/logincall.
You should see the function return with a reflection of the claims it received:
Return token from the API call
{
    "applicationId":"63b73f76-7400-487d-b122-5705b848da80",
    "aud":"63b73f76-7400-487d-b122-5705b848da80",
    "auth_time":"1672137288",
    "authenticationType":"PASSWORD",
    "email":"ehrlich@piedpiper.com",
    "email_verified":"true",
    "exp":"1672140888",
    "iat":"1672137288",
    "iss":"https://local.fusionauth.io",
    "jti":"2f80b975-1870-4970-b876-90c2e7d9444b",
    "preferred_username":"erlich",
    "roles":"[]",
    "sub":"3963000f-686d-4169-b628-9c9c4534b780",
    "tid":"f004c1fe-484b-902c-d7ca-bdbc464da0b7"
 }
Troubleshooting#
-
If you are running a local instance of FusionAuth, Amazon API Gateway will not be able to reach the key sets needed to validate the JWT. You will either need to host FusionAuth on a publicly accessible URL or proxy your local instance through a tool like ngrok.
-
Ensure that your FusionAuth application's Access Token signing key and Id Token signing key on the application's JWT tab are asymmetric (RS256).
-
The JWT issued by the FusionAuth Login API has an expiry. If you wait too long before using it to call the Amazon API Gateway, the token will expire and the call will fail. You can resolve this by re-running the curl command to obtain a JWT token and using the new token.
Next Steps#
You can build a complete HTTP API using Amazon API Gateway, AWS Lambda, and FusionAuth without managing any servers.
You can also configure required scopes for a route and check against them before allowing a user through. Set the scope claim using a JWT Populate lambda.
Finally, you can configure FusionAuth to ensure that the user is registered for the Amazon Gateway API application or fire off webhooks when the user logs in.
You used the FusionAuth API to create a test token on behalf of a user. For a production system, the token will be generated after a user signs in to your application through a frontend. Check out some of the framework integration tutorials to implement that: