Kong Gateway
Kong Gateway is an API management tool that allows you to connect client API calls to the appropriate services.
You can configure Kong Gateway to handle authorization to the services through JSON Web Tokens (JWTs) issued on behalf of a user authenticated by an identity provider.
In this document, you'll learn how to set up Kong Gateway with FusionAuth as the identity provider to protect a simple HTTP service.
Prerequisites#
- A FusionAuth instance running on a publicly accessible URL. You can spin up a basic FusionAuth Cloud instance or install it on any server.
- A Kong Gateway instance with service routes. You can follow the Kong quickstart guide at to set up Kong locally. You should complete both the Get Kong and Services and Routes sections.
** Note: If the terminal seems to hang after outputting
Debugging info logged to 'kong-quickstart.log', it may be having trouble connecting to Docker. Try resetting Docker to factory defaults to solve this issue.
Restrict Access to your Kong Gateway Service#
After following the Kong Quickstart Guide above, you can execute the following command in the terminal.
Curl to test Kong setup
curl -I http://localhost:8000/mock/requestsIf you have correctly set up Kong Gateway, this command will return HTTP/1.1 200 OK, indicating a successful connection to the service.
Now, you can restrict access to the service by requiring a JWT. To do this, add a JWT plugin to the Kong service with the following command. We assume the service name is "example_service", as in the Kong Get Started guide.
Restricting access with JWT
curl -X POST http://localhost:8001/services/example_service/plugins \
    --data "name=jwt"
At this point, the service is inaccessible without a token. To confirm this, you can execute:
Curl to test Kong setup after restricting access
curl -I http://localhost:8000/mock/requestsThis time, the command will return HTTP/1.1 401 Unauthorized.
Set Up FusionAuth#
Navigate to your FusionAuth instance.
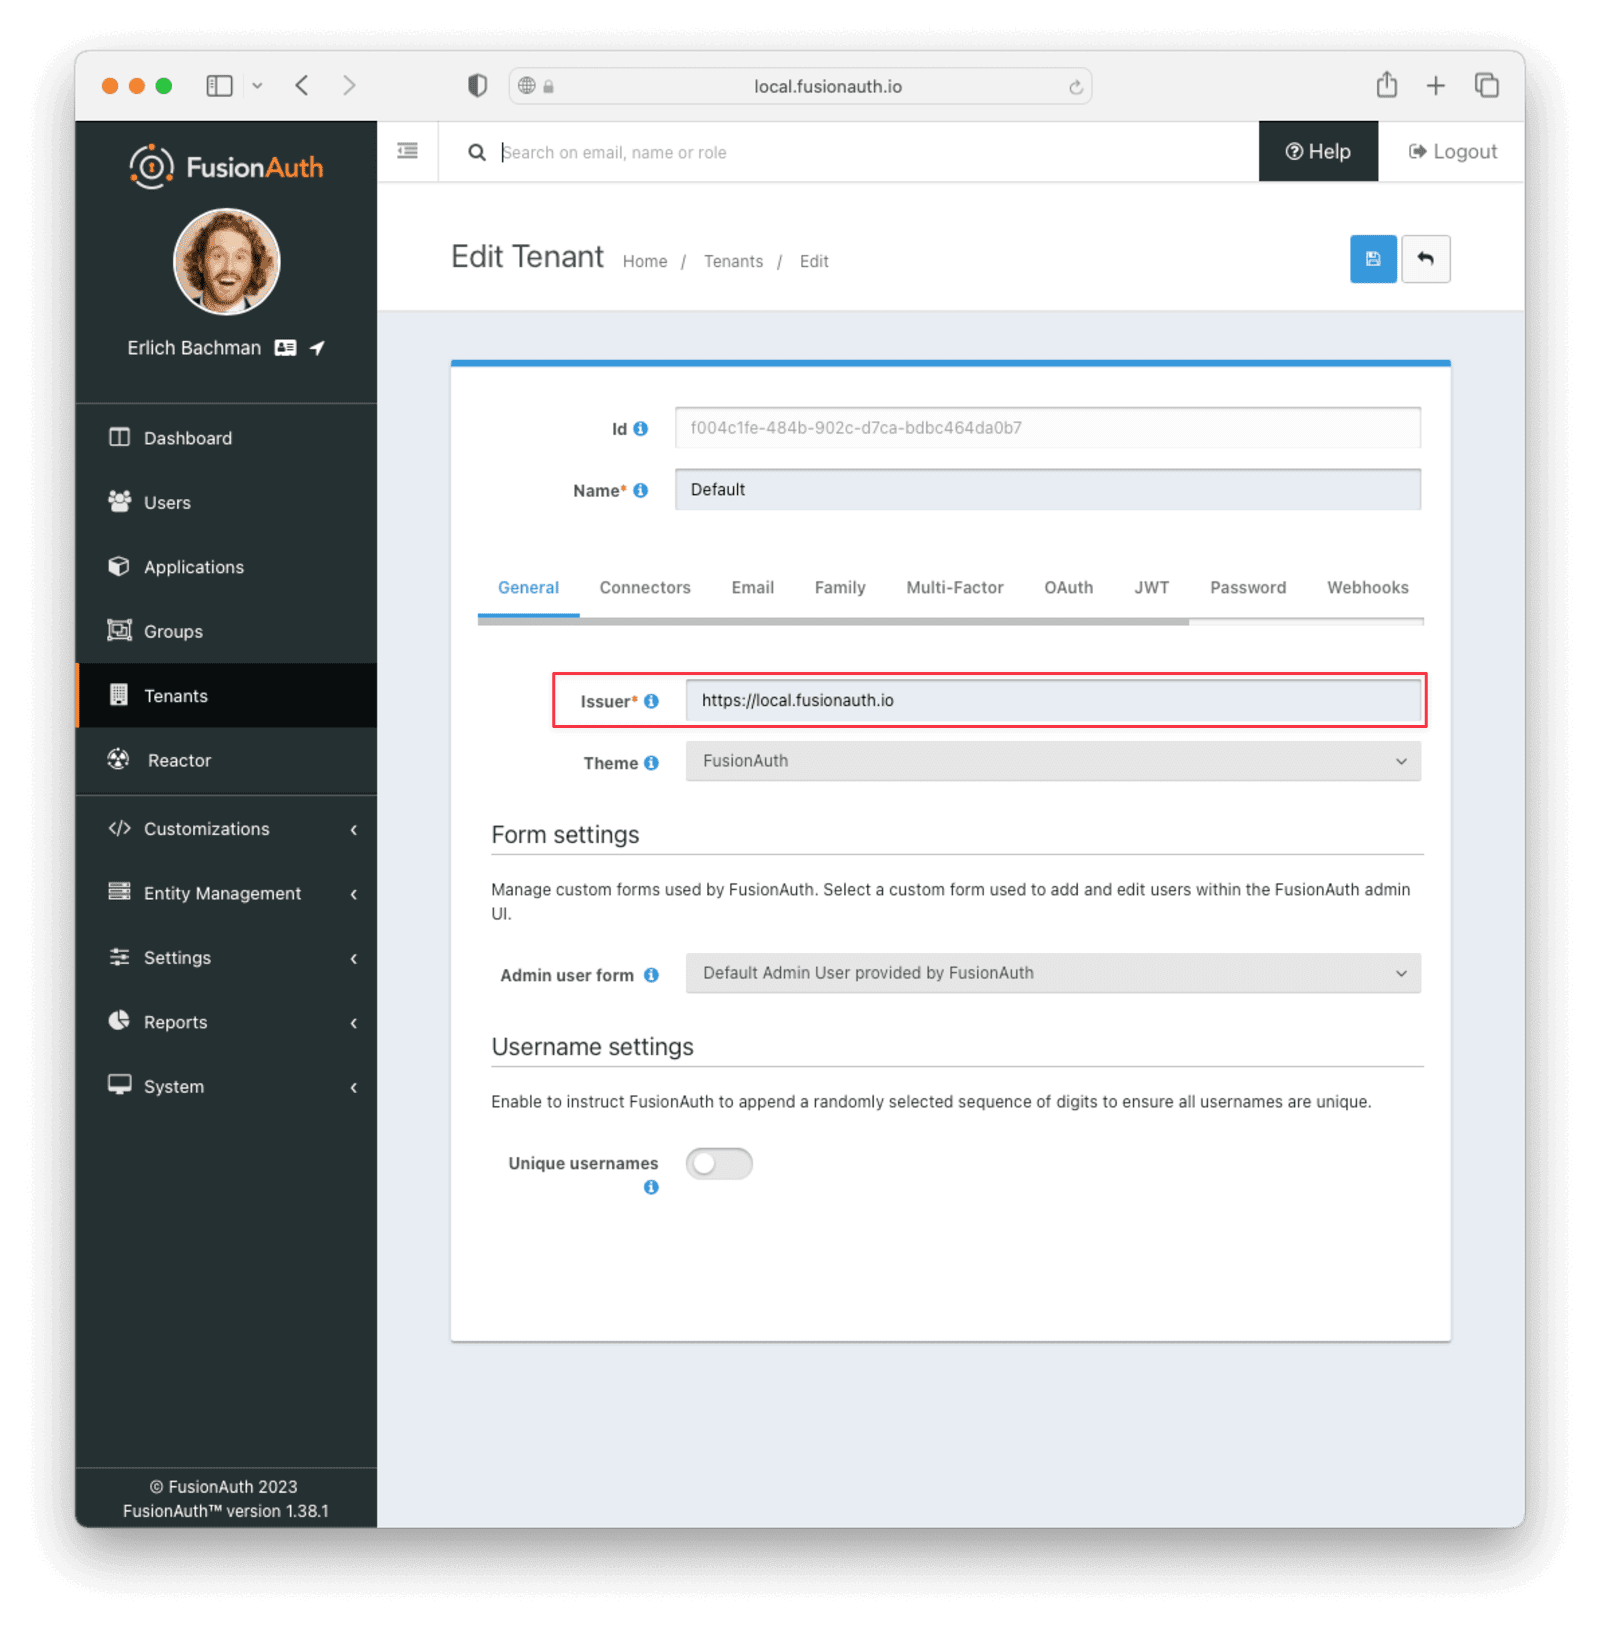
First, you need to make sure the JWT issuer setting is correct. Navigate to Tenants -> Your Tenant and change the Issuer field to the URL of your FusionAuth instance, for example, https://local.fusionauth.io. Record this value, because you will use it later when generating the JWT.
Next, you need to configure an application that will issue tokens to access the Kong Gateway service.
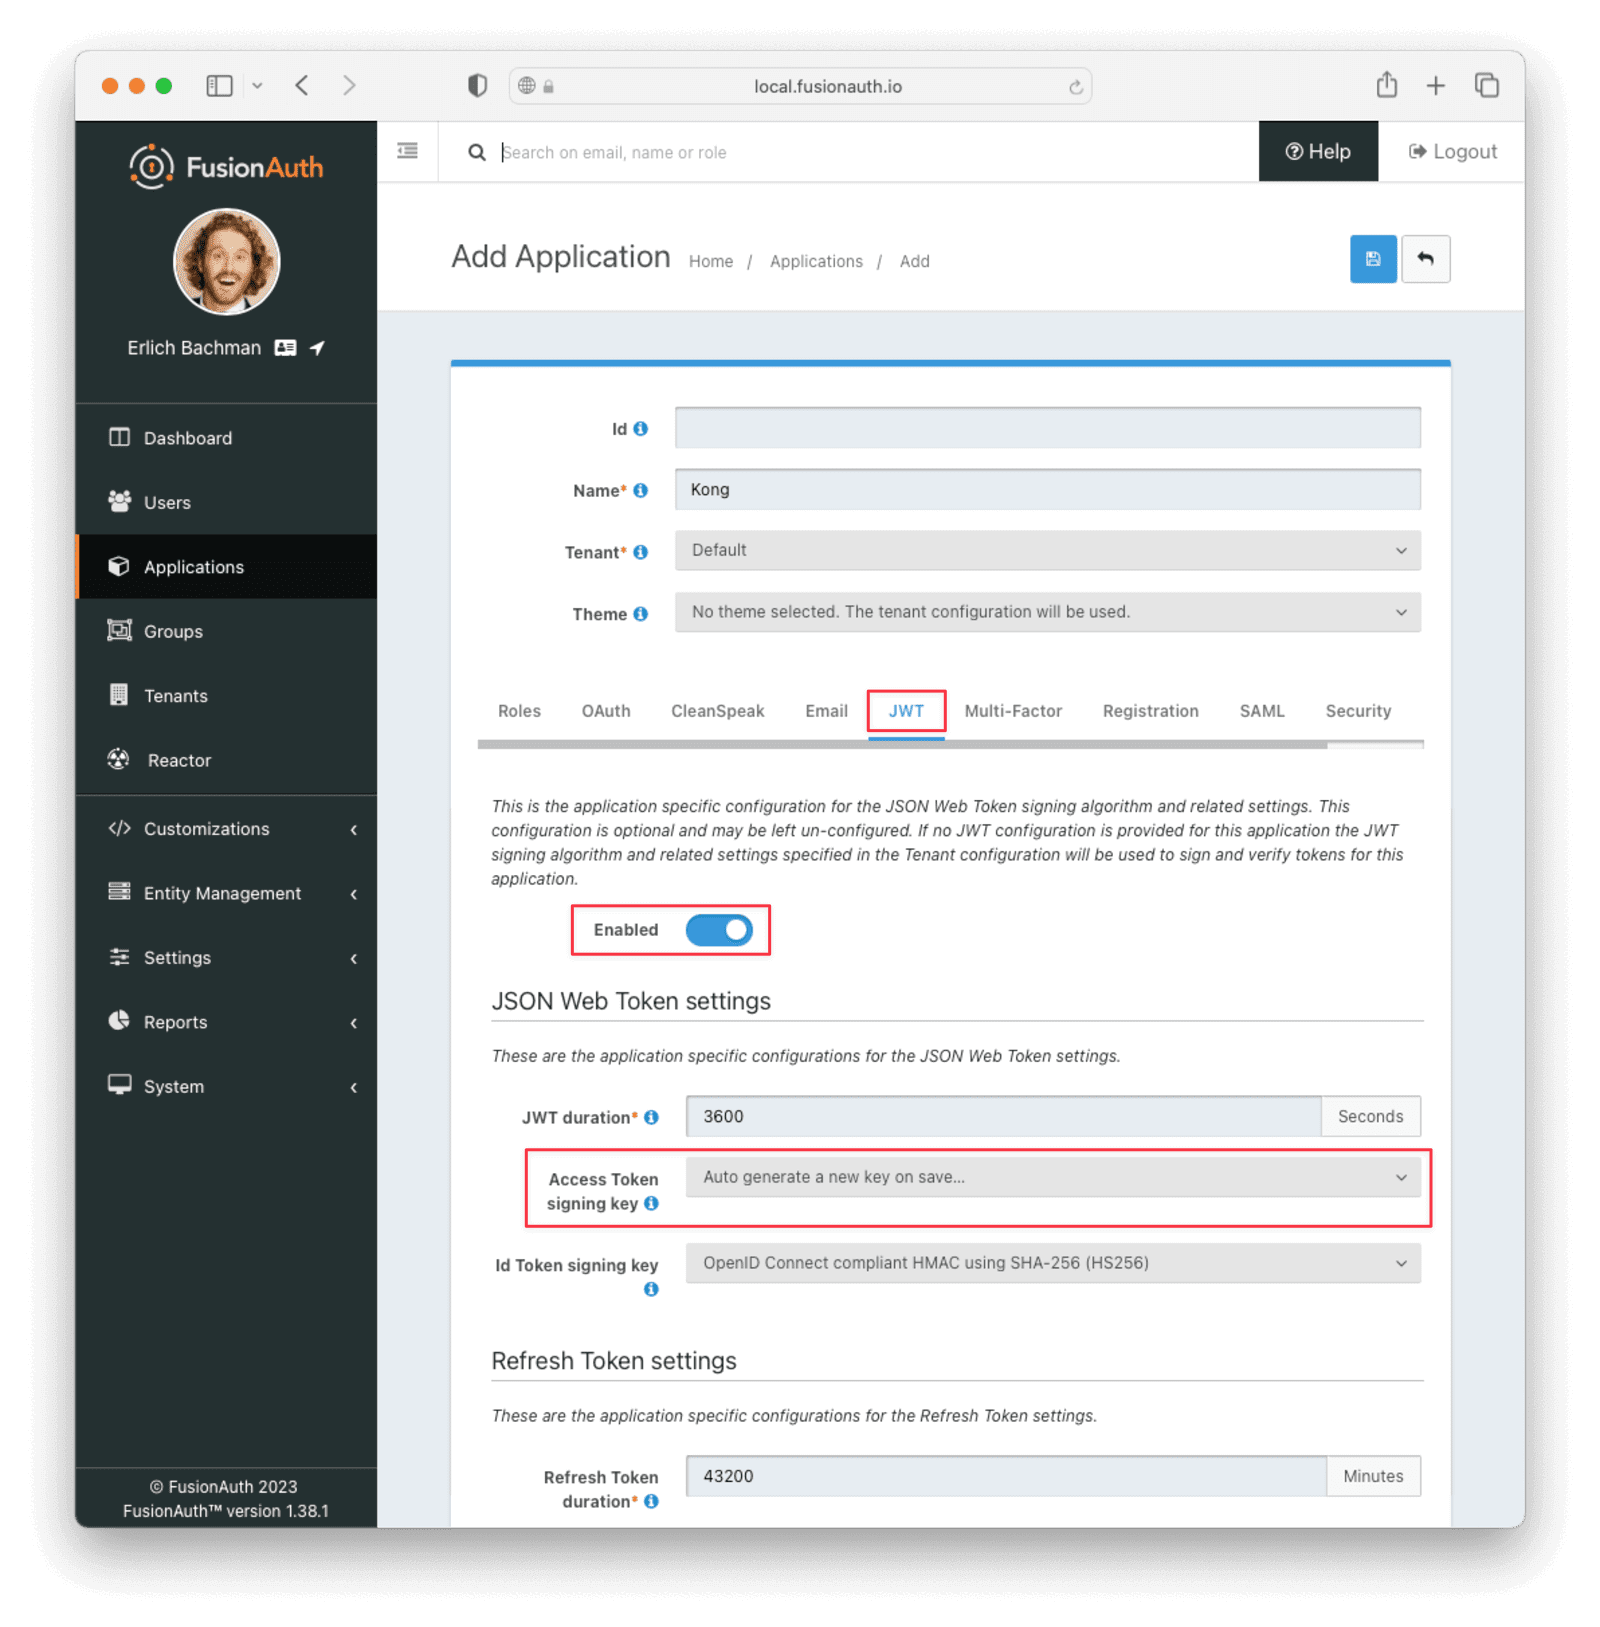
Navigate to Applications and create a new application. Fill out the Name field, then click the JWT tab and toggle the Enabled switch. Select Auto generate a new key on save... for the Access Token signing key field. This will generate an RS256 asymmetric key pair specifically for this application.
Click the Save button.
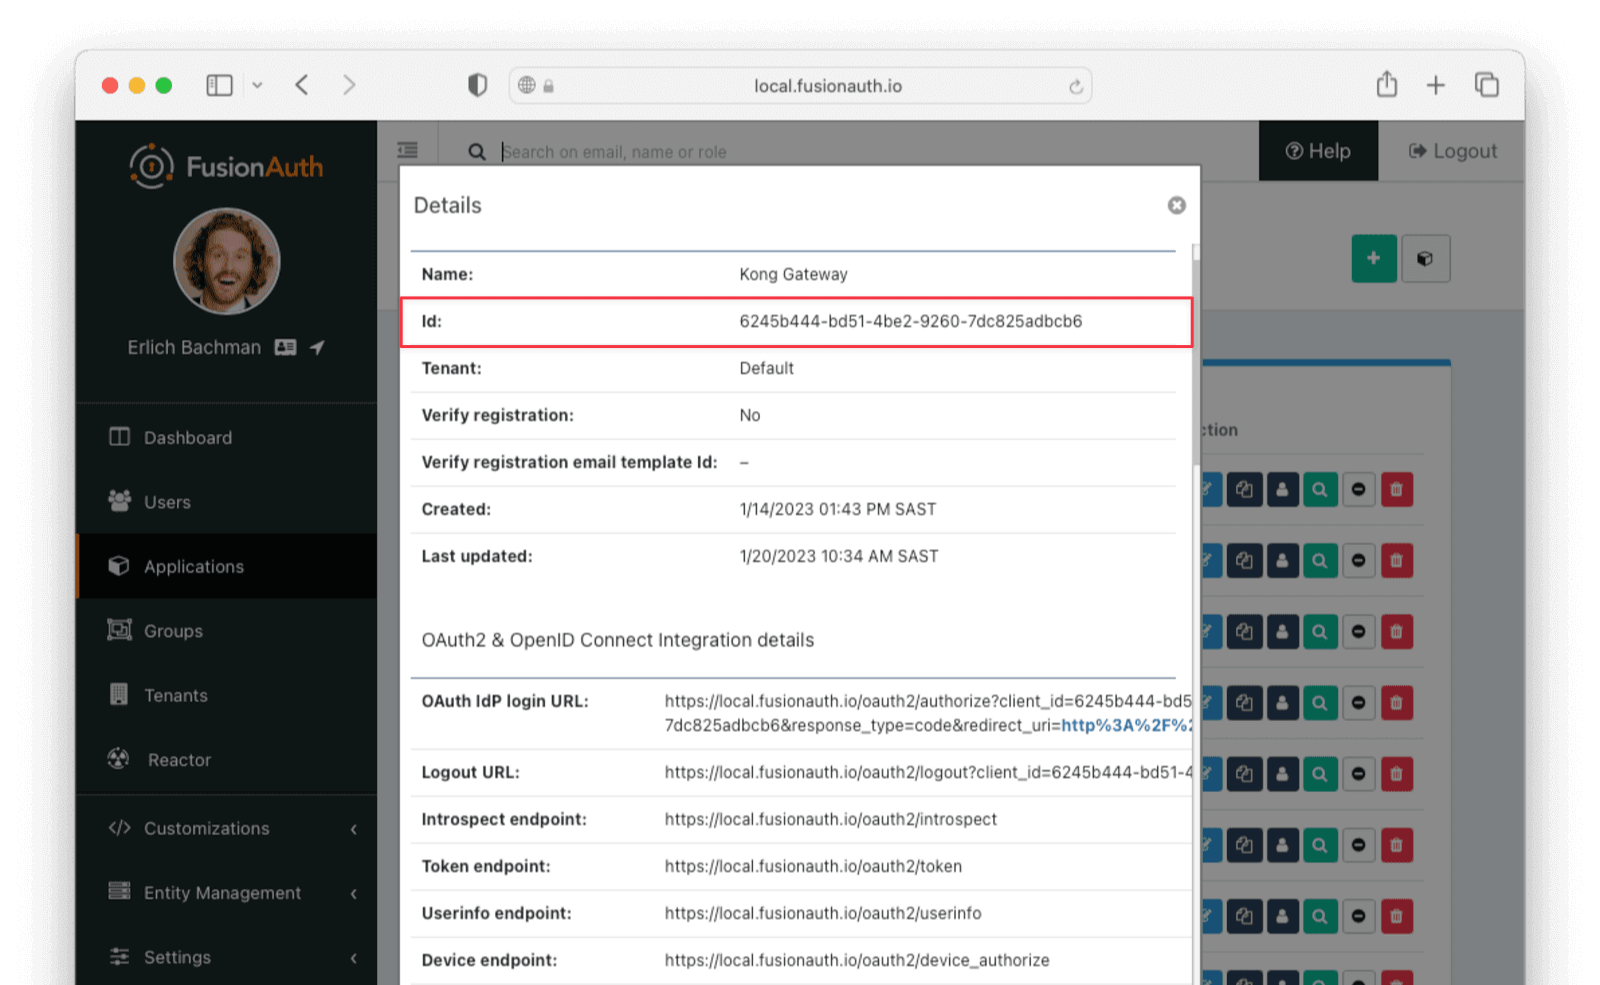
After saving the application, find the application in the list of applications and click View next to the application you just created. Here you will find the application Id . Note this value, as we will refer to it later as APPLICATION_ID.
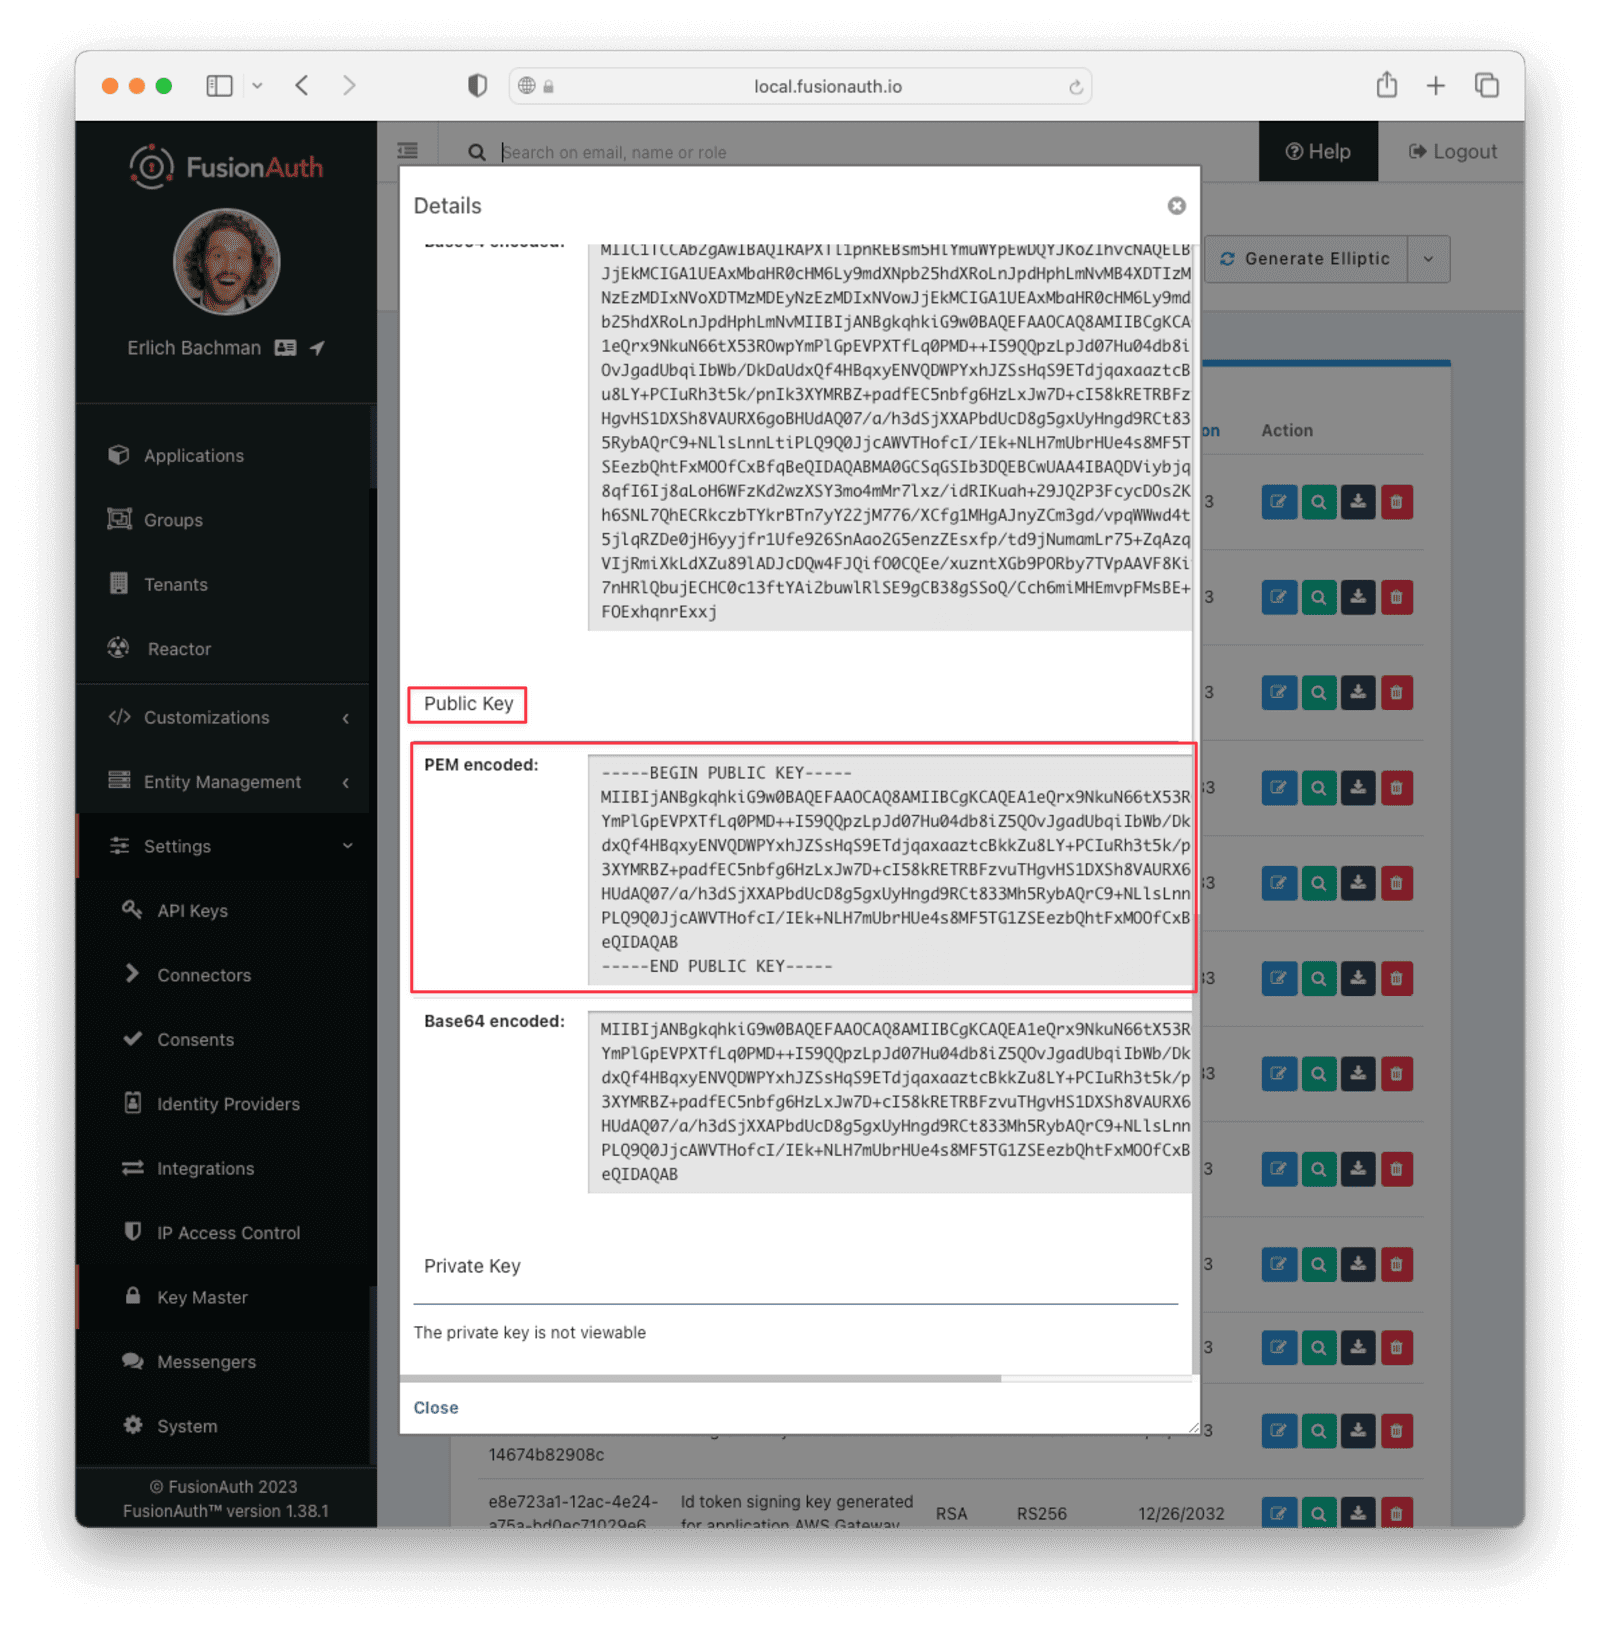
Now, navigate to Settings -> Key Master . You will see the access key that you've just created in this list. By default, it has the name Access token signing key generated for application <NAME_OF_APPLICATION>. View the key and copy the entire contents of the PEM encoded field under the Public Key section into a file in your current working directory. Name the file something like public.pem.
Why not use JWKS, which FusionAuth supports, to retrieve the public key?
Unfortunately, JWKS is not supported by the JWT Kong plugin.
You will use FusionAuth's API to generate a test JWT for your application.
In a real-world application, the user or service would get the JWT through an OAuth grant. In the case of a user, the appropriate grant is the Authorization Code grant, and for a service, the Client Credentials grant.
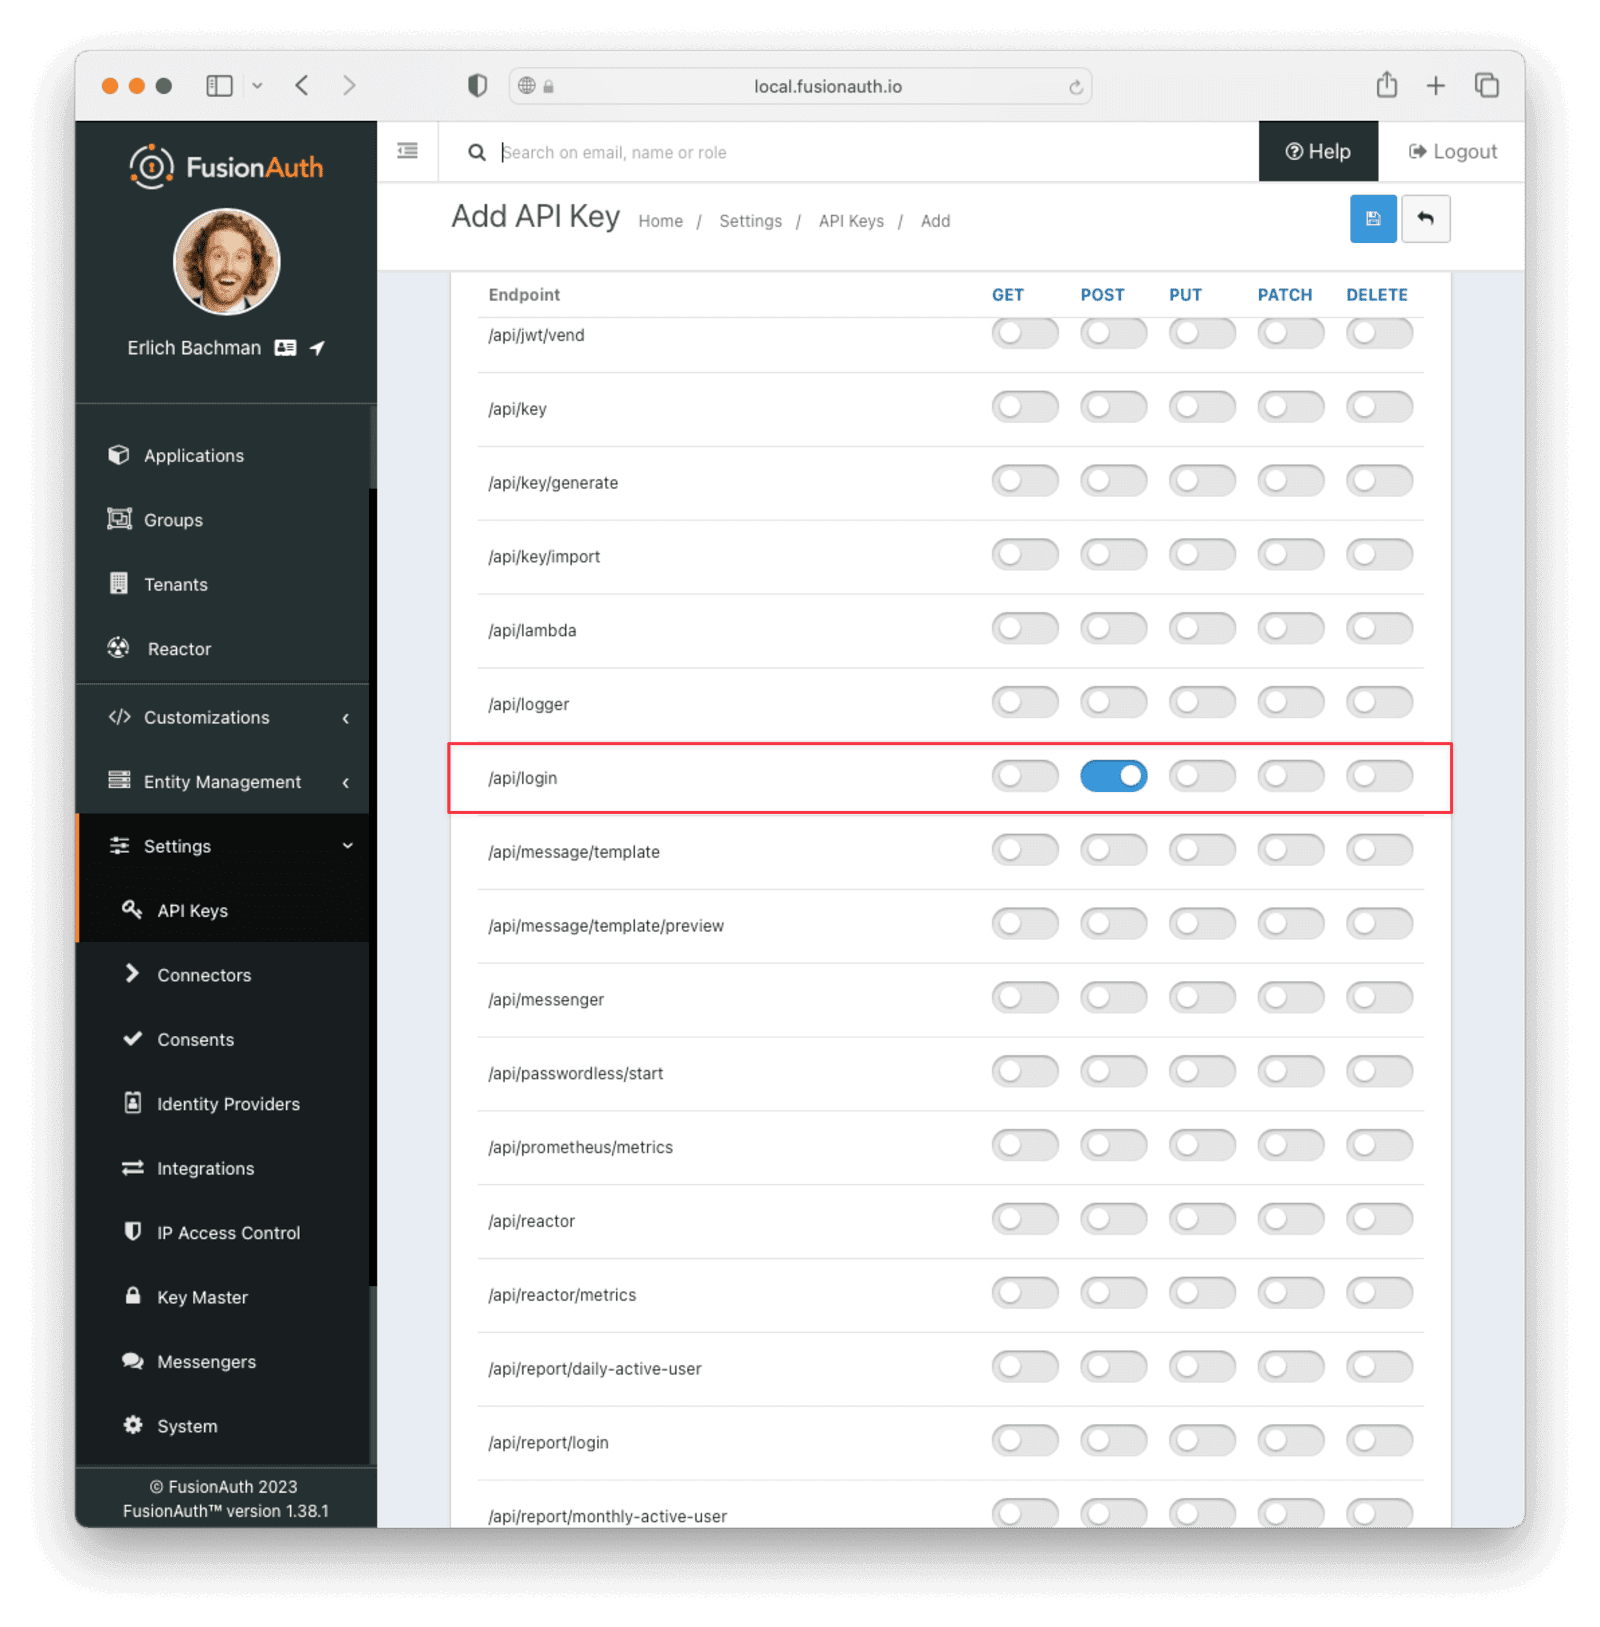
To make this example simpler, you'll use the Login API to get the JWT. To do this, you need an API key with POST access to the /api/login endpoint. Go to Settings -> API Keys to add the key. Make sure the appropriate tenant is selected in the Tenant field.
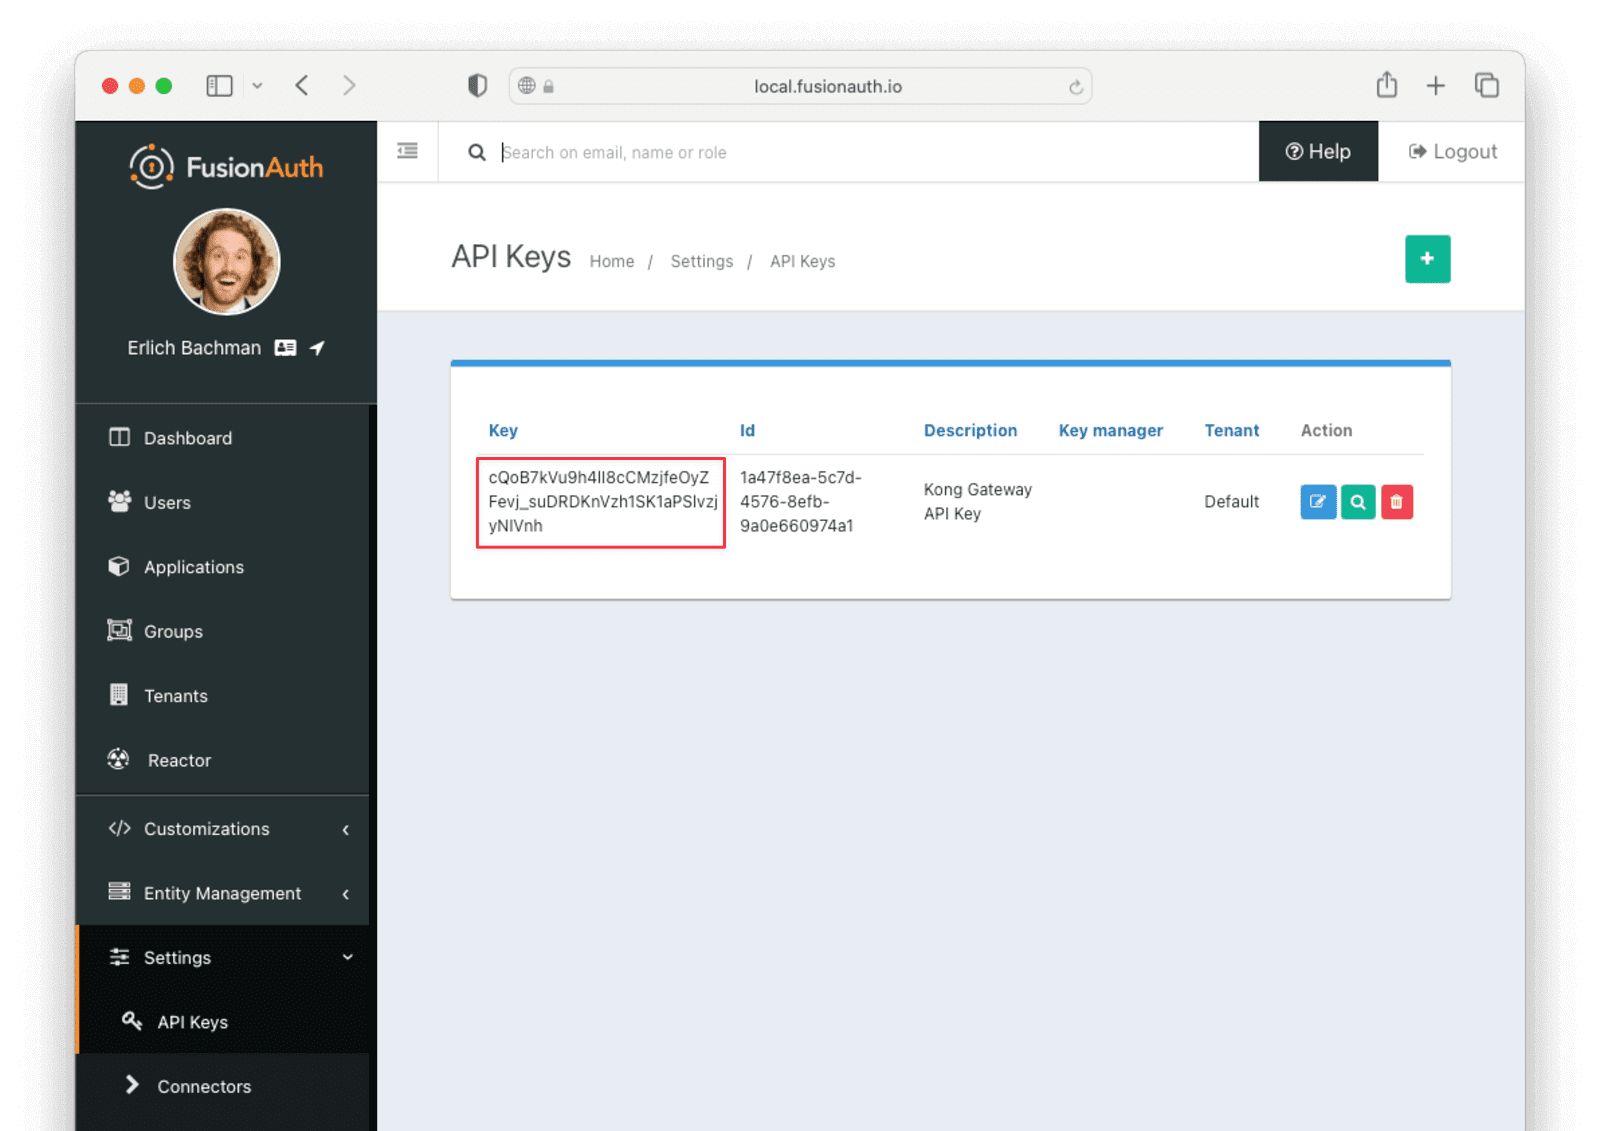
After saving the API key, you can view the key in the list of API keys. Make a note of the value of the Key field, as it will be used later. You will need to click the red padlock icon next to the key to reveal the value.
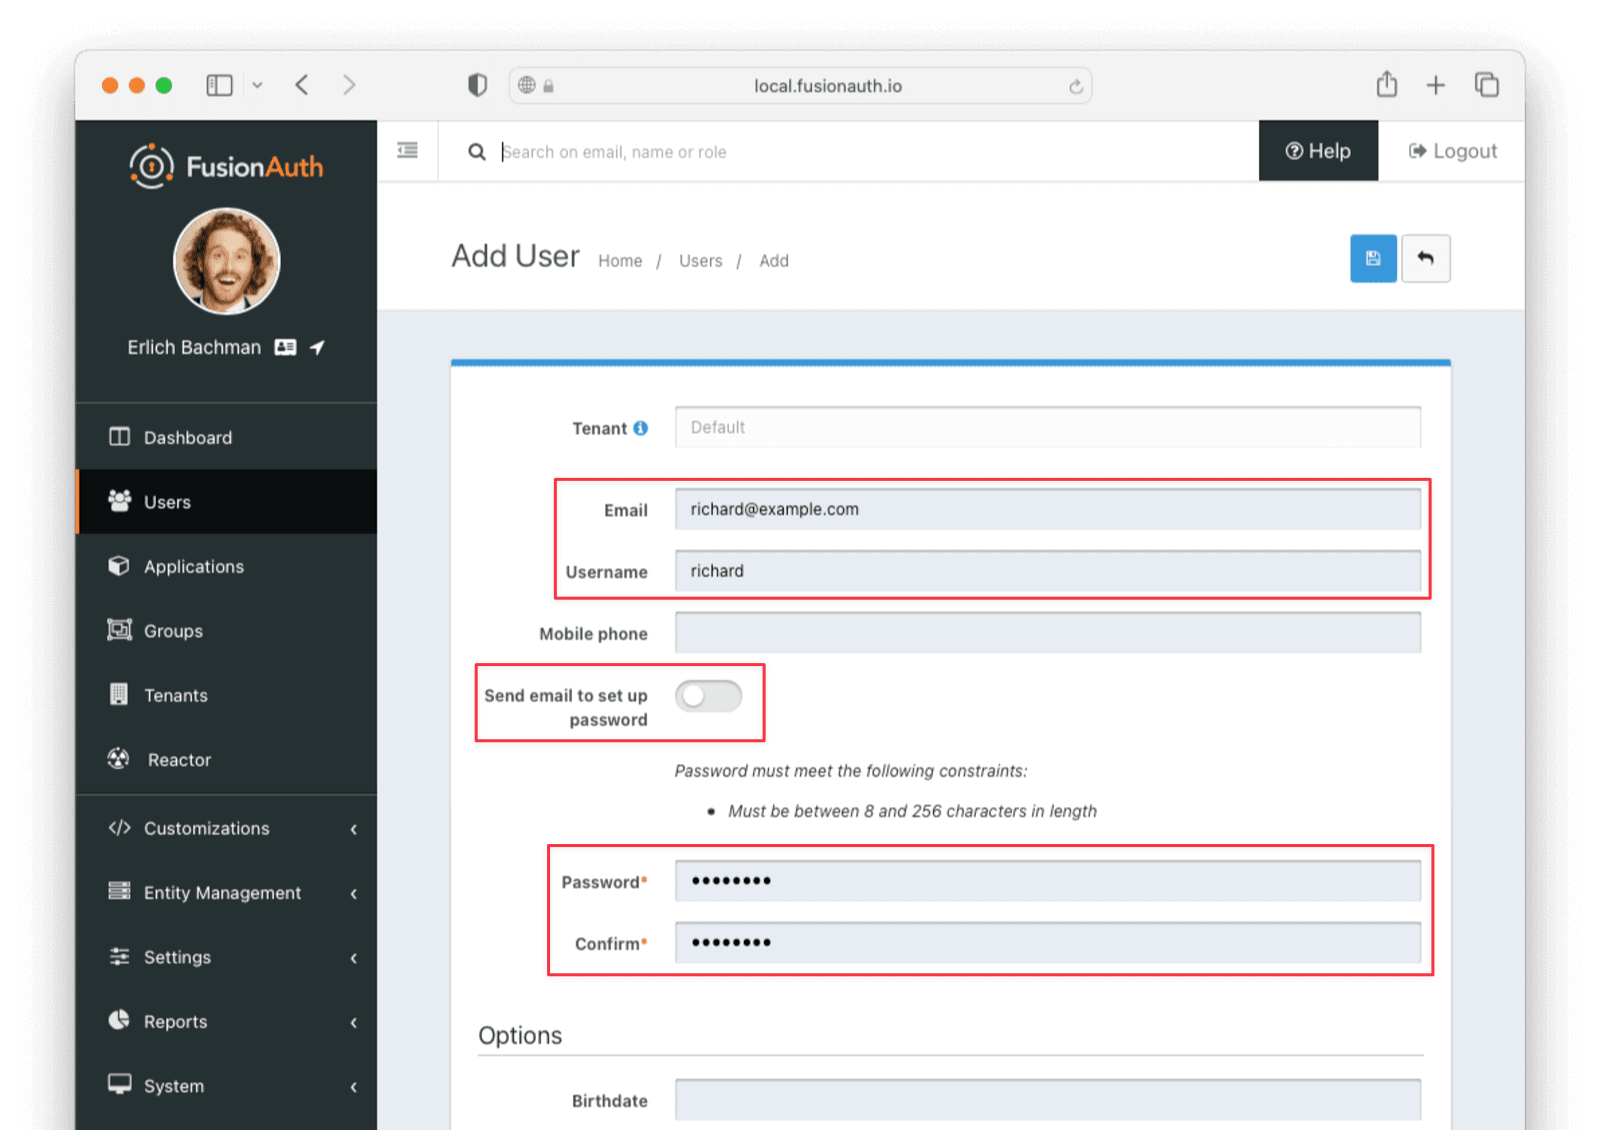
Finally, make sure there is at least one user registered to your application so that you can test with a JWT issued for that user. You can create a new user by navigating to Users -> Add user . Toggle the Send email to set up password switch to off and manually enter a password in the Password field.
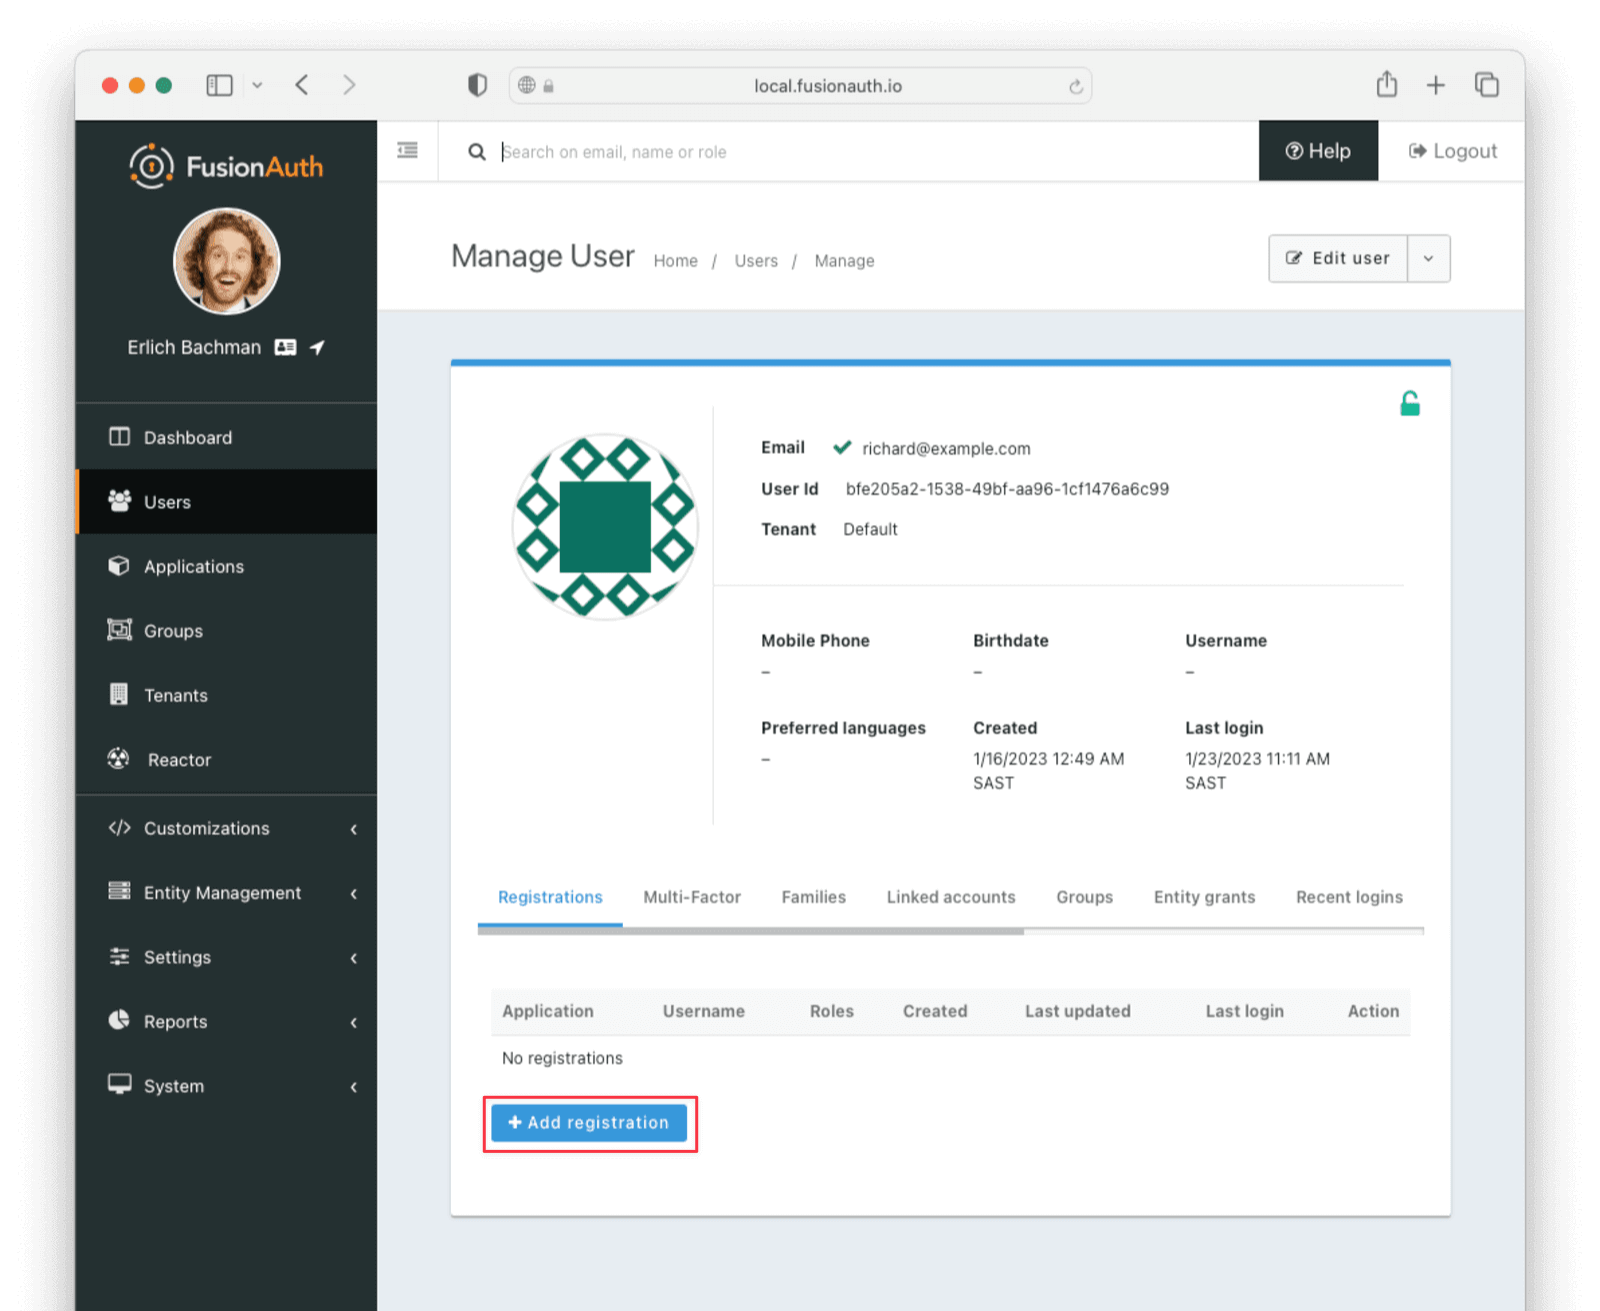
After saving this user, click Manage and go to the Registrations tab. Click Add Registration to register the user to your application.
Add a Consumer in Kong Gateway#
Now that FusionAuth has all the requisite information to create a JWT, you can configure your Kong Gateway and JWT plugin to provide access based on valid tokens created by FusionAuth.
Execute the following command in your terminal to add a consumer to Kong.
Creating a consumer
curl -i -X POST http://localhost:8001/consumers \
  --data "username=fusionauth"
This command creates a Kong consumer with the username fusionauth. This consumer will be linked to credentials that you supply to it, namely the Public key and Issuer name from FusionAuth. This consumer uses the information provided to verify any JWT used to access the service. You can enable this with the following command:
Create credentials for the consumer
curl -i -X POST http://localhost:8001/consumers/<CONSUMER_USERNAME>/jwt \
  -F "algorithm=RS256" \
  -F "rsa_public_key=@./<PUBLIC_KEY_FILENAME>" \
  -F "key=<YOUR_FUSIONAUTH_URL>"
Here, <YOUR_FUSIONAUTH_URL> should exactly match the Issuer field from Tenants -> Your Tenant , <CONSUMER_USERNAME> should match the username that you supplied to the consumer in the prior step, and <PUBLIC_KEY_FILENAME> should match the name of the file that you saved the public key to, from the Key Master page.
Using the example values from this guide, the command would be:
Supply key to consumer with example values
curl -i -X POST http://localhost:8001/consumers/fusionauth/jwt \
  -F "algorithm=RS256" \
  -F "rsa_public_key=@./public.pem" \
  -F "key=https://local.fusionauth.io"
Creating and Using the Service with a JWT#
You can now generate a test JWT to access your Kong Gateway service using FusionAuth's login API. Execute the following command in your terminal.
Get JWT token from FusionAuth
curl --location --request POST '<YOUR_FUSIONAUTH_URL>/api/login' \
--header 'Authorization: <API_KEY>' \
--header 'Content-Type: application/json' \
--data-raw '  {
    "loginId": "<USER_EMAIL>",
    "password": "<USER_PASSWORD>",
    "applicationId": "<APPLICATION_ID>",
    "noJWT" : false
  }'
Here, <YOUR_FUSIONAUTH_URL> is the Issuer name, and <API_KEY> is the key you noted when setting it up on the Settings -> API Keys page.
For <APPLICATION_ID>, use the Id of your FusionAuth application, noted when setting up the application.
The values for <USER_EMAIL> and <USER_PASSWORD> are the username and password of the test user that you registered to that application.
Using the example values from this guide, the command would be:
Get JWT token from FusionAuth with example values
curl --location --request POST 'https://local.fusionauth.io/api/login' \
--header 'Authorization: cQoB7kVu9h4lI8cCMzjfeOyZFevj_suDRDKnVzh1SK1aPSlvzjyNIVnh' \
--header 'Content-Type: application/json' \
--data-raw '  {
    "loginId": "richard@example.com",
    "password": "password",
    "applicationId": "6245b444-bd51-4be2-9260-7dc825adbcb6",
    "noJWT" : false
  }'
The return response from FusionAuth should look similar to the following:
Token response from API call
{
    "token": "eyJhbGciOiJSUzI1NiIsInR5cCI6IkpXVCIsImtpZCI6ImhDUjA4X3daR2s0OUFlYUFmRDY5ZmJKWmRGTSJ9.eyJhdWQiOiI2M2I3M2Y3Ni03NDAwLTQ4N2QtYjEyMi01NzA1Yjg0OGRhODAiLCJleHAiOjE2NzMzNjYyMDQsImlhdCI6MTY3MzM2MjYwNCwiaXNzIjoiaHR0cHM6Ly9mdXNpb25hdXRoLnJpdHphLmNvIiwic3ViIjoiMzk2MzAwMGYtNjg2ZC00MTY5LWI2MjgtOWM5YzQ1MzRiNzgwIiwianRpIjoiZDk3ZGIyZWYtZjExNS00ZDIxLWFlOTQtMDIyN2RmMGU4YzI5IiwiYXV0aGVudGljYXRpb25UeXBlIjoiUEFTU1dPUkQiLCJlbWFpbCI6ImJvYkBhd3MuY29tIiwiZW1haWxfdmVyaWZpZWQiOnRydWUsInByZWZlcnJlZF91c2VybmFtZSI6ImJvYmF3cyIsImFwcGxpY2F0aW9uSWQiOiI2M2I3M2Y3Ni03NDAwLTQ4N2QtYjEyMi01NzA1Yjg0OGRhODAiLCJyb2xlcyI6W10sImF1dGhfdGltZSI6MTY3MzM2MjYwNCwidGlkIjoiZjAwNGMxZmUtNDg0Yi05MDJjLWQ3Y2EtYmRiYzQ2NGRhMGI3In0.m7gzXhNLToPNVE1p5Vo2pLgP6WBcPNfS_zZJnJ81mdEgi6-orViz-tU8j0L8wva0-8KlMdy54cq_XjnDnYJ0aX90O4ZE_QVU5NuDDfzXH14wQtKQoIIydsB6ZvQoBt8JNFUHJb9ANLCGnfn6FVQKqPIzye18Gx_7wYSVokw3eLNFyzrq9dwOD5Q8V9gvZmXV2pTokQAtA7qFaadb2dIeFlSEB7wamKiZLXILjeWAeMbbvAAMQZWFh46UJjwr06QTd8PxQmRwDWWznJy1Vs8EAgZA4vkRSWnn3IbiaCtOaL1ANuEex6il7q32ahxj0Ncm9wn0DbDsQE9NB0CCNTSIhA",
    "tokenExpirationInstant": 1673366204805,
    "user": {
        "sampleuserdata" : "..."
    }
}
Copy the token value. You can now gain access to your Kong Gateway service by passing this value as a bearer token.
Gain access with JWT
curl -I http://localhost:8000/mock/requests \
-H 'Authorization: Bearer <TOKEN>'
Where <TOKEN> is the value of the JWT that you copied from the /api/login call.
This command should return HTTP/1.1 200 OK, indicating successful authorization to the Kong Gateway service.
Troubleshooting#
-
The JWT issued by the FusionAuth Login API has an expiry. If you wait too long before using it to call the Kong service, the token will expire and the call will fail. You can resolve this by rerunning the curl command to obtain another JWT token and using the new token.
-
The issuer URL set in the Issuer field from Tenants -> Your Tenant must exactly match the
keyvalue in the curl command when creating the consumer credentials on Kong. If the values do not match exactly, including any white space and slashes, the JWT token will not be accepted by Kong.
Next steps#
You've learned how to enable JWT authorization on a Kong service. In a production application, using Kong and the JWT plugin is useful to secure backend services of the application. This way, each service does not need to handle authorization or authentication. Instead, authentication and authorization are handled by FusionAuth and Kong.
You used the FusionAuth API to create a test token on behalf of a user. For a production system, the token will be generated after a user signs in to your application through a frontend. Check out some of the framework integration tutorials to implement that: