Twitter/X
Adding a Login with Twitter/X button to FusionAuth is simple, and this guide will walk you through the steps necessary to collect the credentials from Twitter in order to enable this Social login.
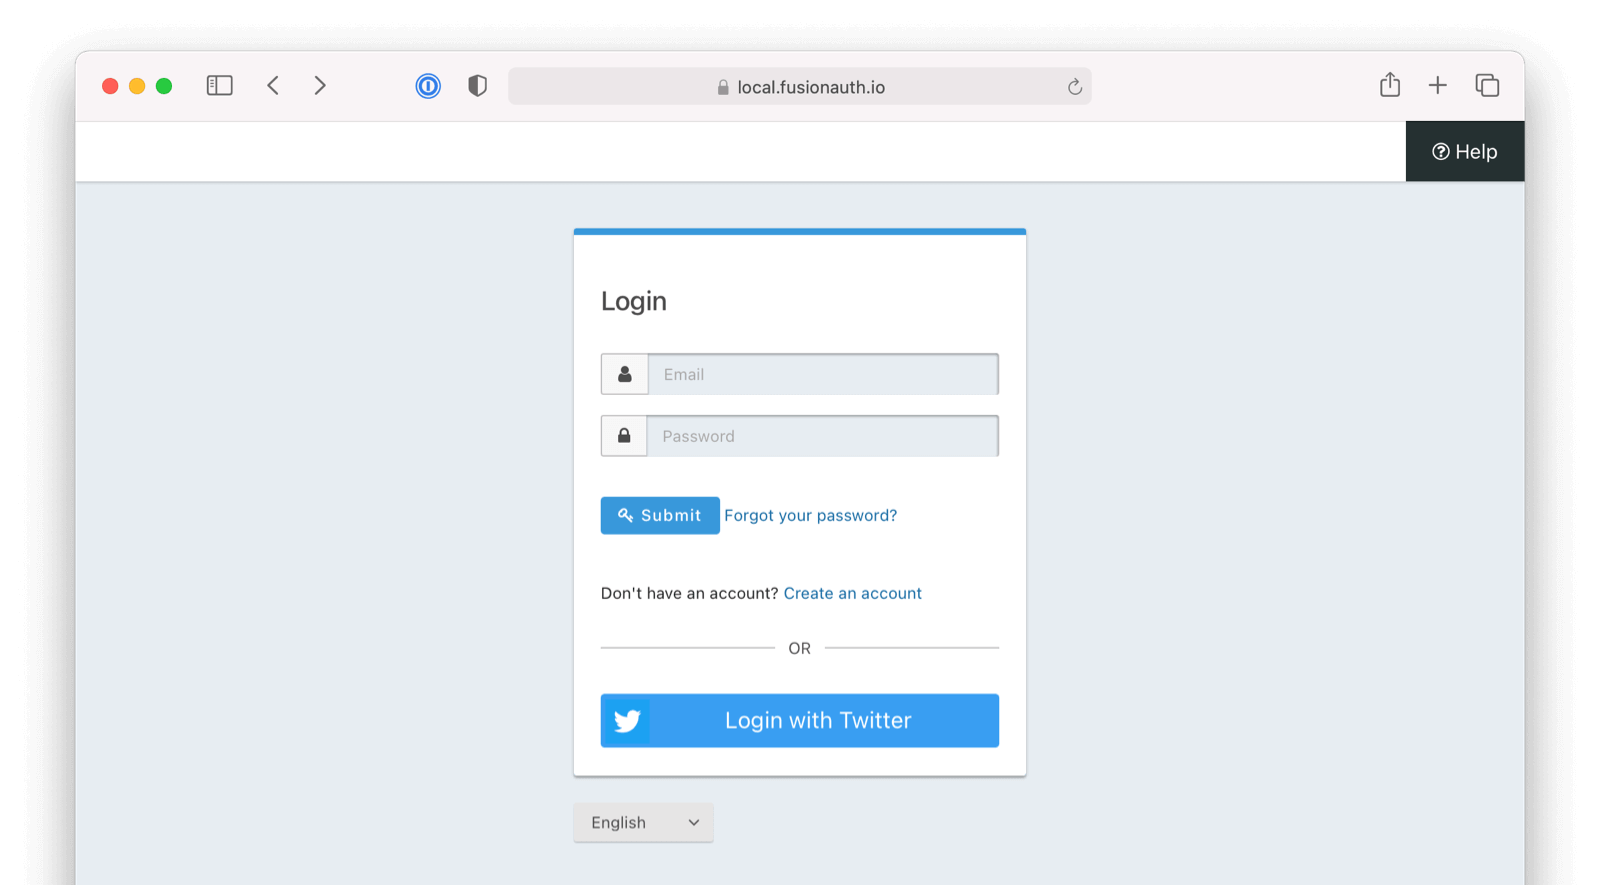
Once you have completed this configuration you will be able to enable the Twitter login button for one or more FusionAuth Applications. Below is an example login page with the Twitter Identity Provider enabled.
Here's a diagram of the login flow between:
- the user
- your application
- FusionAuth and
- a remote identity provider
sequenceDiagram
    participant User as User/Browser
    participant App
    participant FusionAuth
    participant IdentityProvider as Provider

    User ->> App : View Initial Page<br/>Click Login
    App ->> User : Displays Login Page<br/>Including Link To 'Login With Provider'
    User ->> App : Clicks On 'Login With Provider'
    App ->> User : Redirect To Provider Authorization URL
    User ->> IdentityProvider : Enters Credentials
    IdentityProvider ->> IdentityProvider : Validate Credentials
    IdentityProvider ->> User : Redirect to App With Authorization Code
    User ->> App : Requests Page, Has Authorization Code
    App ->> FusionAuth : Calls Complete Login<br/>With Code And Redirect URI
    FusionAuth ->> IdentityProvider : Exchanges Code And<br/>Redirect URI For Provider Token
    IdentityProvider ->> FusionAuth : Returns Provider Token
    FusionAuth ->> FusionAuth : Stores Provivider Token, Calls Lambda, Creates User And Registrations (If Needed), Generates FusionAuth Tokens
    FusionAuth ->> App : Return FusionAuth Tokens
    App ->> App : Create Session Or<br/>Otherwise Log User In
    Note over User, IdentityProvider: User Is Logged In And App Can Proceed<br/>Delivering Data And Functionality
Although this looks complex, the user only sees a few screens, such as the FusionAuth login screen, the provider login screen, and your application.
Create a Twitter Account#
Ensure you have a Twitter account, and then navigate to the Twitter Developer Portal.
If you do not yet have a developer account, you will need to apply for access to the Twitter API.
https://developer.twitter.com/en/apply-for-access.html
Once you have logged into Twitter and have obtained access to a Twitter developer account, continue to the next step.
Create a Twitter App#
Twitter allows you to create an application as part of the developer account setup. If you do not yet have a Twitter app you will need to create one in this step. Application creation is restricted according to the level of access you have in your Twitter project. You will need to apply for elevated access to be able to create more than one app in your Twitter project as well as to get access to settings that are otherwise restricted in Essential access mode. You can learn more about access levels and permissions here. If you already have a Twitter app that you plan to use for FusionAuth please review this section anyway to ensure your configuration is correct to support the Twitter login.
You can view a list of your Twitter apps on the Twitter Developer Portal dashboard.
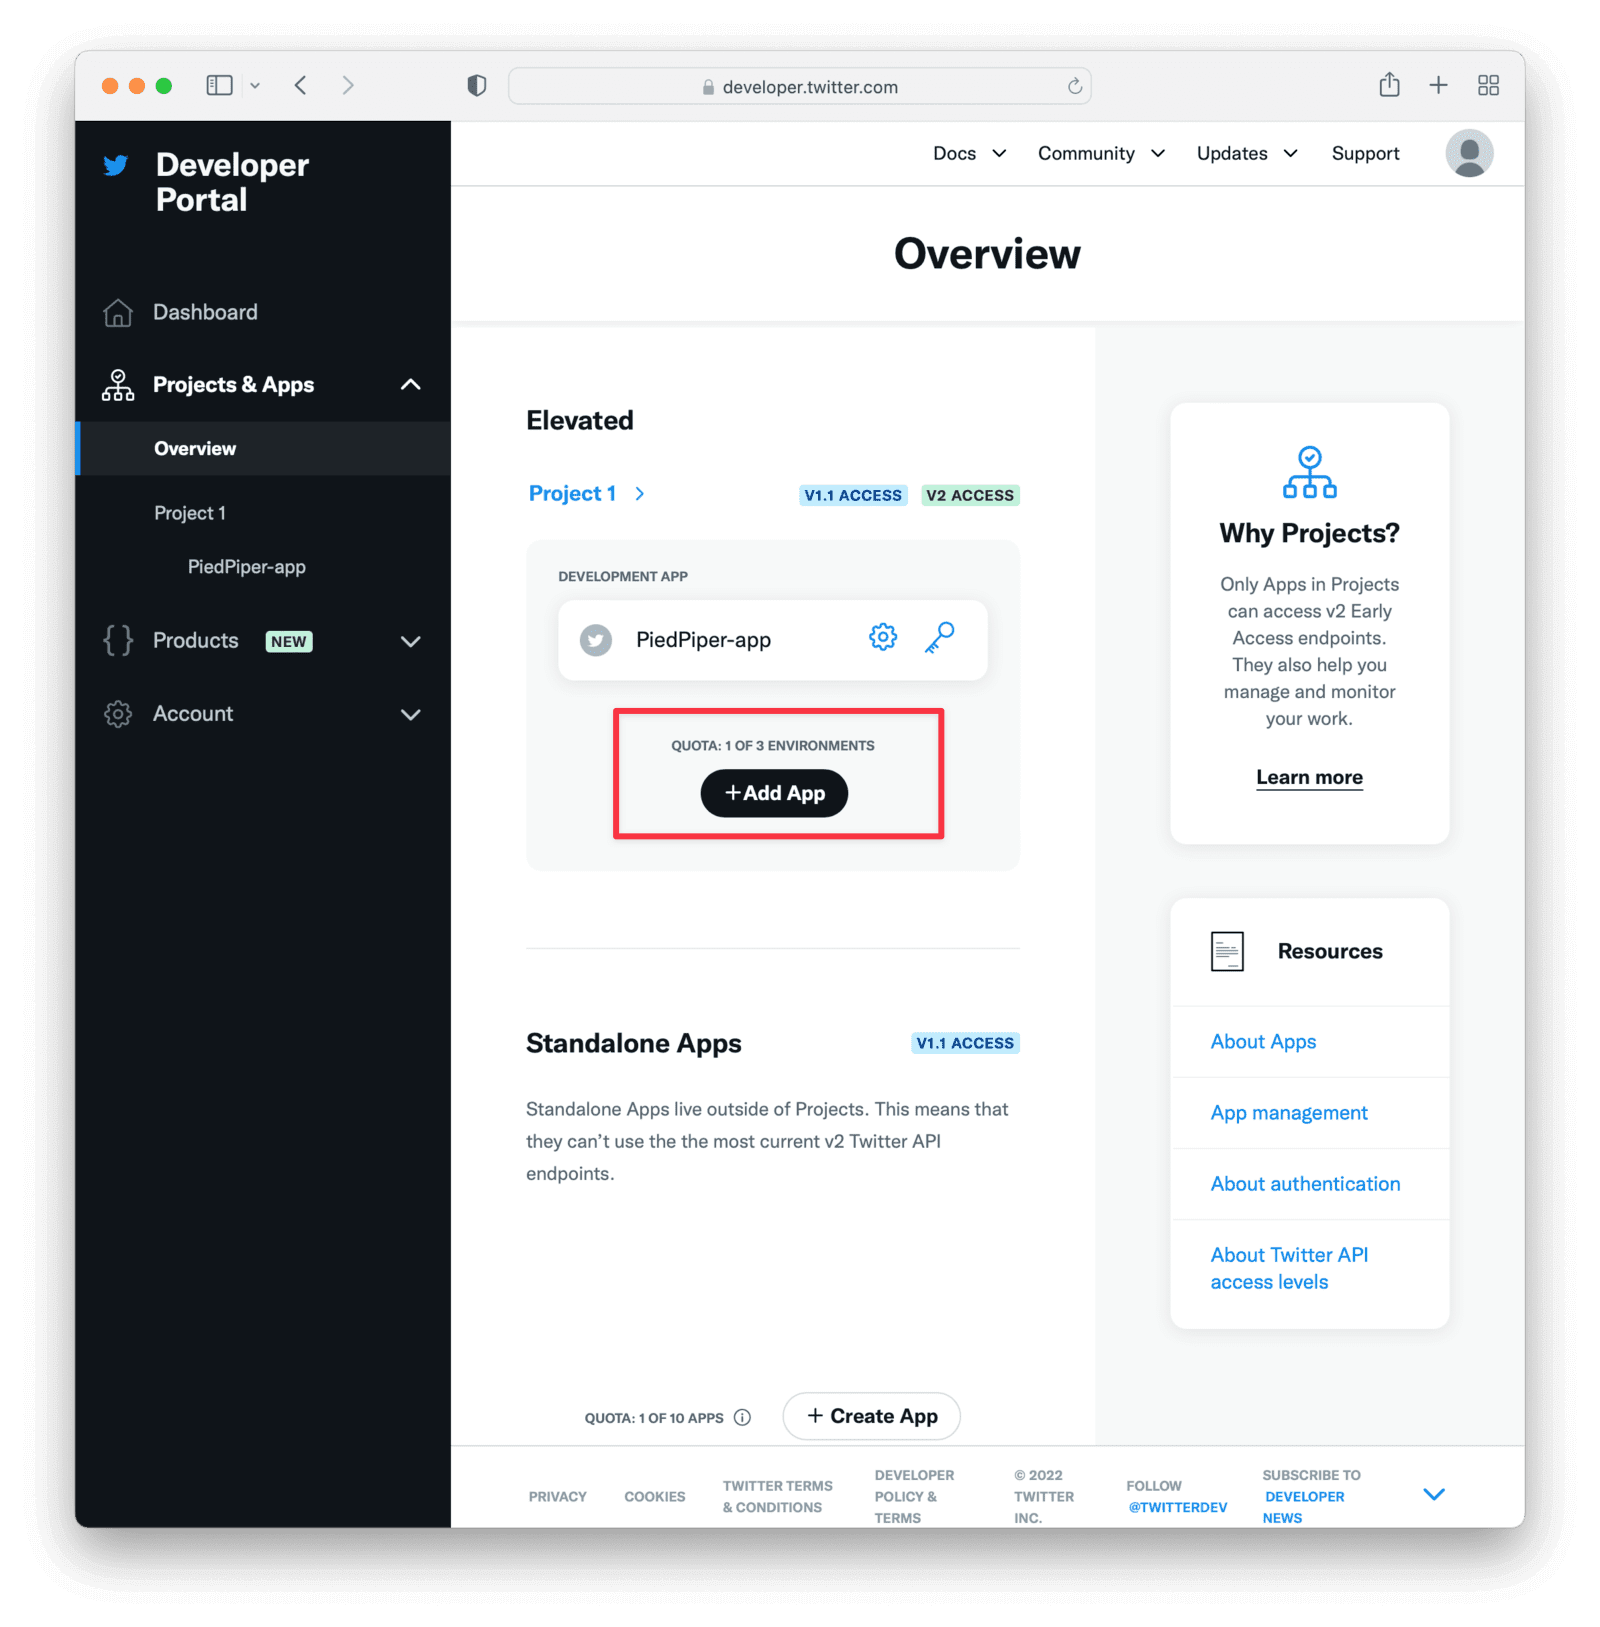
In the following sections we go through the configurations that you will need to set in your app to allow Twitter to connect with FusionAuth.
Record the Keys and Token#
The API key and API secret key are typically presented at the onset of app creation. Record these values. They will be needed for later integration with the FusionAuth Identity Provider.
Authentication Settings#
You will need to modify a few settings to enable Twitter to connect with FusionAuth.
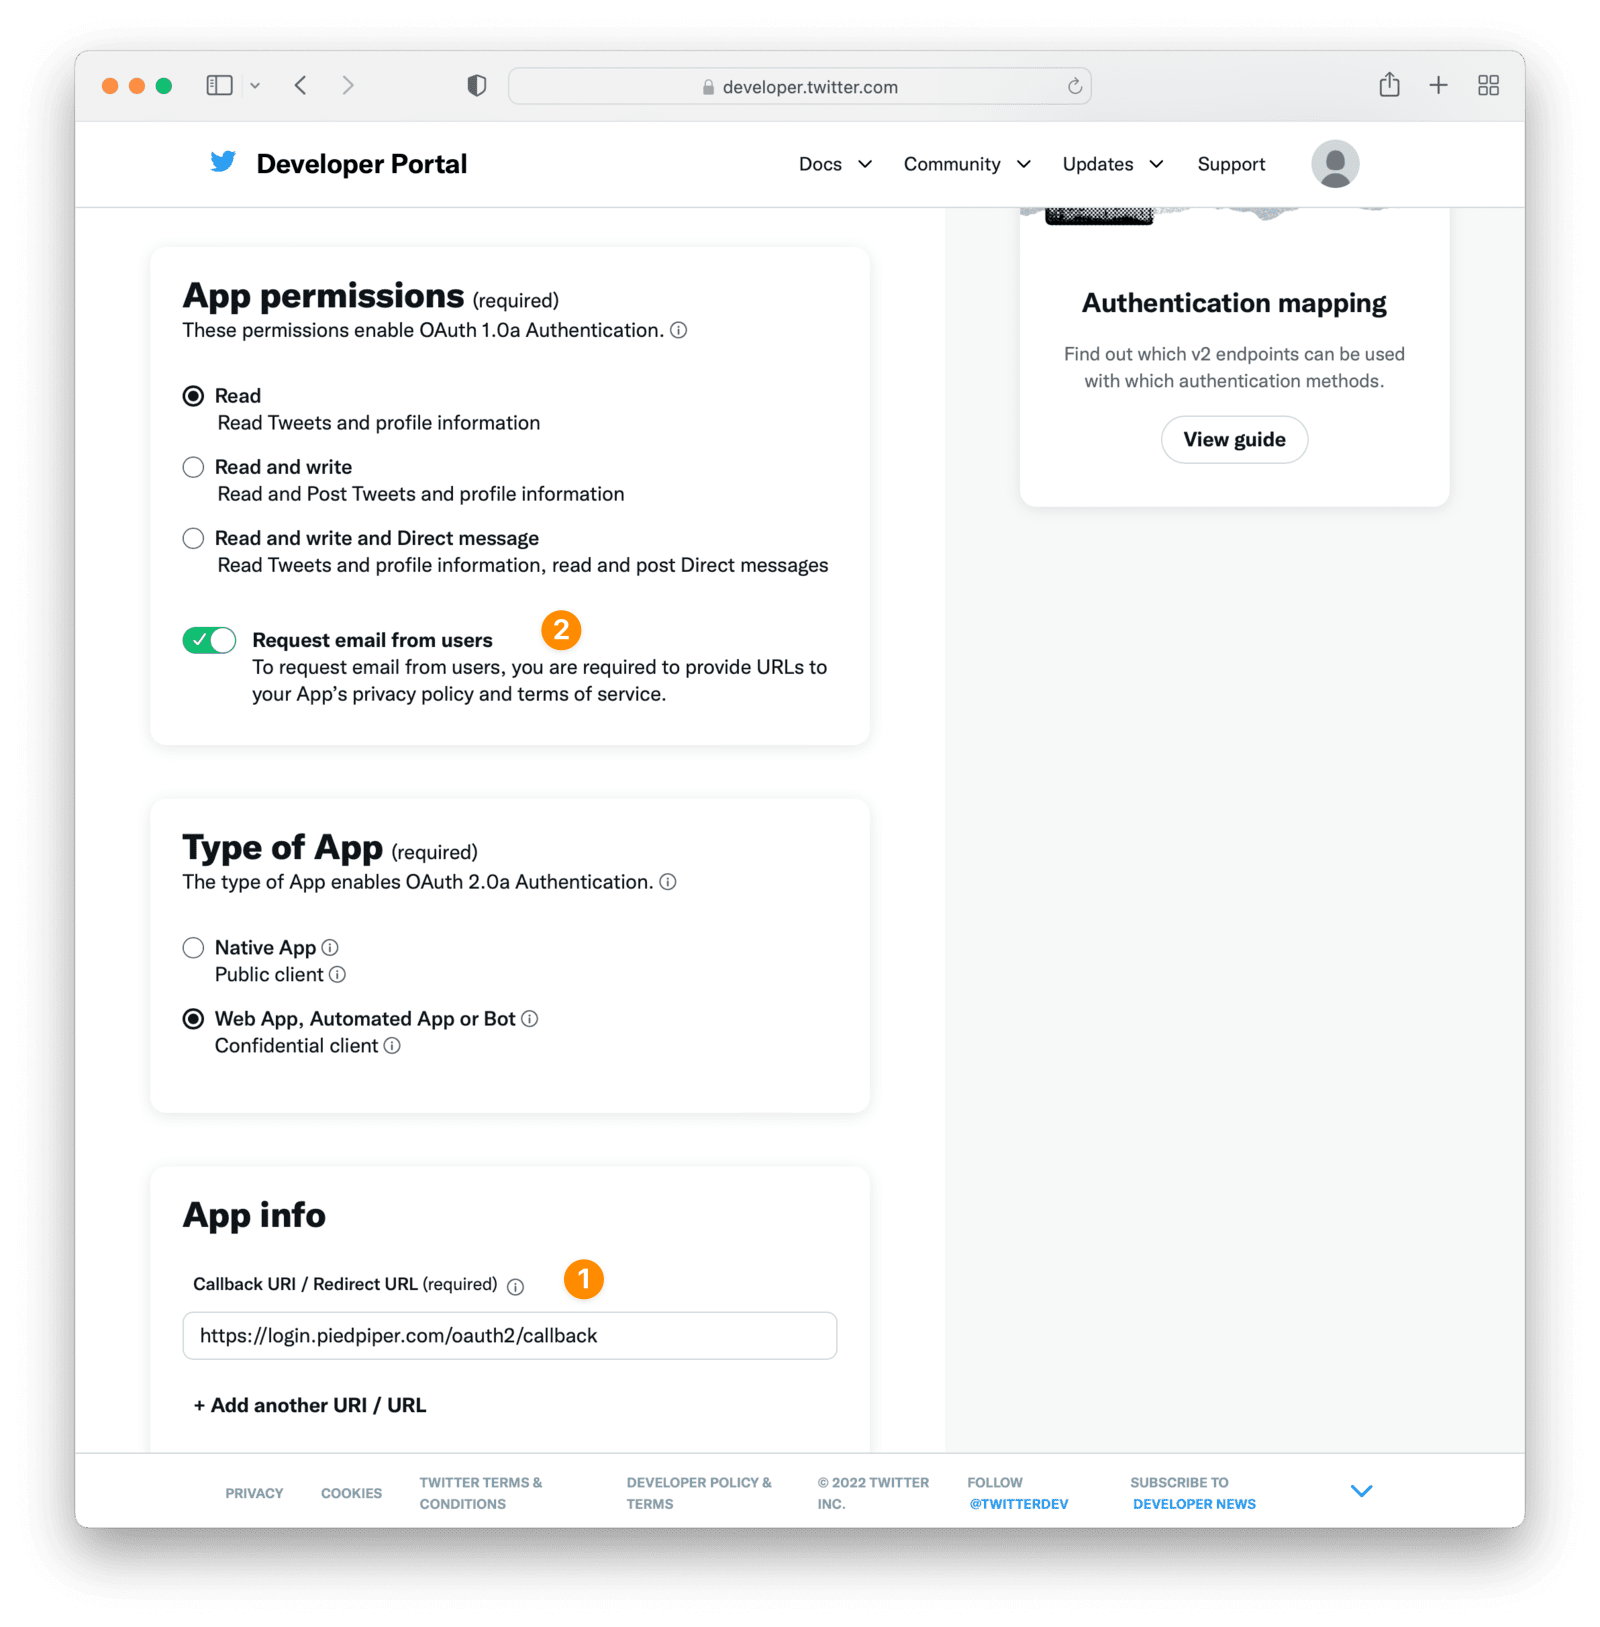
Under User authentication settings modify the app settings as below:
Add a Callback URI#
See label for step 1
Under the App Info section register a Callback URI / Redirect URL and specify your website URL.
In this example we are registering https://login.piedpiper.com/oauth2/callback as the callback URI. The redirect URL must be set to an absolute URL in the Twitter console for your application. If the hostname for your FusionAuth app is login.piedpiper.com, the redirect URL would be https://login.piedpiper.com/oauth2/callback.
Enable Request Email#
See label for step 2
To link your users by email, you will want to ensure you have checked Request email from users. Please note, for some Twitter users, it is possible to create an account without an email address. If this is the case for your Twitter users, you will want to configure the IdP below to link on a username, or use a reconcile lambda to map custom claims returned from Twitter. See Linking Strategies which discusses workaround options.
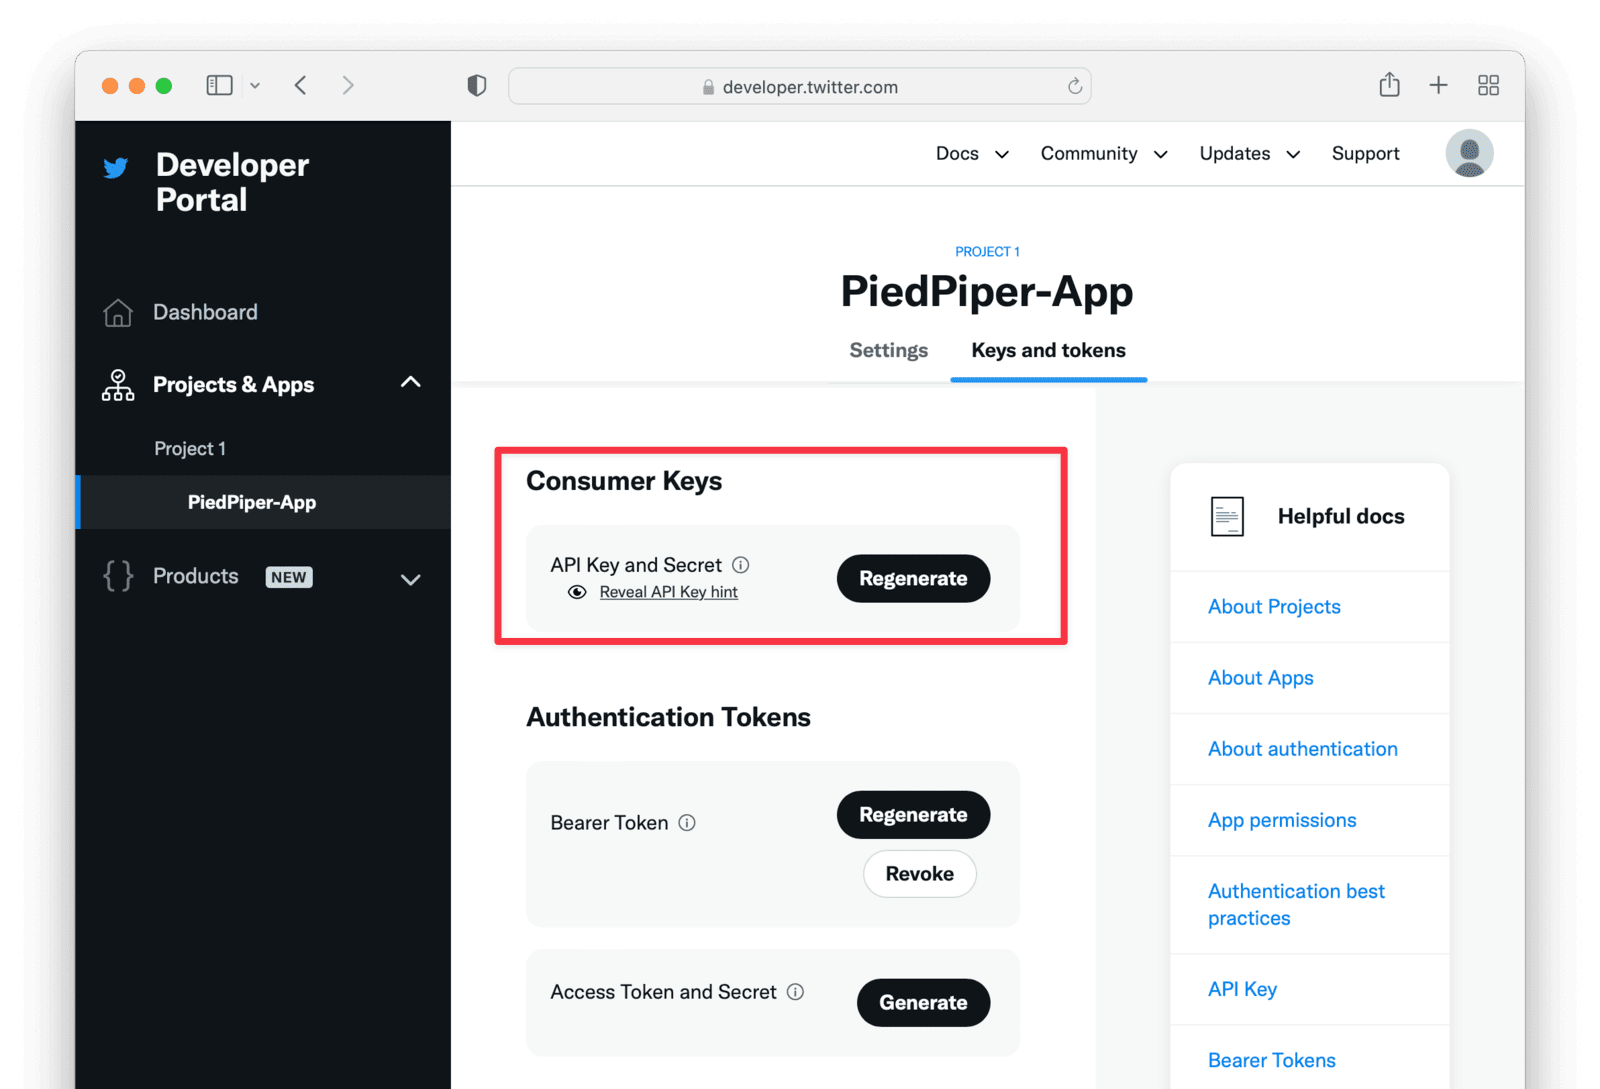
Keys and Tokens#
Under the Keys and tokens section you will find the Consumer API Keys and Secret. These two values are the same values that were presented to you during app creation and will be used to configure the FusionAuth Identity Provider.
Create a Twitter Identity Provider#
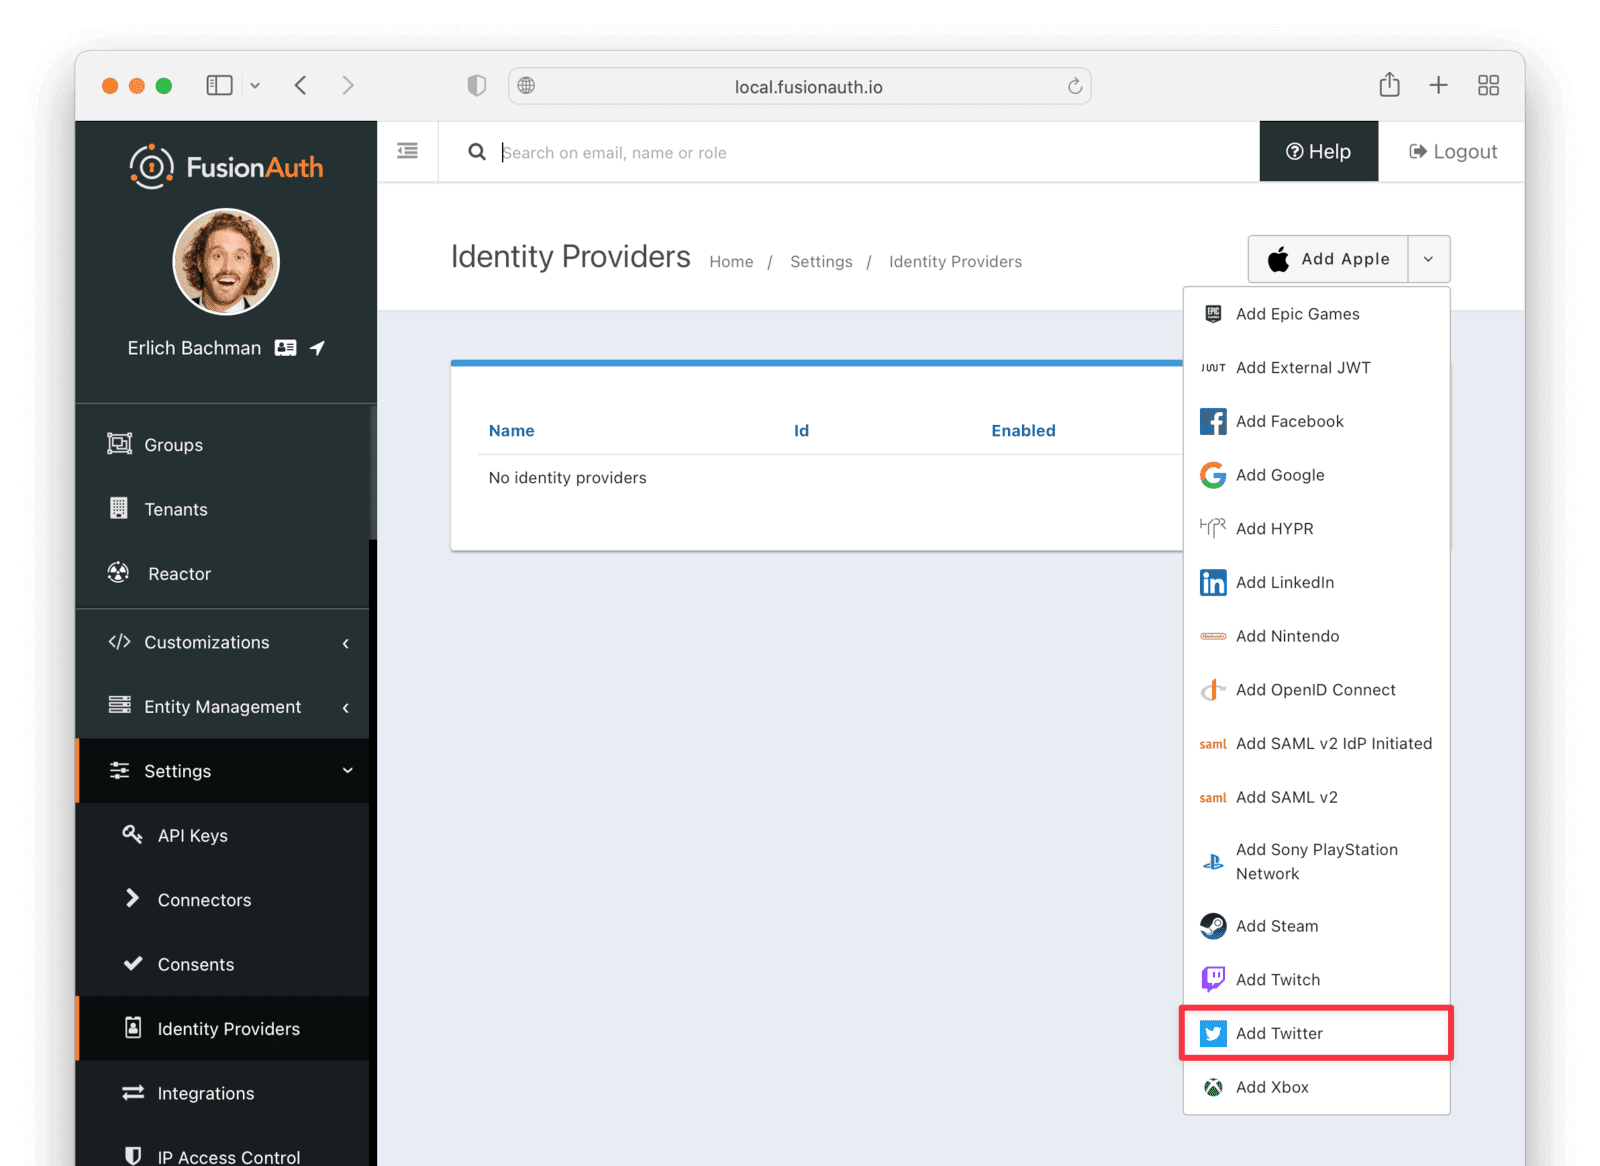
The last step will be to create a Twitter Identity Provider in FusionAuth. To create an Identity Provider navigate to Settings -> Identity Providers and click Add Twitter from the dropdown.
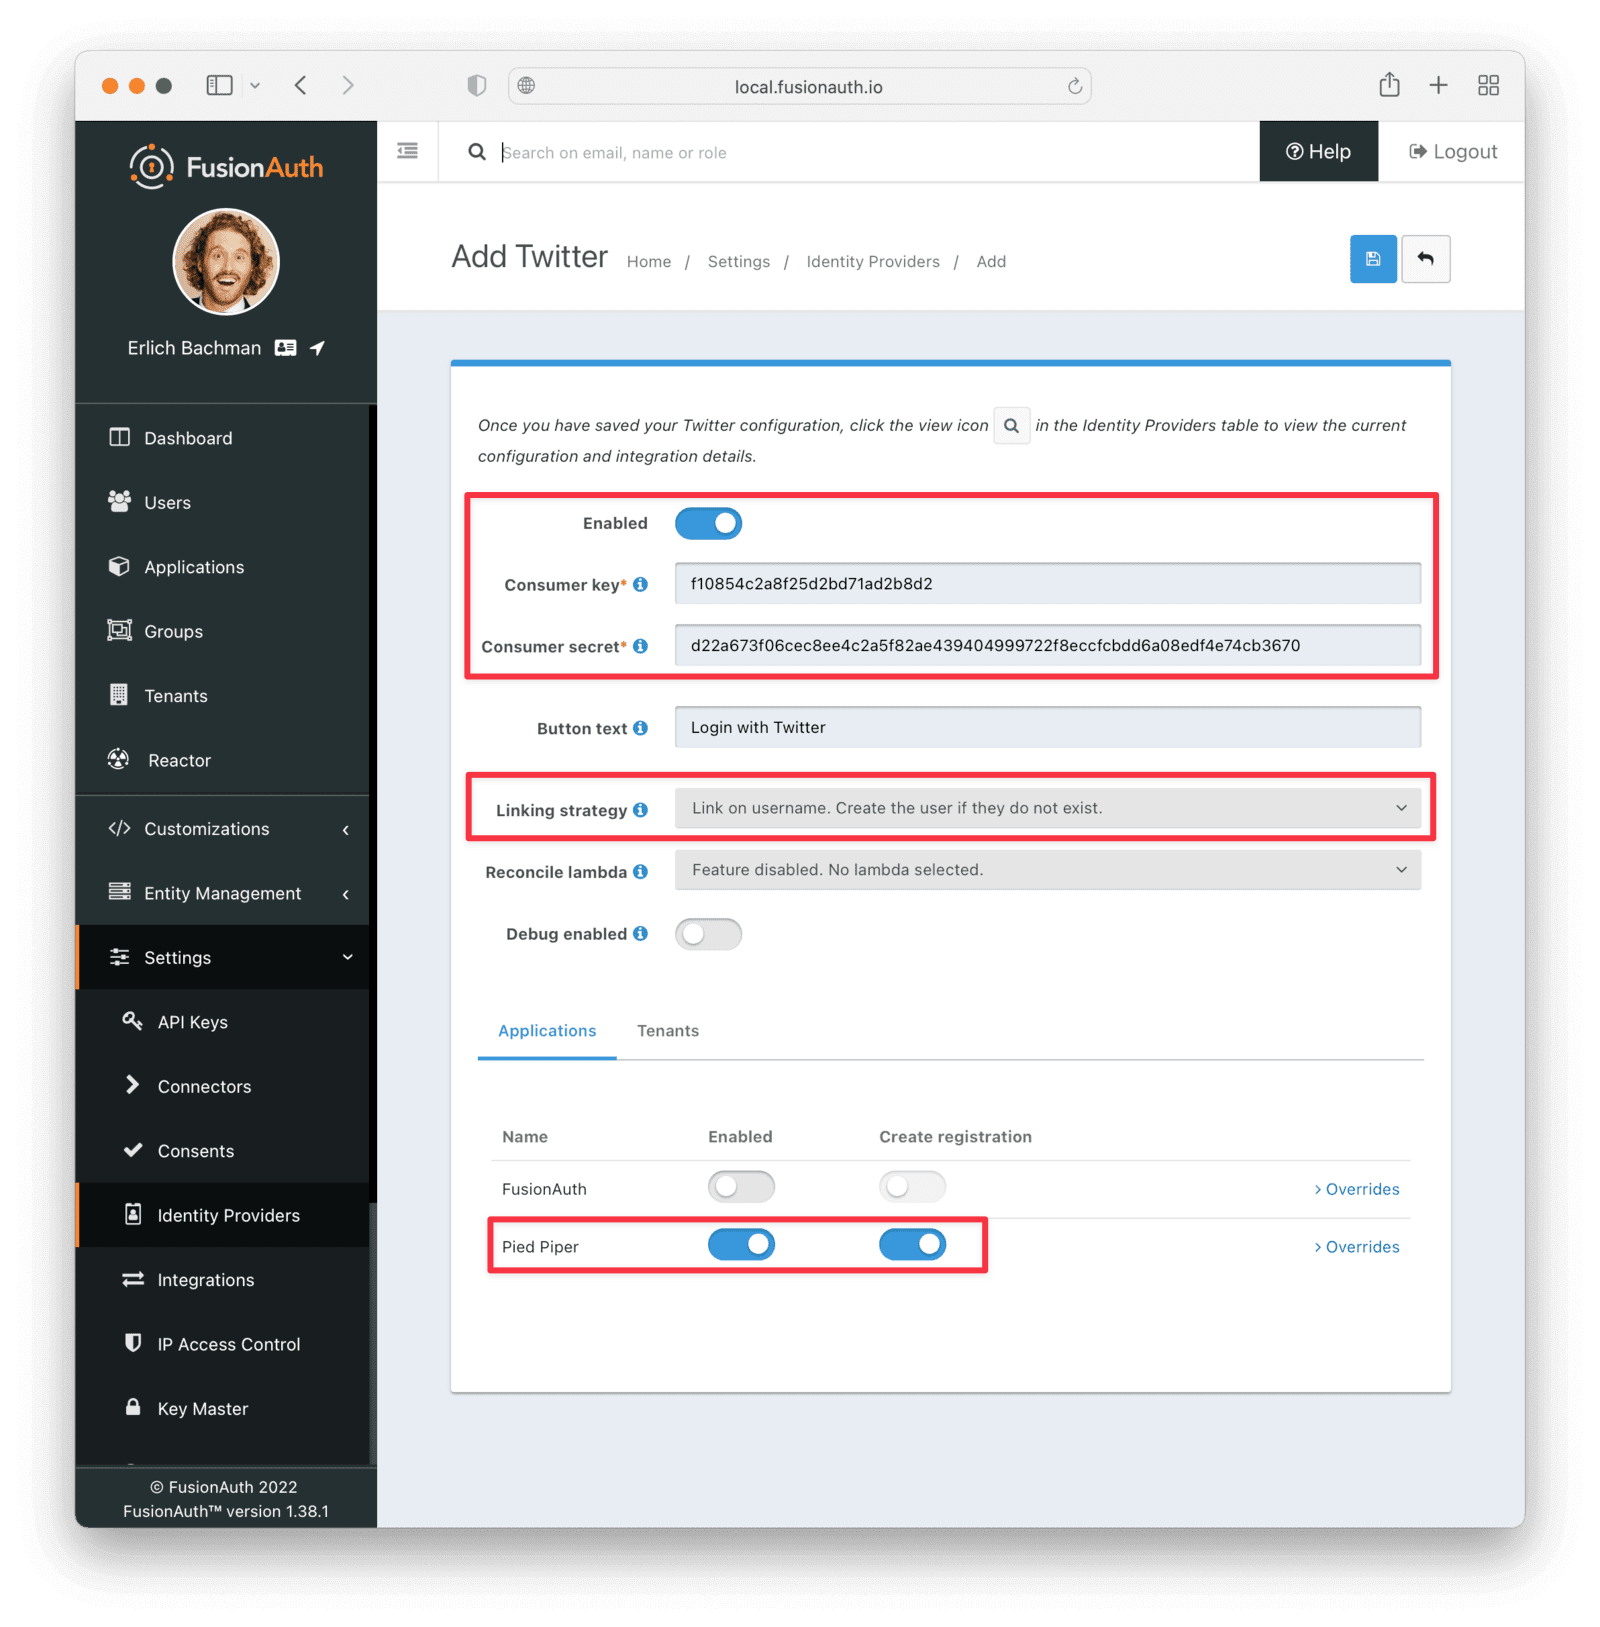
This will take you to the Add Twitter page, and you'll fill out the Consumer key and Consumer secret required fields using the values found in the Twitter App Keys and tokens tab from the previous step.
The button text is also required but it will be defaulted to Login with Twitter, you may optionally modify this default value.
To enable Twitter for an Application:
-
Navigate to Settings -> Identity Providers .
-
Click the Add provider dropdown and select Twitter . This will take you to the Add Twitter screen.
- Fill out the required fields; your identity provider can provide most of these values. For a detailed description of each field, see the documentation for Twitter.
-
In the Applications configuration section at the bottom of this panel, find your application name.
-
To dynamically create FusionAuth user accounts (with default roles) for all users who successfully authenticate using this provider, select Create registration . If you disable this option, only an administrator with registration permissions can create new users for this application with access via Sign in with Twitter.
- You should now see the Sign in with Twitter button on the login page for the Pied Piper application.
Form Fields#
IdoptionalAvailable since 1.61.0An optional UUID. When this value is omitted a unique Id will be generated automatically.
TenantoptionalAvailable since 1.62.0The tenant to which this identity provider belongs. This field only displays when the user selects a specific tenant on the previous page. When Global identity provider is selected on the previous page, this field does not display.
NamerequiredAvailable since 1.61.0A unique name to identify the identity provider. This name is for display purposes only and it can be modified later if desired.
Consumer keyrequiredThe Twitter API key found in your Twitter App Keys and tokens settings in the API key field.
Consumer secretrequiredThe Twitter API secret key found in your Twitter App Keys and tokens settings in the API secret key field.
Callback URLAvailable since 1.6.0This is the callback URL you will provide in your Twitter configuration.
Button textrequiredThe text to be displayed in the button on the login form. This value is defaulted to Login with Twitter but it may be modified to your preference.
Linking strategyoptionalThe linking strategy for Twitter. See Linking Strategies for more.
Available since 1.65.0 You can only change this value when the identity provider is disabled. To change the linking strategy for an identity provider that is already enabled, disable the provider, change the value, and then re-enable the provider.
Reconcile lambdaoptionalAvailable since 1.17.0A lambda may be utilized to map custom claims returned from Twitter.
To configure a lambda, navigate to Customizations -> Lambdas .
Debug enabledoptionalDefaults to falseEnable debug to create an event log to assist you in debugging integration errors.
Proxy details#
If you are running FusionAuth behind a proxy of some sort, please review the following information.
FusionAuth will detect the public URL of your instance at runtime to send to Twitter as the callback URL. If you are behind a proxy, ensure that the X-Forwarded-Host and the X-Forwarded-Proto headers are added by your proxy if the host or protocol do not match what is behind the proxy. For example, if your public URL is using https and your proxy is performing SSL acceleration the URL behind the proxy may be http. In this scenario, most proxies will have added the X-Forwarded-Proto header to the request which will allow FusionAuth to send the correct URL to Twitter.
Building Your Own Integration#
If you are building your own login experience, you'll want to start the identity provider flow yourself and then complete the login.
You might do this if you are using the Login API rather than using the hosted FusionAuth login pages. Here's a diagram illustrating this login flow:
sequenceDiagram
    participant User as User/Browser
    participant App
    participant FusionAuth
    participant IdentityProvider as Provider

    User ->> App : View Initial Page<br/>Click Login
    App ->> User : Displays Login Page<br/>Including Link To 'Login With Provider'
    User ->> App : Clicks On 'Login With Provider'
    App ->> User : Redirect To Provider Authorization URL
    User ->> IdentityProvider : Enters Credentials
    IdentityProvider ->> IdentityProvider : Validate Credentials
    IdentityProvider ->> User : Redirect to App With Authorization Code
    User ->> App : Requests Page, Has Authorization Code
    App ->> FusionAuth : Calls Complete Login<br/>With Code And Redirect URI
    FusionAuth ->> IdentityProvider : Exchanges Code And<br/>Redirect URI For Provider Token
    IdentityProvider ->> FusionAuth : Returns Provider Token
    FusionAuth ->> FusionAuth : Stores Provider Token, Calls Lambda, Creates User And Registrations (If Needed), Generates FusionAuth Tokens
    FusionAuth ->> App : Return FusionAuth Tokens
    App ->> App : Create Session Or<br/>Otherwise Log User In
    Note over User, IdentityProvider: User Is Logged In And App Can Proceed<br/>Delivering Data And Functionality
If you require a refresh token after completing the login, ensure Enable JWT Refresh is true in the application configuration. This is found in the administrative user interface by navigating to Applications -> Your Application -> Security -> Login API settings .