Add a Google IdP
Adding a Login with Google button to FusionAuth is straightforward, and this guide will walk you through the steps necessary to collect the credentials from Google in order to enable this Social login.
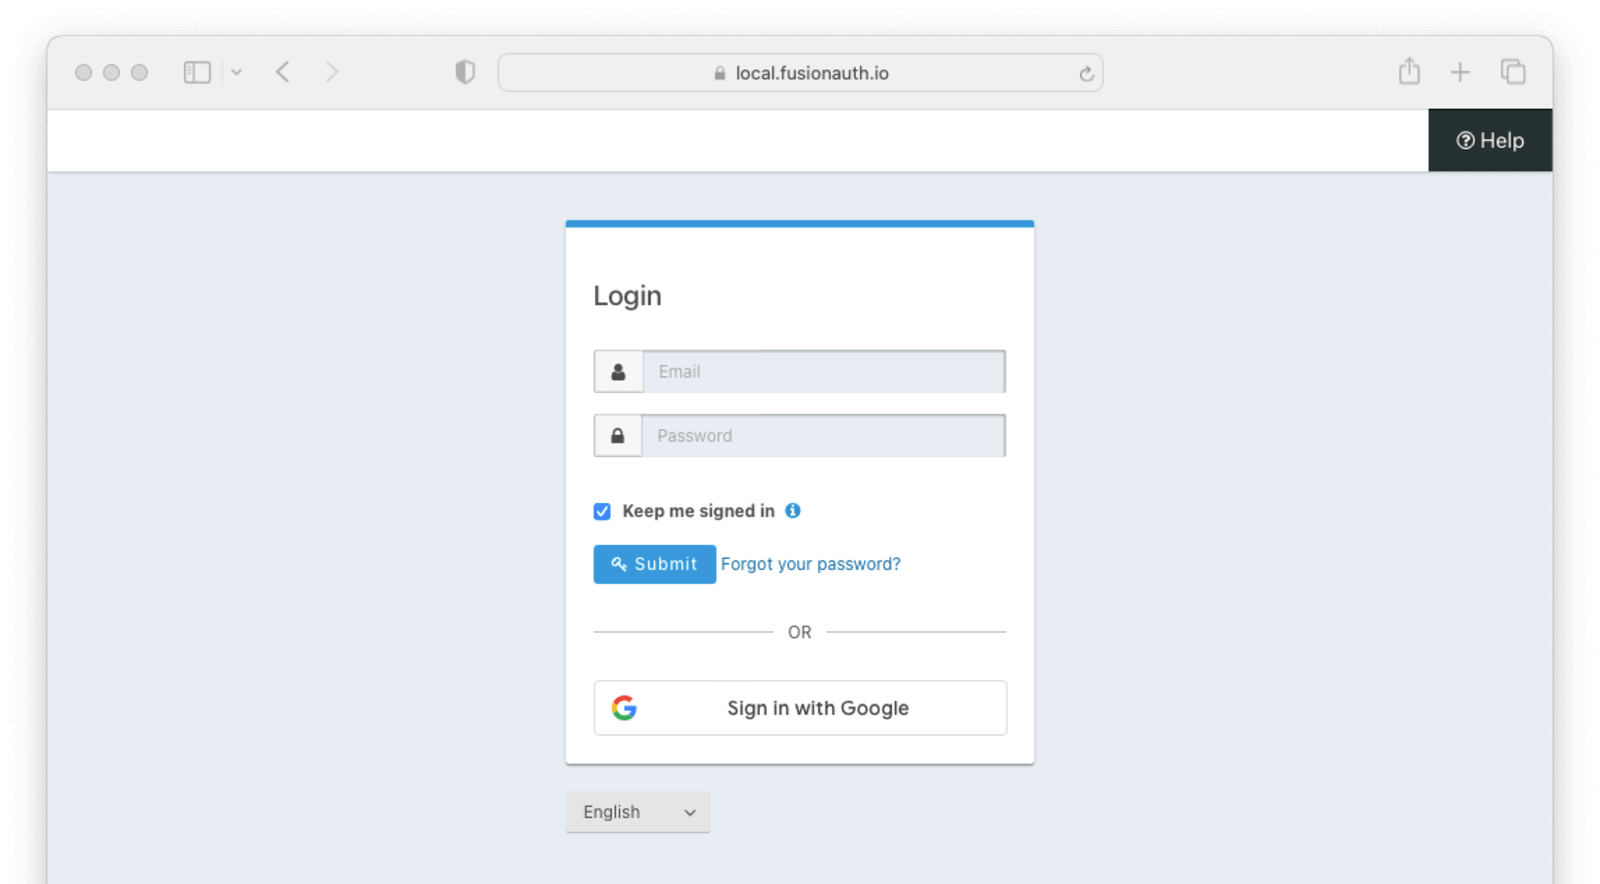
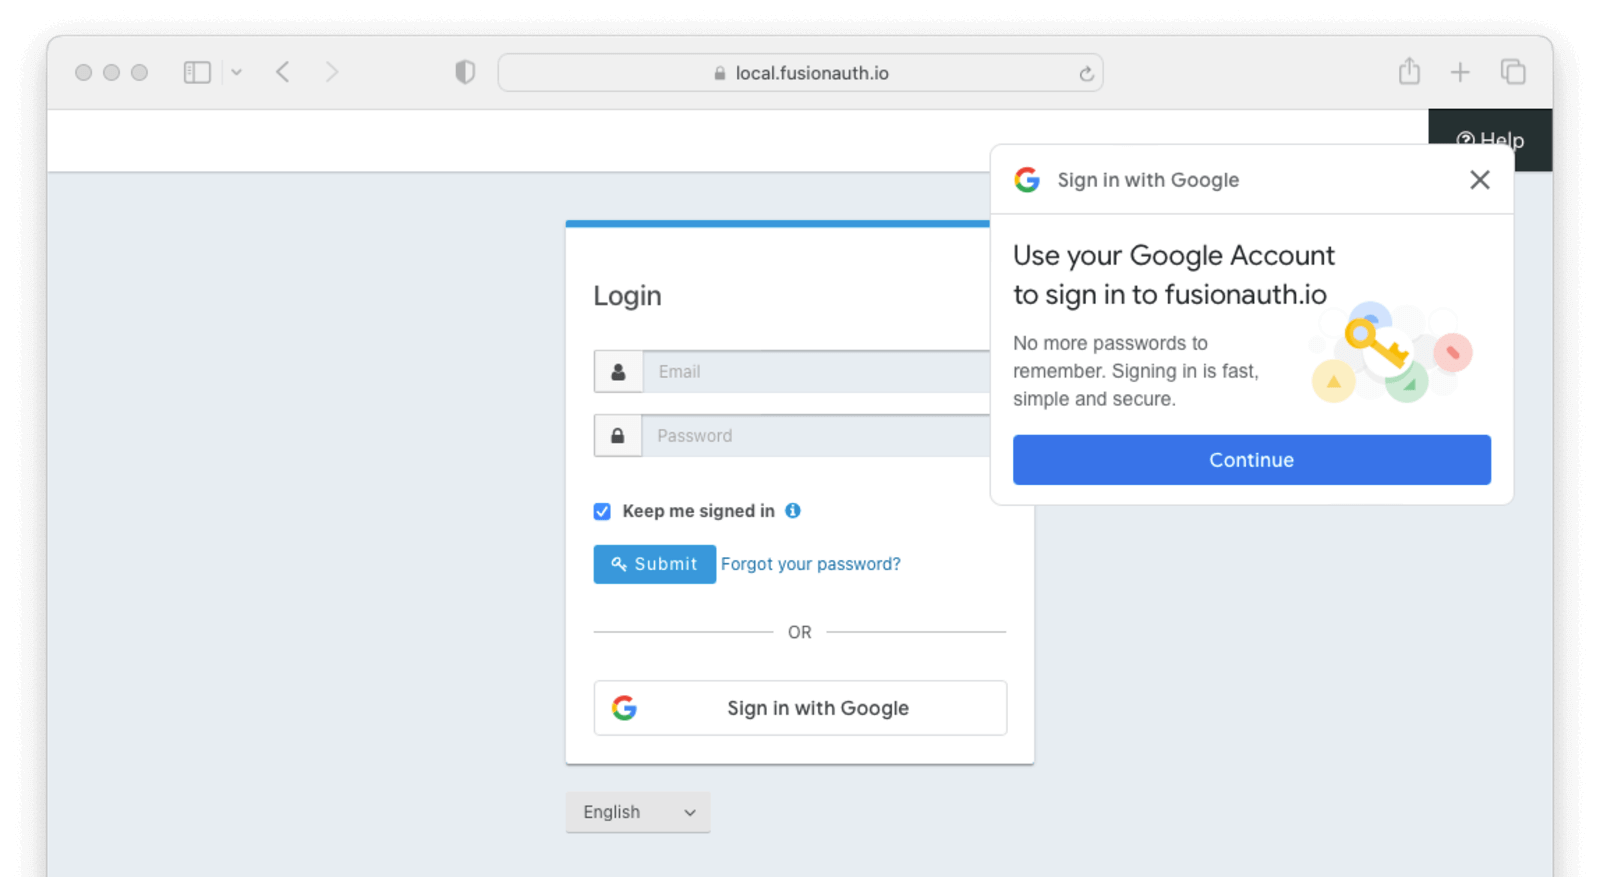
Once you have completed this configuration you will be able to enable the Google login button for one or more FusionAuth Applications. Below is an example login page with the Google Identity Provider enabled.
Here's a diagram of the login flow between:
- the user
- your application
- FusionAuth and
- a remote identity provider
sequenceDiagram
    participant User as User/Browser
    participant App
    participant FusionAuth
    participant IdentityProvider as Provider

    User ->> App : View Initial Page<br/>Click Login
    App ->> User : Displays Login Page<br/>Including Link To 'Login With Provider'
    User ->> App : Clicks On 'Login With Provider'
    App ->> User : Redirect To Provider Authorization URL
    User ->> IdentityProvider : Enters Credentials
    IdentityProvider ->> IdentityProvider : Validate Credentials
    IdentityProvider ->> User : Redirect to App With Authorization Code
    User ->> App : Requests Page, Has Authorization Code
    App ->> FusionAuth : Calls Complete Login<br/>With Code And Redirect URI
    FusionAuth ->> IdentityProvider : Exchanges Code And<br/>Redirect URI For Provider Token
    IdentityProvider ->> FusionAuth : Returns Provider Token
    FusionAuth ->> FusionAuth : Stores Provivider Token, Calls Lambda, Creates User And Registrations (If Needed), Generates FusionAuth Tokens
    FusionAuth ->> App : Return FusionAuth Tokens
    App ->> App : Create Session Or<br/>Otherwise Log User In
    Note over User, IdentityProvider: User Is Logged In And App Can Proceed<br/>Delivering Data And Functionality
Although this looks complex, the user only sees a few screens, such as the FusionAuth login screen, the provider login screen, and your application.
Create a Google Cloud Account#
Ensure you have a Google login, and then navigate to the Google Cloud console.
Create Google OAuth client credentials#
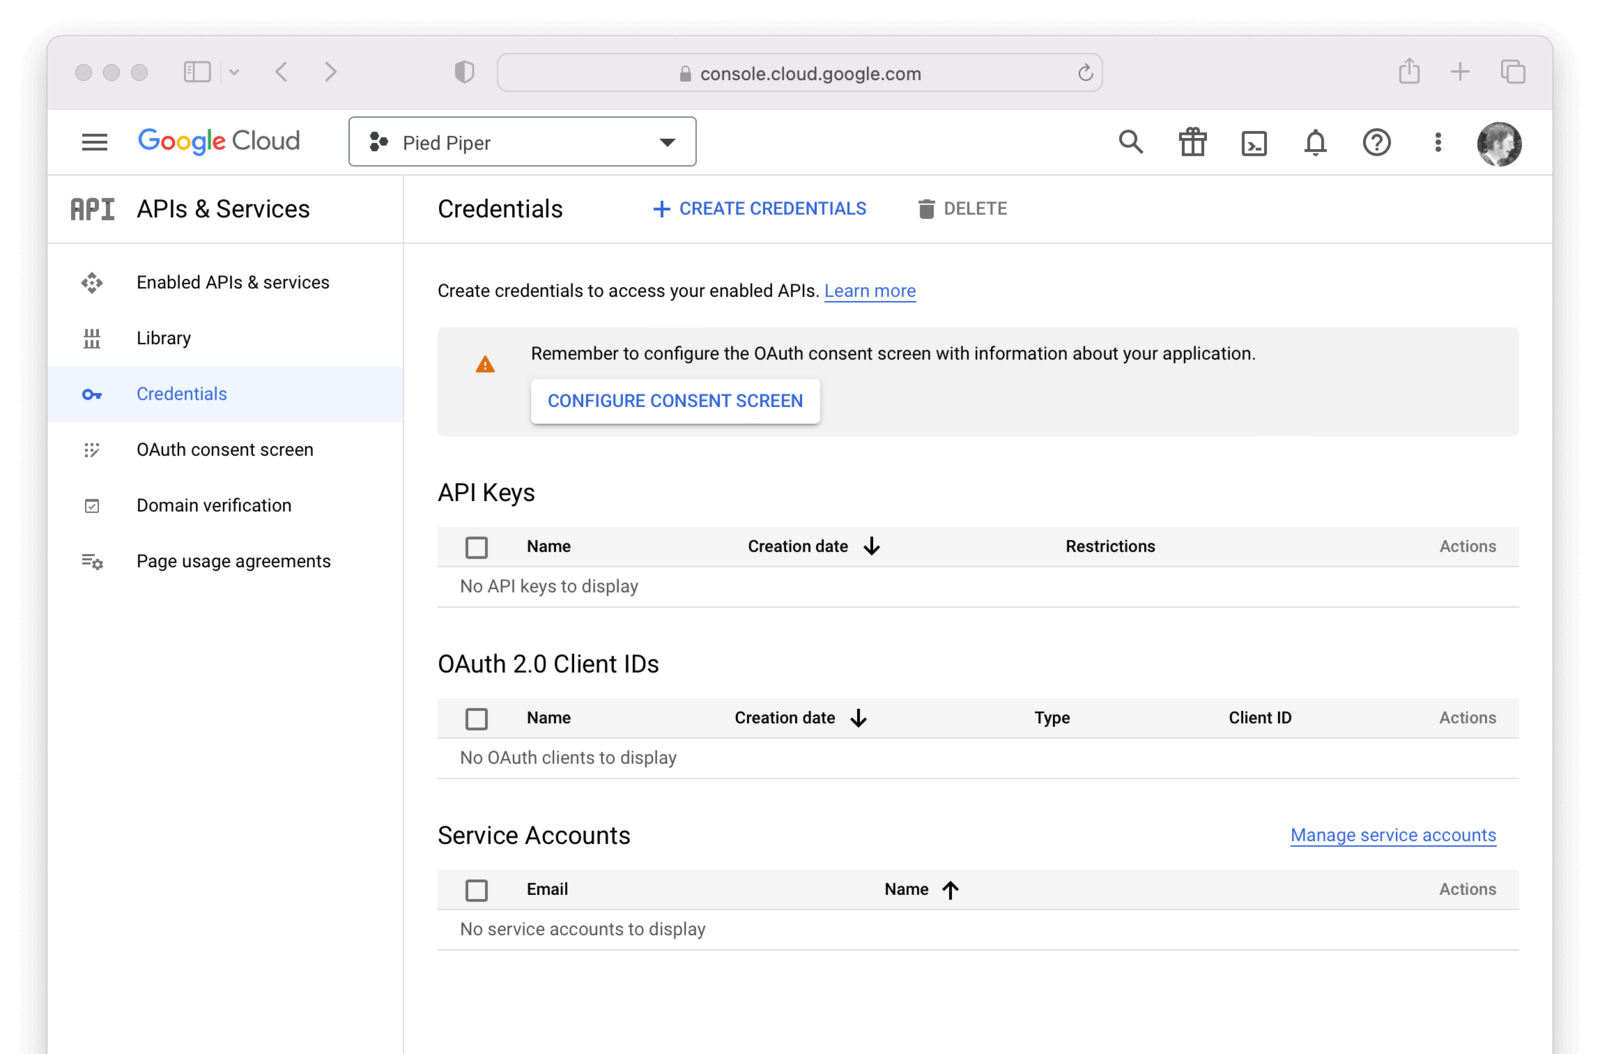
In the Google Cloud console, find the APIs & Services Credentials by navigating to APIs and Services -> Credentials .
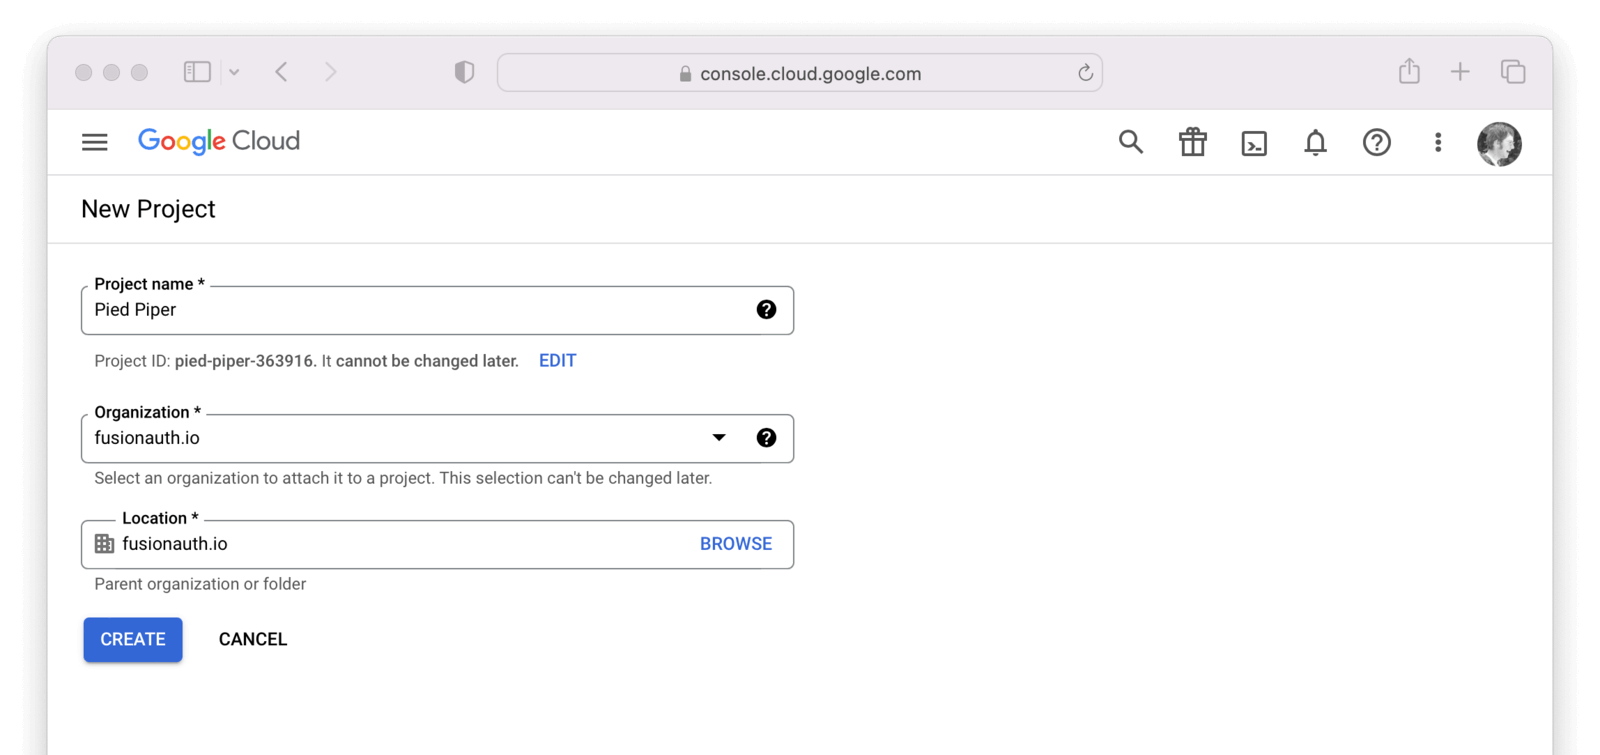
If you are prompted to select or create a project, do that now. In the following example I will need to create my first project before I can create credentials. I will call the project Pied Piper.
Now that you have selected or created your first project, navigate to APIs & Services -> Credentials and then click on Create credentials and select OAuth client ID.
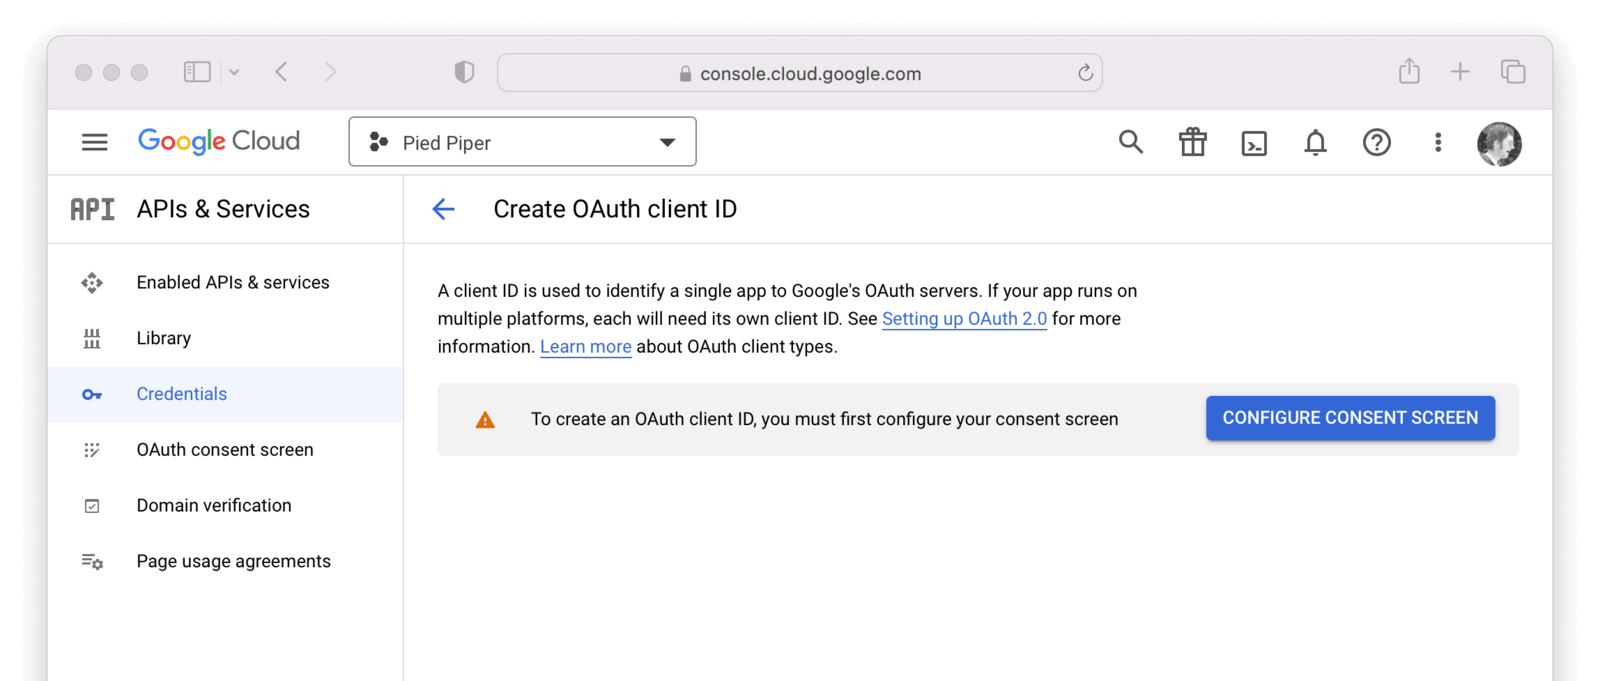
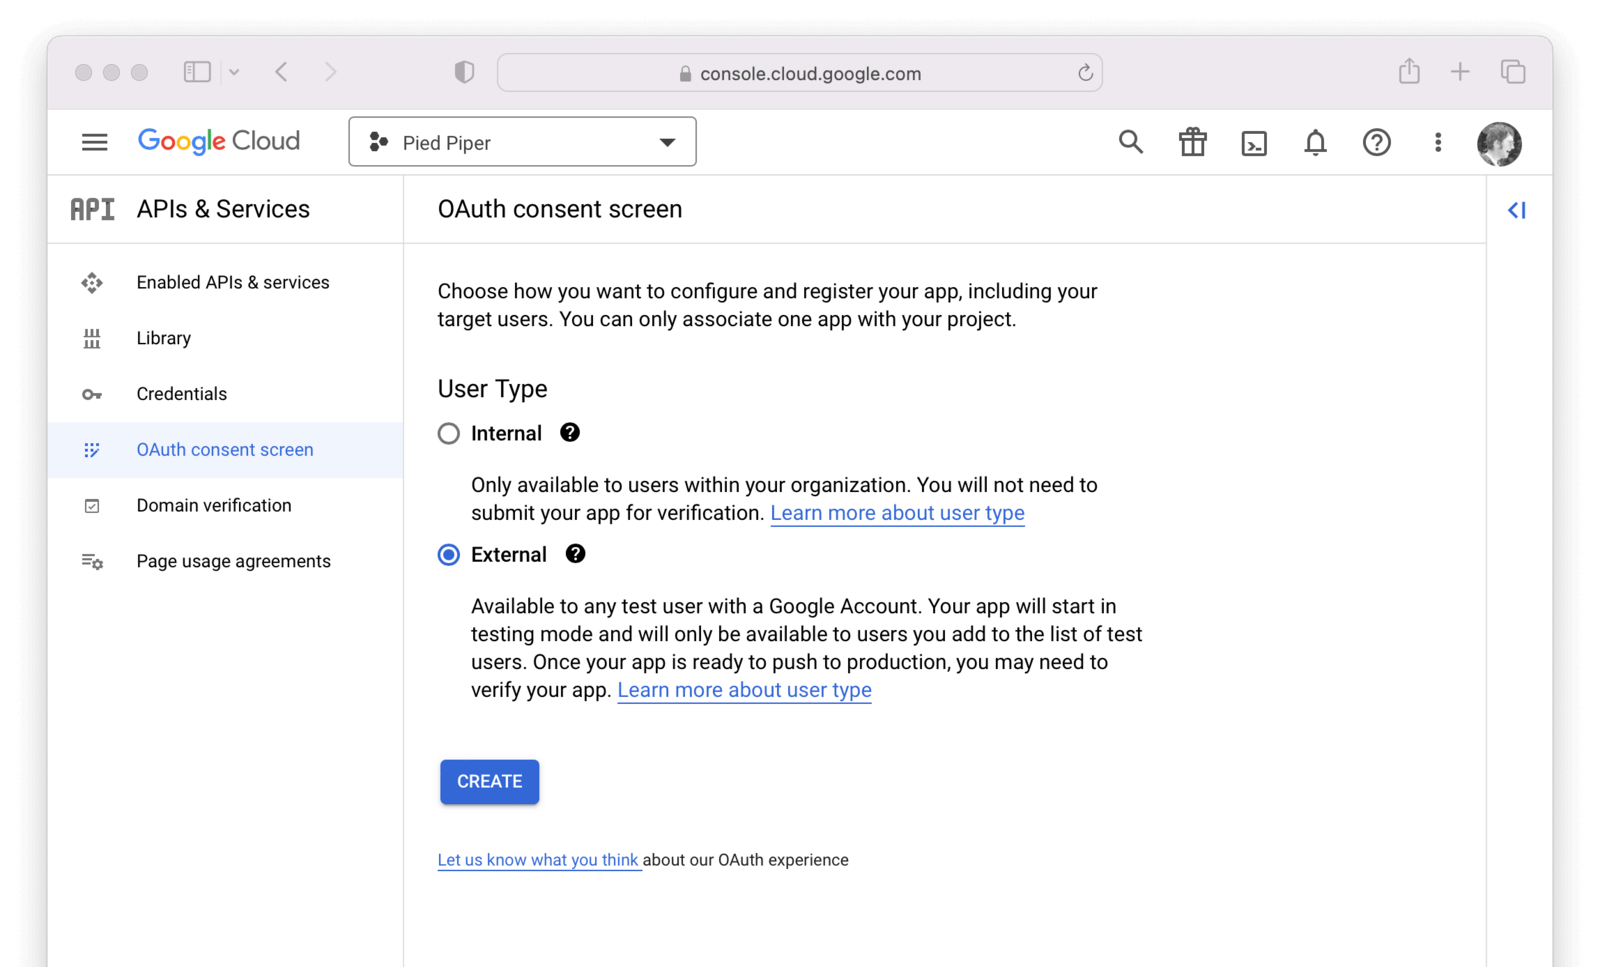
If you see an alert indicating you first need to configure the content screen, do that now by clicking on Configure consent screen .
You will be prompted to define a consent type, typically External. Click Create .
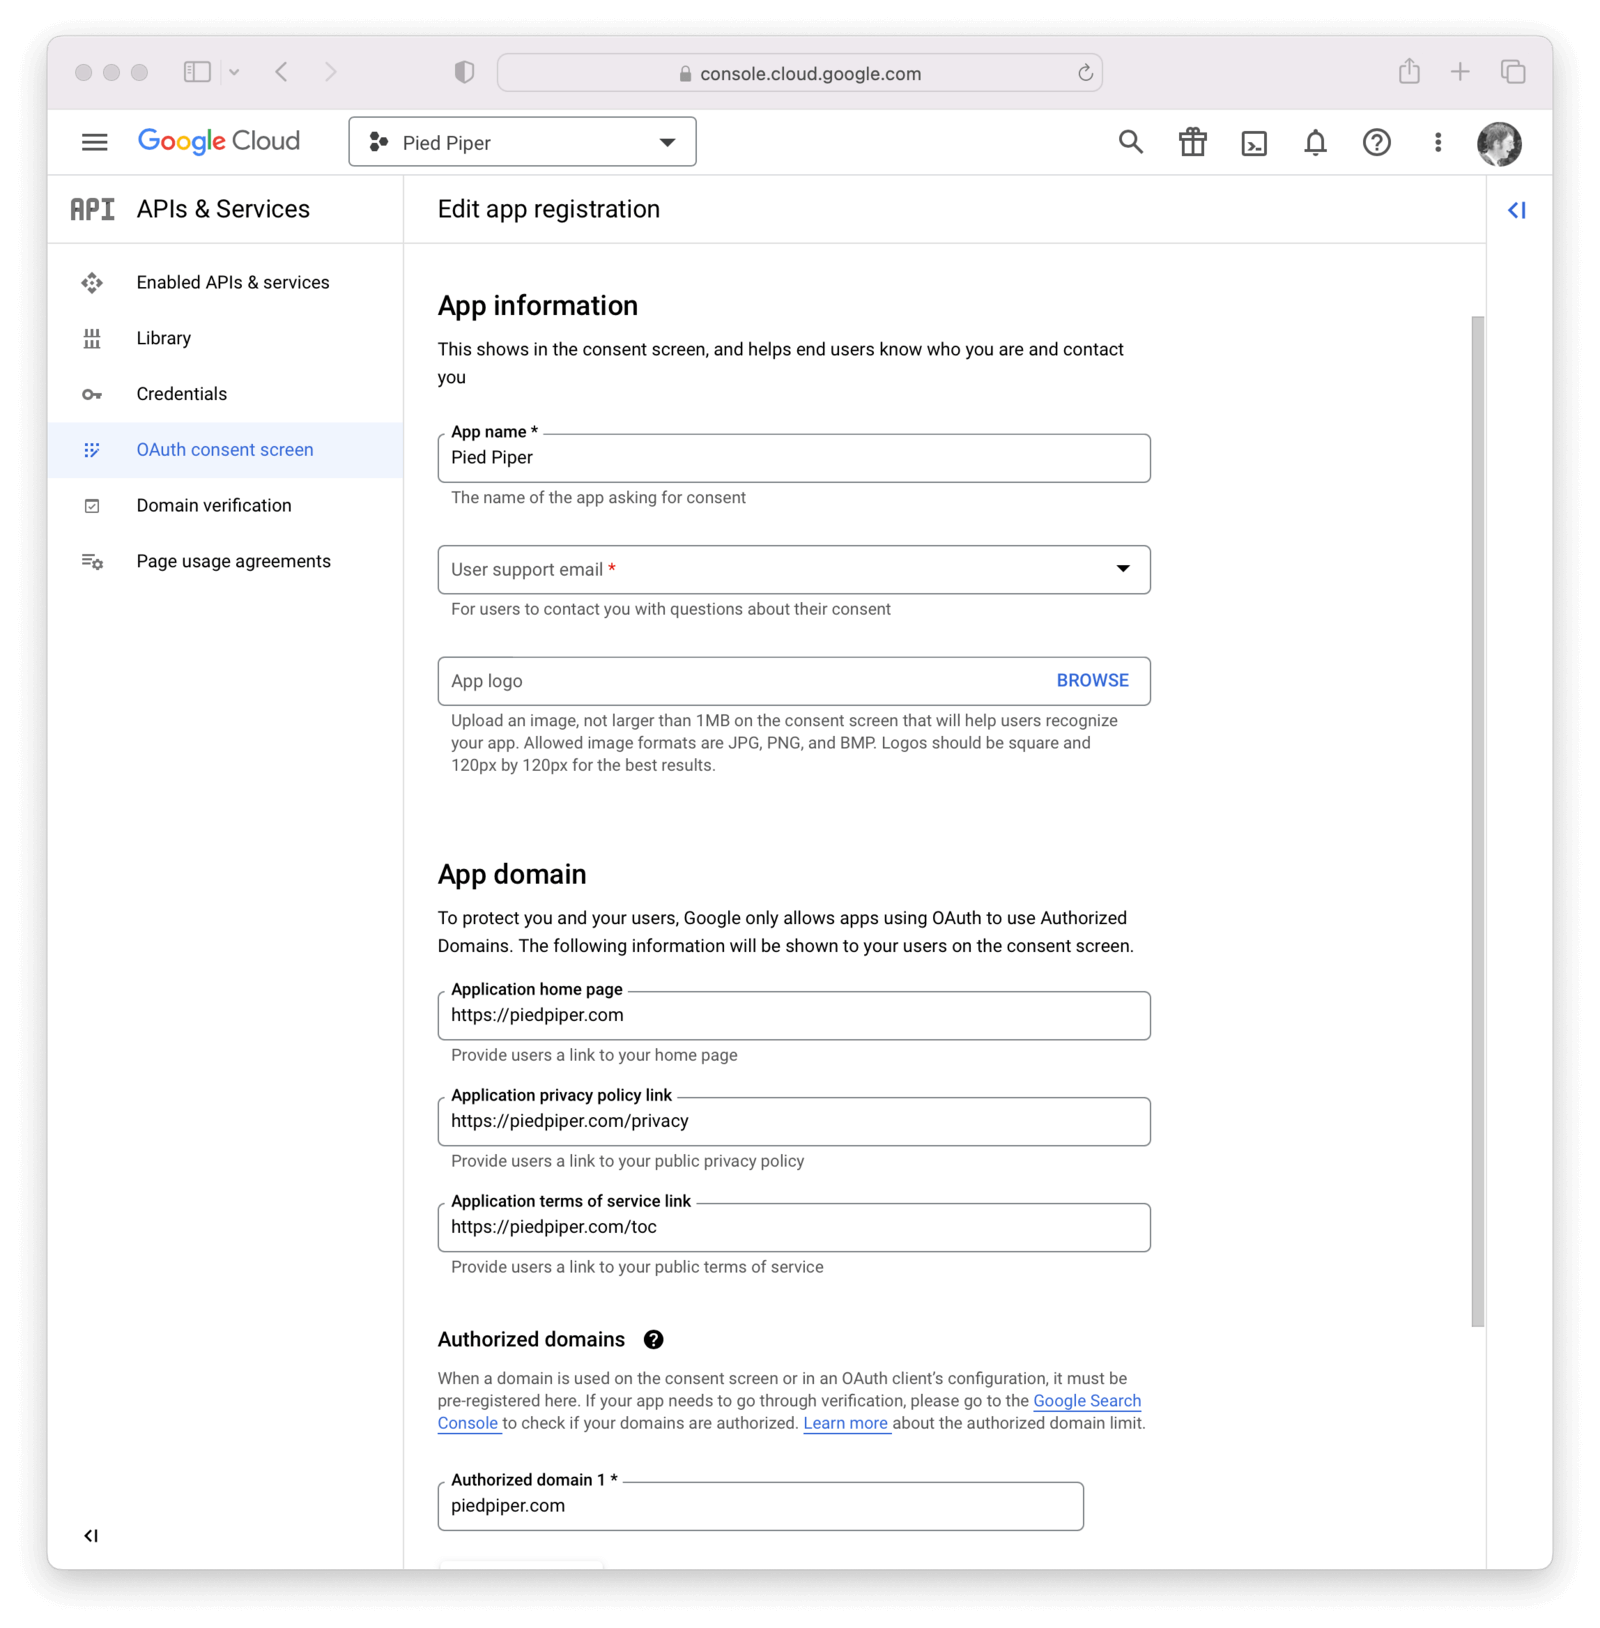
On this panel, you will need to fill out the required fields and then click Save .
In this example I have set the following fields.
- Application name
- User support email (not shown)
- App logo (not shown)
- Authorized domains
- Application Homepage link
- Application Privacy Policy link
- Application Terms of Service link
- Authorized domains
- Developer contact information (not shown)
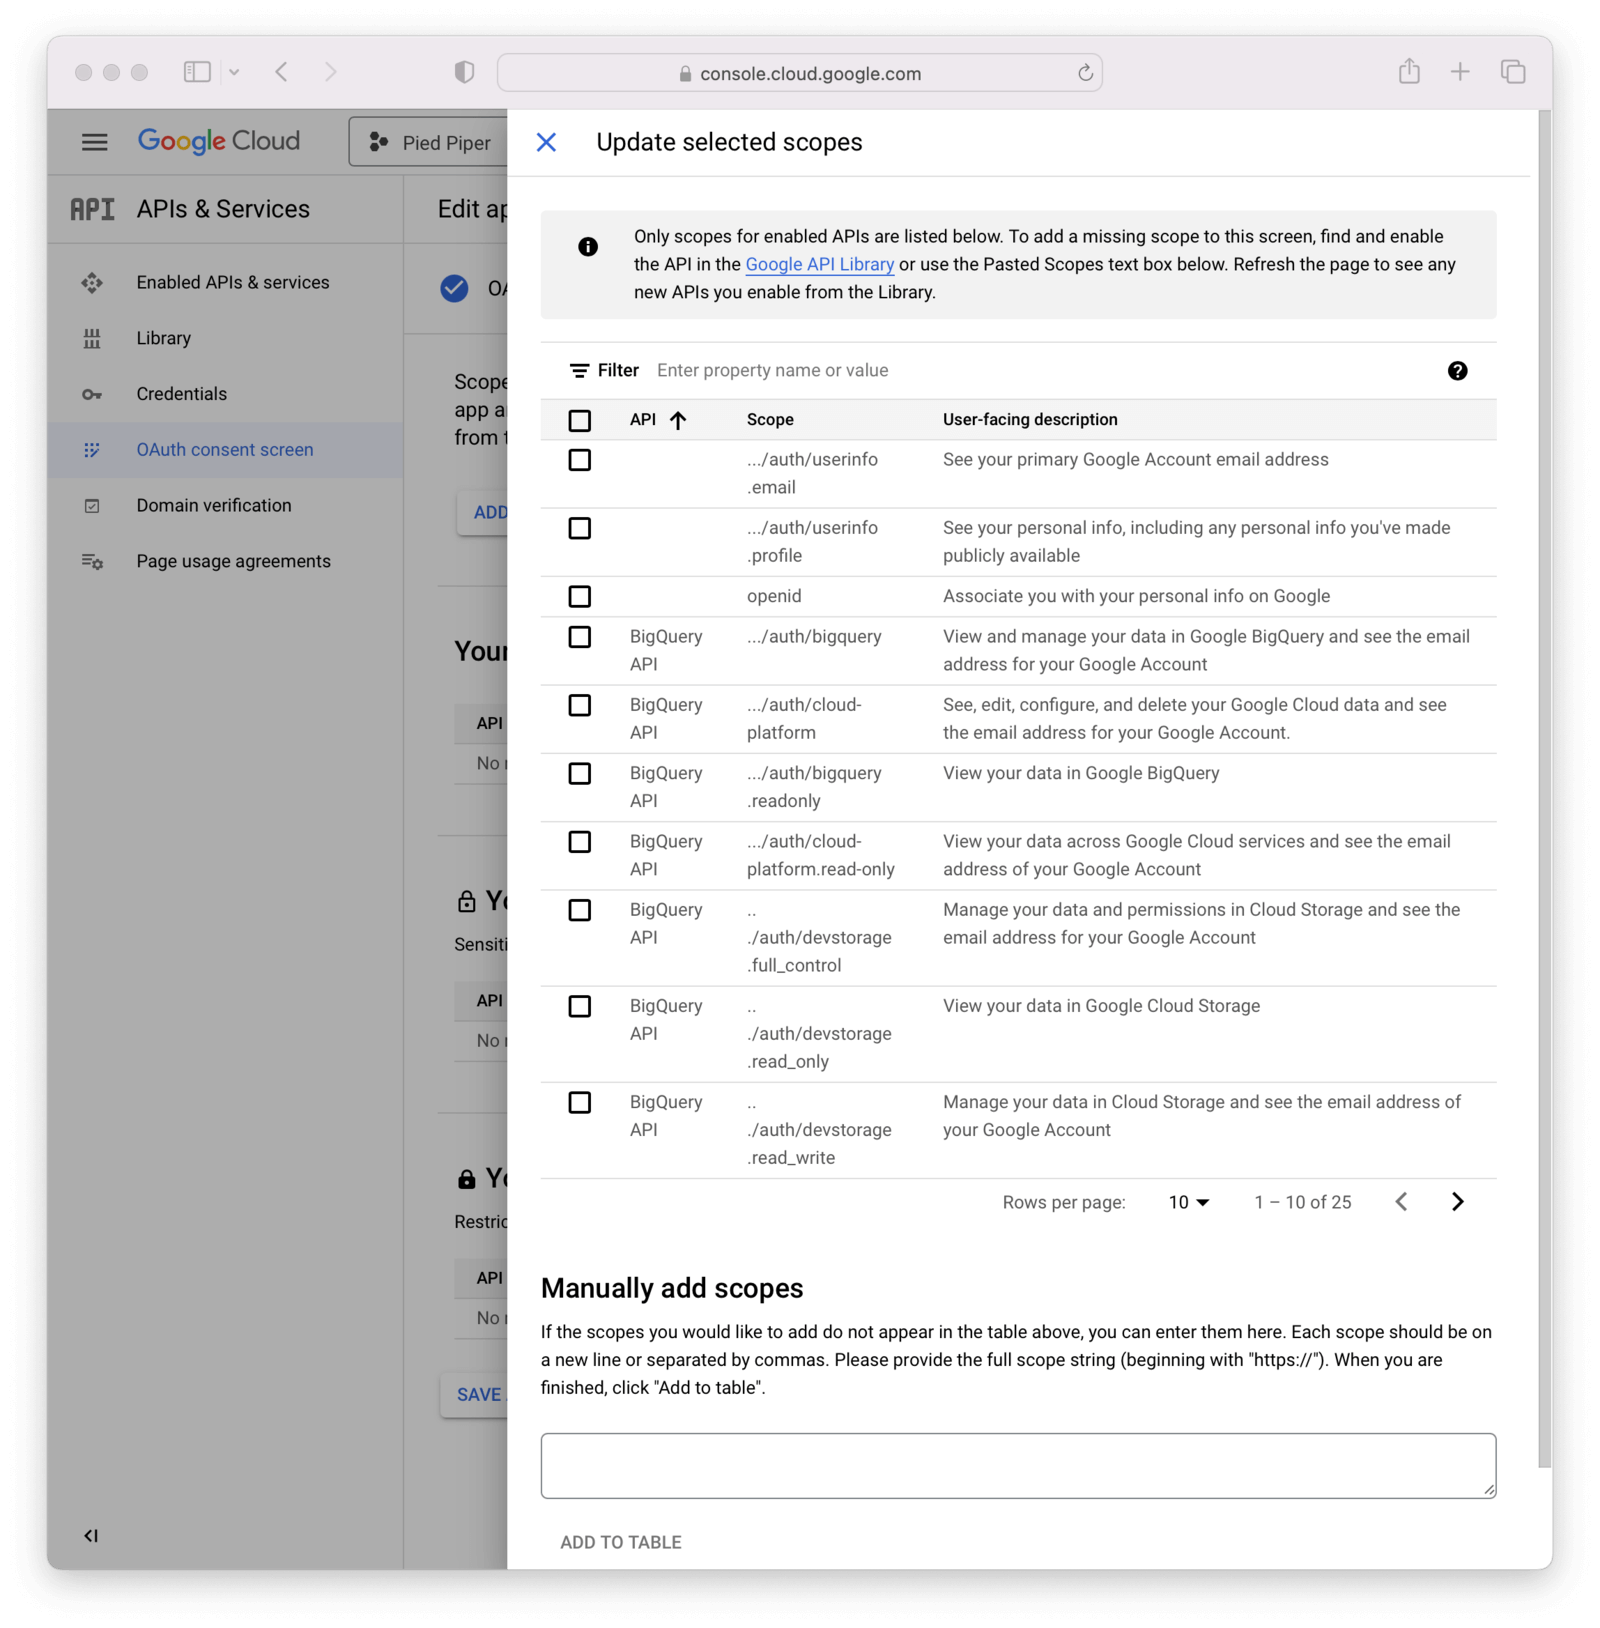
Once this is complete, you can add or update scopes by clicking on the Add or remove scopes button. It is typical to select https://www.googleapis.com/auth/userinfo.email and https://www.googleapis.com/auth/userinfo.profile.profile as well as openid, but feel free to enable any you would like.
View the full list of Google scopes. Some of these may require additional configuration in the Google console, as outlined here.
These same scopes should be referenced in the IdP configuration in FusionAuth, which is configured later in this process.
Then, click Save and continue after optionally adding any test users.
Navigate to APIs & Services -> Credentials and then click on Create credentials and select OAuth client ID.
Select Web application from the Application Type field.
Add the name of the application to the Name Type field.
How you configure this panel depends on the type of login method interaction used. In this example I have specified https://login.piedpiper.com because this is the URL of FusionAuth for Pied Piper.
If using a redirect method, add an Authorized redirect URI. This should be an absolute URL. For example, if FusionAuth is installed at login.piedpiper.com, the value would be https://login.piedpiper.com/oauth2/callback.
If using a popup, select Web application, specify the name of the credential and fill out the Authorized JavaScript origins field. This value should be the origin of your application login page.
In the image below, we are showcasing details needed for both the popup login method (added an origin) and the redirect URL. In the real world you will fill in either option, but not both (depending on your business needs).
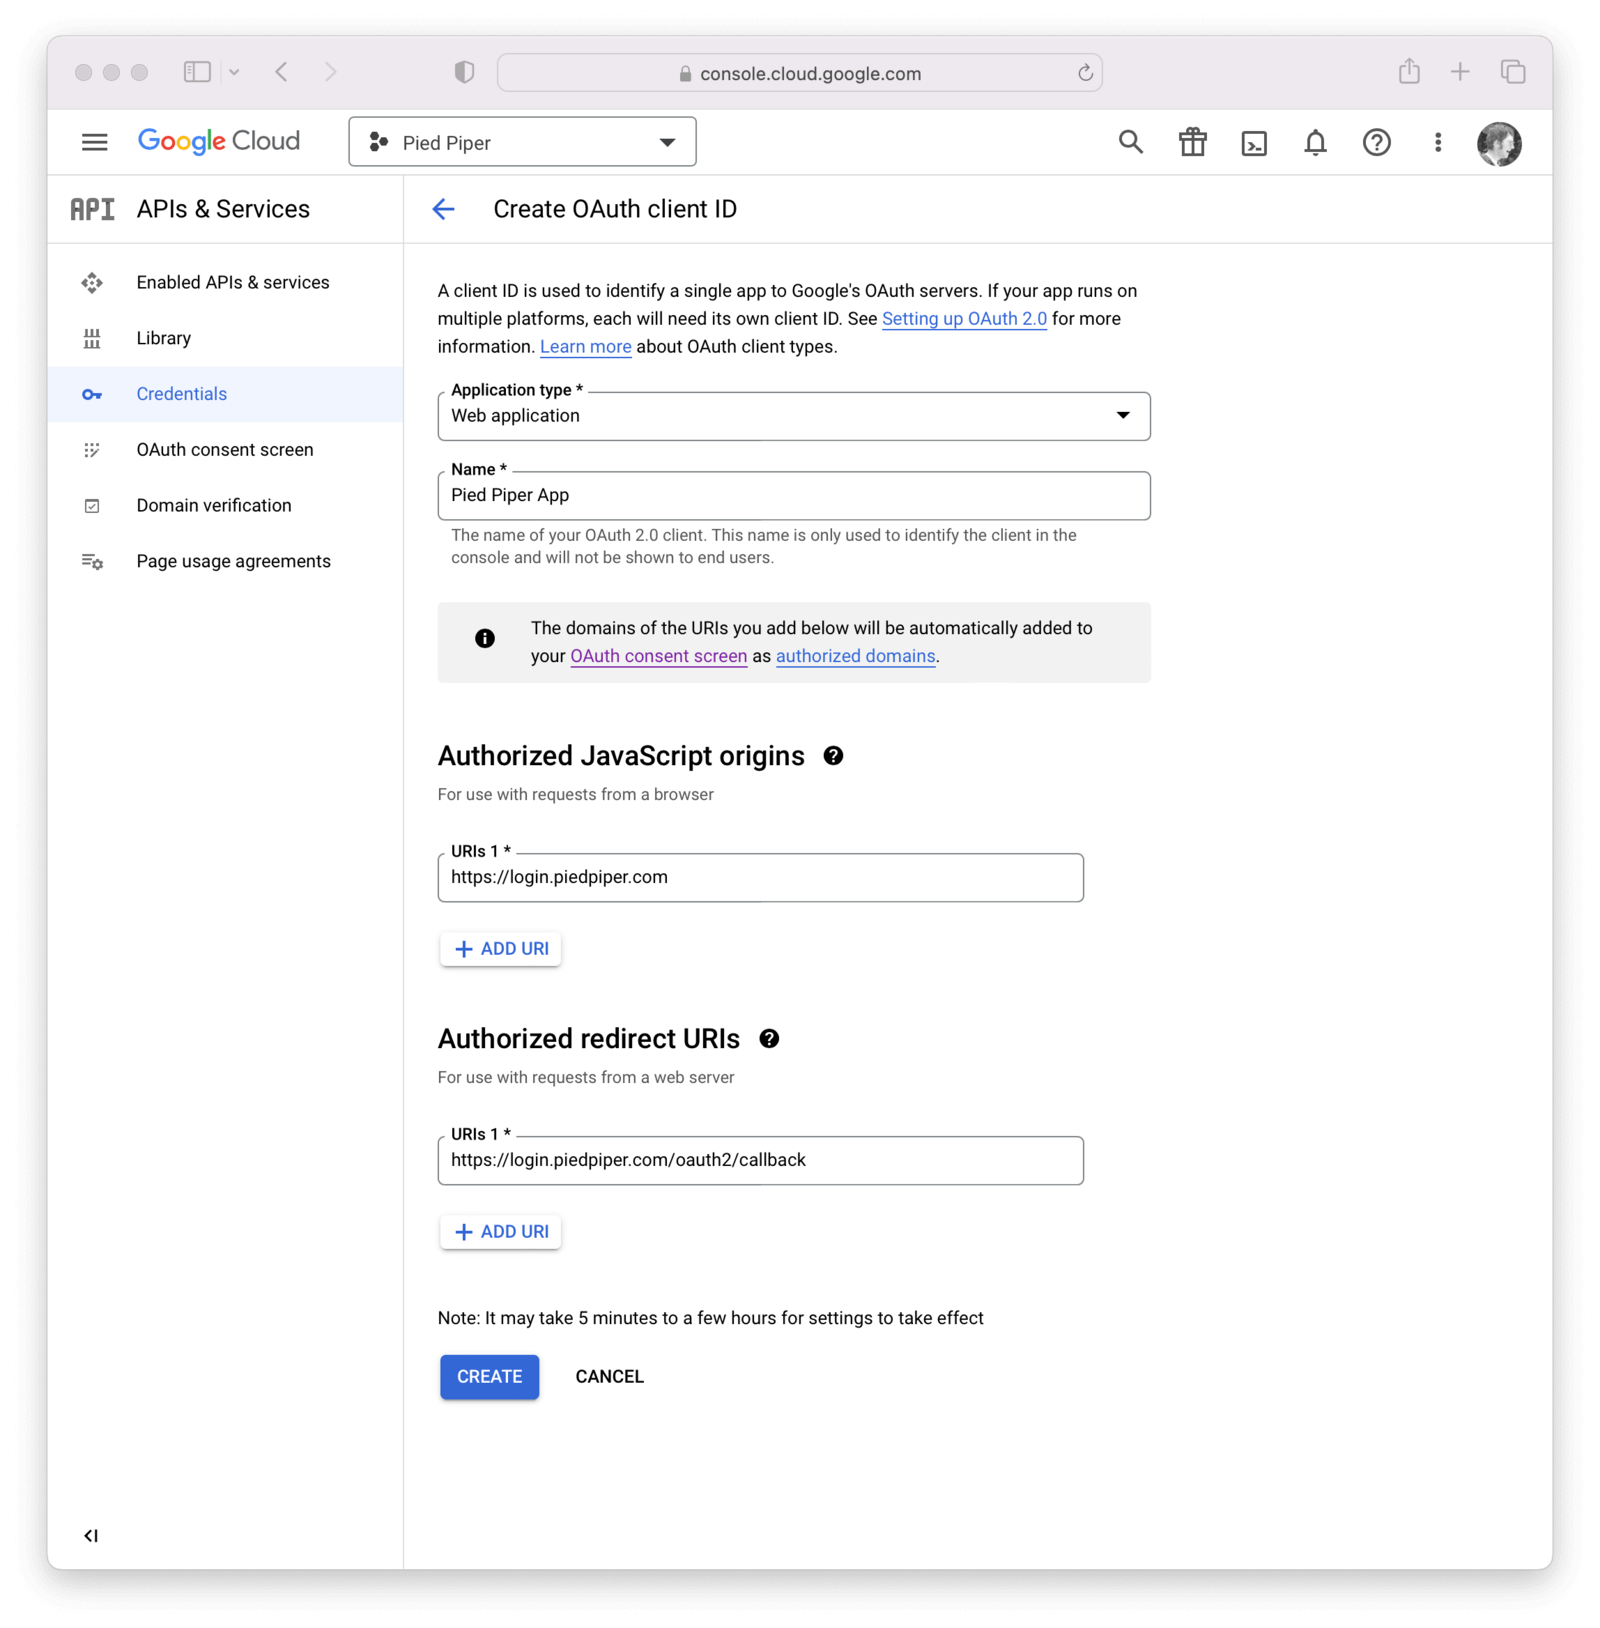
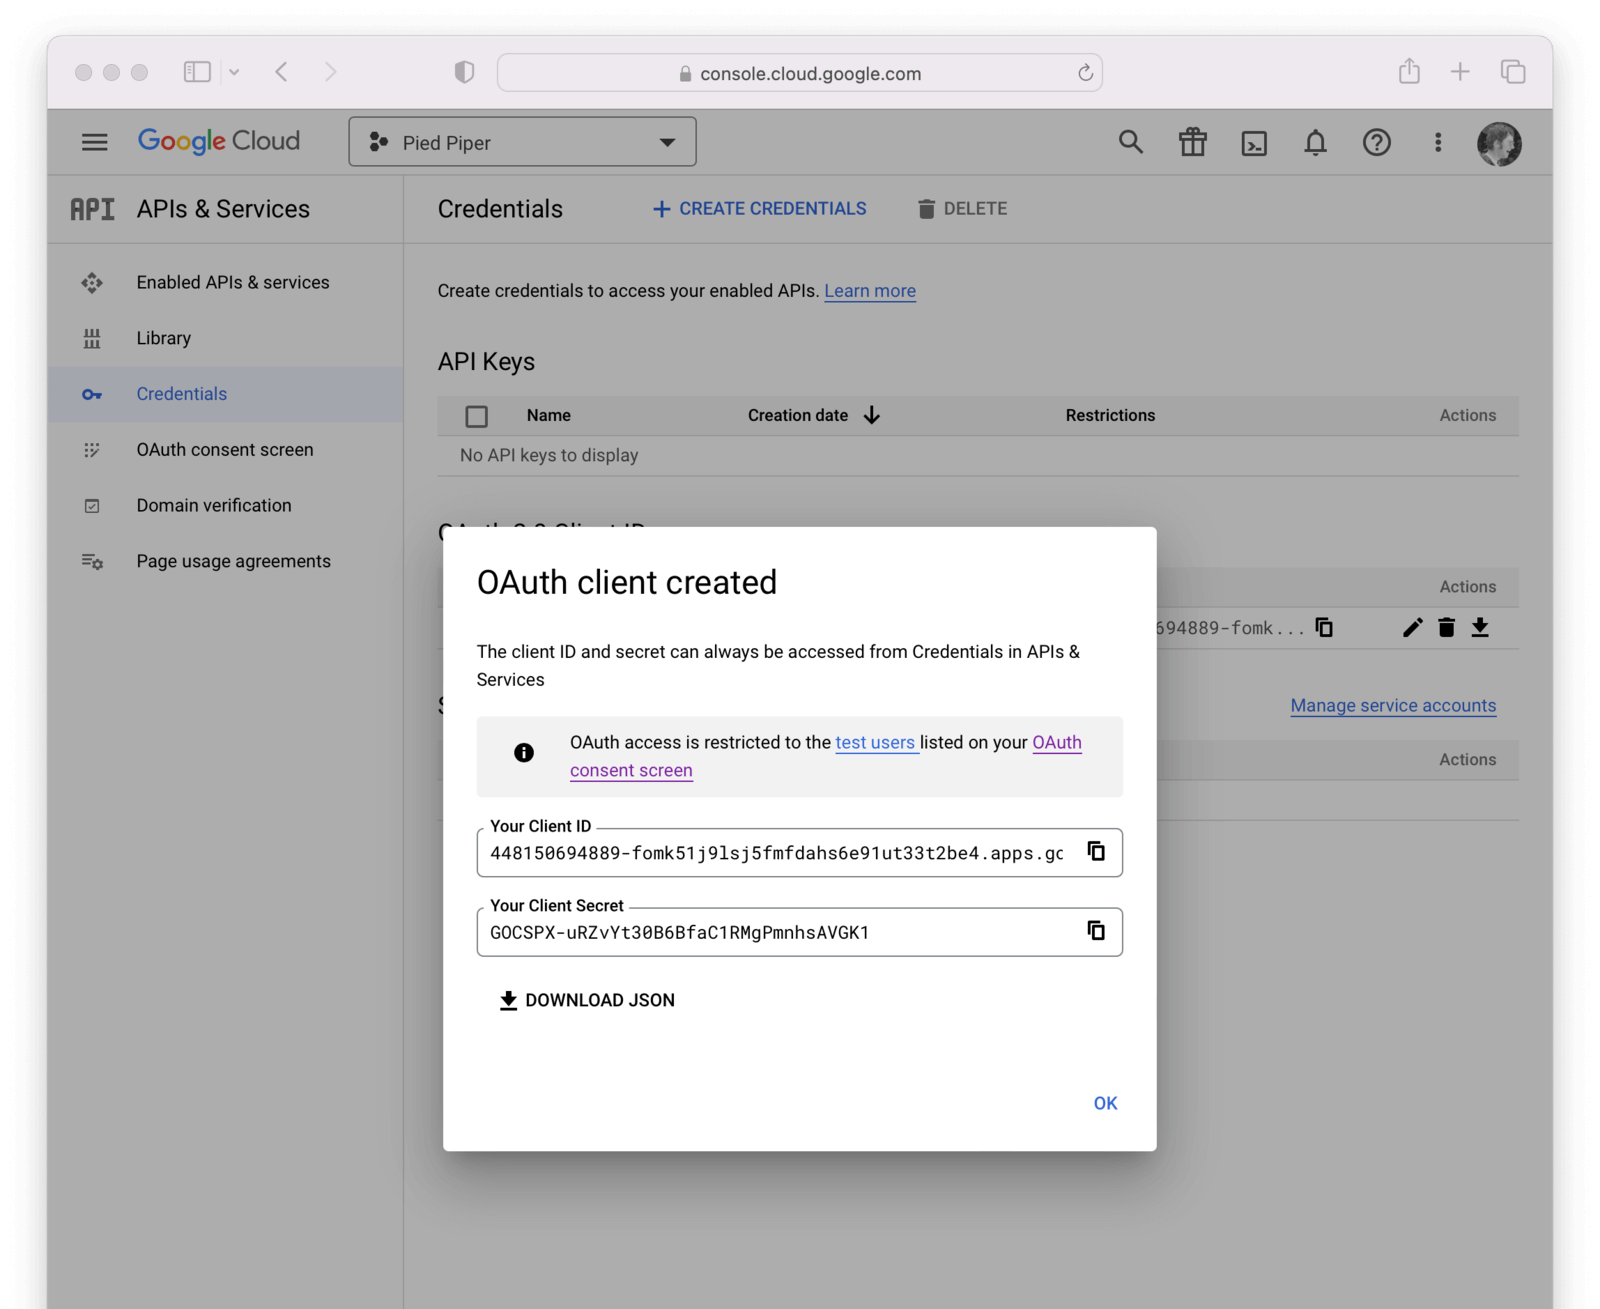
Click the Create button.
Now you have completed creating a Google OAuth client credential. If you select the newly created credential, you will be provided with the Client ID and Client secret necessary for the next step.
Create a Google Identity Provider#
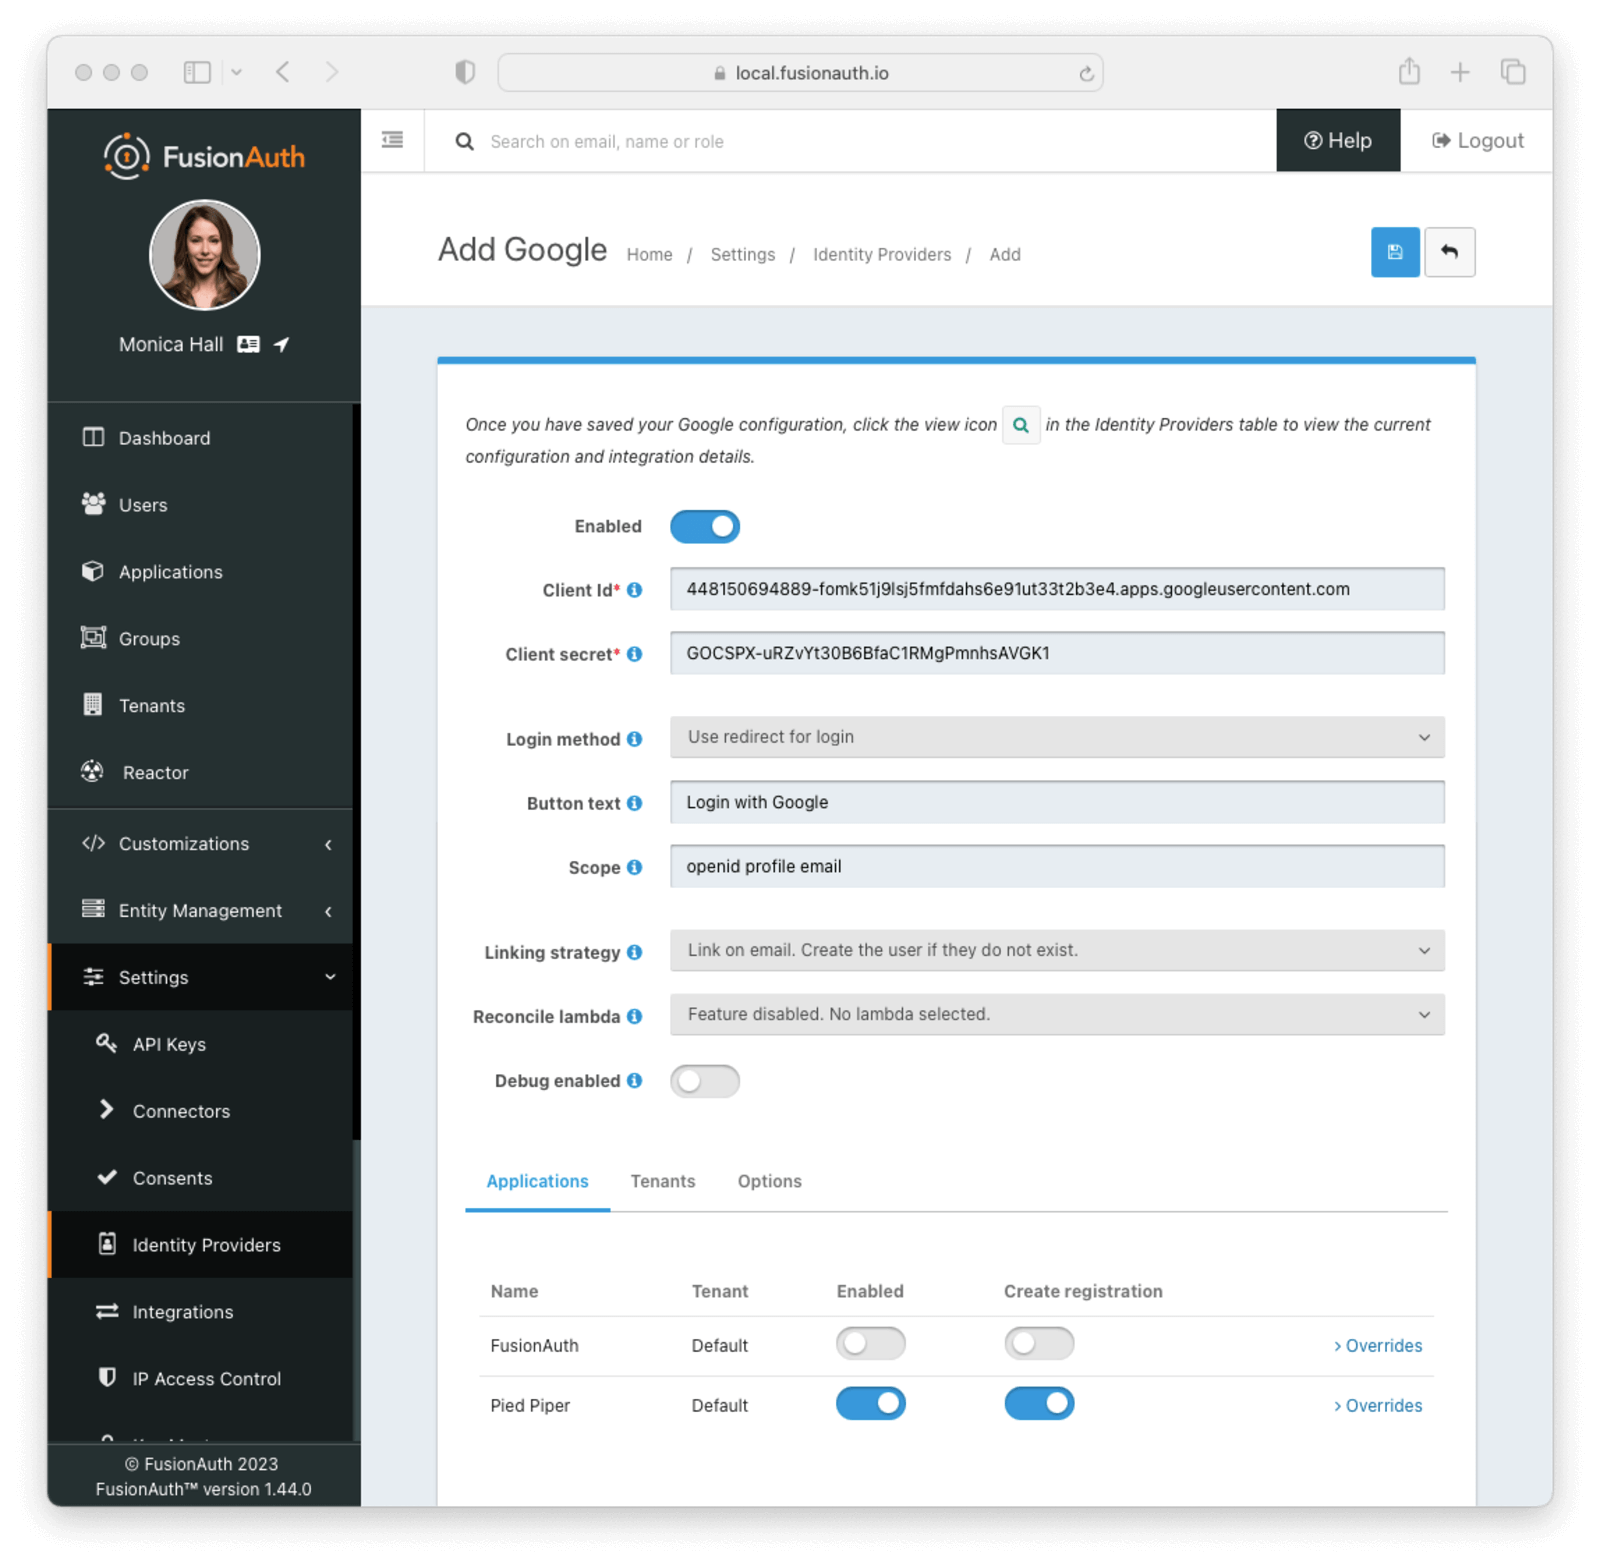
The last step will be to create a Google Identity Provider in FusionAuth. To create an Identity Provider navigate to Settings -> Identity Providers and click the menu in the upper right corner and select Add Google .
This will take you to the Add Google panel, and you'll fill out the Client Id and Client secret required fields using the values found in the Google Cloud console. Provide the scopes needed for your application which you configured in the Google Console above. The button text is also required but it will be defaulted to Login with Google, you may optionally modify this default value.
To enable Google for an Application:
-
Navigate to Settings -> Identity Providers .
-
Click the Add provider dropdown and select Google . This will take you to the Add Google screen.
- Fill out the required fields; your identity provider can provide most of these values. For a detailed description of each field, see the documentation for Google.
-
In the Applications configuration section at the bottom of this panel, find your application name.
-
To dynamically create FusionAuth user accounts (with default roles) for all users who successfully authenticate using this provider, select Create registration . If you disable this option, only an administrator with registration permissions can create new users for this application with access via Sign in with Google.
- You should now see the Sign in with Google button on the login page for the Pied Piper application.
Form Fields#
IdoptionalAvailable since 1.61.0An optional UUID. When this value is omitted a unique Id will be generated automatically.
TenantoptionalAvailable since 1.62.0The tenant to which this identity provider belongs. This field only displays when the user selects a specific tenant on the previous page. When Global identity provider is selected on the previous page, this field does not display.
NamerequiredAvailable since 1.61.0A unique name to identify the identity provider. This name is for display purposes only and it can be modified later if desired.
Client IdrequiredThe Google Client Id found in your Google credentials settings in the Client ID field.
Client secretrequiredThe Google Client Secret found in your Google credentials settings in the Client secret field.
Login MethodoptionalUser interaction behavior after clicking on the IdP button (Login with Google, for instance).
Use redirect for login- if selected, the user is redirected to a Google login page. Once authenticated, the user is redirected back to FusionAuth. If selected, the redirect URL must be set to an absolute URL in the Google console for your application. If your hostname is login.piedpiper.com, the redirect URL would behttps://login.piedpiper.com/oauth2/callback.Use popup for login- if selected, a popup is displayed to the user to login with google. Once authenticated, the window is closed. If selected, theAuthorized JavaScript originsURL must be allowed for your host name in the Google console for your application. For example,https://login.piedpiper.com.Use vendor JavaScript- if selected, the login method will be determined by the vendor JavaScript library.
Please note if an idp_hint is appended to the OAuth Authorize endpoint, then the interaction behavior will be redirect, even if popup interaction is explicitly configured.
If you are using a version of FusionAuth older than 1.44.0, Use popup for login won't work. UseRedirect will continue to work after this date. Please see the notes for release 1.44.0 for more information. This forum post has more details on an available workaround and upgrade process.
Button textrequiredThe text to be displayed in the button on the login form. This value is defaulted to Login with Google but it may be modified to your preference.
The Button text value may only be used when the Login method is set to Use redirect for login. The button text is managed by Google for all other configurations. Google allows for minor adjustments using their API. You may specify any valid API parameter in the Button properties configuration.
ScopeoptionalThis optional field defines the scope you're requesting from the user during login. See the Google login documentation for further information. Three common scopes to include are email, profile, and openid.
The Scope value may only be used when the Login method is set to Use redirect for login. The email, profile, and openid scopes will always be requested for all other configurations.
Linking strategyoptionalThe linking strategy for the Google FusionAuth Identity Provider. See Linking Strategies for more.
Available since 1.65.0 You can only change this value when the identity provider is disabled. To change the linking strategy for an identity provider that is already enabled, disable the provider, change the value, and then re-enable the provider.
Reconcile lambdaoptionalAvailable since 1.17.0A lambda may be utilized to map custom claims returned from Google.
To configure a lambda, navigate to Customizations -> Lambdas .
Enable debug loggingoptionalDefaults to falseCreates event log entries to help debug integration errors. Check System -> Event Log .
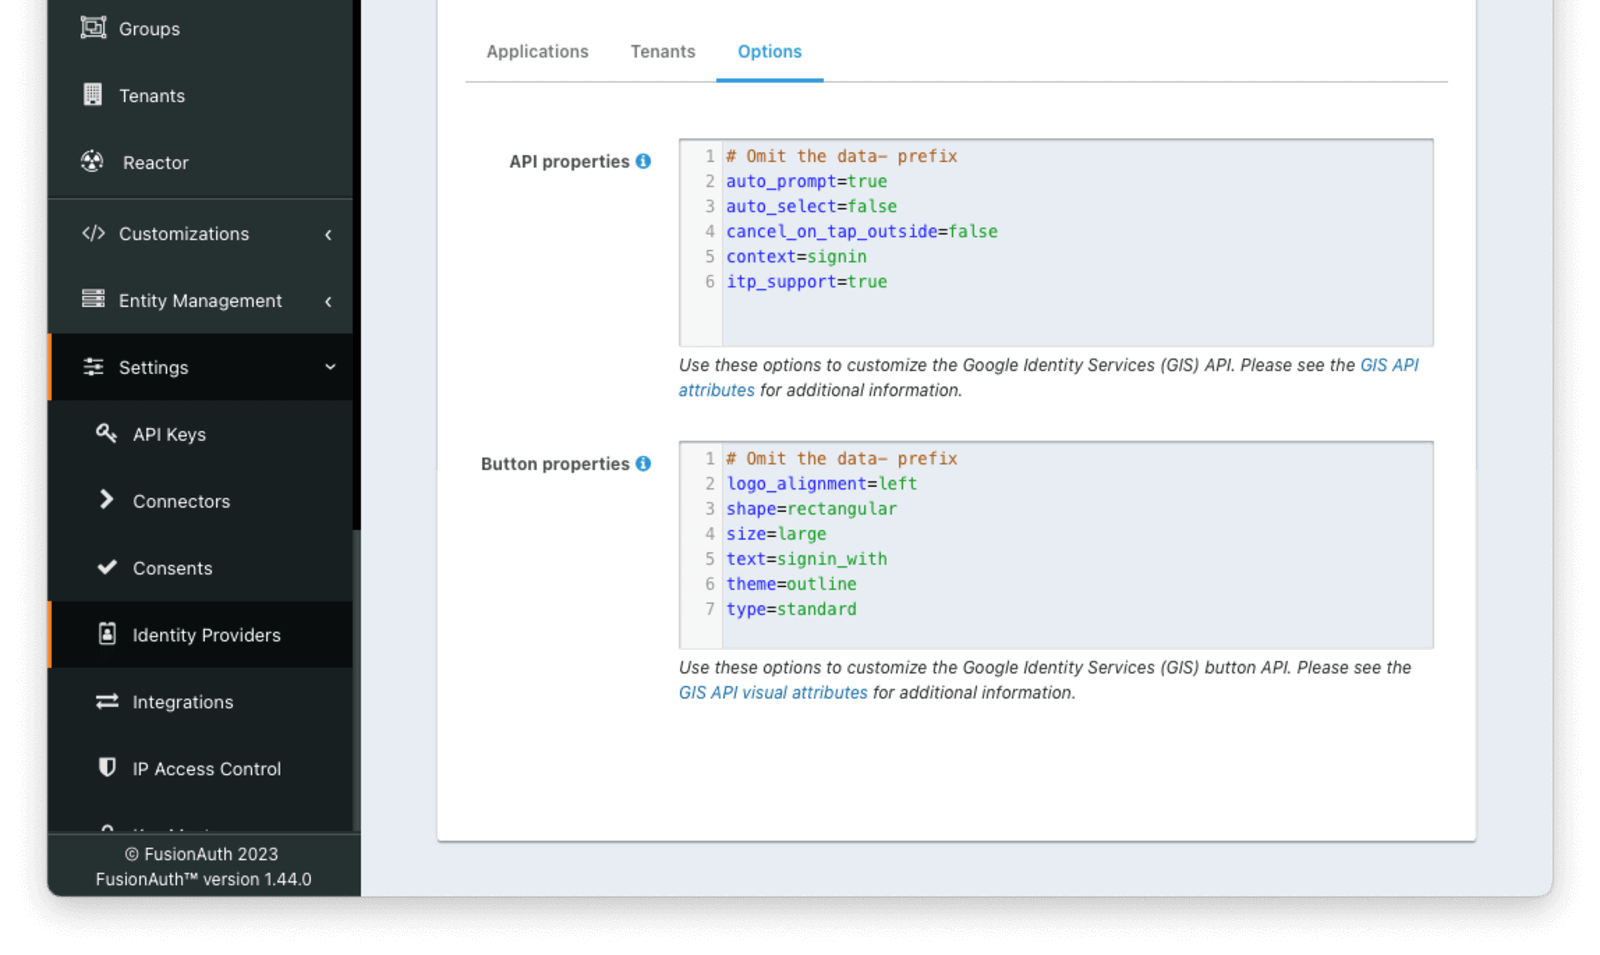
Options#
The Options tab can be used to configure the Google identity provider by providing properties for the Google Identity Services API.
The API properties and Button properties will only be applied when using the Google Identity Services API. When using a Login Method of Use redirect for login the GIS API will not be used and the properties will not be used. The various properties of the button can be set using Themes in this case.
Form Fields#
API propertiesoptionalAvailable since 1.44.0Google Identity Services login API configuration in a properties file formatted String. Any attribute from Google's documentation can be added. Properties can be referenced in templates that support Google login to initialize the API via HTML or JavaScript. The properties specified in this field should not include the data- prefix on the property name.
If omitted, this value will default to the following properties:
Default API Configuration Properties
auto_prompt=true
auto_select=false
cancel_on_tap_outside=false
context=signin
itp_support=true
Button propertiesoptionalDefaults to 'See Description'Available since 1.44.0Google Identity Services button configuration in a properties file formatted String. Any attribute from Google's documentation can be added. Properties can be referenced in templates that support Google login to render the login button via HTML or JavaScript. The properties specified in this field should not include the data- prefix on the property name.
If omitted, this value will default to the following properties:
Default Button Properties
logo_alignment=left
shape=rectangular
size=large
text=signin_with
theme=outline
type=standard
Google One Tap#
Google One Tap provides registration and authentication with a single user action on supporting applications.
Google One Tap can be enabled in FusionAuth 1.44.0 and later by:
- setting the Login Method to
Use popup for login - including
auto_prompt=truein the API properties configuration
Additional Steps For Your Google Application#
If you are in development or building a personal application, the above steps are enough. Otherwise you'll need to publish your OAuth application with Google.
If you are deploying to production and request sensitive scopes, you'll need to verify your application with Google.
Please consult the above Google provided documentation for these additional steps.
Building Your Own Integration#
If you are building your own login experience, you'll want to start the identity provider flow yourself and then complete the login.
You might do this if you are using the Login API rather than using the hosted FusionAuth login pages. Here's a diagram illustrating this login flow:
sequenceDiagram
    participant User as User/Browser
    participant App
    participant FusionAuth
    participant IdentityProvider as Provider

    User ->> App : View Initial Page<br/>Click Login
    App ->> User : Displays Login Page<br/>Including Link To 'Login With Provider'
    User ->> App : Clicks On 'Login With Provider'
    App ->> User : Redirect To Provider Authorization URL
    User ->> IdentityProvider : Enters Credentials
    IdentityProvider ->> IdentityProvider : Validate Credentials
    IdentityProvider ->> User : Redirect to App With Authorization Code
    User ->> App : Requests Page, Has Authorization Code
    App ->> FusionAuth : Calls Complete Login<br/>With Code And Redirect URI
    FusionAuth ->> IdentityProvider : Exchanges Code And<br/>Redirect URI For Provider Token
    IdentityProvider ->> FusionAuth : Returns Provider Token
    FusionAuth ->> FusionAuth : Stores Provider Token, Calls Lambda, Creates User And Registrations (If Needed), Generates FusionAuth Tokens
    FusionAuth ->> App : Return FusionAuth Tokens
    App ->> App : Create Session Or<br/>Otherwise Log User In
    Note over User, IdentityProvider: User Is Logged In And App Can Proceed<br/>Delivering Data And Functionality
If you require a refresh token after completing the login, ensure Enable JWT Refresh is true in the application configuration. This is found in the administrative user interface by navigating to Applications -> Your Application -> Security -> Login API settings .
Custom Parameters#
Google sometimes requires custom URL parameters when starting a login to access certain functionality. Examples include:
access_type=offlineif you want a refresh token from Google.prompt=select_accountif you want to force an account selection screen.
There are more options covered here.
Google is great at conforming to OIDC, so using the OIDC provider instead of Google has no affect on functionality. It just requires a tad more configuration.
When you need such custom parameters, the Google Identity Provider won't work. Instead, do the following:
- Create an OpenID Connect Identity Provider.
- Set Discover endpoints to be
false. - Enter the endpoints manually from the Discovery document.
- Add the desired space-separated Google OAuth2 scopes to Scope. The most commonly requested scopes are
openid,profileandemail. You must includeemailif you're using the linking on email strategy. - Append whatever additional parameters are needed to the Authorization endpoint value. For example, you might end up with something like
https://accounts.google.com/o/oauth2/v2/auth?access_type=offline&prompt=select_account.
Limitations#
Google's GSI client supports a single configuration per page, which limits FusionAuth's capability to support multiple configurations on the same login page.
Google identity providers configured with a Login Method of Use popup for login or Use vendor JavaScript use the GSI client. This provides a more modern and dynamic UX and support for Google One Tap.
If more than one Google IdP using the GSI client would be available on the same login page, the themed page will select one configuration to initialize the button. Other IdPs configured to use the GSI client will not have a button rendered.
You can work around this limitation by either
- Making sure to enable just one Google IdP using the GSI client per application
- Providing alternate Google IdP configurations with the
Use redirect for loginLogin Method