Multi-Factor Authentication (MFA)
Multi-factor authentication (MFA) makes authentication more secure by requiring multiple methods of identification, known as factors. Users can use specific methods to verify these factors, including passwords, codes sent to the user, and time-based one time passwords (TOTP).
Two-Factor Authentication (2FA) is the practice of requiring two factors of authentication for a login. 2FA typically combines a password with any other factor.
In FusionAuth, you can implement MFA for login and step-up authentication, a feature that requires users to authenticate before accessing sensitive parts of an application, such as an administrator dashboard or a password change UI.
MFA Workflow#
Fusionauth applies MFA as follows:
- User signs in
- FusionAuth checks tenant and user settings
- If policy or context requires, prompt for MFA code
- Validate code
- Continue login or step-up flow
Supported Methods#
FusionAuth currently supports the following factors:
- Time-based one-time passwords (TOTP) using an application such as Google Authenticator (free with Community plan)
- Email MFA (requires paid plan)
- Phone MFA, including Twilio (requires paid plan)
Tenant MFA Settings (Enable methods, policies, templates)#
Before users can use an MFA method, you must explicitly enable MFA methods for each tenant. This includes configuring templates and messengers. If you are using hosted login pages or the login API, enable your preferred allowed MFA methods on the tenant. If you are only using step-up auth, on the other hand, you do not have to enable any tenant MFA methods.
The tenant configuration also sets the default multi-factor policy. The policy controls when MFA is required.
In the image below, this tenant has all FusionAuth supported methods enabled:
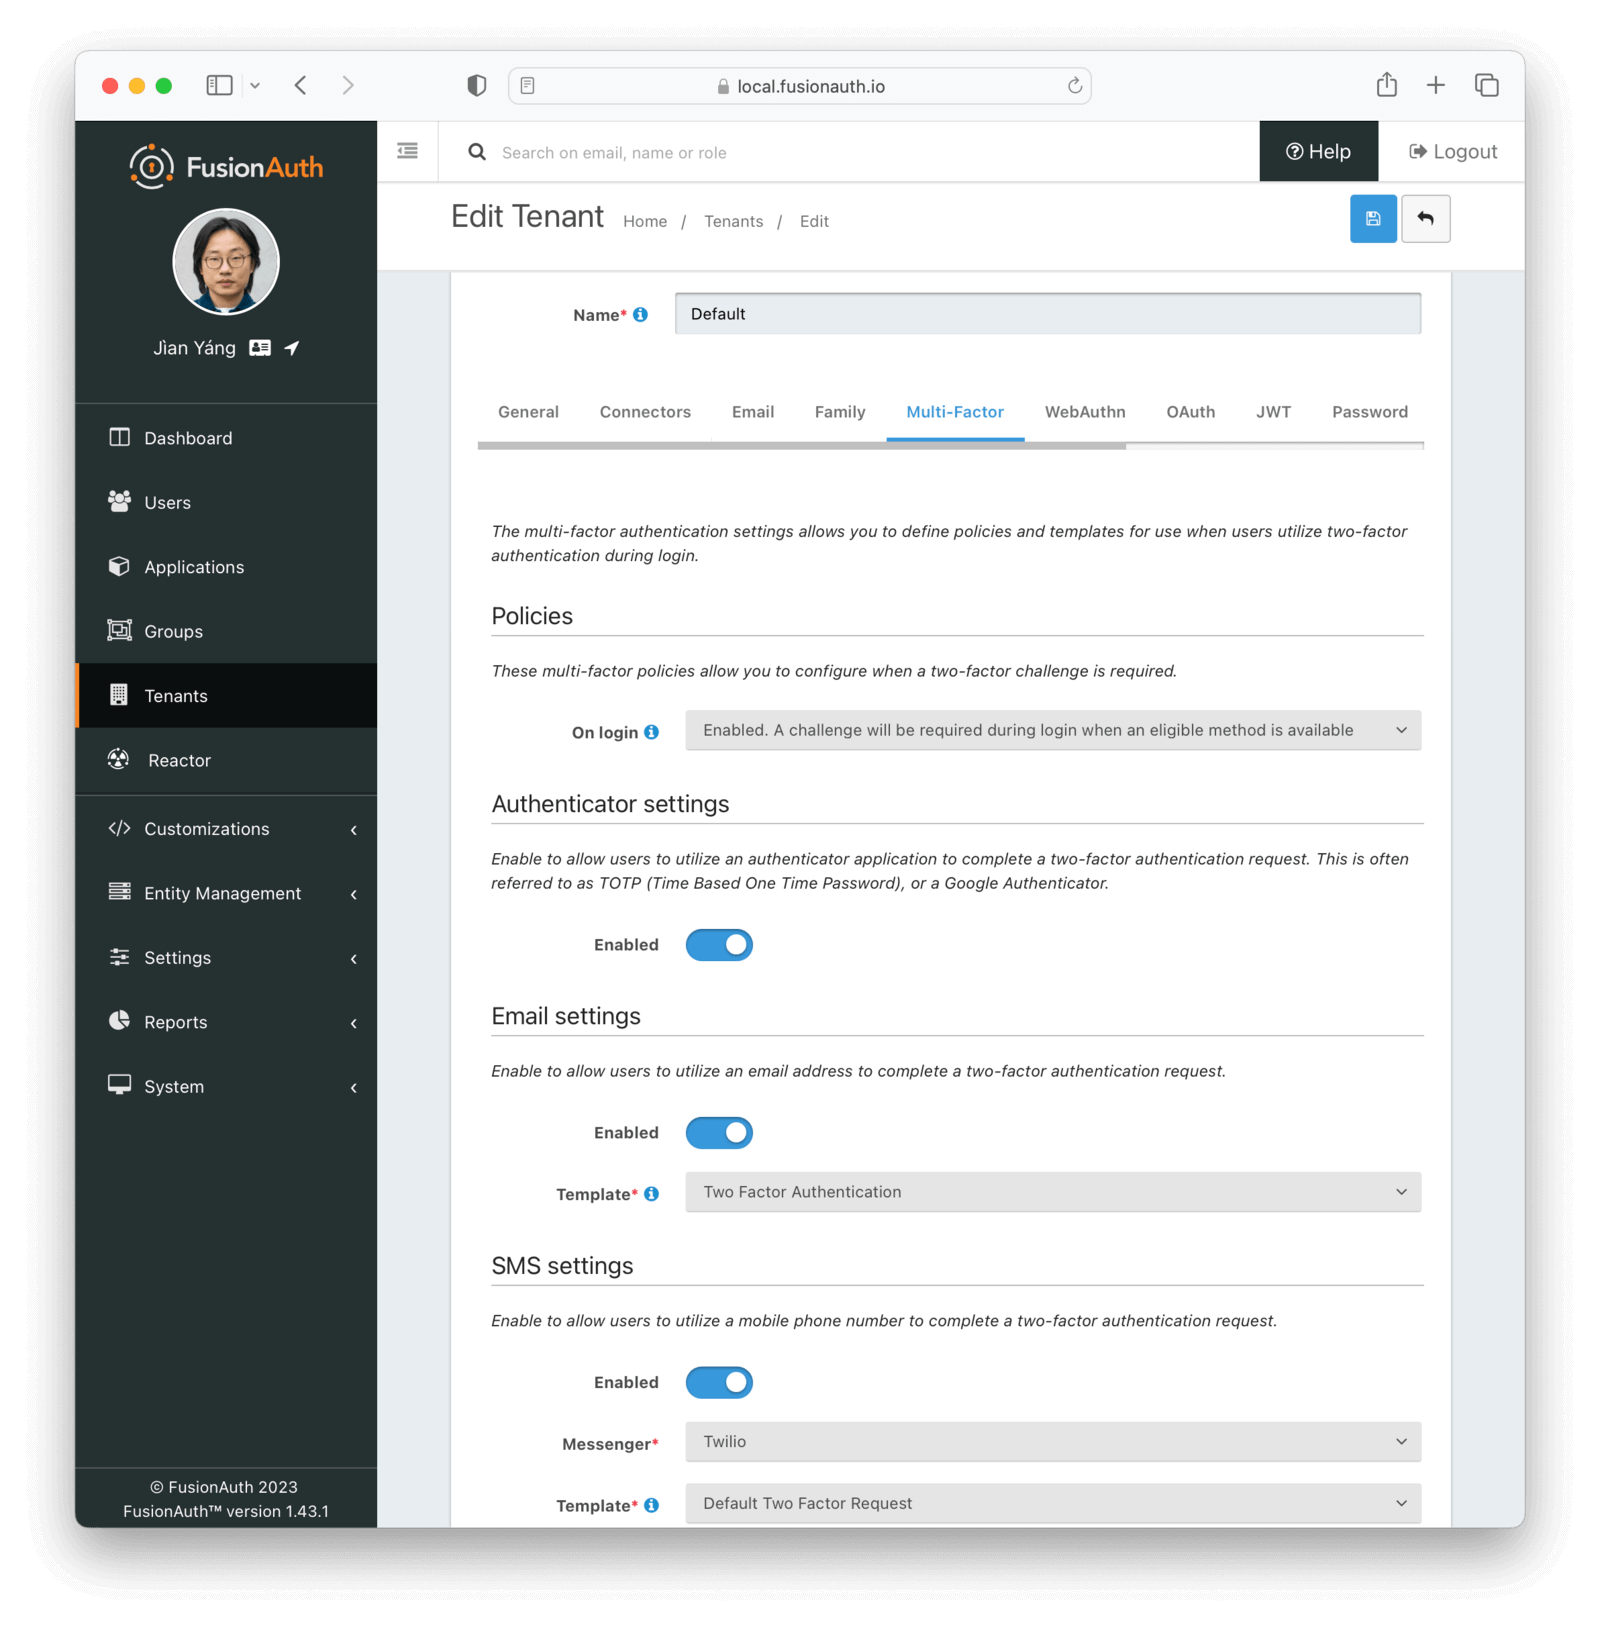
Please see the Tenant configuration documentation for more information.
For configuring message templates (for SMS/Voice/email codes), see the Message Templates documentation.
Review tenant concepts and where MFA defaults live.
Application-Level MFA Settings (Overrides & requirements)#
This feature is only available in the Enterprise plan. To learn more, see our pricing page.
You can override some MFA configuration settings at the application level. For instance, if you have one application that is used by your administrators, you might want to require MFA. For another application used by your customers, you might want to disable MFA.

Please see the Application configuration documentation for more information.
See application settings that affect MFA.
Enable MFA for a User#
Once you've configured tenant settings, enable one or more MFA methods on a user. Doing this will require the user to present the additional factor of proof whenever they log in.
Since this involves sharing secrets and verifying possession of email accounts or mobile phones, you cannot enable MFA for a different user using the FusionAuth administrative user interface.
You can, however, enable MFA on your own account using the administrative user interface.
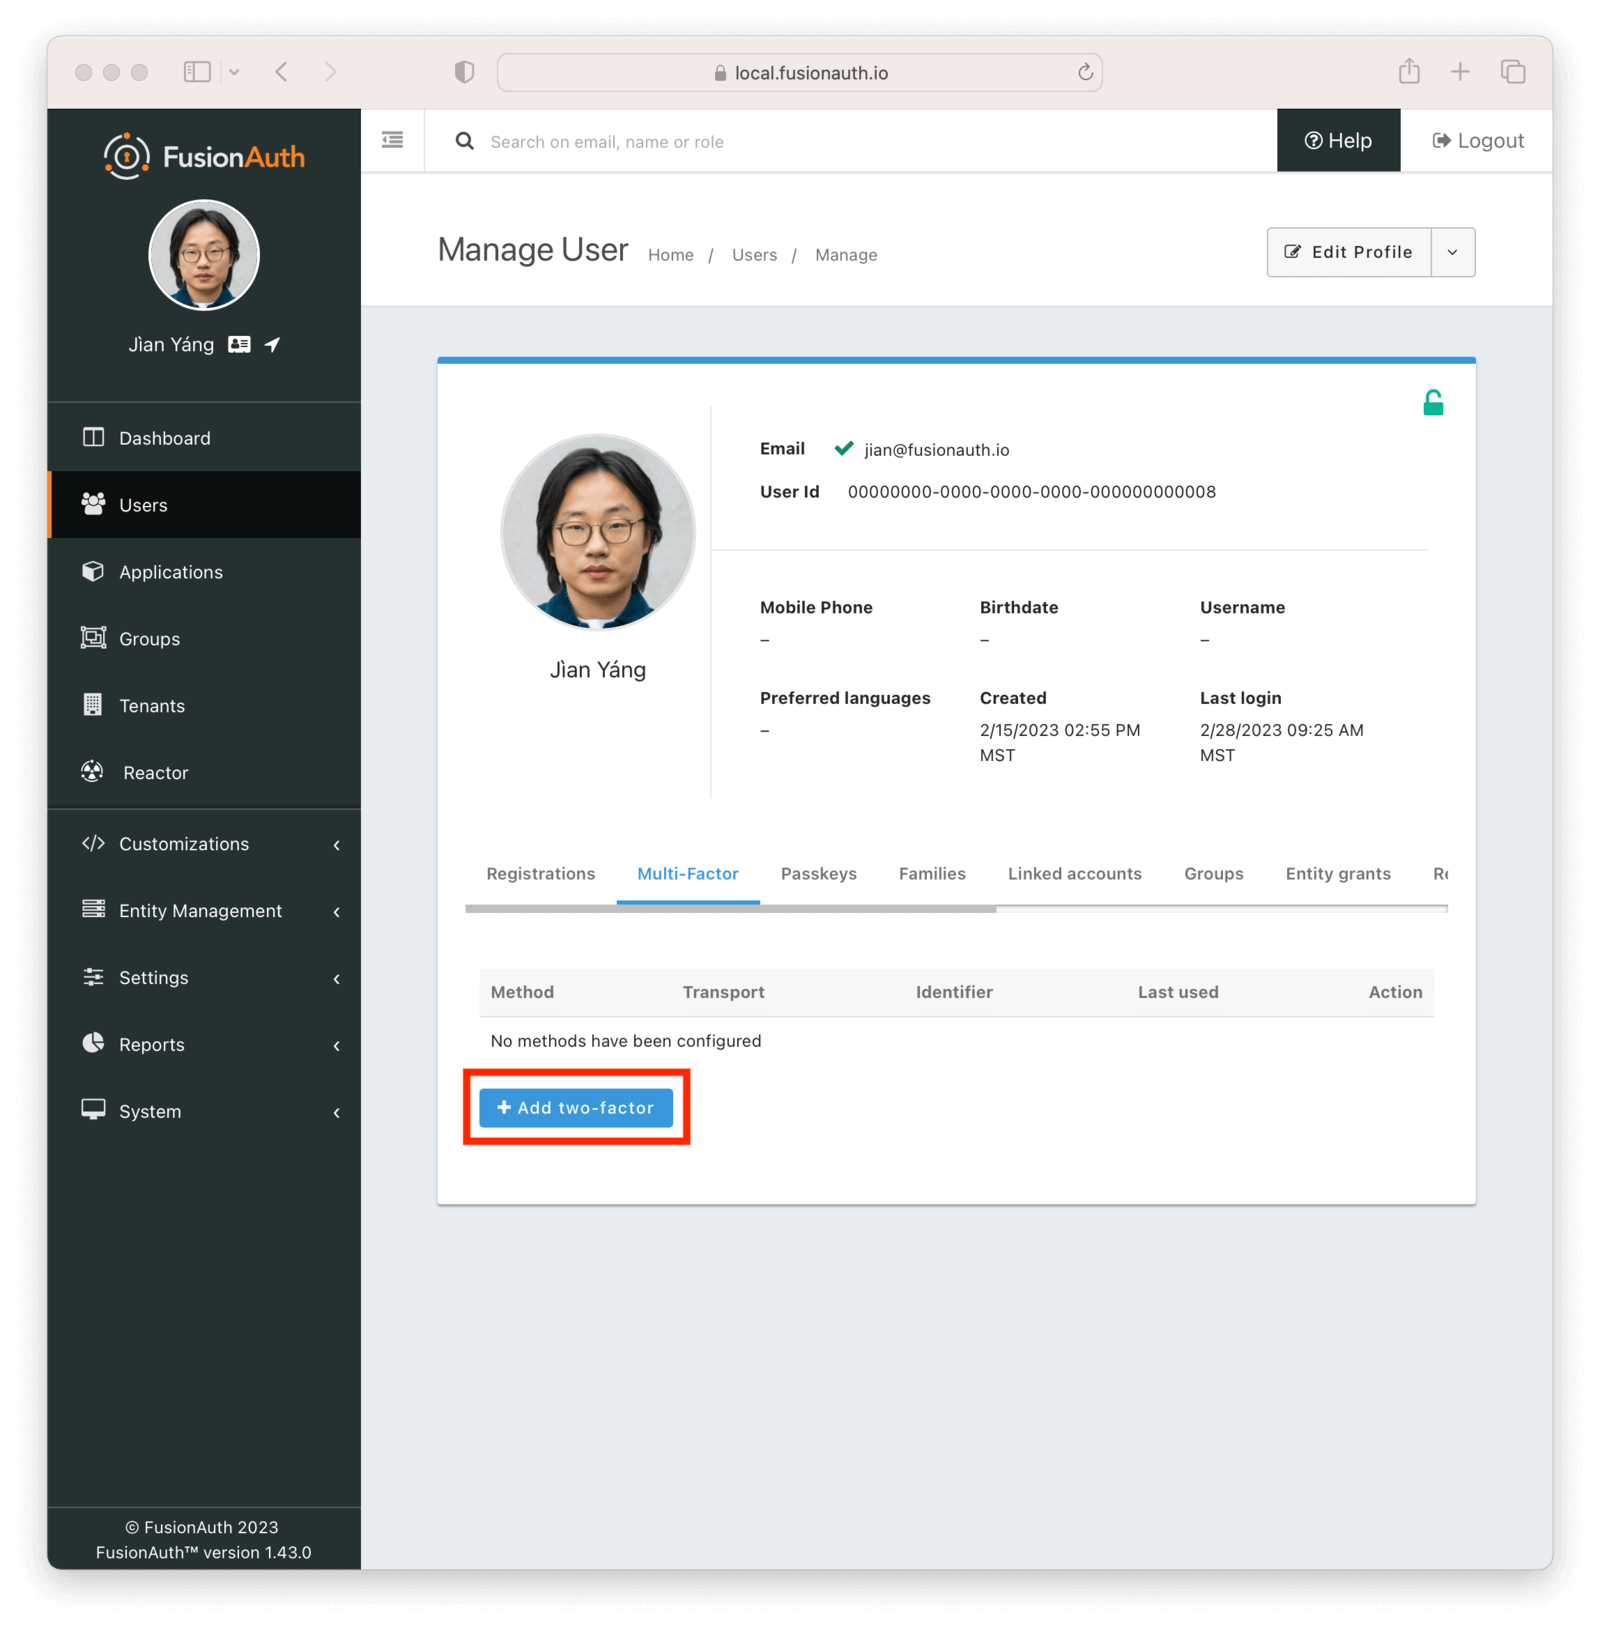
There are three options to allow users to enable multi-factor authentication on their account:
- If you have a paid plan, users may use the self service account management feature to enable MFA for their accounts. Learn more about that option here.
- You may enable MFA directly using the User API.
- You can build your own MFA user interface, allowing end users to enable MFA.
Directly Enable MFA for another User#
To directly enable MFA for a user, update their user object with one or more MFA methods:
- Retrieve user object
- Add MFA method to
twoFactor.methodsarray - Update user via PATCH request
- Verify MFA is enabled
Adding MFA methods to a user directly
API_KEY=...

curl -XPATCH -H 'Content-type: application/json' -H "Authorization: $API_KEY" \
'https://localhost.fusionauth.io/api/user/00000000-0000-0000-0000-000000000004' \
-d '{
  "user": {
    "twoFactor": {
      "methods": [{
        "method": "email",
        "email": "dinesh@aol.com"
      }, {
        "method": "email",
        "email": "dinesh@gmail.com"
      }]
    }
  }
}'
You are using PATCH for twoFactor array; doing so multiple times adds to the array each time (rather than setting it to exactly what you provided in the API call). Learn more about PATCH options.
If adding a TOTP factor, make sure you capture the secret and convey it to the user so they may enter it into their authenticator application.
There is no confirmation step when using this approach, so if an email address or phone number is incorrect, the user will never see the code sent.
You can read more about updating a user in the User API docs.
Build Your Own Interface#
If building your own user interface, these are the steps to take with the API:
- If using TOTP, optionally generate a shared secret to present to the user
- If using a message based MFA method, send a code to the user
- Build a page to accept that code and enable MFA
Optionally Generate a Shared Secret#
This is needed if you are using TOTP. For any other MFA method, skip this section.
Additionally, using this API is not required as you may build your own secret. The API is provided for your convenience only.
Generate a Shared Secret Sample Curl Script
API_KEY=...

curl -XGET -H "Authorization: $API_KEY" 'https://local.fusionauth.io/api/two-factor/secret'
Here's a sample response:
Generate a Shared Secret Response JSON
{
  "secret": "8MJJfCY4ERBtotvenSc3",
  "secretBase32Encoded": "HBGUUSTGINMTIRKSIJ2G65DWMVXFGYZT"
}
You must present the shared secret to the user for TOTP MFA. This can be presented as a QR code or a string of digits to enter into an application such as Google Authenticator or Authy.
Unless you are using the self service account management, you'll have to build this interface for your application.
Optionally Send a Code to the User For Message-Based MFA#
For email and phone-based methods (SMS or Voice), send a code to the user using the Send API. If you are using TOTP, skip this section.
Send a Code Sample Curl Script
API_KEY=...
REQUEST_PAYLOAD='{...}'

curl -XPOST -H 'Content-type: application/json' -H "Authorization: $API_KEY" 'https://local.fusionauth.io/api/two-factor/send' -d $REQUEST_PAYLOAD
Send a Code Sample Curl Script Request JSON
{
  "messageType": "Voice",
  "method": "sms",
  "mobilePhone": "+13035551212",
  "userId": "c075e472-a732-47d6-865a-d385a5fcb525"
}
This API call will send a unique code to the user using the method specified.
The lifetime and length of this code can be configured by navigating to Tenants -> Your Tenant -> Advanced and modifying the Two-Factor One Time Code settings.
Collect the Code#
Once the code has been sent or the secret shared, accept the code from the user. Unless you are using the self service account management, you'll have to build this page in your application.
With message based MFA methods, the user enters the code they've been sent. In the case of TOTP, they configure the application with the shared secret, then enter the code displayed by their application.
After your application has the code, enable MFA for this user with this API call. You must specify the method the code is associated with.
You may optionally include a name field to give the method a user-friendly label (for example, Work email or Work authenticator).
Enable MFA Sample Curl Script for the Email Method
API_KEY=...
USER_ID=...
REQUEST_PAYLOAD='{...}'

curl -XPOST -H 'Content-type: application/json' -H "Authorization: $API_KEY" 'https://local.fusionauth.io/api/user/two-factor/'$USER_ID -d $REQUEST_PAYLOAD
Enable MFA for the Email Method Request JSON
{
  "code": "435612",
  "email": "richard@piedpiper.com",
  "method": "email",
  "name": "Work email"
}
Verify MFA Is Enabled#
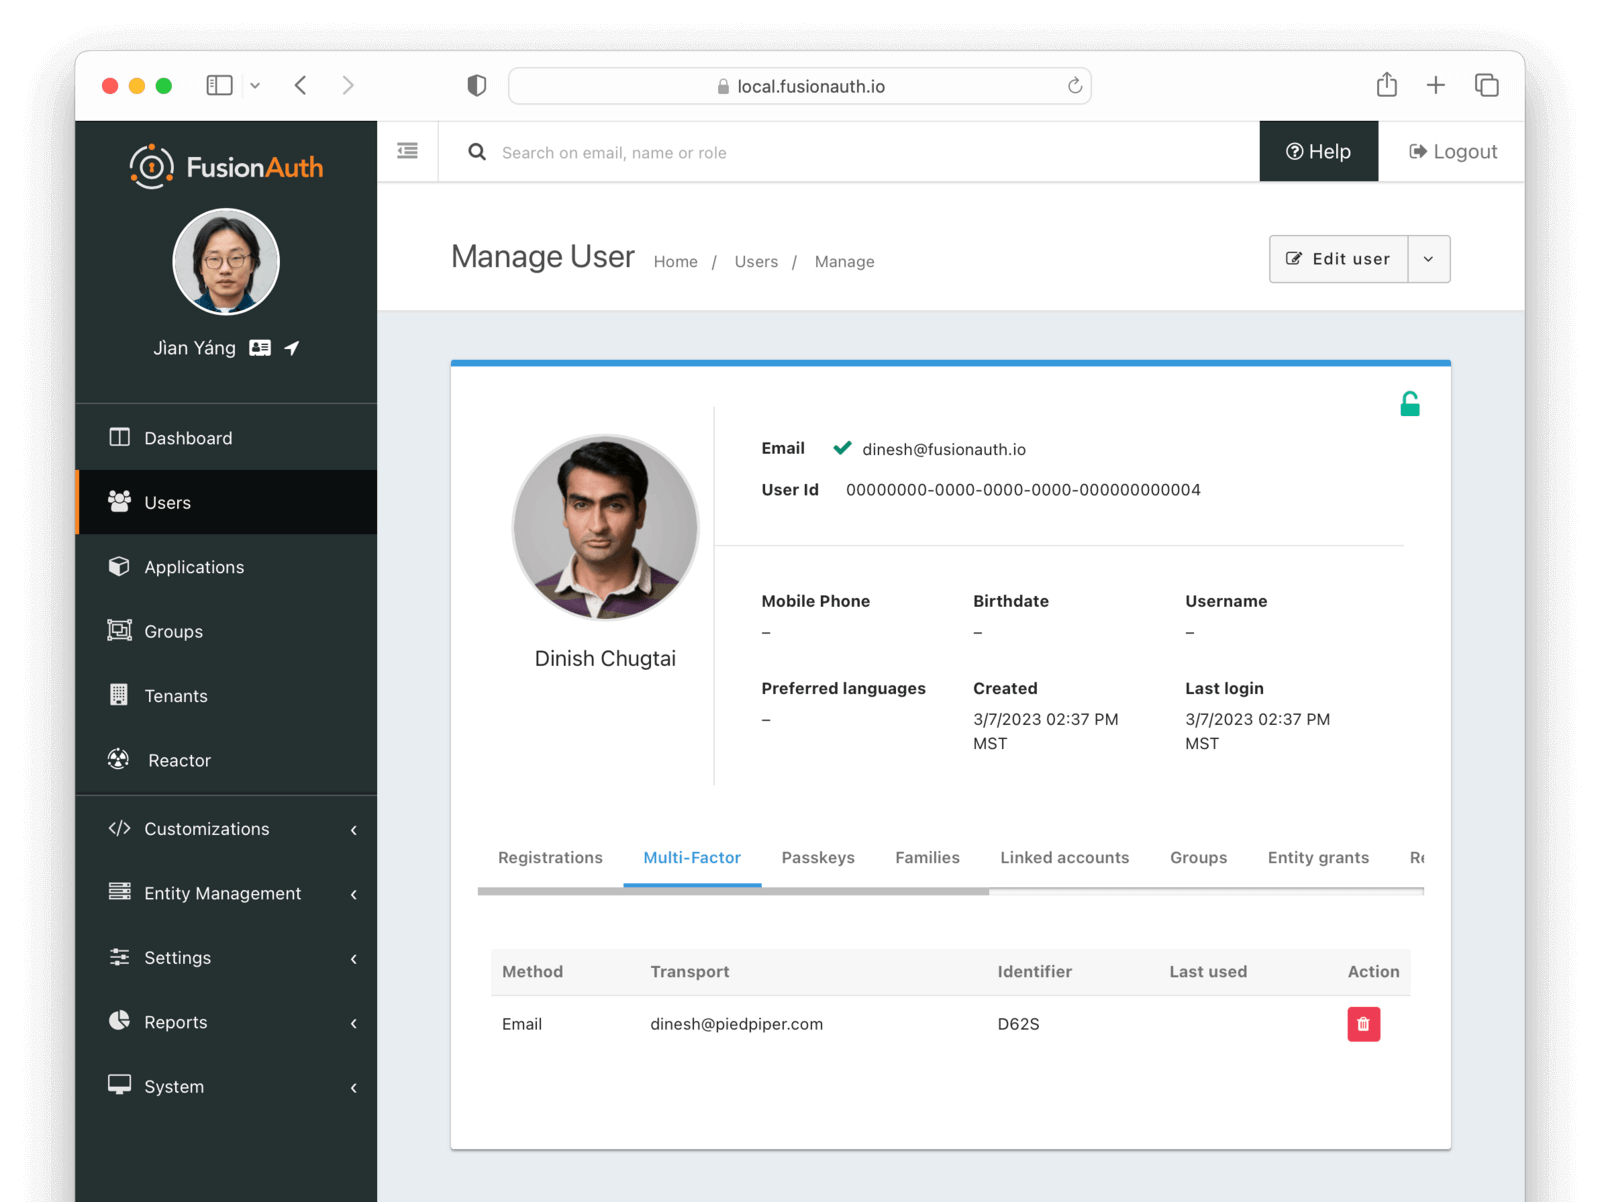
If you view the user in the administrative user interface, you can see the user has an MFA method attached to their account:
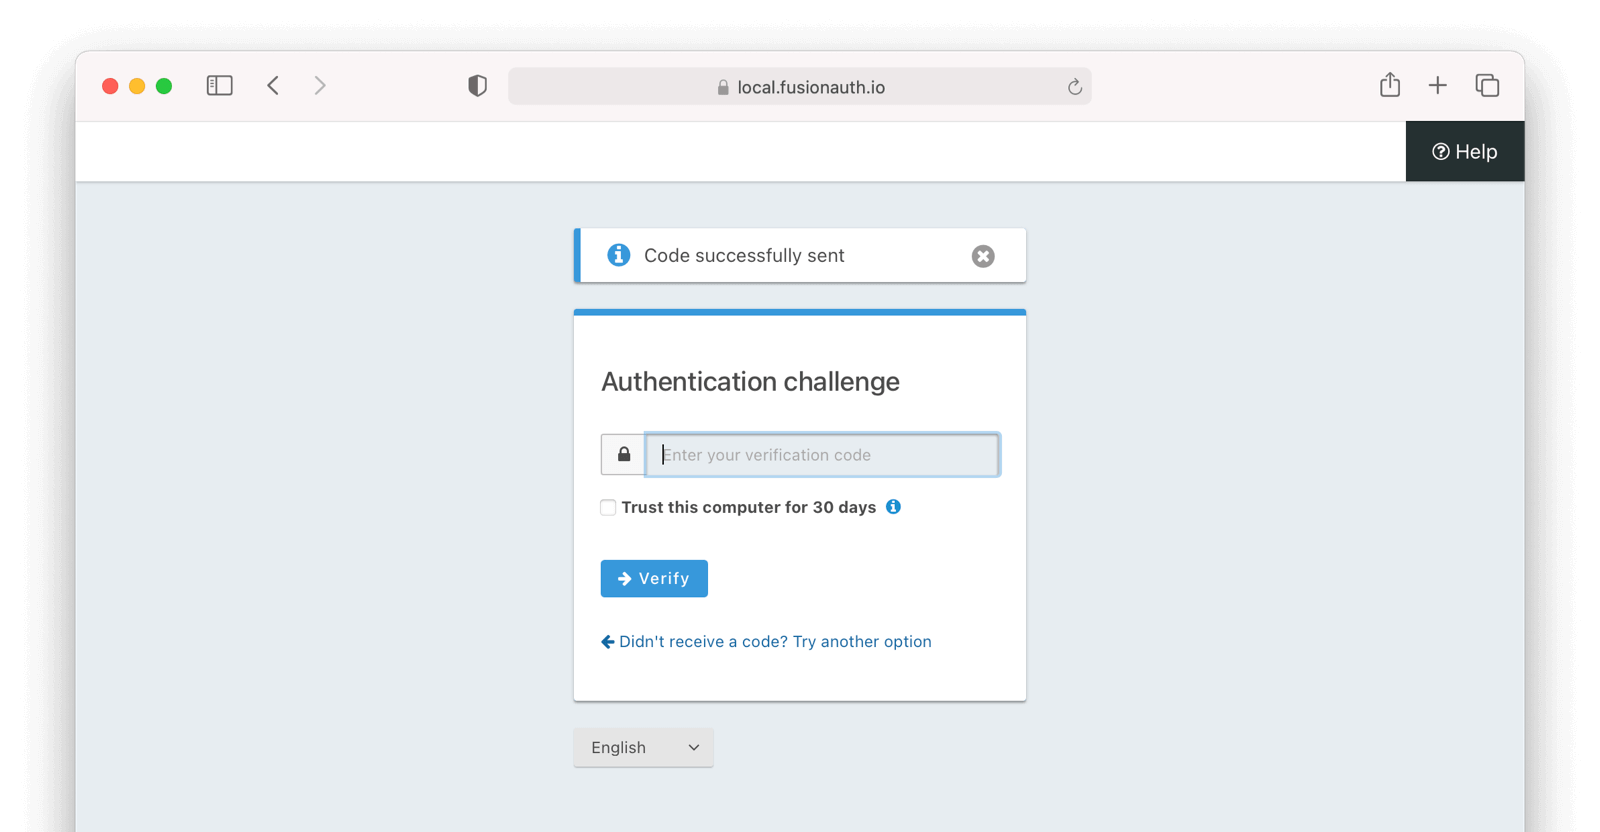
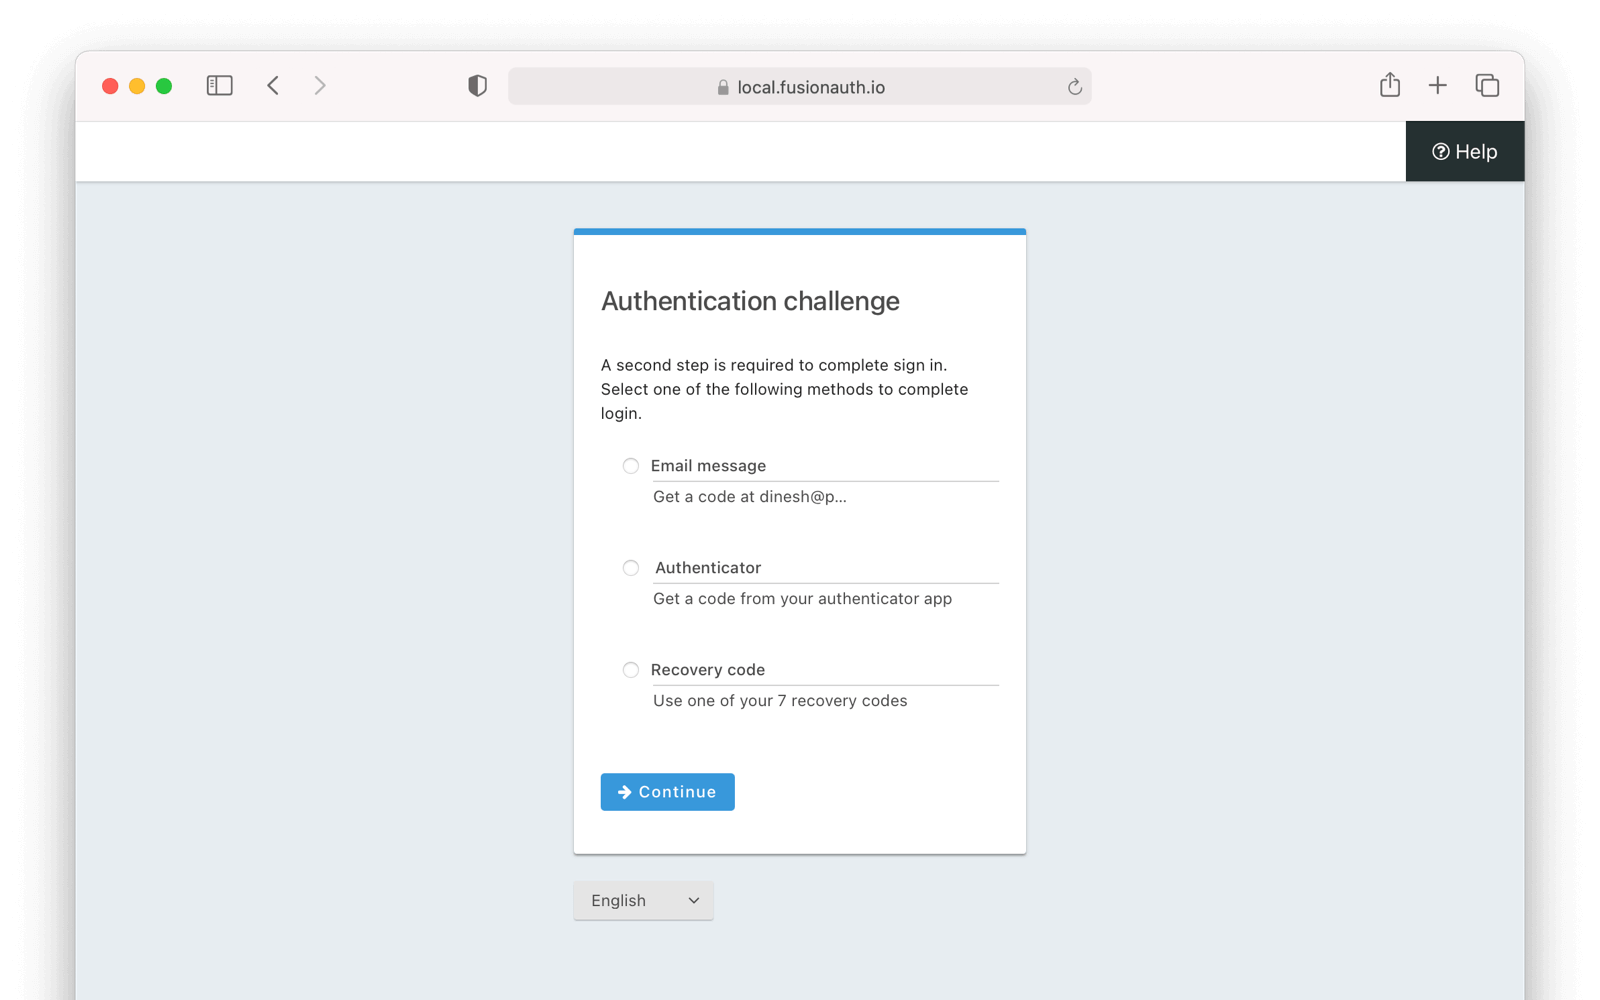
At this point, the user will be prompted to provide another factor of authentication whenever they login. This is the default screen displayed if you are using the hosted login pages:
Add a Second Method#
To enable TOTP based MFA, use a slightly different request body, which includes the code the user provides and the shared secret:
Enable MFA Sample Curl Script for TOTP Method
API_KEY=...
USER_ID=00000000-0000-0000-0000-000000000004
REQUEST_PAYLOAD='{...}'

curl -XPOST -H 'Content-type: application/json' -H "Authorization: $API_KEY" 'https://local.fusionauth.io/api/user/two-factor/'$USER_ID -d $REQUEST_PAYLOAD
Enable MFA for TOTP Method Request JSON
{
  "code": "435612",
  "method": "authenticator",
  "name": "Work authenticator",
  "secret": "8MJJfCY4ERBtotvenSc3",
  "twoFactorId": "a6yRXP9-FF0sqD86L_1n_zRp6iAS_aXuuhQM8OL_nIA"
}
Now that the user has two MFA methods associated with their account, the user is prompted to choose a method when logging in:
If you provided a method name during enrollment, that name will be shown in this list.
In the administrative user interface, the user has a second MFA method attached to their account:
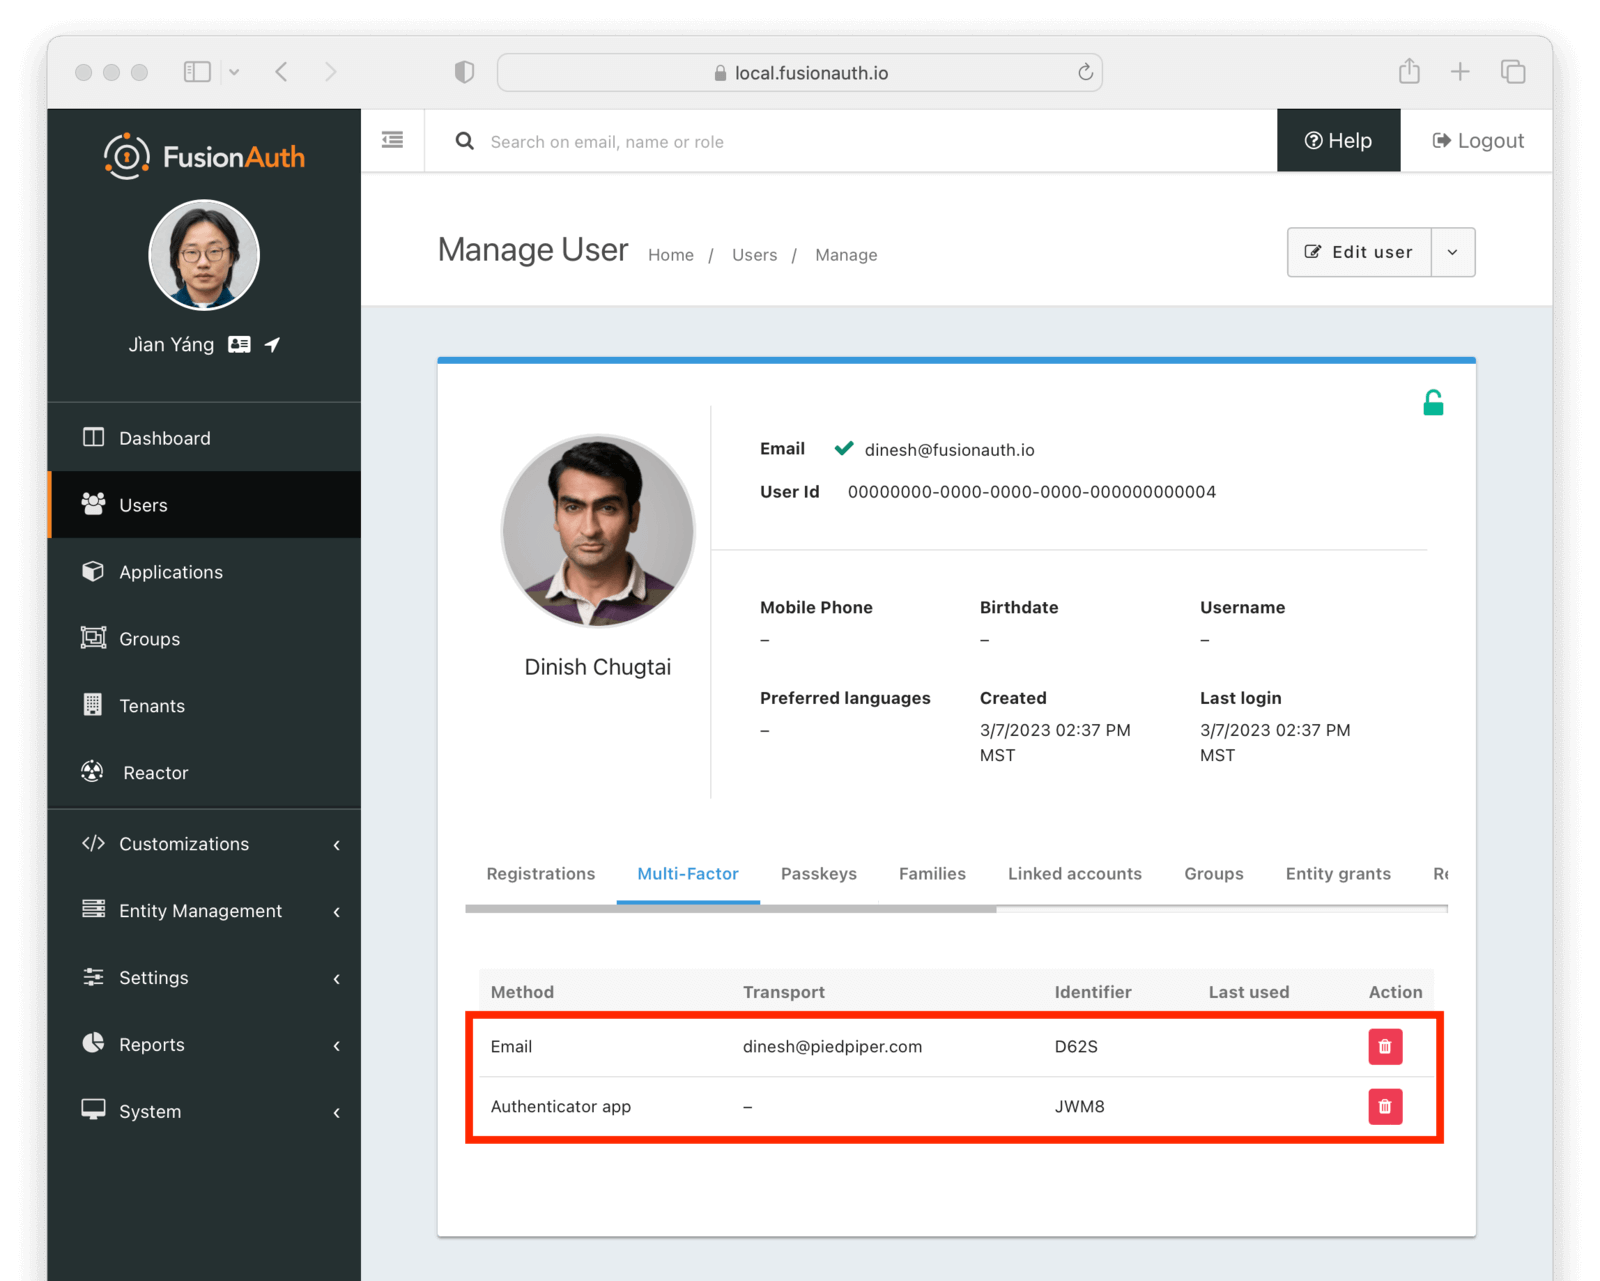
By repeating this process, users can attach as many MFA methods of each type to their account as they wish.
Recovery Codes#
When you first add an MFA method to a user, the response is a set of codes:
Recovery Codes Response JSON
{
  "code": "752185",
  "recoveryCodes": [
    "QJD73-L6GR5",
    "R7RJH-GB7H3",
    "JJ5YZ-KS4C3",
    "CRDHP-7L355",
    "928QS-P9HMJ",
    "8VLFT-Z2WMM",
    "PQZX9-YV5VR",
    "TK9TB-7BT6H",
    "6QYPL-ZPQJV",
    "VJ35W-98RW4"
  ]
}
These should be presented to the user to store for safekeeping. They are one time use only and may be used any time a code parameter is required in an MFA flow. If valid, FusionAuth considers the additional factor provided and marks the recovery code used.
As a developer, you can manage them via the Recovery Code API. As of 1.68.0, recovery codes are hashed at rest — they are only available in plaintext at the moment of generation and cannot be retrieved afterward.
These recovery codes are useful if a user loses their device or their email account access. By presenting a recovery code, the user may log in to their account even if they've lost access to their MFA method of choice.
User Login Experience#
Once multi-factor authentication is enabled for a user, they'll be required to provide the additional factor whenever they log in until they disable MFA.
Hosted Login Pages#
If you are using hosted login pages (learn more about "hosted login pages"), there are two MFA specific templates you'll want to modify.
- The "OAuth two-factor methods" template displays the page where a user may choose between various MFA methods.
- The "OAuth two-factor" template displays the page where a user enters an MFA code during login.
You'll also need to modify the email or message templates if using email, SMS, or voice methods.
Here's an example of the default template when a user has one MFA method enabled. By default, the code for the factor is sent, if applicable, and the user is prompted for the code.
Here's an example of the default template when a user has more than one MFA method enabled. The user is then prompted to pick which method they'd like.
Learn more about themes and templates, including the variables available for each page, in the themes documentation.
Build Your Own Screens#
If you are not using the hosted login pages, you'll need to build your own pages using the Login API. In that case, you'll want to use the following flow:
- Start the login process
- Send the code
- Complete the login
Let's walk through each of these steps.
Log the User In#
Build a page with a login form. Use the Login API docs to call the API correctly.
Log the User In Sample Curl Script
API_KEY=...
REQUEST_PAYLOAD='{...}'

curl -XPOST -H 'Content-type: application/json' -H "Authorization: $API_KEY" 'https://local.fusionauth.io/api/login' -d $REQUEST_PAYLOAD
Log the User In Request JSON
{
  "applicationId": "10000000-0000-0002-0000-000000000001",
  "eventInfo": {
    "ipAddress": "127.0.0.1"
  },
  "loginId": "example@fusionauth.io",
  "loginIdTypes": [
    "email"
  ],
  "newDevice": false,
  "noJWT": false,
  "password": "password"
}
If they have MFA enabled or MFA is required, your code will receive a 242 response status code. You'll also get JSON with a list of the user's methods:
Log the User In Response JSON When MFA Enabled
{
  "methods": [
    {
      "authenticator": {
        "algorithm": "HmacSHA1",
        "codeLength": 6,
        "timeStep": 30
      },
      "id": "2KSZ",
      "method": "authenticator"
    },
    {
      "email": "richard@fusionauth.io",
      "id": "KLRT",
      "method": "email"
    }
  ],
  "twoFactorId": "YkQY5Gsyo4RlfmDciBGRmvfj3RmatUqrbjoIZ19fmw4"
}
Save the twoFactorId value as you'll need that later in the flow. Save the methods array to present to the user when they need to choose their preferred MFA method. Implement a screen letting a user choose this.
When they have chosen a method, send a code if they are using a message based MFA method.
Optionally Send a Code#
This is only required if the user chooses a message based MFA method. Calling this API invalidates any other codes previously sent to the user.
Send the Code Sample Curl Script
API_KEY=...
REQUEST_PAYLOAD='{...}'
TWO_FACTOR_ID=... # from the login response

curl -XPOST -H 'Content-type: application/json' -H "Authorization: $API_KEY" 'https://local.fusionauth.io/api/two-factor/send?twoFactorId='$TWO_FACTOR_ID -d $REQUEST_PAYLOAD
Send the Code Request JSON
{
  "messageType": "Voice",
  "methodId": "KLRT"
}
This sends an email because that is the MFA method corresponding to the provided methodId.
The email address to which the code is sent may be different from the loginId used, since the target email address for a MFA method need not be the same as the user's login Id.
Collect the Code and Complete the Login#
Build a screen to collect the code. When you have it, complete the two-factor login by calling the Login API:
Complete the MFA Login Sample Curl Script
API_KEY=...
REQUEST_PAYLOAD='{...}'

curl -XPOST -H 'Content-type: application/json' -H "Authorization: $API_KEY" 'https://local.fusionauth.io/api/two-factor/login' -d $REQUEST_PAYLOAD
Complete the MFA Login Request JSON
{
  "applicationId": "10000000-0000-0002-0000-000000000001",
  "code": "915187",
  "ipAddress": "192.168.1.42",
  "twoFactorId": "YkQY5Gsyo4RlfmDciBGRmvfj3RmatUqrbjoIZ19fmw4"
}
You can pass a parameter to this request indicating you want to receive a twoFactorTrustId. That can then be provided at future logins to bypass the MFA process. Please consult the Login API documentation for more on that.
OAuth overview (challenge during login, tokens) provides more context on the OAuth flow with MFA.
Step-Up Auth#
Step-up authentication allows you to be extra certain that a user is who they say they are. You can use this in your application to protect sensitive actions, such as account deletion or sending money.
Step-up authentication is intertwined in your application in a way that normal login isn't. Only you know what type of actions require the additional certainty of a step-up. Therefore, you always need to implement a step-up by calling the FusionAuth APIs.
To use this:
- Check if MFA is required
- Start the step-up process
- Optionally send the code
- Collect the code and verify it
Here's a diagram showing this flow for a banking application which requires step-up auth before completing a transfer, but not when users view a balance.
sequenceDiagram
    participant User
    participant app as Application
    participant FusionAuth
    User ->> app : View Bank Balance
    app ->> User : Show Bank Balance
    User ->> app : Transfer $1000
    app ->> FusionAuth : Check If Step Up Auth<br/>Required Via Two-Factor Status<br/>(API call)
    FusionAuth ->> app : Returns Step Up Auth Required
    app ->> FusionAuth : Start Step Up Auth (API call)
    FusionAuth ->> app : Returns List Of Methods
    app ->> User : Shows List Of Methods
    User ->> app : Selects Email MFA Method
    app ->> FusionAuth : Send Step Up Auth (API call)
    FusionAuth ->> User : Send Code Via Email
    User ->> User : Finds Code In Email
    User ->> app : Enters Code
    app ->> FusionAuth : Completes Step Up Auth<br/>(API call)
    FusionAuth ->> FusionAuth : Verifies Code
    FusionAuth ->> app : Returns Success
    app ->> app : Completes Transfer
    app ->> User : Shows Confirmation
Diagram of step-up auth when user selects a message based MFA method like email.
You can also send information at the start of the step-up process and receive it at the end.
Let's walk through each of these steps.
Check if MFA is Required#
Before starting the step up process, determine if the user is required to complete MFA.
Check MFA Requirement Sample Curl Script
API_KEY=...
REQUEST_PAYLOAD='{...}'

curl -XPOST -H 'Content-type: application/json' -H "Authorization: $API_KEY" 'https://local.fusionauth.io/api/two-factor/status' -d "$REQUEST_PAYLOAD"The POST method of this endpoint was added in FusionAuth 1.62.0 and is preferred over the GET method because it allows specifying more details about the context of the request for MFA Lambdas to evaluate. See the MFA Status API API documentation for more details.
Check MFA Requirement Request JSON
{
  "action": "stepUp",
  "applicationId": "85a03867-dccf-4882-adde-1a79aeec50df",
  "eventInfo": {
    "data": {
      "page": "/account/bank-accounts"
    },
    "ipAddress": "127.0.0.1"
  },
  "userId": "429797ba-37d7-4bbe-8748-58fb812448ff"
}
Specify the action field as stepUp to indicate this is for step up auth. If a MFA Lambda is configured, it will be used to determine if MFA is required. If not, the default tenant and application policies will be used.
Check MFA Requirement Response JSON
{
  "trusts": [
    {
      "applicationId": "975c7d21-f4b7-4a16-bbb9-a7826045f7e2",
      "expiration": 1660946705239,
      "expired": false,
      "startInstant": 1660860305239
    }
  ],
  "twoFactorTrustId": "XOgai4Ro68xfGiex0ngXiJ2bbhduM4Pm7h3lvF0xibQ"
}
If MFA is required, a status code of 242 will be returned. If not, a status code of 200 will be returned, along with the JSON above, and the user can proceed with the sensitive action.
Start the Process#
Kick off the process using the start endpoint:
Start a Step-Up MFA Flow Sample Curl Script
API_KEY=...
REQUEST_PAYLOAD='{...}'

curl -XPOST -H 'Content-type: application/json' -H "Authorization: $API_KEY" 'https://local.fusionauth.io/api/two-factor/start' -d "$REQUEST_PAYLOAD"
Start a Step-Up MFA Flow Request JSON
{
  "loginId": "richard@piedpiper.com",
  "applicationId": "10000000-0000-0002-0000-000000000001",
  "code": "123456",
  "state": {
    "redirect_uri": "https://fusionauth.io"
  }
}
Specify a code if you don't want FusionAuth to generate one. You can also provide a state object containing JSON. This is returned to you after the step-up auth process completes, and can be useful to help the application return to its previous state after step-up authentication completes.
Start an MFA Flow Response JSON
{
  "code": "123456",
  "methods": [
    {
      "id": "BD5R",
      "method": "authenticator",
      "name": "Bitwarden Authenticator",
      "authenticator": {
        "algorithm": "HmacSHA1",
        "codeLength": 6,
        "timeStep": 30
      }
    },
    {
      "id": "KLRT",
      "method": "email",
      "name": "Work email",
      "email": "richard@piedpiper.com",
      "lastUsed": true
    },
    {
      "id": "K8RT",
      "method": "email",
      "name": "Personal email",
      "email": "dinesh@piedpiper.com"
    },
    {
      "id": "87KW",
      "method": "sms",
      "name": "Mobile",
      "mobilePhone": "+13035551212"
    }
  ],
  "twoFactorId": "DvnAUMCHLxCCAWyHXOVWPQd8ZY0a6U0e3YpYkT0MNxs"
}
Store the twoFactorId as you'll need that later. Present the user with the list of methods that they can choose.
When they select an MFA method, inspect it. If they choose a message based MFA method, you can send it with FusionAuth or send it via your own messaging.
If you provided your own code during the start API call, do not use FusionAuth to send that code. If you attempt to do so, FusionAuth will create a new code instead. If you provided your own code for the step-up authentication, send the code using your own delivery mechanism instead.
Optionally Send the Code#
This is only required if the user chooses a message based MFA method and you want to send the message with FusionAuth. Unlike with the login API, you don't have to send the code using this API with step-up authentication.
However, you need to get the code to the user somehow. The user doesn't even need to have MFA enabled within FusionAuth. You could, for example, build your own integration with a chat service like Slack and send the code to the user that way. Any out of band method, even carrier pigeon, would work.
Using this request will reset the code to a different value than any provided to the start API call.
Send the Code Sample Curl Script
API_KEY=...
REQUEST_PAYLOAD='{...}'
TWO_FACTOR_ID=... # from the /api/two-factor/start response

curl -XPOST -H 'Content-type: application/json' -H "Authorization: $API_KEY" 'https://local.fusionauth.io/api/two-factor/send?twoFactorId='$TWO_FACTOR_ID -d "$REQUEST_PAYLOAD"
Send the Code Request JSON
{
  "messageType": "Voice",
  "methodId": "KLRT"
}
This call will send the user an email, because that is the specified method.
Complete the Step-Up#
Build a screen or page to collect the code. When you have it, complete the step-up by calling the Login API. This will return the user object if the provided code is valid. If the code is not valid, one of the other return codes documented in the Login API will be returned.
Complete the MFA Step-Up Sample Curl Script
API_KEY=...
REQUEST_PAYLOAD='{...}'

curl -XPOST -H 'Content-type: application/json' -H "Authorization: $API_KEY" 'https://local.fusionauth.io/api/two-factor/login' -d "$REQUEST_PAYLOAD"
Complete the MFA Login Request JSON
{
  "applicationId": "10000000-0000-0002-0000-000000000001",
  "code": "915187",
  "ipAddress": "192.168.1.42",
  "twoFactorId": "YkQY5Gsyo4RlfmDciBGRmvfj3RmatUqrbjoIZ19fmw4"
}
If you have a valid user object, full speed ahead with the sensitive action your application was protecting!
Example Valid User Object
{
  "state": {
    "redirect_uri": "https://fusionauth.io"
  },
  "token": "eyJhbGciOiJIUzI1NiIsInR5cCI6IkpXVCJ9.eyJleHAiOjE0ODUxNDA5ODQsImlhdCI6MTQ4NTEzNzM4NCwiaXNzIjoiYWNtZS5jb20iLCJzdWIiOiIyOWFjMGMxOC0wYjRhLTQyY2YtODJmYy0wM2Q1NzAzMThhMWQiLCJhcHBsaWNhdGlvbklkIjoiNzkxMDM3MzQtOTdhYi00ZDFhLWFmMzctZTAwNmQwNWQyOTUyIiwicm9sZXMiOltdfQ.Mp0Pcwsz5VECK11Kf2ZZNF_SMKu5CgBeLN9ZOP04kZo",
  "user": {
    "active": true,
    "email": "richard@piedpiper.com",
    "expiry": 1571786483322,
    "id": "00000000-0000-0001-0000-000000000000",
    "lastLoginInstant": 1471786483322,
    "passwordChangeRequired": false,
    "passwordLastUpdateInstant": 1471786483322,
    "verified": true
  }
}
State For Step-Up#
As mentioned above, you can also store arbitrary data in the state field. This is provided by your application when you start the step-up process, and then returned after the end. This is useful in the following situations:
- Tracing a step-up auth request to a given interaction, such as a transaction id.
- Reconstituting the state of the application, such as displaying a modal, after a step-up display screen.
- Re-filling a multi-step form that you interrupted to display a step-up challenge.
Contextual MFA for more advanced step-up scenarios.
Disable MFA on a User#
Users may need to disable an MFA method. They may switch email addresses, change their phone number, or simply want to turn off MFA.
To disable MFA for a user, use one of the following options:
- If you have a paid plan, users may use the self-service account management feature to disable MFA for their accounts.
- You may remove MFA using the administrative user interface.
- You may disable MFA directly using the User API.
- You can build your own MFA user interface, allowing end users to disable MFA.
Disable MFA in the Administrative User Interface#
Navigate to Users -> The User and manage the user. Then go to the Multi-Factor tab. Remove any of the MFA methods by clicking the red trash can icon and confirming the deletion:
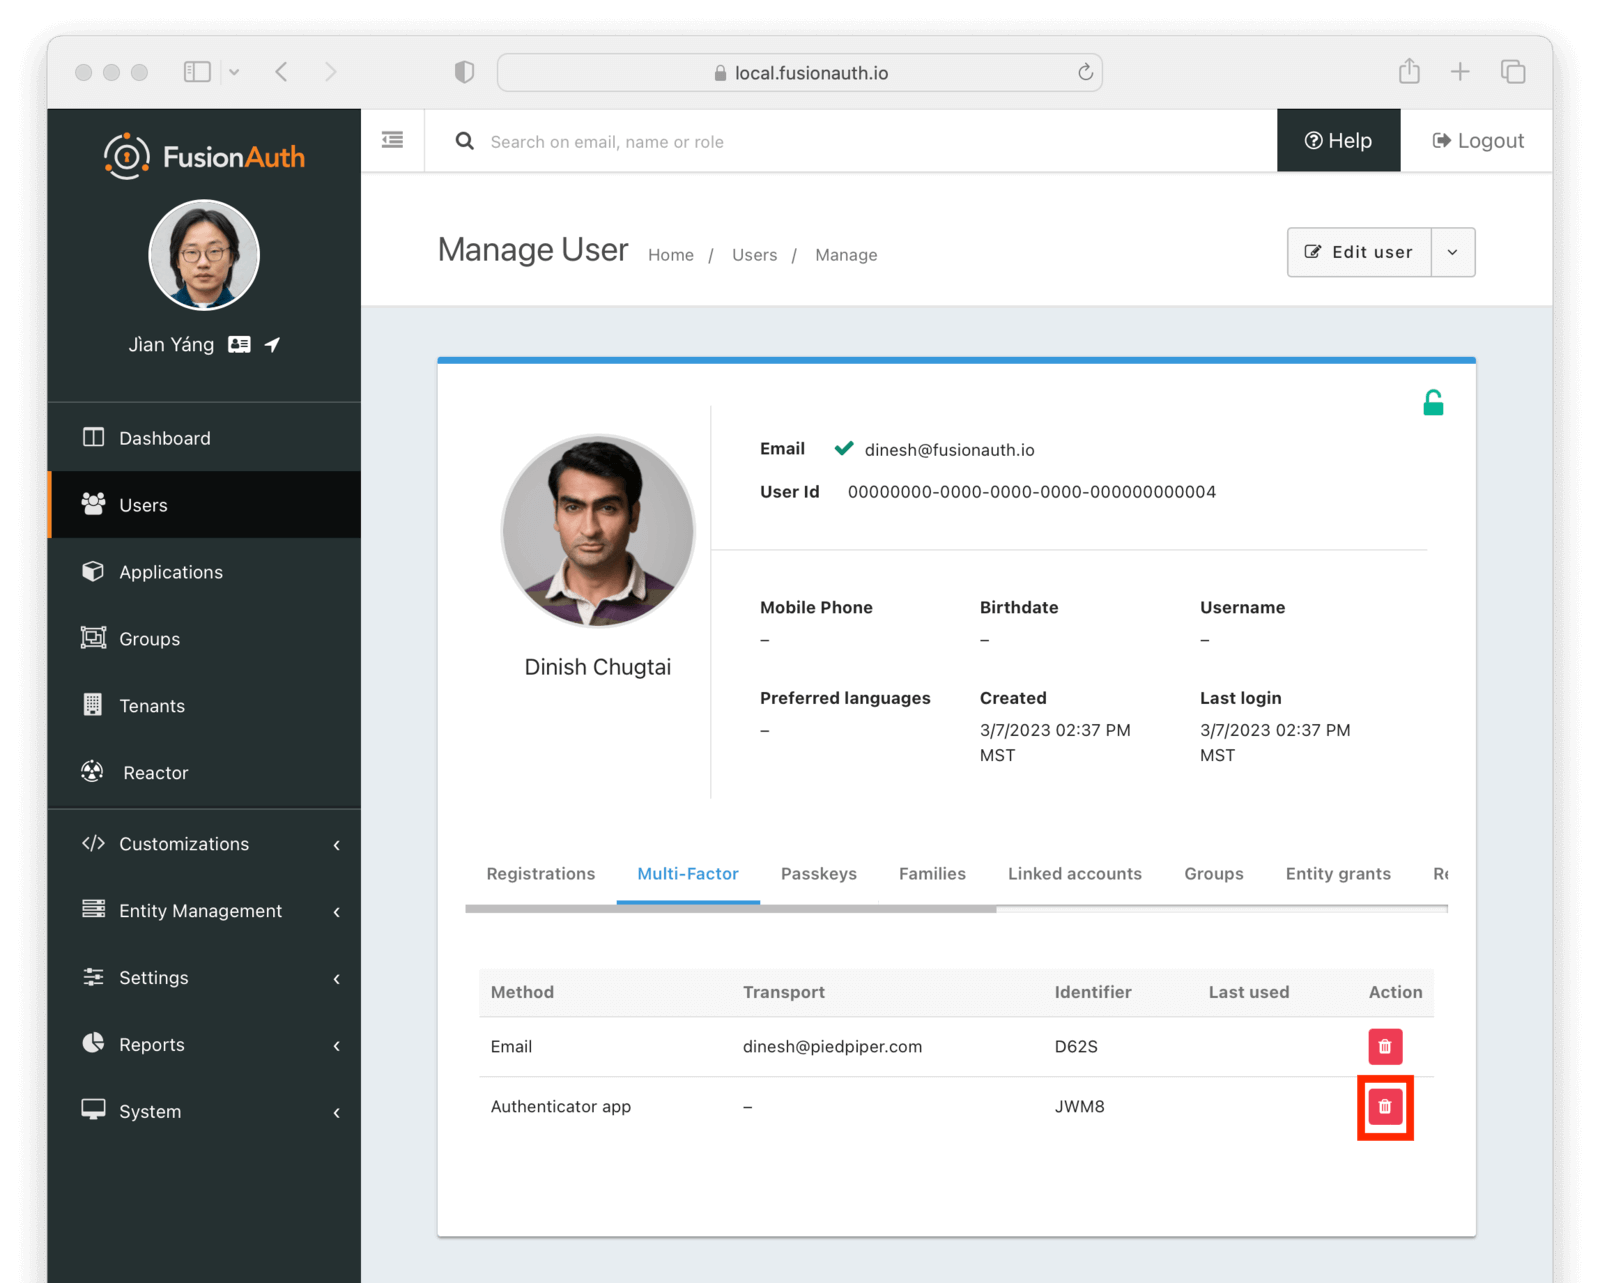
When removing a method in the Admin UI, behavior depends on the acting user's role:
admincan remove a method from another user without entering a one-time code.mfa_deletercan also remove a method from another user without entering a one-time code, but only when additional safeguards are met.user_manager,user_support_manager, anduser_support_viewercan only remove their own methods and must complete the standard verification-code flow.
The mfa_deleter role has the following limitations:
- The target user cannot be registered to the FusionAuth admin application.
- The target user must be notifiable through at least one verified primary identity and the corresponding tenant template configuration:
- verified email + configured
tenant.emailConfiguration.adminTwoFactorMethodRemoveEmailTemplateId, or - verified phone number + configured
tenant.phoneConfiguration.adminTwoFactorMethodRemoveTemplateId.
- verified email + configured
If these safeguards are not met, method removal is blocked in the Admin UI.
Successful administrative removals attempt to notify the target user using the configured tenant templates.
A user may also remove an MFA method by using the self service account management (if you have a paid plan) by clicking the - link. Learn more about that here.

Directly Disable MFA for a User#
To do this, you'll need to update the twoFactor array.
In the below example, all methods are removed.
You could also remove just the ones with a method of email or one particular MFA method.
Step-by-step disable process:
- Retrieve current user object
- Modify twoFactor array (remove methods)
- Update user via PUT request
- Confirm MFA is disabled
Deleting MFA methods from a user directly
API_KEY=...

user=`curl -XGET -H "Authorization: $API_KEY" 'https://local.fusionauth.io/api/user/00000000-0000-0000-0000-000000000004'`

# this empties out the twoFactor array. You can use any programming language to do this, this example uses jq
user_two_factor_removed=`echo $user| jq 'del(.[].twoFactor[])' -`

curl -XPUT -H 'Content-type: application/json' -H "Authorization: $API_KEY" 'https://sandbox.fusionauth.io/api/user/00000000-0000-0000-0000-000000000004' -d "$user_two_factor_removed"
The reason you need to retrieve the user and modify the data then use PUT to update it, is because of how PATCH handles arrays.
Build Your Own Interface#
Building your interface allows you maximal control. To disable MFA, you need to do the following:
- Optionally send the code
- Collect the code
- Call the disable MFA API
Typically, you need to send a code to the user first. If they are using TOTP, this is optional.
Optionally Send a Code#
This can be a code from one of the user's existing MFA methods or a recovery code. To build this screen, you may need to present them with a list of available MFA methods. This is present on the user object.
If the user choose a message based MFA method, send them a code:
Send a Code For Disabling MFA Sample Curl Script
API_KEY=...
REQUEST_PAYLOAD='{...}'

curl -XPOST -H 'Content-type: application/json' -H "Authorization: $API_KEY" 'https://local.fusionauth.io/api/two-factor/send' -d $REQUEST_PAYLOAD
Send a Code For Disabling MFA Request JSON
{
  "messageType": "Voice",
  "methodId": "RLRT",
  "userId": "c075e472-a732-47d6-865a-d385a5fcb525"
}
This will send a code using the method specified. If a user is using a TOTP method or a recovery code, skip this.
Collect the Code#
You'll need to build a page to collect the code. This will be part of your application.
For message based MFA methods, this will be a code you sent. For TOTP MFA, this will be a code provided by an authenticator application.
Disable MFA#
When you have the code, you can then call the disable API.
Send a Code For Disabling MFA Sample Curl Script
API_KEY=...
USER_ID=...
CODE=...
METHOD_ID=...

curl -XDELETE -H "Authorization: $API_KEY" 'http://localhost:9011/api/user/two-factor/'$USER_ID'?&code='$CODE'&methodId='$METHOD_ID
If this returns successfully, the MFA method has been removed from the user. If all MFA methods are removed from the user, they will no longer be prompted to provide additional factors at login.
When you use a recovery code to disable MFA, it removes all the MFA methods for a given user and invalidates all the other recovery codes.
Resend Codes#
You can resend codes using message based MFA methods by calling the send API.
You may need to do this because a user requests it. For example, if a user initially requests to get a code to be sent to an email address, then realizes they really want to MFA with their mobile phone, your application may call the send endpoint twice.
Calling the send endpoint sends a new code but also invalidates all other codes associated with this MFA request.
Recovery Codes#
When you first add an MFA method to a user, the response is a set of codes:
Recovery Codes Response JSON
{
  "code": "752185",
  "recoveryCodes": [
    "QJD73-L6GR5",
    "R7RJH-GB7H3",
    "JJ5YZ-KS4C3",
    "CRDHP-7L355",
    "928QS-P9HMJ",
    "8VLFT-Z2WMM",
    "PQZX9-YV5VR",
    "TK9TB-7BT6H",
    "6QYPL-ZPQJV",
    "VJ35W-98RW4"
  ]
}
These should be presented to the user to store for safekeeping. They are one time use only and may be used any time a code parameter is required in an MFA flow. If valid, FusionAuth considers the additional factor provided and marks the recovery code used.
As a developer, you can manage them via the Recovery Code API. As of 1.68.0, recovery codes are hashed at rest — they are only available in plaintext at the moment of generation and cannot be retrieved afterward.
These recovery codes are useful if a user loses their device or their email account access. By presenting a recovery code, the user may log in to their account even if they've lost access to their MFA method of choice.
Trust Tokens and Trust Challenges#
Changing a password when 2FA is enabled requires a trust token. To obtain this token of trust, you can complete a two-factor workflow. This is to ensure that anyone who has MFA enabled and tries to change their password also has the additional factor of authentication, which provides a higher level of assurance.
When using the hosted login pages, you don't need to worry about this. If you are building your own MFA integration, however, read on.
For example, to change a password, you need to do the following:
- Request
/api/two-factor/start. You get thetwoFactorIdand acode. - Request
/api/two-factor/login. Send in thetwoFactorIdand thecodereturned from the previous call. You'll get atrustToken.
This is an overview of the process. See the API docs for all parameters for these API calls.
Now you have the trustToken required to perform a trusted action, such as changing your password while MFA is enabled. But this trust token could be stolen and used by someone else.
In order to offer a higher level of security, you can provide a trustChallenge when you start the MFA process. Using one binds the challenge and the token. You can't use the trustToken without the corresponding trustChallenge.
If you do not provide a trustChallenge when you begin the MFA workflow, you do not need to provide anything other than the trustToken to access a trusted endpoint such as the Change Password API.
If, on the other hand, you want to use a trustChallenge, do the following to get the trustToken:
- Request
/api/two-factor/start. Send atrustChallenge. You can provide any value, but it is best practice to make it long and random. You get thetwoFactorIdand acode. - Request
/api/two-factor/login. Send in thetwoFactorIdand thecodereturned from the previous call. You'll get atrustToken.
This is an overview of the process. See the API docs for all parameters for these API calls.
Now you have the trustToken required to perform a trusted action, such as changing your password while MFA is enabled.
In this situation, when using the trustToken on the Change Password API, because you provided a trustChallenge on the /api/two-factor/start step, the same value must be provided as well as the trustToken to successfully use the trustToken and complete the privileged operation.
Migration from Version 1.25 and Earlier#
To migrate from the Two-Factor Authentication APIs provided in FusionAuth 1.25 or earlier, you'll need to think about the following aspects:
- Your plan
- Your data
- Your code
Your Plan#
If you do not have a paid FusionAuth plan, you have the Community plan. Learn more about the various plans. Due to the complexity of the new MFA implementation, SMS based MFA is no longer part of the Community plan as it was before version 1.26.
Therefore if you want to use message based MFA in a version of FusionAuth after 1.25, you must purchase a paid license.
Google Authenticator and time based one-time password MFA continue to work in the Community plan. TOTP MFA has been improved and you can now add multiple authenticator devices to one user account.
Your Data#
If you used the Two-Factor API previously, your data should be migrated transparently when you run the SQL migration.
The migrated data includes:
- Whether or not each user has MFA enabled
- Existing Twilio settings which will be converted to the new messenger configuration
- TOTP configuration
If you find your data has not migrated correctly, please file an issue and let us know. If you have a plan which includes support, please file a ticket.
Your Code#
Modifying your code depends on what MFA methods you were using. To enable MFA on a user in the new system:
- Ensure the MFA method is allowed on the tenant.
- Ensure the Twilio messenger is set up correctly if you are using that.
- Instead of using the delivery field, use the method field and the corresponding method specific field such as email.
To disable MFA on a user:
- In addition to passing the userId and code fields, you also need to determine the method to disable and pass the appropriate methodId field.
When sending a code, Twilio SMS was previously your only choice. The send API is now more complicated and requires different parameters for enabling or disabling MFA on a user than sending a code for step-up authentication or a login.
To migrate this functionality:
- Ensure the MFA method is allowed on the tenant.
- Ensure the Twilio messenger is set up correctly if you are using that.
- Review the API and call the send endpoint with the correct parameters.
Integrate Other MFA Methods (Generic messenger, webhooks)#
If you have other MFA methods that you'd like to use with FusionAuth, you have a few options:
- Check out the roadmap guidance to see if your desired method is going to be added soon. If not, the roadmap documents various ways you can request a new feature.
- If you can identify a user using their phone number and can set up a small application to process JSON requests from FusionAuth, you may use a custom Generic Messenger to send a code as a second factor. This works well with transports like SMS or any other messaging protocol.
- If you can send a code out of band, you may use step-up authentication to protect all the pages in your system. As soon as a user logs in, require step-up auth. Users don't have to have MFA enabled to use step-up.
- If your additional factor can receive a webhook, configure your webhooks to be transactional and send one on login. The service can then perform the MFA check, perhaps doing something like fingerprint recognition. If any status other than
200is returned, the login will fail. The downside of this approach is that the message to the end user won't be helpful, and that MFA will be required on every login. Here is an example of a webhook stopping a login. - Use the Login API and build custom login flows, inserting your custom MFA functionality where needed.
- Set up an OpenID Connect server with the required MFA functionality. Then set up an Identity Provider that delegates to that OIDC server. Add a Login Validation Lambda so that this Identity Provider is the only login option.
Authentication workflows overview (where MFA appears in end-to-end flows) provides comprehensive guidance on integrating MFA into your authentication architecture.
Migrate MFA Methods From a Different System#
Users with supported multi-factor methods can be migrated. By using the Users API and updating the twoFactor attributes of each user, you can migrate any of the supported MFA methods. You can use this with a bulk import or a slow migration.
twoFactor object when migrating email MFA methods
"twoFactor": {
  "methods": [{
    "method": "email",
    "email": "dinesh@aol.com"
  },
  {
    "method": "email",
    "email": "dinesh@gmail.com"
  }]
}
If your MFA method is not supported, but is message based (such as push notifications) please evaluate the Generic Messenger to see if it fits your needs. You might be able to use the SMS method with a generic messenger.
Otherwise, please open a GitHub issue detailing your use case.
Enforce or Require MFA (Login policy & contextual checks)#
There are times when you might want to force a user to provide an additional factor of authentication before they ever get access to your application. For example, you might require MFA when a user logs into an accounting application, but not when they log in to a customer support application.
In FusionAuth, this is controlled by the Login Policy setting. This can be configured at the tenant level, or, if you have the Enterprise plan, at the application level. Tenant login policies support the following values:
Enabled: requires a two-factor challenge when a user has configured one or more two-factor methods.Disabled: does not require a two-factor challenge, even when a user has one or more two-factor methods configuredRequired: requires a two-factor challenge; if a user does not have configured two-factor methods, they will not be able to log in.ChallengeOnHighRisk: requires a two-factor challenge when Intelligent MFAdetects a high level of risk for a login attemptChallengeOnMediumRisk: requires a two-factor challenge when Intelligent MFA detects a medium level of risk for a login attempt
You can learn more about the logic behind MFA challenges in the Contextual Multi-Factor documentation.
Alternate Methods#
If login policies aren't flexible enough for you, you can add step-up authentication to your application. Each time the user accesses a sensitive part of an application, you can require a step-up, which will force them to provide an additional factor.
Troubleshooting#
If using the email MFA method and your emails don't get sent, ensure you have configured your SMTP settings correctly. See the Email Troubleshooting section for more.
If using the phone MFA method and your SMS/voice messages don't get sent, ensure that you have tested the messenger configuration, enabled debugging, and reviewed the event log.
If you have enabled MFA on a user but are not prompted for MFA in the login process, ensure the MFA method associated with the user is enabled on the tenant.
Additional Common Issues#
Codes aren't arriving (SMS, Voice, or email):
- Check tenant/app messenger + template configuration and verify email/message delivery settings
- Verify user-facing phone MFA setup steps and resend behavior
Users stuck logged in / sign-out doesn't clear MFA prompts:
- Confirm full sign-out across apps with Logout & Session Management (IdP session vs app session)
Where do I let end users add/remove factors themselves?
- Point admins and users to Self-Service Account Management (enrollment, removal, logout link)
MFA is forced for IdP users:
Require MFA for admin portal access:
- Configure tenant-level MFA requirements for administrative access
Enable MFA for all users or certain projects (Essentials plan):