Migrate From Amazon Cognito
This document will help you migrate your users off of Amazon Cognito. If you are looking to compare FusionAuth and Cognito, this document may help.
There are a number of different ways applications can be integrated with Cognito, and it would be difficult to cover them all. This guide focuses on migrating user data, including profile data and passwords. However, Cognito does not allow for password hash export. Therefore, you must perform a slow migration if you don't want to force users to reset their passwords.
Alternatively, you can do a bulk migration and force everyone to reset their passwords. This option is discussed below, but the primary focus of this guide is enabling you to migrate your users from Cognito without requiring any password resets.
Prerequisites#
This guide assumes intermediate level familiarity with AWS, in particular Cognito, CloudFormation and AWS Lambda.
This guide assumes you have installed FusionAuth. If you have not, please view our installation guides and install FusionAuth before you begin. For more general migration information, please view the FusionAuth migration guide.
Planning Considerations#
Slow Migration Or Bulk Migration#
To preserve your user's passwords, you need to perform a slow migration. Users log in to FusionAuth with their Cognito credentials, and FusionAuth transparently migrates their data. Slow migrations in FusionAuth use Connectors, a paid feature.
If, on the other hand, resetting user passwords is acceptable, a Bulk Migration can work for you. Review that section for more details on the required steps. You may also perform a bulk migration after a slow migration has run for a while. Active users can be transparently migrated and infrequent users may not mind resetting their password.
You can learn more about the types of migrations that FusionAuth supports here.
Mapping User Attributes#
The attributes of the User object in FusionAuth are well documented.
If there is an attribute in your Cognito user which cannot be directly mapped to a FusionAuth attribute, you can place it in the user.data field. This field can store arbitrary JSON values and will be indexed and searchable.
One Tenant or Many#
In Cognito, users are placed in User Pools. FusionAuth has a similar concept called Tenants. Both of these include data about users, applications and other configuration.
Each tenant in FusionAuth is a distinct user space. You may choose to merge multiple Cognito User Pools into one FusionAuth tenant or keep them separate.
Learn more about FusionAuth tenants.
Identity Pools#
In Cognito, external identity providers are managed using Identity Pools. With FusionAuth, these are called Identity Providers.
Review the supported FusionAuth Identity Providers to ensure any you need are supported. At this time, all Cognito external identity providers are supported by FusionAuth, except Login with Amazon.
If not supported explicitly, a provider may work with an OIDC or SAML connection. Otherwise, please open a feature request.
Importing Cognito users stored in an external identity provider is more straightforward because you can use the Import API; you don't have to perform a slow migration. Many of the steps in Bulk Migration will apply.
To retrieve the user information, use the approach documented in the Export User Data From Cognito section.
Migrating users with social logins such as Apple or Facebook requires that you have an existing user Id for that provider. What this unique user Id looks like depends on the particular social identity provider. The unique Id may be an email address, an integer, UUID, or a random string.
Configure the appropriate FusionAuth Identity Provider with the same values (client_id, etc) as the original user management system you are migrating away from.
Import users with the Import API, assigning each user with a social login a random password such as a UUID.
Your next step depends on whether the social login provider's unique identifier is available as part of your migration data. If you have the social login provider's unique identifier, for each user, use the Link API to create a link with the appropriate User Id, Identity Provider Id, and Identity Provider User Id.
- The User Id is the Id of the recently created FusionAuth User.
- The Identity Provider Id is found on the corresponding Identity Provider API documentation. Look for identityProvider.id.
- The Identity Provider User Id is the existing social provider user identifier exported or otherwise extracted from the original system.
You do not need to migrate the social network token, which may or may not be accessible. During the first login of a newly migrated user, FusionAuth finds the unique user in the social login provider based on the migrated Identity Provider User Id, and completes the login. During this process, FusionAuth stores a token on the Link, if the social provider returns one. Depending on the configuration of the social provider, users may see a prompt asking if they want to allow FusionAuth to have access to user data such as email address.
IdP linking strategies have been available since version 1.28.0. Before that version, users were linked on email.
If you do not have the social login provider's identifier, you need to decide if you want to transparently link the two accounts, which is easier for the end user, or if you want to ask the user to manually link the accounts, which is more accurate, but may be confusing.
To transparently link the accounts, choose a linking strategy of Link On Email or Link On Username, which will create the user if they don't exist. However, if the user has an email address at their social provider which differs from the email address that was used to sign up for your application and which you imported to FusionAuth, then two accounts will be created.
For example, if the user has a Google account richard@gmail.com, but signed up for your application with richard@fusionauth.io, then if you use the Link On Email strategy, two different accounts will be created, since FusionAuth is trying to match on email address and they don't. The same holds true for usernames with the Link on Username strategy.
To prompt the user to link the accounts, choose a linking strategy of Pending, which will prompt the end user to sign into FusionAuth after they sign into the social provider, authoritatively linking the two accounts.
Here's more information about IdP Linking Strategies.
Apple only returns a user's full name the first time the user logs in. Since you have users who have already used Apple to log in to your previous authentication gateway, Apple will not provide the user's name when they log in to FusionAuth now. The only solution is to import the user's name manually from your previous database into FusionAuth.
Other Entities#
There are often other important entities, such as app clients or password policies, that need to be migrated. There are usually fewer of these, so an automated migration may not make sense, but plan to move this configuration somehow.
Be aware that functionality may not be the same between Cognito and FusionAuth. This is different from user data; as long as you can somehow migrate a login identifier (a username or email) and a password hash, a user will be authenticated and successfully migrated. You can download FusionAuth before you begin a migration and build a proof of concept to learn more about the differences.
A partial list of what may need to be migrated for your application to work properly includes the following:
- Lambda Triggers are ways for you to customize authentication or authorization workflows with AWS Lambdas. FusionAuth has a similar concept called Lambdas. FusionAuth also has webhooks fired at certain points in the user lifecycle; in certain configurations, they can also stop a particular authentication flow.
- Cognito is deeply integrated with AWS IAM, in particular with respect to roles and permissions. FusionAuth has roles that are configured on an application by application basis and made available in a token after a successful authentication. FusionAuth can also issue tokens which can be used with AWS IAM OIDC federation.
- Cognito has the concept of a Hosted UI where users can log in or register. FusionAuth has hosted login pages which offer a superset of the functionality of Cognito's Hosted UI. They are customized via themes.
- In Cognito, users log into app clients if using the Hosted UI. In FusionAuth, Applications are a similar construct, but users are associated with them through Registrations. You can migrate both your Client Id and Client Secret from Cognito to FusionAuth.
- Cognito sends emails on your behalf, such as forgot password notifications. FusionAuth can do so too; the templates are customizable.
- Cognito offers the Client Credentials grant. FusionAuth offers a constrained version of this using Entity Management; this is available in all paid plans.
- Refresh tokens allow JWTs to be refreshed without a user logging in. These can be migrated from Cognito using the Import Refresh Tokens API.
- Cognito allows for custom attributes, but they must be configured at User Pool creation. In FusionAuth, as mentioned above, custom user attributes are stored on the user.data field and are dynamic, searchable and unlimited in size. Any valid JSON value may be stored in this field.
- Cognito supports MFA. FusionAuth also supports MFA, which may be enabled for a tenant and configured for a user at any time.
In FusionAuth, users are explicitly mapped to applications with a Registration.
Cognito, in contrast, gives users access to all Cognito applications In a User Pool by default.
Identifiers#
When creating an object with the FusionAuth API, you can specify the Id. It must be a UUID.
This works for users, applications, and tenants, among others.
If you have external dependencies on an Id stored in Cognito, port the same Id over to FusionAuth.
Differences#
In addition to the different names for common functionality outlined above in Other Entities, there are some fundamental differences between FusionAuth and Cognito. If your application relies on Cognito specific functionality, please review this section carefully.
- Cognito has quotas that apply to logins and operations. FusionAuth has no quotas. Instead, you are limited by the resources provided to a FusionAuth instance, such as memory, CPU and database capacity.
- Cognito has the ability to retrieve AWS credentials when a user logs in. FusionAuth has no inherent ability to do so. If this is required, you could use FusionAuth as a Cognito OIDC External Identity Provider and have Cognito provision the AWS credentials.
- FusionAuth has no analog to Cognito Sync. If you need this feature, use a specialized syncing library. Users report that FusionAuth works fine with AWS AppSync.
- Cognito does not support Cross-Region Replication, which syncs data across multiple geographic regions for higher availability. In contract, FusionAuth supports this.
Once you've planned the migration of other entities, the next step is to set up FusionAuth to connect to Cognito to import users during login.
Importing Users#
Because you are implementing a slow migration, it will take place over time. But you can set up a test environment to confirm it will work before deploying to production. Here are the steps we need to take.
- Set Up FusionAuth
- Set Up AWS
- Set Up the Connector
- Log In as a Test User
- Verify the Import
- Migrate Everything Else
Set Up FusionAuth#
You need to set up FusionAuth in order to store migrated user data. As mentioned above, this guide assumes you have FusionAuth installed.
If you don't, view our Getting Started guide and install it before proceeding further.
Create a Test Tenant#
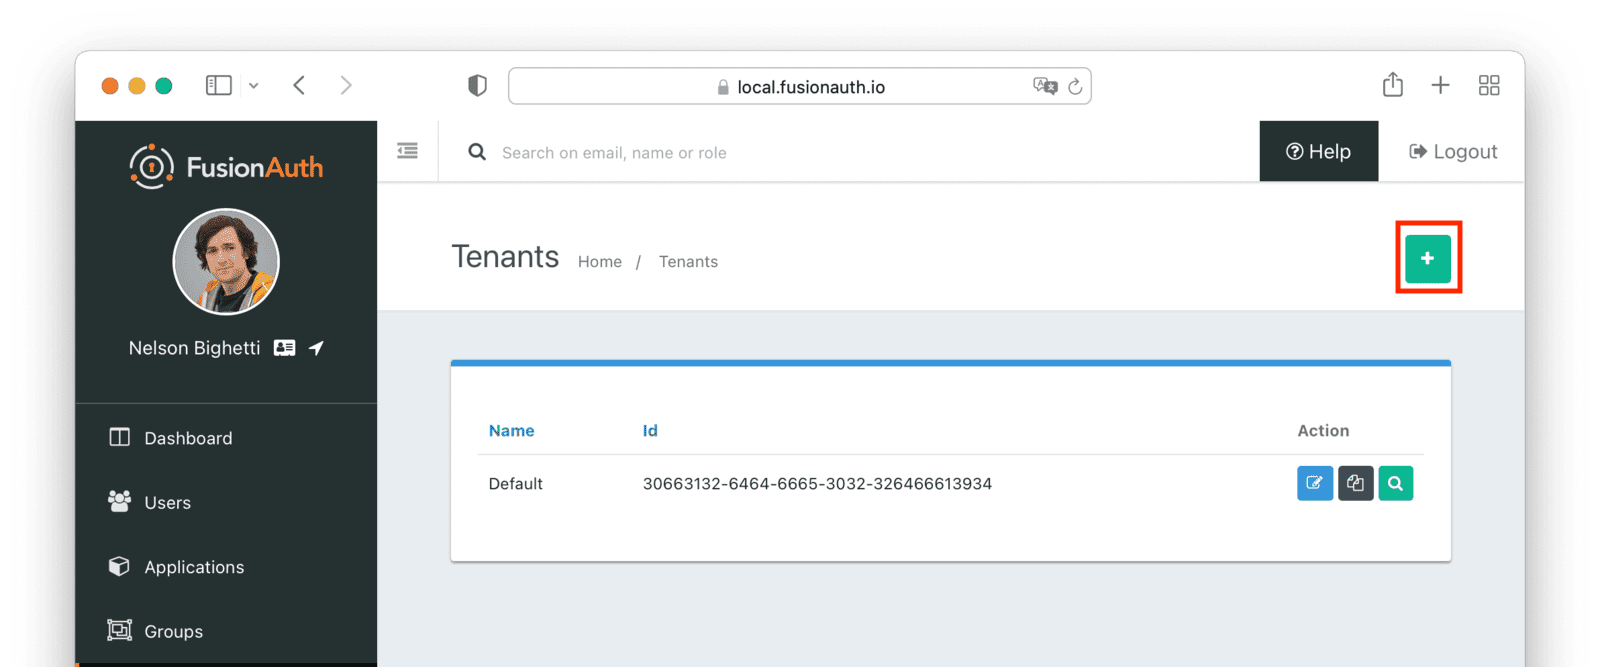
It is best to create a separate tenant for migration testing. Tenants logically isolate configuration settings and users. If a migration goes awry or you need to redo it after tweaking settings, you can delete the test tenant and start with a clean system. To add a tenant, navigate to Tenants and click the Add button.
Give it a descriptive Name like Cognito import test. You shouldn't need to modify any of the other configuration options to test importing users.
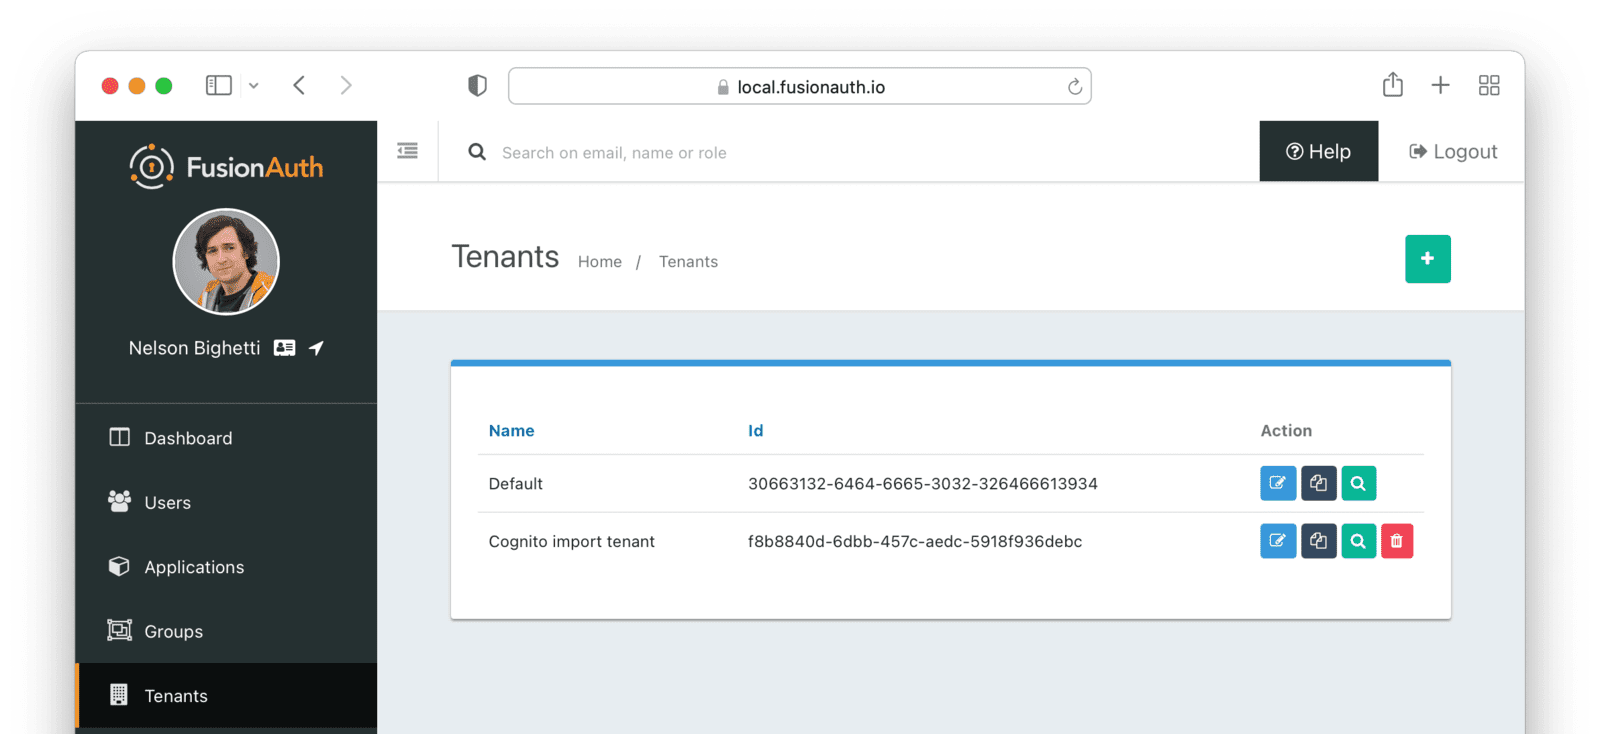
Save the tenant.
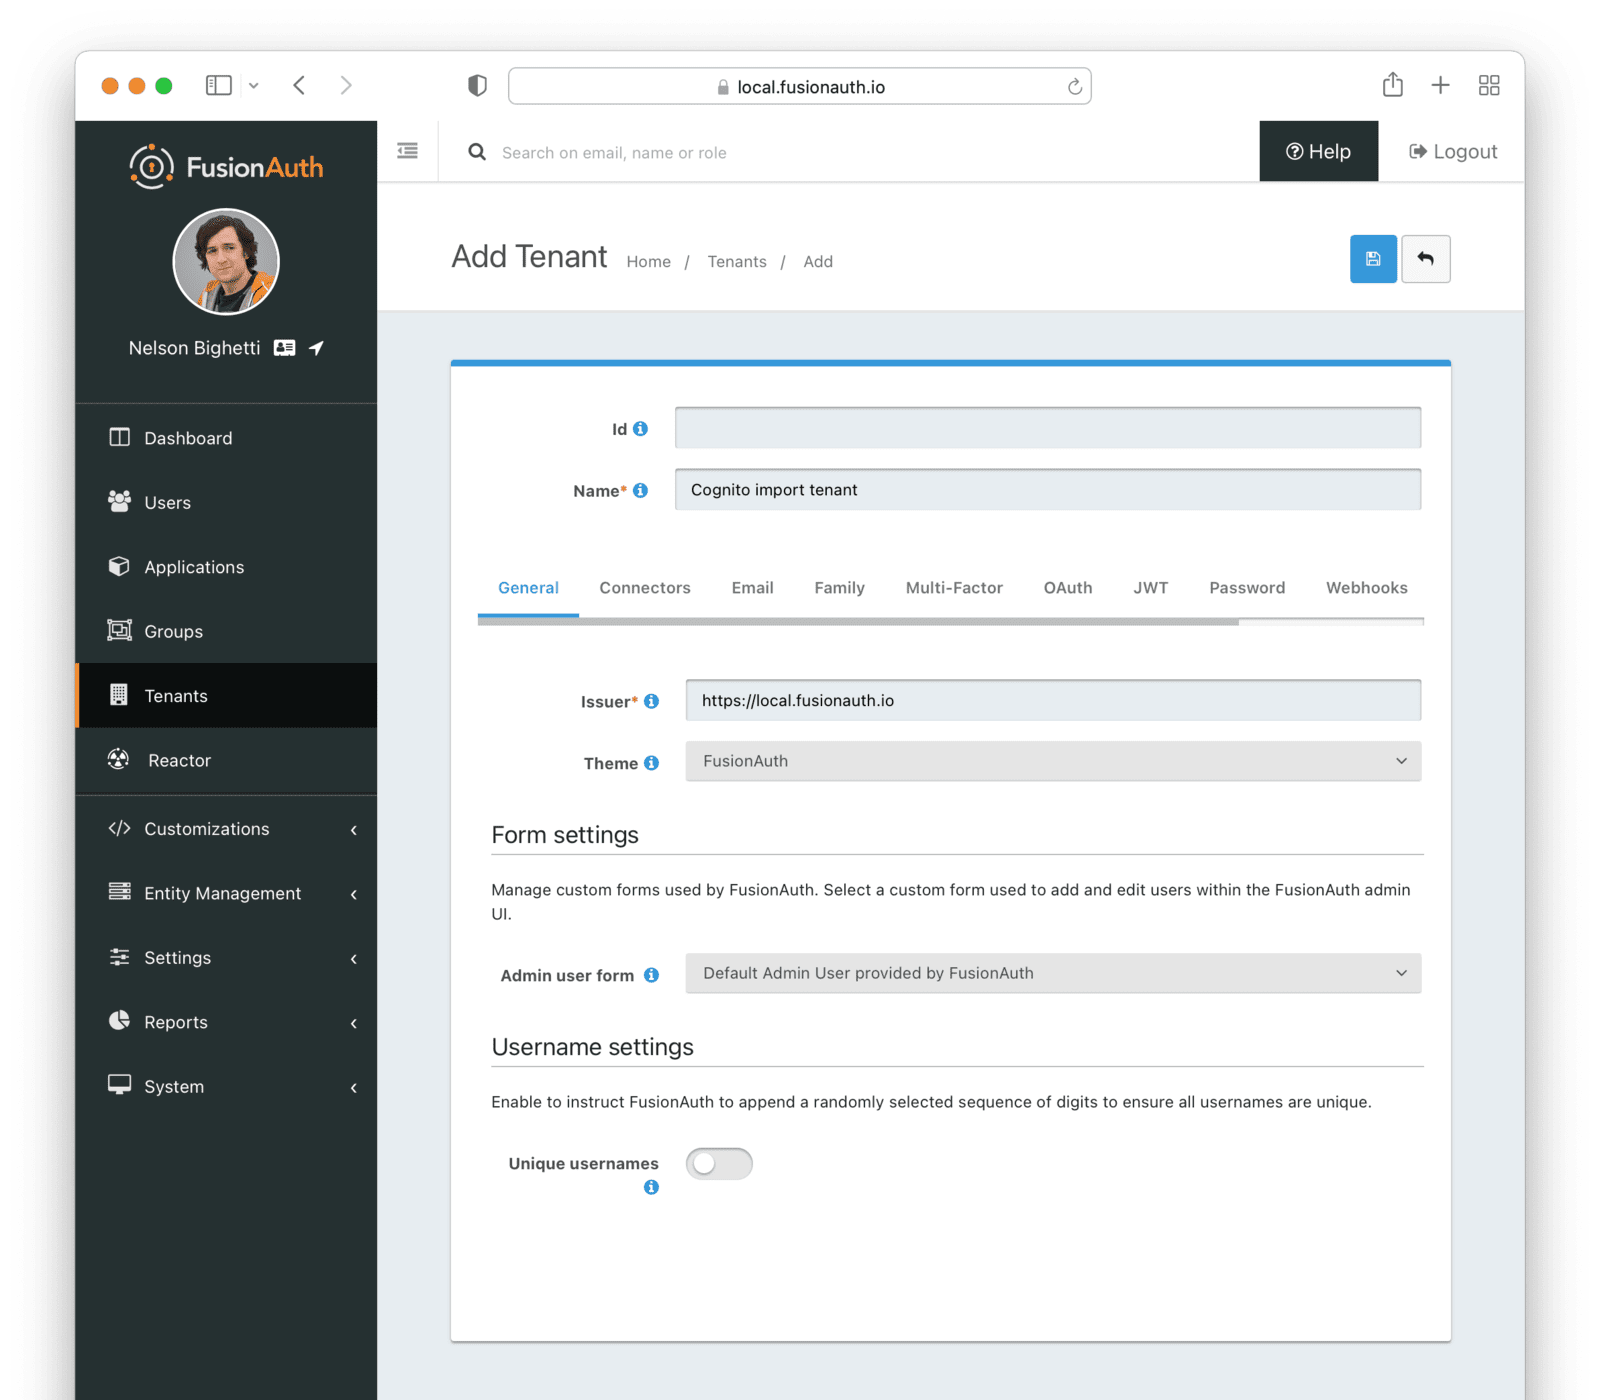
Record the Id of the tenant, which will be a UUID. It will look something like 25c9d123-8a79-4edd-9f76-8dd9c806b0f3. You'll use this later.
Create a Test Application#
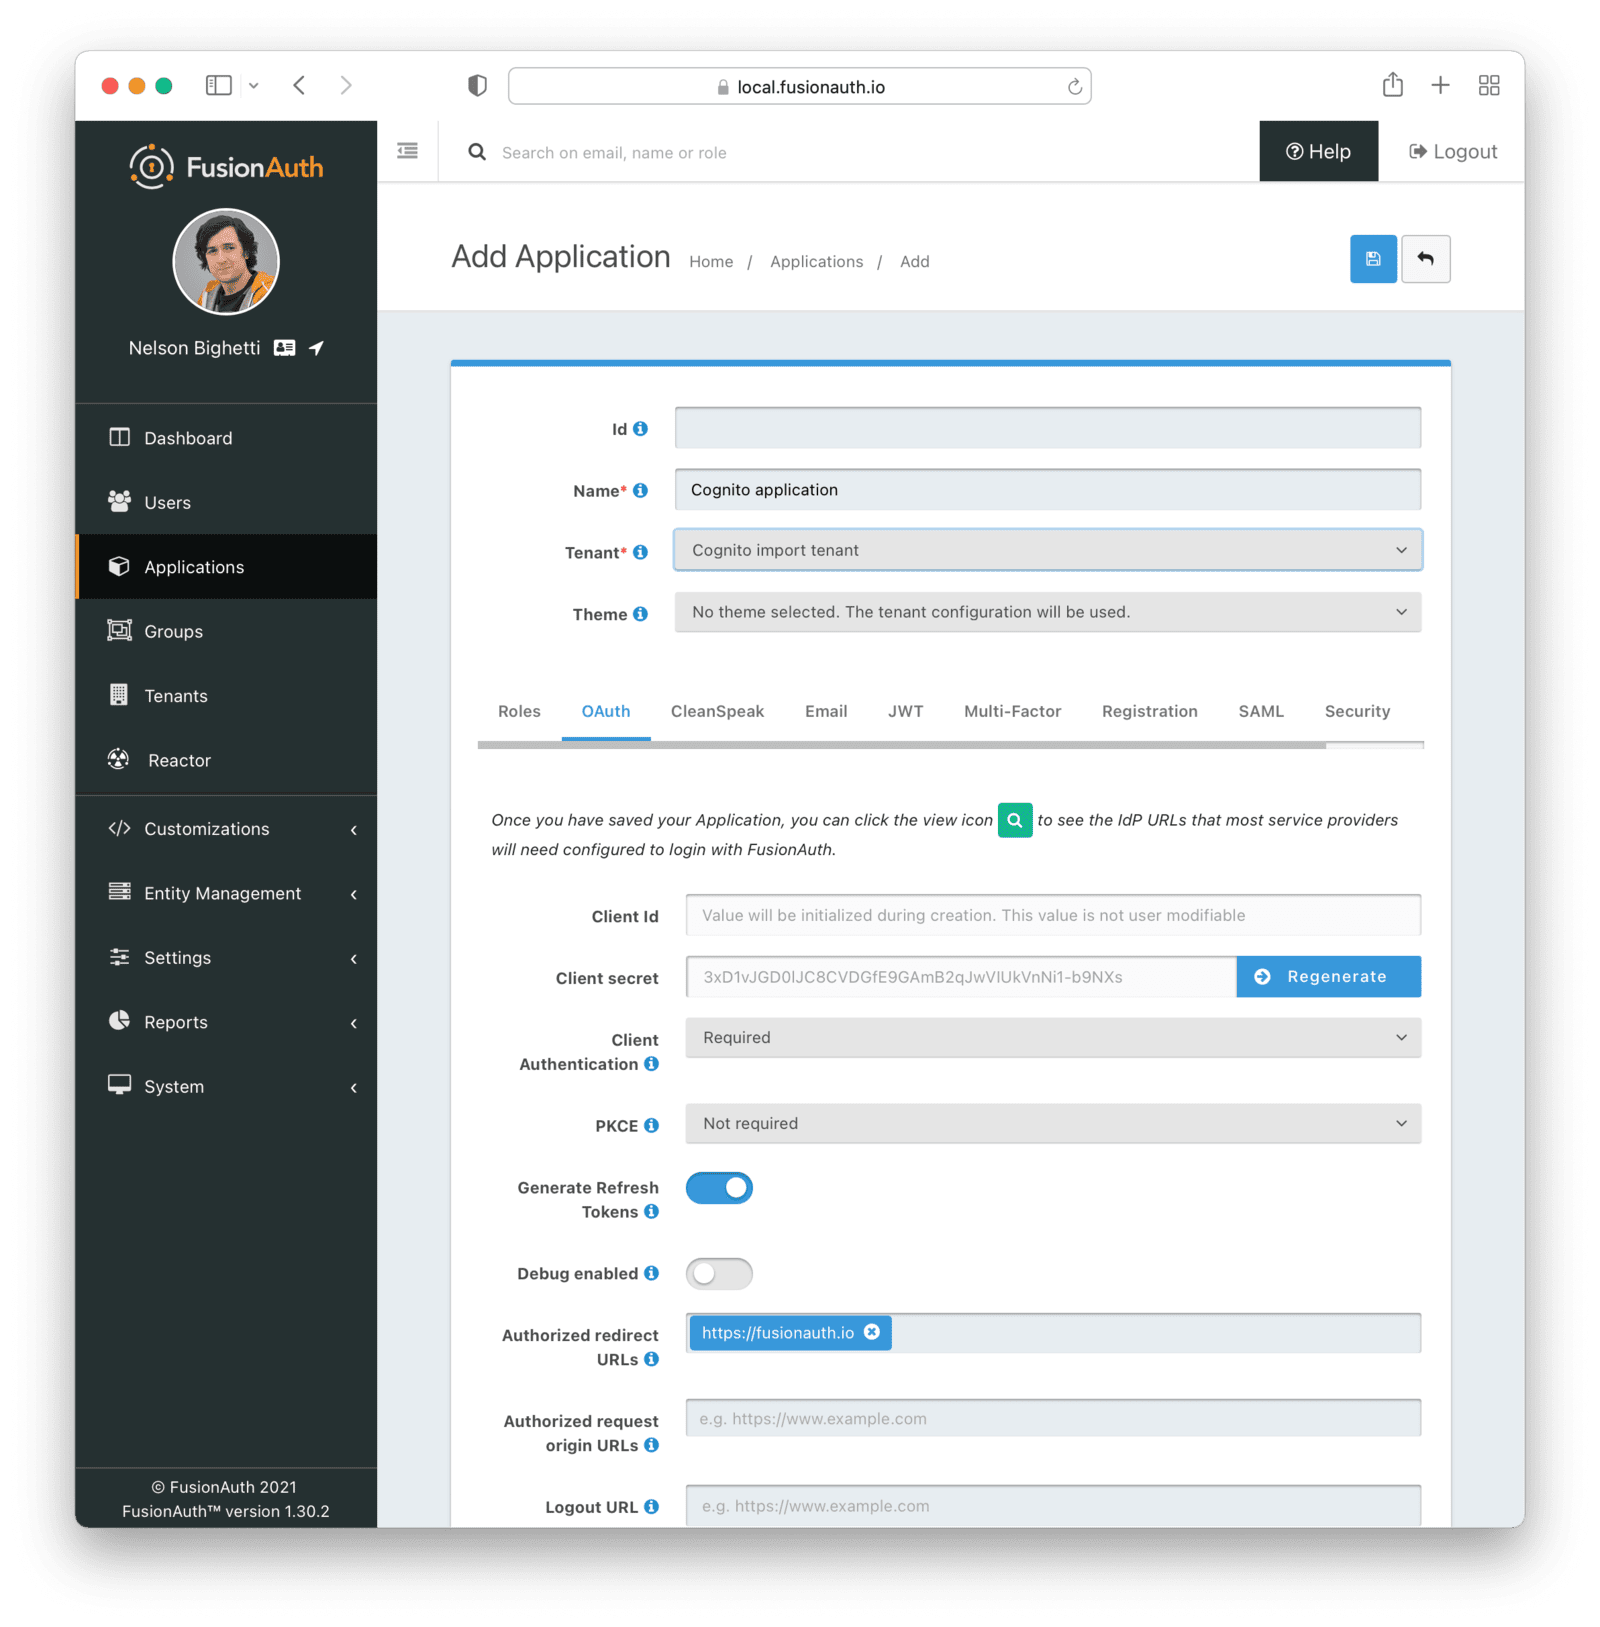
Applications are anything a user can log in to. In FusionAuth there's no differentiation between web applications, SaaS applications, APIs and native apps. To add an application, navigate to Applications and click on the Add button. Give the application a descriptive name like {props.migration_source_name} application.
Select your new tenant, created above, in the dropdown for the Tenant field.
Navigate to the OAuth tab and add an entry to Authorized redirect URLs. Use a dummy value such as https://example.com. Later, you'll need to update this to be a valid redirect URL that can take the authorization code and exchange it for a token. Learn more about this in the FusionAuth OAuth documentation.
You shouldn't need to modify any of the other configuration options to test importing users. Save the application.
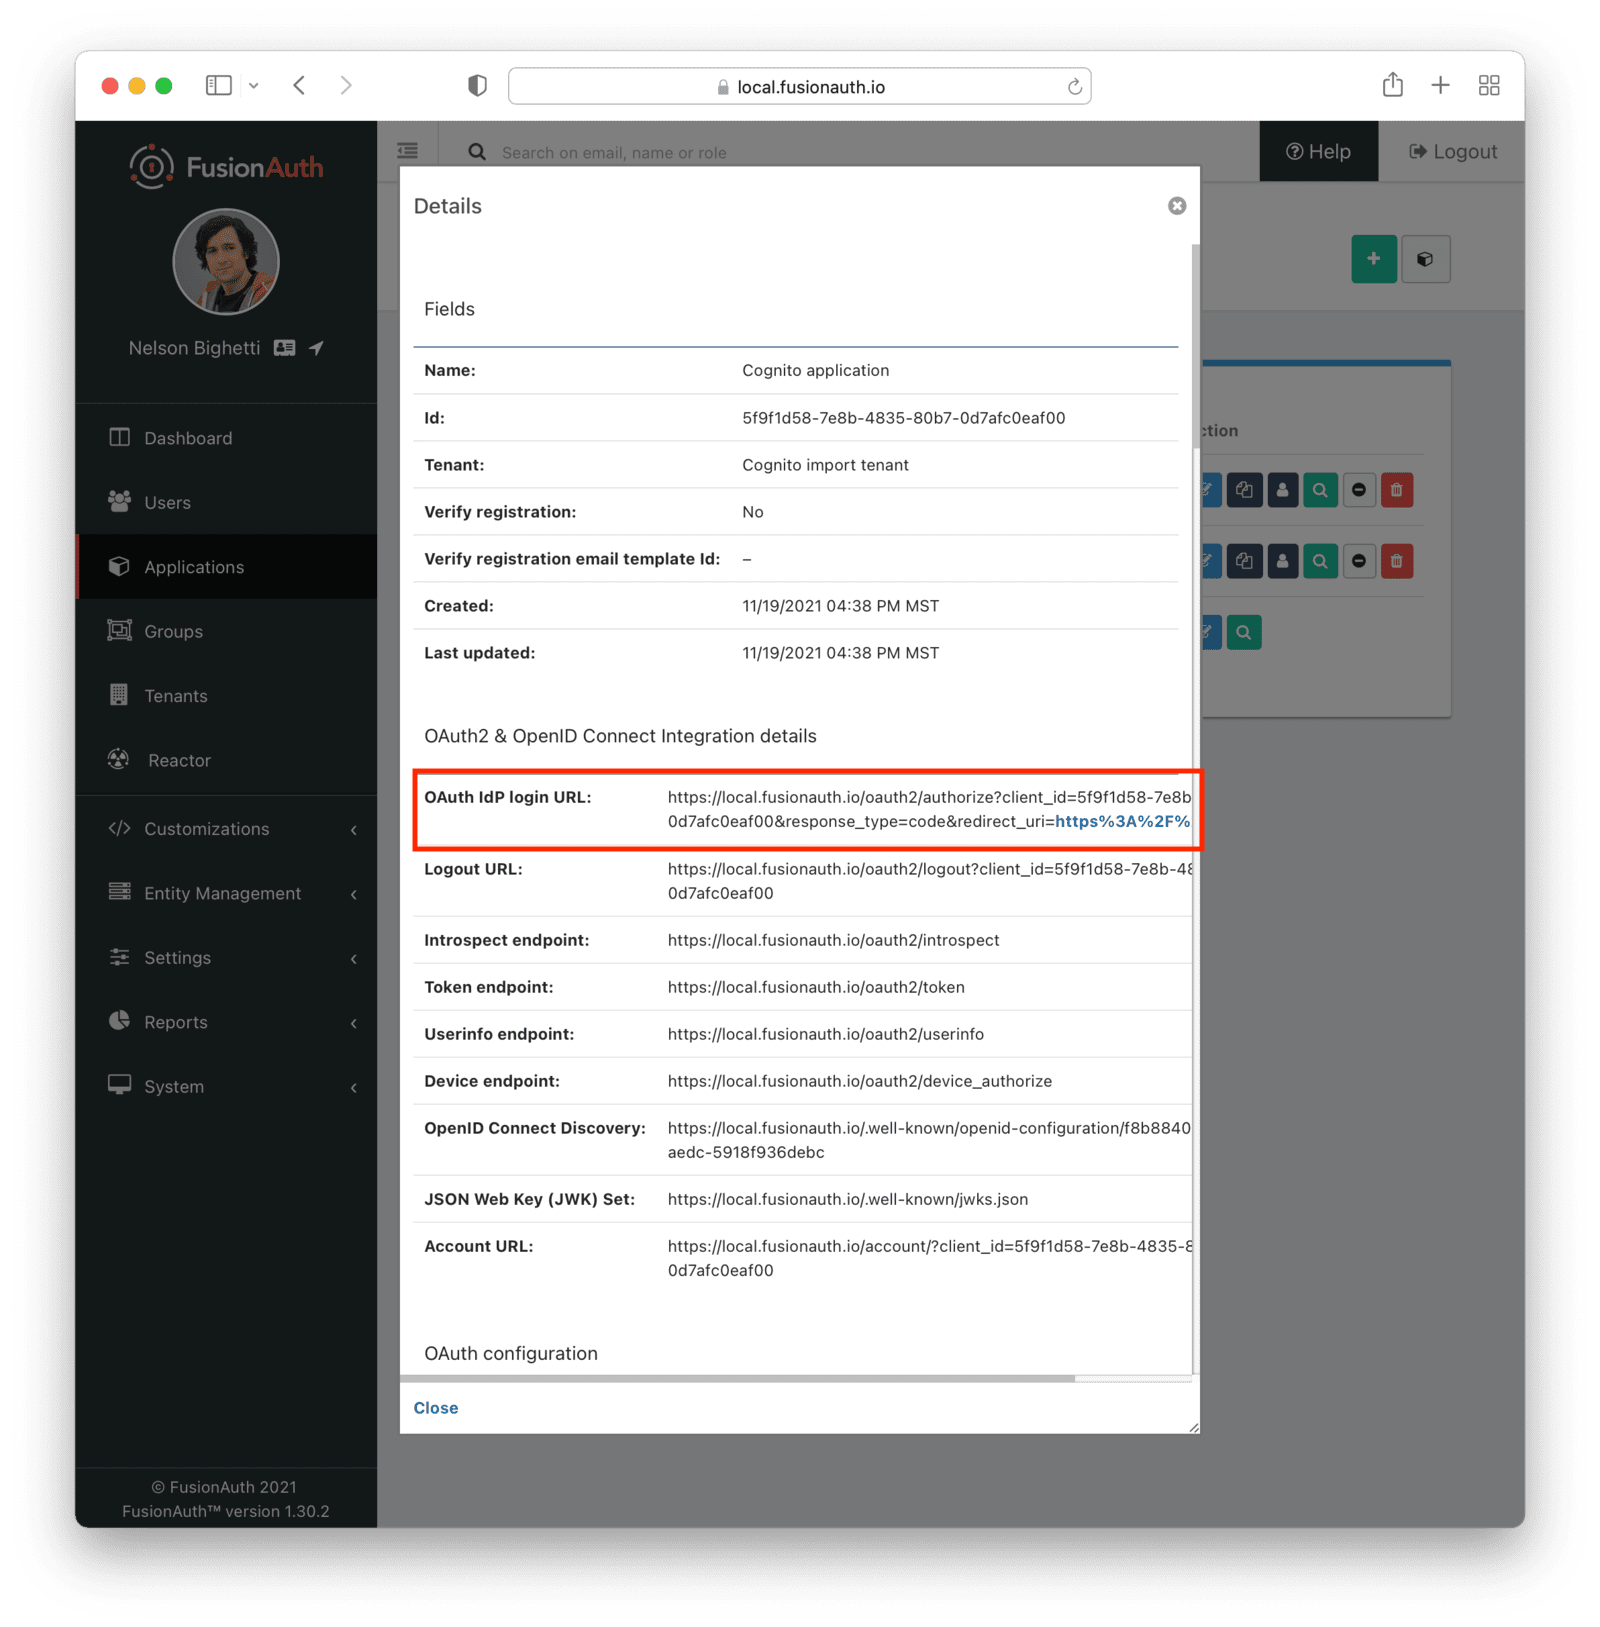
Next, view the application by clicking the Select dropdown and choosing View , then note the OAuth IdP login URL. You'll be using it to test that users can log in.
Set Up AWS#
There are two main components you need to set up to enable this migration. The first is an App Client. The second is an AWS Lambda to accept login requests from FusionAuth over TLS and proxy them to Cognito.
Set up both of these components for each Cognito User Pool whose users you are migrating.
FusionAuth Connectors will send user credentials to Cognito for authentication. Secure both the data in transit and the AWS Lambda endpoint.
In this guide, all communication is over TLS and the Lambda requires a certain Authorization header value. You could add additional layers of security, such as:
- Rotating the header periodically.
- Requiring a client certificate.
- Locking down the API gateway to only allow access from the FusionAuth IP address(es).
- Running FusionAuth within the same VPC as the Lambda and using a VPC endpoint.
Configuring the App Client in Cognito#
FusionAuth will send login requests to Cognito but needs a client Id to do so. You can re-use an existing app client, but it is better practice to create a new one to receive these requests. This guide will walk through configuration using the AWS Console, but you can also configure this using CloudFormation, Terraform or any other IAC tool.
These instructions use the new Cognito user interface released in the fall of 2021.
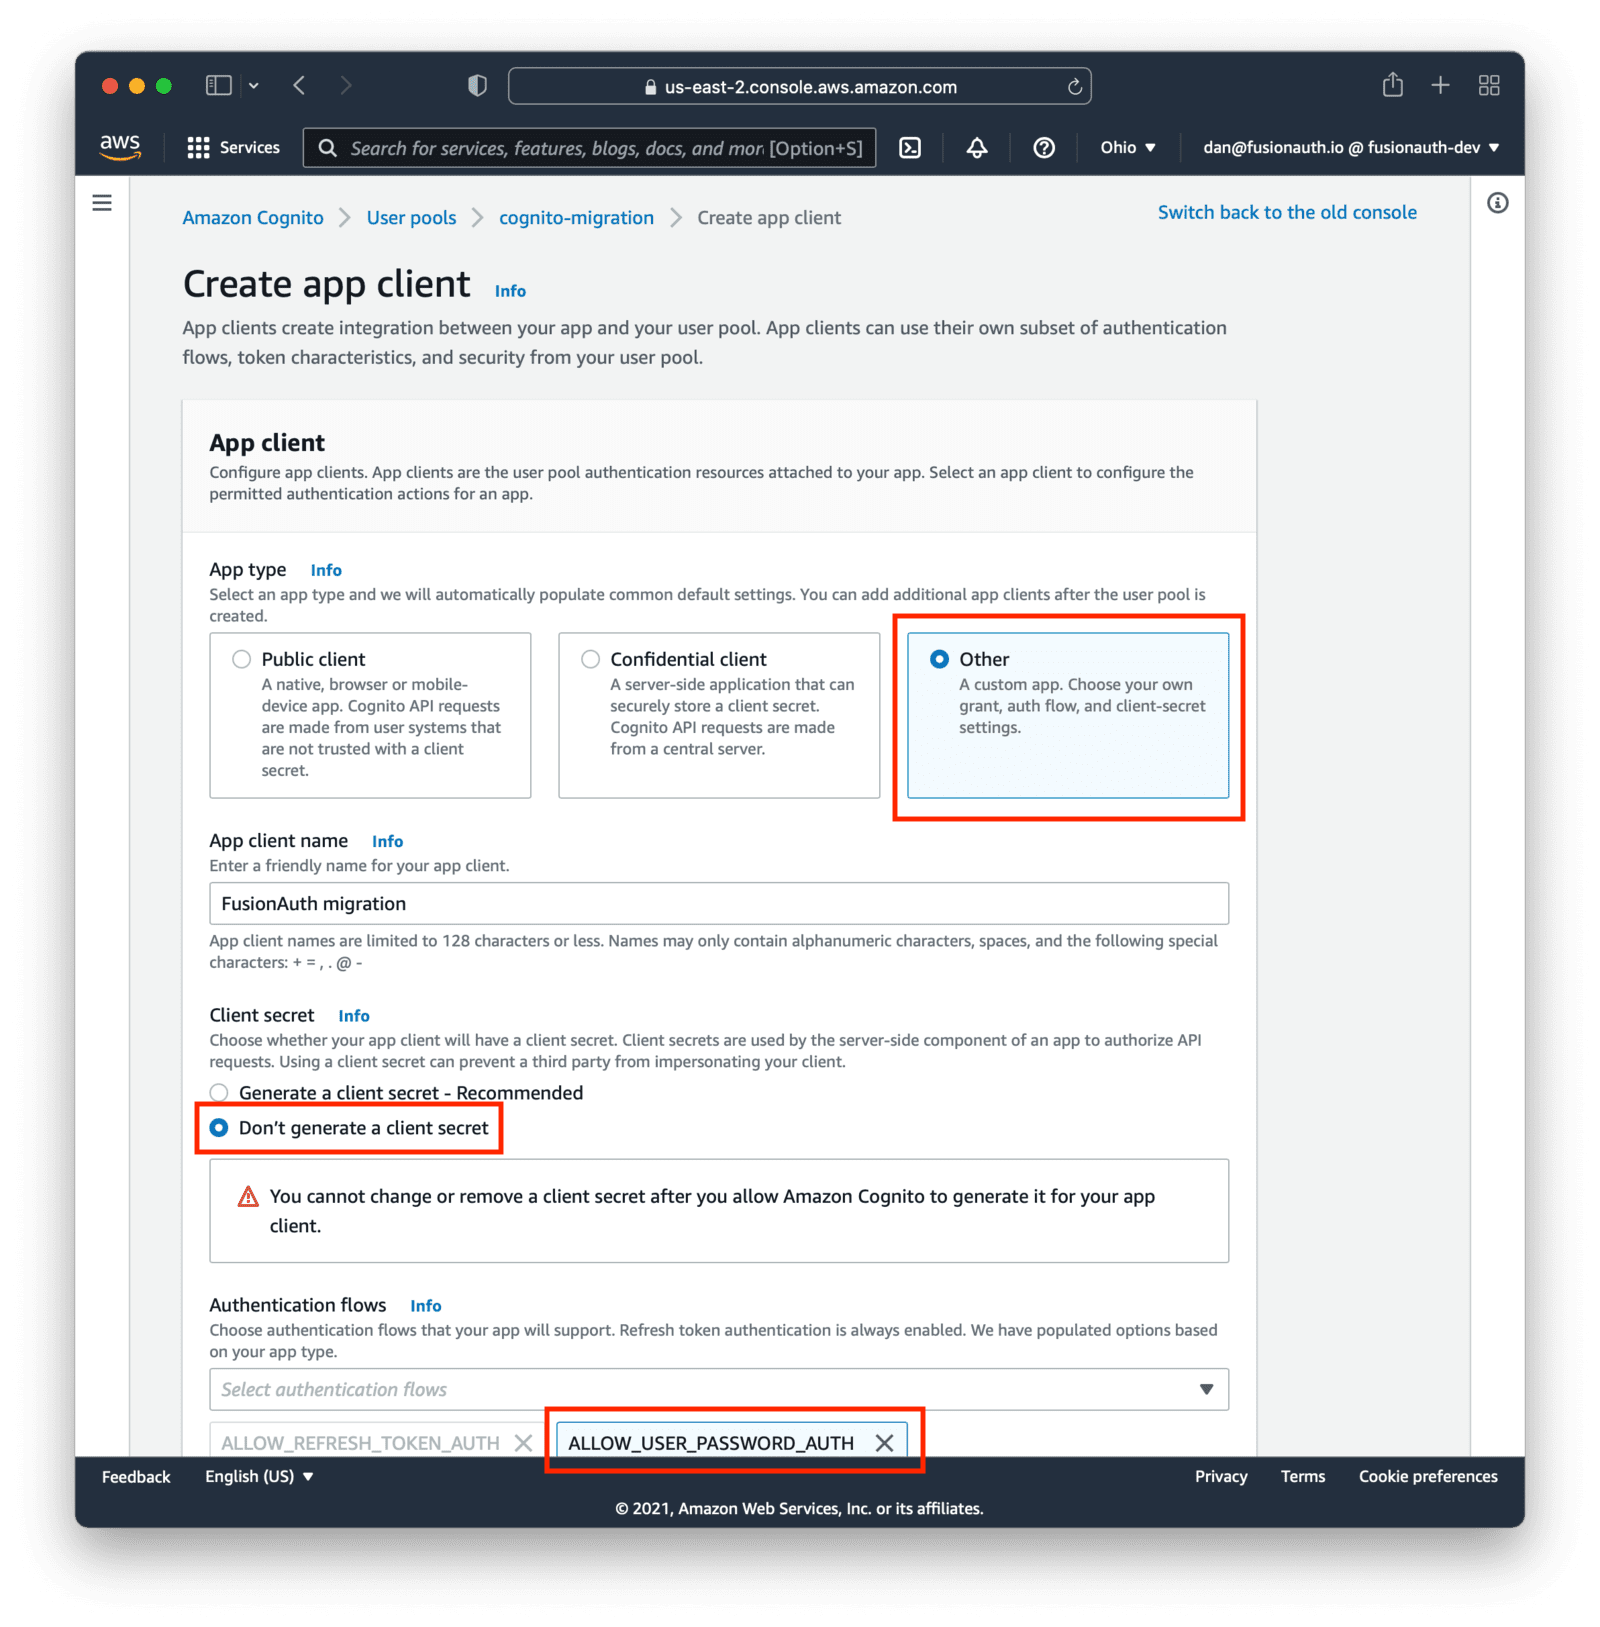
Visit the Cognito User Pool configuration containing the users you want to migrate. Navigate to the Create app client screen. Configure the new app client:
- Select
Otherfor the App type. Give it a name, such asFusionAuth migration. - Ensure the Client secret field is set to not generate a secret.
- For the Authentication flows field, select
ALLOW_USER_PASSWORD_AUTHto enable username/password based authentication. This is the form of authentication FusionAuth will use to migrate over your users. - You must enter a value in the Allowed callback URLs field, but this won't be used. Use a value like
https://example.com. - Make sure the client can read whatever attributes should be migrated; include the username or email address at a minimum.
Everything else can be left with default values.
At the end, you'll end up with an app client configuration looking similar to this:
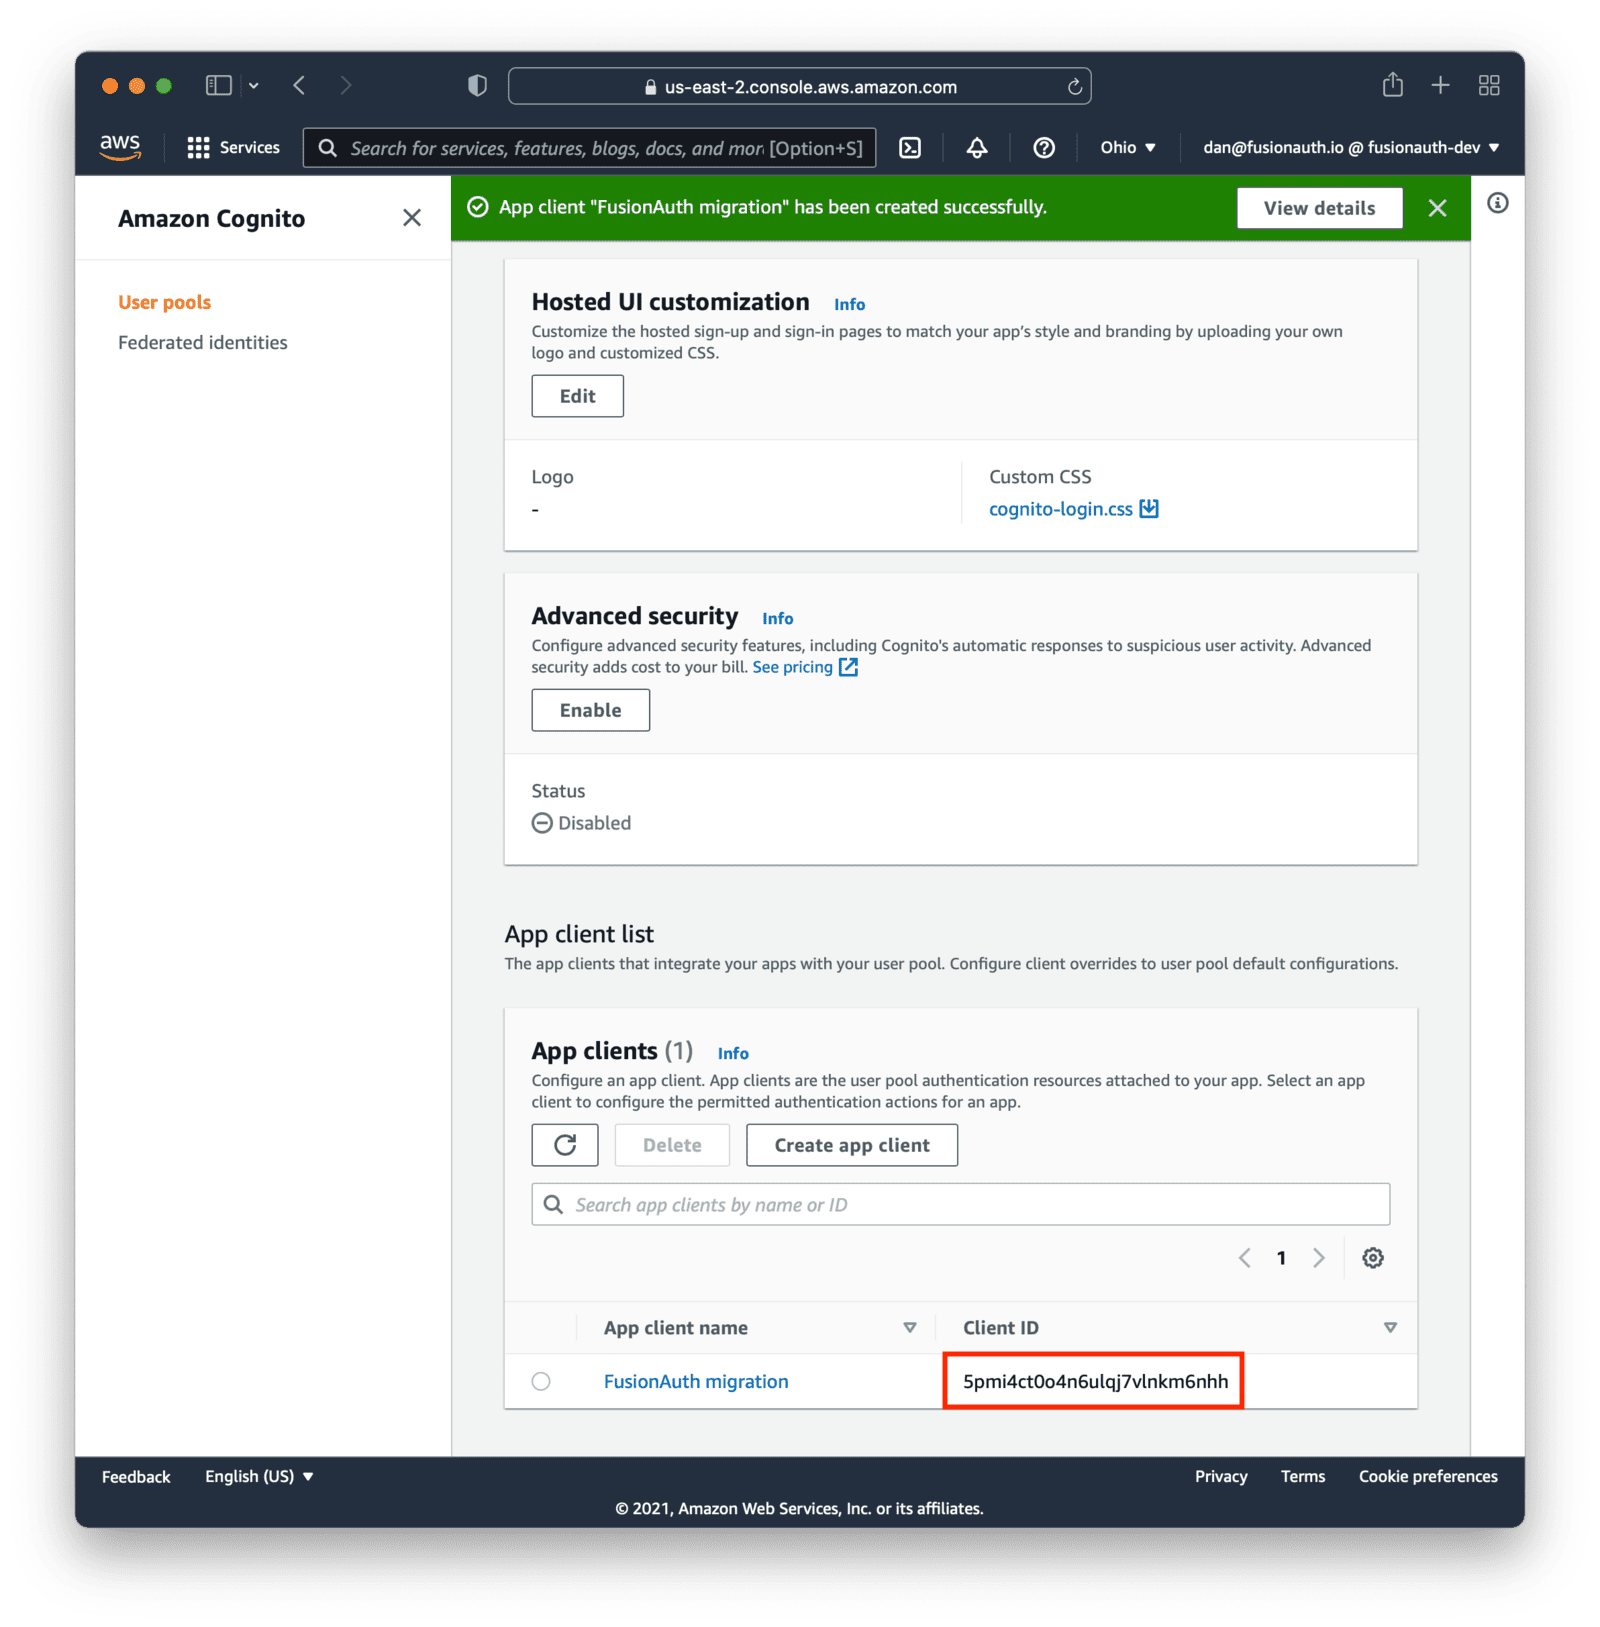
Save the new configuration. On the list of app clients, you'll see your new one.
Record the client Id. This will be a value like 5pmi4ct0o4n6ulqj7vlnkm6nhh. Also, note the AWS region your User Pool is in, such as us-east-2.
Next, you'll need to set up an Lambda with an API Gateway to receive the login requests from FusionAuth. The lambda will pass the credentials on to Cognito and, when the authentication succeeds, return a FusionAuth friendly JSON object.
Configuring the AWS Lambda#
The AWS lambda receives the login request from FusionAuth, attempts to log the user in via Cognito, and then returns a FusionAuth user object on success. The lambda will call the GetUser API after successful authentication to get additional user attributes, which will then be transformed into a FusionAuth compatible format.
When setting this up, modify the example lambda code provided in this guide. Here's the entire sample AWS lambda, tested with the node 14 runtime:
This code will not work with the node 18 runtime or greater. Be sure to select the proper version of the node runtime when creating the AWS lambda.
AWS Connector Lambda code
const AWS = require('aws-sdk');

const clientId = "1r4gcuhj4f127iuhoiov9234tm"
const region = "us-east-2"
const fusionAuthApplicationId = "85a03867-dccf-4882-adde-1a79aeec50df"
const authorizationHeaderValue = "2687EE95-AF19-4CE6-A8BD-963139DED32E" // make this a random value

const cognito = new AWS.CognitoIdentityServiceProvider(region);

function processOneAttribute(attributes, name) {
    console.log("processing: " + name)
    if (attributes && attributes.filter(obj => obj.Name == name).length > 0) {
        return attributes.filter(obj => obj.Name == name)[0].Value
    }
    return null
}

function processUserJSON(json) {
    // map the json returned by cognito to FusionAuth compatible json
    // see https://fusionauth.io/docs/lifecycle/migrate-users/connectors/generic-connector for more
    // example Cognito JSON: {"Username":"06744664-df6e-48cc-9421-3d56a9732172","UserAttributes":[{"Name":"sub","Value":"06744664-df6e-48cc-9421-3d56a9732172"},{"Name":"website","Value":"http://example.com"},{"Name":"given_name","Value":"Test"},{"Name":"middle_name","Value":"T"},{"Name":"family_name","Value":"Testerson"},{"Name":"email","Value":"test@example.com"}],"testValue":"foo"}
    // console.log(json)

    const userJSON = {}
    userJSON.user = {}

    userJSON.user.data = {}

    // add migration metadata for future queries
    userJSON.user.data.migratedDate = new Date()
    userJSON.user.data.migratedFrom = "cognito"

    // map cognito attributes if present to FusionAuth attributes
    const attributes = json.UserAttributes
    const website = processOneAttribute(attributes, "website")
    if (website != null) {
        userJSON.user.data.website = website
    }

    userJSON.user.username = json.Username // use the same username if desired

    const email = processOneAttribute(attributes, "email")
    if (email != null) {
        userJSON.user.email = email
    }

    userJSON.user.id = json.Username // prefer the sub claim as the id, but fall back to this
    const sub = processOneAttribute(attributes, "sub")
    if (sub != null) {
        userJSON.user.id = sub
    }

    const firstName = processOneAttribute(attributes, "given_name")
    if (firstName != null) {
        userJSON.user.firstName = firstName
    }
    const lastName = processOneAttribute(attributes, "family_name")
    if (lastName != null) {
        userJSON.user.lastName = lastName
    }

    const emailVerified = processOneAttribute(attributes, "email_verified")
    if (emailVerified != null) {
        userJSON.user.verified = (emailVerified == "true")
    }

    // default values

    userJSON.user.active = true

    // register for certain FusionAuth applications
    userJSON.user.registrations = []
    userJSON.user.registrations[0] = {
        applicationId: fusionAuthApplicationId
    }

    return userJSON
}

// ***********
// you shouldn't need to modify anything below this
// ***********

exports.handler = async function(event, context) {
    try {
        const headers = event.headers
        if (headers["Authorization"] !== authorizationHeaderValue) {
            return {
                statusCode: 401,
                headers: {},
                body: ""
            };
        }

        const method = event.httpMethod;
        // Get name, if present
        if (method === "POST") {

            if (event.path === "/") {
                const incomingBody = JSON.parse(event.body)
                if (incomingBody.loginId && incomingBody.password) {

                    //https://docs.aws.amazon.com/AWSJavaScriptSDK/latest/AWS/CognitoIdentityServiceProvider.html#initiateAuth-property

                    var params = {
                        AuthFlow: 'USER_PASSWORD_AUTH',
                        ClientId: clientId,
                        AuthParameters: {
                            USERNAME: incomingBody.loginId,
                            PASSWORD: incomingBody.password
                        }
                    };

                    const res = await cognito.initiateAuth(params).promise()
                    var jsonResponse = {}
                    if (res.AuthenticationResult && res.AuthenticationResult.AccessToken) {
                        const res2 = await cognito.getUser({
                            AccessToken: res.AuthenticationResult.AccessToken
                        }).promise();
                        jsonResponse = processUserJSON(res2)

                        return {
                            statusCode: 200,
                            headers: {},
                            body: JSON.stringify(jsonResponse)
                        };
                    } else if (res.ChallengeName) {
                        console.log("Unable to log user in. Got response: " + res.ChallengeName + " and am unsure how to handle.")
                    }
                }
            }
        }

        return {
            statusCode: 400,
            headers: {},
            body: "Invalid request"
        };
    } catch (error) {
        var body = error.stack || JSON.stringify(error, null, 2);
        console.log("Error in authenticating")
        console.log(body)
        return {
            statusCode: 404,
            headers: {},
            body: ""
        }
    }
}
First, modify the constants at the top of the file with values you've previously recorded.
AWS Connector Lambda constants to modify
const clientId = // the value of the App Client Id you created above
const region = // the AWS region where your user pool exists
const fusionAuthApplicationId = // the Id of the FusionAuth application to which you want to register the users automatically. Must exist in the test tenant.
const authorizationHeaderValue = // a random string to ensure that only the Connector can execute this lambda
You must modify the processUserJSON function as well. This converts the JSON returned from Cognito into the JSON format FusionAuth requires. You can see samples of both below.
The exact implementation depends on your UserPool custom attributes and business logic. You could, for example, give users certain FusionAuth roles, register them for more than one application or add them to a previously created FusionAuth group.
To test the AWS lambda you can configure the test event in the AWS management console. You will need to supply the Event JSON. It should look something like this:
Test Event JSON
{
  "path": "/",
  "httpMethod": "POST",
  "headers": {
    "Authorization": "2687EE95-AF19-4CE6-A8BD-963139DED32E"
  },
  "body": "{\"loginId\":\"user1\",\"password\":\"Password#1\"}"
}
Update the Authorization header value and supply a known Cognito username and password.
Sample User Data Response from Cognito
{
  "Username": "06744664-df6e-48cc-9421-3d56a9732172",
  "Attributes": [
    {
      "Name": "sub",
      "Value": "06744664-df6e-48cc-9421-3d56a9732172"
    },
    {
      "Name": "website",
      "Value": "http://example.com"
    },
    {
      "Name": "given_name",
      "Value": "Test"
    },
    {
      "Name": "middle_name",
      "Value": "T"
    },
    {
      "Name": "family_name",
      "Value": "Testerson"
    },
    {
      "Name": "email",
      "Value": "test@example.com"
    }
  ]
}
The processUserJSON will transform the above into a FusionAuth compatible format, as displayed below:
Sample Successful Login JSON
{
  "user": {
    "active": true,
    "birthDate": "1976-05-30",
    "data": {
      "displayName": "Johnny Boy",
      "migrated": true,
      "favoriteColors": [
        "Red",
        "Blue"
      ]
    },
    "email": "example@fusionauth.io",
    "expiry": 1571786483322,
    "firstName": "John",
    "fullName": "John Doe",
    "id": "00000000-0000-0001-0000-000000000000",
    "imageUrl": "http://65.media.tumblr.com/tumblr_l7dbl0MHbU1qz50x3o1_500.png",
    "lastLoginInstant": 1471786483322,
    "lastName": "Doe",
    "middleName": "William",
    "mobilePhone": "303-555-1234",
    "passwordChangeRequired": false,
    "passwordLastUpdateInstant": 1471786483322,
    "preferredLanguages": [
      "en",
      "fr"
    ],
    "registrations": [
      {
        "applicationId": "10000000-0000-0002-0000-000000000001",
        "data": {
          "displayName": "Johnny",
          "favoriteSports": [
            "Football",
            "Basketball"
          ]
        },
        "id": "00000000-0000-0002-0000-000000000000",
        "insertInstant": 1446064706250,
        "lastLoginInstant": 1456064601291,
        "preferredLanguages": [
          "en",
          "fr"
        ],
        "roles": [
          "user",
          "community_helper"
        ],
        "username": "johnny123",
        "usernameStatus": "ACTIVE",
        "verified": true,
        "verifiedInstant": 1698772159415
      }
    ],
    "timezone": "America/Denver",
    "tenantId": "f24aca2b-ce4a-4dad-951a-c9d690e71415",
    "twoFactor": {
      "methods": [
        {
          "authenticator": {
            "algorithm": "HmacSHA1",
            "codeLength": 6,
            "timeStep": 30
          },
          "id": "35VW",
          "method": "authenticator"
        },
        {
          "id": "V7SH",
          "method": "sms",
          "mobilePhone": "555-555-5555"
        },
        {
          "email": "example@fusionauth.io",
          "id": "7K2G",
          "method": "email"
        }
      ]
    },
    "usernameStatus": "ACTIVE",
    "username": "johnny123",
    "verified": true,
    "verifiedInstant": 1698772159415
  }
}
Once you have the custom lambda logic updated, it is time to deploy the AWS Lambda. Since it will be communicating over HTTP, it also needs an API Gateway.
Deploying the AWS Lambda#
You have a number of options here. It's simplest to deploy with CloudFormation, but pick the option that works best for you.
CloudFormation#
Below is a sample template which sets up an API gateway that forwards POSTs to the AWS lambda. The lambda function definition is subject to the limits outlined in the AWS documentation for the ZipFile property.
Note the one looooong line containing the AWS lambda code.
You'll modify that next.
CloudFormation AWS Lambda Deployment Template
AWSTemplateFormatVersion: 2010-09-09
Description: My API Gateway and Lambda function

Parameters:
  apiGatewayName:
    Type: String
    Default: my-api
  apiGatewayStageName:
    Type: String
    AllowedPattern: "[a-z0-9]+"
    Default: call
  apiGatewayHTTPMethod:
    Type: String
    Default: POST
  lambdaFunctionName:
    Type: String
    AllowedPattern: "[a-zA-Z0-9]+[a-zA-Z0-9-]+[a-zA-Z0-9]+"
    Default: my-function

Resources:
  apiGateway:
    Type: AWS::ApiGateway::RestApi
    Properties:
      Description: Example API Gateway
      EndpointConfiguration:
        Types:
          - REGIONAL
      Name: !Ref apiGatewayName

  apiGatewayRootMethod:
    Type: AWS::ApiGateway::Method
    Properties:
      AuthorizationType: NONE
      HttpMethod: !Ref apiGatewayHTTPMethod
      Integration:
        IntegrationHttpMethod: POST
        Type: AWS_PROXY
        Uri: !Sub
          - arn:aws:apigateway:${AWS::Region}:lambda:path/2015-03-31/functions/${lambdaArn}/invocations
          - lambdaArn: !GetAtt lambdaFunction.Arn
      ResourceId: !GetAtt apiGateway.RootResourceId
      RestApiId: !Ref apiGateway

  apiGatewayDeployment:
    Type: AWS::ApiGateway::Deployment
    DependsOn:
      - apiGatewayRootMethod
    Properties:
      RestApiId: !Ref apiGateway
      StageName: !Ref apiGatewayStageName

  lambdaFunction:
    Type: AWS::Lambda::Function
    Properties:
      Code:
        ZipFile: |
          const AWS=require("aws-sdk"),clientId="1r4gcuhj4f127iuhoiov9234tm",region="us-east-2",fusionAuthTenantId="30663132-6464-6665-3032-326466613934",fusionAuthApplicationId="85a03867-dccf-4882-adde-1a79aeec50df",authorizationHeaderValue="2687EE95-AF19-4CE6-A8BD-963139DED32E",cognito=new AWS.CognitoIdentityServiceProvider(region);function processOneAttribute(e,t){return console.log("processing: "+t),e&&e.filter(e=>e.Name==t).length>0?e.filter(e=>e.Name==t)[0].Value:null}function processUserJSON(e){const t={user:{}};t.user.data={},t.user.data.migratedDate=new Date,t.user.data.migratedFrom="cognito";const s=e.UserAttributes,n=processOneAttribute(s,"website");null!=n&&(t.user.data.website=n),t.user.username=e.Username;const r=processOneAttribute(s,"email");null!=r&&(t.user.email=r),t.user.id=e.Username;const o=processOneAttribute(s,"sub");null!=o&&(t.user.id=o);const i=processOneAttribute(s,"given_name");null!=i&&(t.user.firstName=i);const a=processOneAttribute(s,"family_name");null!=a&&(t.user.lastName=a);const u=processOneAttribute(s,"email_verified");return null!=u&&(t.user.verified="true"==u),t.user.active=!0,t.user.tenantId=fusionAuthTenantId,t.user.registrations=[],t.user.registrations[0]={applicationId:fusionAuthApplicationId},t}exports.handler=async function(e,t){try{if(e.headers.Authorization!==authorizationHeaderValue)return{statusCode:401,headers:{},body:""};if("POST"===e.httpMethod&&"/"===e.path){const t=JSON.parse(e.body);if(t.loginId&&t.password){var s={AuthFlow:"USER_PASSWORD_AUTH",ClientId:clientId,AuthParameters:{USERNAME:t.loginId,PASSWORD:t.password}};const e=await cognito.initiateAuth(s).promise();var n={};if(e.AuthenticationResult&&e.AuthenticationResult.AccessToken){return n=processUserJSON(await cognito.getUser({AccessToken:e.AuthenticationResult.AccessToken}).promise()),{statusCode:200,headers:{},body:JSON.stringify(n)}}e.ChallengeName&&console.log("Unable to log user in. Got response: "+e.ChallengeName+" and am unsure how to handle.")}}return{statusCode:400,headers:{},body:"Invalid request"}}catch(e){var r=e.stack||JSON.stringify(e,null,2);return console.log("Error in authenticating"),console.log(r),{statusCode:404,headers:{},body:""}}};
      Description: FusionAuth Connector lambda function
      FunctionName: !Ref lambdaFunctionName
      Runtime: nodejs14.x
      Timeout: 10
      Handler: index.handler
      MemorySize: 128
      Role: !GetAtt lambdaIAMRole.Arn

  lambdaApiGatewayInvoke:
    Type: AWS::Lambda::Permission
    Properties:
      Action: lambda:InvokeFunction
      FunctionName: !GetAtt lambdaFunction.Arn
      Principal: apigateway.amazonaws.com
      SourceArn: !Sub arn:aws:execute-api:${AWS::Region}:${AWS::AccountId}:${apiGateway}/${apiGatewayStageName}/${apiGatewayHTTPMethod}/

  lambdaIAMRole:
    Type: AWS::IAM::Role
    Properties:
      AssumeRolePolicyDocument:
        Version: 2012-10-17
        Statement:
          - Action:
              - sts:AssumeRole
            Effect: Allow
            Principal:
              Service:
                - lambda.amazonaws.com
      Policies:
        - PolicyDocument:
            Version: 2012-10-17
            Statement:
              - Action:
                  - logs:CreateLogGroup
                  - logs:CreateLogStream
                  - logs:PutLogEvents
                Effect: Allow
                Resource:
                  - !Sub arn:aws:logs:${AWS::Region}:${AWS::AccountId}:log-group:/aws/lambda/${lambdaFunctionName}:*
          PolicyName: lambda

  lambdaLogGroup:
    Type: AWS::Logs::LogGroup
    Properties:
      LogGroupName: !Sub /aws/lambda/${lambdaFunctionName}
      RetentionInDays: 90

Outputs:
  apiGatewayInvokeURL:
    Value: !Sub https://${apiGateway}.execute-api.${AWS::Region}.amazonaws.com/${apiGatewayStageName}

  lambdaArn:
    Value: !GetAtt lambdaFunction.Arn
Find a JavaScript minifier online and minify your custom lambda code. It's best if the minifier puts everything on one line; this one is fine.
Update the template; replace the line after ZipFile: | with your minified JavaScript code.
CloudFormation Customization Point
  lambdaFunction:
    Type: AWS::Lambda::Function
    Properties:
      Code:
        ZipFile: |
          # REPLACE THIS LINE
Next, create this stack as you would any other CloudFormation stack. Skip to Testing The Deployed API.
AWS CDK#
If you'd like to set up your Lambda with the AWS CDK, use this example project.
Here's an introduction to the CDK.
Next, proceed to Testing The Deployed API.
Deploy In Your Environment With Your Tools#
If you already have an API gateway set up or want to build the environment from scratch, use the lambda code and deploy it in whatever fashion you wish. It doesn't need any special permissions other than CloudWatch logs for logging. When you deploy this infrastructure, make sure the lambda code is only available for POSTs.
Here's the AWS documentation about setting up an API gateway with a lambda.
Testing The Deployed API#
Now that you've deployed the API backed by your custom AWS lambda, you should have a URL that looks something like this: https://j2xbdwi6hf.execute-api.us-east-2.amazonaws.com/prod/.
Test the login process with the lambda. You can use curl and an account whose username and password you know to do so.
Testing the API and AWS Lambda with Curl
curl -XPOST -H 'Authorization: <the value of authorizationHeaderValue>' \
https://j2xbdwi6hf.execute-api.us-east-2.amazonaws.com/prod/  -H 'Content-type: application/json' -d '{
  "loginId": "test@example.com",
  "password": "password"
}'
If the user is authenticated, you should receive a response similar, though differing based on how you modified the lambda code, to this:
Successful Results of Testing the API and AWS Lambda
{
  "user": {
    "data": {
      "migratedDate": "2021-11-19T21:50:19.048Z",
      "migratedFrom": "cognito",
      "website": "http://example.com"
    },
    "username": "06744664-df6e-48cc-9421-3d56a9732172",
    "email": "test@example.com",
    "id": "06744664-df6e-48cc-9421-3d56a9732172",
    "firstName": "Test",
    "lastName": "Testerson",
    "active": true,
    "tenantId": "30663132-6464-6665-3032-326466613934",
    "registrations": [{
      "applicationId": "85a03867-dccf-4882-adde-1a79aeec50df"
    }]
  }
}
If the authorization header or account credentials are incorrect, an empty body and an HTTP status code are returned. You can view the status code by running curl with the -vv switch.
Set Up the Connector#
Now you need to set up a Connector to use the AWS API you created. You should set up a different Connector for each Cognito User pool.
Log back into the FusionAuth administrative user interface if needed.
This feature is only available in paid plans. To learn more, see our pricing page.
Connectors are a feature limited to paid plans, so you must ensure you have a valid reactor license. Learn more about activating reactor.
Next:
- Configure the Connector with the API URL and authorization header
- Configure the Tenant to use the Connector
Configure a Connector#
Create and configure the Connector. Navigate to Settings -> Connectors and add a new Generic Connector.
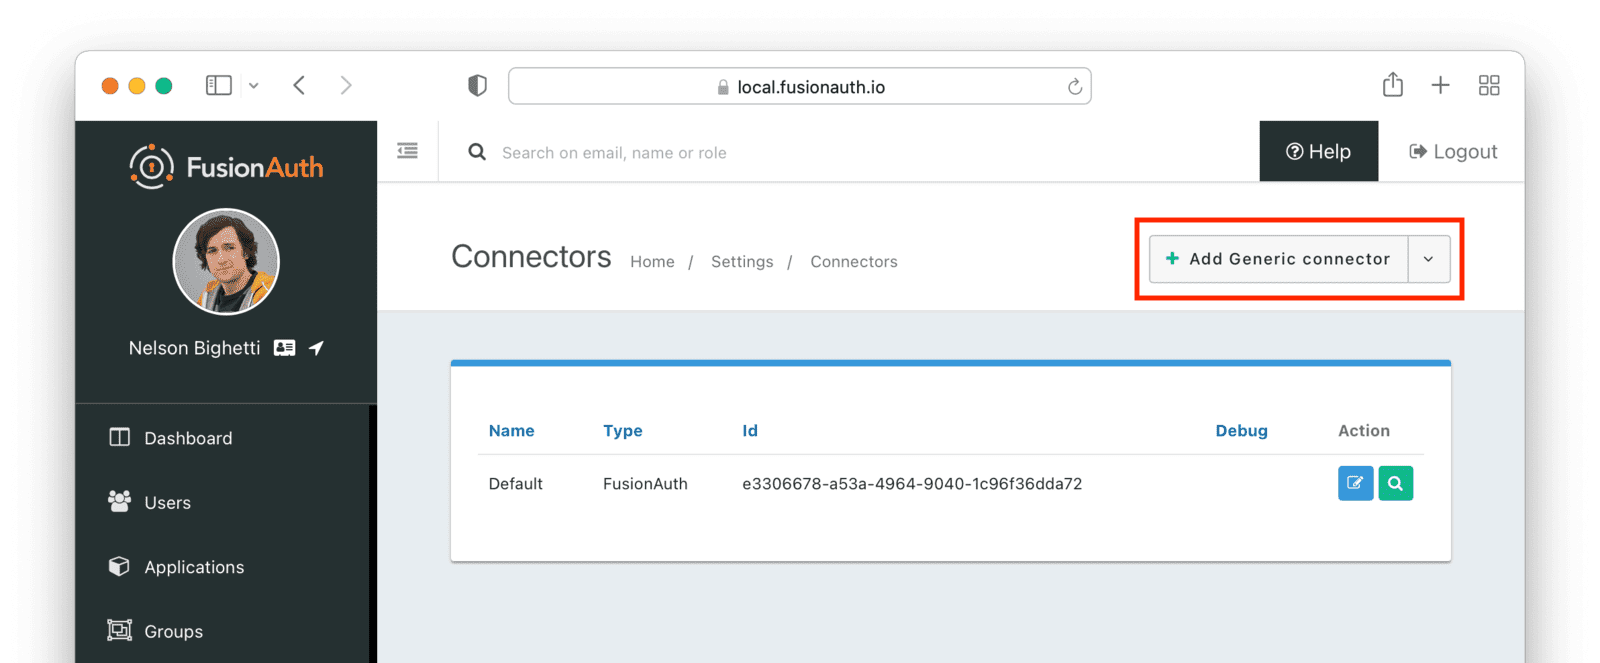
Configure the Connector:
- Add a name like
Cognito migration. - Set the Authentication URL to the value of the API gateway endpoint created above.
- Navigate to the Headers tab. Add the custom header value the AWS Lambda requires. Unless you modified the code, the header name is
Authorization.
At the end, you should have a screen like this:
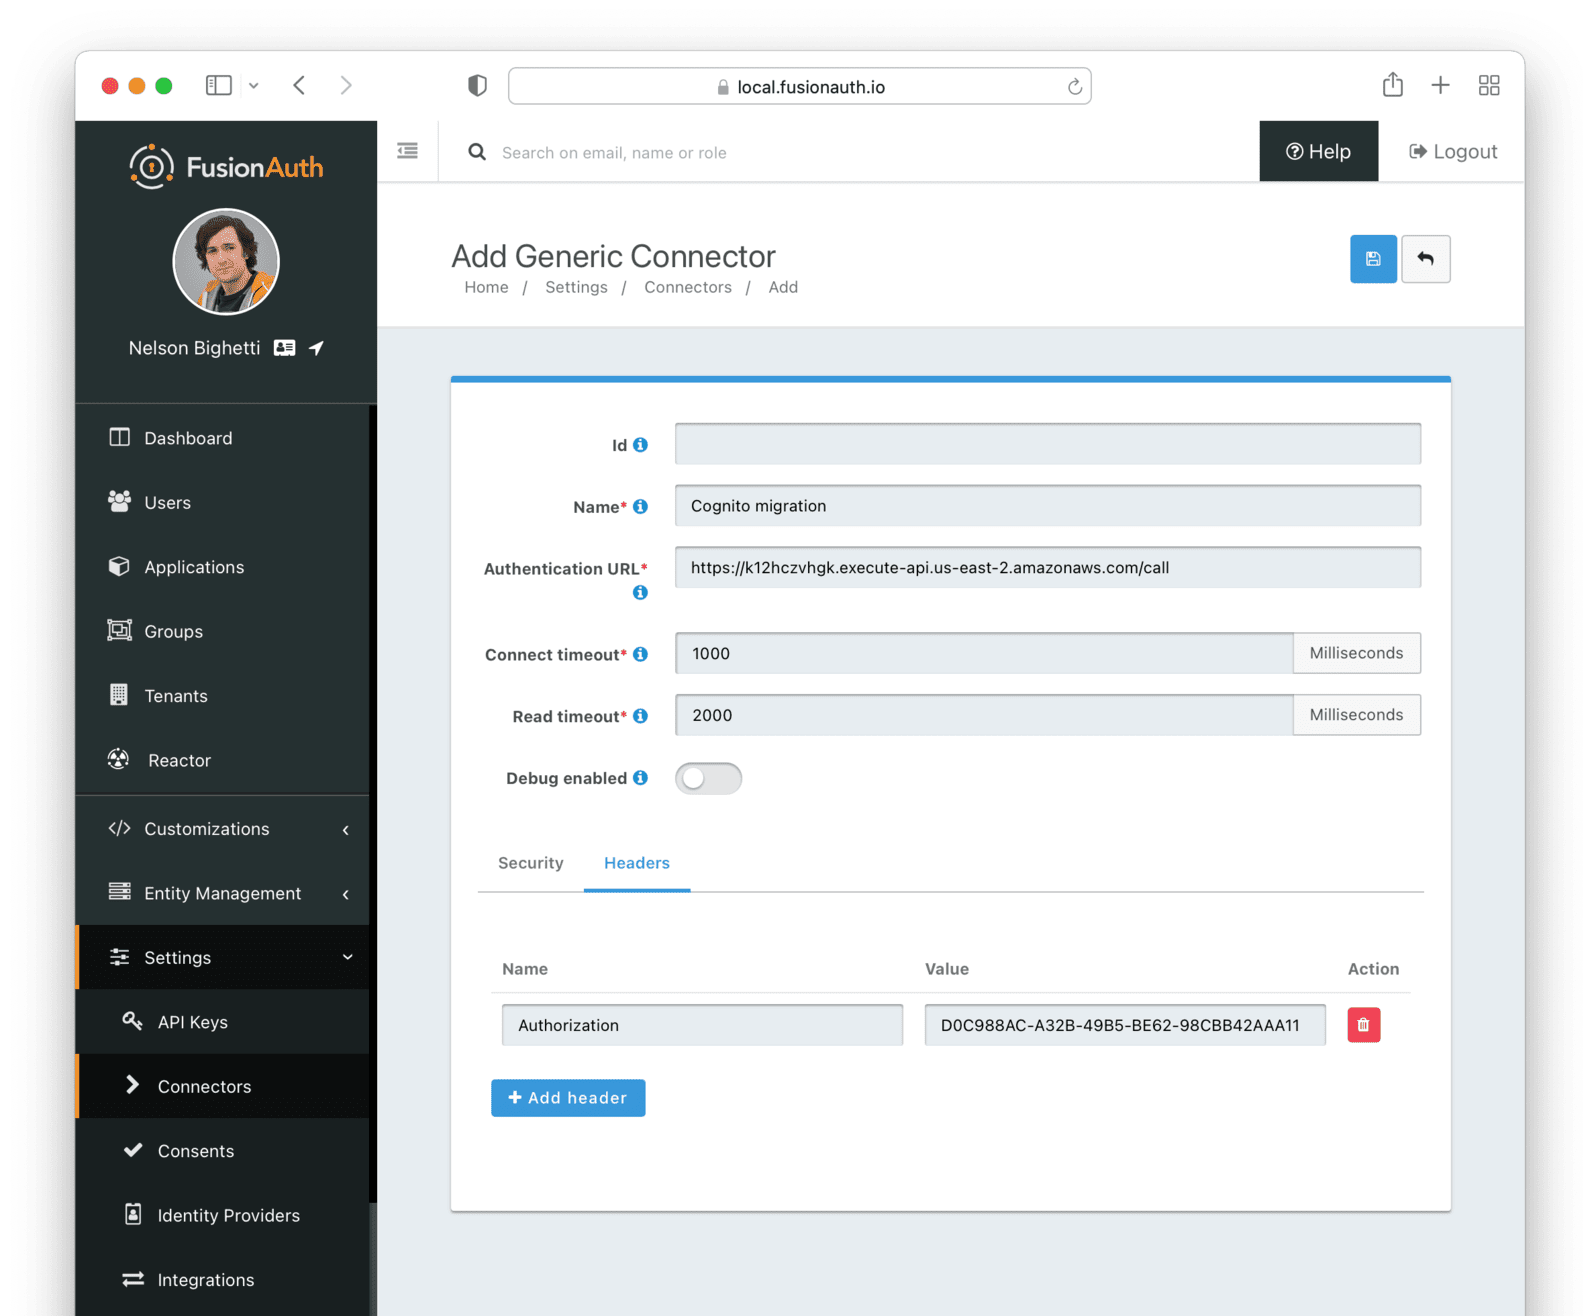
Save the Connector. Next, configure your tenant to use this Connector.
Configuring the Tenant#
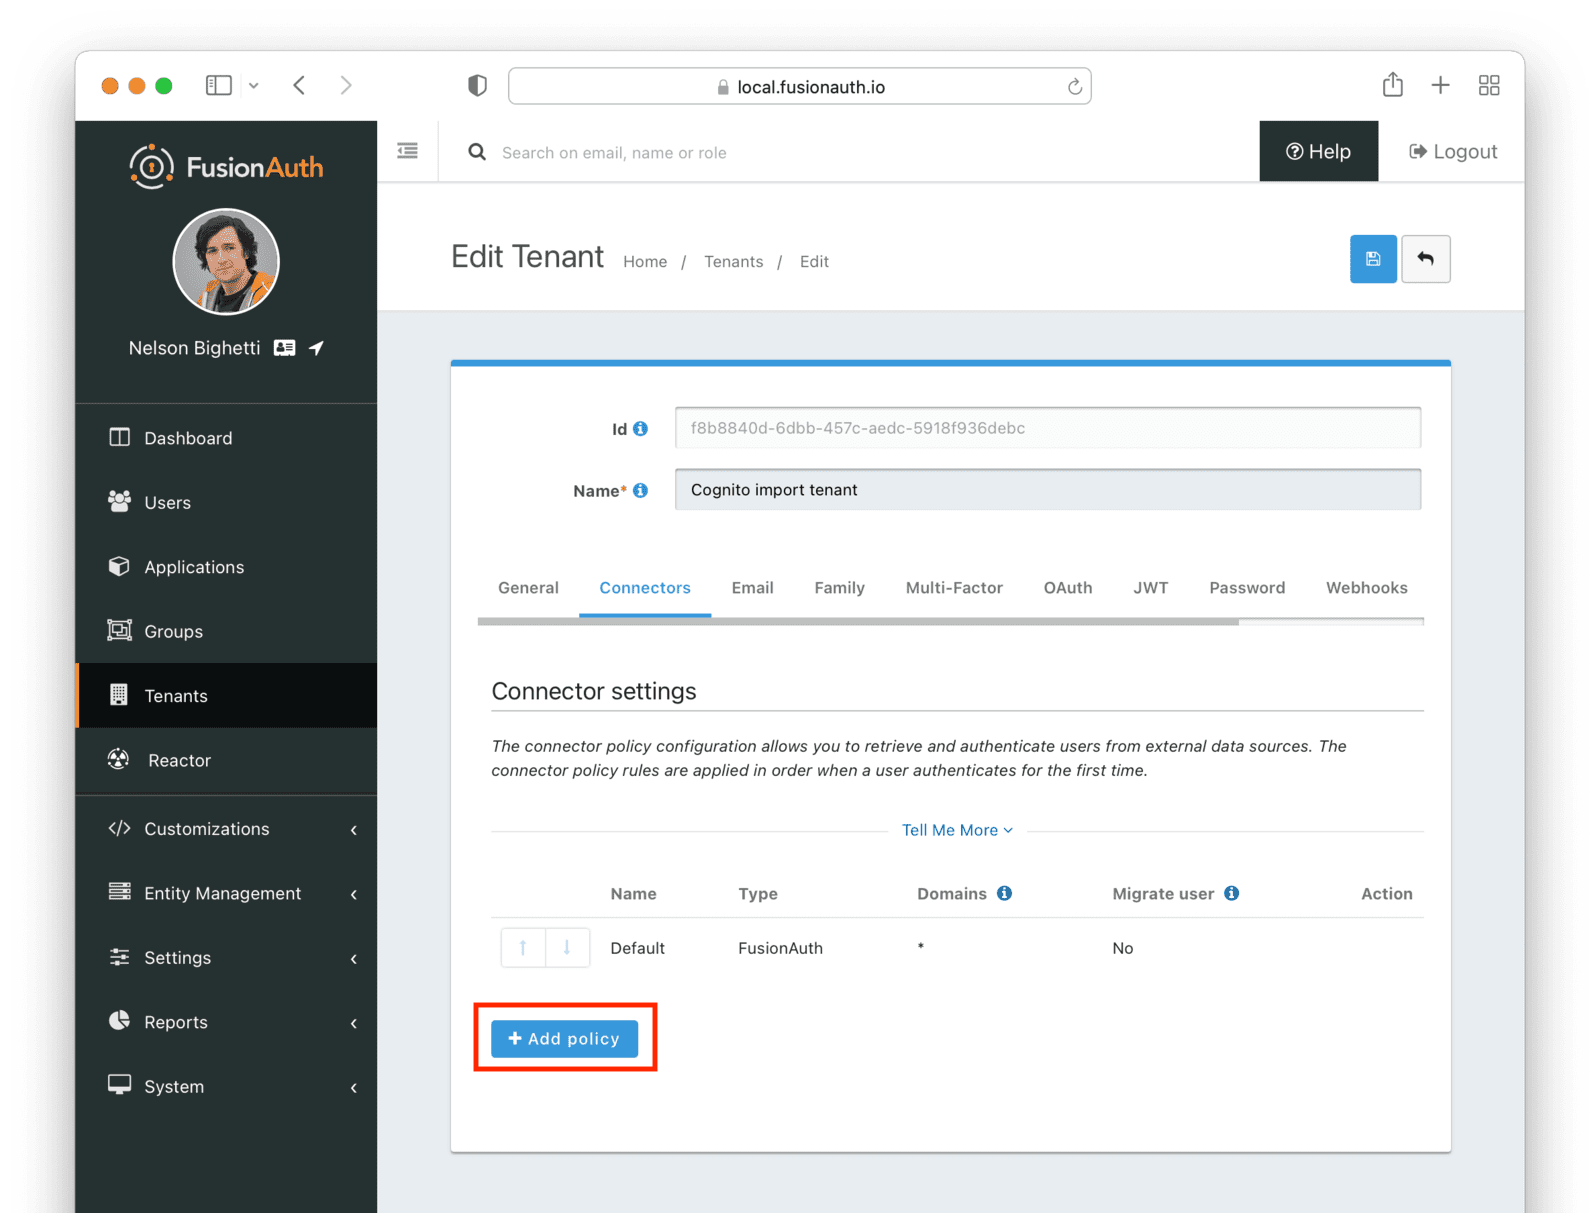
Navigate to your tenant settings: Tenants -> Cognito import tenant -> Connectors .
Click the Add policy button to set up a new Connector policy.
Set the Connector field value to the name of the Connector created previously. Make sure that the Migrate user field is enabled. You can leave the Domains field with the value of *, which will apply this Connector to every user.
After configuration, the Policy entry form should look similar to this:
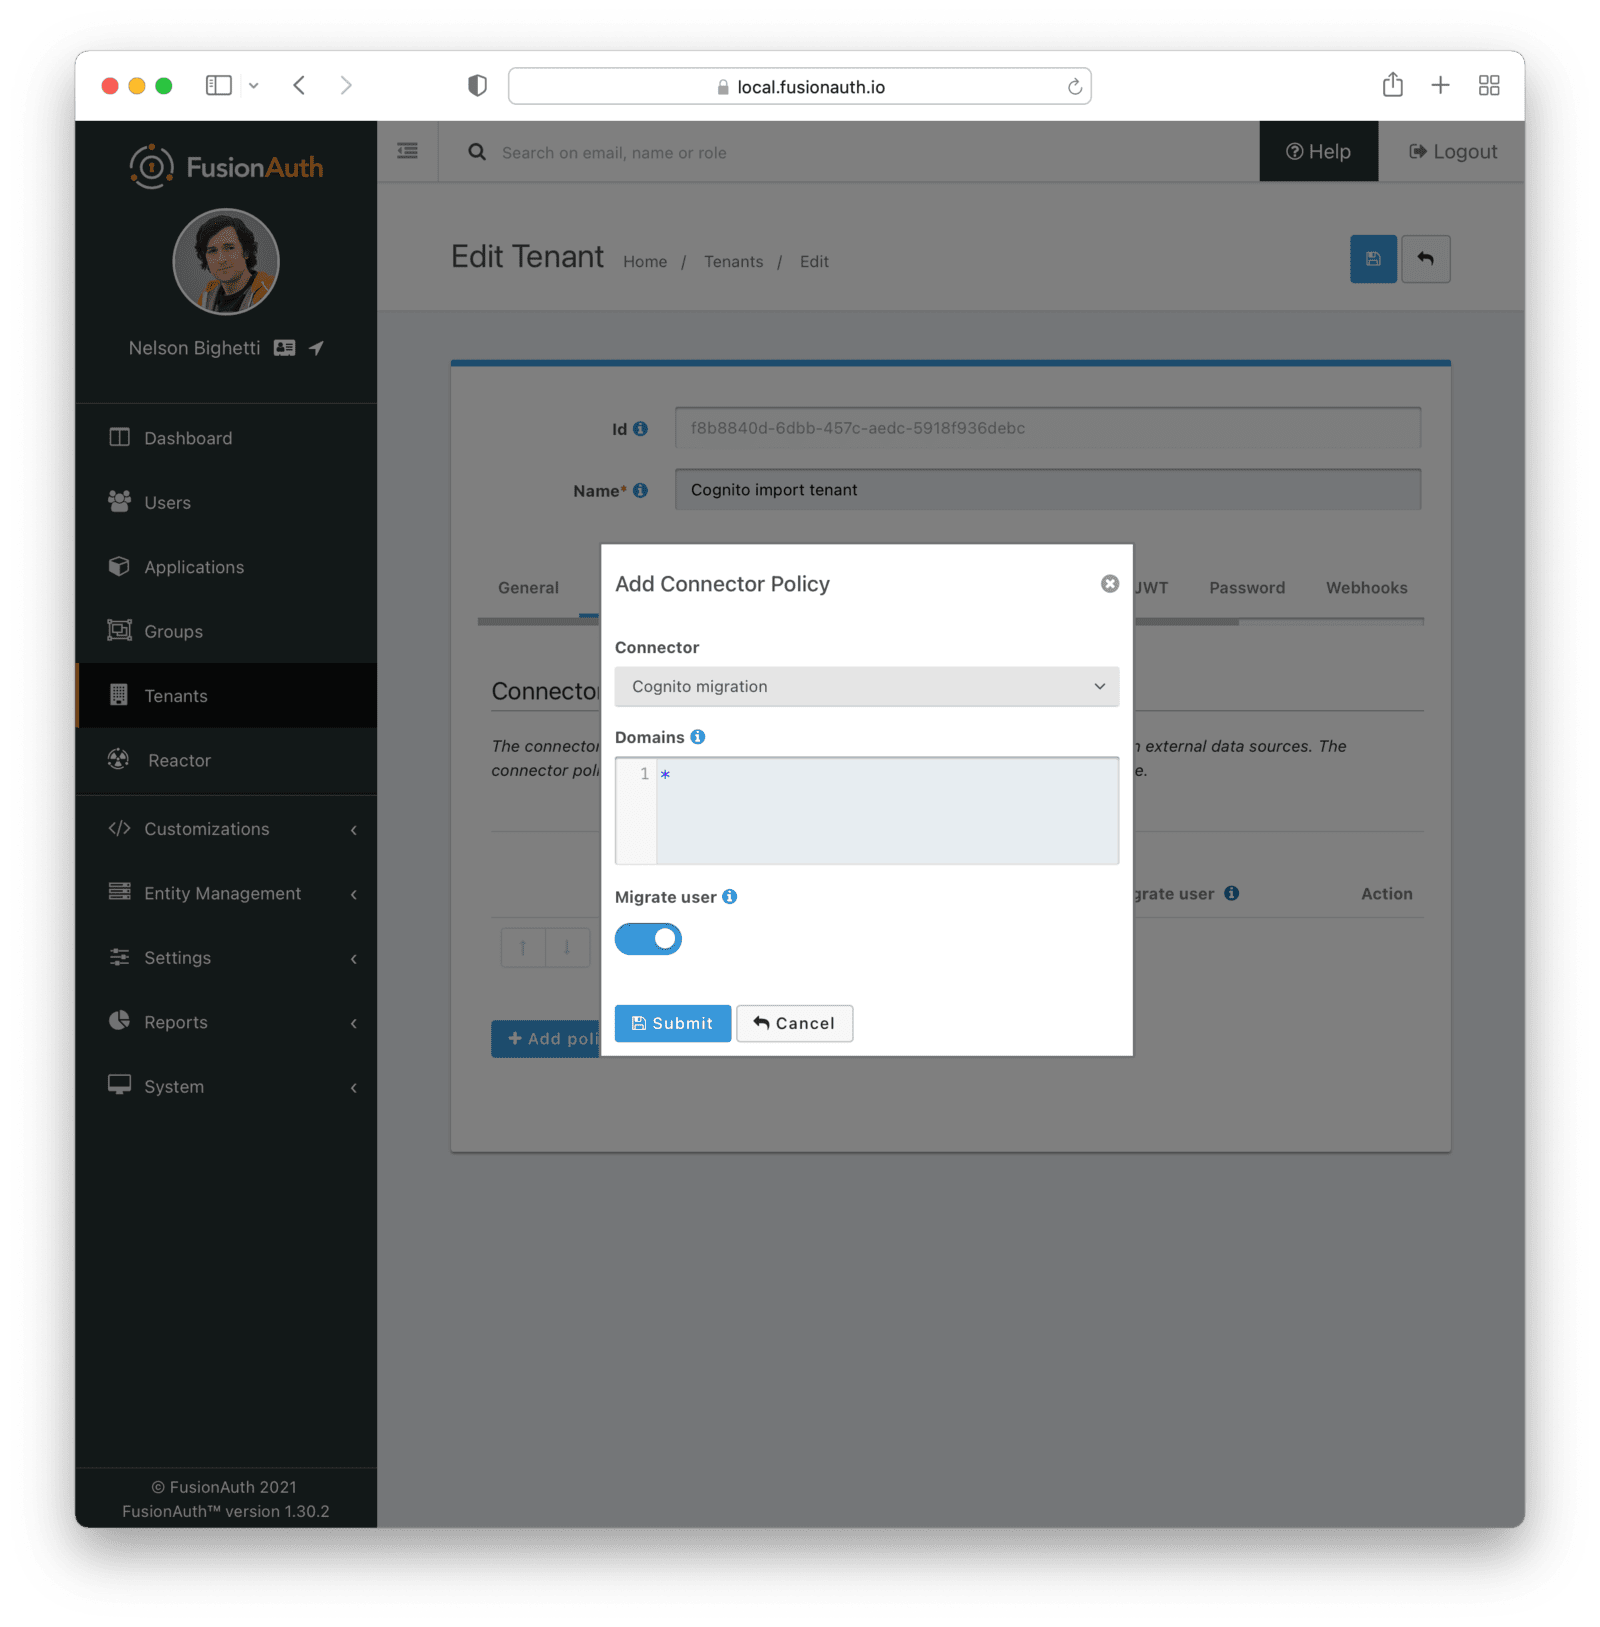
Save it.
Next, ensure this Connector Policy is in the correct order by using the arrows in the administrative user interface to put it at the top. With this configuration, all users are checked against this Connector the first time they are seen. If they log in, they'll be migrated to the FusionAuth user database.

Log In With a Test User#
To test that users will be migrated, log in as a test user via the FusionAuth interface.
When you set up the test application, you recorded the OAuth IdP login URL.
Copy this URL and open it in a new incognito browser window. (If you don't use an incognito window, the admin user session will interfere with the test.) You should see the login screen:
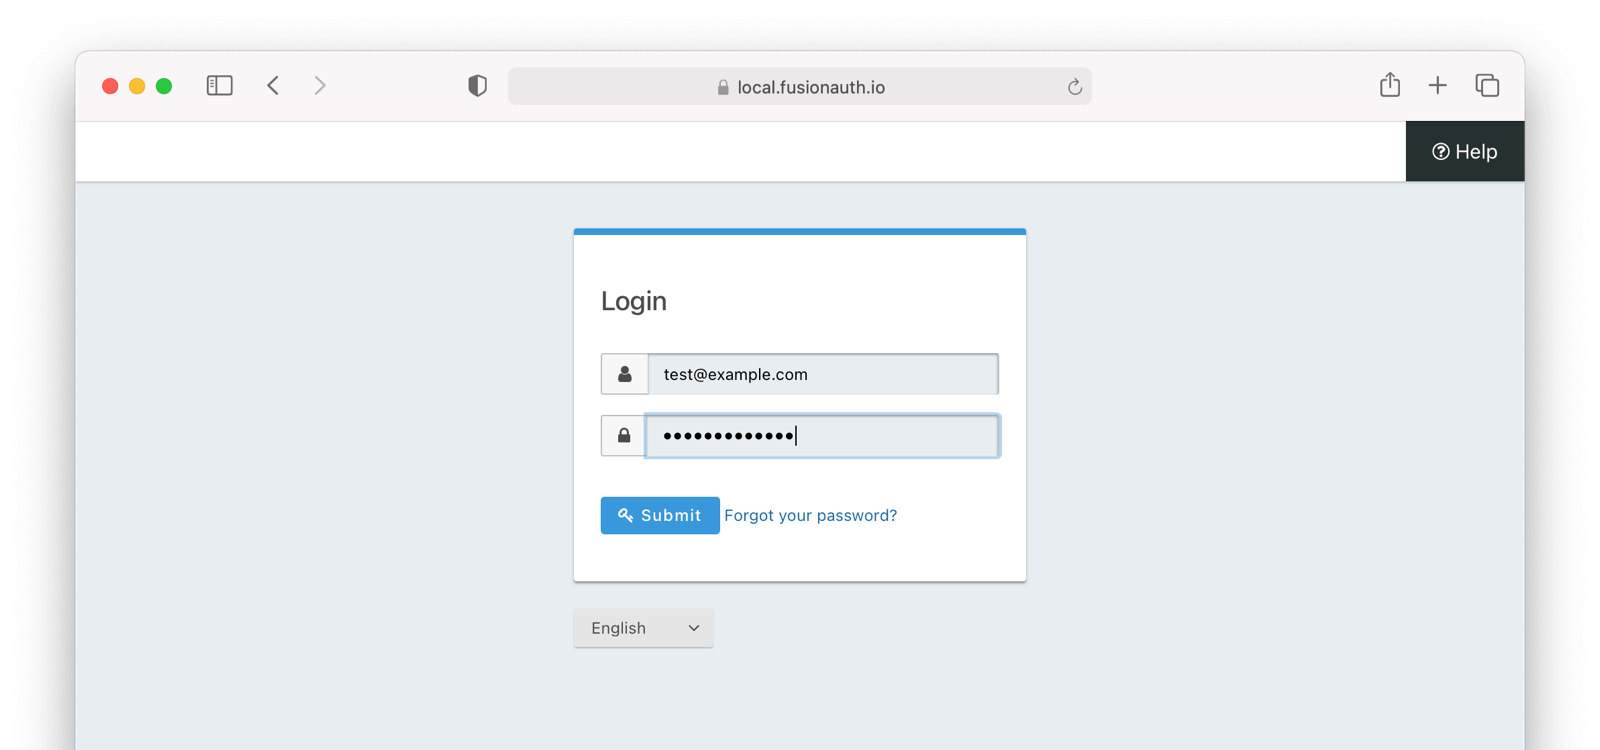
Enter credentials for a Cognito user account; it can be the same one you used to test the API with curl and log in. The user will be transparently migrated over to FusionAuth.
If the user was not migrated or the login was unsuccessful, you can troubleshoot. In the administrative user interface, enable the Debug enabled field in the Connector configuration by navigating to Settings -> Connectors and editing the Generic Connector you added.
After enabling enhanced debug messages, try to log in again with the test user. In the administrative user interface, navigate to System -> Event Log and look for useful messages.
After a successful test login, the user will be redirected to a URL like https://example.com/?code=FlZF97WIYLNxt4SGD_22qvpRh4fZ6kg_N89ZbBAy1E4&locale=fr&userState=Authenticated. This occurs because you haven't set up a web application to handle the authorization code redirect yet.
That is an important next step but is beyond the scope of this document. Consult the 5 minute setup guide for an example of how to do this.
Let's check that the import succeeded in another way: by viewing the user in the administrative user interface.
Verify the Migration#
Next, log in to the FusionAuth administrative user interface. Review the user entries to ensure the data was correctly imported.
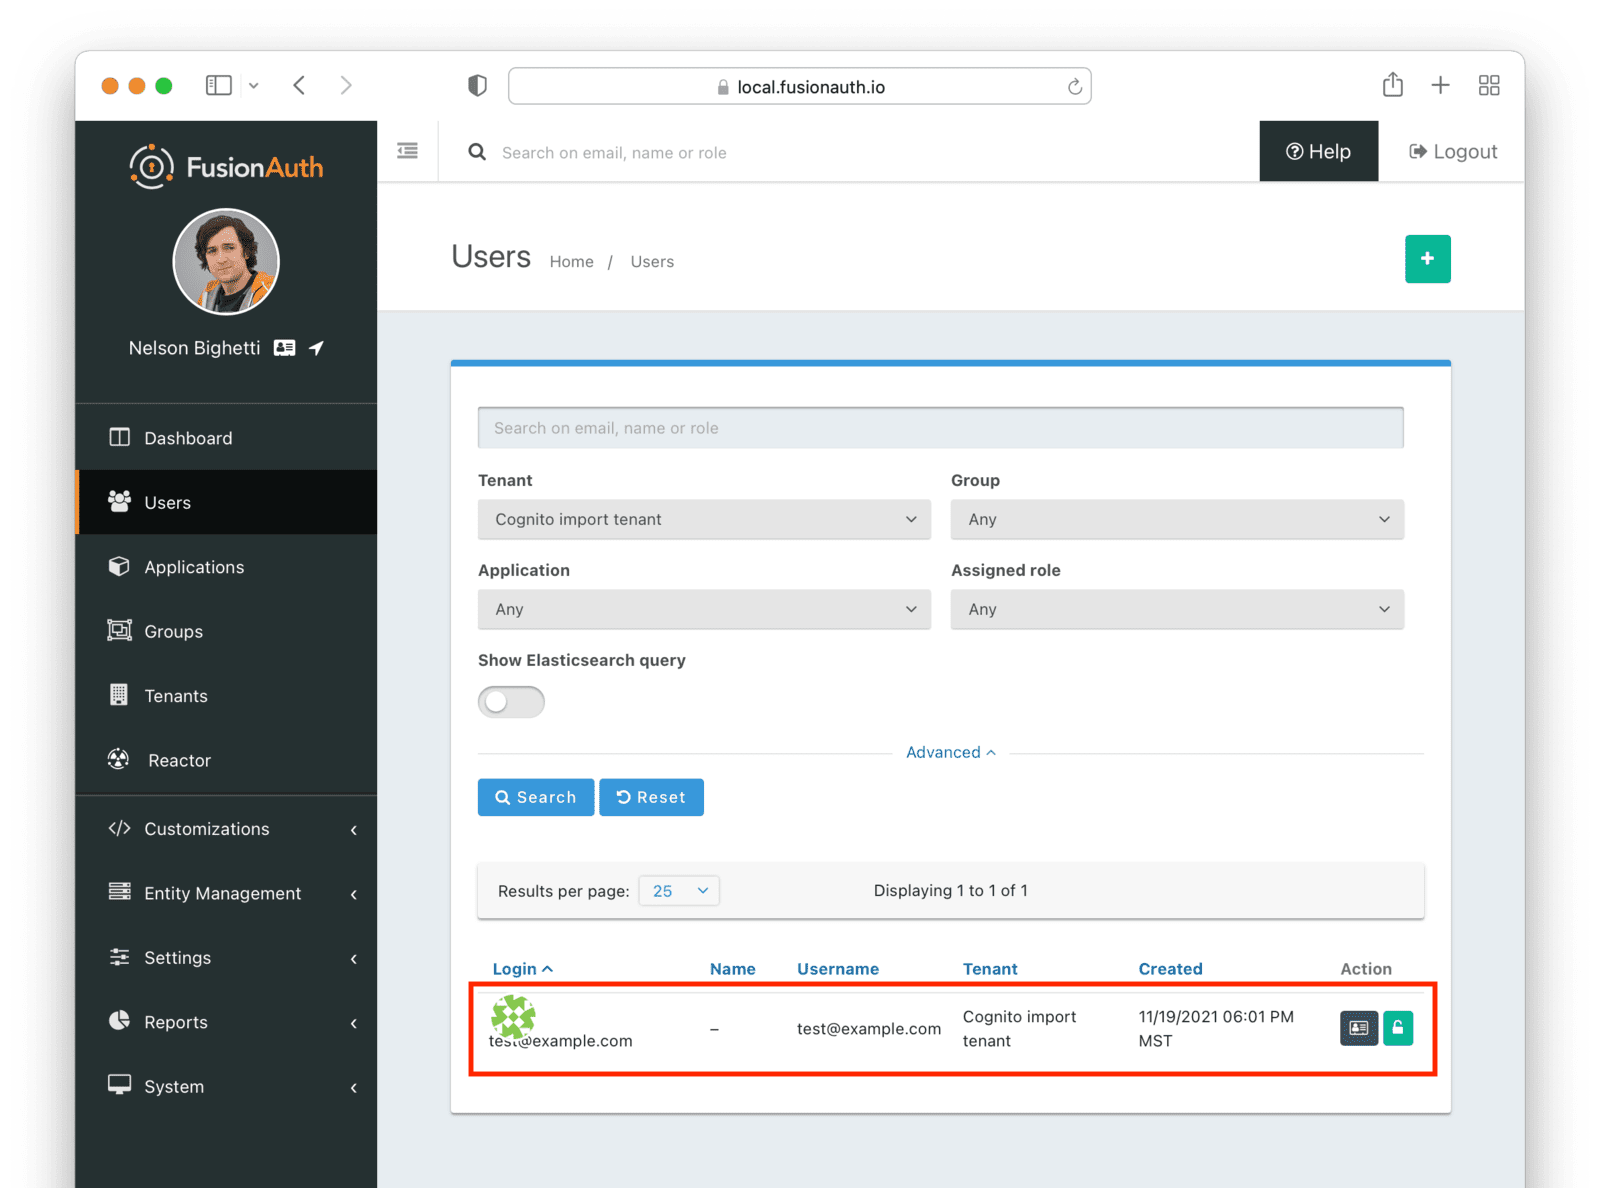
You can manage the user by clicking on the Manage button (black button) to the right of the Created date in the list to review the details of the imported user's profile.
At this point, you've successfully migrated a user from Cognito into FusionAuth. Any further changes for this user will occur against the FusionAuth database; this includes profile and password changes.
Clean Up Your Test Environment#
After you are done testing, deploy these same configuration changes to production.
Depending on your architecture, you can choose to migrate users into the default tenant or a new tenant of the production instance. Whichever you choose, configure the Connector policy of the destination tenant.
If you aren't keeping users in the test tenant, delete it. This is also useful if you want to start over because you need to tweak a setting such as the default application registration. In either case, delete the tenant you created.
This will remove all the users and other configuration for this tenant, giving you a fresh start. To delete a tenant, navigate to Tenants and choose the red trash can icon corresponding to the tenant to be deleted.

Confirm your desire to delete the tenant. Depending on how many users exist in that tenant, this may take some time. If it is easier, you may also delete migrated users one at a time using the administrative user interface.
Migrate Everything Else#
You now have your users migrated, or a plan to do so. Congratulations! What is next?
You need to migrate additional configurations, as mentioned in Other Entities. Since the type of configuration varies, it is hard to provide a full list of how to import these items, but the general pattern will be:
- Identify corresponding FusionAuth functionality.
- Configure it in your FusionAuth instance, either manually or by scripting it using the client libraries or API.
- Update your application configuration to use the new FusionAuth functionality.
Make sure you assign your users to the appropriate FusionAuth applications. You can do this either:
- As part of your import process by adding registrations at import time.
- After users have been migrated with the Registrations API.
You'll also need to modify and test each of your applications, whether custom, open source, or commercial, to ensure:
- Users can successfully log in.
- The authorization code redirect is handled correctly.
- Users receive appropriate permissions and roles based on the JWT.
- The look and feel of the hosted login pages matches each application's look and feel.
If your application uses a standard OAuth, SAML or OIDC library to communicate with , the transition should be relatively painless.
If you want to migrate Client Credentials grants, create Entities in FusionAuth corresponding to each Cognito app client that is configured to use the Client Credentials grant. The scopes within FusionAuth are currently constrained to a certain format. Learn more about Entity Management.
You can migrate each of your Cognito app clients to a FusionAuth application using the Application API, which allows you to set your Client Id and Client Secret to be the same as they were in Cognito. Maintaining these values will minimize the impact on any applications using the OAuth Authorization Code grant or Implicit grant. Ensure you add the application to the correct tenant.
Estimate The Slow Migration Timeline#
When using a slow migration, you can estimate how many accounts will be migrated in a given period of time.
You can calculate a timeline by knowing the following:
- How frequently the average user logs in
- What the distribution of your users' login behavior is
- What your migration goal is
Determining these values precisely is beyond the scope of this guide. However, a good rule of thumb is to determine how often your average user logs in to your application. Then you can use this formula to find out when a certain percentage of users have migrated: S = [(1 - (1 - P)^D)*100]%.
Breaking that equation down, you have:
Pis the probability of any single user authenticating in a given day. So if your users log in once a week on a business day, it is 0.2 (one out of five days). If they log in once a year, it is 0.0027 (one out of 365 days).Dis the number of days of the migration period.Sis the percentage of users who have migrated.
For P = 0.2 and D = 10, S = 89%. Therefore, if your users log in one out of every five days, in ten days almost nine out of ten will be migrated to FusionAuth.
For P = 0.0027 and D = 370, S = 63.7%; if your users log in once a year on average, in about a year, almost two thirds of accounts will be migrated to FusionAuth.
Using the above calculations should help you estimate the duration of a migration.
After this period of time, you may want to bulk migrate the rest of the users, or treat them as inactive and not migrate them. Plan to disable the Connector and remove the tenant's Connector Policy after the slow migration is complete.
Learn more about general slow migration considerations.
Additional Support#
If you need support in your migration beyond that provided in this guide, you may:
- Post in our forums and get support from the community.
- Purchase a support plan and get expert help from the Engineering Team.
Bulk Migration#
As mentioned above, a bulk migration of Cognito users requires all imported users to reset their passwords, since Cognito password hashes are inaccessible. This is typically a poor choice as it negatively affects users. However, if a slow migration won't work because of timing or other reasons, you can move all user information other than passwords from Cognito to FusionAuth, and then send password reset emails.
The benefits of a bulk migration are:
- You can move your users all at once.
- You no longer have a dependency on Cognito.
The downsides of a bulk import:
- You must require all users to reset their password. You can do this in bulk via API calls or you can have users reset their passwords when they try to login.
To bulk migrate users, do the following:
- Set up FusionAuth
- Extract all user data from Cognito
- Reformat the data into FusionAuth compatible JSON
- Import the users using the Import User API
- Reset all user passwords
Let's look at each of these steps in more detail.
Set Up FusionAuth For a Bulk Migration#
You need to set up FusionAuth, including a tenant and API key.
It is best to create a separate tenant for migration testing. Tenants logically isolate configuration settings and users. If a migration goes awry or you need to redo it after tweaking settings, you can delete the test tenant and start with a clean system. To add a tenant, navigate to Tenants and click the Add button.
Give it a descriptive Name like Cognito import test. You shouldn't need to modify any of the other configuration options to test importing users.
Save the tenant.
Record the Id of the tenant, which will be a UUID. It will look something like 25c9d123-8a79-4edd-9f76-8dd9c806b0f3. You'll use this later.
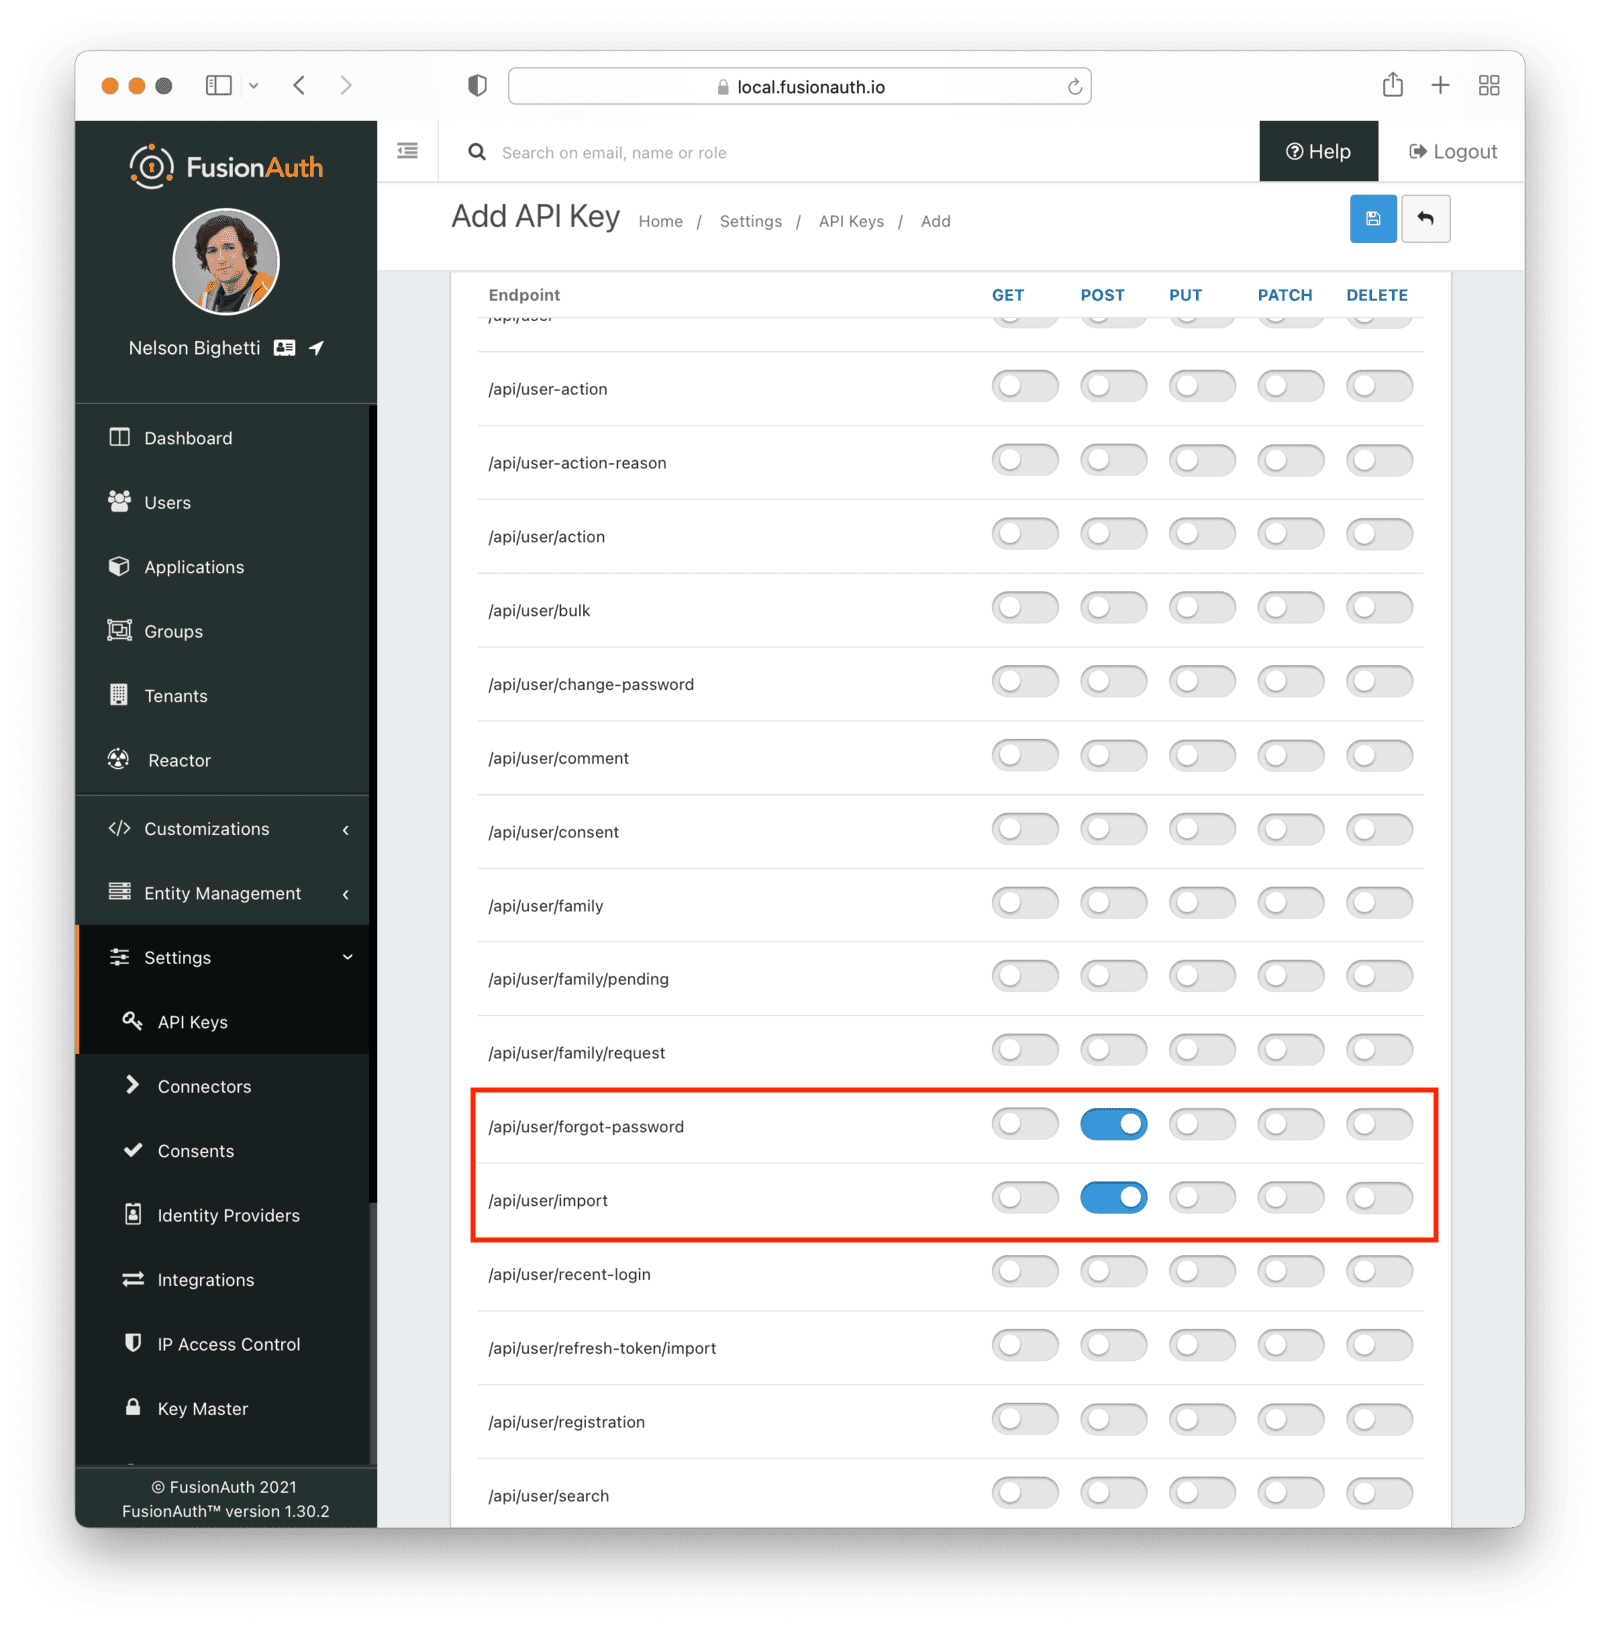
The next step is to create an API key. This will be used by the import script. To do so, navigate to Settings -> API Keys in the administrative user interface.
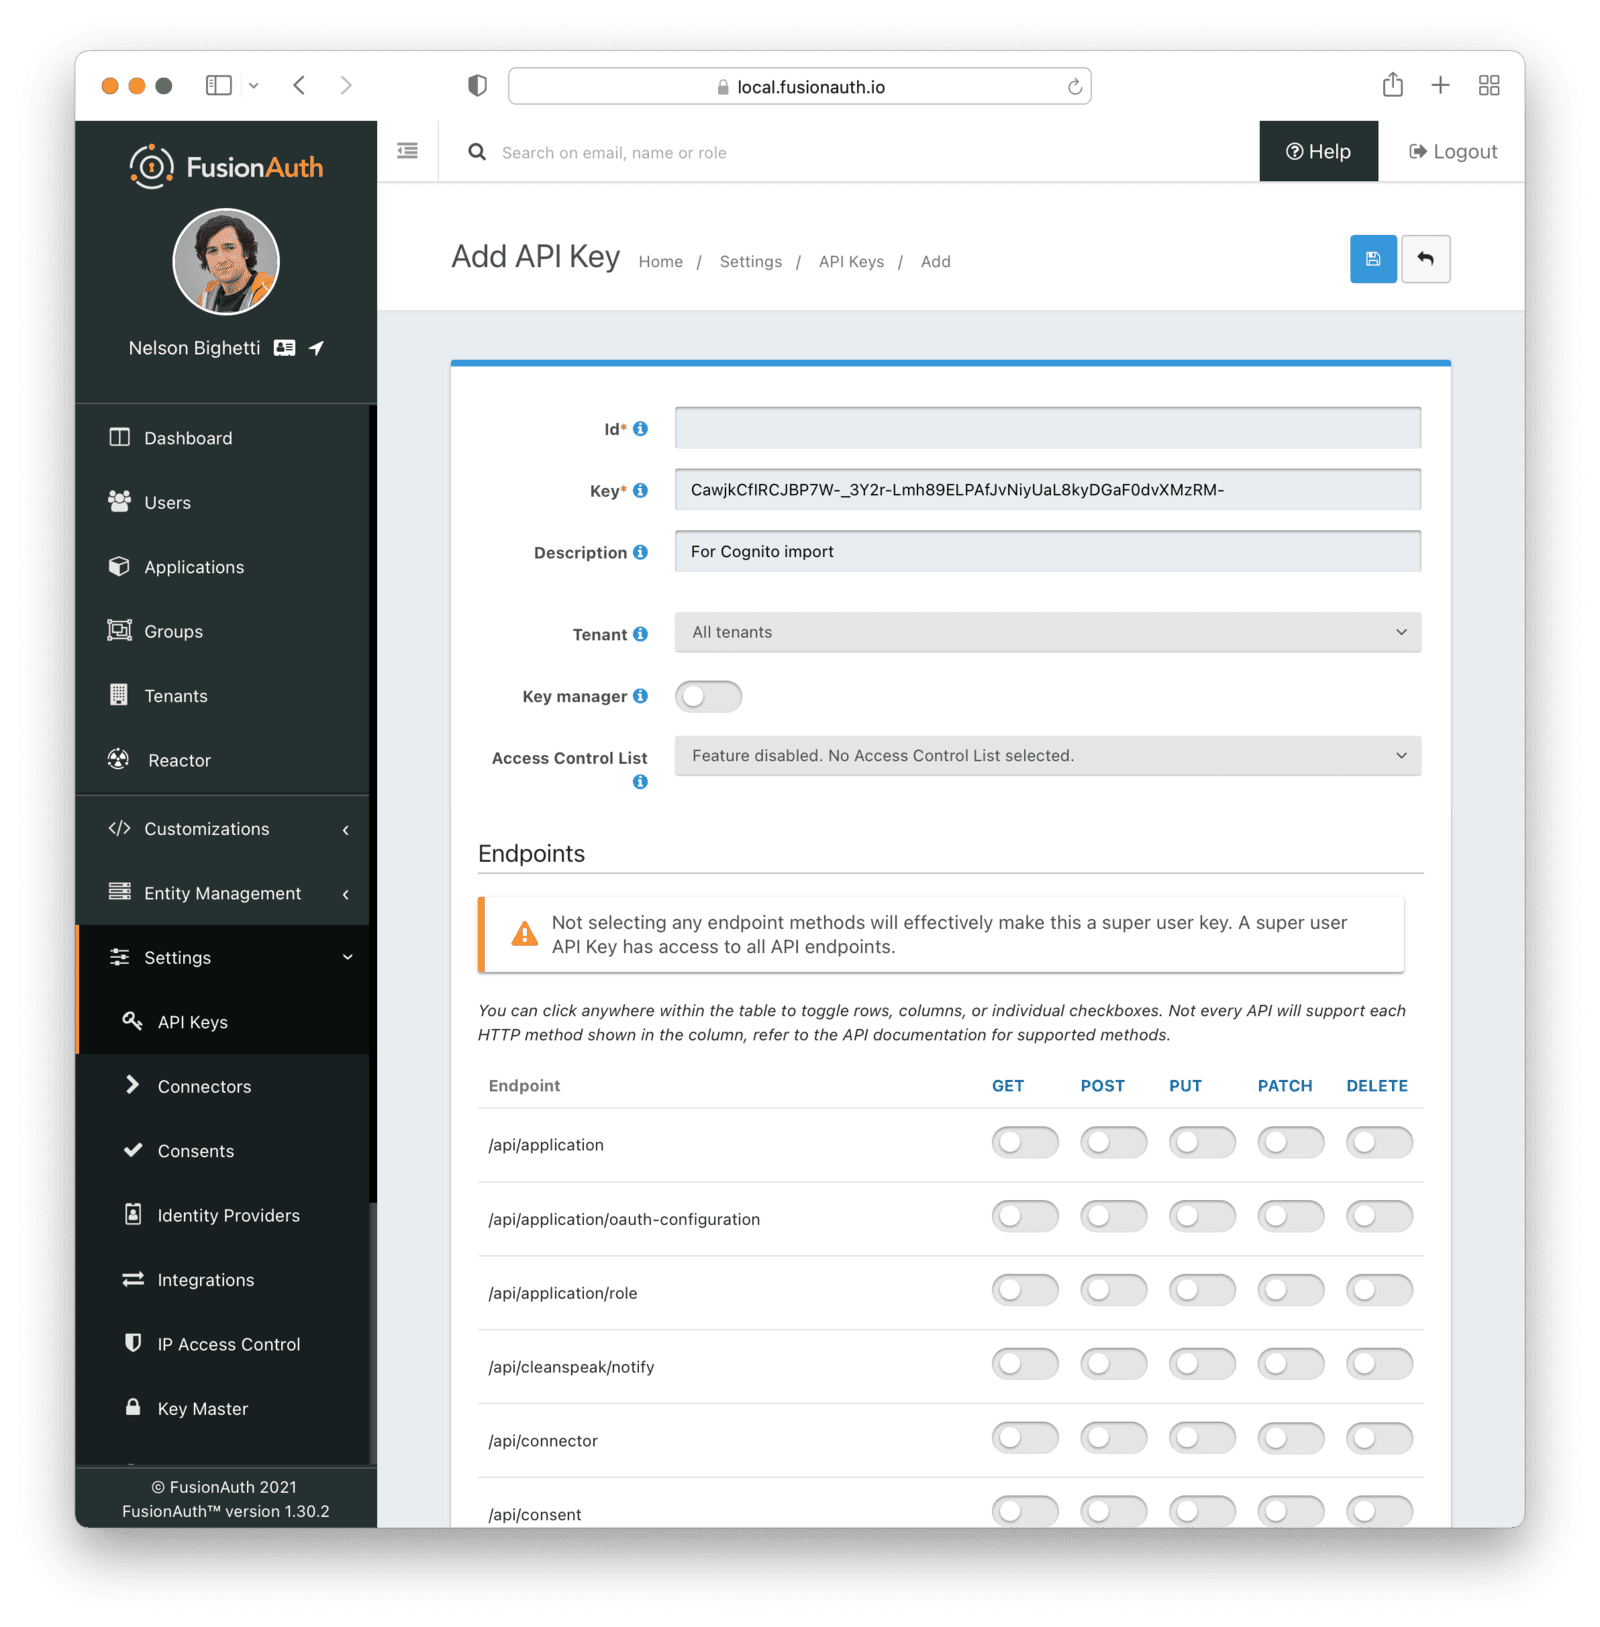
This key needs to have the permission to run a bulk import of users. In the spirit of the principle of least privilege, give it the permission to POST to the /api/user/import endpoint. Also, give the key permissions to POST to the API endpoint /api/user/change-password. Record the API key string, as you'll use it below.
Export User Data From Cognito#
You need to export whatever data you can from Cognito before you can import it to FusionAuth.
These instructions use the aws command line tool. If you don't have that installed, please install and configure it using the AWS documentation.
Log in to the AWS console to find your User Pool Id. It will look something like us-east-2_ud90QwSeF. Then, get a list of all your users with the list-users command:
Listing users in a pool
aws cognito-idp list-users --user-pool-id us-east-2_ud90QwSeFlist-users results
{
    "Users": [
        {
            "Username": "05f1780a-17d4-4bba-befb-07c074a89d7b",
            "Attributes": [
                {
                    "Name": "sub",
                    "Value": "05f1780a-17d4-4bba-befb-07c074a89d7b"
                },
                {
                    "Name": "website",
                    "Value": "http://example.com"
                },
                {
                    "Name": "email_verified",
                    "Value": "true"
                },
                {
                    "Name": "given_name",
                    "Value": "testverified"
                },
                {
                    "Name": "middle_name",
                    "Value": "T"
                },
                {
                    "Name": "family_name",
                    "Value": "Testerson"
                },
                {
                    "Name": "email",
                    "Value": "testverified@example.com"
                }
            ],
            "UserCreateDate": "2021-11-16T17:27:47.442000-07:00",
            "UserLastModifiedDate": "2021-11-16T17:30:05.292000-07:00",
            "Enabled": true,
            "UserStatus": "CONFIRMED"
        },
        {
            "Username": "06744664-df6e-48cc-9421-3d56a9732172",
            "Attributes": [
                {
                    "Name": "sub",
                    "Value": "06744664-df6e-48cc-9421-3d56a9732172"
                },
                {
                    "Name": "website",
                    "Value": "http://example.com"
                },
                {
                    "Name": "given_name",
                    "Value": "Test"
                },
                {
                    "Name": "middle_name",
                    "Value": "T"
                },
                {
                    "Name": "family_name",
                    "Value": "Testerson"
                },
                {
                    "Name": "email",
                    "Value": "test@example.com"
                }
            ],
            "UserCreateDate": "2021-11-15T15:51:01.512000-07:00",
            "UserLastModifiedDate": "2021-11-15T15:53:06.566000-07:00",
            "Enabled": true,
            "UserStatus": "CONFIRMED"
        }
    ]
}
If you have more than a few users, you may need to paginate the results. If this is the case, you'll receive a NextToken value in the JSON output:
NextToken sample value
{
  "Users": [ ... ],
   "NextToken": "eyJQYWdpbmF0aW9uVG9rZW4iOiBudWxsLCAiYm90b190cnVuY2F0ZV9hbW91bnQiOiAxfQ=="
}
Use that value in your next call list-users request:
Listing users in a pool using pagination
aws cognito-idp list-users --user-pool-id us-east-2_ud90QwSeF --starting-token eyJQYWdpbmF0aW9uVG9rZW4iOiBudWxsLCAiYm90b190cnVuY2F0ZV9hbW91bnQiOiAxfQ==You'll need to do this until you have all your user data.
You are now ready to transform your data. Use a tool like jq or any other programming language to transform the JSON from the Cognito format to the FusionAuth format. In addition to fields you are directly translating, such as from family_name to lastName, make sure you:
- Ensure every user has a valid email address so they can reset their password.
- Create any registrations for users for existing FusionAuth Applications.
- Configure the users to be part of the test tenant by setting their
tenantId. - Set a user.data field indicating these users are from a bulk import. That is, set
user.data.importSourceto"cognito". - Set the password to a random string, such as a UUID. Set the encryption and salt methods to any valid value, because the password will be reset in the last stage of the bulk migration.
- Optionally use the
subclaim from Cognito as your user Id. - Ensure that the email address is unique across all users imported to the same tenant.
Here's an example of JSON suitable for import:
Example Import Request JSON
{
  "users": [
    {
      "active": true,
      "birthDate": "1976-05-30",
      "data": {
        "displayName": "Johnny Boy",
        "favoriteColors": [
          "Red",
          "Blue"
        ]
      },
      "email": "example@fusionauth.io",
      "encryptionScheme": "salted-sha256",
      "expiry": 1571786483322,
      "factor": 24000,
      "firstName": "John",
      "fullName": "John Doe",
      "imageUrl": "http://65.media.tumblr.com/tumblr_l7dbl0MHbU1qz50x3o1_500.png",
      "insertInstant": 1331449200000,
      "lastName": "Doe",
      "memberships": [
        {
          "data": {
            "externalId": "cc6714c6-286c-411c-a6bc-ee413cda1dbc"
          },
          "groupId": "2cb5c83f-53ff-4d16-88bd-c5e3802111a5"
        }
      ],
      "middleName": "William",
      "mobilePhone": "303-555-1234",
      "password": "5ac152b6f8bdb8bb12959548d542cb237c4a730064bf88bbb8dd6e204912baad",
      "passwordChangeRequired": false,
      "phoneNumber": "303-555-1212",
      "preferredLanguages": [
        "en",
        "fr"
      ],
      "registrations": [
        {
          "applicationId": "00000000-0000-0000-0000-000000000002",
          "data": {
            "birthplace": "Bremen"
          },
          "insertInstant": 1331449200000,
          "preferredLanguages": [
            "de"
          ],
          "roles": [
            "moderator"
          ],
          "username": "Mausebär",
          "verified": true
        }
      ],
      "salt": "NDdiYWZkZDMtYjk5ZC00ZmZkLWE1YmUtZTQxNGM4MDkwNWYw",
      "timezone": "America/Denver",
      "twoFactor": {
        "methods": [
          {
            "authenticator": {
              "algorithm": "HmacSHA1",
              "codeLength": 6,
              "timeStep": 30
            },
            "secret": "aGVsbG8Kd29ybGQKaGVsbG8gaGVsbG8=",
            "method": "authenticator"
          },
          {
            "method": "sms",
            "mobilePhone": "555-555-5555"
          },
          {
            "method": "email",
            "email": "example@fusionauth.io"
          }
        ]
      },
      "usernameStatus": "ACTIVE",
      "username": "johnny123",
      "verified": true
    }
  ]
}
You can put as many as 100,000 users in each FusionAuth import JSON file.
Import the Users#
After you have transformed your data to the format expected by the Import Users API, load the user data. Place all the JSON files in a directory, and update the shell script below with the location of that directory, the FusionAuth instance hostname and the API key you created above. Then you can run this shell script.
Example Import Shell Script
#!/bin/sh

API_KEY=...
JSON_FILE_DIR=...
FA_HOST=...

for file in $JSON_FILE_DIR/*.json; do
  echo "Processing $file";
  RES=`curl --max-time 600 \
       -s -w "%{http_code}" \
       -H "Authorization: $API_KEY" \
       -H "Content-type: application/json" \
       -XPOST \
       $FA_HOST/api/user/import \
       -d@$file`
  if [ "$RES" -ne "200" ]; then
    echo "Error: $RES";
    exit 1;
  fi
done
You can also review the Import scripts repository for other example scripts which process export data in a more robust fashion; the Auth0 import script is a good example. Pull requests to add Cognito compatibility are welcome!
Now that you have all the users imported, you must reset their passwords. Ouch. Don't worry, you can script it.
Reset Passwords#
Users may reset their password using the Forgot Password link on the login page, or you can use the API calls documented below to do it.
This script will send an email to every imported user. Ensure your SMTP server, configured in Tenants -> Your Tenant -> Email , is able to handle the volume.
Review the Change Password template to ensure the messaging is correct. Here is more information on modifying the template.
Retrieve the loginId from the Cognito JSON export files and place it in a single file. The loginId will either be the username or the email address. Update the script below to use the API key created in Set Up FusionAuth For a Bulk Migration step.
The script below will call the forgot password API for every user. It sleeps periodically to avoid overloading the SMTP server.
Example User Password Reset
#!/bin/bash
API_KEY=...
LOGIN_ID_FILE=...
FA_HOST=...

for loginId in `cat $LOGIN_ID_FILE`; do
  sleep $[( $RANDOM % 10 > 8)] # sleeps 1 second ~10% of the time
  RES=`curl --max-time 600 \
       -s -w "%{http_code}" \
       -H "Authorization: $API_KEY" \
       -H "Content-type: application/json" \
       -XPOST \
       $FA_HOST/api/user/forgot-password \
       -d '{"loginId": "'$loginId'","sendForgotPasswordEmail": true}'`
  if [ "$RES" -ne "200" ]; then
    echo "Error: $RES";
    exit 1;
  fi
done
At the end of this process, you have imported the user data and enabled users to reset their passwords to a known value.
What To Do Next#
You now have your users migrated, or a plan to do so. Congratulations! What is next?
You need to migrate additional configurations, as mentioned in Other Entities. Since the type of configuration varies, it is hard to provide a full list of how to import these items, but the general pattern will be:
- Identify corresponding FusionAuth functionality.
- Configure it in your FusionAuth instance, either manually or by scripting it using the client libraries or API.
- Update your application configuration to use the new FusionAuth functionality.
Make sure you assign your users to the appropriate FusionAuth applications. You can do this either:
- As part of your import process by adding registrations at import time.
- After users have been migrated with the Registrations API.
You'll also need to modify and test each of your applications, whether custom, open source, or commercial, to ensure:
- Users can successfully log in.
- The authorization code redirect is handled correctly.
- Users receive appropriate permissions and roles based on the JWT.
- The look and feel of the hosted login pages matches each application's look and feel.
If your application uses a standard OAuth, SAML or OIDC library to communicate with , the transition should be relatively painless.
If you want to migrate Client Credentials grants, create Entities in FusionAuth corresponding to each Cognito app client that is configured to use the Client Credentials grant. The scopes within FusionAuth are currently constrained to a certain format. Learn more about Entity Management.
You can migrate each of your Cognito app clients to a FusionAuth application using the Application API, which allows you to set your Client Id and Client Secret to be the same as they were in Cognito. Maintaining these values will minimize the impact on any applications using the OAuth Authorization Code grant or Implicit grant. Ensure you add the application to the correct tenant.
Additional Support#
If you need support in your migration beyond that provided in this guide, you may:
- Post in our forums and get support from the community.
- Purchase a support plan and get expert help from the Engineering Team.