Migrate From Passport
This document will help you migrate from Passport authentication to FusionAuth.
This guide assumes you have installed FusionAuth. If you have not, please view our installation guides and install FusionAuth before you begin. For more general migration information, please view the FusionAuth migration guide.
The screenshots, scripts, and code snippets in this guide are from this example Express application, but the migration steps apply to other Node.js applications.
The example project uses Passport to implement authentication using two common strategies:
passport-local: Username-and-password authentication using credentials stored in the application's database.passport-google-oauth20: OAuth social login using Google.
Each approach requires different user data to be migrated. Passport itself doesn't manage user data; it only handles authentication. Your application defines the user model, database schema, and data storage approach.
The export script and migration strategies here are tailored to each authentication method, preserving user passwords (where applicable), account states, and social login connections so users can continue logging in with their current credentials.
Prerequisites#
To follow this tutorial, you need:
- Node.js 22 or higher to run the migration script.
- FusionAuth. The easiest way to run FusionAuth locally is to use Docker with the configuration file provided later in this tutorial.
- ngrok (optional) to expose your local Express application for testing purposes.
Planning Considerations#
Slow Migration Or Bulk Migration#
To preserve your users' passwords, you need to perform a slow migration. Users log in to FusionAuth with their existing credentials, and FusionAuth transparently migrates their data. Slow migrations in FusionAuth use Connectors, a paid feature.
If, on the other hand, resetting user passwords is acceptable, a Bulk Migration can work for you. Review that section for more details on the required steps. You may also perform a bulk migration after a slow migration has run for a while. Active users can be transparently migrated, and infrequent users may not mind resetting their passwords.
You can learn more about the types of migrations that FusionAuth supports here.
Obtaining User Data#
To migrate users from a Node.js application, you'll need to export user data from your database. Since Passport doesn't manage user data directly, the export process depends on your database and user schema.
passport-local#
Applications using passport-local store user credentials in their database. Common user data includes:
emailorusername: The primary user identifier.password: The hashed password, usually bcrypt.emailVerifiedorconfirmed: Email verification status.firstName,lastName,displayName: User profile information.loginAttempts,blocked,lastLogin: Security and access control fields.
This data can be exported directly from the database and preserved in FusionAuth during migration.
OAuth Strategies#
Applications using OAuth strategies store minimal local user data since authentication happens through external providers. Exporting data from an application using OAuth focuses on:
- Profile fields such as
email,name,username, andavatar. - Provider connection data like the provider Id (
googleId,githubId, orfacebookId).
FusionAuth uses the provider Id to link migrated user accounts to the correct external identity provider.
Mapping User Attributes#
The attributes of the User object in FusionAuth are well documented.
If there is an attribute in your Passport user that cannot be directly mapped to a FusionAuth attribute, you can place it in the user.data field. This field can store arbitrary JSON values and will be indexed and searchable.
Social Logins#
Passport.js also provides integrations with other social login providers such as Twitter, Google or Facebook. Review the supported FusionAuth Identity Providers to ensure your social providers are supported.
If not supported explicitly, a provider may work with an OIDC or SAML connection. Otherwise, please open a feature request.
When migrating social logins, you may need to modify the switches of the Passport.js import script. See Use the Script for more.
Migrating users with social logins such as Apple or Facebook requires that you have an existing user Id for that provider. What this unique user Id looks like depends on the particular social identity provider. The unique Id may be an email address, an integer, UUID, or a random string.
Configure the appropriate FusionAuth Identity Provider with the same values (client_id, etc) as the original user management system you are migrating away from.
Import users with the Import API, assigning each user with a social login a random password such as a UUID.
Your next step depends on whether the social login provider's unique identifier is available as part of your migration data. If you have the social login provider's unique identifier, for each user, use the Link API to create a link with the appropriate User Id, Identity Provider Id, and Identity Provider User Id.
- The User Id is the Id of the recently created FusionAuth User.
- The Identity Provider Id is found on the corresponding Identity Provider API documentation. Look for identityProvider.id.
- The Identity Provider User Id is the existing social provider user identifier exported or otherwise extracted from the original system.
You do not need to migrate the social network token, which may or may not be accessible. During the first login of a newly migrated user, FusionAuth finds the unique user in the social login provider based on the migrated Identity Provider User Id, and completes the login. During this process, FusionAuth stores a token on the Link, if the social provider returns one. Depending on the configuration of the social provider, users may see a prompt asking if they want to allow FusionAuth to have access to user data such as email address.
IdP linking strategies have been available since version 1.28.0. Before that version, users were linked on email.
If you do not have the social login provider's identifier, you need to decide if you want to transparently link the two accounts, which is easier for the end user, or if you want to ask the user to manually link the accounts, which is more accurate, but may be confusing.
To transparently link the accounts, choose a linking strategy of Link On Email or Link On Username, which will create the user if they don't exist. However, if the user has an email address at their social provider which differs from the email address that was used to sign up for your application and which you imported to FusionAuth, then two accounts will be created.
For example, if the user has a Google account richard@gmail.com, but signed up for your application with richard@fusionauth.io, then if you use the Link On Email strategy, two different accounts will be created, since FusionAuth is trying to match on email address and they don't. The same holds true for usernames with the Link on Username strategy.
To prompt the user to link the accounts, choose a linking strategy of Pending, which will prompt the end user to sign into FusionAuth after they sign into the social provider, authoritatively linking the two accounts.
Here's more information about IdP Linking Strategies.
Apple only returns a user's full name the first time the user logs in. Since you have users who have already used Apple to log in to your previous authentication gateway, Apple will not provide the user's name when they log in to FusionAuth now. The only solution is to import the user's name manually from your previous database into FusionAuth.
Other Entities#
There are often other important entities, such as roles, that need to be migrated. There are usually fewer of these, so an automated migration may not make sense, but plan to move this configuration somehow.
Be aware that functionality may not be the same between Passport and FusionAuth. This is different from user data; as long as you can somehow migrate a login identifier (a username or email) and a password hash, a user will be authenticated and successfully migrated. You can download FusionAuth before you begin a migration and build a proof of concept to learn more about the differences.
Identifiers#
When creating an object with the FusionAuth API, you can specify the Id. It must be a UUID.
This works for users, applications, and tenants, among others.
If you have external dependencies on an Id stored in Node.js/Passport.js applications, port the same Id over to FusionAuth.
Exporting Users#
To export users from a Node.js application that uses Passport, you'll need a script that queries the database and formats the data for import into FusionAuth.
The export script in the following section generates a JSON file ready for import into FusionAuth. Before running the script:
- Update the application Id values to match your FusionAuth application Ids.
- Modify the User model field references to match your application's schema.
Step 1: Export Raw User Data#
The following script exports raw user data from a Node.js application database.
import { promises as fs } from 'fs';
import sqlite3 from 'sqlite3';
import { promisify } from 'util';

// SQLite database connection
const db = new sqlite3.Database('./db/users.db');
const dbAll = promisify(db.all.bind(db));

try {
  const rows = await dbAll('SELECT * FROM users ORDER BY created_at DESC');
  console.log(`Found ${rows.length} users to export`);

  await fs.writeFile('users.json', JSON.stringify(rows, null, 4));

  console.log('Export completed successfully!');
  console.log('File saved as: users.json');
  console.log(`Total users exported: ${rows.length}`);

  // Show breakdown by provider
  const localUsers = rows.filter(u => u.provider === 'local').length;
  const oauthUsers = rows.filter(u => u.provider === 'google').length;
  console.log(`- Local users: ${localUsers}`);
  console.log(`- OAuth users: ${oauthUsers}`);

} catch (error) {
  console.error('Export failed:', error);
  process.exit(1);
} finally {
  db.close();
}
The script creates a users.json file containing the exported data, similar to the example below.
[
  {
    "id": 5,
    "email": "sarah.johnson@techcorp.com",
    "password": "$2b$10$TlFbuG62ZB29BQCRA2R6IeU544NuZb4GX8bXIMds5jR6tXReLnQhK",
    "name": "Sarah Johnson",
    "google_id": null,
    "avatar": null,
    "provider": "local",
    "verified": 1,
    "active": 1,
    "last_login_at": null,
    "created_at": "2025-07-25 04:24:58",
    "updated_at": "2025-07-25 04:24:58"
  }
]
Step 2: Convert The User Objects To A Format Supported By FusionAuth#
The conversion script transforms the raw data into FusionAuth's required format.
import { promises as fsp } from 'fs';
import * as fs from 'fs';
import parser from 'stream-json';
import StreamArray from 'stream-json/streamers/StreamArray.js';
import Chain from 'stream-chain';
import { v4 as uuid, validate as uuidValidate } from 'uuid';

const inputFilename = 'users.json';
const outputFilename = 'faUsers.json';
const applicationId = 'e9fdb985-9173-4e01-9d73-ac2d60d1dc8e';

processUsers();

async function processUsers() {
  await fsp.writeFile(outputFilename, '[\n', 'utf8');
  const inputUsers = new Chain([fs.createReadStream(inputFilename), parser(), new StreamArray(),]);
  let isFirstLine = true;
  for await (const { value: user } of inputUsers) {
    if (!isFirstLine) await fsp.appendFile(outputFilename, ',\n', 'utf8');
    isFirstLine = false;
    await fsp.appendFile(outputFilename, JSON.stringify(getFaUserFromUser(user)), 'utf8');
  }
  await fsp.appendFile(outputFilename, '\n]', 'utf8');
}

// Fields are detailed here: https://fusionauth.io/docs/apis/users#request-6
function getFaUserFromUser(user) {
  const faUser = {};

  //ID field
  // Do it if id is an UUID
  if (uuidValidate(user.id)) {
    faUser.id = user.id;
  } else {
    faUser.id = uuid();
  }

  // SecureIdentity fields ------
  faUser.email = user.email;
  faUser.username = user.email;
  faUser.uniqueUsername = user.email;

  // Handle password - FusionAuth requires a password for all users
  if (user.password && user.password.trim() !== '') {
    // Parse bcrypt hash: $2a$10$salt+hash (22 chars salt, rest is hash)
    const bcryptMatch = user.password.match(/^\$2[aby]\$(\d+)\$(.{22})(.+)$/);
    if (bcryptMatch) {
      // Valid bcrypt hash found
      faUser.encryptionScheme = 'bcrypt';
      faUser.factor = parseInt(bcryptMatch[1]);
      faUser.salt = bcryptMatch[2];
      faUser.password = bcryptMatch[3];
      faUser.passwordChangeRequired = false;
    } else {
      console.error(`CRITICAL ERROR: Failed to parse bcrypt hash for user ${user.email}`);
      console.error(`Password hash: ${user.password}`);
      console.error(`This indicates the password hashing algorithm has changed.`);
      console.error(`Please update the conversion script to handle the new algorithm.`);
      process.exit(1);
    }
  } else {
    // No password (OAuth users) - generate random UUID password
    faUser.password = uuid();
    faUser.encryptionScheme = 'bcrypt';
    faUser.factor = 10;
    faUser.salt = '';
    faUser.passwordChangeRequired = false; // OAuth users don't need to change password
  }

  // User fields ------
  faUser.active = Boolean(user.active);
  faUser.verified = Boolean(user.verified);

  // Set name
  if (user.name) {
    const nameParts = user.name.split(' ');
    faUser.firstName = nameParts[0];
    if (nameParts.length > 1) {
      faUser.lastName = nameParts.slice(1).join(' ');
    }
  }

  if (user.created_at) {
    faUser.insertInstant = new Date(user.created_at).getTime();
  }
  if (user.updated_at) {
    faUser.lastUpdateInstant = new Date(user.updated_at).getTime();
  }
  if (user.last_login_at) {
    faUser.lastLoginInstant = new Date(user.last_login_at).getTime();
  }

  faUser.registrations = [{
    'applicationId': applicationId,
    'roles': ['user']
  }];
  faUser.tenantId = 'd7d09513-a3f5-401c-9685-34ab6c552453';

  faUser.data = {
    "ImportedFromExpressPassport": true,
    "source_system": "express_passport",
    "original_user_id": user.id,
    "provider": user.provider
  };

  // Add OAuth specific data for identity linking
  if (user.provider === 'google_oauth2' && user.google_id) {
    faUser.data.google_id = user.google_id;
    faUser.data.oauth_provider = 'google';
  }

  return faUser;
}
The conversion script generates a faUsers.json file ready for import into FusionAuth.
If your application uses a different password hashing algorithm than bcrypt, you'll need to identify the encryption scheme and properly separate the hash components according to FusionAuth's requirements. When exporting password data, you must provide:
encryptionScheme: The hashing algorithm used.password: The hashed password portion.salt: The salt value, if applicable to the scheme.factor: The cost factor or iteration count.
Review the supported password hashing schemes to see available options and the Import Users API documentation for implementation details, or consider creating a custom password encryptor if your scheme isn't supported.
Importing Users#
Next up, import the user data. Here are the steps you need to take:
- Set up FusionAuth
- Get the script
- Install needed packages
- Use the script
- Verify the import
- The final destination of imported users
Set Up FusionAuth#
You need to set up FusionAuth in order to store migrated user data. As mentioned above, this guide assumes you have FusionAuth installed.
If you don't, view our Getting Started guide and install it before proceeding further.
Create A Test Tenant#
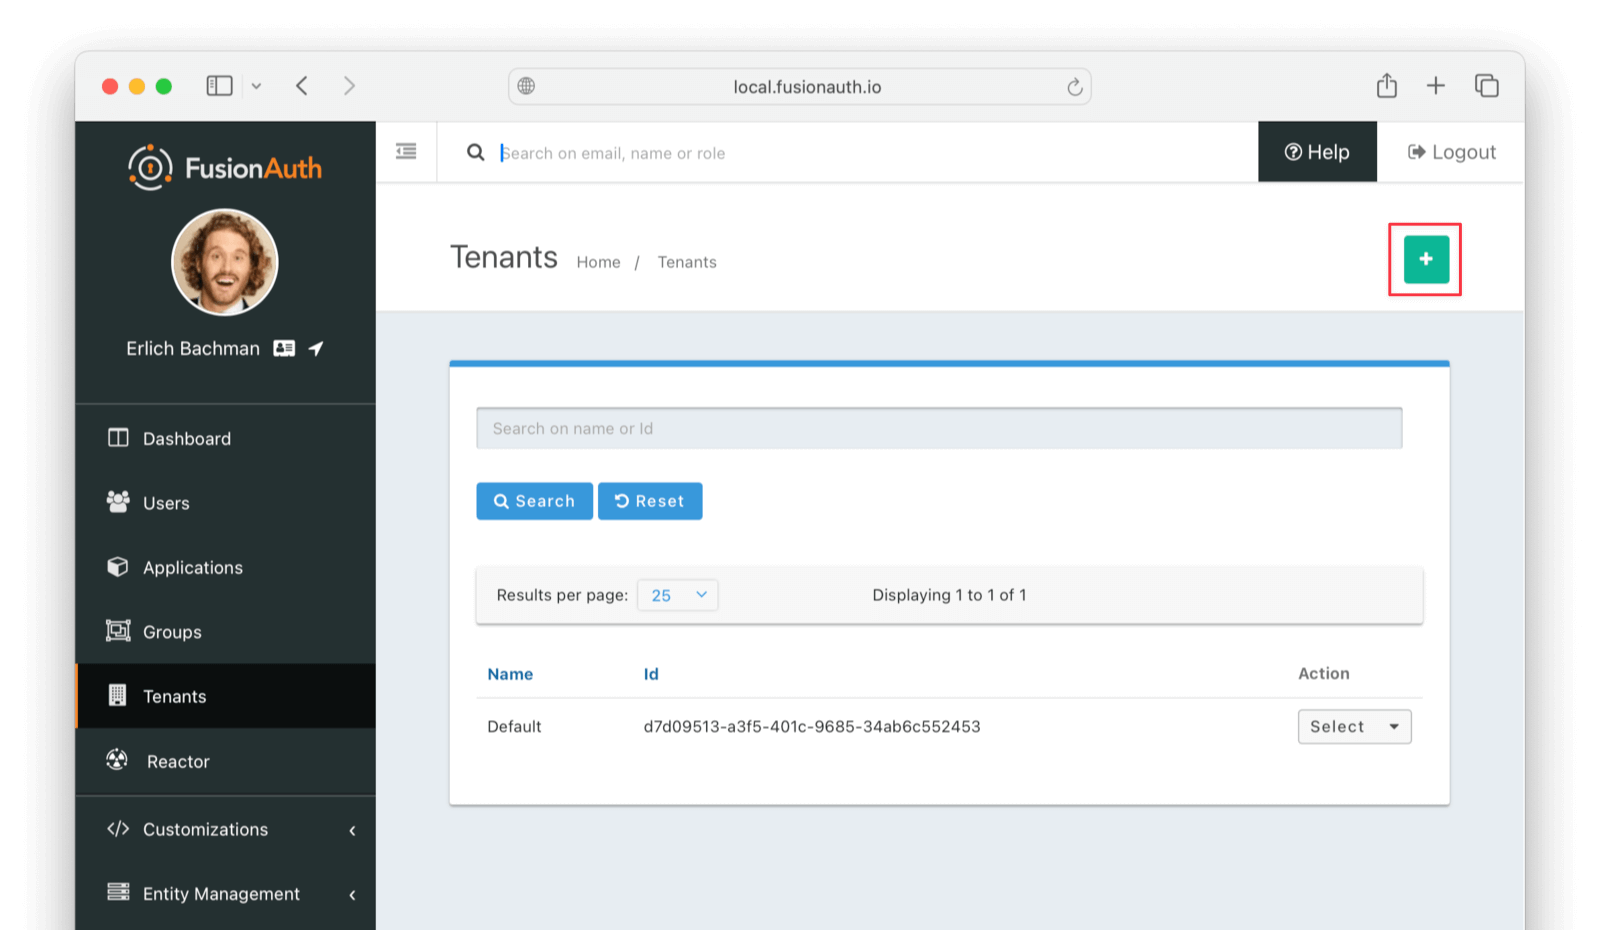
It is best to create a separate tenant for migration testing. Tenants logically isolate configuration settings and users. If a migration goes awry or you need to redo it after tweaking settings, you can delete the test tenant and start with a clean system. To add a tenant, navigate to Tenants and click the Add button.
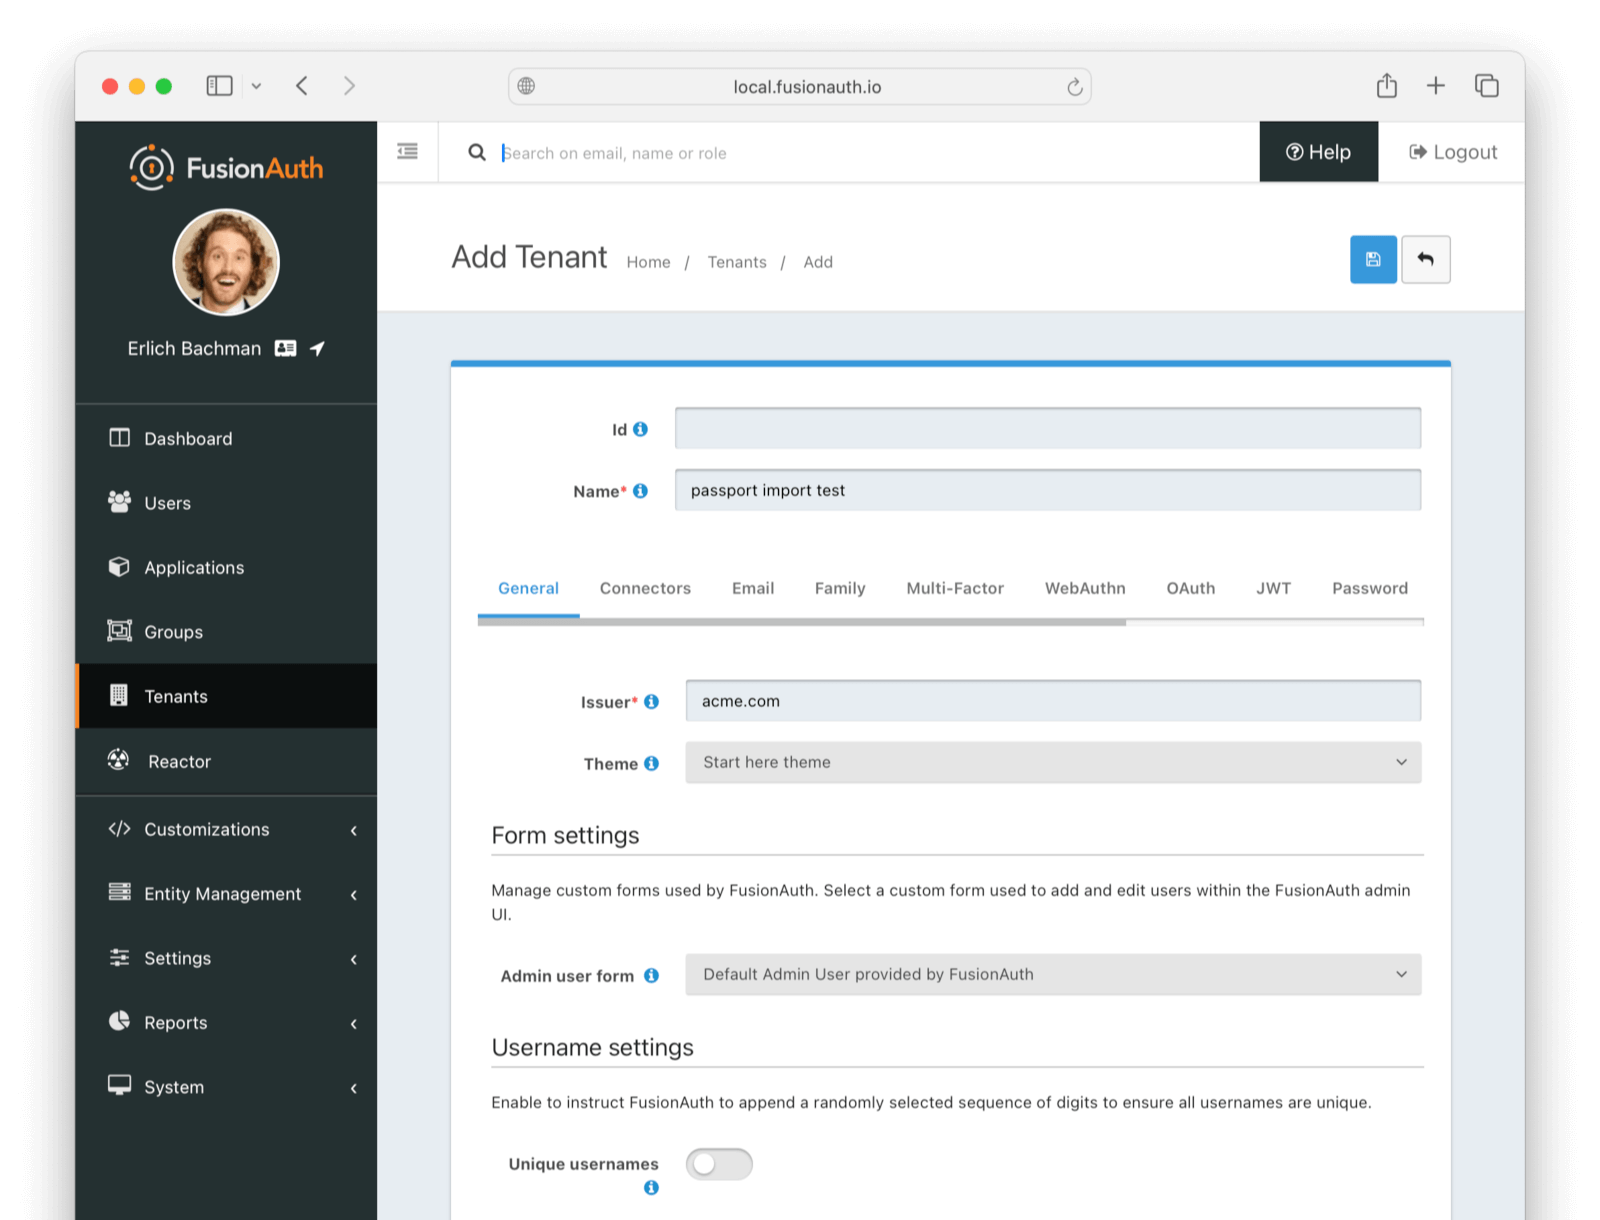
Give it a descriptive Name like passport import test. You shouldn't need to modify any of the other configuration options to test importing users.
Save the tenant.
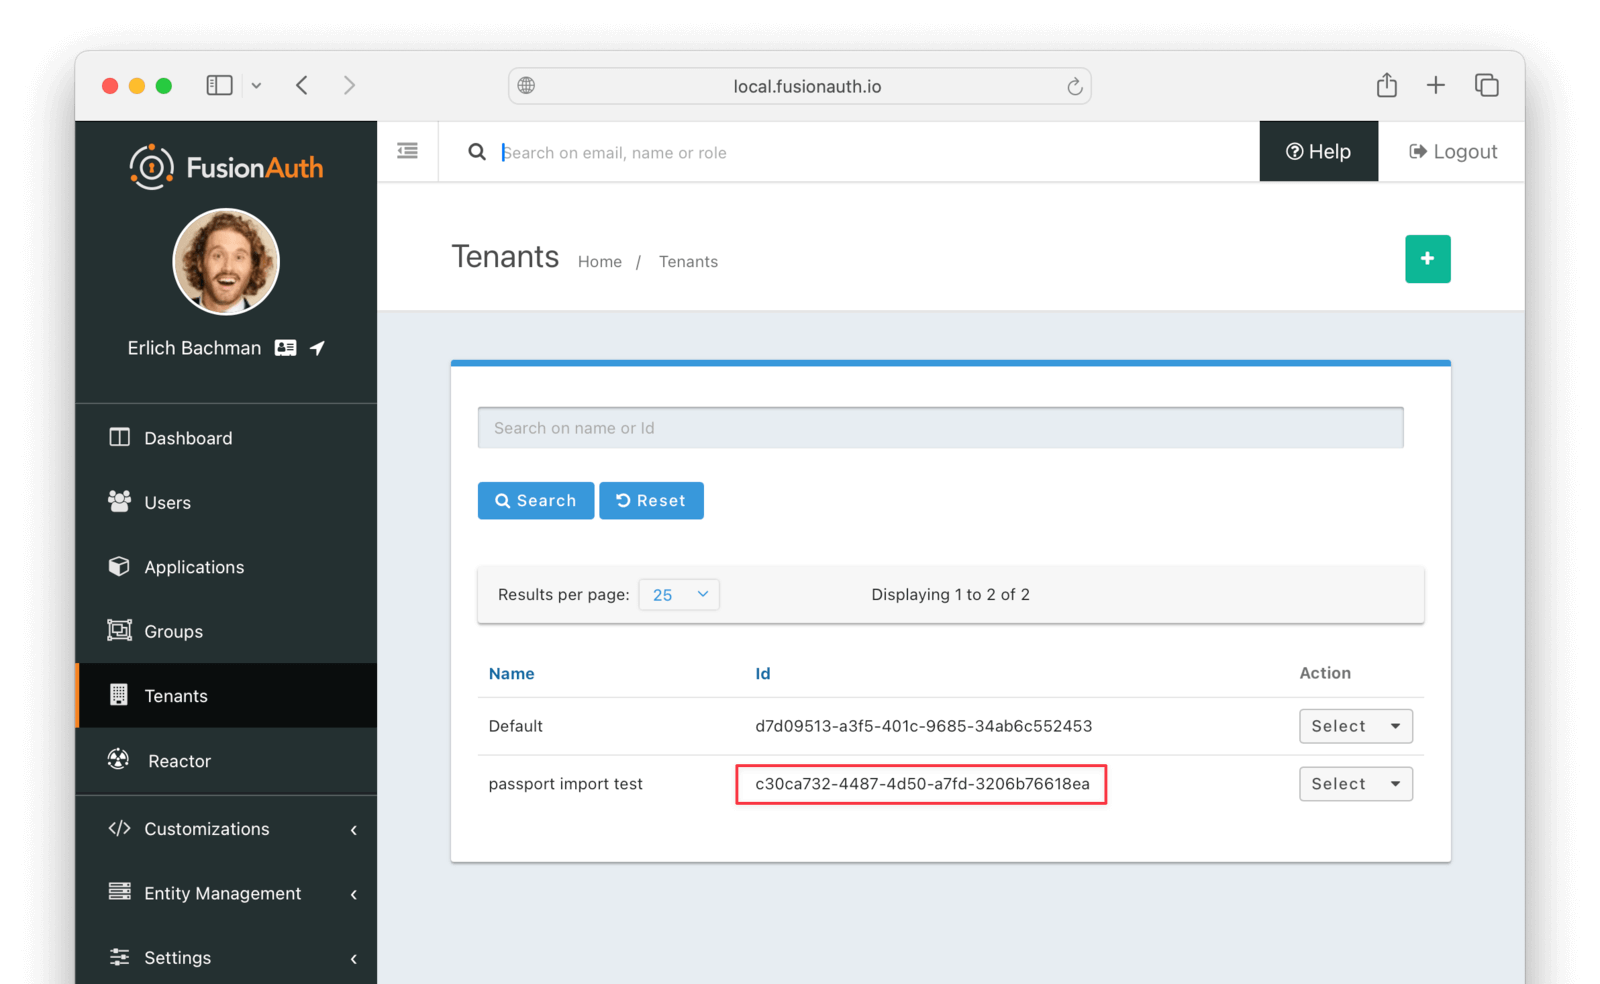
Record the Id of the tenant, which will be a UUID. It will look something like 25c9d123-8a79-4edd-9f76-8dd9c806b0f3. You'll use this later.
Create A Test Application#
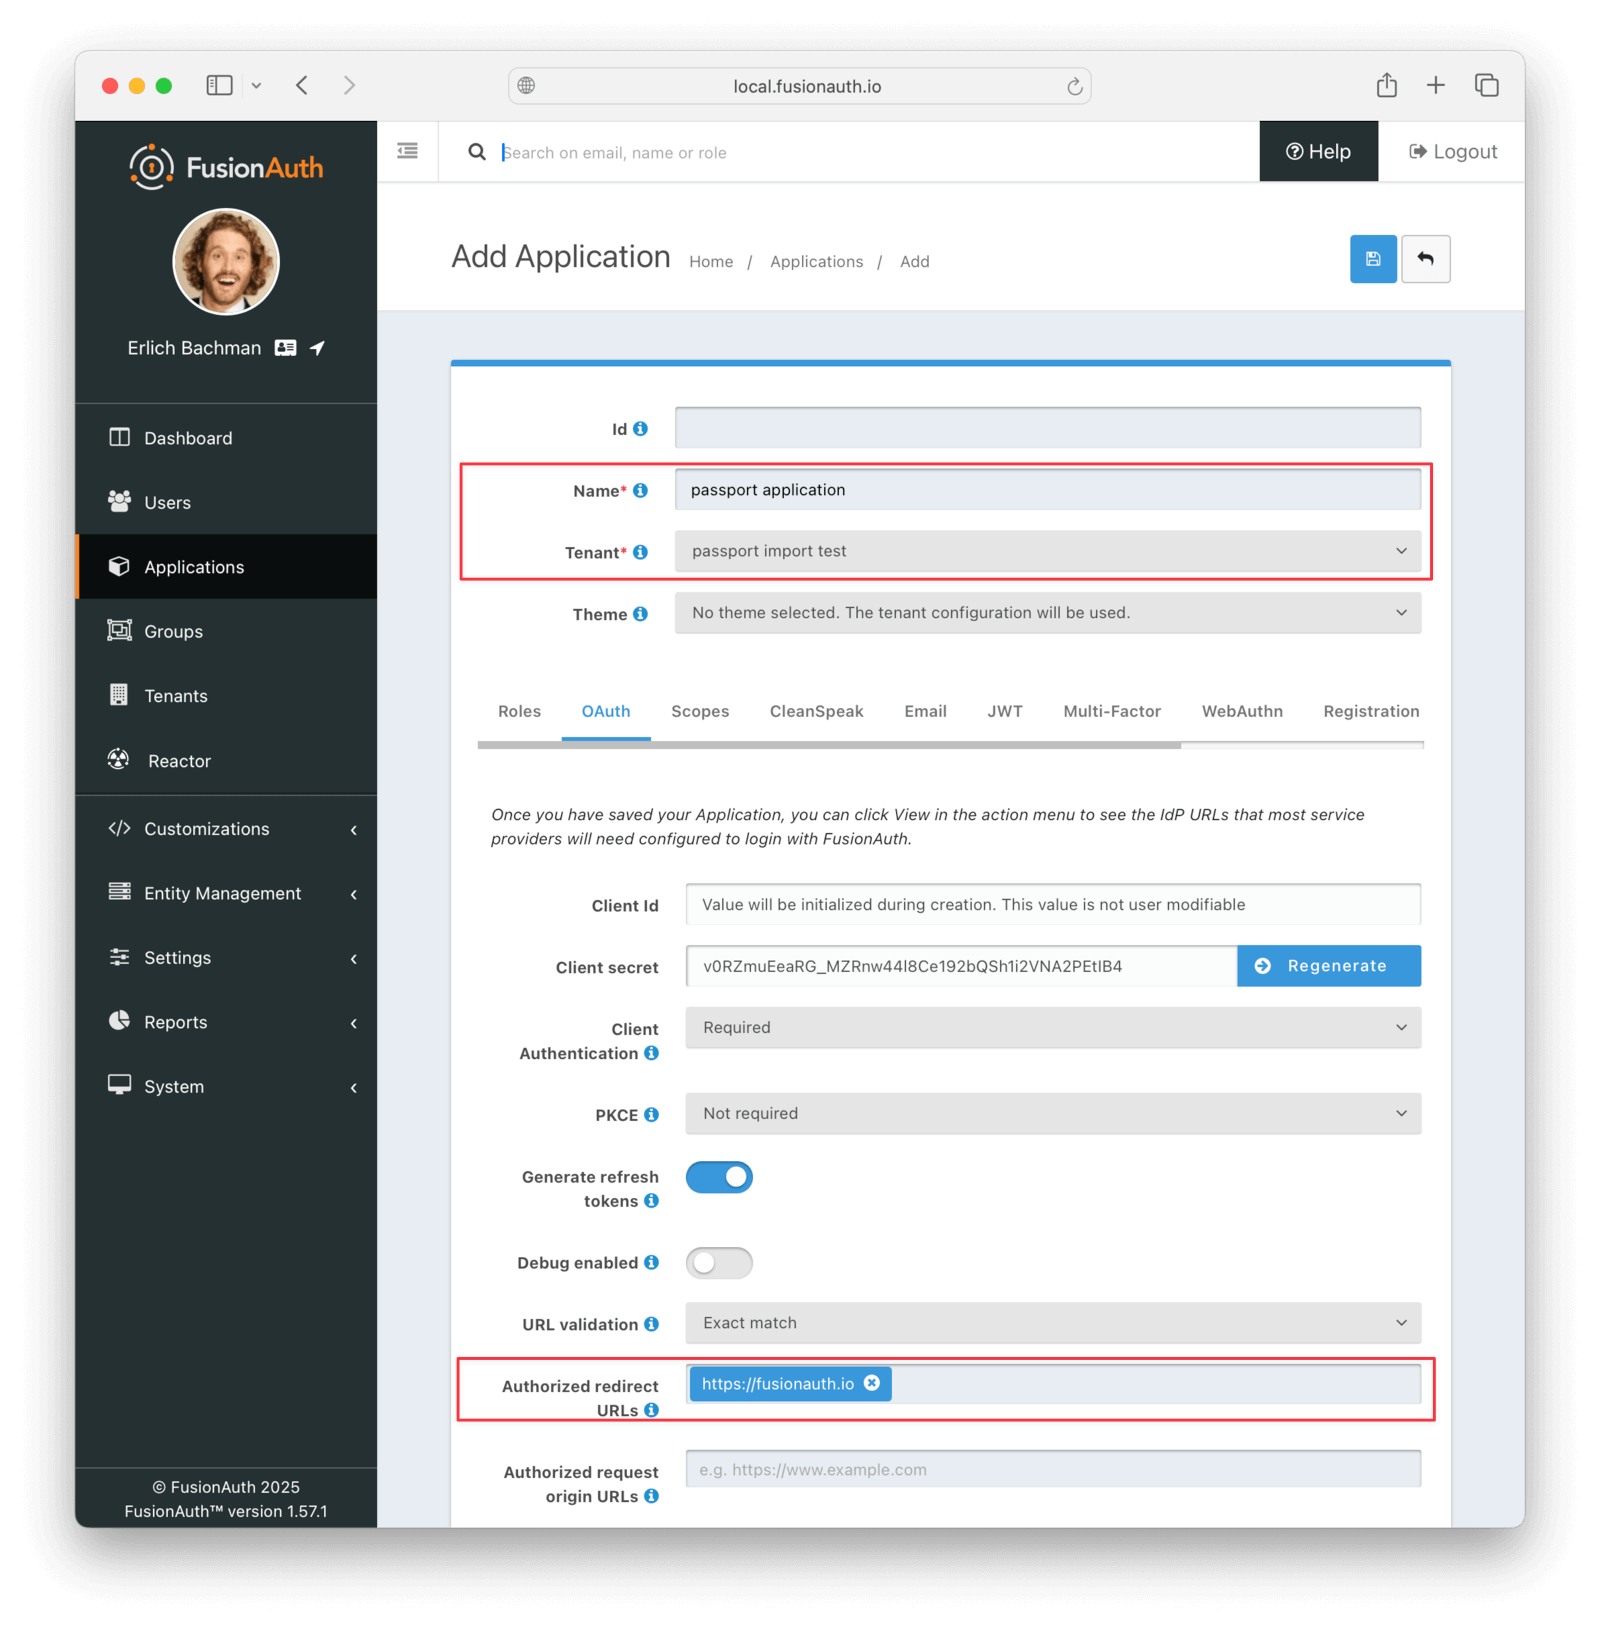
Applications are anything a user can log in to. In FusionAuth there's no differentiation between web applications, SaaS applications, APIs and native apps. To add an application, navigate to Applications and click on the Add button. Give the application a descriptive name like {props.migration_source_name} application.
Select your new tenant, created above, in the dropdown for the Tenant field.
Navigate to the OAuth tab and add an entry to Authorized redirect URLs. Use a dummy value such as https://example.com. Later, you'll need to update this to be a valid redirect URL that can take the authorization code and exchange it for a token. Learn more about this in the FusionAuth OAuth documentation.
You shouldn't need to modify any of the other configuration options to test importing users. Save the application.
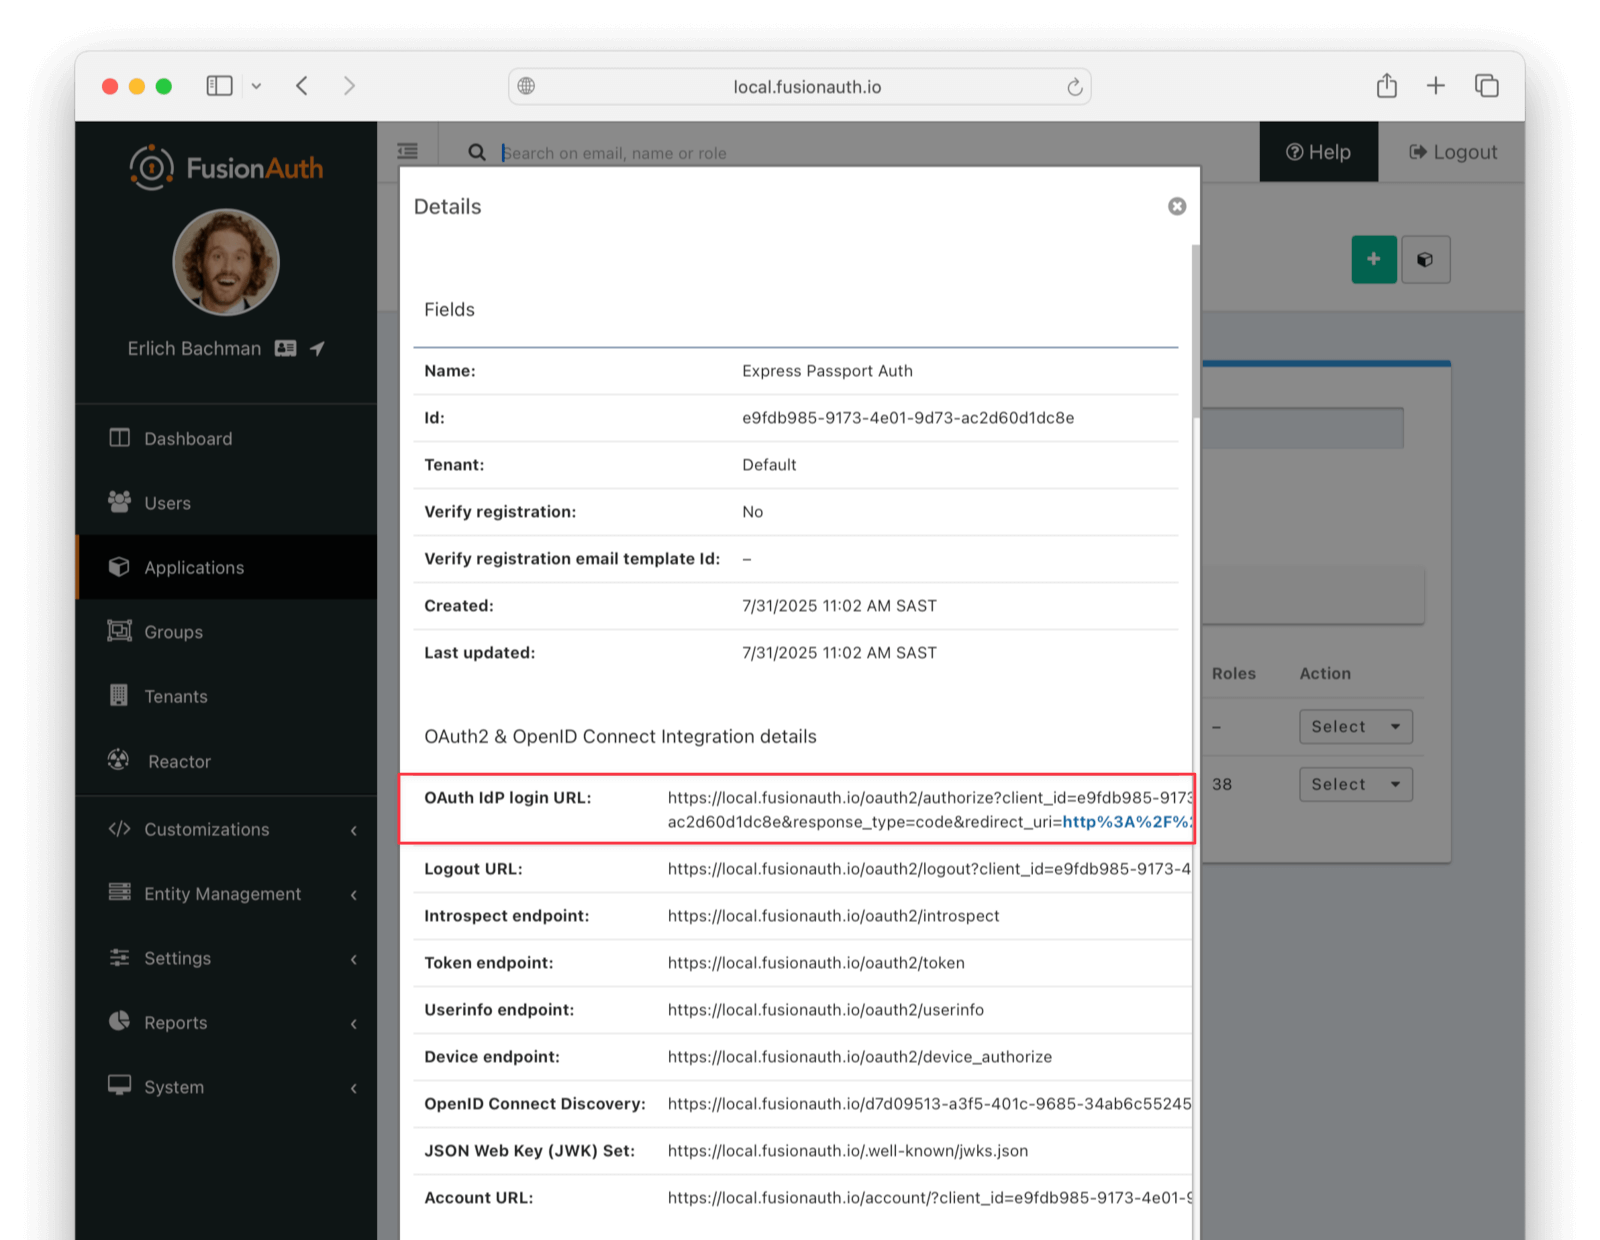
Next, view the application by clicking the Select dropdown and choosing View , then note the OAuth IdP login URL. You'll be using it to test that users can log in.
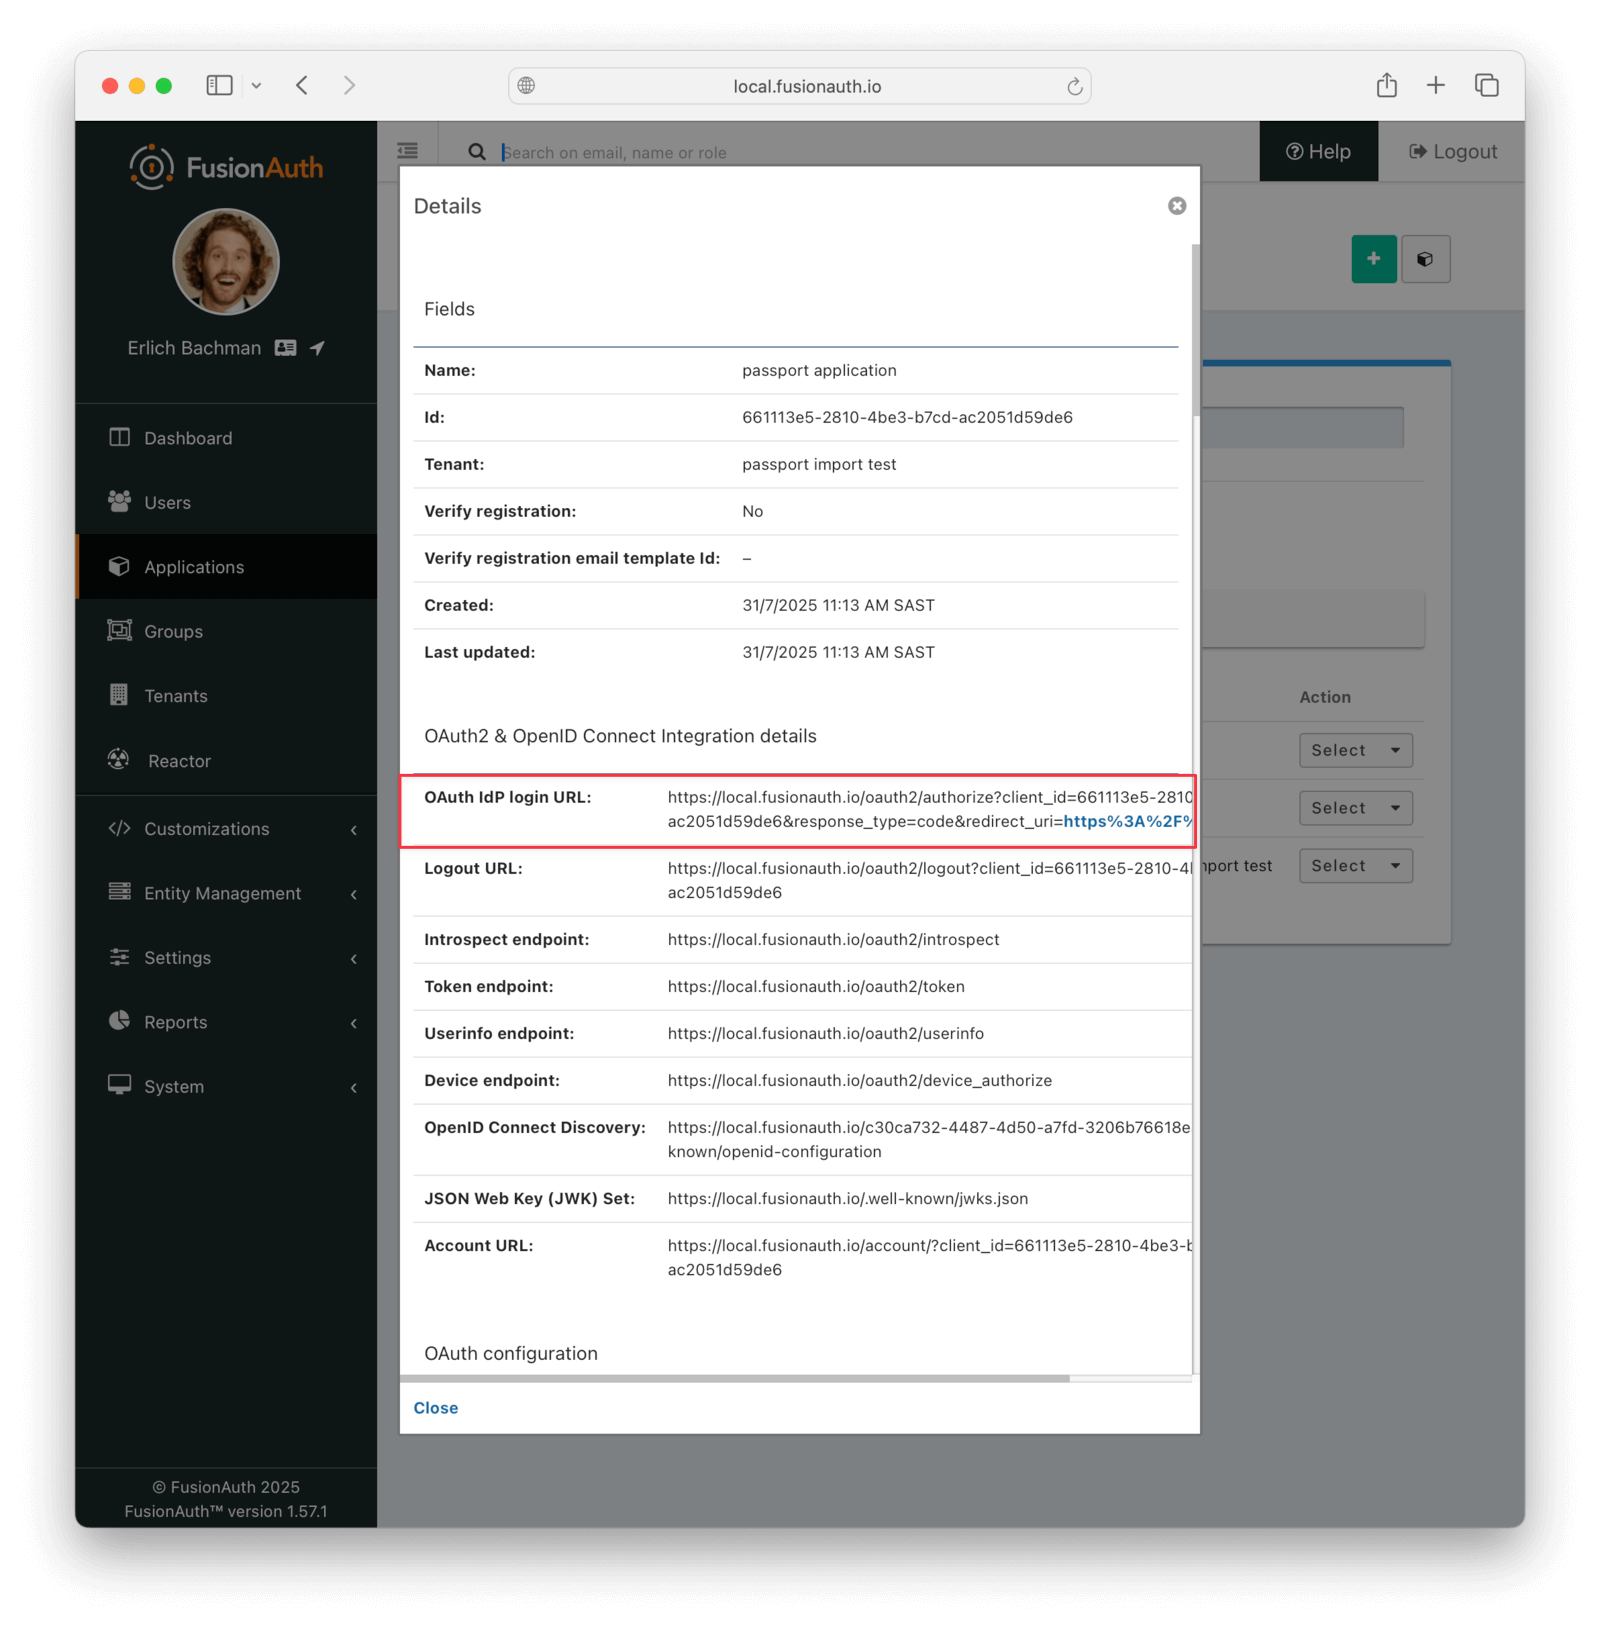
Set Up User Roles#
Before importing users, create the roles they'll need in your FusionAuth application. For this example, create a "user" role.
Navigate to Applications and click the Select dropdown next to your test application. Select Manage Roles .
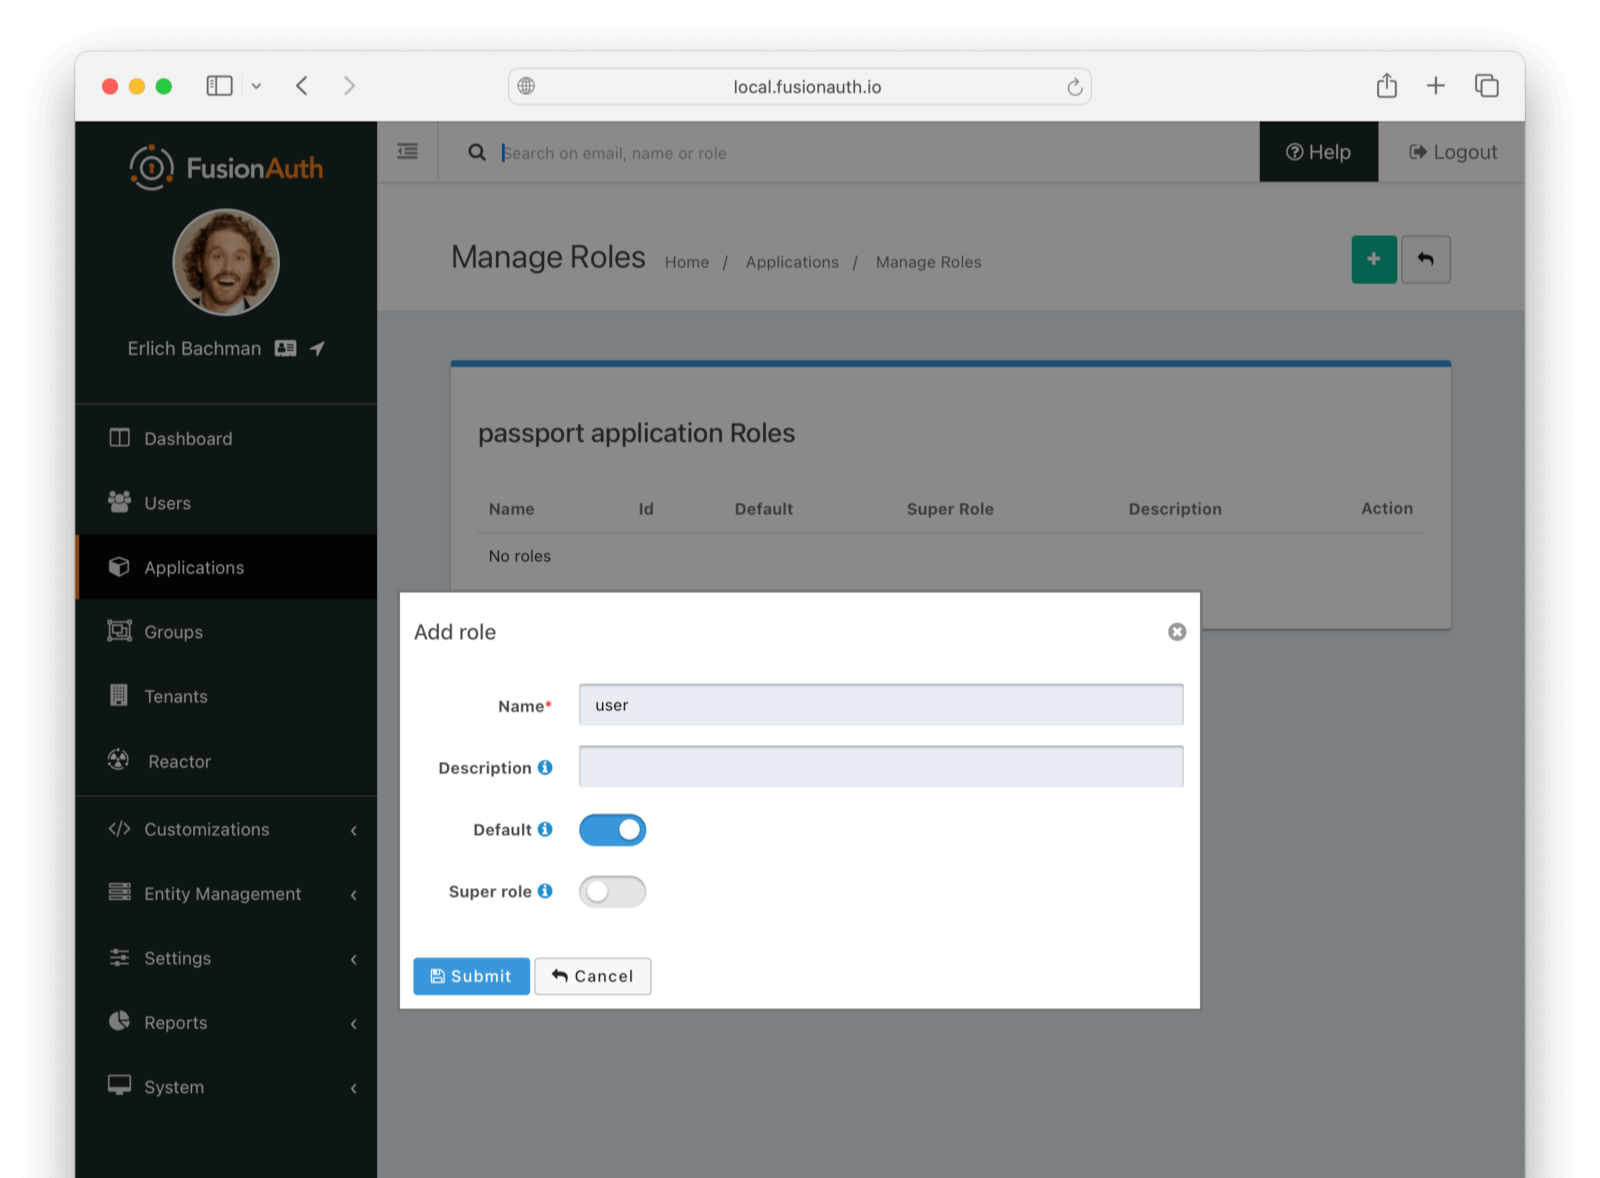
On the roles page, click the Add button to create a new role.
Configure the role:
- Set Name to
user. - Enable the Default toggle so new users automatically receive this role.
- Leave the default values for the other settings.
Click Submit to create the role.
You can create additional roles as needed based on your application's authorization structure. The export scripts reference these role names in the registrations section of the user data.
Add An API Key#
The next step is to create an API key. This will be used by the import script. To do so, navigate to Settings -> API Keys in the administrative user interface.
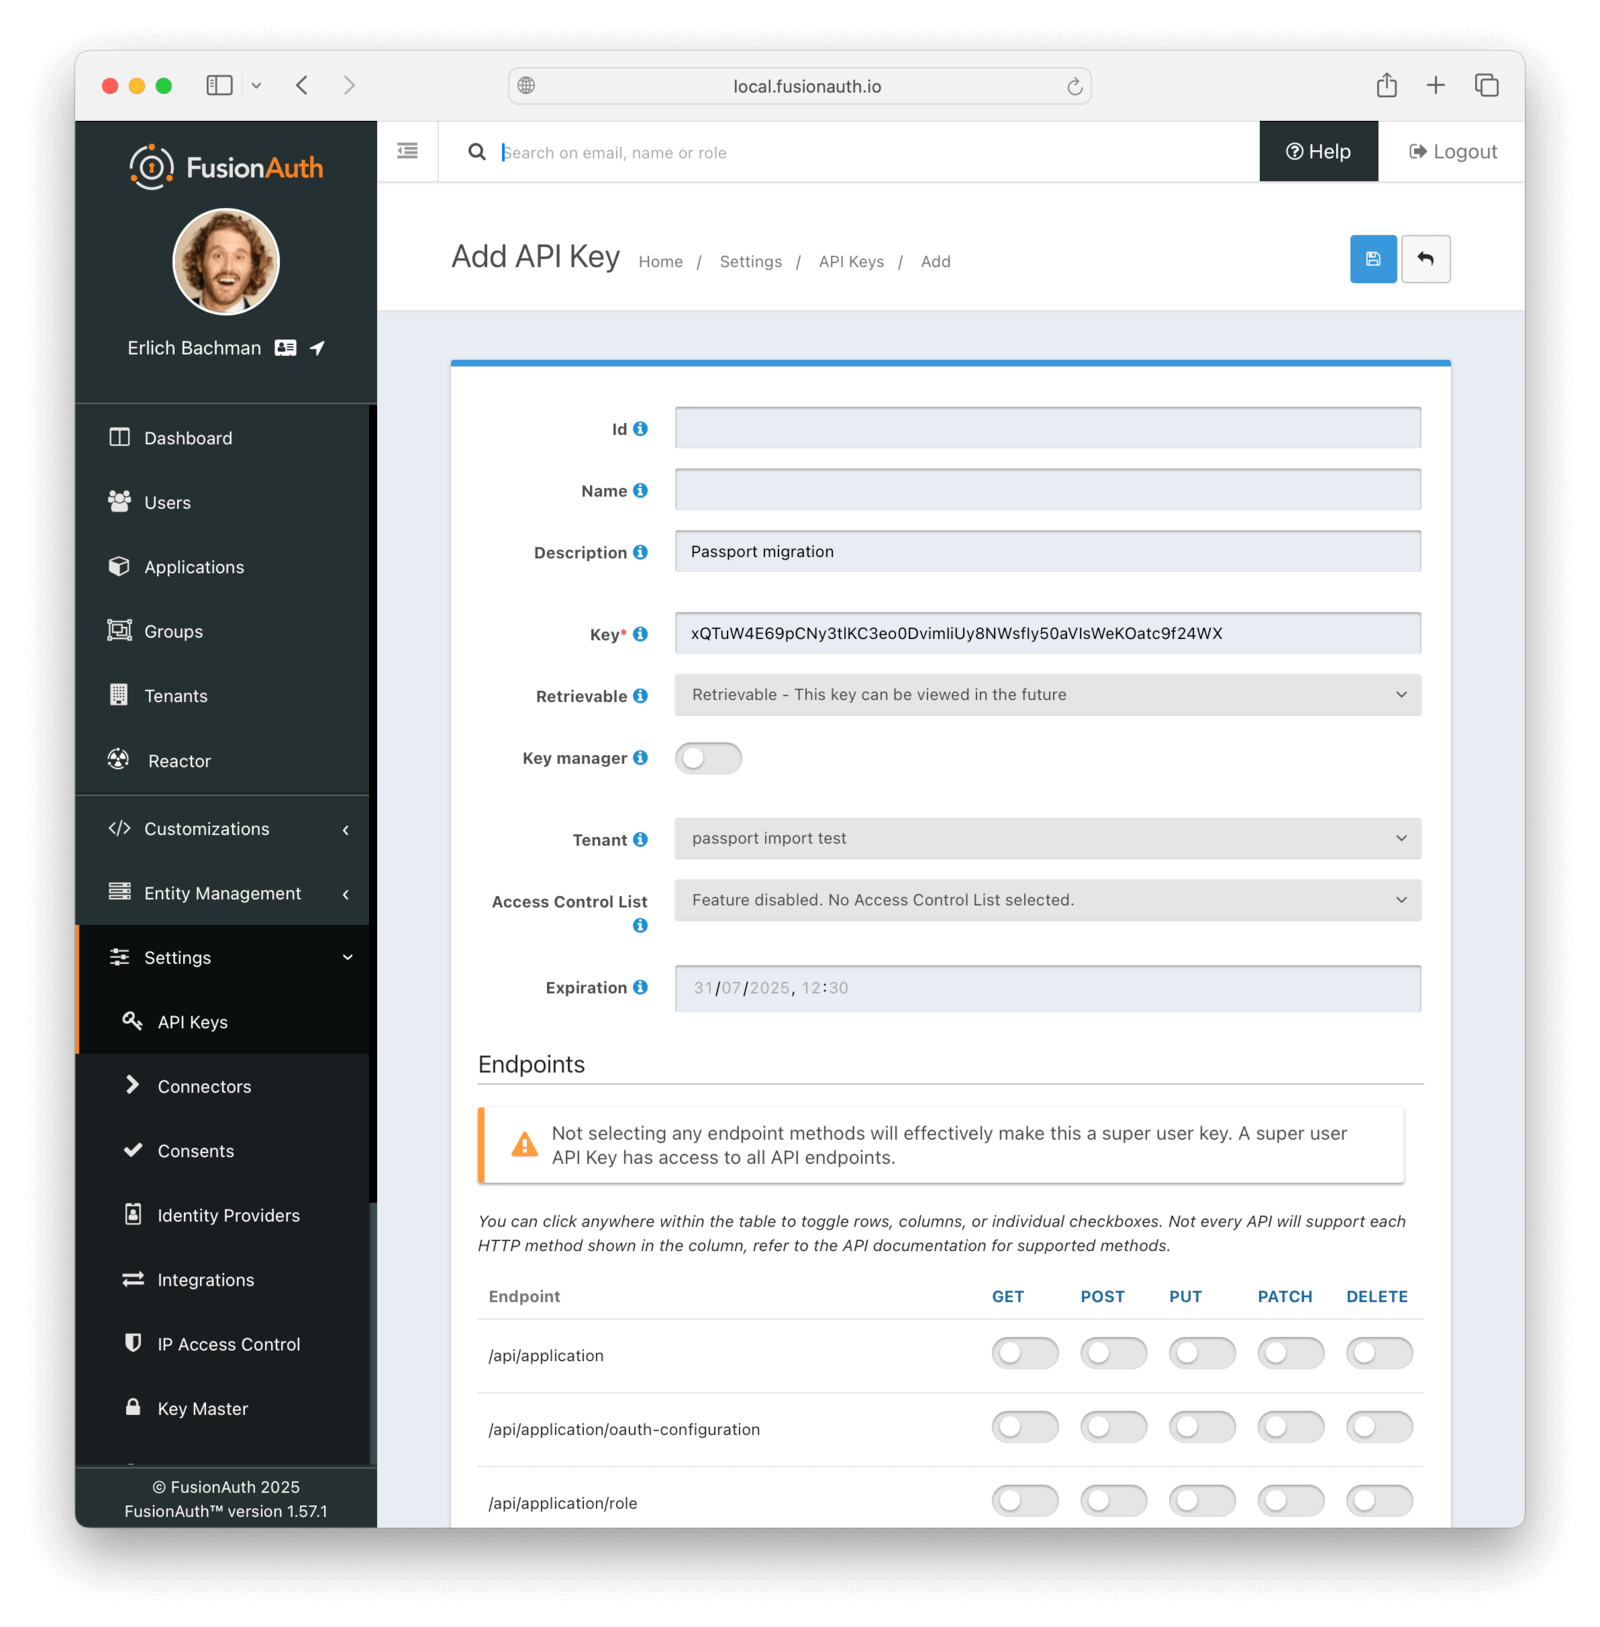
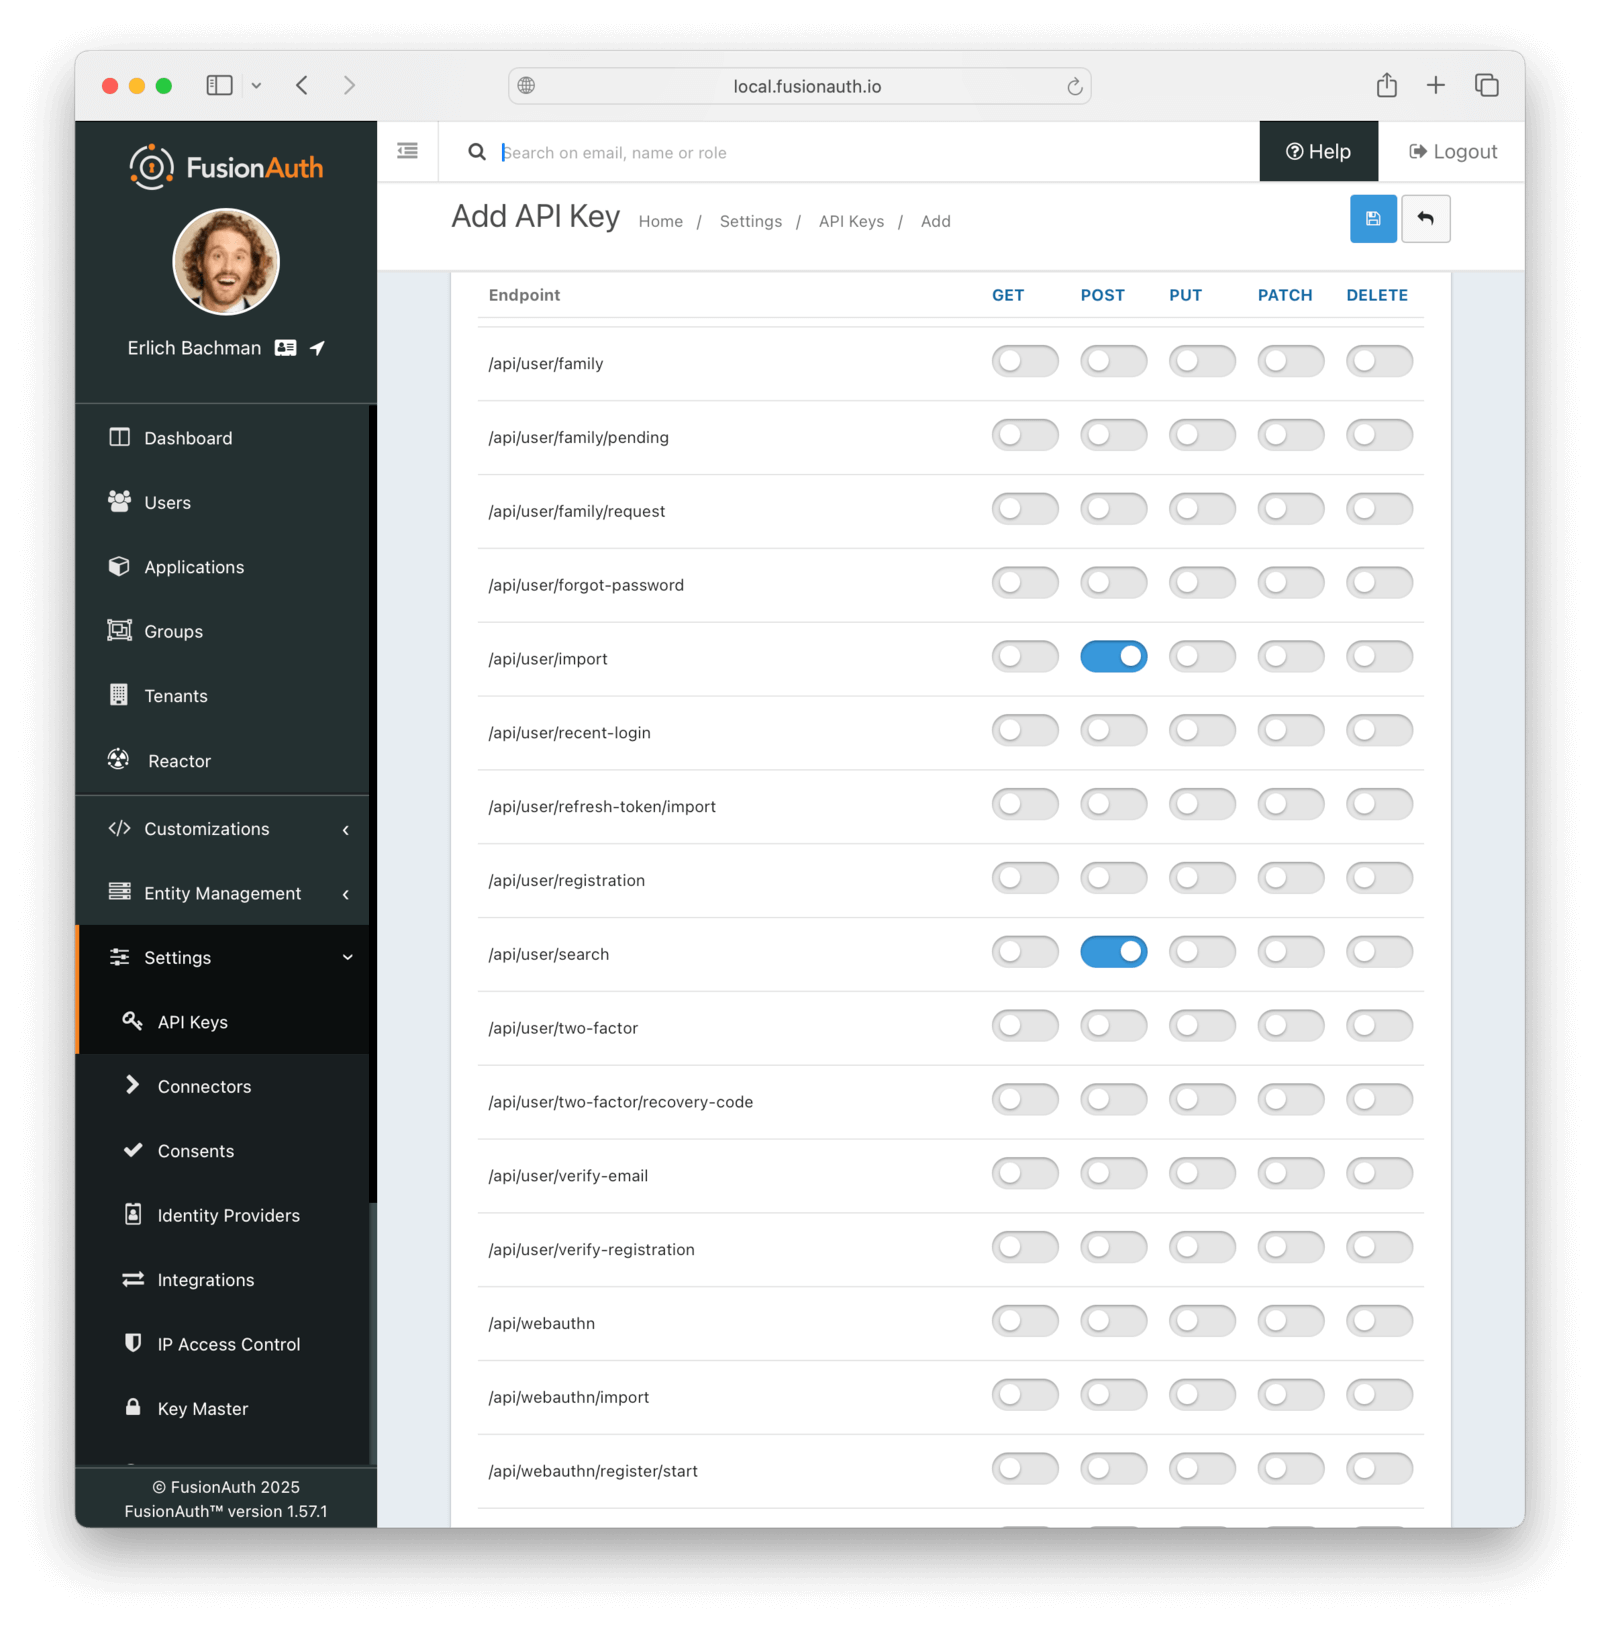
This key needs to have the permission to run a bulk import of users. In the spirit of the principle of least privilege, give it only the following permissions:
POSTto the/api/user/importendpoint.POSTto the/api/user/searchendpoint.POSTto the/api/identity-provider/linkendpoint (not shown below).
Record the API key string, as you'll use it below.
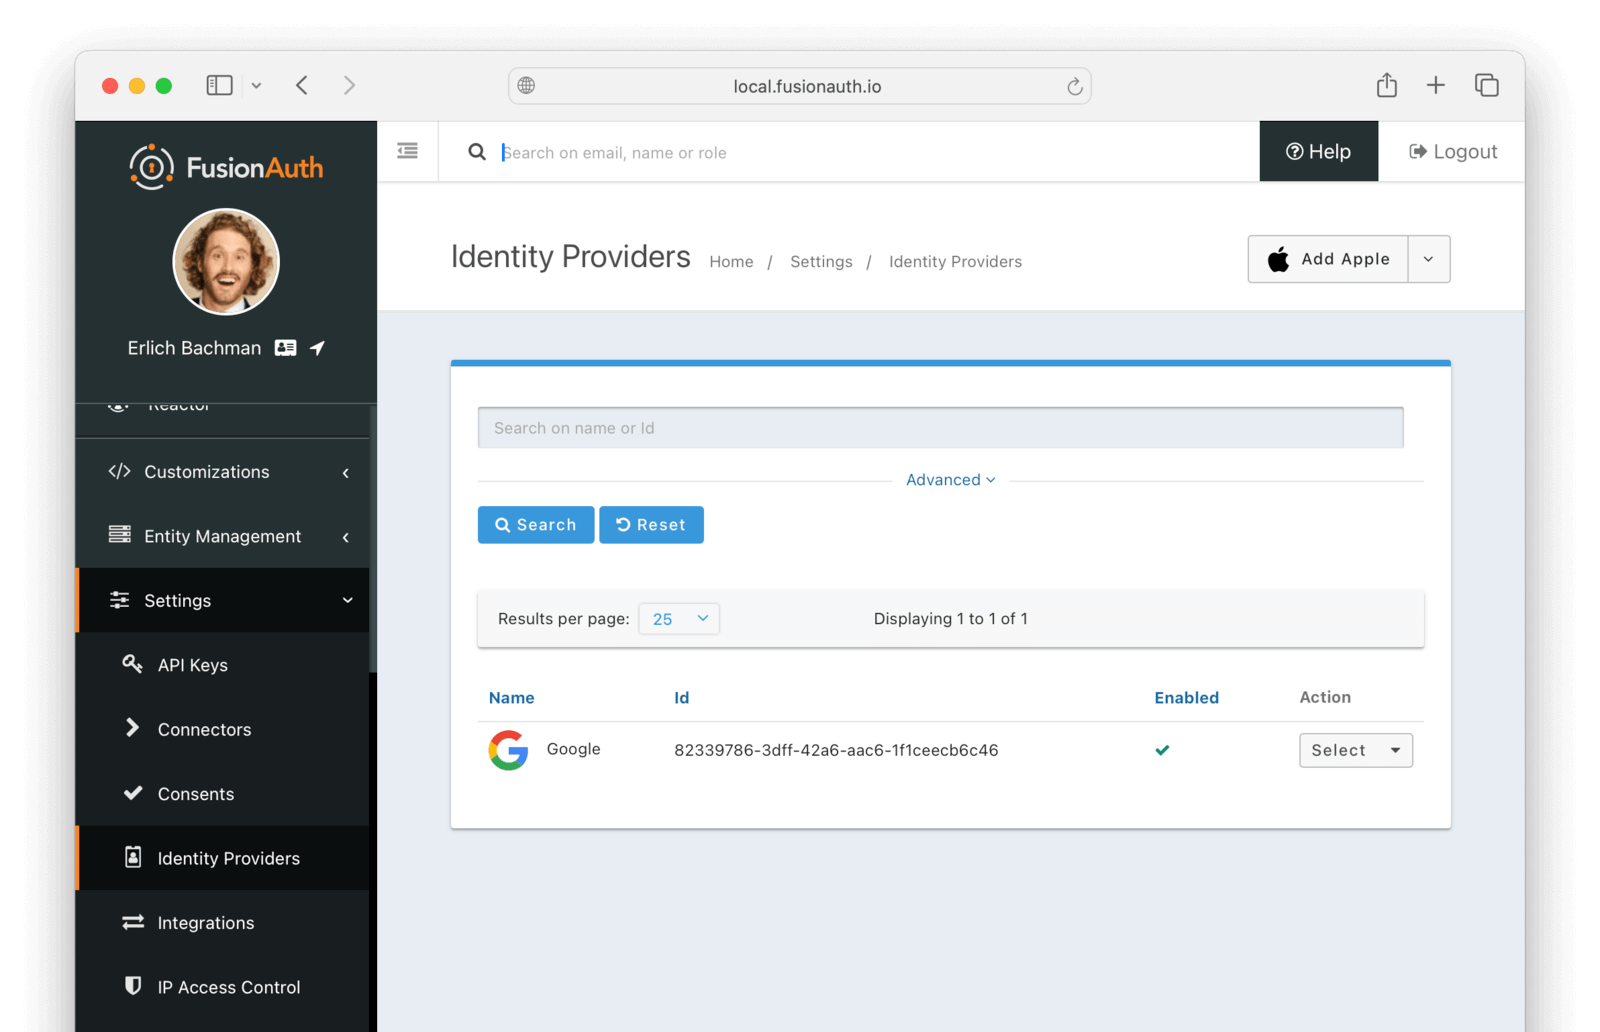
Add An Identity Provider#
Set up an identity provider by navigating to Settings -> Identity Providers . In the dropdown, choose Add Google , and then enter your Google Client Id and Client secret (find these values in your Google Cloud console). Save the identity provider.
Bulk Migration#
Get The Scripts#
FusionAuth provides a JavaScript import script under a permissive open-source license.
Getting the import scripts
$ git clone https://github.com/fusionauth/fusionauth-import-scripts
Navigate to the passportjs directory.
Navigating to the import scripts directory
$ cd fusionauth-import-scripts/passportjs
Install Needed Packages#
Add the required packages to your Node.js project with the following command.
Installing required packages
$ npm install sqlite3 stream-json uuid @fusionauth/typescript-client
For databases other than SQLite, install the appropriate driver package.
Use The Script#
Make sure the users.json and faUsers.json files are in the same directory as the scripts.
Use the following command to run the script to bulk import users into FusionAuth.
Importing users
$ node scripts/6_importUsersBulk.mjs
Use the following command to run the script to link users with social logins.
Importing social logins
$ node scripts/7_importSocialUsers.mjs
Enhancing The Script#
You may also want to migrate additional data. Currently, the following attributes are migrated:
emailusernamefullName(when available)verifiedactivepasswordregistrationsdata: Custom metadata including source system and original user Id
If you have additional user attributes to migrate, review and modify the script's user mapping logic.
You may also want to assign Roles or associate users with Groups by creating the appropriate JSON data structures in the import call. These are documented in the Import User API docs.
Verify The Import#
Next, log in to the FusionAuth administrative user interface. Review the user entries to ensure the data was correctly imported.
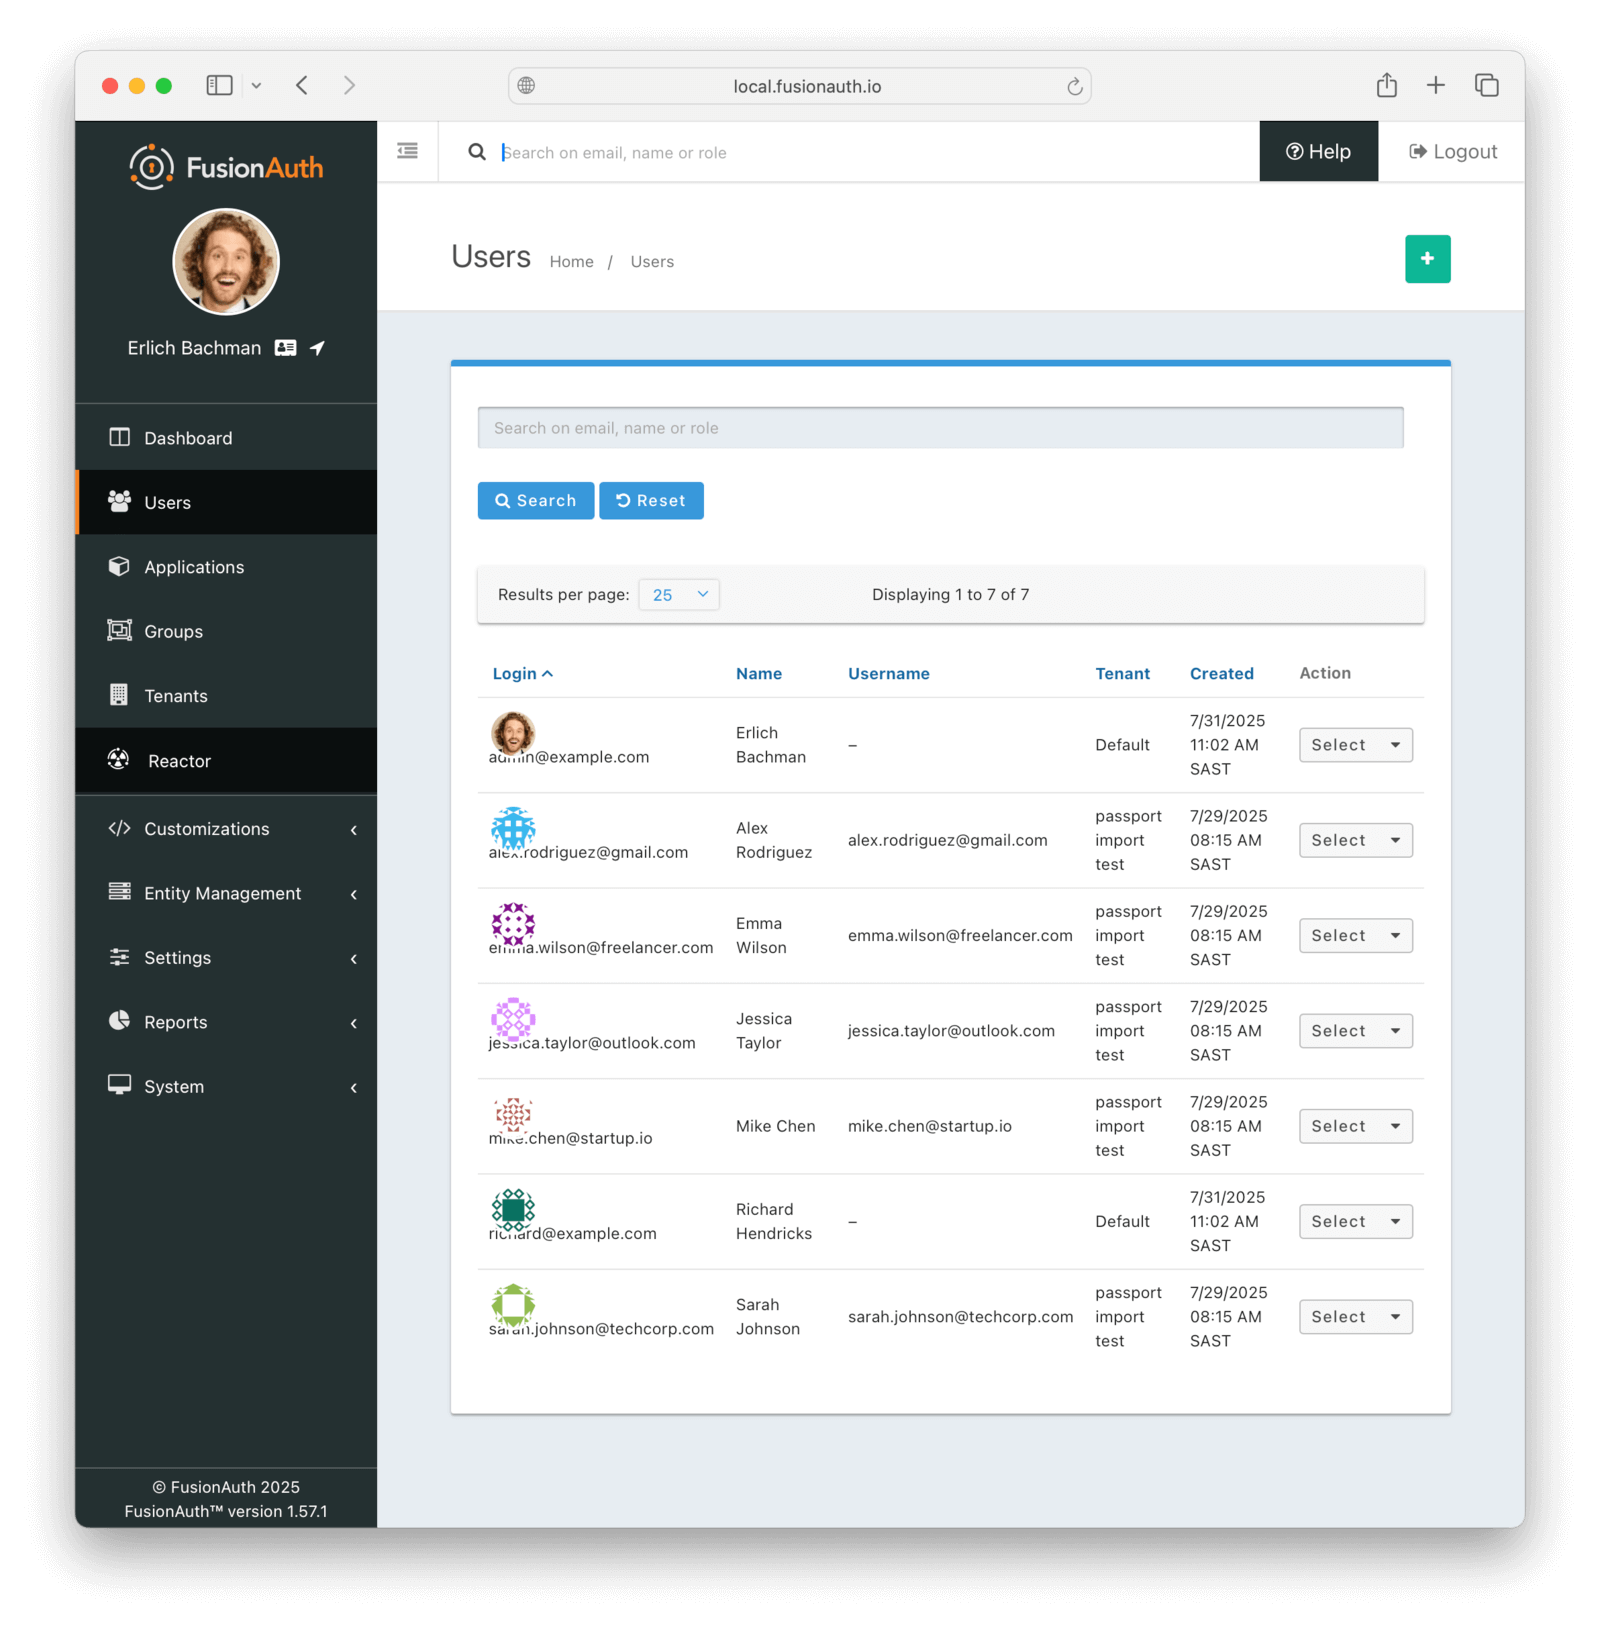
You can manage the user by clicking on the Manage button (black button) to the right of the Created date in the list to review the details of the imported user's profile.
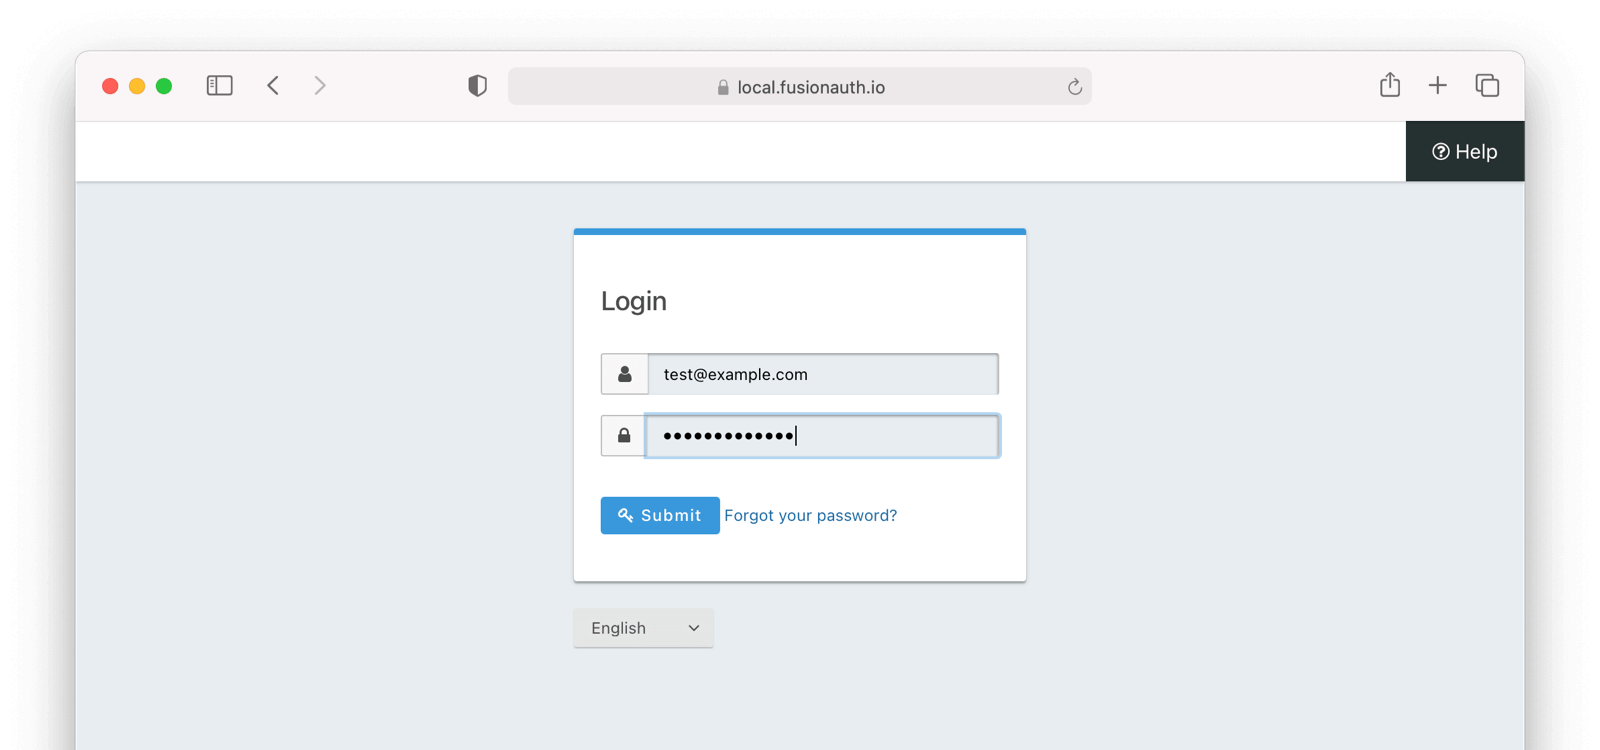
If you have a test user whose password you know, open an incognito window and log in to ensure the hash migration was successful. You recorded the URL to log in to the example application in Create a Test Application.
After the test login, the user will be redirected to a URL like https://example.com/?code=FlZF97WIYLNxt4SGD_22qvpRh4fZ6kg_N89ZbBAy1E4&locale=fr&userState=Authenticated. This happens because you haven't set up a web application to handle the authorization code redirect.
That is an important next step but is beyond the scope of this document. Consult the 5 minute setup guide for an example of how to do this.
The Final Destination Of Imported Users#
After you are done testing, you can choose to import users into the default tenant or a new tenant. Whichever you choose, make sure to update the -t switch to the correct value before running the import for the final time.
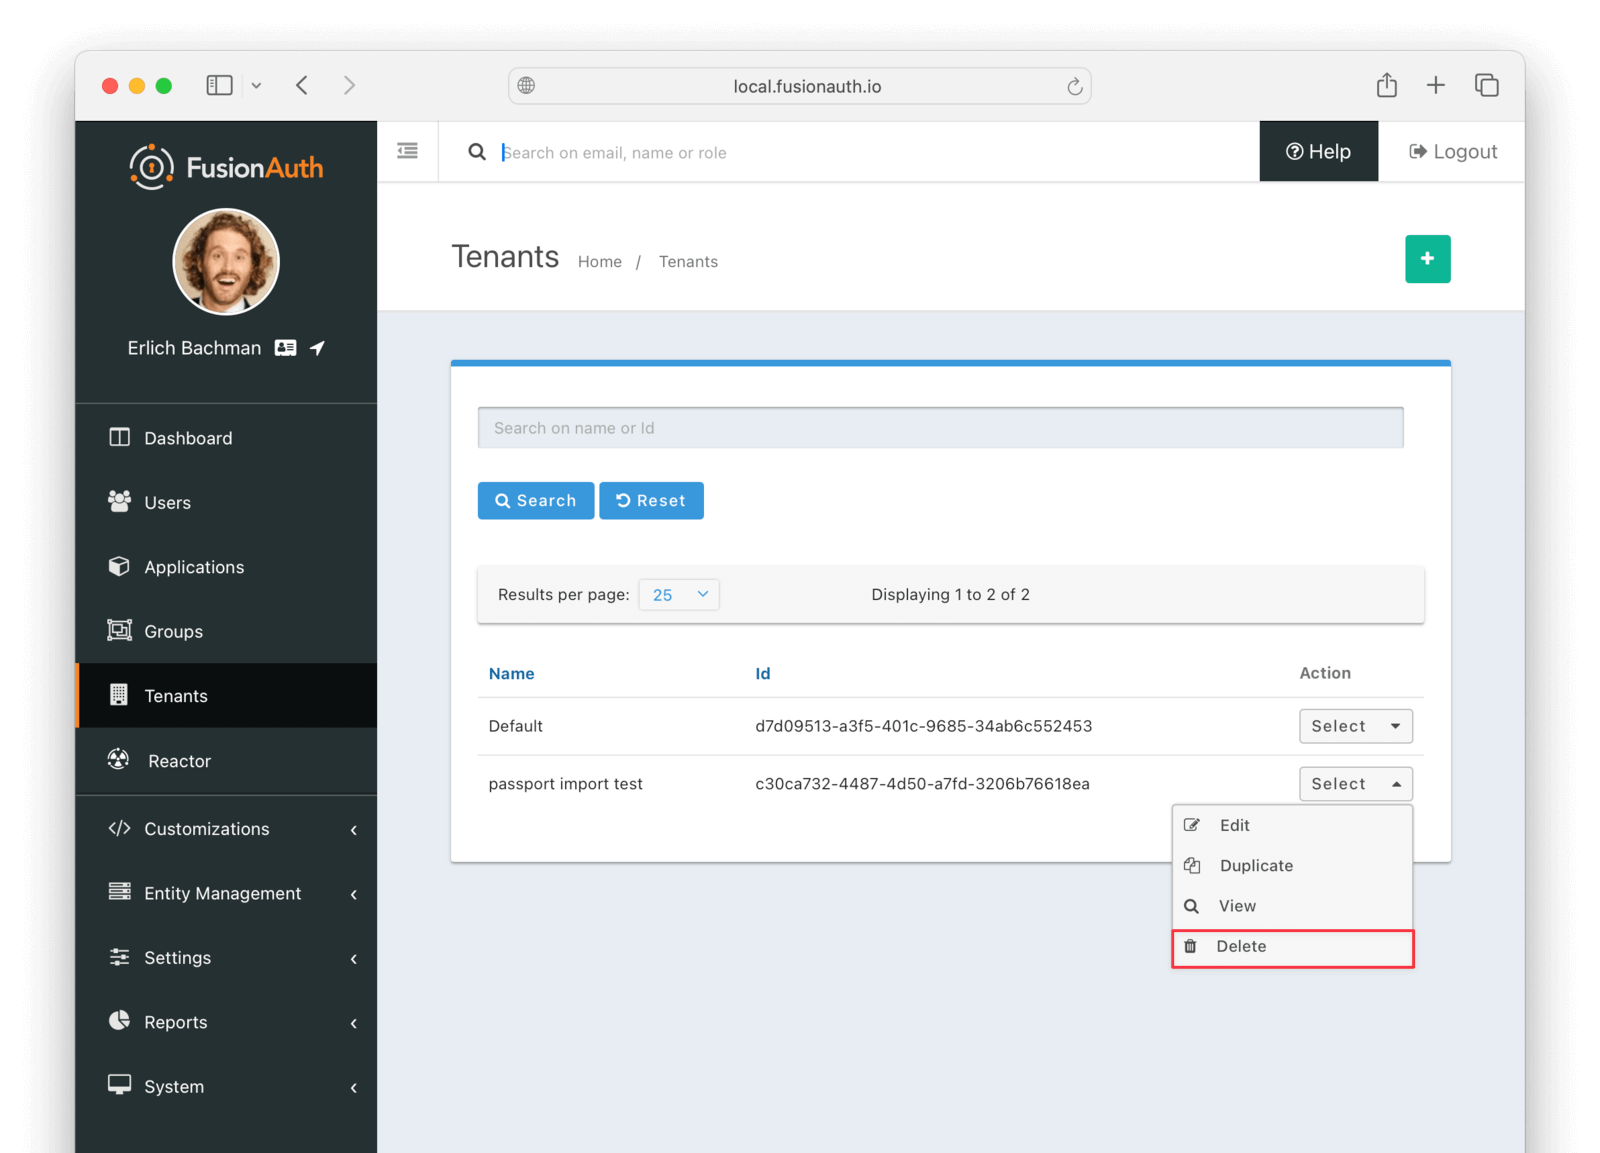
If you aren't keeping users in the test tenant, delete it.
If you need to start over because the import failed or you need to tweak a setting, delete the tenant you created. This will remove all the users and other configurations for this tenant, giving you a fresh start. To do so, navigate to Tenants , click the Select dropdown corresponding to the tenant to be deleted, and choose Delete .
Confirm your desire to delete the tenant. Depending on how many users you have imported, this may take some time.
Slow Migration#
This step of the tutorial is optional. In this section, you'll learn how to create a Connector for FusionAuth to import your users' data individually as each user logs in.
This feature is only available in paid plans. To learn more, see our pricing page.
If you don't need to do this, please skip to the What To Do Next section below.
Create A User With A Password#
To test the slow migration, you need a user with a password you know. The example project includes a models/users.js setup script that creates test user accounts.
You can also register new users by accessing the example in your browser at http://localhost:3000.
Configure A Connector Between FusionAuth And Your Application#
This feature is only available in paid plans. To learn more, see our pricing page.
If you haven't done so already, activate your FusionAuth license by navigating to Reactor in the sidebar of the admin UI.
Now configure a FusionAuth Connector to point to an intermediary web service between FusionAuth and your application. The web service will expose an API endpoint that FusionAuth can call to retrieve user details for migration.
For a general overview of Connectors, please see this video.
Before proceeding, note that if you're running FusionAuth in Docker and your application locally, you'll need to ensure FusionAuth can reach the application. There are two ways to do this:
-
Use ngrok: Use a tool like ngrok to expose your local application.
-
Use your host machine's IP address: Run the Express application on
0.0.0.0and find your host machine's IP address:ifconfig | grep "inet " | grep -v 127.0.0.1 | awk '{print $2}' | head -1Then construct the connector URL as
http://<IP_ADDRESS>:PORT/fusionauth/connector.
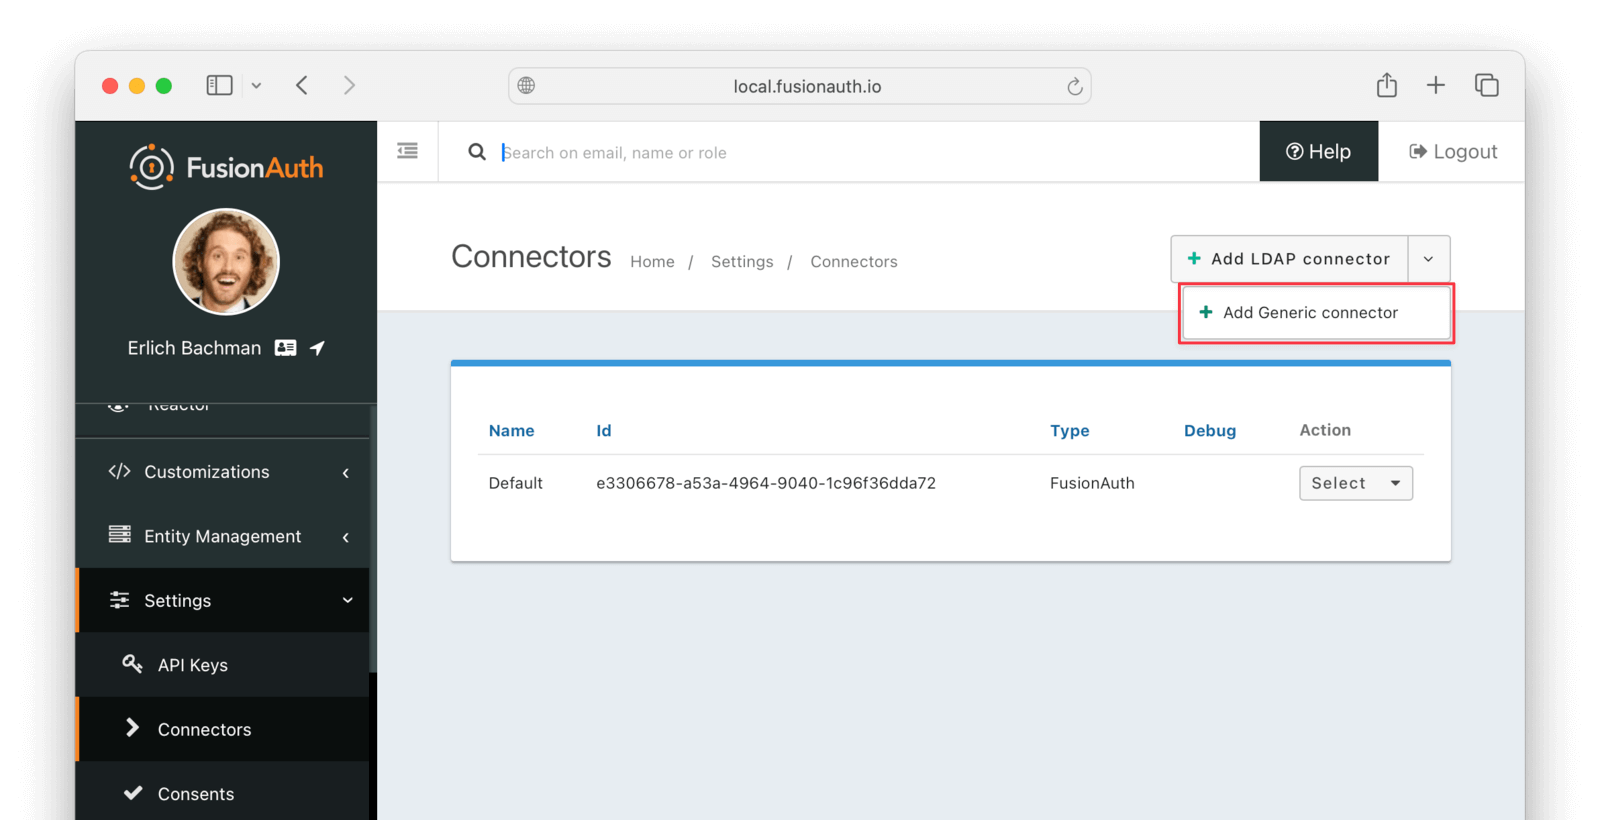
In your FusionAuth admin UI, browse to Settings -> Connectors .
Click the dropdown button on the top right and select Add Generic connector .
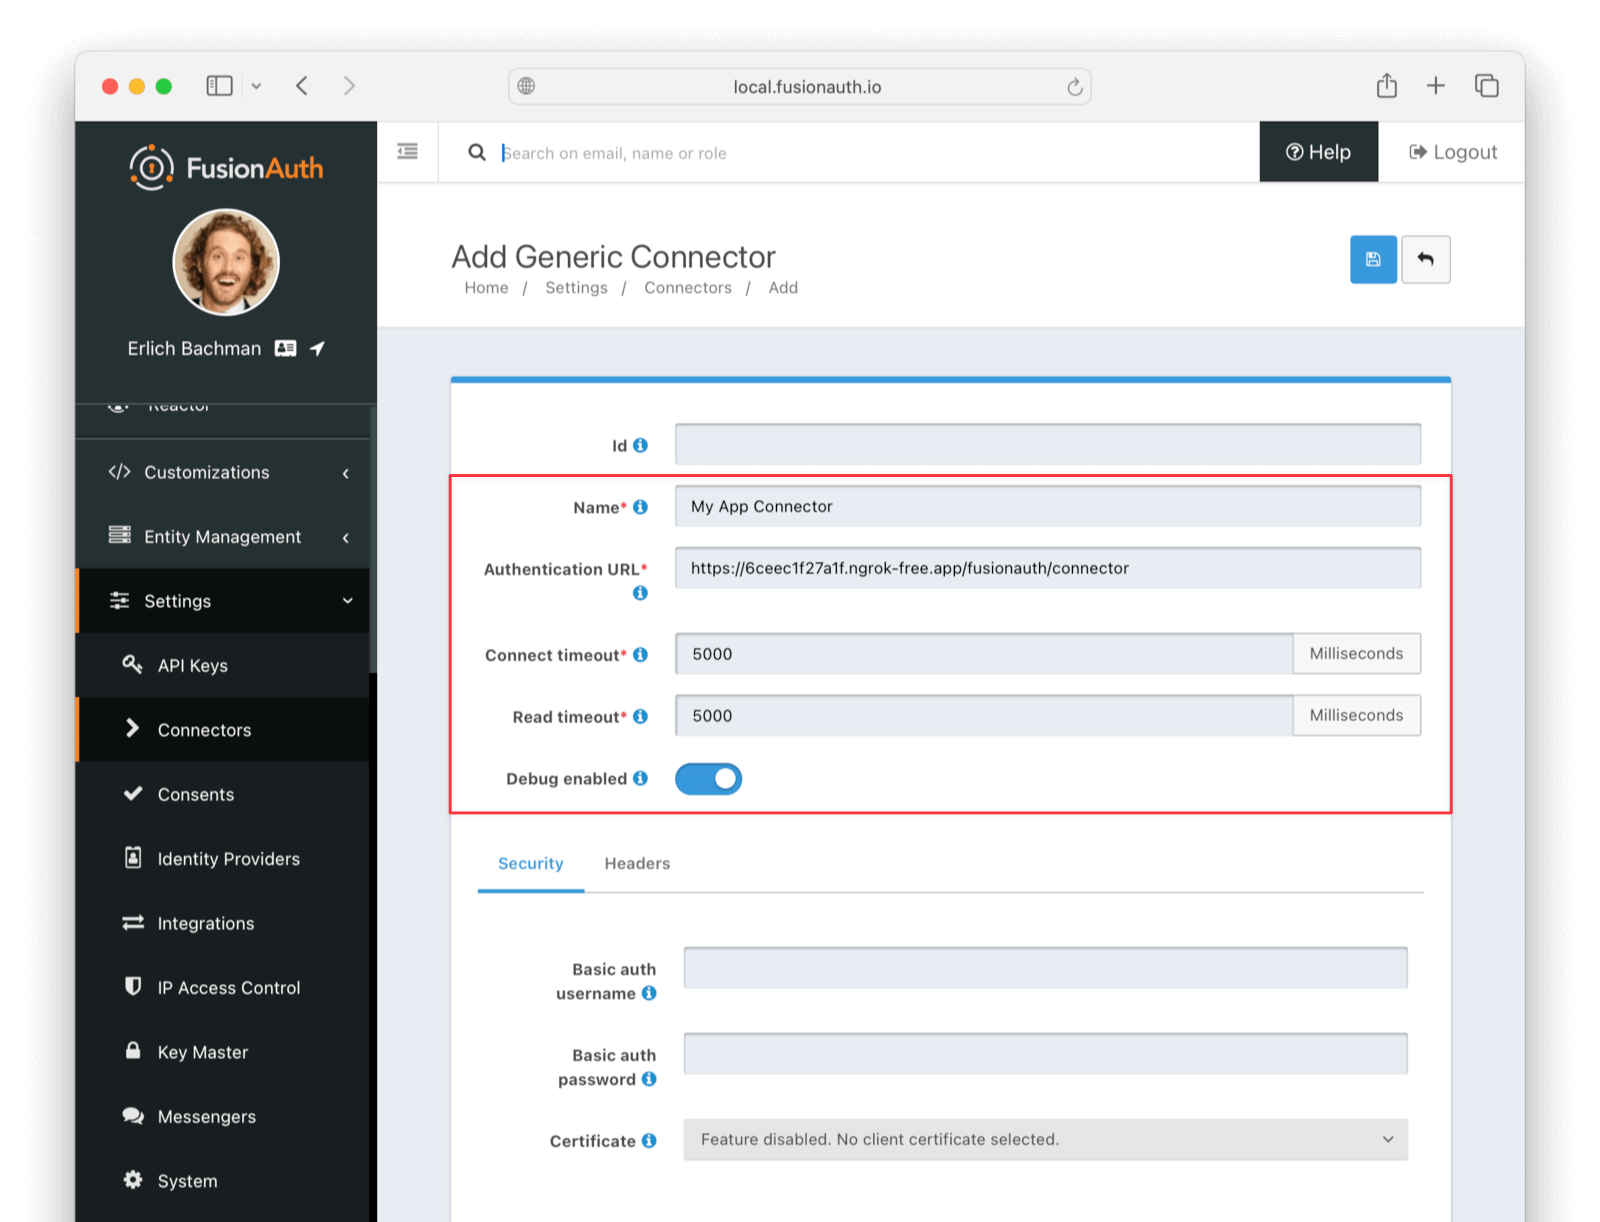
Enter the field values as follows:
- Set Name to
My App Connectoror anything you like. - Set Authentication URL to the URL provided by ngrok or
http://<IP_ADDRESS_OR_DOMAIN>:PORT/fusionauth/connector. ReplaceIP_ADDRESS_OR_DOMAINwith the IP address or domain name of your host machine, andPORTwith the port number of your Express application. - Increase timeout values (for example, to
5000) to accommodate network latency when the API requests are being made. - Enable Enable debug logging.
- Save the connector.
In production, you will want to add authentication to the web service. You can add basic authentication using the Security tab in the Connector details page.
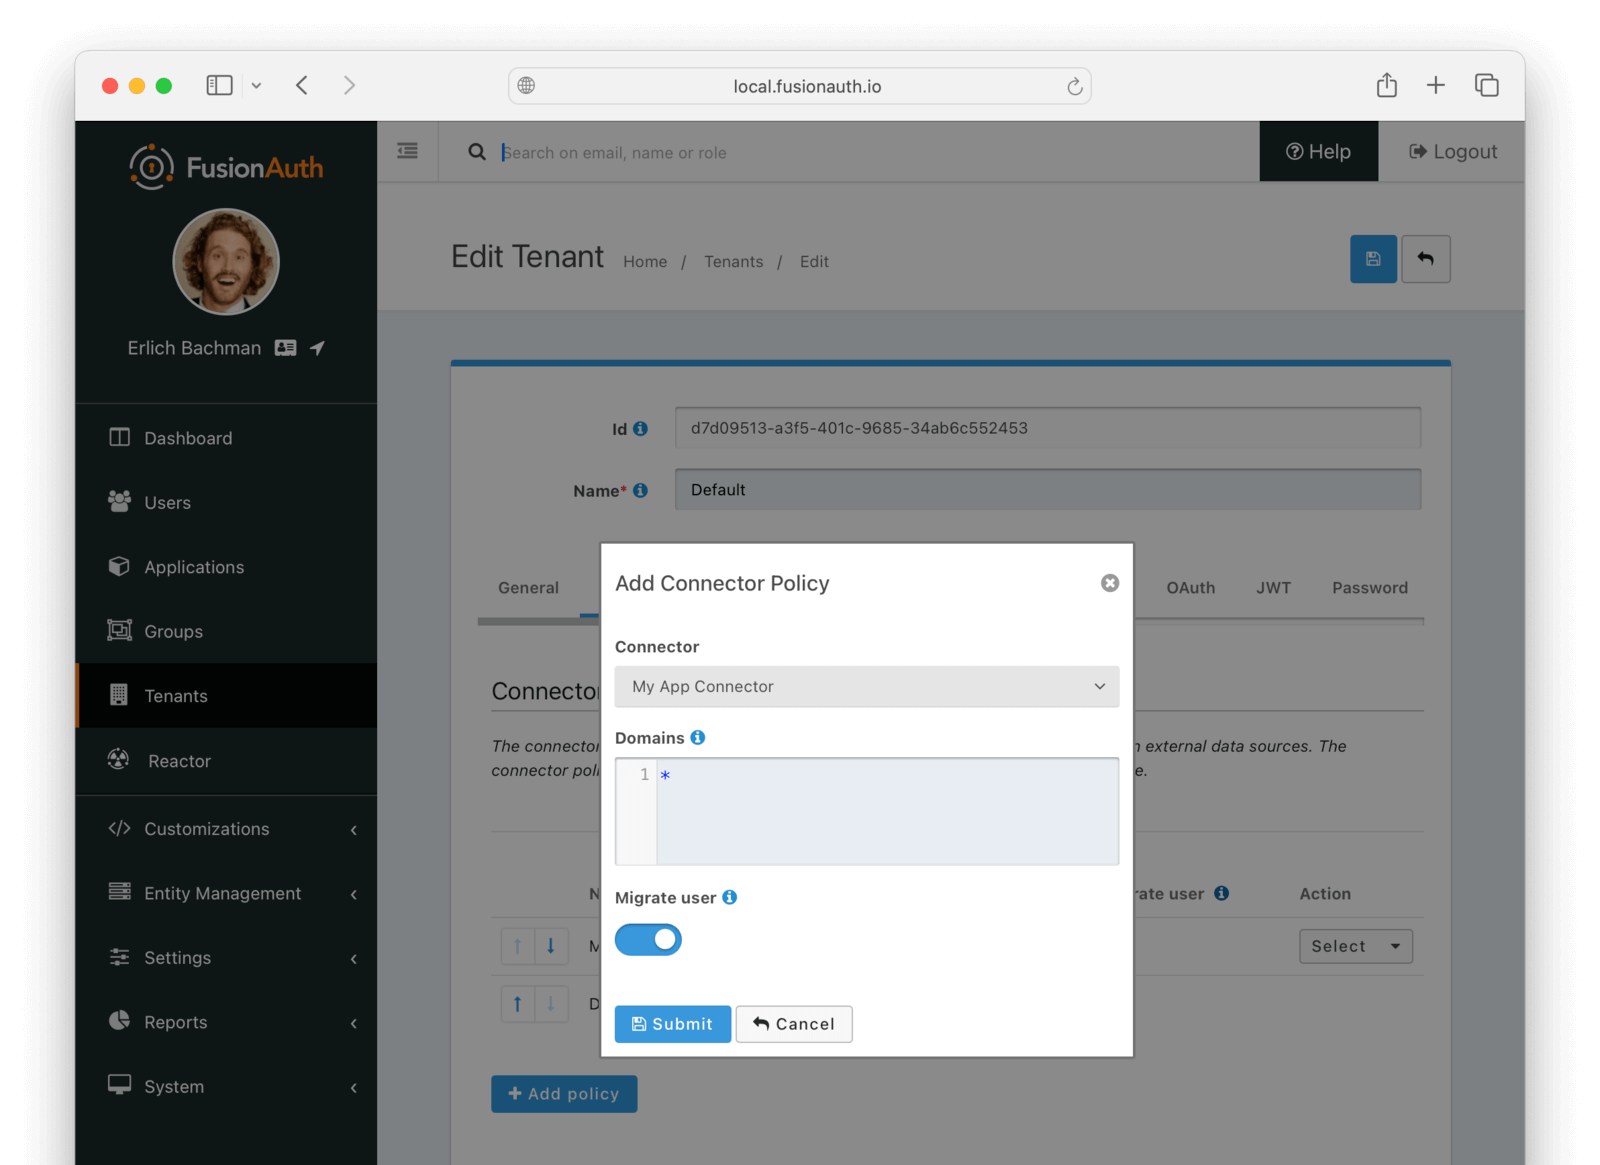
Now browse to Tenants and do the following:
- Select Edit on the default tenant.
- Navigate to the Connectors tab.
- Click Add policy .
- Select
My App Connector. - Leave Domains with the value
*to apply this Connector to every user. - Enable Migrate to FusionAuth so that FusionAuth will no longer use Passport for subsequent logins of the same user.
- Click Submit .
Move the My App Connector policy to the top of the list, using the arrow buttons if necessary.
With this configuration, all users are checked against this Connector the first time they are seen. If they log in, they'll be migrated to the FusionAuth user database.
After configuration, the Connector entry form should look similar to this:

Save the changes by clicking the save icon at the top right.
Add An Authentication Intermediary Endpoint#
The next step is to write an API endpoint that will accept the user's login Id and password and return the user details to be saved to FusionAuth on successful login.
Documentation on the inputs and outputs a Connector expects is here.
The Connector makes a POST request to the URL you specify, and expects a JSON object containing a user in return.
An example controller is in passportjs/connectorSnippet.mjs.
Log In With A Test User#
In the FusionAuth admin interface, browse to Applications . Click the Select dropdown next to the "Example App" application, then select View . Copy the OAuth IdP login URL and open it in an incognito window in your browser (if you don't use an incognito window, you need to log out of the FusionAuth admin session to prevent the active session from interfering with the test). This URL is a login page for the "Example App", so that you can test the web service and Connector.
For this tutorial, the login URL should be http://localhost:9011/oauth2/authorize?client\_id=e9fdb985-9173-4e01-9d73-ac2d60d1dc8e\&response\_type=code\&redirect\_uri=http%3A%2F%2Flocalhost%3A8080%2Foauth-redirect.
Log in with the username and password for a sample user as defined in the models/user.js file of the example application, for example, sarah.johnson@techcorp.com and SecurePass2024!. Your Connector service should show request received and the login request succeeding in the terminal.
After a successful test login, the user will be redirected to a URL like https://example.com/?code=2aUqU0ZhQCjtz0fnrFL_i7wxhIAh7cTfxAXEIpJE-5w&locale=en&userState=AuthenticatedNotRegistered.
This occurs because you haven't set up a web application to handle the authorization code redirect yet. This is an important next step, but it's beyond the scope of this document. Consult the 5-minute setup guide for an example of how to do this.
If you log out and log in again with the same user, you'll notice that request received will not show in the web service console. This is because FusionAuth is now using its own authentication service, as the original user password has been hashed and saved in the FusionAuth database.
The user has been successfully migrated, and Passport authentication system is no longer needed.
Debug The Connector Service#
If you encounter errors in this process, try the following:
- View the System Event Logs in the bottom left of the FusionAuth web interface.
- Adjust the timeout values of the Connector to higher values to accommodate network latency between API calls.
Estimate The Slow Migration Timeline#
When using a slow migration, you can estimate how many accounts will be migrated in a given period.
You can calculate a timeline by knowing the following:
- How frequently the average user logs in
- What the distribution of your users' login behavior is
- What your migration goal is
Determining these values precisely is beyond the scope of this guide. However, a good rule of thumb is to determine how often your average user logs in to your application. Then you can use this formula to find out when a certain percentage of users have migrated: S = [(1 - (1 - P)^D)*100]%.
Breaking that equation down, you have:
Pis the probability of any single user authenticating in a given day. So if your users log in once a week on a business day, it is 0.2 (one out of five days). If they log in once a year, it is 0.0027 (one out of 365 days).Dis the number of days of the migration period.Sis the percentage of users who have migrated.
For P = 0.2 and D = 10, S = 89%. Therefore, if your users log in one out of every five days, in ten days almost nine out of ten will be migrated to FusionAuth.
For P = 0.0027 and D = 370, S = 63.7%; if your users log in once a year on average, in about a year, almost two thirds of accounts will be migrated to FusionAuth.
Using the above calculations should help you estimate the duration of a migration.
After this period, you may want to bulk migrate the rest of the users, or treat them as inactive and not migrate them. Plan to disable the Connector and remove the tenant's Connector policy after the slow migration is complete.
Learn more about general slow migration considerations.
What To Do Next#
You now have your users migrated, or a plan to do so. Congratulations! What is next?
You need to migrate additional configurations, as mentioned in Other Entities. Since the type of configuration varies, it is hard to provide a full list of how to import these items, but the general pattern will be:
- Identify corresponding FusionAuth functionality.
- Configure it in your FusionAuth instance, either manually or by scripting it using the client libraries or API.
- Update your application configuration to use the new FusionAuth functionality.
Make sure you assign your users to the appropriate FusionAuth applications. You can do this either:
- As part of your import process by adding registrations at import time.
- After users have been migrated with the Registrations API.
You'll also need to modify and test each of your applications, whether custom, open source, or commercial, to ensure:
- Users can successfully log in.
- The authorization code redirect is handled correctly.
- Users receive appropriate permissions and roles based on the JWT.
- The look and feel of the hosted login pages matches each application's look and feel.
If your application uses a standard OAuth, SAML or OIDC library to communicate with , the transition should be relatively painless.
Additional Support#
If you need support in your migration beyond that provided in this guide, you may:
- Post in our forums and get support from the community.
- Purchase a support plan and get expert help from the Engineering Team.