Implementing Single Sign-on
This guide will walk you through setting up single sign-on (SSO) between two web applications using FusionAuth as their common authentication and authorization server. You will use the hosted login pages for your login form.
These are the applications you'll build:
- Pied Piper
- Hooli
At the end of this guide, both applications will be running. You can then log in to Pied Piper. Then if you visit Hooli, you will be automatically signed in to that second application. If you sign out from either of them, you'll be signed out from both.
This pattern scales to any number of applications, and can include commercial off the shelf apps. If you have a suite of applications, you can provide a seamless single sign-on experience for all your users.
This guide illustrates a single sign-on scenario where FusionAuth is the system of record for your users.
If, instead, another datastore is your system of record, check out the Identity Providers documentation, which allows users to authenticate with third party login. This includes both social sign-on providers like Google as well as providers implementing standards such as OIDC.
Concepts#
It's worth spending a bit of time to discuss sessions. Sessions are how servers know they've seen the client, usually a browser, before. They are usually implemented with cookies, but the actual technologies used don't matter. In the SSO scenario, the following sessions exist:
- FusionAuth's session, also known as the single sign-on session
- The Pied Piper application's session
- The Hooli application's session
If a session doesn't exist for a given application, or expected values aren't present in it, then the session must be created or updated after the user has presented valid credentials. For FusionAuth, the credentials are a username and password, but for the other applications, the credential is a valid FusionAuth token.
Request Flow Diagrams#
Here's the flow of a single sign-on login request.
sequenceDiagram
    participant Browser
    participant pp as Pied Piper
    participant FusionAuth
    participant h as Hooli
    Browser ->> pp : View Home Page
    pp ->> pp : Check Session Existence
    pp ->> Browser : Redirect to FusionAuth Because There is No Valid Session
    Browser ->> FusionAuth : Request Login Page
    FusionAuth ->> FusionAuth : Check FA Session Existence
    FusionAuth ->> Browser : Send Login Page
    Browser ->> FusionAuth : Send Credentials
    FusionAuth ->> Browser : Redirects to Pied Piper
    Browser ->> pp : Requests Home Page
    pp ->> Browser : Sends Home Page
    Browser ->> h : Requests Home Page
    h ->> h : Check Session Existence
    h ->> Browser : Redirect to FusionAuth Because There is No Valid Session
    Browser ->> FusionAuth : Request Login Page
    FusionAuth ->> FusionAuth : Check FA Session Existence
    FusionAuth ->> Browser : Redirects to Home Page
    Browser ->> h : Requests Application Page
    h ->> Browser : Sends Application Page
Single sign-on request flow during login.
Here's the flow of the corresponding logout request:
sequenceDiagram
    participant Browser
    participant pp as Pied Piper
    participant FusionAuth
    participant h as Hooli
    Browser ->> pp : View Home Page
    Browser ->> pp : Click Logout
    pp ->> pp : Destroy Local Session
    pp ->> Browser : Redirect to FusionAuth
    Browser ->> FusionAuth : Request Logout
    FusionAuth ->> FusionAuth : Destroy FusionAuth Session
    FusionAuth ->> h : GET Request to Logout URL
    h ->> h : Destroy Local Session
    FusionAuth ->> Browser : Redirect to Pied Piper Configured Logout URL
    Browser ->> pp : Request Login URL
    pp ->> Browser : Redirect to Login URL
Single sign-on request flow during logout.
Above, note that FusionAuth automatically logs the user out of the Hooli application after the user chooses to log out of the Pied Piper application. The user does not have to log out of multiple applications. The logout URLs will be called for each application in this tenant, allowing you to transparently sign the user out of three, five or ten web applications. However, you can disable this setting too.
Prerequisites#
To walk through this guide, you will need to have FusionAuth and Node installed. For FusionAuth installation instructions, please visit the 5 minute setup guide.
Set Up The Domains#
In order to properly exercise single sign-on, applications need to live on different domains, or at least different paths. If you, for instance, set up two Node applications at localhost:3000 and localhost:3001, browser sessions won't be separated and the SSO functionality won't work as intended. Cookies typically don't differ based on ports, so you'll see confusing behavior.
You can, however, easily set up two local domains. Edit your hosts file; on macOS, this file lives at /etc/hosts. Look for a line starting with 127.0.0.1, which is the address of your computer.
Add the following text to that line:
Additions to the /etc/hosts file
hooli.local piedpiper.localYou want it to look something like this after editing:
The modified localhost line in /etc/hosts file
127.0.0.1 localhost hooli.local piedpiper.localLater, when you have the code running, you can type http://piedpiper.local:3000 or http://hooli.local:3001 into your browser's address bar and the local Node application will serve the request.
Configure The Applications In FusionAuth#
Next, create and configure the applications in FusionAuth. This guide uses the Admin UI, though you can also do this using the API.
Navigate to Applications and create two new applications. Configure the following for each application:
- Name
- Authorized redirect URL
- Logout URL
The Name is used for display purposes.
The Authorized redirect URL lists all the valid redirect URLs that the application is capable of handling. In this case there is only one per application, but if you want your user to be sent to different landing pages based on where they signed in or some other parameter, you can add more.
Logout URL is where the user is sent if they log out from this application. It is also a URL requested by FusionAuth if you have multi-application logout enabled. The value of Logout behavior controls this. The default value of All applications means that when a user signs out of one FusionAuth application in a tenant, they are automatically signed out of all of them.
For the Pied Piper application, the configuration values will be:
- Name: Pied Piper
- Authorized redirect URL:
http://piedpiper.local:3000/oauth-redirect - Logout URL:
http://piedpiper.local:3000/endsession
For the Hooli application, the values will be:
- Name: Hooli
- Authorized redirect URL:
http://hooli.local:3001/oauth-redirect - Logout URL:
http://hooli.local:3001/endsession
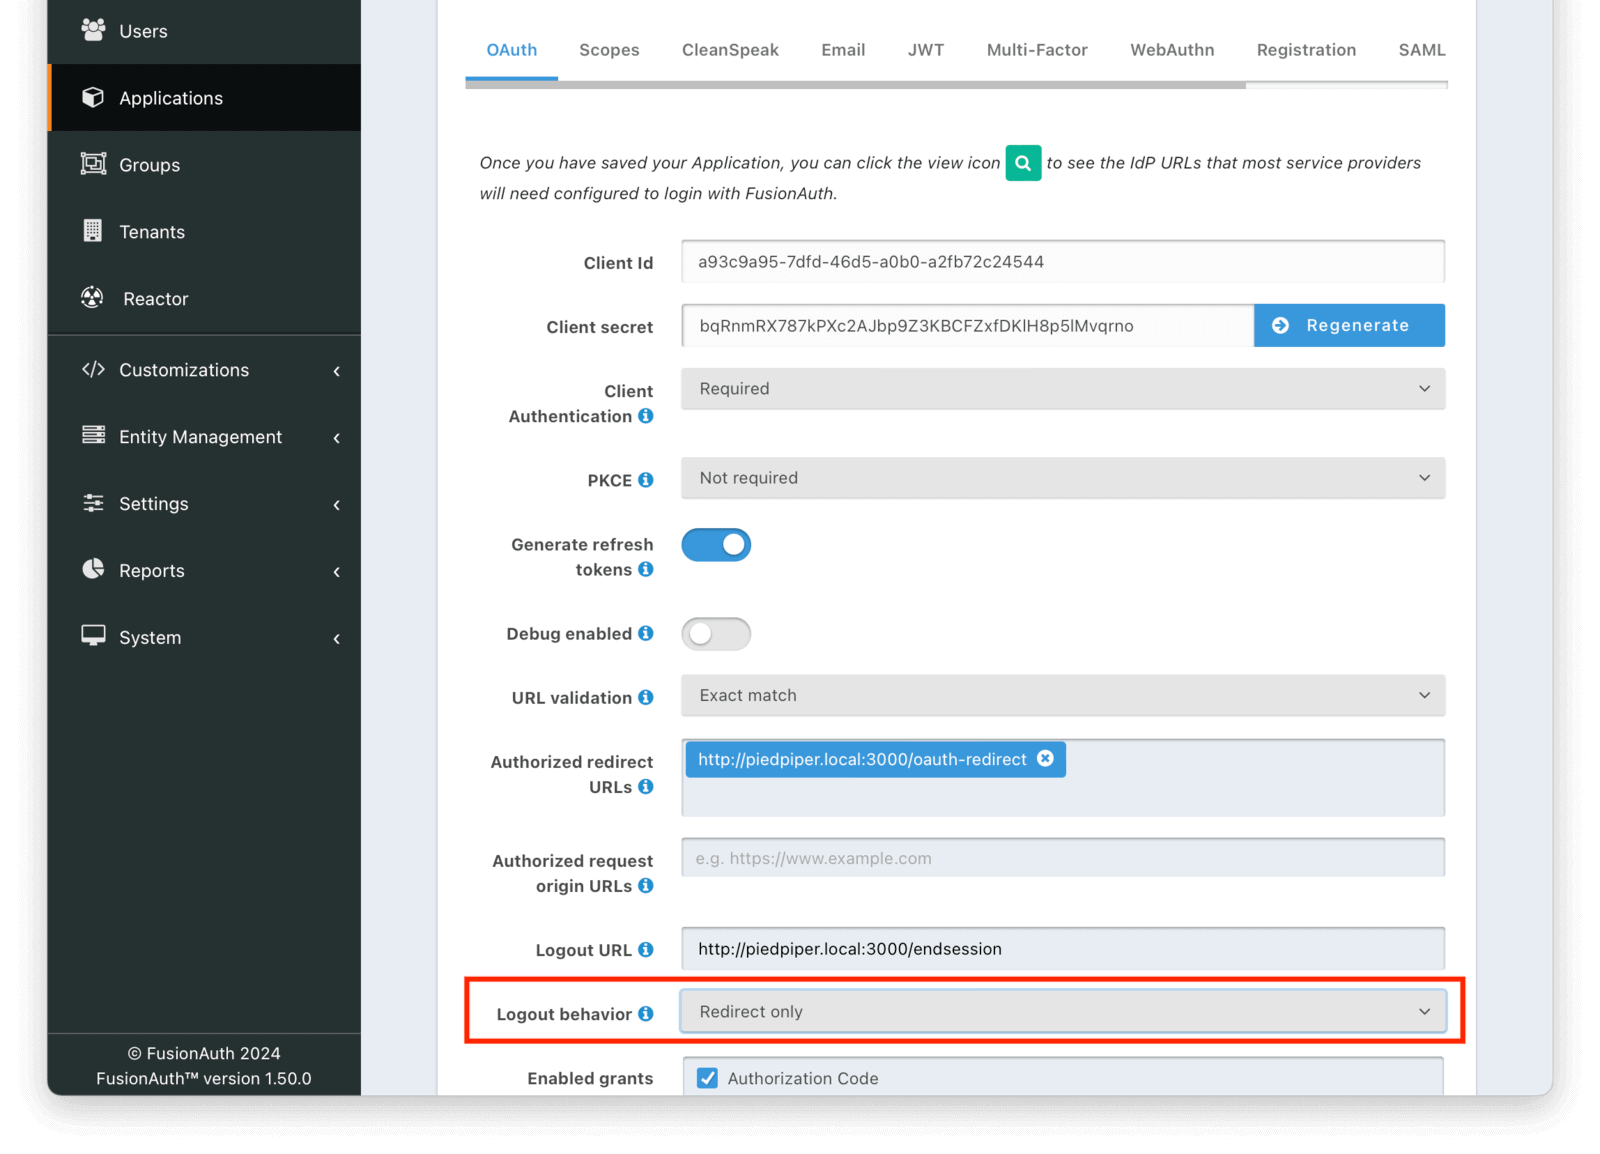
All of these will be configured on the OAuth tab.
Here's what the Pied Piper application might look like when properly configured:
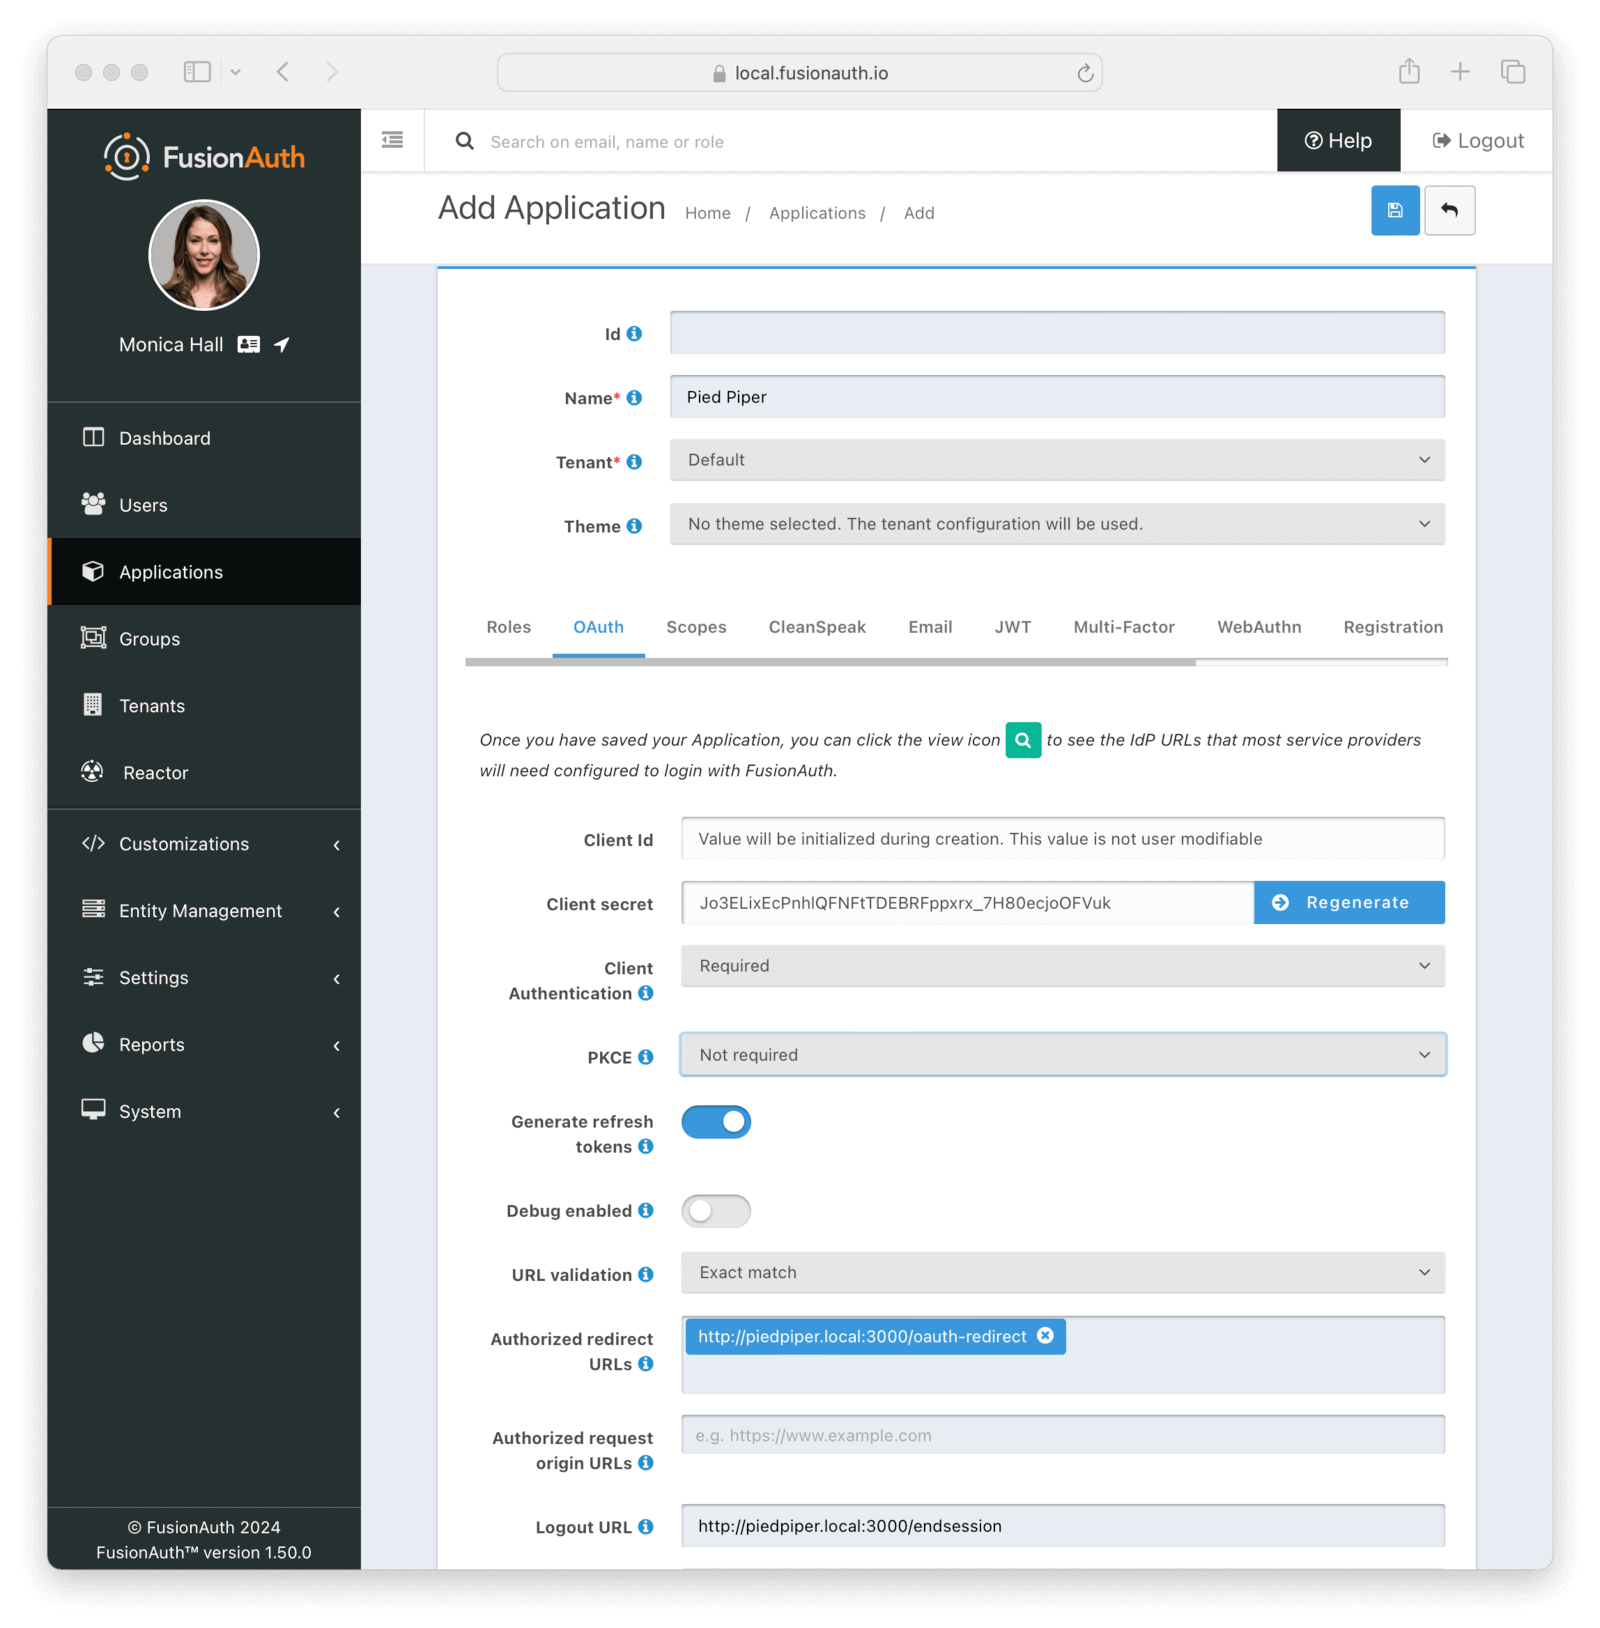
Click Save for each application.
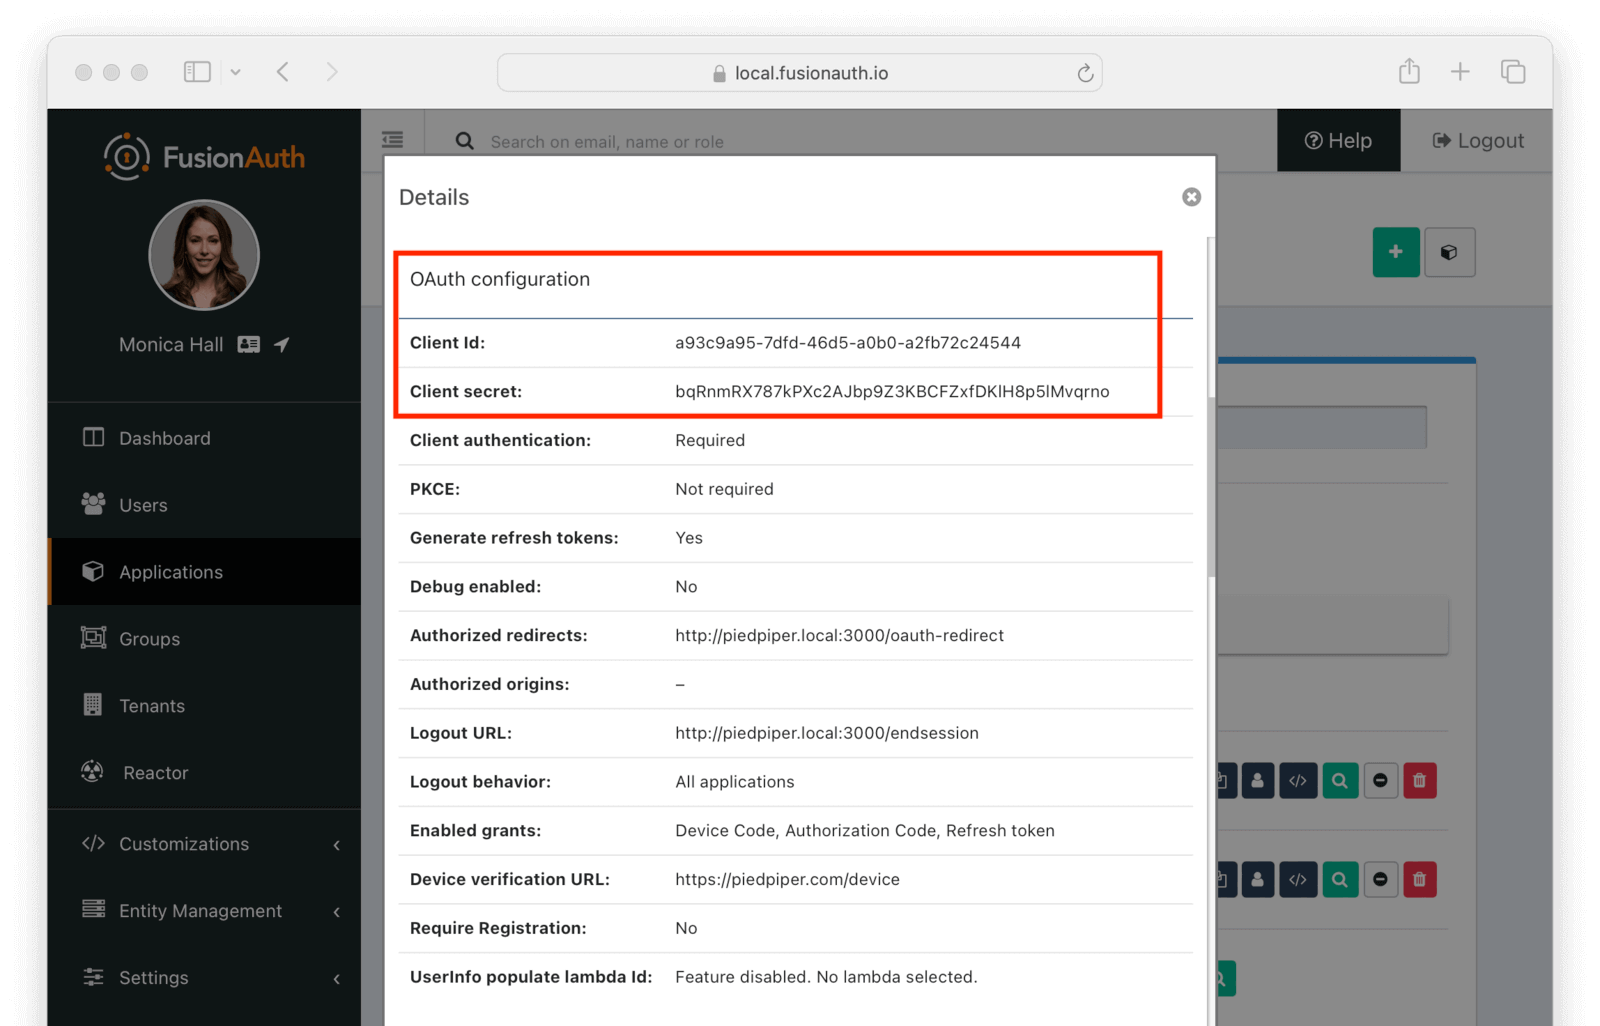
View each application by clicking the green magnifying glass when looking at the list of applications and note the Client Id and Client Secret values:
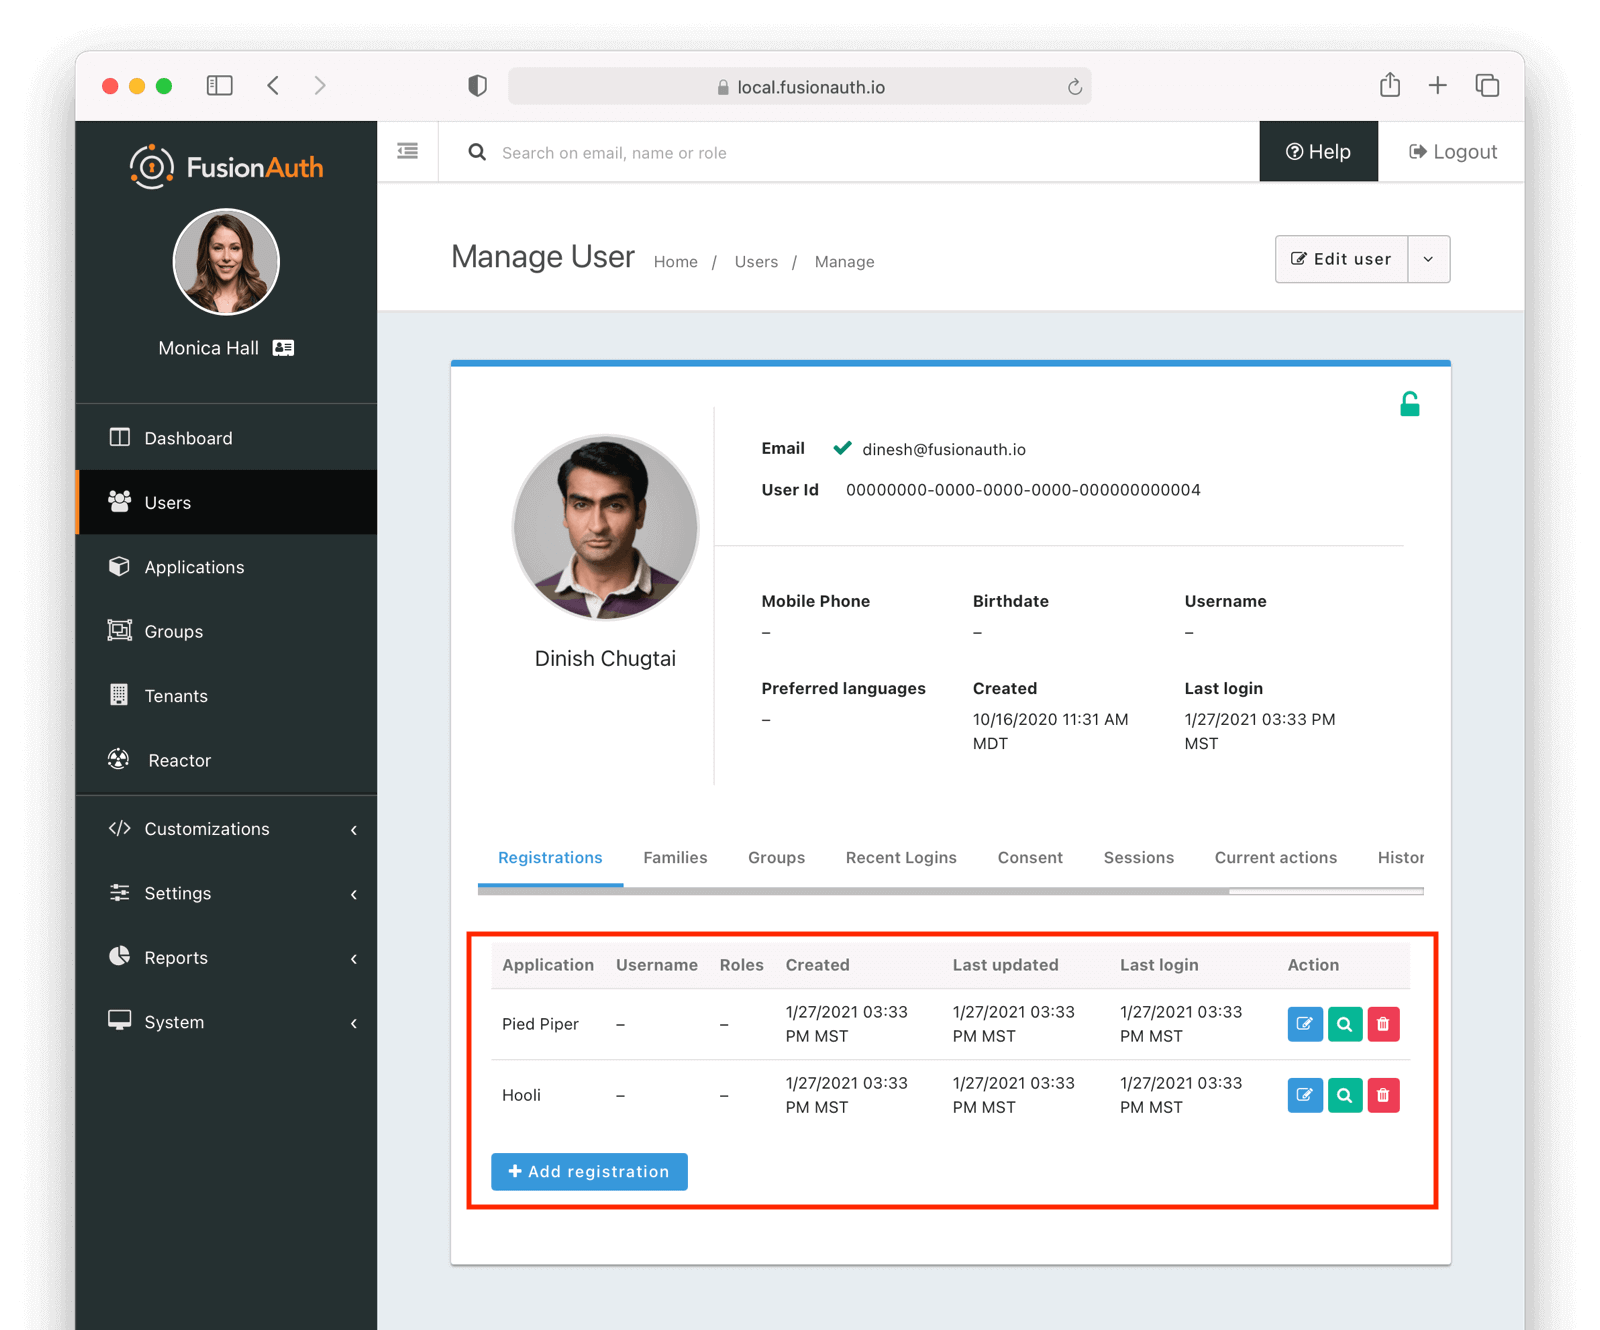
Set Up The User#
You'll need to make sure that a FusionAuth user is registered for both applications you created. You can use the default user created when installing FusionAuth or any other user. Here's an example of what the user details of a user registered for both the Pied Piper and Hooli applications will look like:
Set Up The Code#
Next, set up the code. Both of the applications in this guide are written in Node, but the logic will be the same no matter the language. This code is available on GitHub, feel free to clone the repository.
Set up two Node applications, one for Pied Piper and one for Hooli. In this guide, the applications are very similar, so let's create the Pied Piper application first. Once this is running, you can copy most of the code for the Hooli application.
First off, make a pied-piper directory and change into it.
Creating Pied Piper directory
mkdir pied-piper && cd pied-piperRequired packages#
Set up your needed packages. Here's what the package.json file should look like:
package.json
{
  "name": "fusionauth-node-example-sso-piedpiper",
  "version": "0.0.0",
  "private": true,
  "scripts": {
    "start": "node ./bin/www"
  },
  "dependencies": {
    "@fusionauth/typescript-client": "^1.51.0",
    "cookie-parser": "~1.4.4",
    "debug": "~2.6.9",
    "dotenv": "^16.3.1",
    "express": "^4.19.2",
    "express-session": "1.17.0",
    "http-errors": "~1.6.3",
    "morgan": "~1.9.1",
    "pug": "^3.0.2"
  }
}
Go ahead and install the needed modules:
Installing needed modules
npm installThe Express Server#
This guide uses express for each application and the typescript client for interactions with the FusionAuth API. Create an app.js file; this is what will be executed when the server starts.
This is a pretty standard express application which uses pug and sessions. It reads routes from files in the routes directory and views from the views directory.
app.js
var createError = require('http-errors');
var cookieParser = require('cookie-parser');
var express = require('express');
var expressSession = require('express-session');
var path = require('path');
var logger = require('morgan');

var indexRouter = require('./routes/index');

var app = express();

// view engine setup
app.set('views', path.join(__dirname, 'views'));
app.set('view engine', 'pug');

app.use(logger('dev'));
app.use(express.json());
app.use(express.urlencoded({ extended: false }));
app.use(cookieParser());
app.use(expressSession({resave: false, saveUninitialized: false, secret: 'fusionauth-node-example', cookie: {maxAge: 60000}}));
app.use(express.static(path.join(__dirname, 'public')));

app.use('/', indexRouter);

// catch 404 and forward to error handler
app.use(function(req, res, next) {
  next(createError(404));
});

// error handler
app.use(function(err, req, res, next) {
  // set locals, only providing error in development
  res.locals.message = err.message;
  res.locals.error = req.app.get('env') === 'development' ? err : {};

  // render the error page
  res.status(err.status || 500);
  res.render('error');
});

module.exports = app;
The session length for this application is 60 seconds; the maxAge value is in milliseconds. When the node application's session expires, it will redirect the end user to FusionAuth. If the single sign-on session has not expired, the user will be transparently redirected back. If it has expired, the user must re-authenticate.
The www script#
The next step is to create a script which starts up express. Place the contents of this file in bin/www.
bin/www
#!/usr/bin/env node

/**
 * Module dependencies.
 */

var app = require('../app');
var debug = require('debug')('fusionauth-node-example:server');
var http = require('http');

/**
 * Get port from environment and store in Express.
 */

var port = normalizePort(process.env.PORT || '3000');
app.set('port', port);

/**
 * Create HTTP server.
 */

var server = http.createServer(app);

/**
 * Listen on provided port, on all network interfaces.
 */

server.listen(port);
server.on('error', onError);
server.on('listening', onListening);

/**
 * Normalize a port into a number, string, or false.
 */

function normalizePort(val) {
  var port = parseInt(val, 10);

  if (isNaN(port)) {
    // named pipe
    return val;
  }

  if (port >= 0) {
    // port number
    return port;
  }

  return false;
}

/**
 * Event listener for HTTP server "error" event.
 */

function onError(error) {
  if (error.syscall !== 'listen') {
    throw error;
  }

  var bind = typeof port === 'string'
    ? 'Pipe ' + port
    : 'Port ' + port;

  // handle specific listen errors with friendly messages
  switch (error.code) {
    case 'EACCES':
      console.error(bind + ' requires elevated privileges');
      process.exit(1);
      break;
    case 'EADDRINUSE':
      console.error(bind + ' is already in use');
      process.exit(1);
      break;
    default:
      throw error;
  }
}

/**
 * Event listener for HTTP server "listening" event.
 */

function onListening() {
  var addr = server.address();
  var bind = typeof addr === 'string'
    ? 'pipe ' + addr
    : 'port ' + addr.port;
  debug('Listening on ' + bind);
}
This script is what running npm start actually executes.
This code isn't that interesting with regards to single sign-on but is included for completeness.
It looks for a port from the environment or uses 3000 as the default. It also registers some error handling code. Then it starts up a server listening on that port, based on configuration from app.js.'
The .env File#
Here's the .env file, which should be placed at .env:
The .env File
clientId="e9fdb985-9173-4e01-9d73-ac2d60d1dc8e"
clientSecret="pied-piper-super-secret-secret-that-should-be-regenerated-for-production"
fusionAuthURL="http://localhost:9011"
This contains configuration settings such as the Client Id and Client Secret. Make sure to update it with the correct values you've copied in the Configure The Applications In FusionAuth section.
Next, build out the indexRouter code referenced from the app.js file above.
The Index Route#
Here's the entire index.js file, which should be placed at routes/index.js:
routes/index.js
//tag::constants[]
const express = require('express');
const router = express.Router();
const {FusionAuthClient} = require('@fusionauth/typescript-client');

const dotenv = require('dotenv');
dotenv.config();

if (!process.env.clientId) {
  console.error('Missing clientId from .env');
  process.exit();
}
if (!process.env.clientSecret) {
  console.error('Missing clientSecret from .env');
  process.exit();
}
if (!process.env.fusionAuthURL) {
  console.error('Missing fusionAuthURL from .env');
  process.exit();
}
const clientId = process.env.clientId;
const clientSecret = process.env.clientSecret;
const fusionAuthURL = process.env.fusionAuthURL;

const hostName = 'piedpiper.local';

const port = 3000;
const title = 'Pied Piper';

const client = new FusionAuthClient('noapikeyneeded', fusionAuthURL);
const loginUrl = fusionAuthURL+'/oauth2/authorize?client_id='+clientId+'&response_type=code&redirect_uri=http%3A%2F%2F'+hostName+'%3A'+port+'%2Foauth-redirect&scope=offline_access%20openid';
const logoutUrl = fusionAuthURL+'/oauth2/logout?client_id='+clientId;
//end::constants[]

//tag::homepageroute[]
/* GET home page. */
router.get('/', function (req, res, next) {

  if (!req.session.user) {
     res.redirect(302, loginUrl);
     return;
  }
  res.render('index', {user: req.session.user, title: title + ' App', clientId: clientId, logoutUrl: "/logout", loginUrl: loginUrl});
});
//end::homepageroute[]

//tag::loginpageroute[]
/* Login page if we aren't logged in */
router.get('/login', function (req, res, next) {
  res.render('login', {title: title + ' Login', clientId: clientId, loginUrl: loginUrl});
});
//end::loginpageroute[]

//tag::logoutpageroute[]
/* Logout page */
router.get('/logout', function (req, res, next) {
  req.session.user = null;
  res.redirect(302, logoutUrl);
});
//end::logoutpageroute[]

//tag::endsessionroute[]
/* End session for global SSO logout */
router.get('/endsession', function (req, res, next) {
  req.session.user = null;
  res.redirect(302, "/login");
});
//end::endsessionroute[]

//tag::oauthredirectroute[]
/* OAuth return from FusionAuth */
router.get('/oauth-redirect', function (req, res, next) {
  // This code stores the user in a server-side session
  client.exchangeOAuthCodeForAccessToken(req.query.code,
                                         clientId,
                                         clientSecret,
                                         'http://'+hostName+':'+port+'/oauth-redirect')
      .then((response) => {
        return client.retrieveUserUsingJWT(response.response.access_token);
      })
      .then((response) => {
        console.log(hostName);
        console.log(response.response);
        req.session.user = response.response.user;
        return response;
      })
      .then((response) => {
        res.redirect(302, '/');
      }).catch((err) => {console.log("in error"); console.error(JSON.stringify(err));});
});
//end::oauthredirectroute[]

module.exports = router;
This code handles a number of paths. Let's look at the code in more detail.
Constants section
const express = require('express');
const router = express.Router();
const {FusionAuthClient} = require('@fusionauth/typescript-client');

const dotenv = require('dotenv');
dotenv.config();

if (!process.env.clientId) {
  console.error('Missing clientId from .env');
  process.exit();
}
if (!process.env.clientSecret) {
  console.error('Missing clientSecret from .env');
  process.exit();
}
if (!process.env.fusionAuthURL) {
  console.error('Missing fusionAuthURL from .env');
  process.exit();
}
const clientId = process.env.clientId;
const clientSecret = process.env.clientSecret;
const fusionAuthURL = process.env.fusionAuthURL;

const hostName = 'piedpiper.local';

const port = 3000;
const title = 'Pied Piper';

const client = new FusionAuthClient('noapikeyneeded', fusionAuthURL);
const loginUrl = fusionAuthURL+'/oauth2/authorize?client_id='+clientId+'&response_type=code&redirect_uri=http%3A%2F%2F'+hostName+'%3A'+port+'%2Foauth-redirect&scope=offline_access%20openid';
const logoutUrl = fusionAuthURL+'/oauth2/logout?client_id='+clientId;
The top of the index.js file has configuration values and some needed constants.
The clientId and clientSecret are the values noted in the administrative user interface when you created the application in FusionAuth. The fusionAuthURL value needs to match your FusionAuth location, typically http://localhost:9011. If the FusionAuth server is running at a different hostname, update that.
The first argument to the FusionAuth client creation is noapikeyneeded because the client interactions this application performs do not require an API key. If you extend these applications to update user data or make other privileged API calls, you'll need to change that value to a real API key.
Home page route
/* GET home page. */
router.get('/', function (req, res, next) {

  if (!req.session.user) {
     res.redirect(302, loginUrl);
     return;
  }
  res.render('index', {user: req.session.user, title: title + ' App', clientId: clientId, logoutUrl: "/logout", loginUrl: loginUrl});
});
In this SSO implementation, users can't view the homepage if they aren't signed in. This is a design choice you can make. The code checks for the presence of a user in the session and if it isn't present, the user is redirected to the FusionAuth login page.
Login page route
/* Login page if we aren't logged in */
router.get('/login', function (req, res, next) {
  res.render('login', {title: title + ' Login', clientId: clientId, loginUrl: loginUrl});
});
This page is available to users who are not logged in. For this guide, the only information on this page is a login link, but for a real application you'd probably want to entice the user to register or log in.
Logout page route
/* Logout page */
router.get('/logout', function (req, res, next) {
  req.session.user = null;
  res.redirect(302, logoutUrl);
});
This route removes the user object from the session and then redirects to the FusionAuth logout URL.
Recall that there are three sessions present in this system: the FusionAuth session and one for each application. This route invalidates the local node application's session and then sends the browser to FusionAuth's logout URL, which will invalidate both the FusionAuth session and all other Node application sessions.
End session route
/* End session for global SSO logout */
router.get('/endsession', function (req, res, next) {
  req.session.user = null;
  res.redirect(302, "/login");
});
This route is what FusionAuth requests when a user logs out from any other application in this tenant. If a user is in the Hooli application and logs out, they will be signed out from the Pied Piper application as well. You configured this endpoint in the FusionAuth application details; FusionAuth is responsible for calling this endpoint. This is a separate endpoint from the /logout endpoint because in this request, the browser needs to end up on a page accessible to unauthenticated users, but in the /logout case, the user needs to be sent to FusionAuth.
OAuth redirect route
/* OAuth return from FusionAuth */
router.get('/oauth-redirect', function (req, res, next) {
  // This code stores the user in a server-side session
  client.exchangeOAuthCodeForAccessToken(req.query.code,
                                         clientId,
                                         clientSecret,
                                         'http://'+hostName+':'+port+'/oauth-redirect')
      .then((response) => {
        return client.retrieveUserUsingJWT(response.response.access_token);
      })
      .then((response) => {
        console.log(hostName);
        console.log(response.response);
        req.session.user = response.response.user;
        return response;
      })
      .then((response) => {
        res.redirect(302, '/');
      }).catch((err) => {console.log("in error"); console.error(JSON.stringify(err));});
});
This route is responsible for catching the authorization code request from FusionAuth after the user has signed in. It retrieves an access token and from that gathers the user data. This code ensures that the user is registered for this application, and then places the user data in the session.
Implementation of features that might cause a user to want to log in are left as an exercise for the reader.
Views#
Next, create the views. Each of these live in the views subdirectory. First, the layout view, which looks like this:
Layout view
doctype html
html
  head
    title= title
    link(rel='stylesheet', href='/stylesheets/style.css')
  body
    h2 Pied Piper |
       a(href='http://hooli.local:3001') Hooli
    block content
The content is displayed using the block content directive. Above it is a menu which lets users switch between both applications.
Next, the login view:
Login view
extends layout

block content
  h1= title
  a(href=loginUrl) Login

  p Welcome to #{title}
This is where you'd put information about your application for unauthorized users.
Then, create the index view:
Index view
extends layout


block content
  h1= title
  p Hello #{user.firstName}
  a(href=logoutUrl) Log out

  p Welcome to #{title}
This welcomes the user by name. If you were building a more complicated application, this is where you would put functionality that required a user to be authenticated..
There is some CSS in this application too; the CSS is available in the GitHub repository, but won't be covered here.
Start It Up#
Start the Pied Piper application on port 3000 after you've built the above files.
Starting up the Pied Piper application
PORT=3000 npm startNext, create the sibling Hooli application.
Hooli application#
In real life, these applications would have different functionality. For this guide, they are going to be similar. The only changes you need to make for the Hooli application are:
- Put the same files in a directory called
hooli. - Change
index.jsconstants to use the Hooli values for the title (to 'Hooli'), hostname (hooli.local), port (3001), and the Client Id and Client Secret (from the admin UI application screen). - Change the layout so that the menu links to the Pied Piper application. Make sure to include the port.
Index view
doctype html
html
  head
    title= title
    link(rel='stylesheet', href='/stylesheets/style.css')
  body
    h2
      a(href='http://piedpiper.local:3000') Pied Piper
      |
      || Hooli
block content- Start the application on the port
3001. Use a different terminal window so that you can have both Node applications running at once.
Starting up the Hooli application
PORT=3001 npm startAnd that's it. You've just created a second application. Congrats!
Test The Results#
Here's how you can test the work you've just done:
- Visit
http://piedpiper.local:3000. You'll be redirected to the FusionAuth login screen. - Check Keep Me Signed In
- Log in. You'll be greeted with a welcome message by the Pied Piper app.
- Click on the 'Hooli' link and you'll be automatically signed in to that application.
Here's a demo video of the single sign-on process from the end user perspective:
Caveat#
If you are testing these applications with a modern browser, logout won't work due to browser quirks when you are running over http. However, if you set up TLS and change the redirects to happen over https, then logout works.
Other Scenarios#
In this guide users who click on the Hooli link are automatically logged in. This is appropriate for most applications. However, if you have an application but can't customize the login process to check a session value and redirect if it doesn't exist, you can still use SSO.
Instead of redirecting the user when there's value is missing in such an application, display the FusionAuth login URL with the appropriate redirect parameter. The user will not be automatically signed in, but when they click on the login link, they will be sent to FusionAuth. FusionAuth will recognize the user as being signed in and redirect them back without requiring credentials.
COTS applications#
If you are looking to integrate with a commercial off the shelf or open source software package, FusionAuth can act as a SAML identity provider or an OIDC OpenID Provider. For example, FusionAuth can act as an IdP for Zendesk, as shown in this video:
Please see the SAML IdP and OIDC documentation or the single sign-on documentation for the application you're looking to integrate with for more.
Bootstrapping SSO#
In certain scenarios you may have authenticated a user outside of the typical OAuth flow. If so, you can still acquire an SSO session from FusionAuth as long as you have a valid access token for the user.
To enable this feature perform these one-time setup steps:
- Enable the access token bootstrap setting on the tenant. There are two ways to do this. Use the Admin UI or set the tenant.ssoConfiguration.allowAccessTokenBootstrap field to
truein the Tenant API. - Configure a reverse proxy to add the required
Authorizationheader.
Configuring a reverse proxy will vary, and is out of scope. One common scenario would assume you have an HTTP only secure cookie that holds the user's access token. In this example, the reverse proxy copies the value of that cookie into the Authorization header as it passes through.
Follow these steps to setup the request to bootstrap the SSO session for a user:
- Build a normal Authorize request that redirects to the OAuth Authorize endpoint. The host and path may very based upon your proxy configuration, but the query parameters are the same as a normal request to this endpoint.
- Intercept the request and add the access token to the
Authorizationheader using theBearerscheme. - Forward the request to the FusionAuth Authorize endpoint
/oauth2/authorize.
The following is an example Authorization header using the Bearer scheme:
Authorization: Bearer <access token>If the token is valid, FusionAuth creates an SSO session and completes the requested grant by redirecting to the authorized redirect specified by the redirect_uri request parameter. Any other OAuth2 parameter validation is the same as a normal request.
Note that FusionAuth adds the auth_time claim to the access token. If you remove this claim from the access token it cannot be used to bootstrap a SSO session.
Additional Configuration#
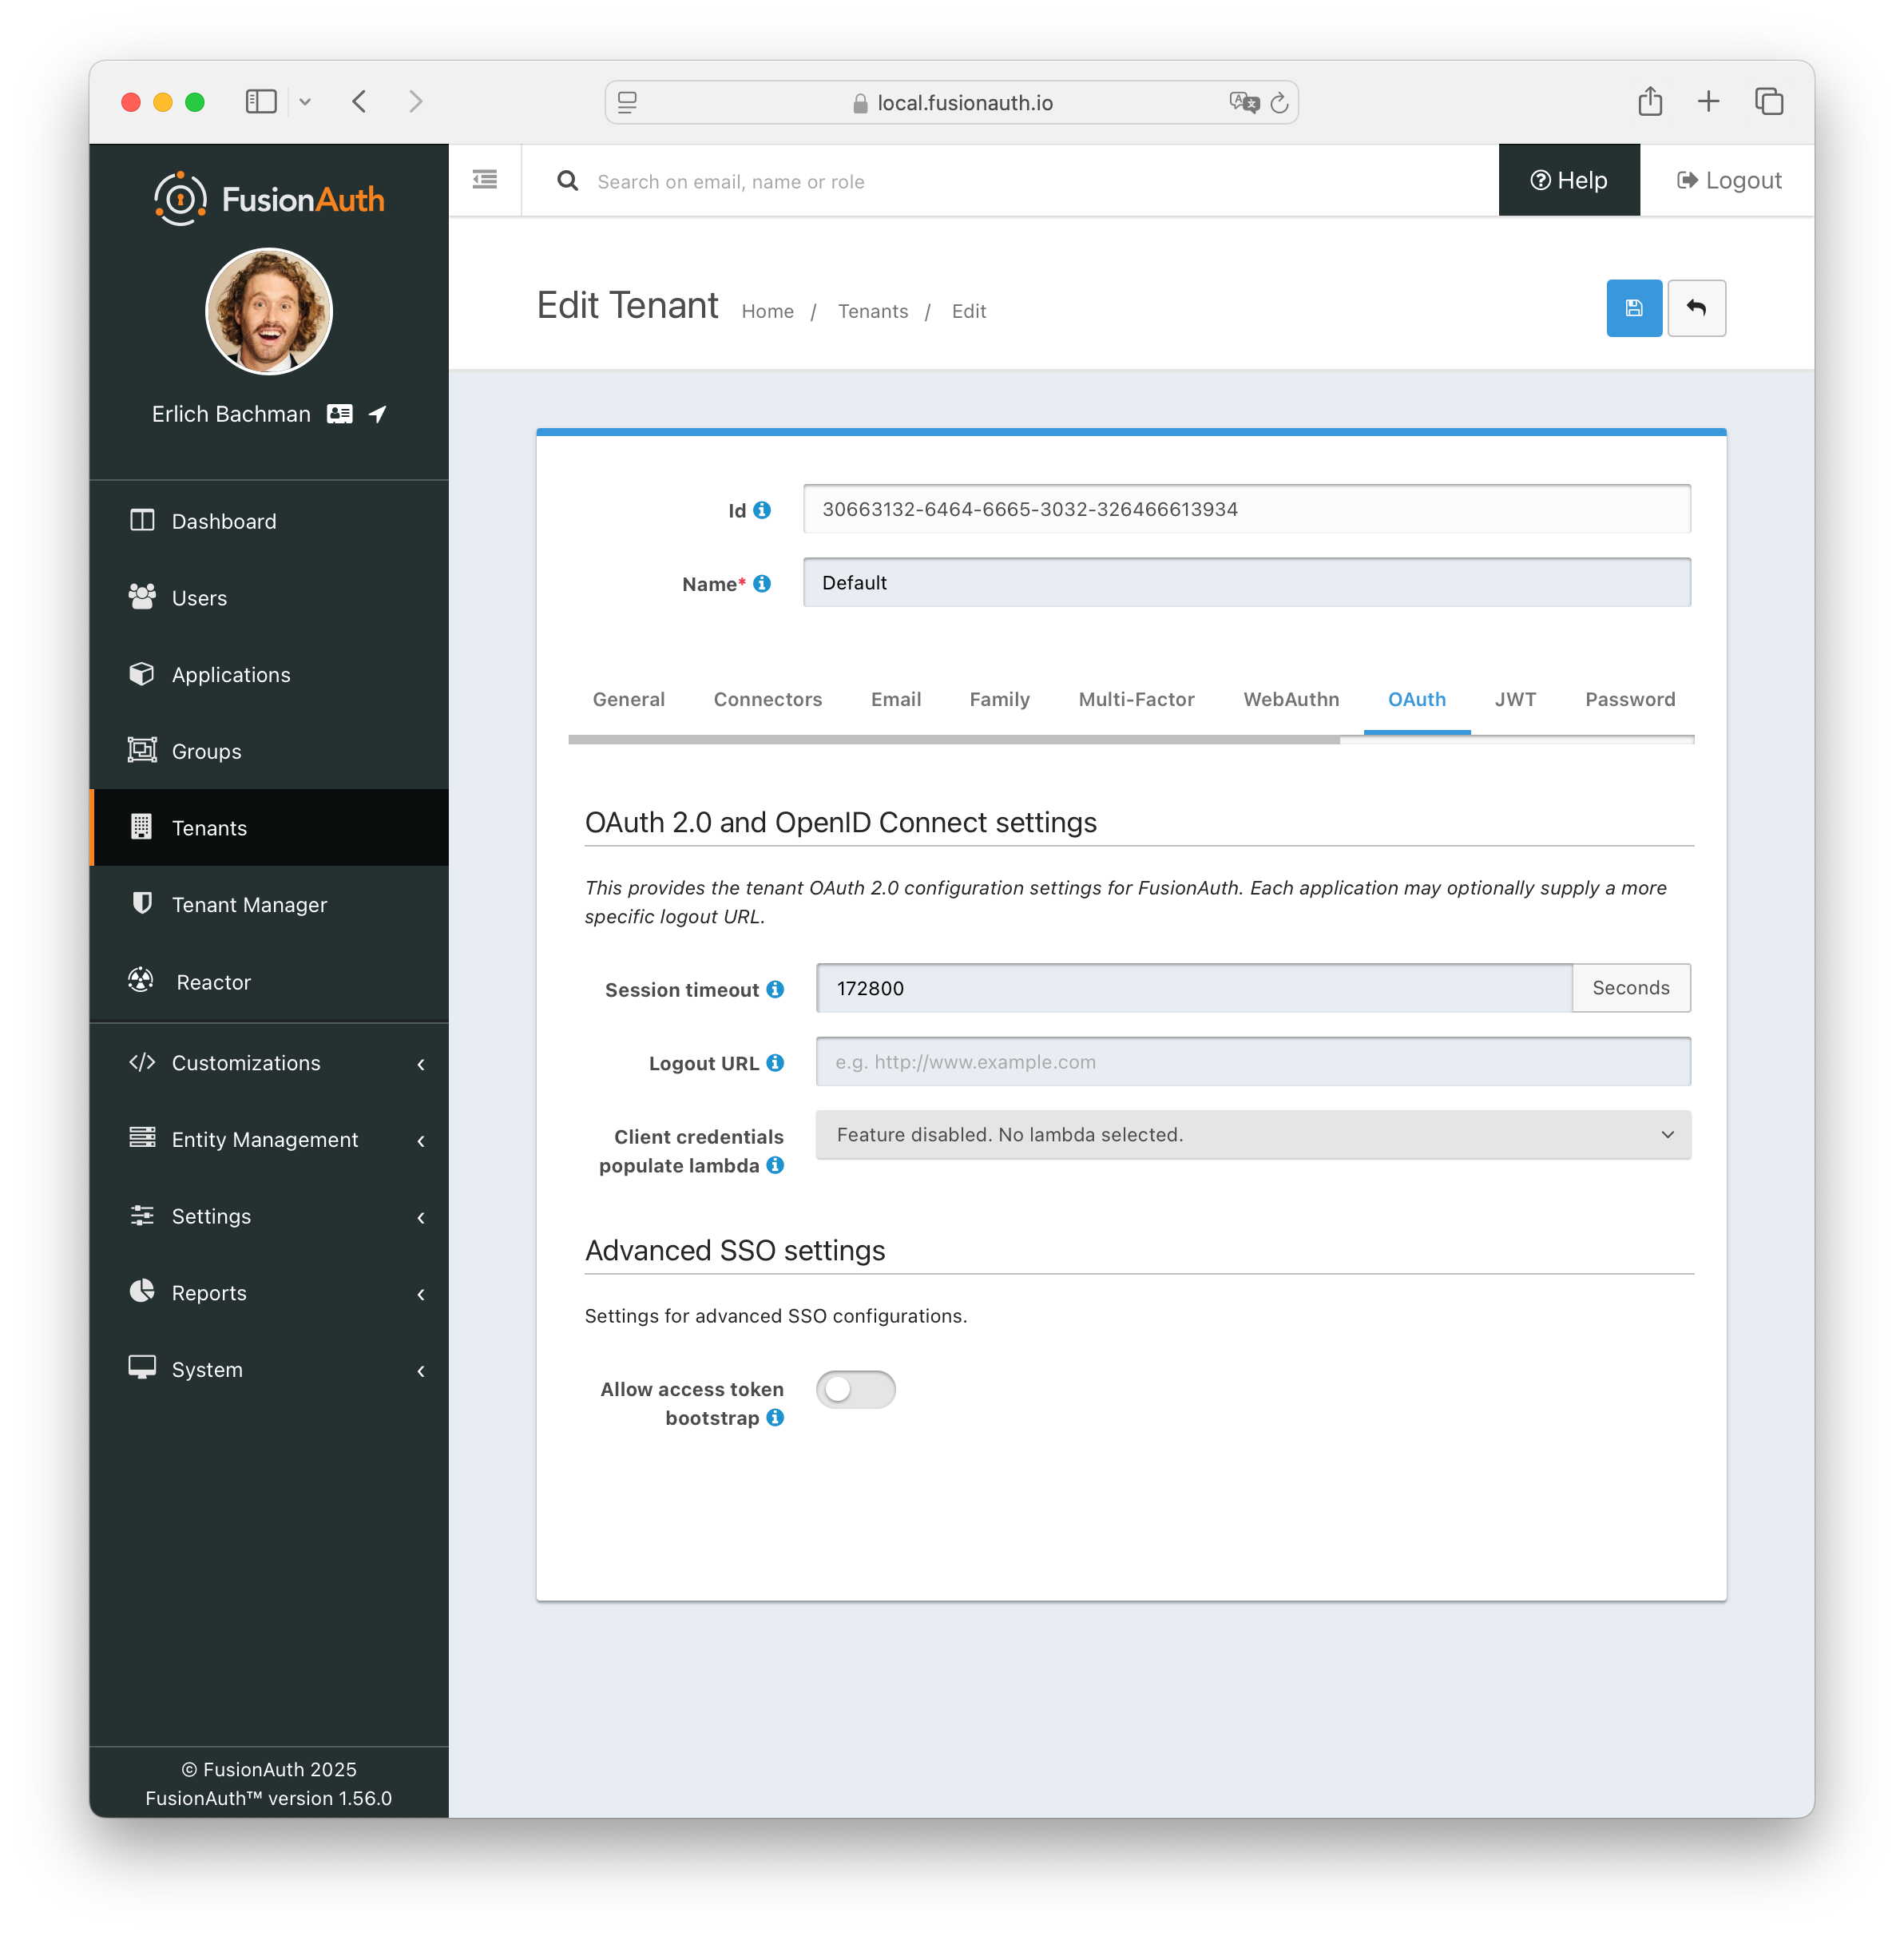
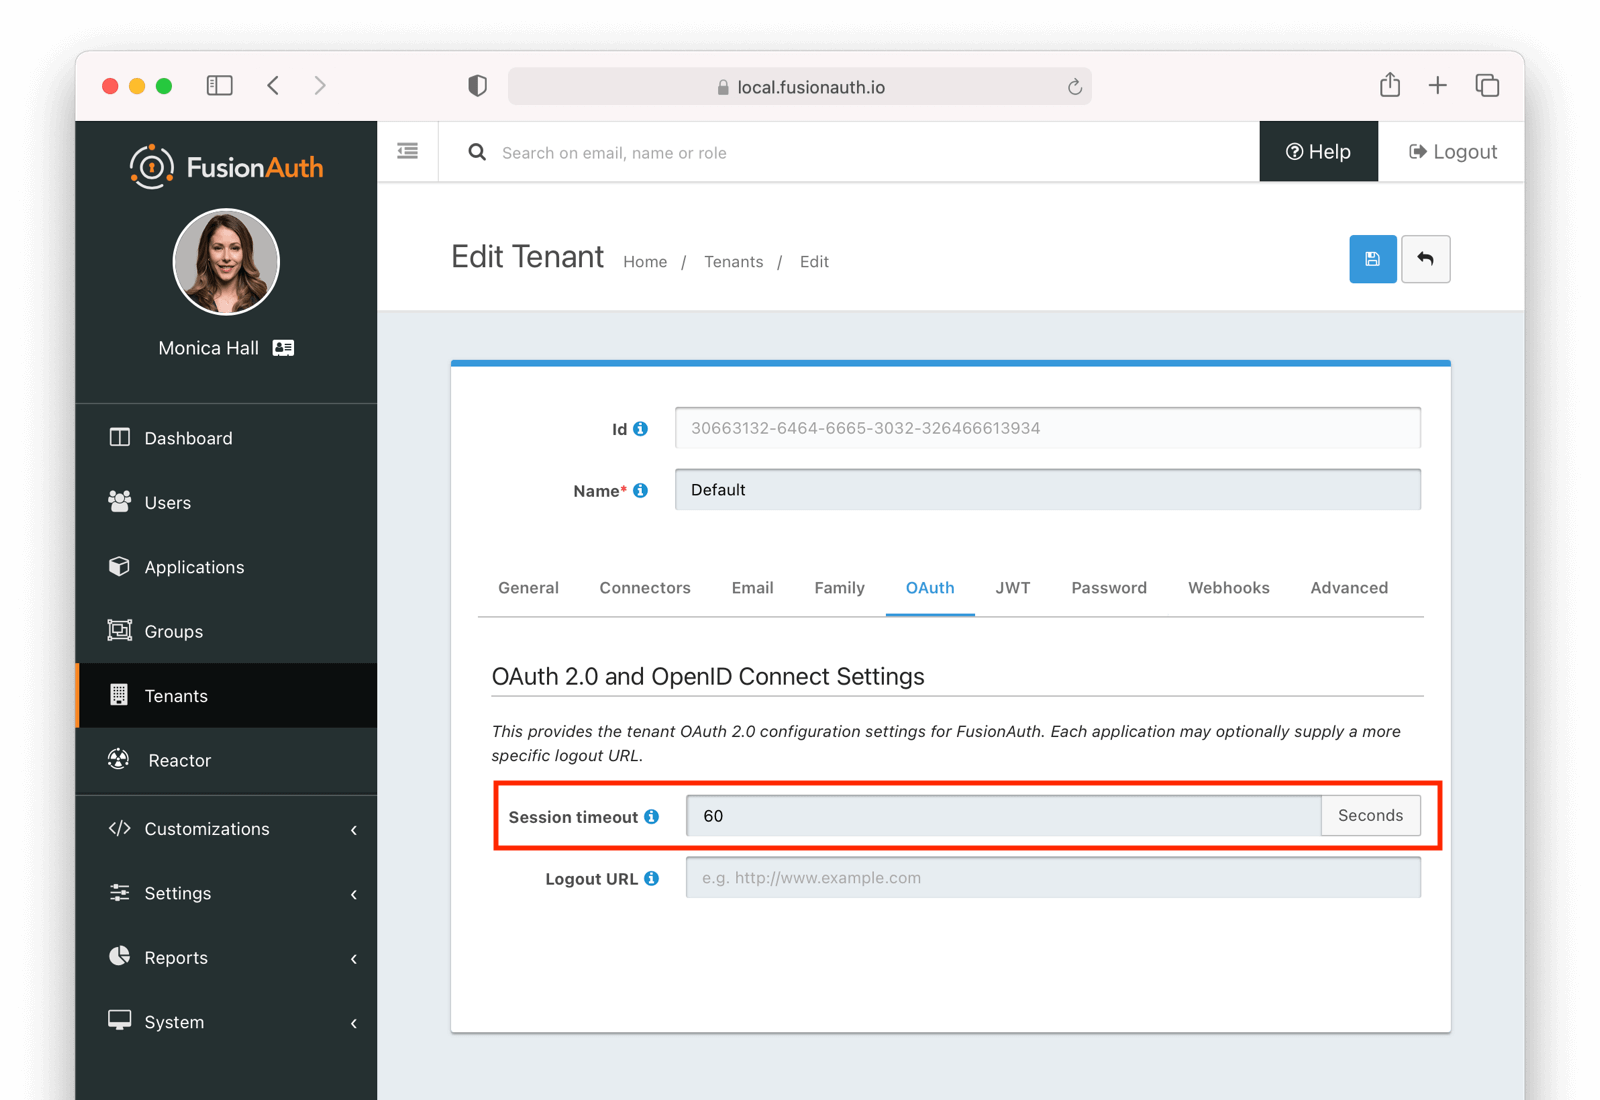
Session Expiration#
The single sign-on session duration can be configured at the Tenant level. Navigate to Tenant -> Your Tenant -> OAuth and edit the Session timeout value. Because this value is shared between applications, it can't be overridden in application configuration.
The length of a single sign-on session can be different from the session length for individual applications. When a request to an application occurs, there are four possible scenarios:
Single sign-on session scenarios
| Application Session | FusionAuth Session | Result |
|---|---|---|
| valid | valid | Application serves request. |
| valid | expired | Application serves request. |
| expired | valid | Application redirects to FusionAuth, which redirects back to the application. The application then adds the user to the session and serves the request. |
| expired | expired | The user must authenticate with FusionAuth. On successful authentication, FusionAuth redirects back to the application. The application then adds the user to the session and serves the request. |
Logout Behavior#
The default behavior is to log a user out of all applications when they log out of one. If you want to only log the user out of the application where the user made the logout request, you can do that.
Navigate to Applications -> Your Application -> OAuth and configure Logout behavior to have the value Redirect Only.
Limitations#
An Application's OAuth configuration allows you to specify the logout behavior of an application as either All applications or Redirect only.
Specifying the default value of All applications will call the configured logout URL for each application in the Tenant except for the FusionAuth admin UI application.
As of version 1.37.0, this is no longer a limitation. See the release notes for version 1.37.0 for more information.
Additional Resources#
- You can view the example application's codebase.
- The Tenant API can be used to manage single sign-on related configuration.
- This guide uses the hosted login pages.
- The Logout and Sessions Guide has more information about session management options beyond using the built in SSO session.