Migrate From Auth0
This document explains how to migrate common Auth0 configurations to FusionAuth. If you are looking to compare FusionAuth and Auth0, see our comparison. For general migration information, see the FusionAuth migration guide.
If you are already a paid FusionAuth customer, contact support. Navigate to Get Support, then open a ticket at the bottom of the support page.
Prerequisites#
- A running instance of FusionAuth. To install an instance, see our installation guides.
Planning Considerations#
Obtaining User Data#
You can use either the Auth0 management API or the Auth0 user interface to export user data. This guide uses the user interface, but if you have a large number of users, the management API is recommended. Auth0 also has a high level export guide worth reviewing.
If you are using the user interface, usernames, email addresses and other data can be obtained by installing an extension and downloading the data. The password hashes can be obtained by opening a support ticket.
Here's a brief video walking through the export process, which is further documented below.
Mapping User Attributes#
The attributes of the User object in FusionAuth are well documented.
If there is an attribute in your Auth0 user which cannot be directly mapped to a FusionAuth attribute, you can place it in the user.data field. This field can store arbitrary JSON values and will be indexed and searchable.
Social Logins#
Auth0 also provides integrations with other social login providers such as Twitter, Google or Facebook. Review the supported FusionAuth Identity Providers to ensure your social providers are supported.
If not supported explicitly, a provider may work with an OIDC or SAML connection. Otherwise, please open a feature request.
When migrating social logins, you may need to modify the switches of the Auth0 import script. See Use the Script for more.
Migrating users with social logins such as Apple or Facebook requires that you have an existing user Id for that provider. What this unique user Id looks like depends on the particular social identity provider. The unique Id may be an email address, an integer, UUID, or a random string.
Configure the appropriate FusionAuth Identity Provider with the same values (client_id, etc) as the original user management system you are migrating away from.
Import users with the Import API, assigning each user with a social login a random password such as a UUID.
Your next step depends on whether the social login provider's unique identifier is available as part of your migration data. If you have the social login provider's unique identifier, for each user, use the Link API to create a link with the appropriate User Id, Identity Provider Id, and Identity Provider User Id.
- The User Id is the Id of the recently created FusionAuth User.
- The Identity Provider Id is found on the corresponding Identity Provider API documentation. Look for identityProvider.id.
- The Identity Provider User Id is the existing social provider user identifier exported or otherwise extracted from the original system.
You do not need to migrate the social network token, which may or may not be accessible. During the first login of a newly migrated user, FusionAuth finds the unique user in the social login provider based on the migrated Identity Provider User Id, and completes the login. During this process, FusionAuth stores a token on the Link, if the social provider returns one. Depending on the configuration of the social provider, users may see a prompt asking if they want to allow FusionAuth to have access to user data such as email address.
IdP linking strategies have been available since version 1.28.0. Before that version, users were linked on email.
If you do not have the social login provider's identifier, you need to decide if you want to transparently link the two accounts, which is easier for the end user, or if you want to ask the user to manually link the accounts, which is more accurate, but may be confusing.
To transparently link the accounts, choose a linking strategy of Link On Email or Link On Username, which will create the user if they don't exist. However, if the user has an email address at their social provider which differs from the email address that was used to sign up for your application and which you imported to FusionAuth, then two accounts will be created.
For example, if the user has a Google account richard@gmail.com, but signed up for your application with richard@fusionauth.io, then if you use the Link On Email strategy, two different accounts will be created, since FusionAuth is trying to match on email address and they don't. The same holds true for usernames with the Link on Username strategy.
To prompt the user to link the accounts, choose a linking strategy of Pending, which will prompt the end user to sign into FusionAuth after they sign into the social provider, authoritatively linking the two accounts.
Here's more information about IdP Linking Strategies.
Apple only returns a user's full name the first time the user logs in. Since you have users who have already used Apple to log in to your previous authentication gateway, Apple will not provide the user's name when they log in to FusionAuth now. The only solution is to import the user's name manually from your previous database into FusionAuth.
Other Entities#
There are often other important entities, such as connections or roles, that need to be migrated. There are usually fewer of these, so an automated migration may not make sense, but plan to move this configuration somehow.
Be aware that functionality may not be the same between Auth0 and FusionAuth. This is different from user data; as long as you can somehow migrate a login identifier (a username or email) and a password hash, a user will be authenticated and successfully migrated. You can download FusionAuth before you begin a migration and build a proof of concept to learn more about the differences.
A partial list of what may need to be migrated for your application to work properly includes the following:
- In Auth0, Database Connections are a source of data for users where credentials are stored locally. FusionAuth similarly supports password authentication, as well as passwordless methods like passkeys and magic links.
- Auth0 has Identity Providers, a source of user data where credentials are stored in another system like Google or Okta. FusionAuth also calls these Identity Providers.
- Actions are ways for you to customize authentication or authorization workflows. FusionAuth has a similar concept called Lambdas. Auth0 defines injection points as a separate object called Triggers; in FusionAuth these are not a separate conceptual object. In Auth0 multiple actions can be added to one Trigger; FusionAuth lets you create different functions in a Lambda.
- With Auth0, Applications are what your users can log in to. Auth0 has separate types of Applications for different use cases. FusionAuth also refers to these as Applications. FusionAuth applications don't have types; mobile, SPA, and API applications are all Applications in FusionAuth. In FusionAuth, you can use universal applications for applications that need to be in more than one tenant.
- Tenants are a high level construct which groups other entities such as users and applications together. FusionAuth calls these Tenants as well. FusionAuth supports a multi-tenant configuration by default.
- Organizations allow admin users within an Auth0 Tenant to manage a separate set of users and functionality. In FusionAuth, you'd model this with tenants and use the API or SDKs.
- For Auth0, Roles and Permissions provide information about what your users can do in your custom or off the shelf applications. FusionAuth has Roles and they are defined on an Application by Application basis.
- Refresh tokens allow JWTs to be refreshed without a user logging in. These can be migrated using the Import Refresh Tokens API.
In FusionAuth, users are explicitly mapped to applications with a Registration.
Auth0, in contrast, gives users access to all Auth0 applications in a tenant by default.
Identifiers#
When creating an object with the FusionAuth API, you can specify the Id. It must be a UUID.
This works for users, applications, and tenants, among others.
If you have external dependencies on an Id stored in , port the same Id over to FusionAuth.
Embedded Login#
Auth0 provides Embedded Login. This is a complex, configurable login component that works with SPAs, native applications and web applications. It is also not recommended by Auth0:
FusionAuth's login experience is simpler. You can choose to build your own login pages or use FusionAuth's hosted login pages. Read more about these choices.
FusionAuth's hosted login pages are very similar to Auth0's Universal Login.
You can build an experience similar to Auth0's Embedded Login using the FusionAuth Login API, but FusionAuth does not offer any widgets or SDKs that use that API.
Once you've planned your migration, the next step is to export your user data from Auth0.
Exporting Users#
To export users with the user interface, log in and navigate to your dashboard. You'll perform the following steps:
- Add the User Import/Export extension, if not present
- Run the extension
- Download the exported file
Add the Extension#
Auth0 provides an extension that allows you to both import and export users to and from Auth0. Add the extension by navigating to Extensions and searching for it.
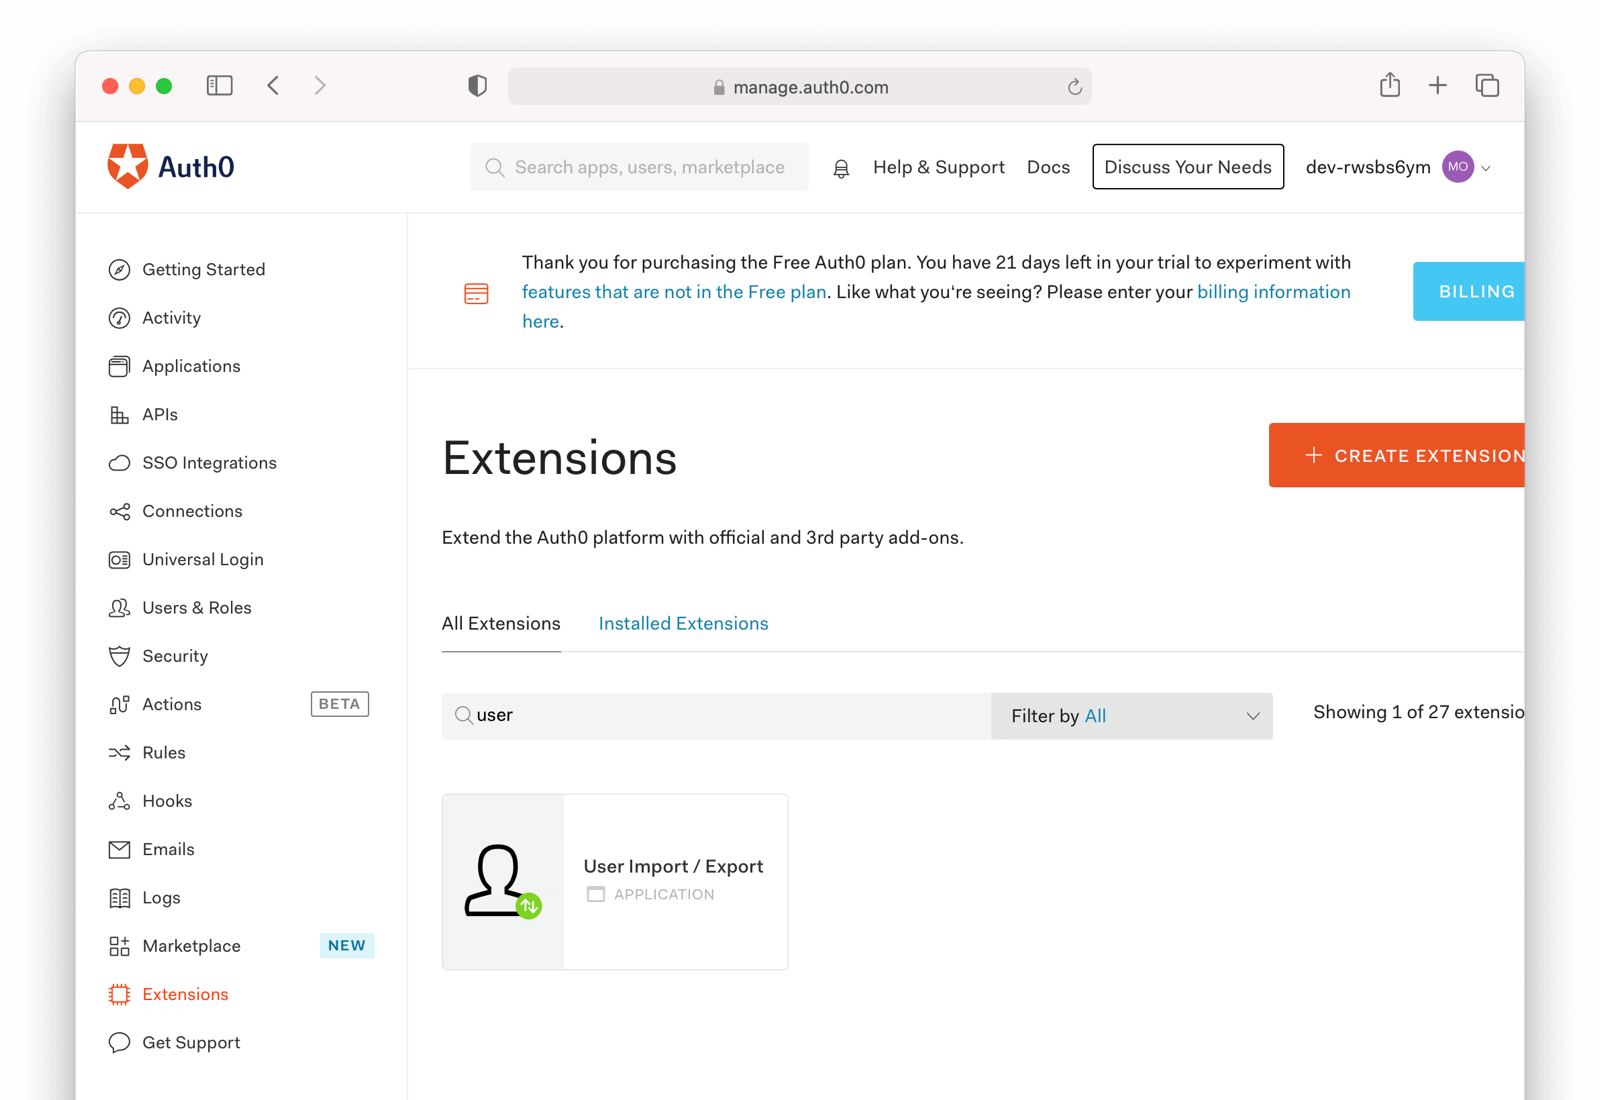
After you find the extension, install it:
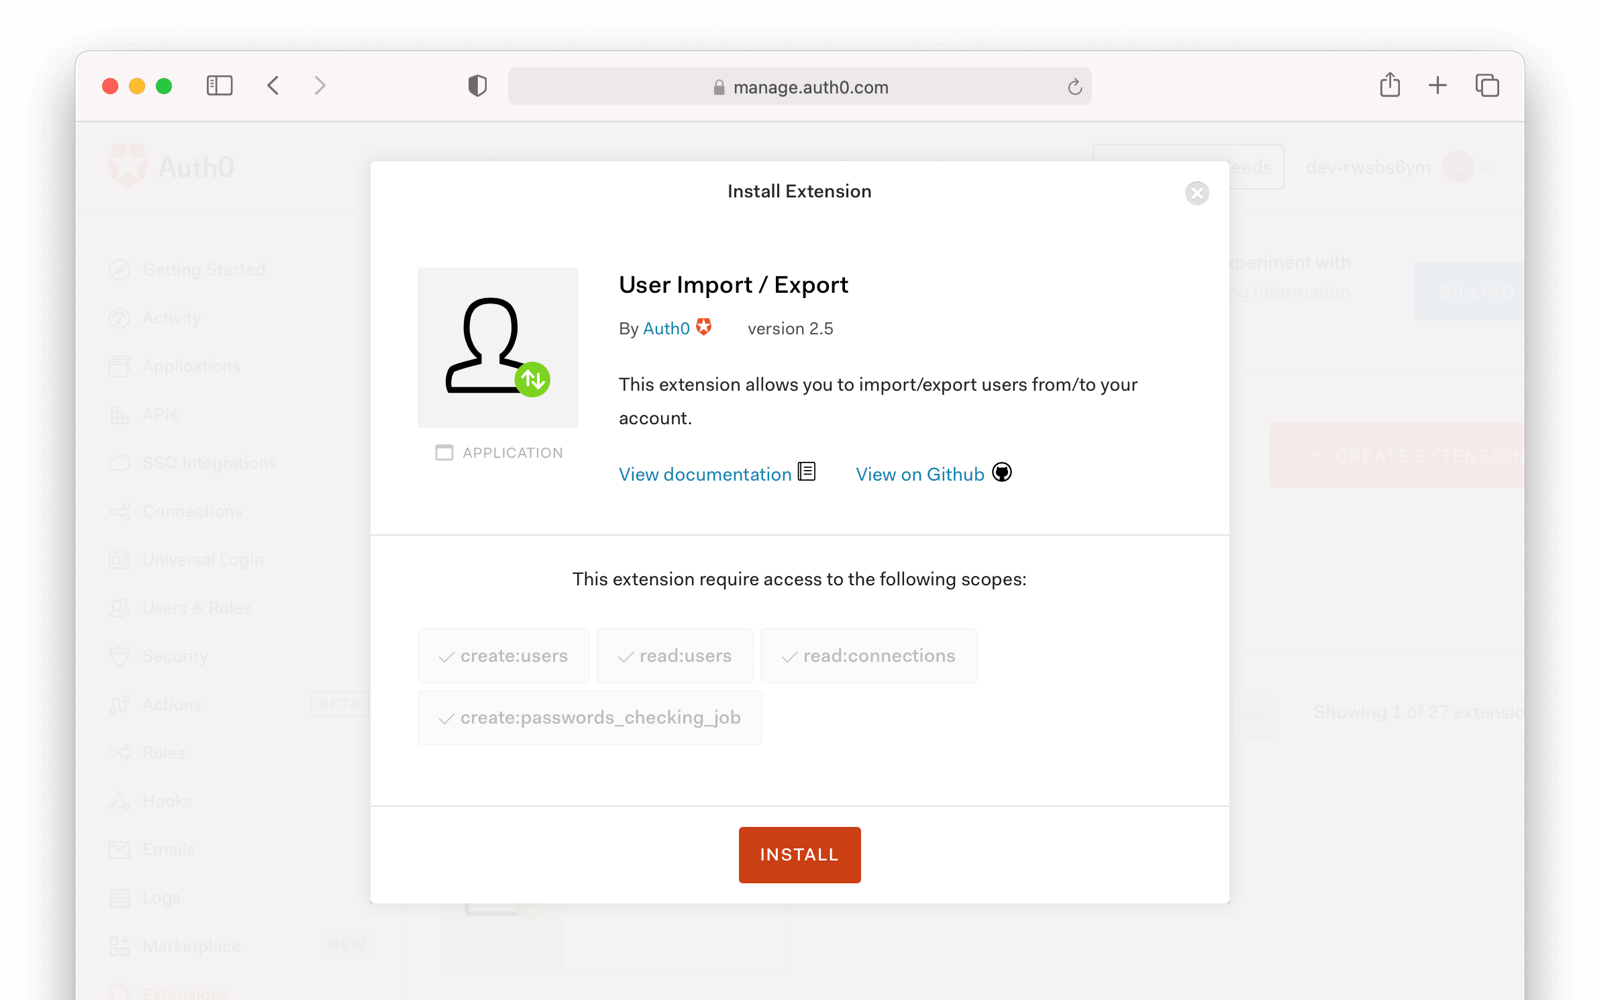
The next step is to run the extension.
Run the Extension#
Next, run the extension. The first time you run it, you'll be asked to grant needed permissions. Then, choose the export tab.
This will bring up a screen with information such as what fields you want to export, which connections to pull users from, and the export file format.
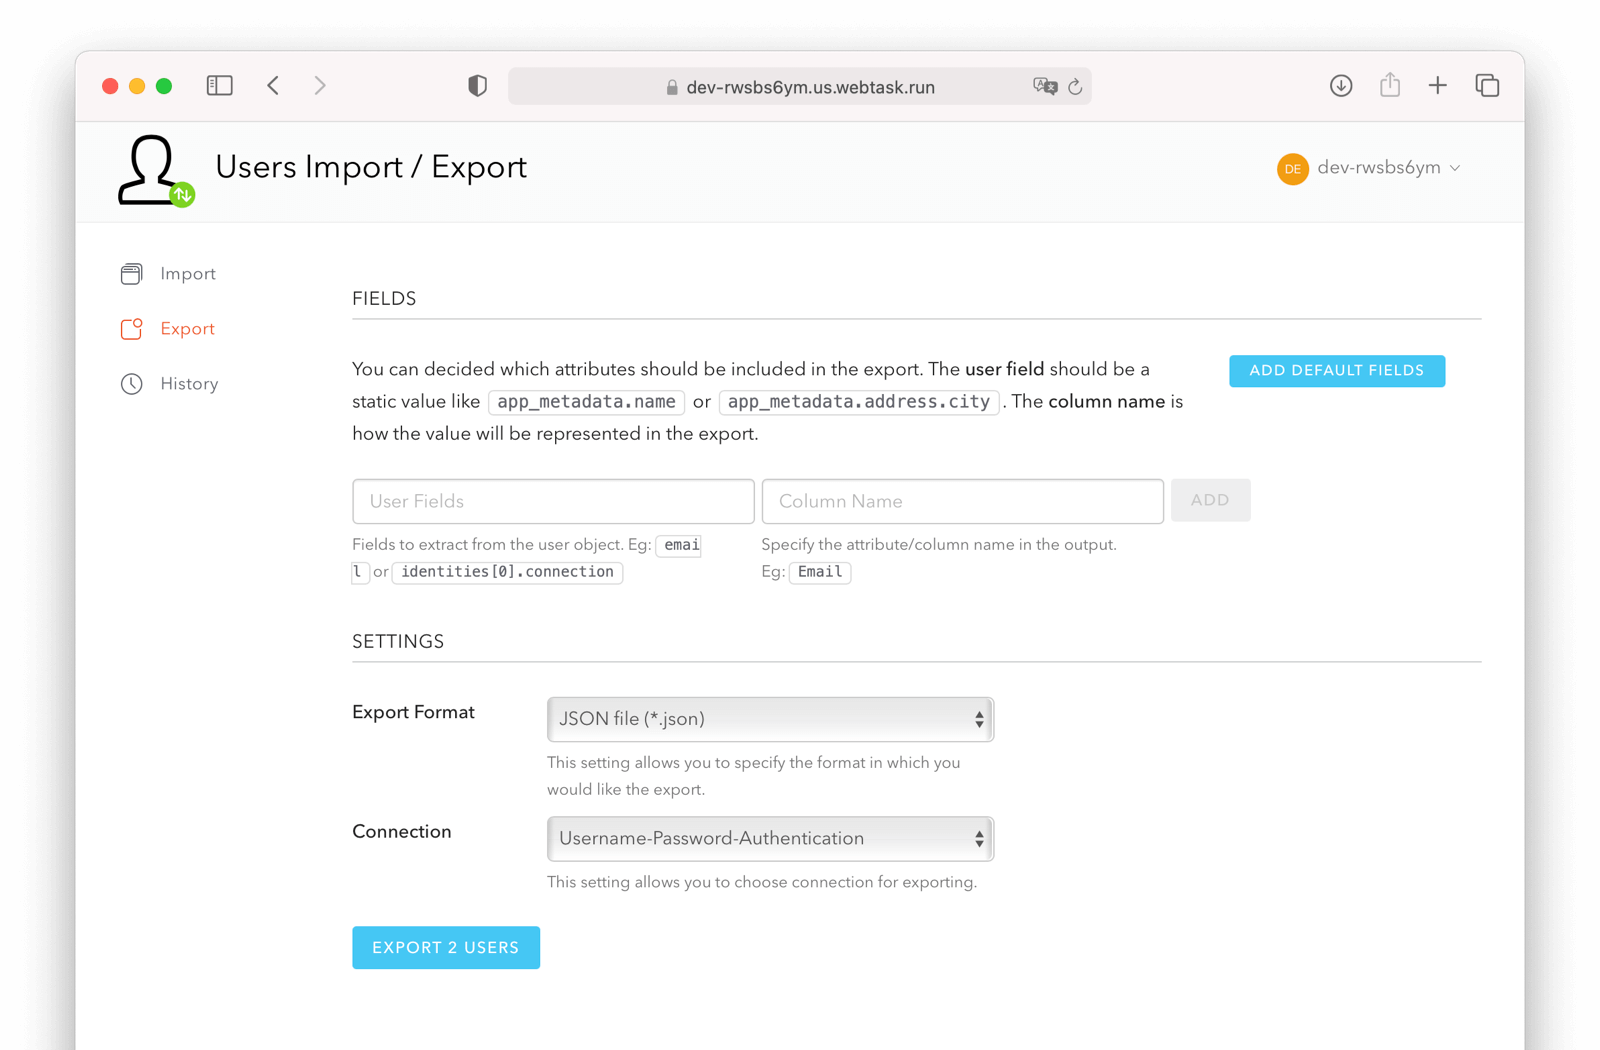
For this guide, export user information as JSON. Choose the default user database. Finally, if you have special fields to include, configure their export as needed. Then begin the export.
Depending on how many users you have in your database, it may take a while for this to complete.
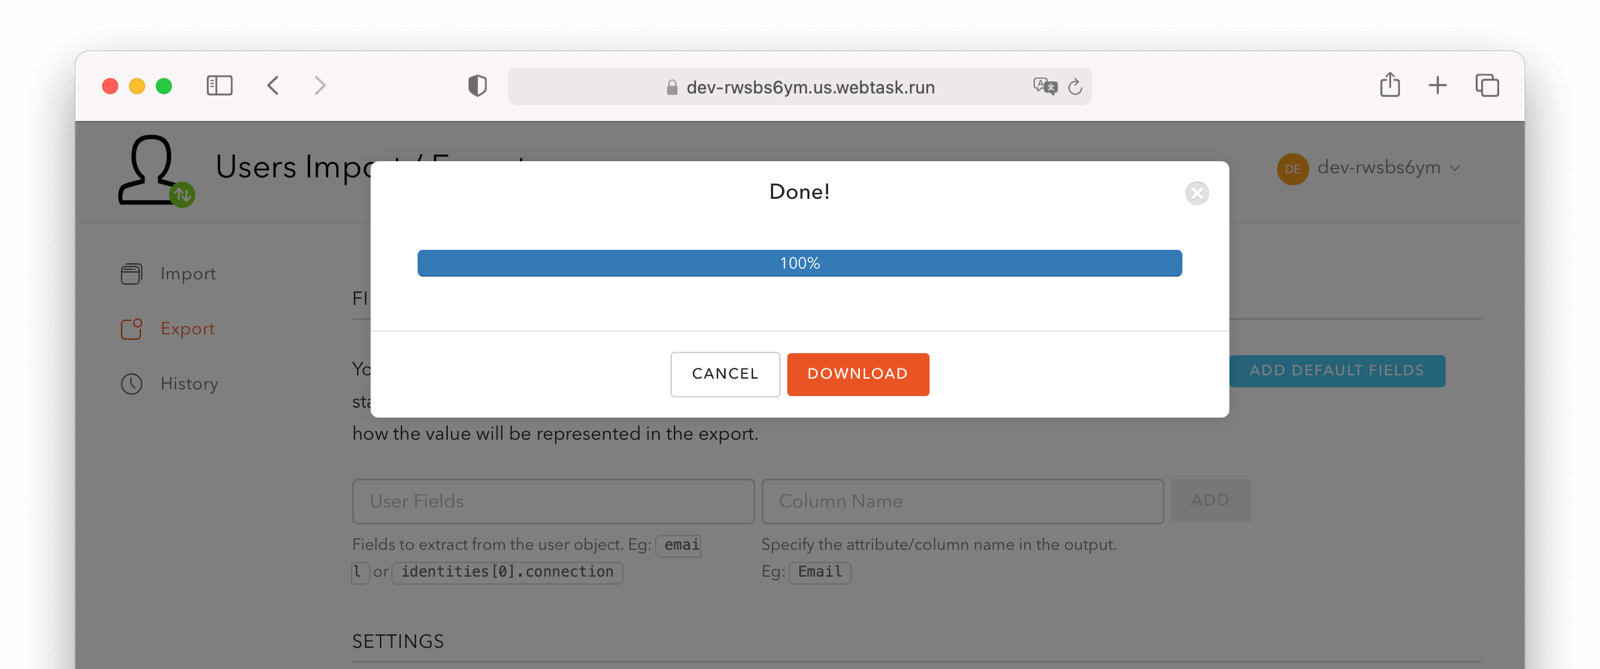
Download the File#
After the export finishes, download the file provided. At the end of the process, you'll end up with a JSON file like this:
Sample Auth0 user data export download
{"user_id":"auth0|60425da93519d90068f82966","email":"test@example.com","name":"test@example.com","nickname":"test","created_at":"2021-03-05T16:34:49.518Z","updated_at":"2021-03-05T16:34:49.518Z","email_verified":false}
{"user_id":"auth0|60425dc43519d90068f82973","email":"test2@example.com","name":"test2@example.com","nickname":"test2","created_at":"2021-03-05T16:35:16.786Z","updated_at":"2021-03-05T16:35:16.786Z","email_verified":false}
This is half of the data you'll need to migrate your users. The other half is the password hashes.
Exporting Password Hashes#
Because password hashes are considered sensitive information, Auth0 does not export them as part of the general export process. You must file a support ticket to get the hashes and other password related information.
During this migration, passwords are never exposed in plaintext. Neither FusionAuth, Auth0, nor you ever have access to the password.
However, once you've exported the password hashes from Auth0 and imported them into FusionAuth, your users will be able to log in to FusionAuth with the same password they used previously.
If you are not able to export the hashes, due to the plan you are on or the migration timelines, one alternative is to have every user change their password using the forgot password flow. You can still import all the user data.
To start the process of obtaining the hashes, open a support ticket. From your dashboard, navigate to Get Support , and then open a ticket by scrolling to the bottom of the support page.
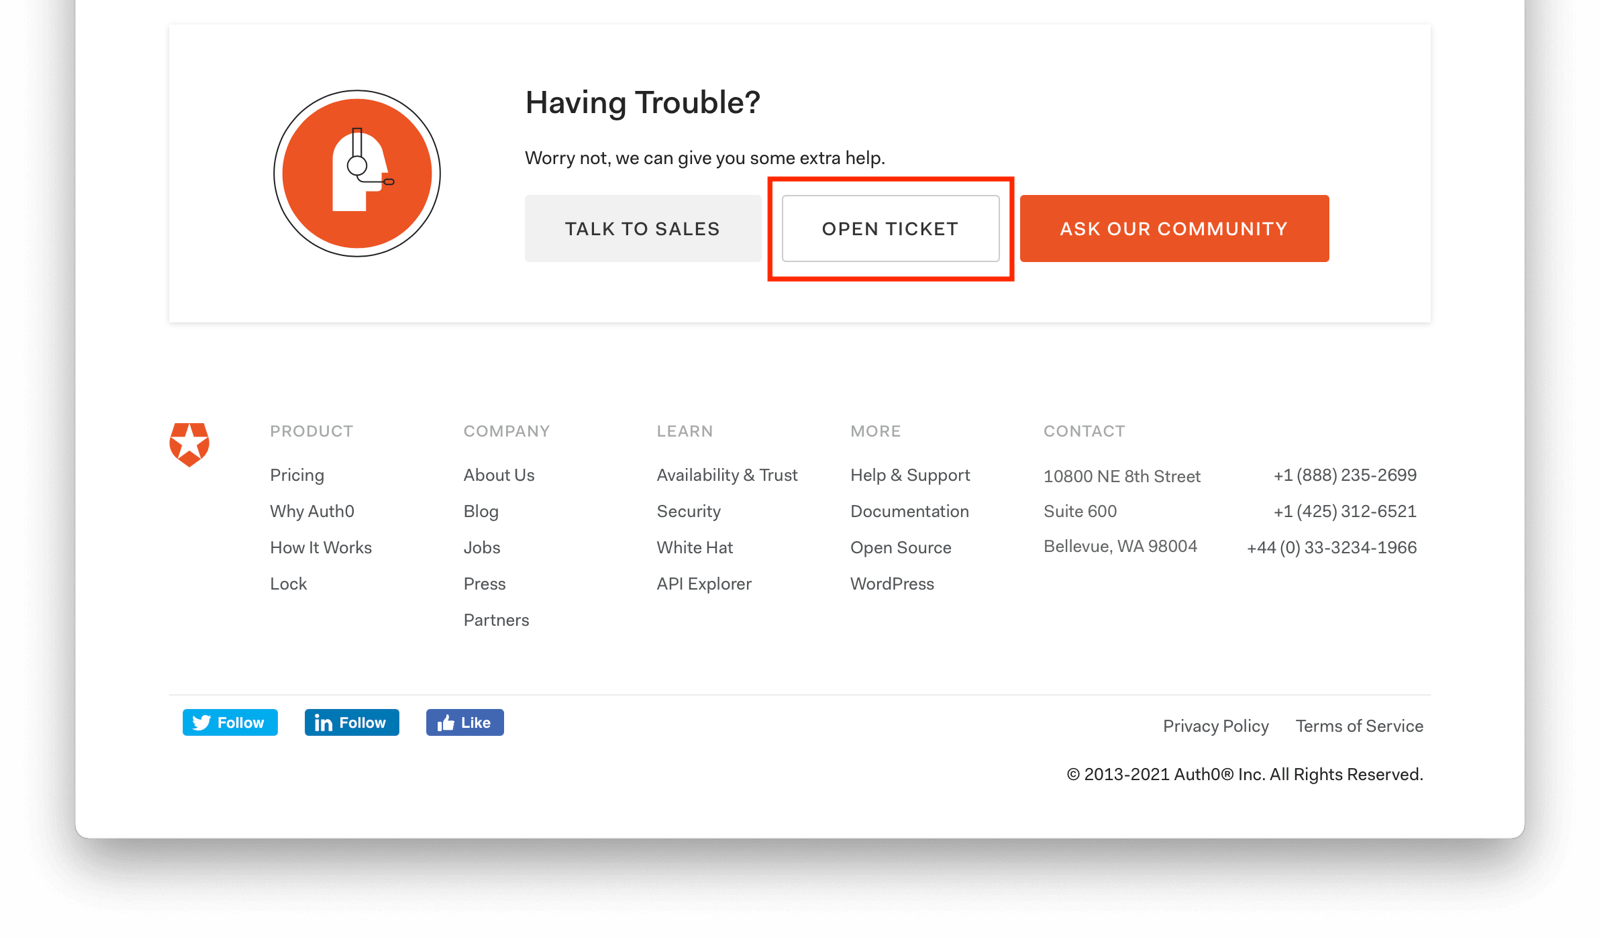
Select the issue and details of your request. Choose I have a question regarding my Auth0 account and then pick the I would like to obtain an export of my password hashes option.
You'll receive an automated message after this ticket is submitted. View progress on the ticket screen.
Auth0 requires you to be on a paid plan to export your password hashes. You cannot export them otherwise.
Additionally, Auth0 makes no commitments about the processing time for a password hash request. In the author's experience, it took approximately one week.
Plan accordingly.
After your request is processed, you'll download a JSON file containing password hashes, related information and user ids. It will look like this:
Sample Auth0 password hash export download
{"_id":{"$oid":"60425dc43519d90068f82973"},"email_verified":false,"email":"test2@example.com","passwordHash":"$2b$10$Z6hUTEEeoJXN5/AmSm/4.eZ75RYgFVriQM9LPhNEC7kbAbS/VAaJ2","password_set_date":{"$date":"2021-03-05T16:35:16.775Z"},"tenant":"dev-rwsbs6ym","connection":"Username-Password-Authentication","_tmp_is_unique":true}
{"_id":{"$oid":"60425da93519d90068f82966"},"email_verified":false,"email":"test@example.com","passwordHash":"$2b$10$CSZ2JarG4XYbGa.JkfpqnO2wrlbfp5eb5LScHSGo9XGeZ.a.Ic54S","password_set_date":{"$date":"2021-03-05T16:34:49.502Z"},"tenant":"dev-rwsbs6ym","connection":"Username-Password-Authentication","_tmp_is_unique":true}
Now that you have both the user data and the password hashes, you can import your users.
Importing Users#
Next up, import the user data. Here are the steps we need to take.
- Set Up FusionAuth
- Get the Script
- Install Needed Gems
- Use the Script
- Verify the Import
- The Final Destination of Imported Users
Set Up FusionAuth#
You need to set up FusionAuth in order to store migrated user data. As mentioned above, this guide assumes you have FusionAuth installed.
If you don't, view our Getting Started guide and install it before proceeding further.
Create a Test Tenant#
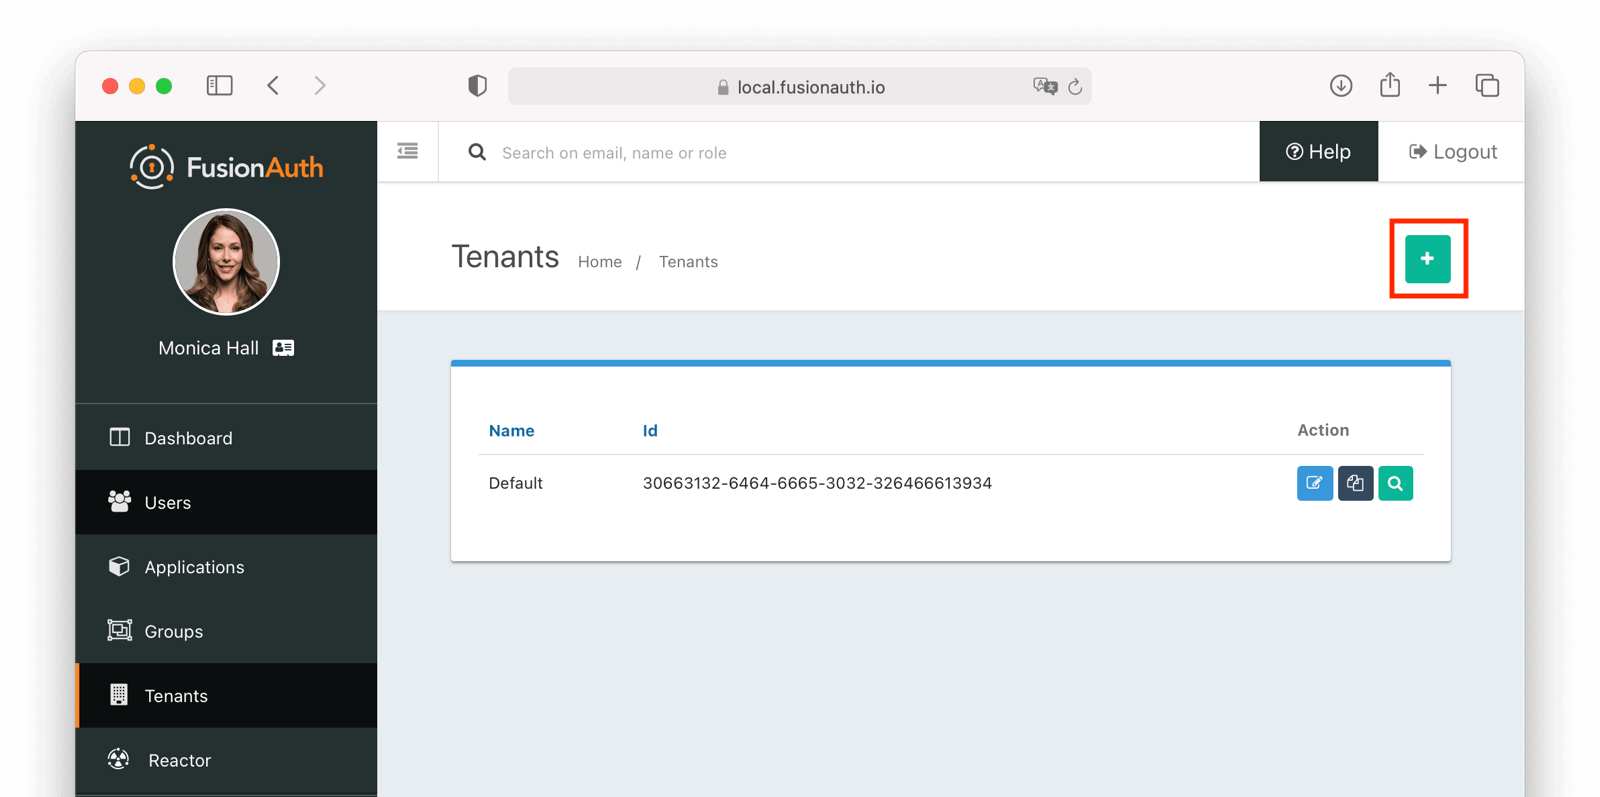
It is best to create a separate tenant for migration testing. Tenants logically isolate configuration settings and users. If a migration goes awry or you need to redo it after tweaking settings, you can delete the test tenant and start with a clean system. To add a tenant, navigate to Tenants and click the Add button.
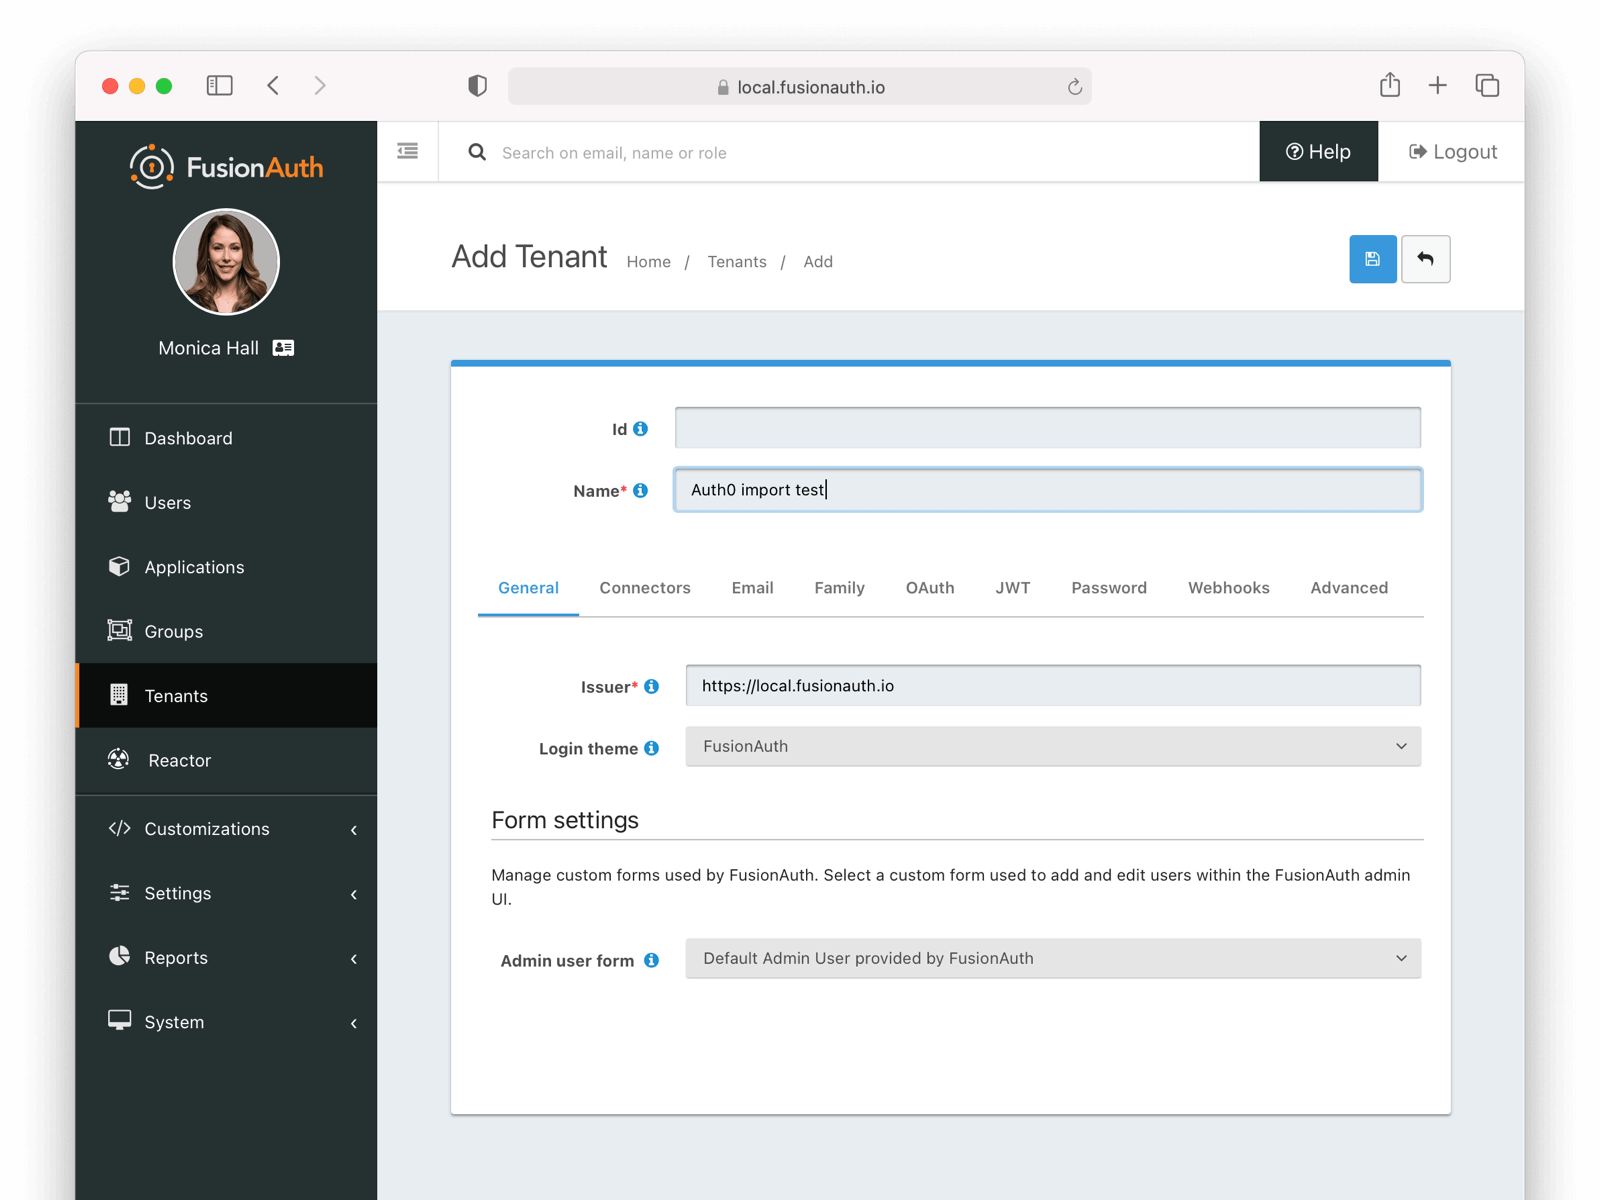
Give it a descriptive Name like Auth0 import test. You shouldn't need to modify any of the other configuration options to test importing users.
Save the tenant.
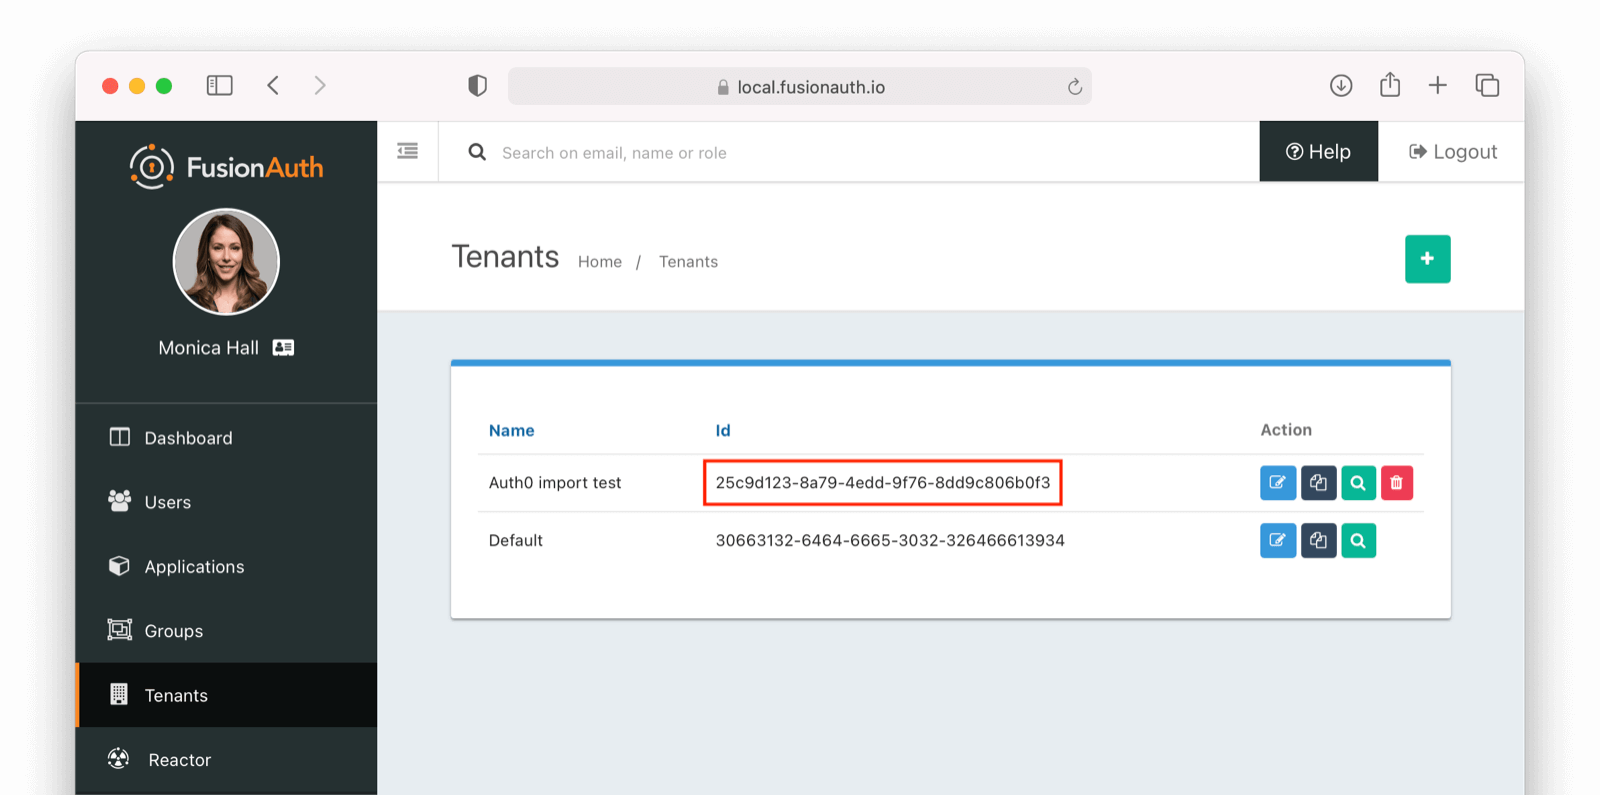
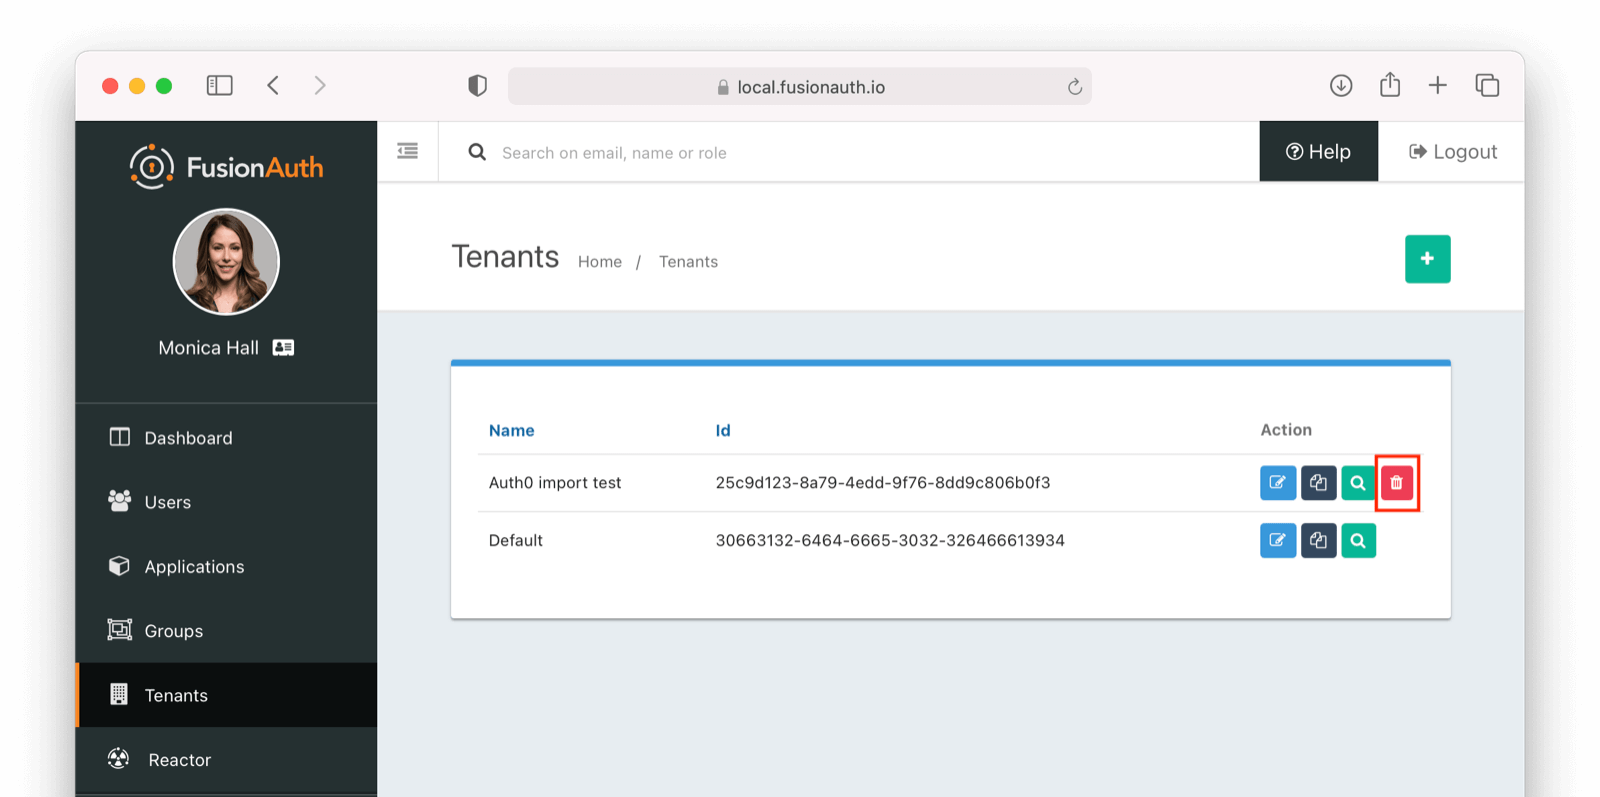
Record the Id of the tenant, which will be a UUID. It will look something like 25c9d123-8a79-4edd-9f76-8dd9c806b0f3. You'll use this later.
Create a Test Application#
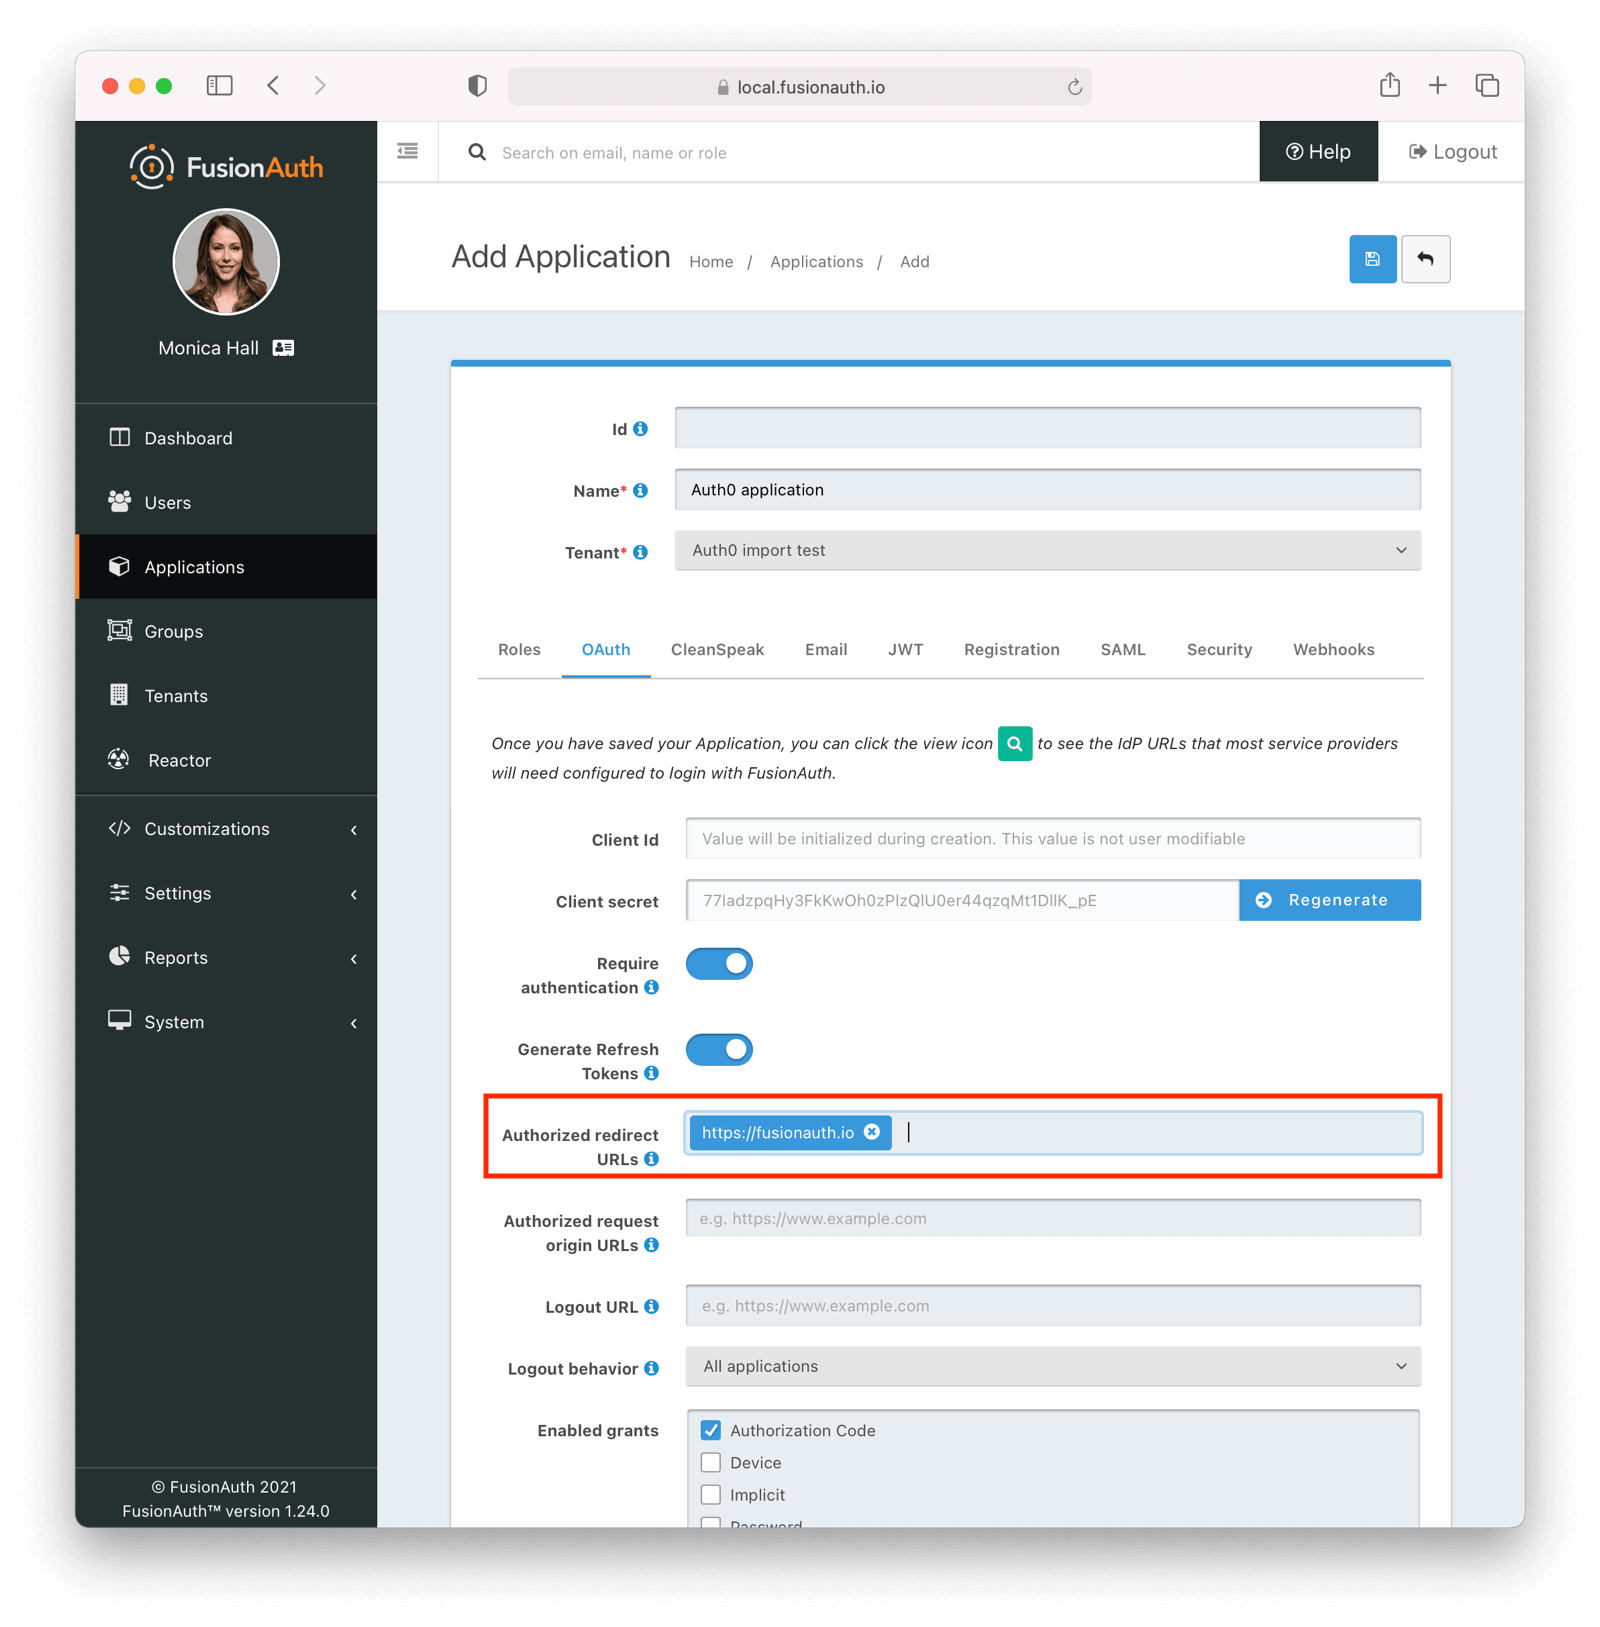
Applications are anything a user can log in to. In FusionAuth there's no differentiation between web applications, SaaS applications, APIs and native apps. To add an application, navigate to Applications and click on the Add button. Give the application a descriptive name like {props.migration_source_name} application.
Select your new tenant, created above, in the dropdown for the Tenant field.
Navigate to the OAuth tab and add an entry to Authorized redirect URLs. Use a dummy value such as https://example.com. Later, you'll need to update this to be a valid redirect URL that can take the authorization code and exchange it for a token. Learn more about this in the FusionAuth OAuth documentation.
You shouldn't need to modify any of the other configuration options to test importing users. Save the application.
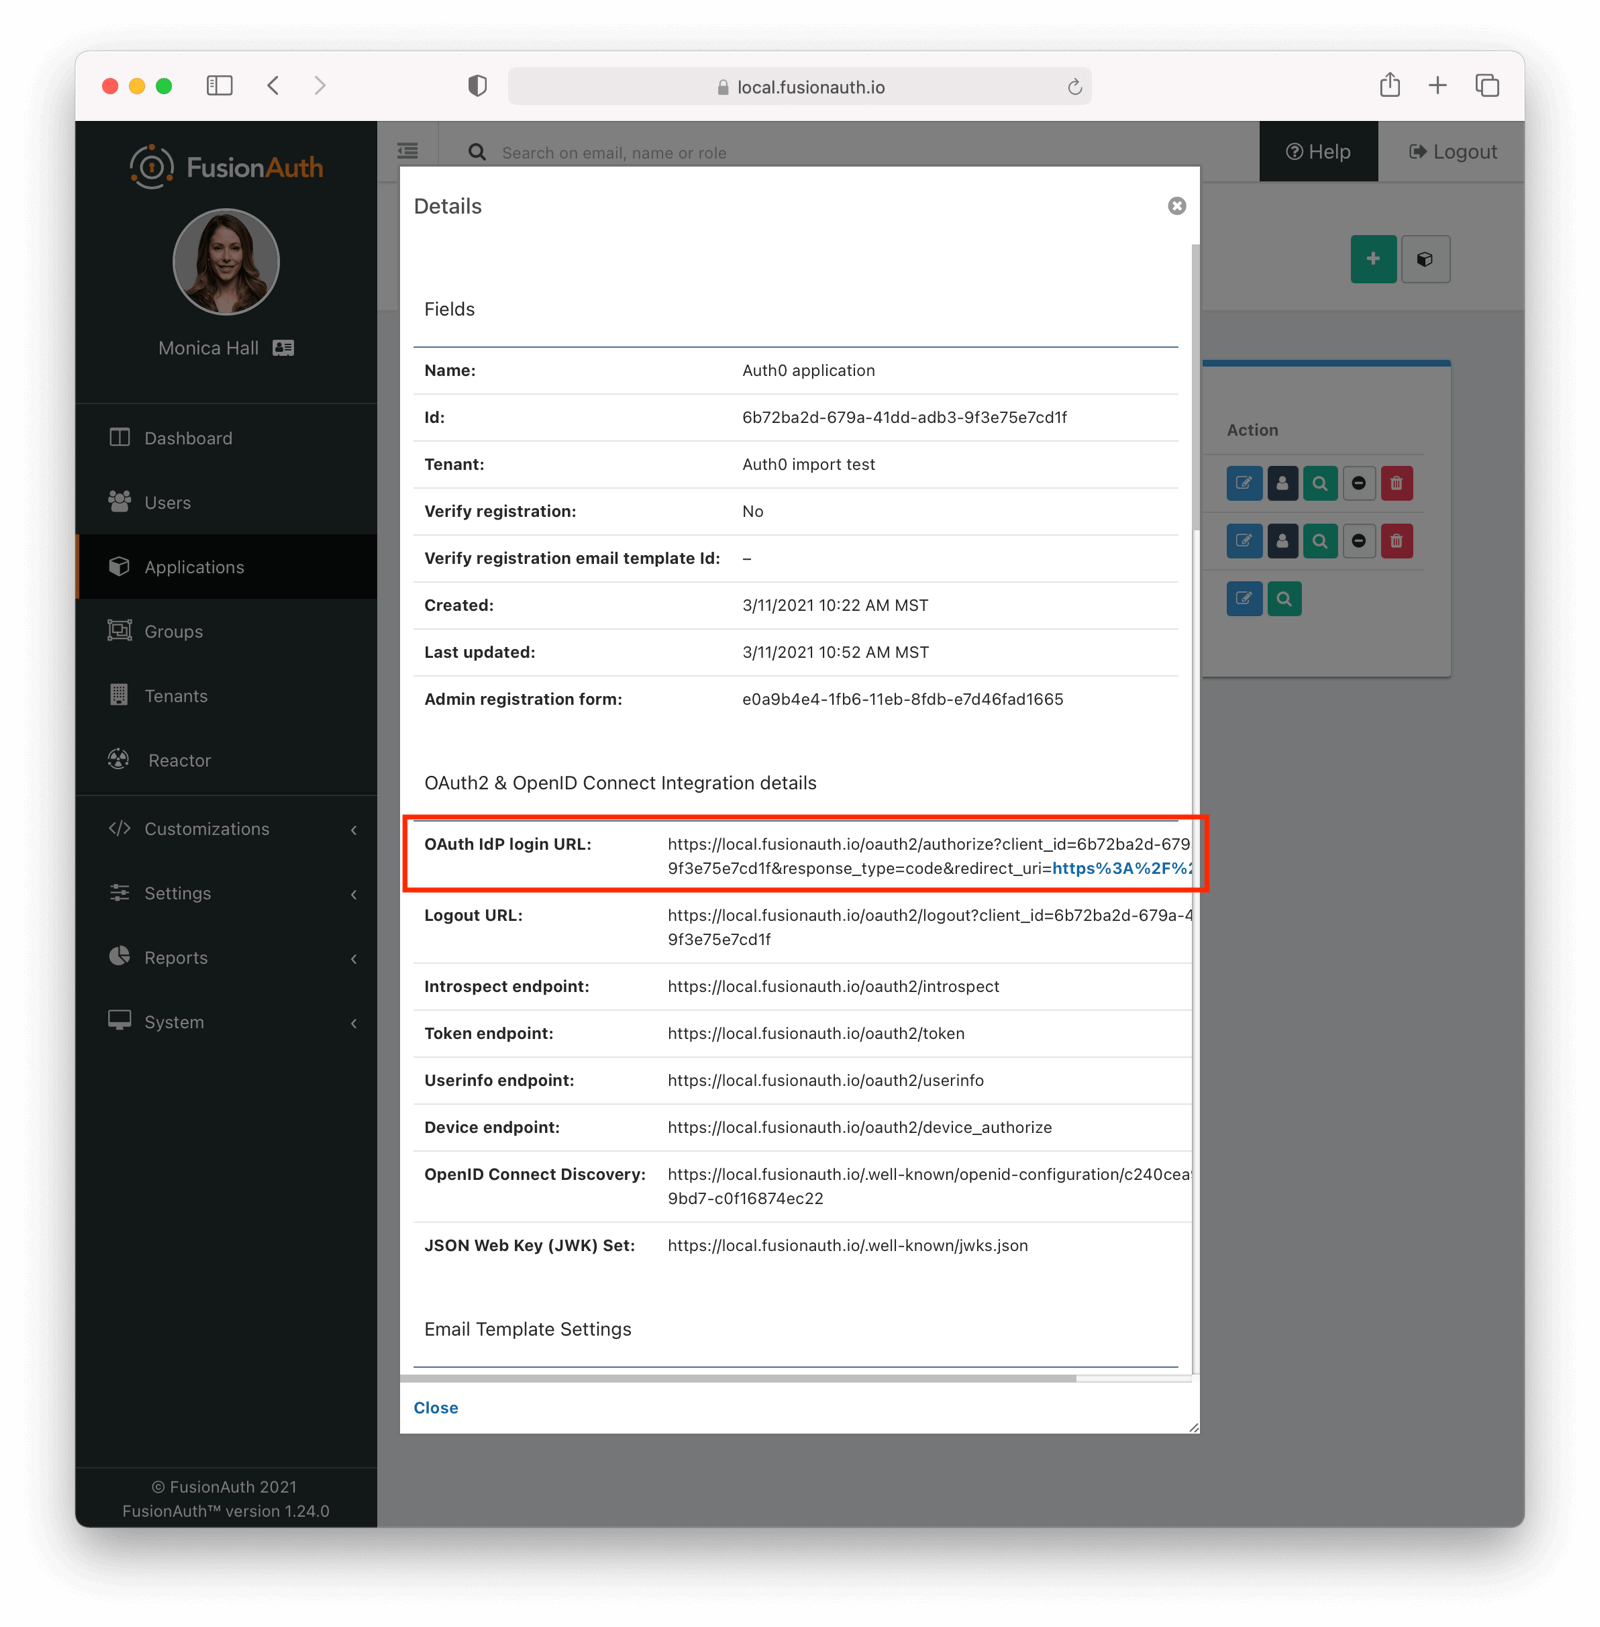
Next, view the application by clicking the Select dropdown and choosing View , then note the OAuth IdP login URL. You'll be using it to test that users can log in.
Add an API Key#
The next step is to create an API key. This will be used by the import script. To do so, navigate to Settings -> API Keys in the administrative user interface.
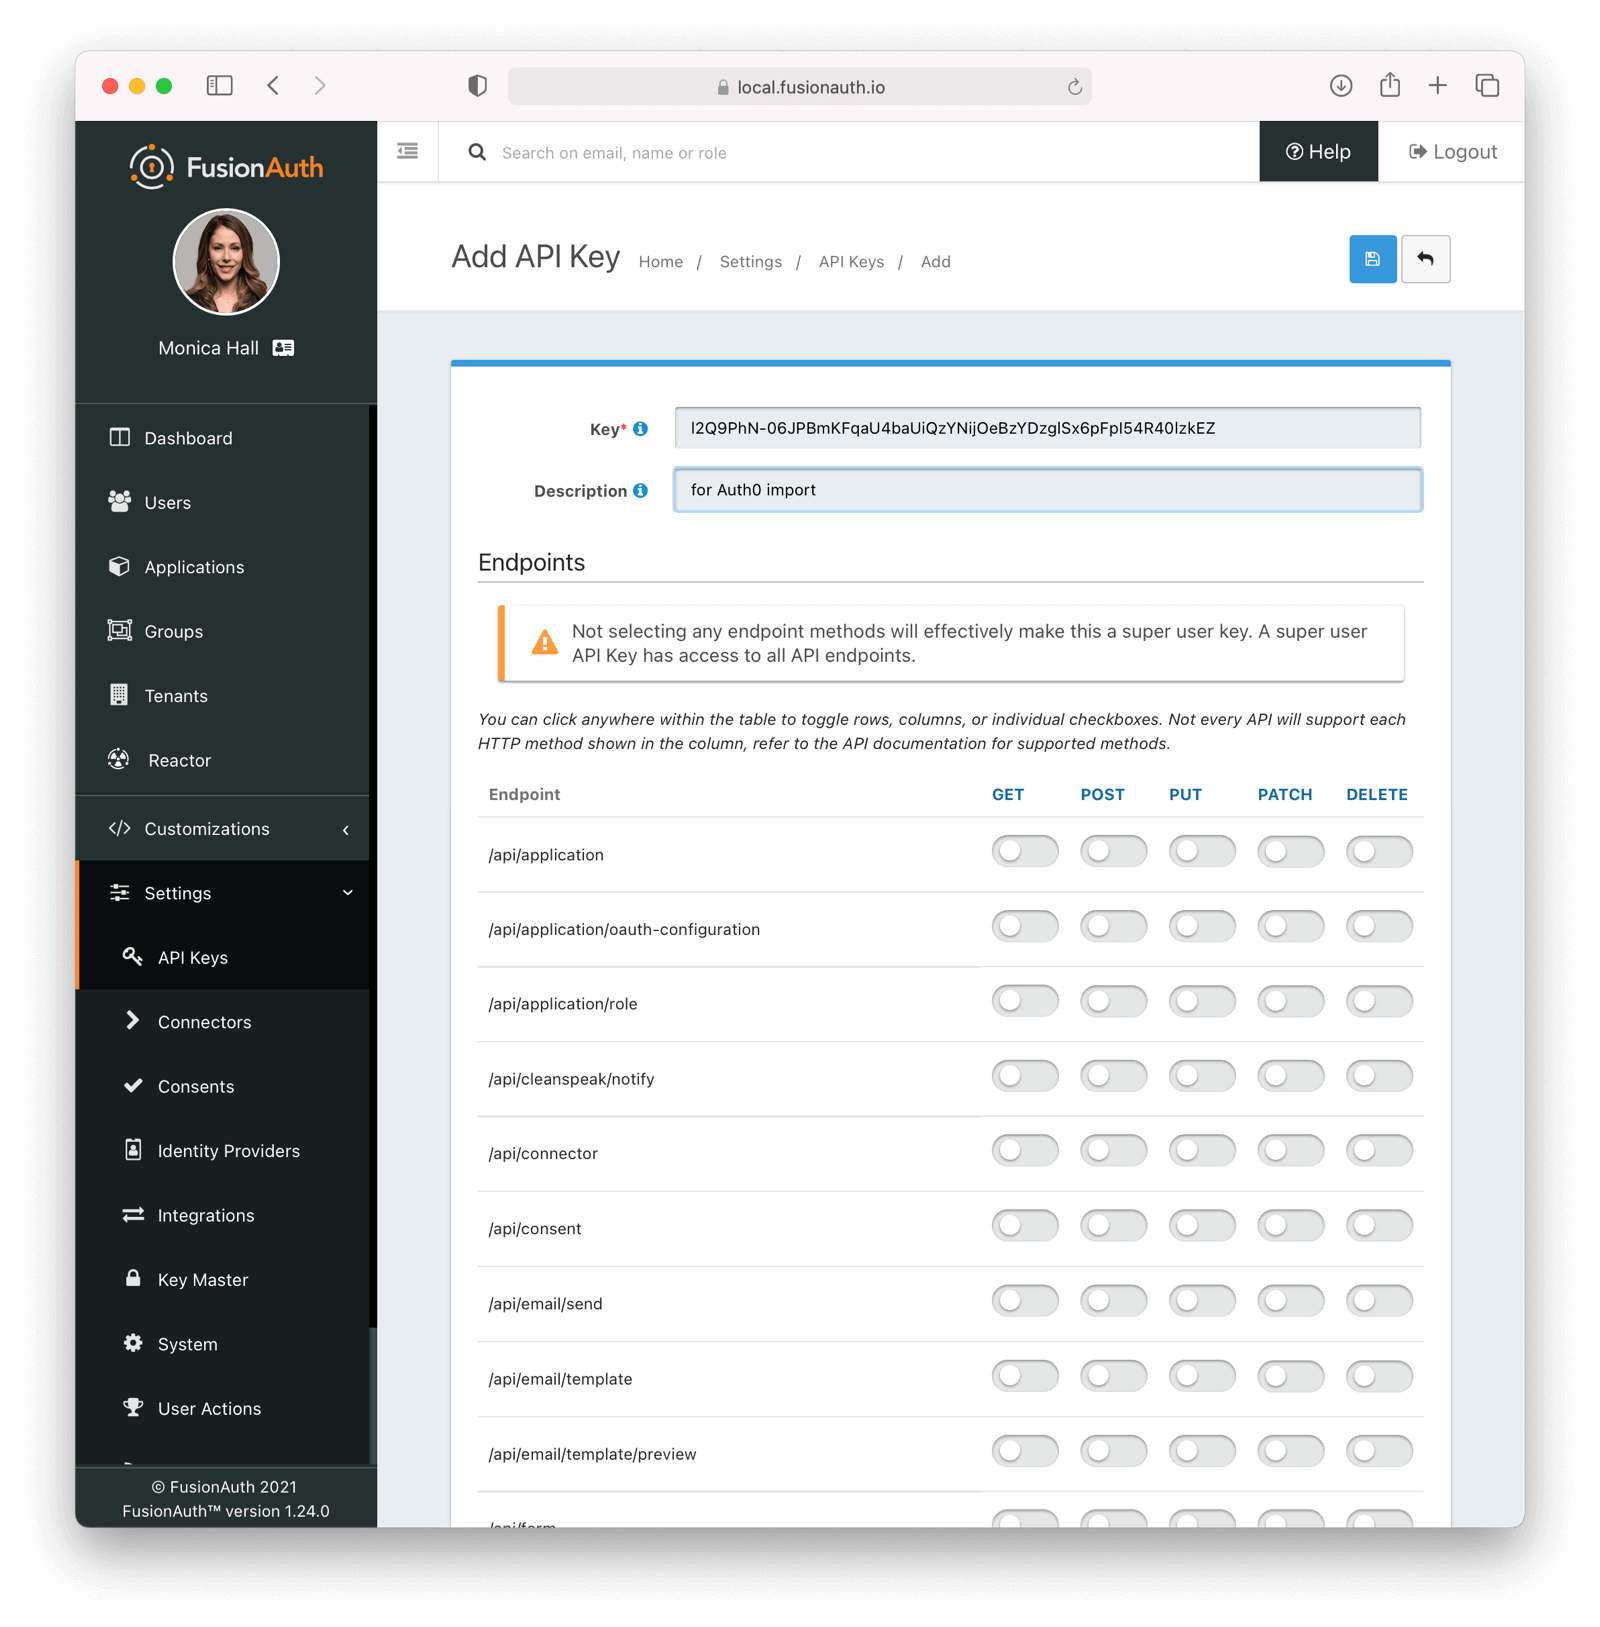
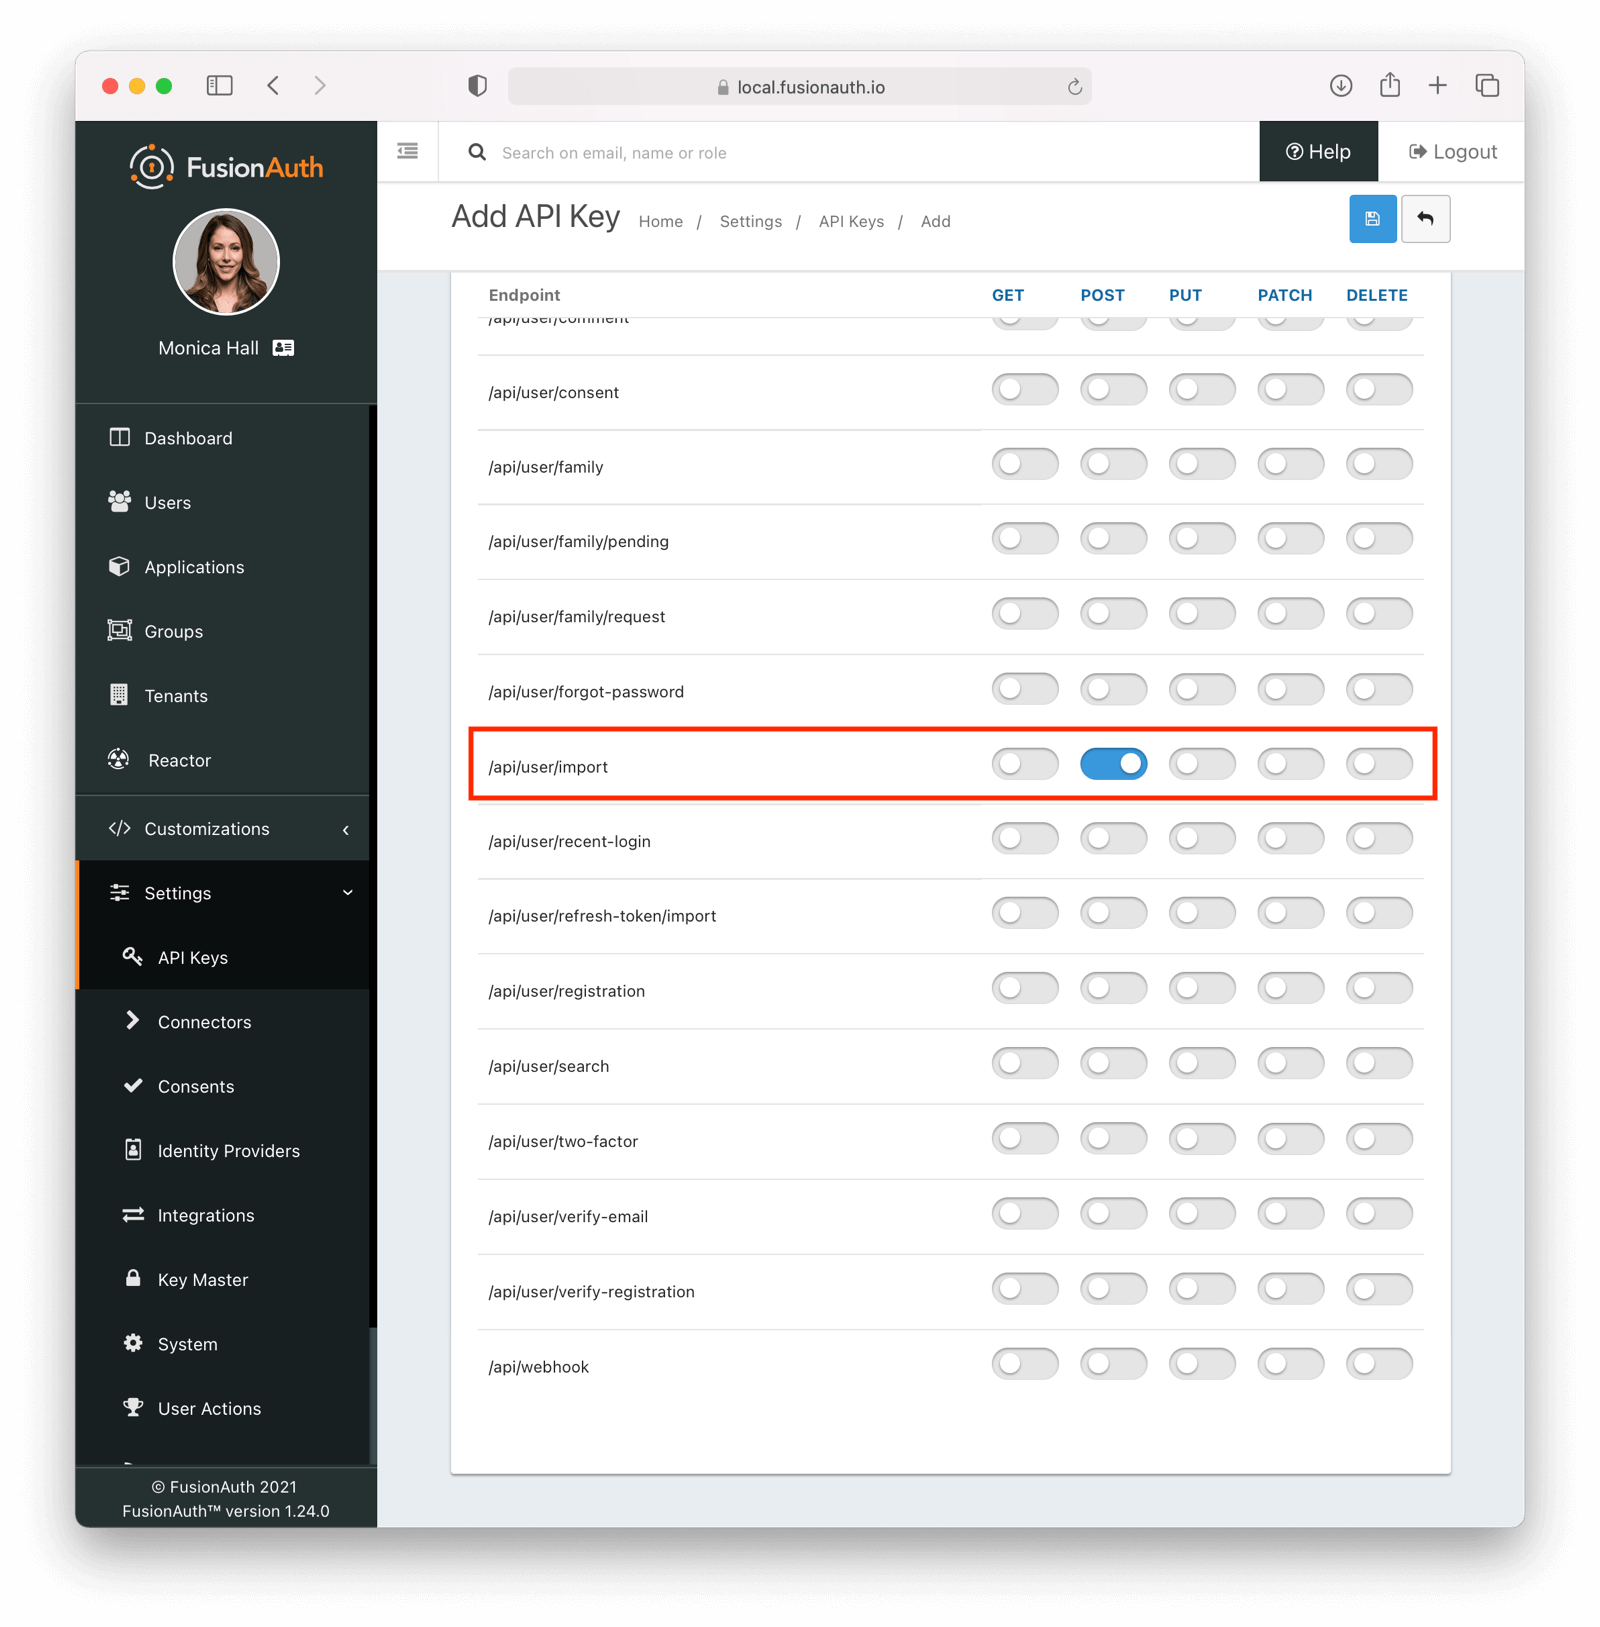
This key needs to have the permission to run a bulk import of users. In the spirit of the principle of least privilege, give it only the following permissions:
POSTto the/api/user/importendpoint.POSTto the/api/user/searchendpoint.POSTto the/api/identity-provider/linkendpoint (not shown below).
Record the API key string, as you'll use it below.
Get the Script#
FusionAuth provides an import script under a permissive open-source license. It requires Ruby 3.0 or later. To get the script, clone the Git repository:
Getting the import scripts
git clone https://github.com/FusionAuth/fusionauth-import-scriptsNavigate to the auth0 directory:
cd fusionauth-import-scripts/auth0Install Needed Gems#
The following gems must be available to the import script:
datejsonoptargssecurerandomfusionauth_client
Most likely all of these will be on your system already, except the fusionauth_client gem.
If you have bundler installed, run bundle install in the auth0 directory. Otherwise install the needed gems in some other way.
Use the Script#
You can see the output of the script by running it with the -h option:
Running the import script with the help command line switch
ruby ./import.rb -hThe output will be similar to this:
The help output of the import.rb script
Usage: import.rb [options]
    -l, --link-social-accounts       Link social accounts, if present, after import. This operation is slower than an import.
    -r APPLICATION_IDS,              A comma separated list of existing applications Ids. All users will be registered for these applications.
        --register-users
    -o, --only-link-social-accounts  Link social accounts with no import.
    -u, --users-file USERS_FILE      The exported JSON user data file from Auth0. Defaults to users.json.
    -f FUSIONAUTH_URL,               The location of the FusionAuth instance. Defaults to http://localhost:9011.
        --fusionauth-url
    -k, --fusionauth-api-key API_KEY The FusionAuth API key.
    -t TENANT_ID,                    The FusionAuth tenant id. Required if more than one tenant exists.
        --fusionauth-tenant-id
    -s, --secrets-file SECRETS_FILE  The exported JSON secrets file from Auth0. Defaults to secrets.json.
    -m, --map-auth0-id               Whether to map the auth0 id for normal imported users to the FusionAuth user id.
    -h, --help                       Prints this help.
For this script to work correctly, set the following switches, unless the defaults work for you:
-ushould point to the location of the user export file you obtained, unless the default works.-sneeds to point to the location of the password hash export file you received, unless the default works.-fmust point to your FusionAuth instance. If you are testing locally, it will probably behttp://localhost:9011.-kneeds to be set to the value of the API key created above.-tshould be set to the Id of the testing tenant created above.
The -o and -l switches will attempt to create links for any social users (where the user authenticated via Google or another social provider) found in the users data file.
If you are loading social users, you must create the social providers in FusionAuth beforehand, or the links will fail. Additionally, creating a link is not currently optimized in the same way that loading users is. So it may make sense to import all the users in one pass (omitting the -l switch). Then, after the users are imported, create the links using the -o switch in a second pass.
The social account linking functionality will only work with FusionAuth versions above or equal to 1.28. The fusionauth_client library must be >= 1.28 as well.
You may or may not want to use the -m switch, which takes the Auth0 Id for users without a social login and uses the same value for the FusionAuth user Id. If you have external systems reliant on the Auth0 user identifier, set this. Doing so ensures imported users have the same Id as they did in Auth0. Otherwise, you can omit this switch.
When you run the script, you'll see output like:
Import script output
$ ruby ./import.rb -f http://localhost:9011 -k '...' -s secrets.json -u user-data.json
FusionAuth Importer : Auth0
 > User file: user-data.json
 > User secrets file: secrets.json
 > Call FusionAuth to import users
 > Import success
Duplicate users 0
Import complete. 2 users imported.
Enhancing the Script#
You may also want to migrate additional data. Currently, the following attributes are migrated:
user_idemailemail_verifiedusernameinsertInstant- the password hash and supporting attributes, if available
registrations, if supplied
The migrated user will have the Auth0 tenant Id and original user Id stored on the user.data object. If you have additional user attributes to migrate, review and modify the map_user method.
You may also want to assign Roles, or associate users with Groups, by creating the appropriate JSON data structures in the import call. These are documented in the Import User API docs. This will require modifying the import.rb code.
Verify the Import#
Next, log in to the FusionAuth administrative user interface. Review the user entries to ensure the data was correctly imported.

You can manage the user by clicking on the Manage button (black button) to the right of the Created date in the list to review the details of the imported user's profile.
If you have a test user whose password you know, open an incognito window and log in to ensure the hash migration was successful. You recorded the URL to log in to the example application in Create a Test Application.
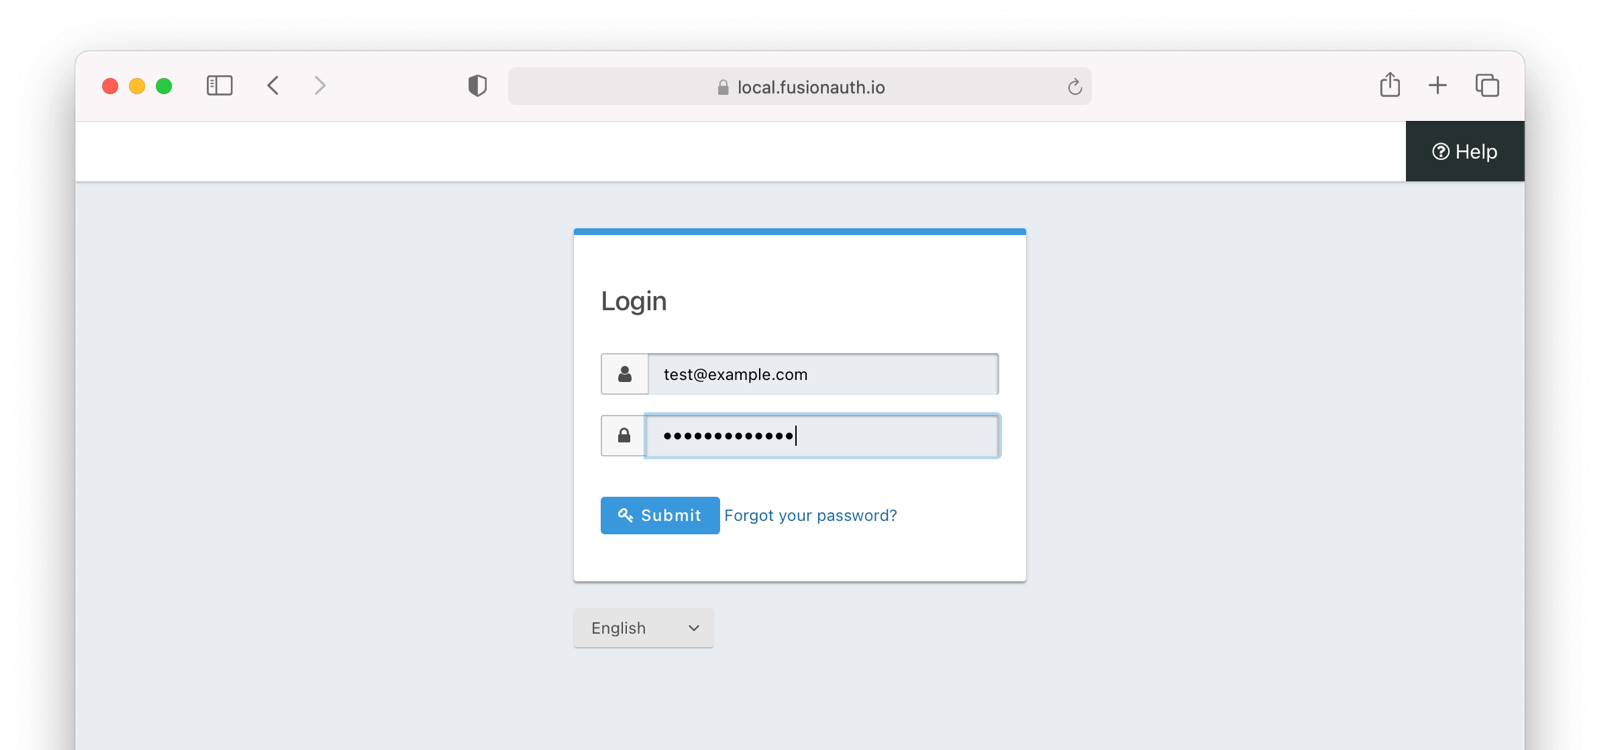
After the test login, the user will be redirected to a URL like https://example.com/?code=FlZF97WIYLNxt4SGD_22qvpRh4fZ6kg_N89ZbBAy1E4&locale=fr&userState=Authenticated. This happens because you haven't set up a web application to handle the authorization code redirect.
That is an important next step but is beyond the scope of this document. Consult the 5 minute setup guide for an example of how to do this.
The Final Destination of Imported Users#
After you are done testing, you can choose to import users into the default tenant or a new tenant. Whichever you choose, make sure to update the -t switch to the correct value before running the import for the final time.
If you aren't keeping users in the test tenant, delete it.
If you need to start over because the import failed or you need to tweak a setting, delete the tenant you created. This will remove all the users and other configurations for this tenant, giving you a fresh start. To do so, navigate to Tenants , click the Select dropdown corresponding to the tenant to be deleted, and choose Delete .
Confirm your desire to delete the tenant. Depending on how many users you have imported, this may take some time.
MFA Enrollments#
Your users may have MFA enabled. If so, you will want to port that over.
The first thing to do is to look at the MFA methods available to your users. Here's the list of Auth0 supported factors. You may not have enabled all of these. Here's Auth0 documentation to see which you've enabled in the dashboard.
The method field of the Two-Factor API lists the MFA methods supported by FusionAuth. FusionAuth also supports recovery codes.
You can determine which type of MFA is used by each user by retrieving their data using the management API.
If a user uses email or SMS verification, you can port the data over to FusionAuth using the user update API or by adding the twoFactor fields to your import JSON. The former will trigger an MAU increment, while the latter will not.
While you can't generate a fixed set of recovery codes, once MFA has been enabled for a user, you can generate a new set of recovery codes and deliver them to the user. As of 1.68.0, recovery codes are hashed at rest and cannot be retrieved after generation.
If your user uses TOTP for MFA, where they provide a one time code provided by an application like Google Authenticator, you'll probably need to re-enroll them. As of Oct 2022, Auth0 "probably" doesn't support export of TOTP secrets. However, we suggest confirming this by opening a support ticket with Auth0.
If your users use a different method unsupported by FusionAuth, then you should map the Auth0 method to a FusionAuth method.
- WebAuthn: Authentication With WebAuthN & Passkeys.
- Push Notifications: It is possible a Generic Messenger would work, but this would require some investigation and custom coding.
- Voice: A Generic Messenger integrated with a solution like Twilio Voice should work.
- Cisco Duo: A Generic Messenger integrated with a solution like Twilio Voice could work.
What to Do Next#
You now have your users migrated, or a plan to do so. Congratulations! What is next?
You need to migrate additional configurations, as mentioned in Other Entities. Since the type of configuration varies, it is hard to provide a full list of how to import these items, but the general pattern will be:
- Identify corresponding FusionAuth functionality.
- Configure it in your FusionAuth instance, either manually or by scripting it using the client libraries or API.
- Update your application configuration to use the new FusionAuth functionality.
Make sure you assign your users to the appropriate FusionAuth applications. You can do this either:
- As part of your import process by adding registrations at import time.
- After users have been migrated with the Registrations API.
You'll also need to modify and test each of your applications, whether custom, open source, or commercial, to ensure:
- Users can successfully log in.
- The authorization code redirect is handled correctly.
- Users receive appropriate permissions and roles based on the JWT.
- The look and feel of the hosted login pages matches each application's look and feel.
If your application uses a standard OAuth, SAML or OIDC library to communicate with , the transition should be relatively painless.
Additional Support#
If you need support in your migration beyond that provided in this guide, you may:
- Post in our forums and get support from the community.
- Purchase a support plan and get expert help from the Engineering Team.