Gate Users Application Registration
Overview#
As of version 1.27.0, FusionAuth can be configured to gate users' accounts until they verify by clicking a link allowing them into an application. While users successfully authenticate, they won't be able to proceed further until they have verified their registration via email.
Version 1.59.0 deprecated registration verification. This feature will be removed in a future version of FusionAuth.
Why Do I Need This?#
Make sure you select the correct gating strategy that makes the most sense for your application. Most people will only require email verification gating.
Most folks will find email verification gating sufficient for their business needs (see adjacent tutorial here). In this email verification workflow, we are simply checking that a user's email is real and fully owned by the user.
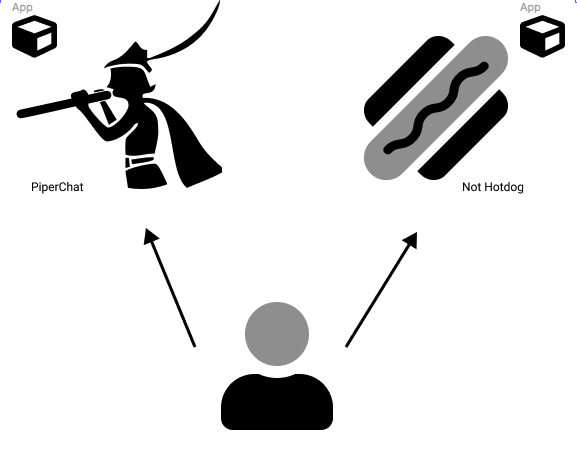
In registration verification, the use case is slightly different. A jared@piedpiper.com user might have access to Not-Hotdog and PiperChat. These applications are both part of the same parent company, PiedPiper. However, PiedPiper requires separate registration verification to allow access to both Not-Hotdog and PiperChat through the same email account. This registration verification is a concrete, separate step that the user must engage in by clicking a link or entering a code (sent via email).
Without this verification step, users may find it alarming their logins (jared@piedpiper.com) work for both Not-Hotdog and PiperChat (without their express consent, especially if they did not know about the parent company relationship). Furthermore, this user, jared@piedpiper, by completing verification, is proving they own the email address used to register for both applications.
Prerequisites#
This feature is only available in paid plans. To learn more, see our pricing page.
This tutorial assumes you are running FusionAuth version 1.27.0 or greater. If you aren't, head on over to the installation guide or the upgrade guide to update to a version with support for this feature.
This tutorial also assumes you have a paid plan and a valid license. If you need to buy a plan, please visit the pricing page. If you need to activate your instance, please visit the Reactor page.
Gating vs Verification#
Email Verification and Application Registration Verification are not premium features, however, gating is. Gating stops the user from receiving a JWT or essentially authenticating any further. FusionAuth is enforcing a "gate" around a user until they verify their email/phone.
FusionAuth ships with registration verification and email verification flows. These verification flows toggle an attribute (verified) on a user object and on a registration array (for a user). As a developer, you have the option to gate the user (or prevent from "continuing" auth) based on these attributes when writing your application and integration code.
However, with paid plan of FusionAuth, you can elect to have FusionAuth "gate" your users based on these verification attributes. Gating in this sense, would prevent the user from authenticating further or obtaining a JWT and would be enforced by the FusionAuth User Interface.
To Enable#
To enable registration verification gating, do the following:
- Configure the tenant with your email server.
- Configure the application to enable registration gating.
- Optionally customize the registration verification template. FusionAuth ships with a default template.
- Enable self-service registration.
- Configure your application with a redirect URL.
Let's step through each of these, but first, there are some required prerequisites.
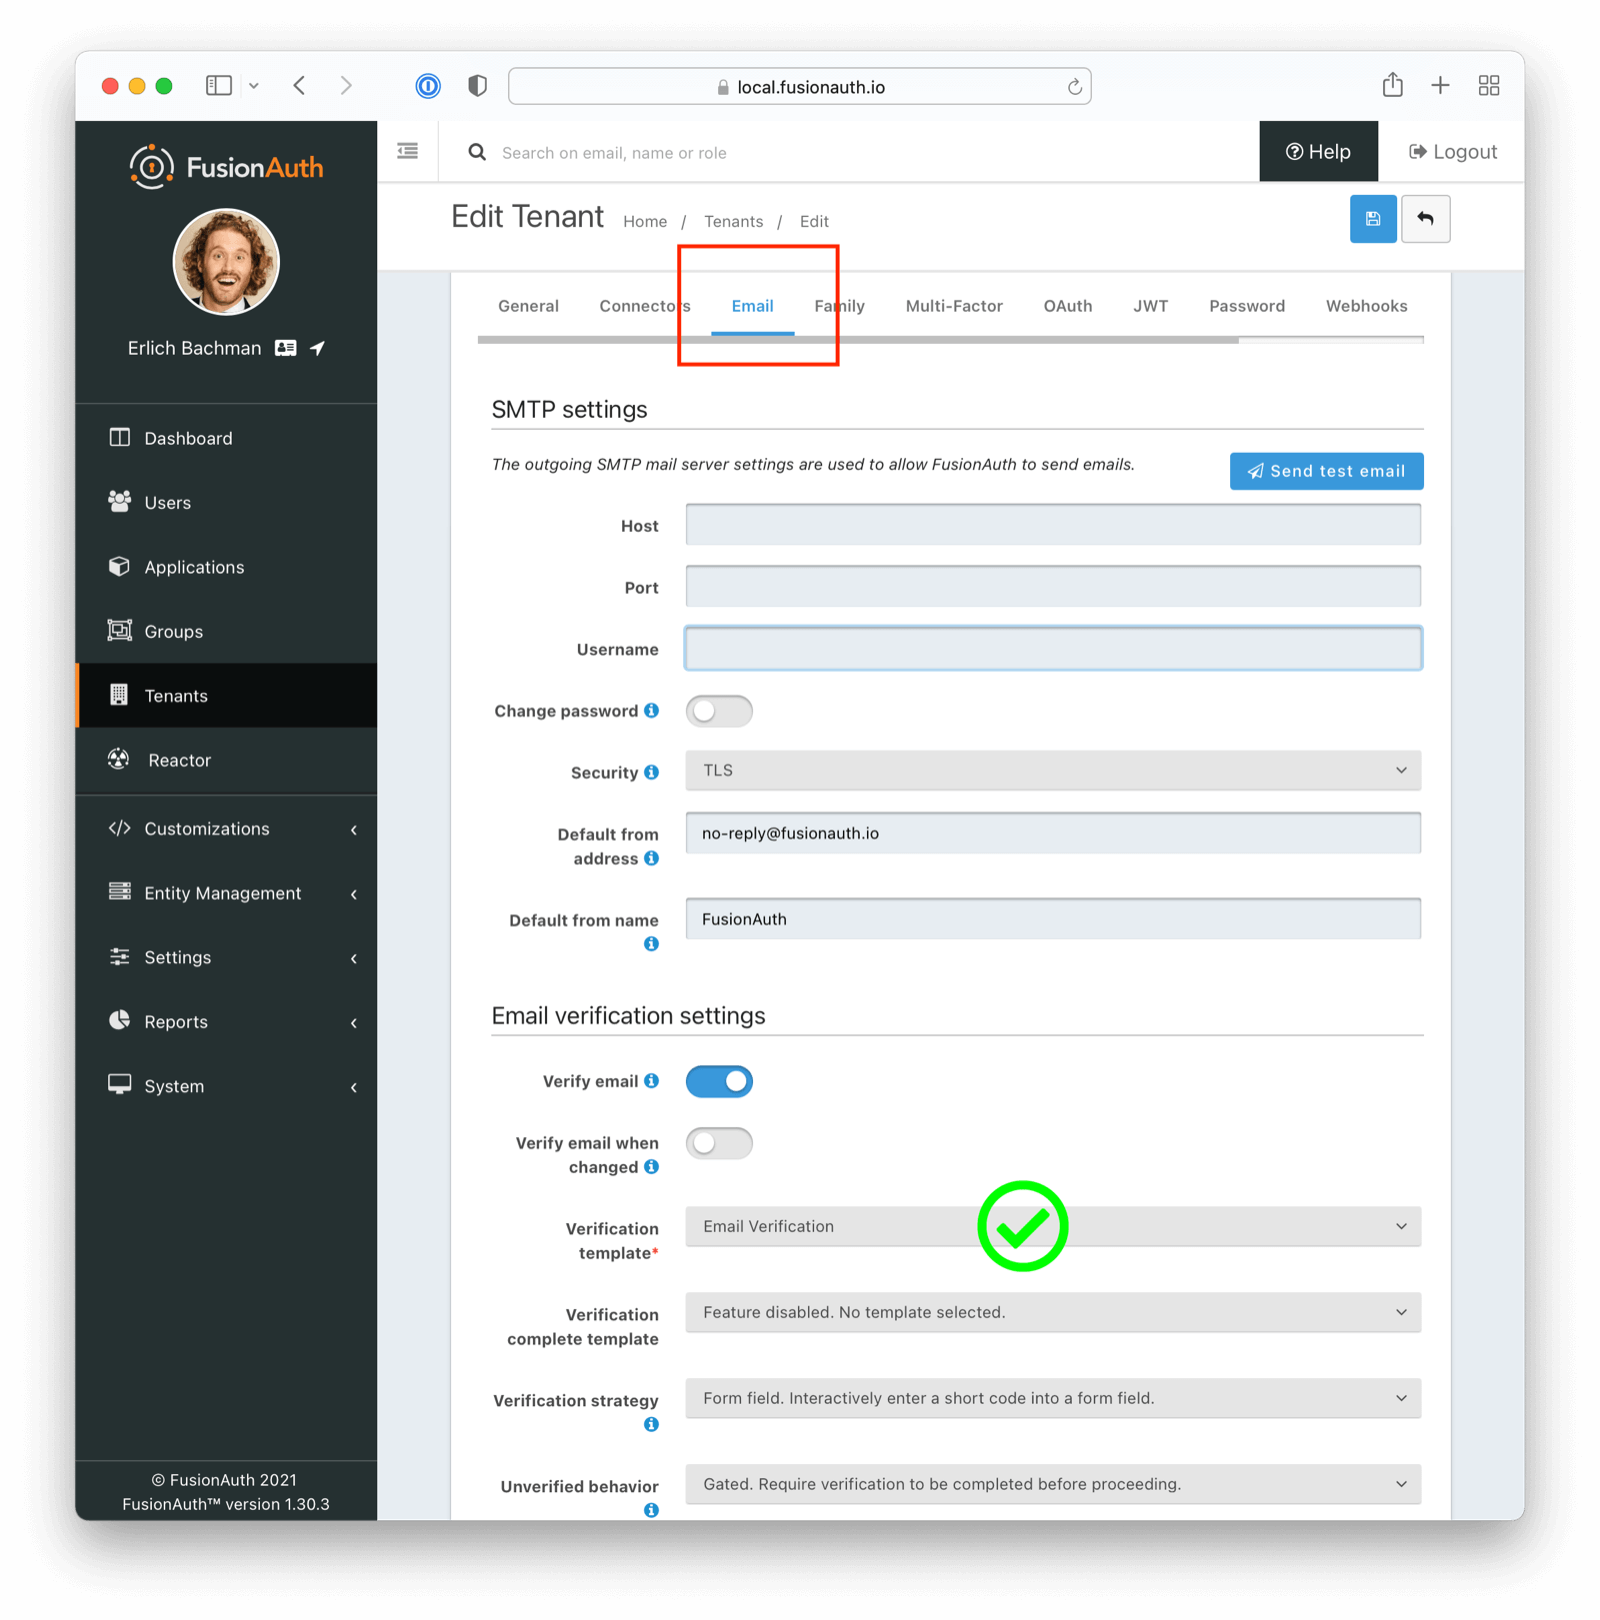
Configure the Tenant Email Server#
Log in to the FusionAuth administrative user interface. You could do all of this configuration with the API or kickstart, but for this tutorial, you'll use the UI.
Navigate to Tenants -> Your Tenant and then select the Email tab. Scroll to the SMTP settings section. Configure this with your SMTP server information. If you are testing locally, you can use a mock email server like mailcatcher.
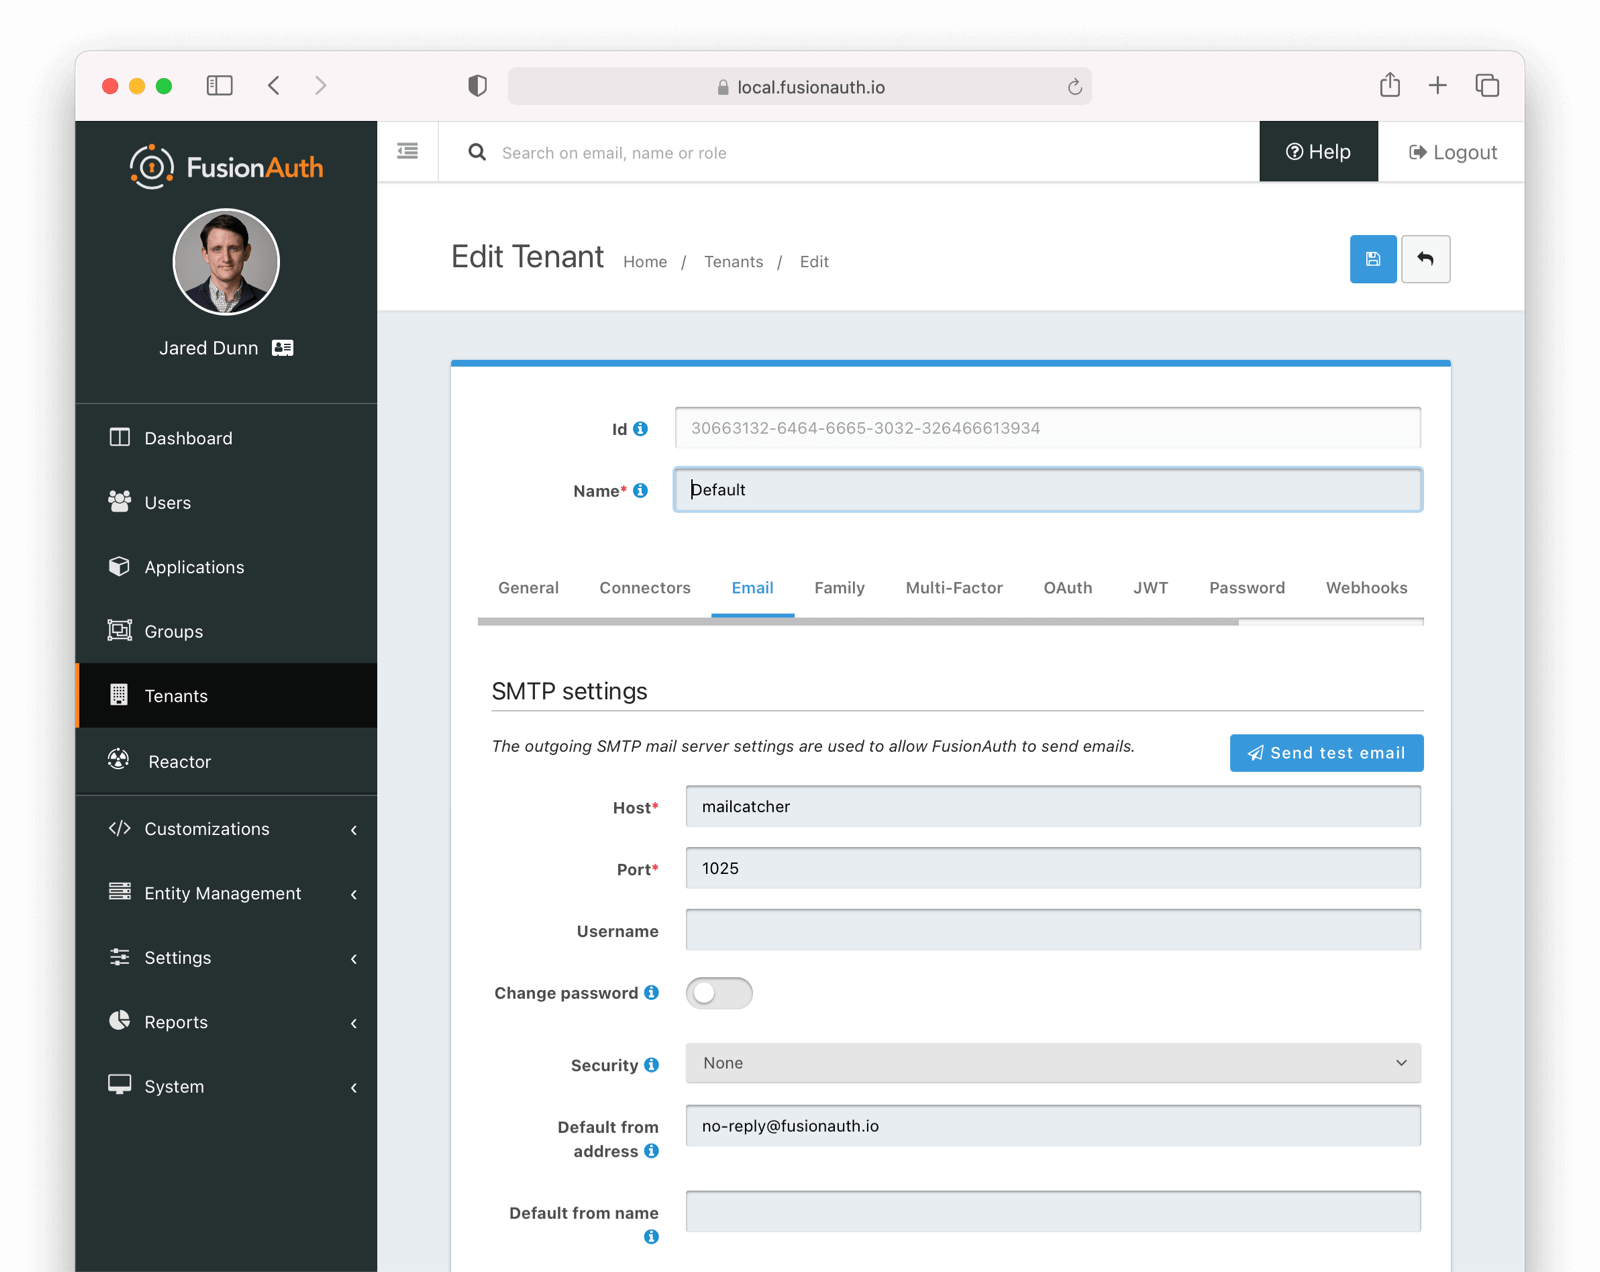
Ensure a test email is delivered. If you have any issues, follow the steps in the email troubleshooting documentation.
Save the configuration.
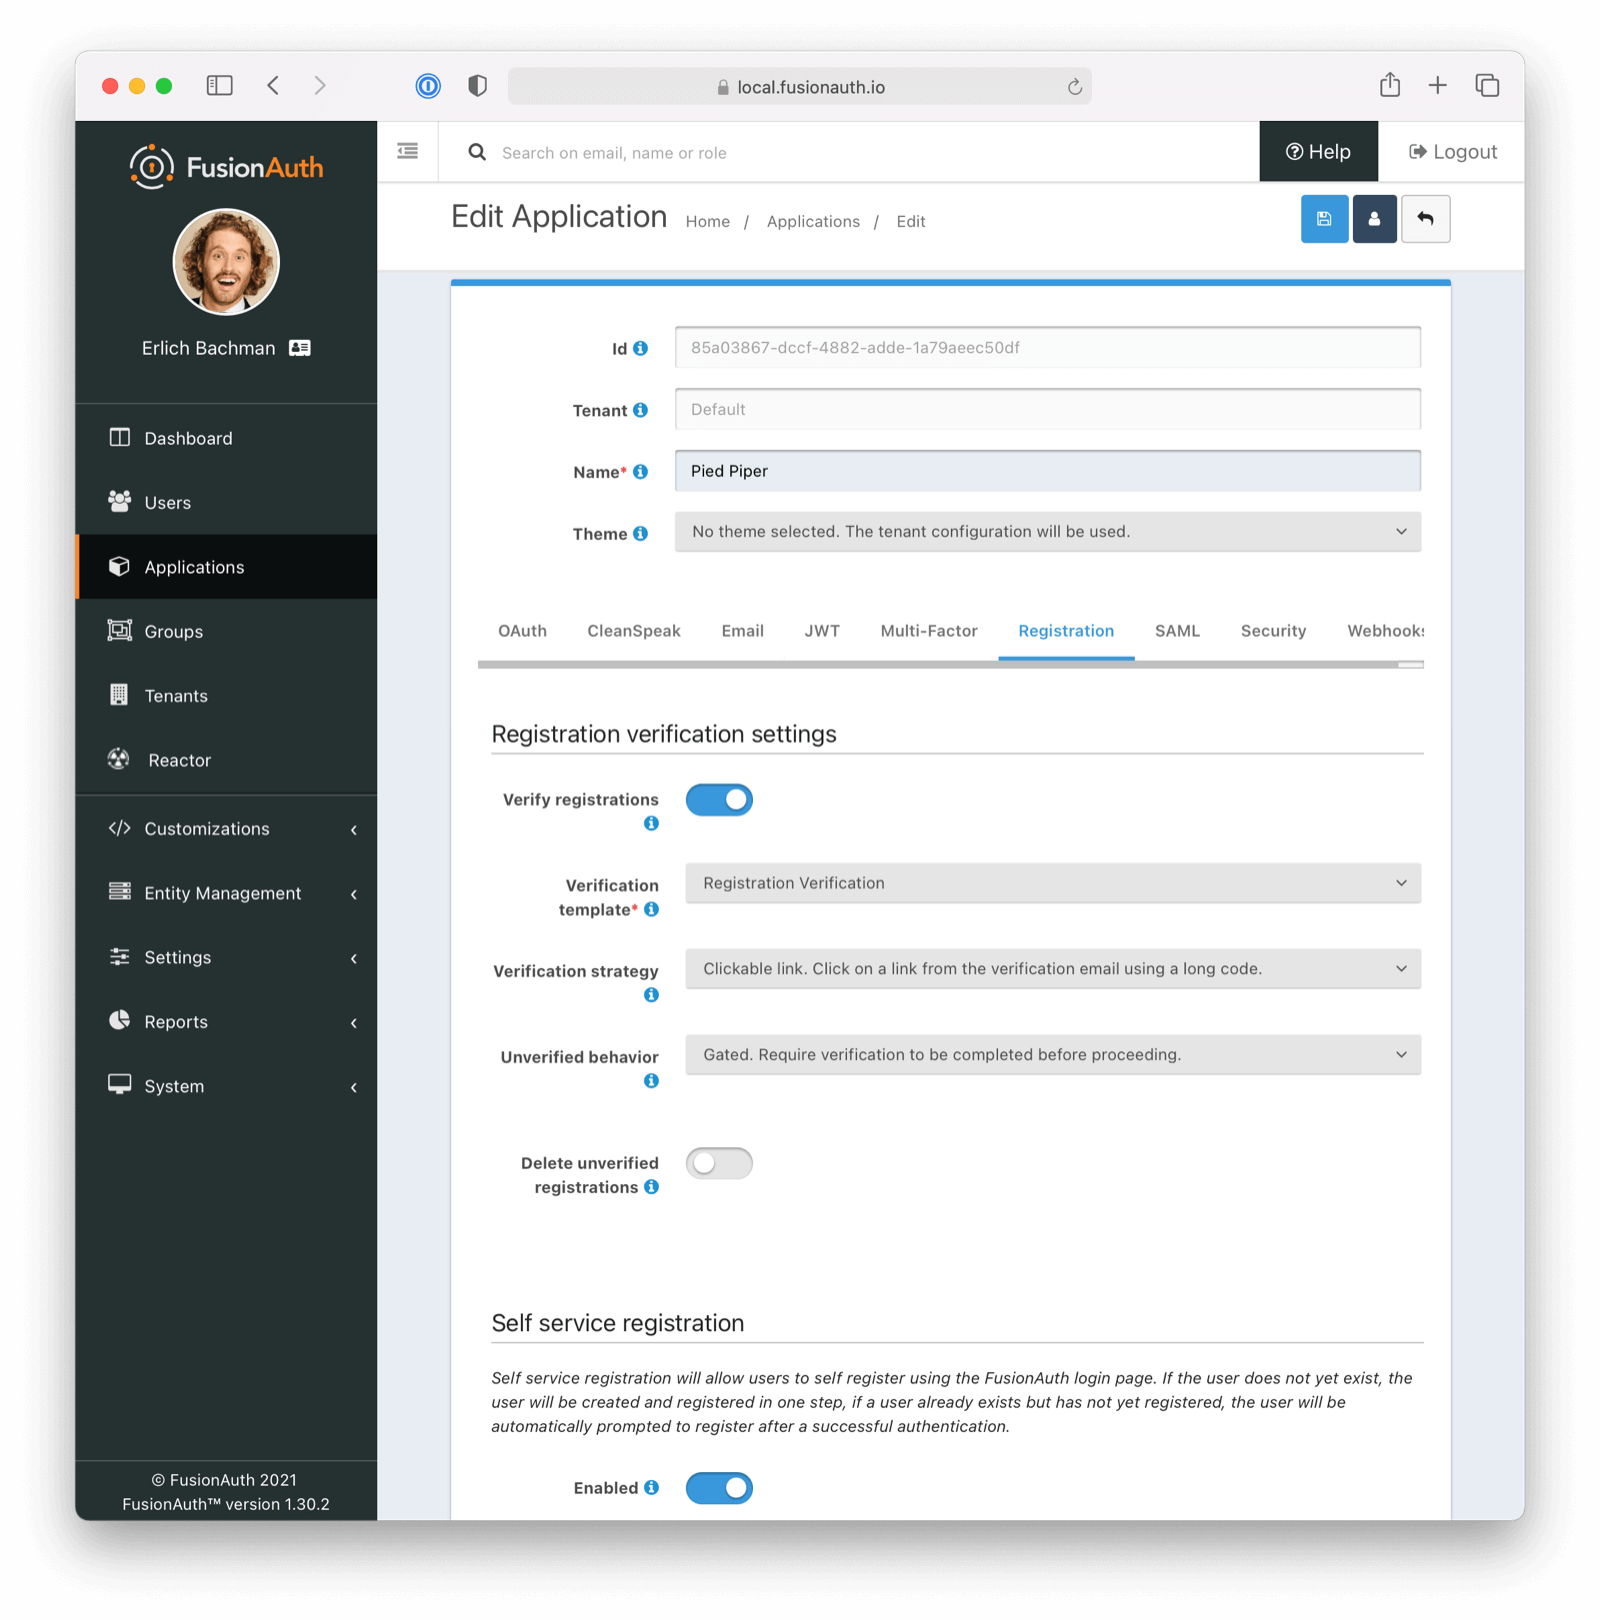
Enable Registration Verification Gating#
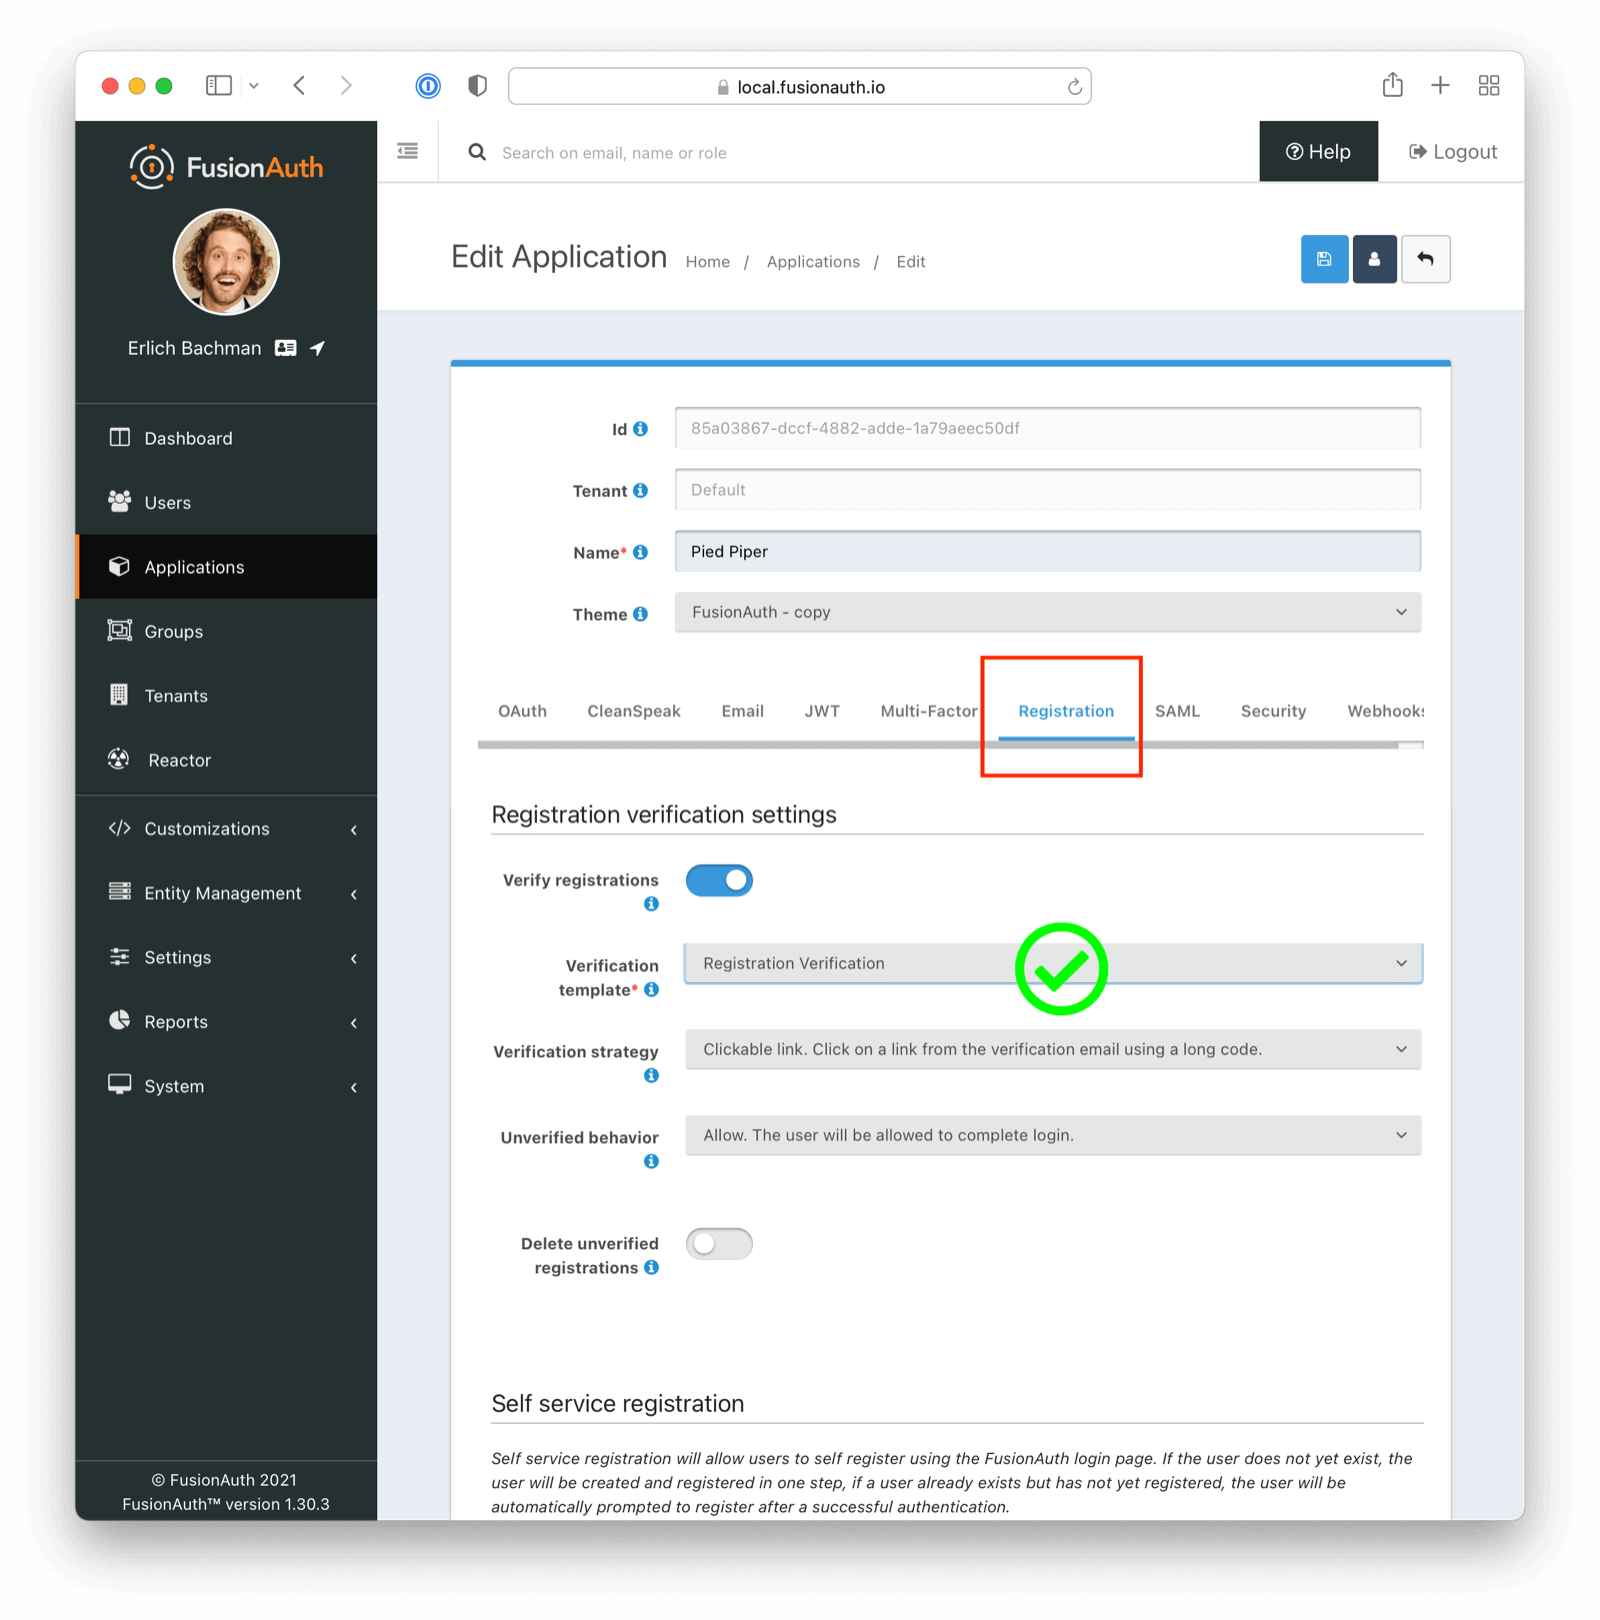
Navigate to Applications -> Your Application and then select the Registration tab. Scroll to the Registration verification settings section.
- Enable Verify registrations.
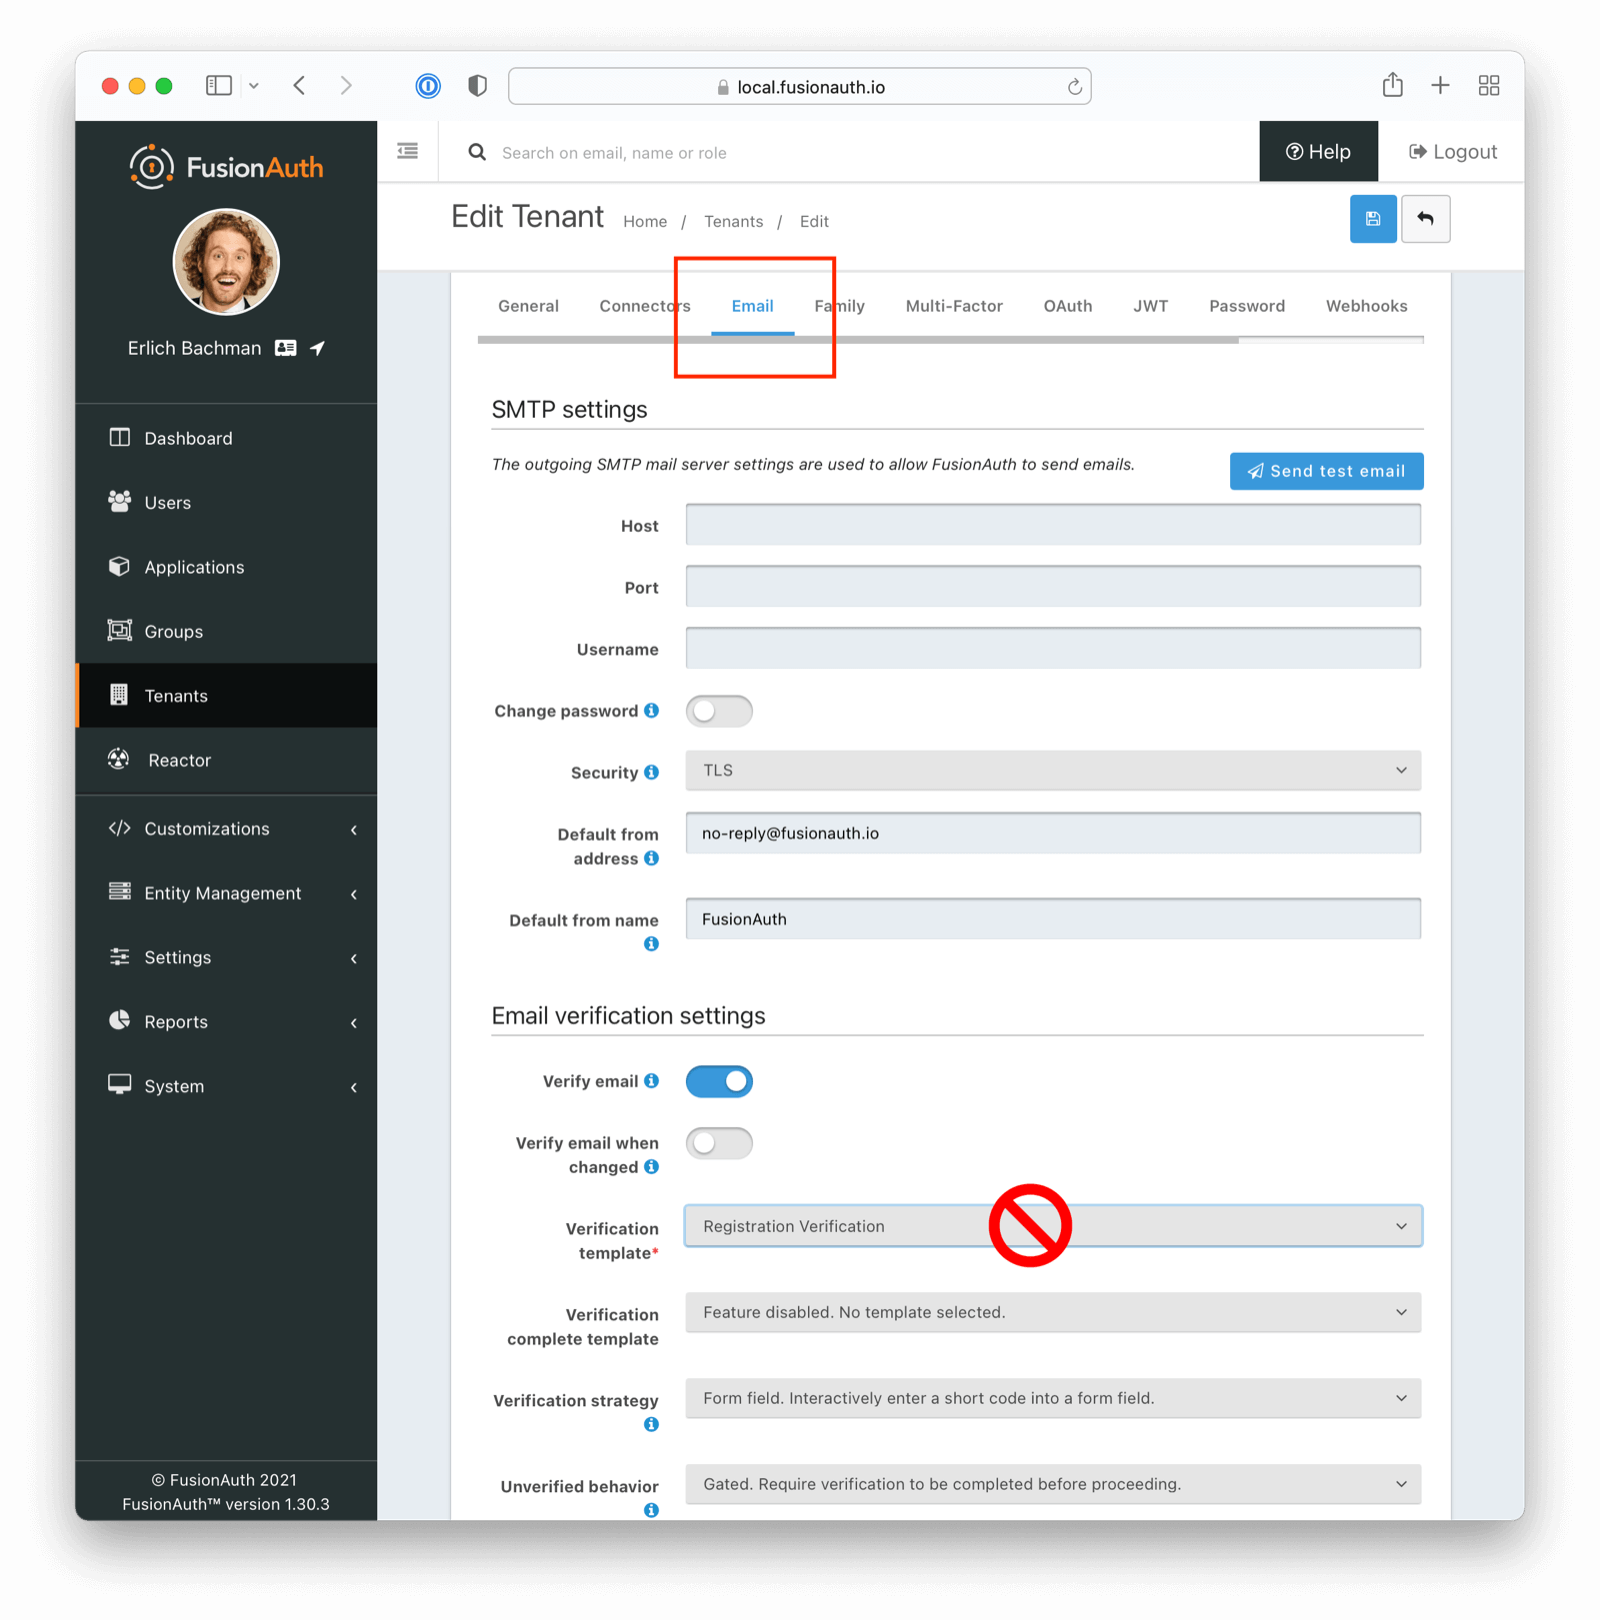
- Choose your email template. The default template is
Registration verification, and that will work fine for this tutorial. - Update the Verification strategy. This can be either
ClickableLinkorFormField. The former sends an email with a link to verify the user's address and intent to register for your application. The latter emails a code which the user will provide to FusionAuth. For this tutorial, useClickableLink. - Ensure that the Unverified behavior value is
Gated.
After these steps, you should end up with a configuration screen that looks like this:
Lastly, enable self service registration and configure the displayed and required fields as desired.
You can create a user with an unverified registration in other ways than self service registration. However, self service registration is the simplest way to create a user without a verified registration.
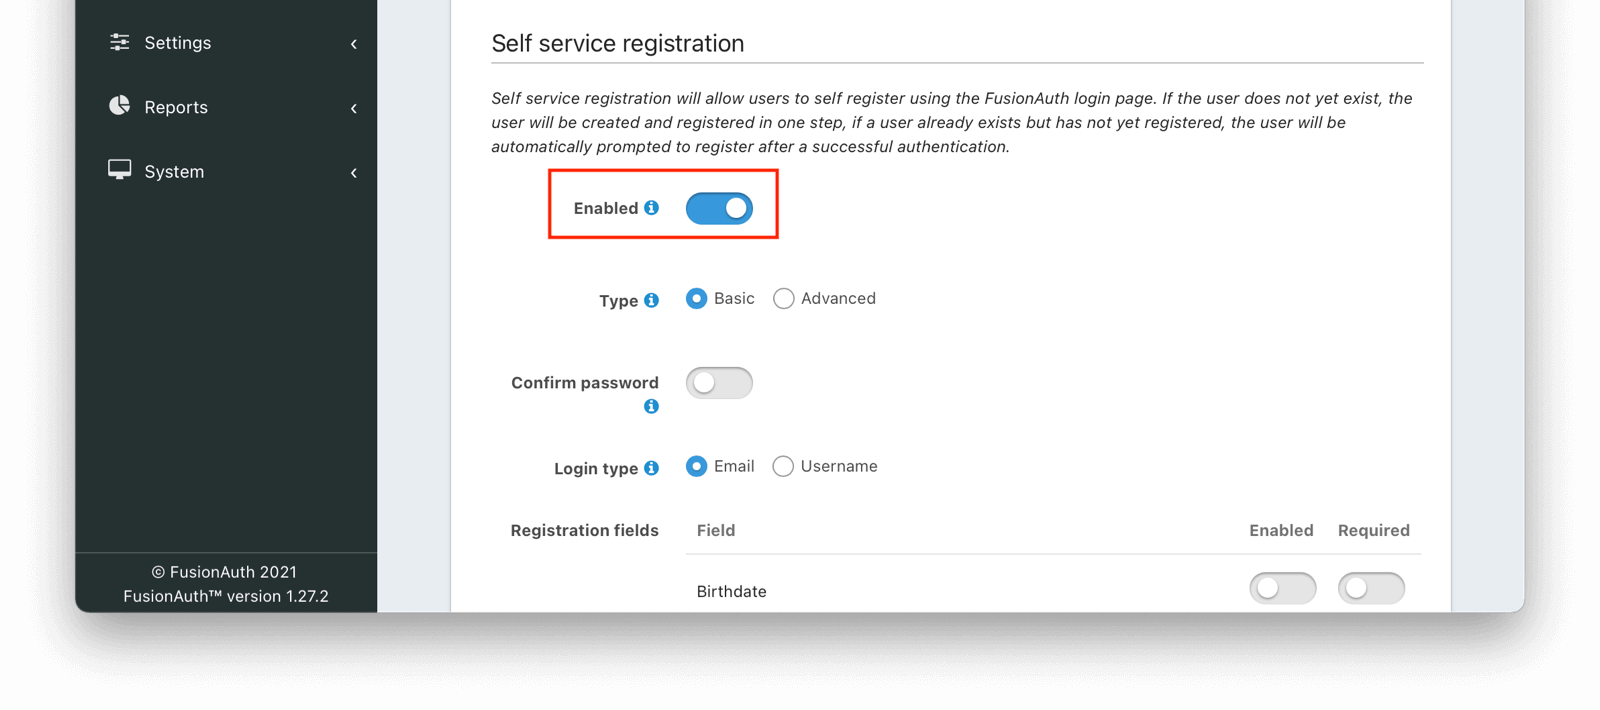
Make sure you save the configuration.
Next, navigate to the OAuth tab. Enable the Authorization Code grant.
In addition, ensure you have entered a valid URL in the Authorized redirect URLs field. (The value of this redirect URL doesn't matter for this tutorial. But for production use, ensure the code at that endpoint can exchange an authorization code for a token.)
Save the application configuration. You'll be returned to the list of applications.
Click on the View button of your application to see the details of your application.
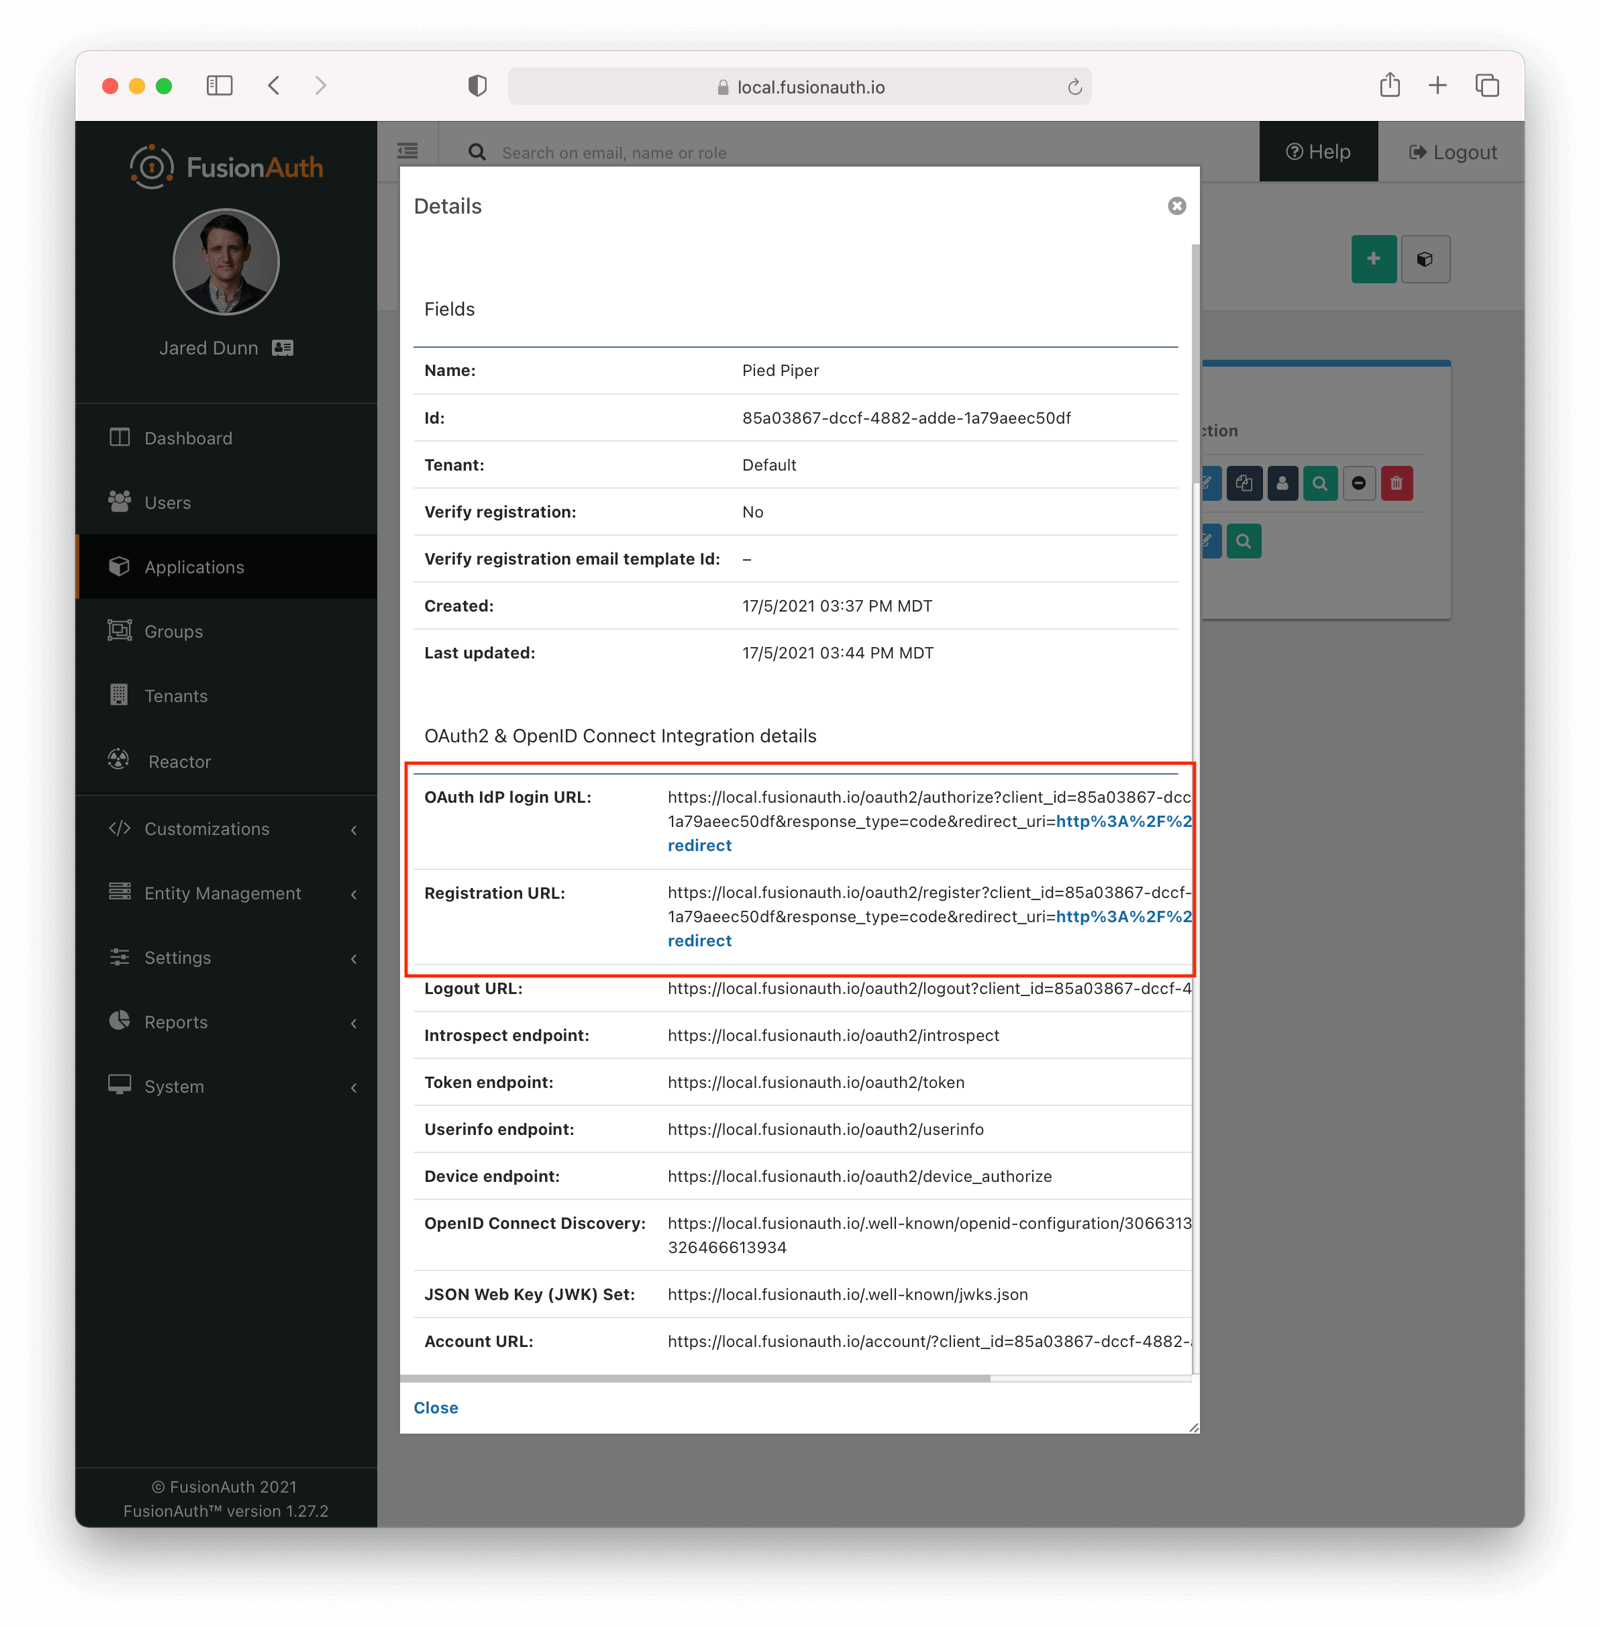
Look for the Registration URL. It'll be something like https://local.fusionauth.io/oauth2/register?client_id=85a03867-dccf-4882-adde-1a79aeec50df&response_type=code&redirect_uri=http%3A%2F%2Flocalhost%3A3000%2Foauth-redirect. Copy that value as you'll use it below.
At the same time, find the OAuth IdP login URL, and copy that as well.
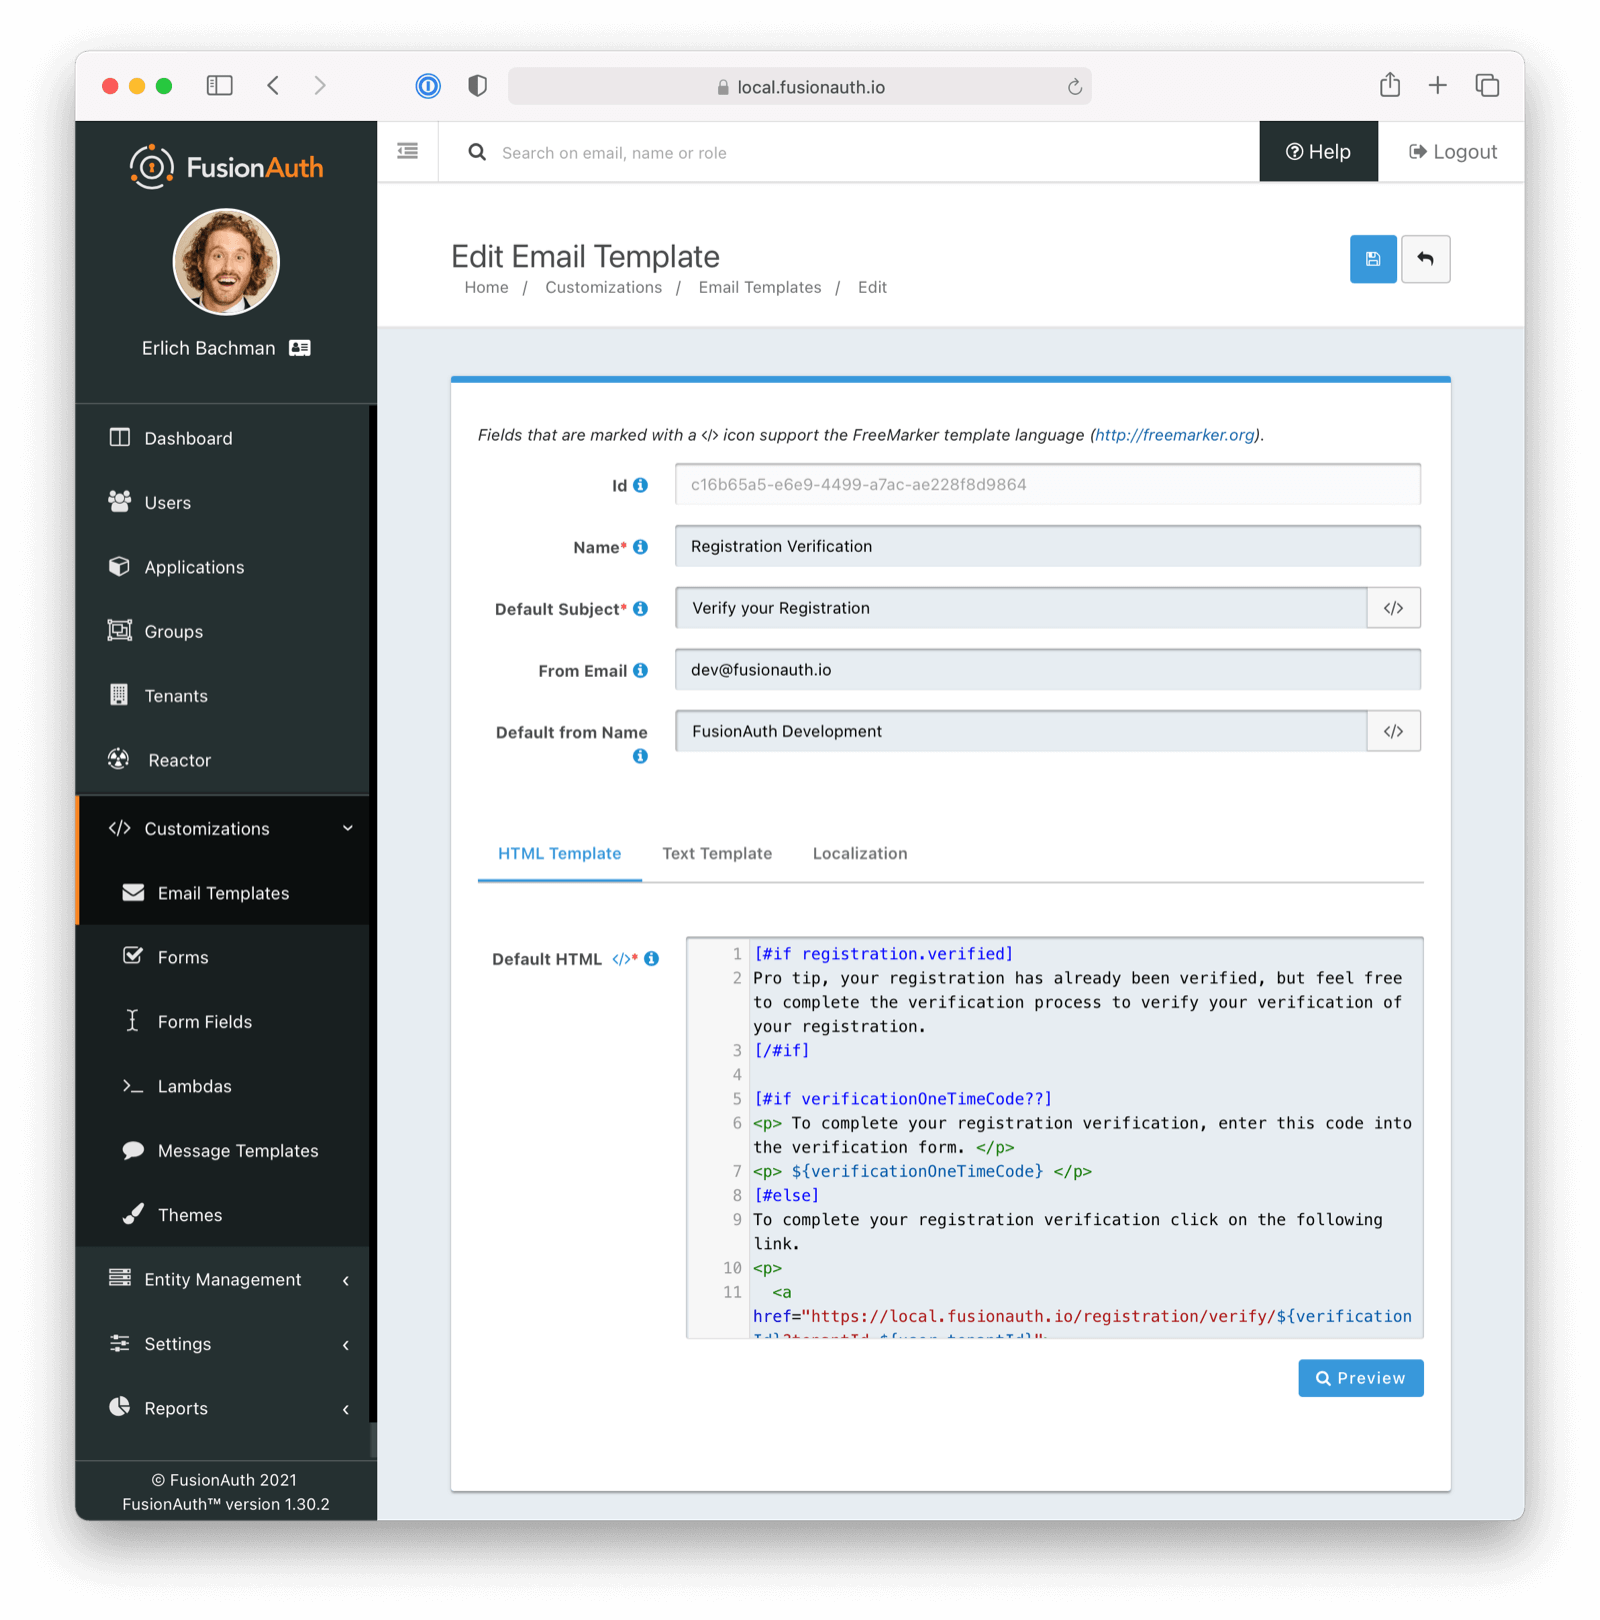
Customize the Registration Verification Template#
Navigate to Customizations -> Email Templates . Edit the Registration Verification template by clicking on the blue Edit button.
Modify the HTML and text templates as desired and then save them. You can also localize the messages.
Test It Out#
Now, test out the functionality. Register a new account. Make sure to use a different browser or incognito mode so that the admin account you logged in with while configuring FusionAuth doesn't interfere with new user registration.
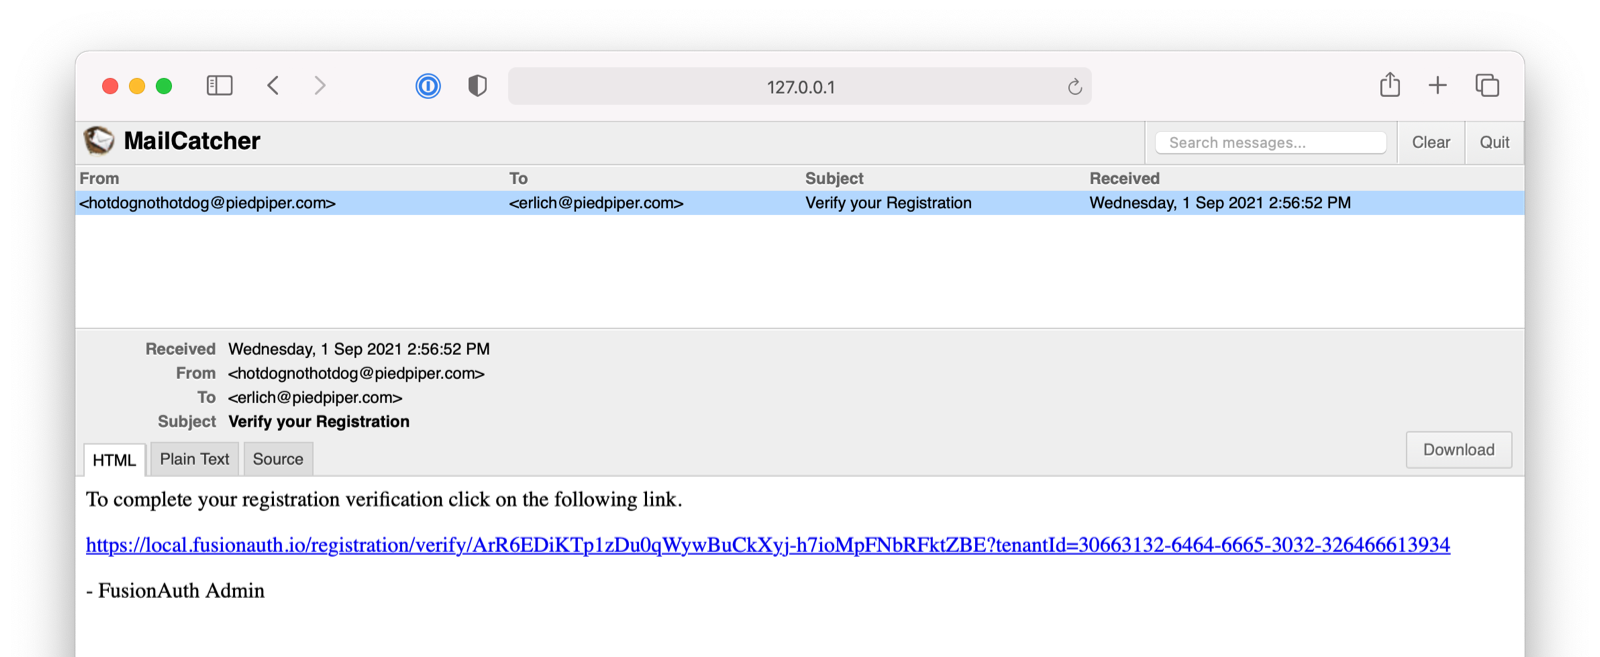
Visit the registration URL copied above. You'll be prompted to register. Fill out the form with a valid email address. After registration is complete, you'll receive an email prompting you to verify the registration.
Here is the email in the mailcatcher user interface:
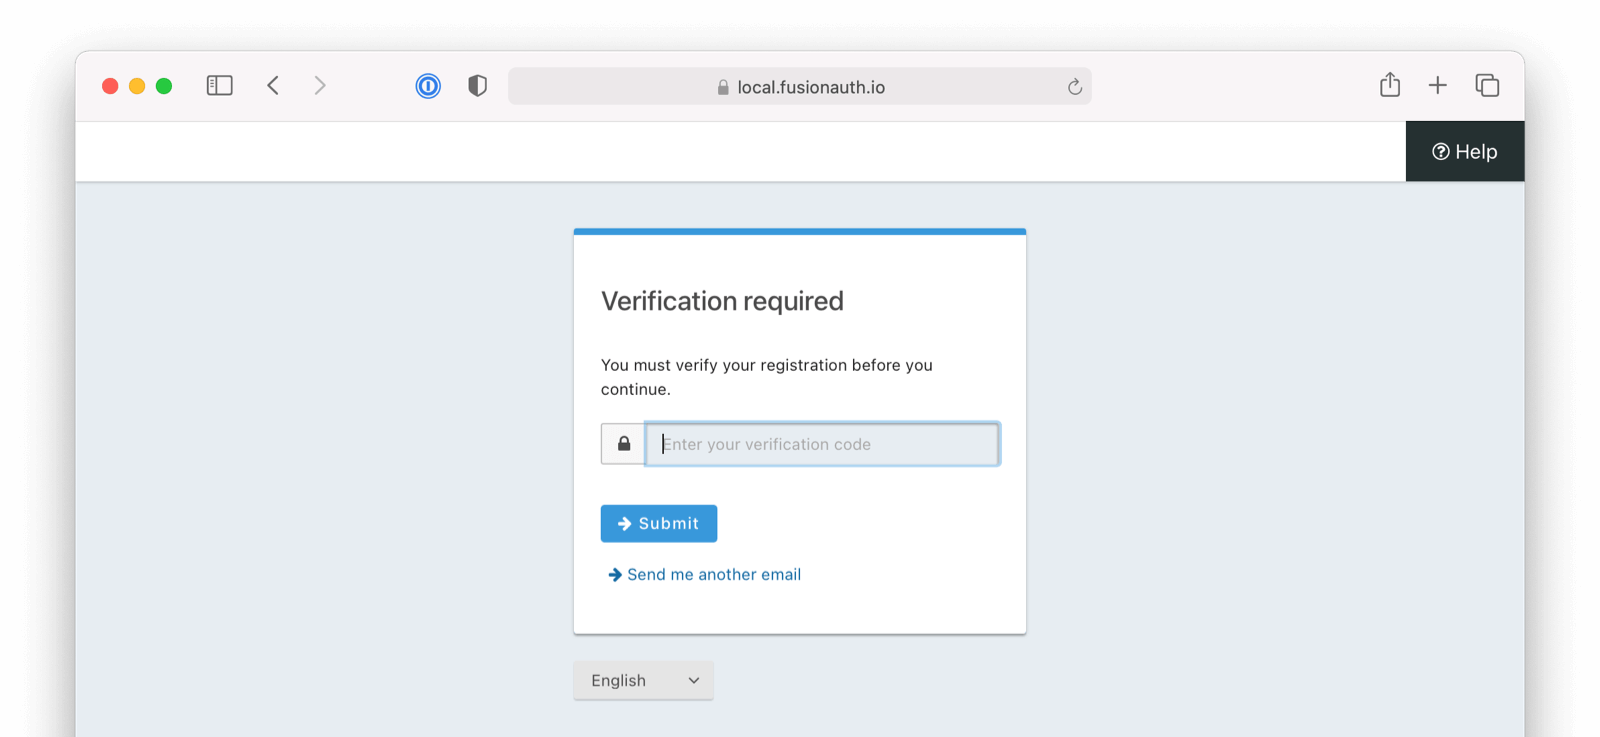
This user account will be gated and unable to completely log in if you have not verified the registration through email. In your browser where you registered, you'll see a page similar to below:
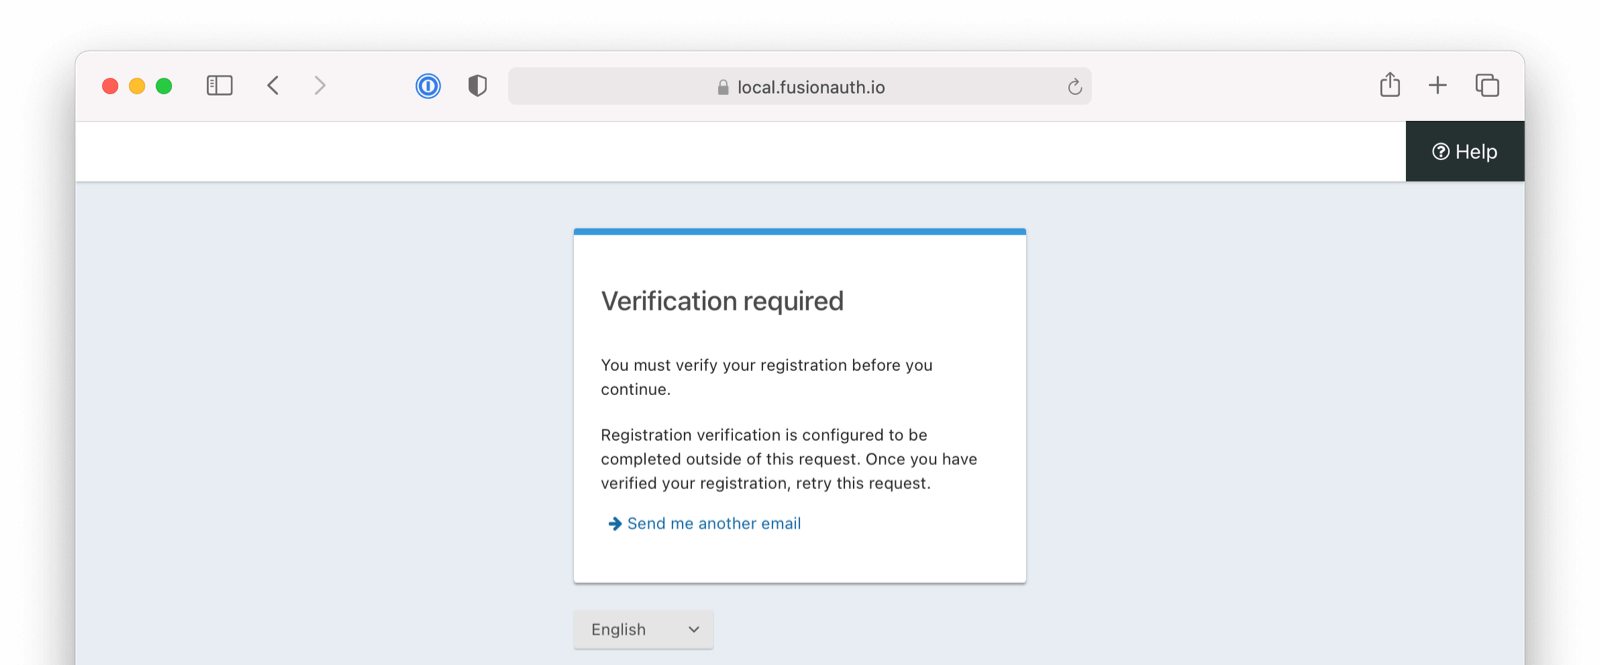
To test the gating, open a different browser (not a window, but an entirely different browser) and visit the login URL copied above. Enter the email and password for the user you just registered.
You'll be sent to the same registration verification gate page.
No matter which API or hosted login page you use, no JWT will be issued until the user registration has been verified. The user will continue to see the verification prompt when they log in until then.
If an API is being used to authenticate the user, the API will return a status code indicating registration verification has not yet occurred. Please see the Login API for more details.
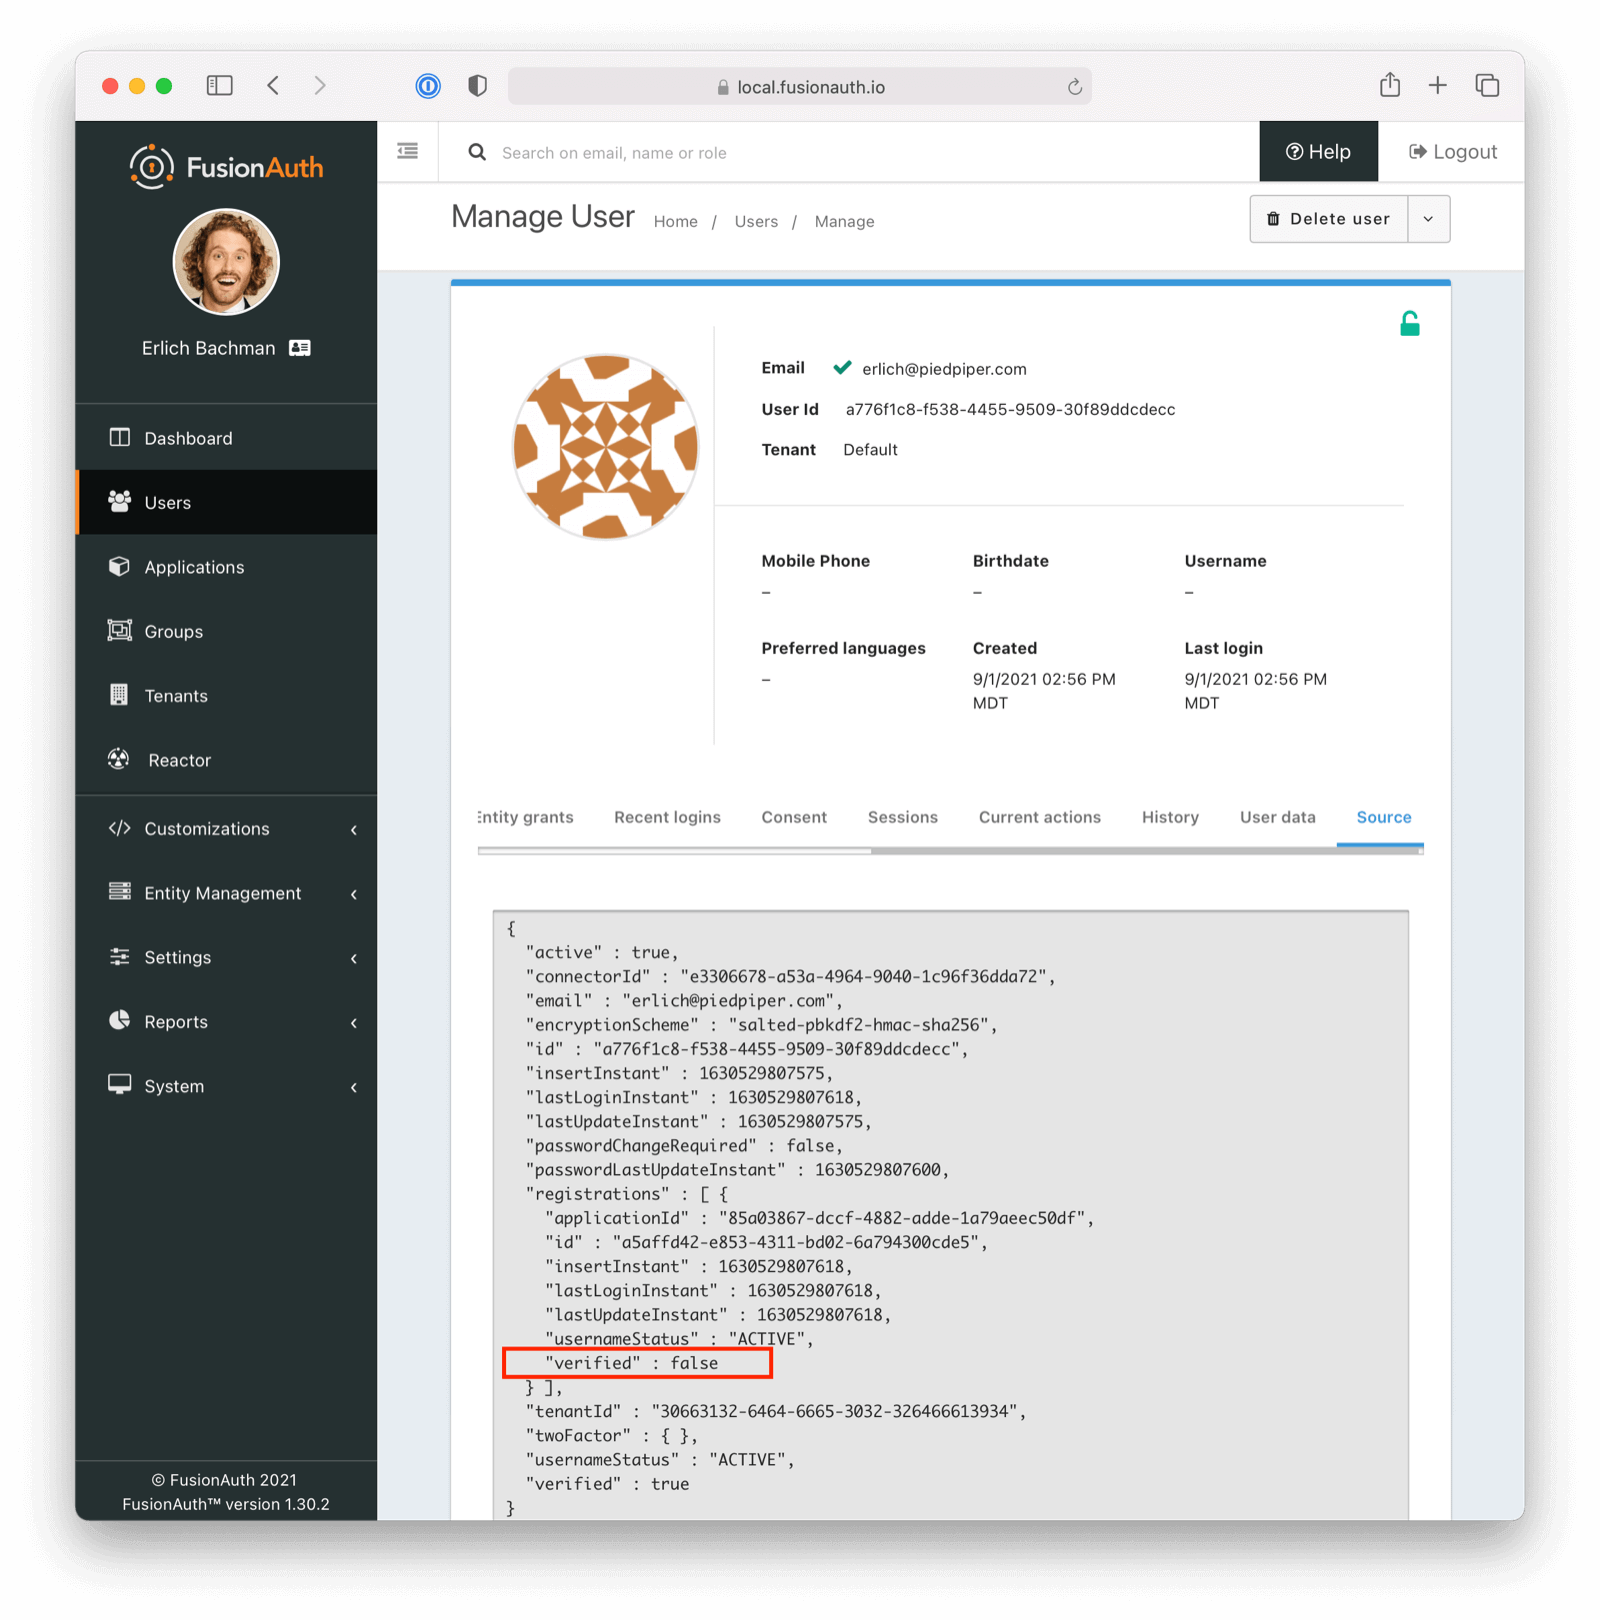
If you view the user in the administrative user interface and click on the source tab you should see the following attributes on the user.
Once you have verified the email address by clicking on the link, you can now log in and will be sent to the configured redirect URL.
The User Object#
The user object changes before, during, and after the registration verification occurs. Let's look at the JSON.
If a user is created and registration verification is disabled, the verified attribute of the registration object will be true. This is because FusionAuth treats all users as having verified registration (via email) when registration verification is disabled.
Registrations Array Showing Verification Set To true/off JSON
{
  "registrations": [
    {
      "applicationId": "3c219e58-ed0e-4b18-ad48-f4f92793ae32",
      "id": "44ae6427-60fc-4d4b-bef4-97274a6d29a6",
      "insertInstant": 1630520102750,
      "lastLoginInstant": 1630639038934,
      "lastUpdateInstant": 1630520102750,
      "roles": [
        "admin"
      ],
      "usernameStatus": "ACTIVE",
      "verified": true
    }
  ]
}
If a user is created and registration verification is enabled, the verified attribute of the registration object will be false.
Registrations Array Showing Verification Set To false/on JSON
{
  "registrations": [
    {
      "applicationId": "3c219e58-ed0e-4b18-ad48-f4f92793ae32",
      "id": "44ae6427-60fc-4d4b-bef4-97274a6d29a6",
      "insertInstant": 1630520102750,
      "lastLoginInstant": 1630639038934,
      "lastUpdateInstant": 1630520102750,
      "roles": [
        "admin"
      ],
      "usernameStatus": "ACTIVE",
      "verified": false
    }
  ]
}
Naturally, this attribute will be true once the user verifies their application registration.
Users imported through the Import API will have whatever attributes are initially imported regardless of verification or gate settings.
Common Questions#
Question: Will all my existing users retroactively get emails or SMS messages for either gate once enabled?
Answer: No. However, if existing users have unverified identities (meaing verified: false with verifiedReason: "Pending"), and gating is enabled, then those users will be required to verify those identities at their next login.
To double-check your users' email verification status, click on Users -> Search Bar and use this Elasticsearch query string: verified: false. Note, this will return if either user or user.registrations[x] is unverified. Users found by this query will be required to verify either their email or application registration once the gate is enabled. However, they will not be emailed until they log in. During the login process, they will be required to click on a link to have a verification email sent to them.
As of version 1.59.0, it's not yet possible to search for unverified phone number identities.
Question: What if I have accidentally/inadvertently imported users with a verified: false value (either on the user or application registration)? In other words, can I do this manually.
Answer: Currently, there is no way to change this. However, there is an open issue adding this functionality. Please upvote if you believe this is needed.
Question: What does it mean to enable both registration and email gates and verification paths?
Answer: If you enable both registration verification and email verification, there will be a bit of redundancy (this is fine and expected). Consider the use case of ten applications and one common tenant. Maybe nine of those applications require only email verification, but the tenth application requires an application gate to force user opt-in behaviors. Specifically, the user on the tenth application will get two emails to verify both their registration and their email.
Troubleshooting Email and Registration Verification#
Links Emailed to Users Don't Function As Expected#
Users cannot verify their application registration or verify their email. The link or code does not work (it is expired or there is some other error).
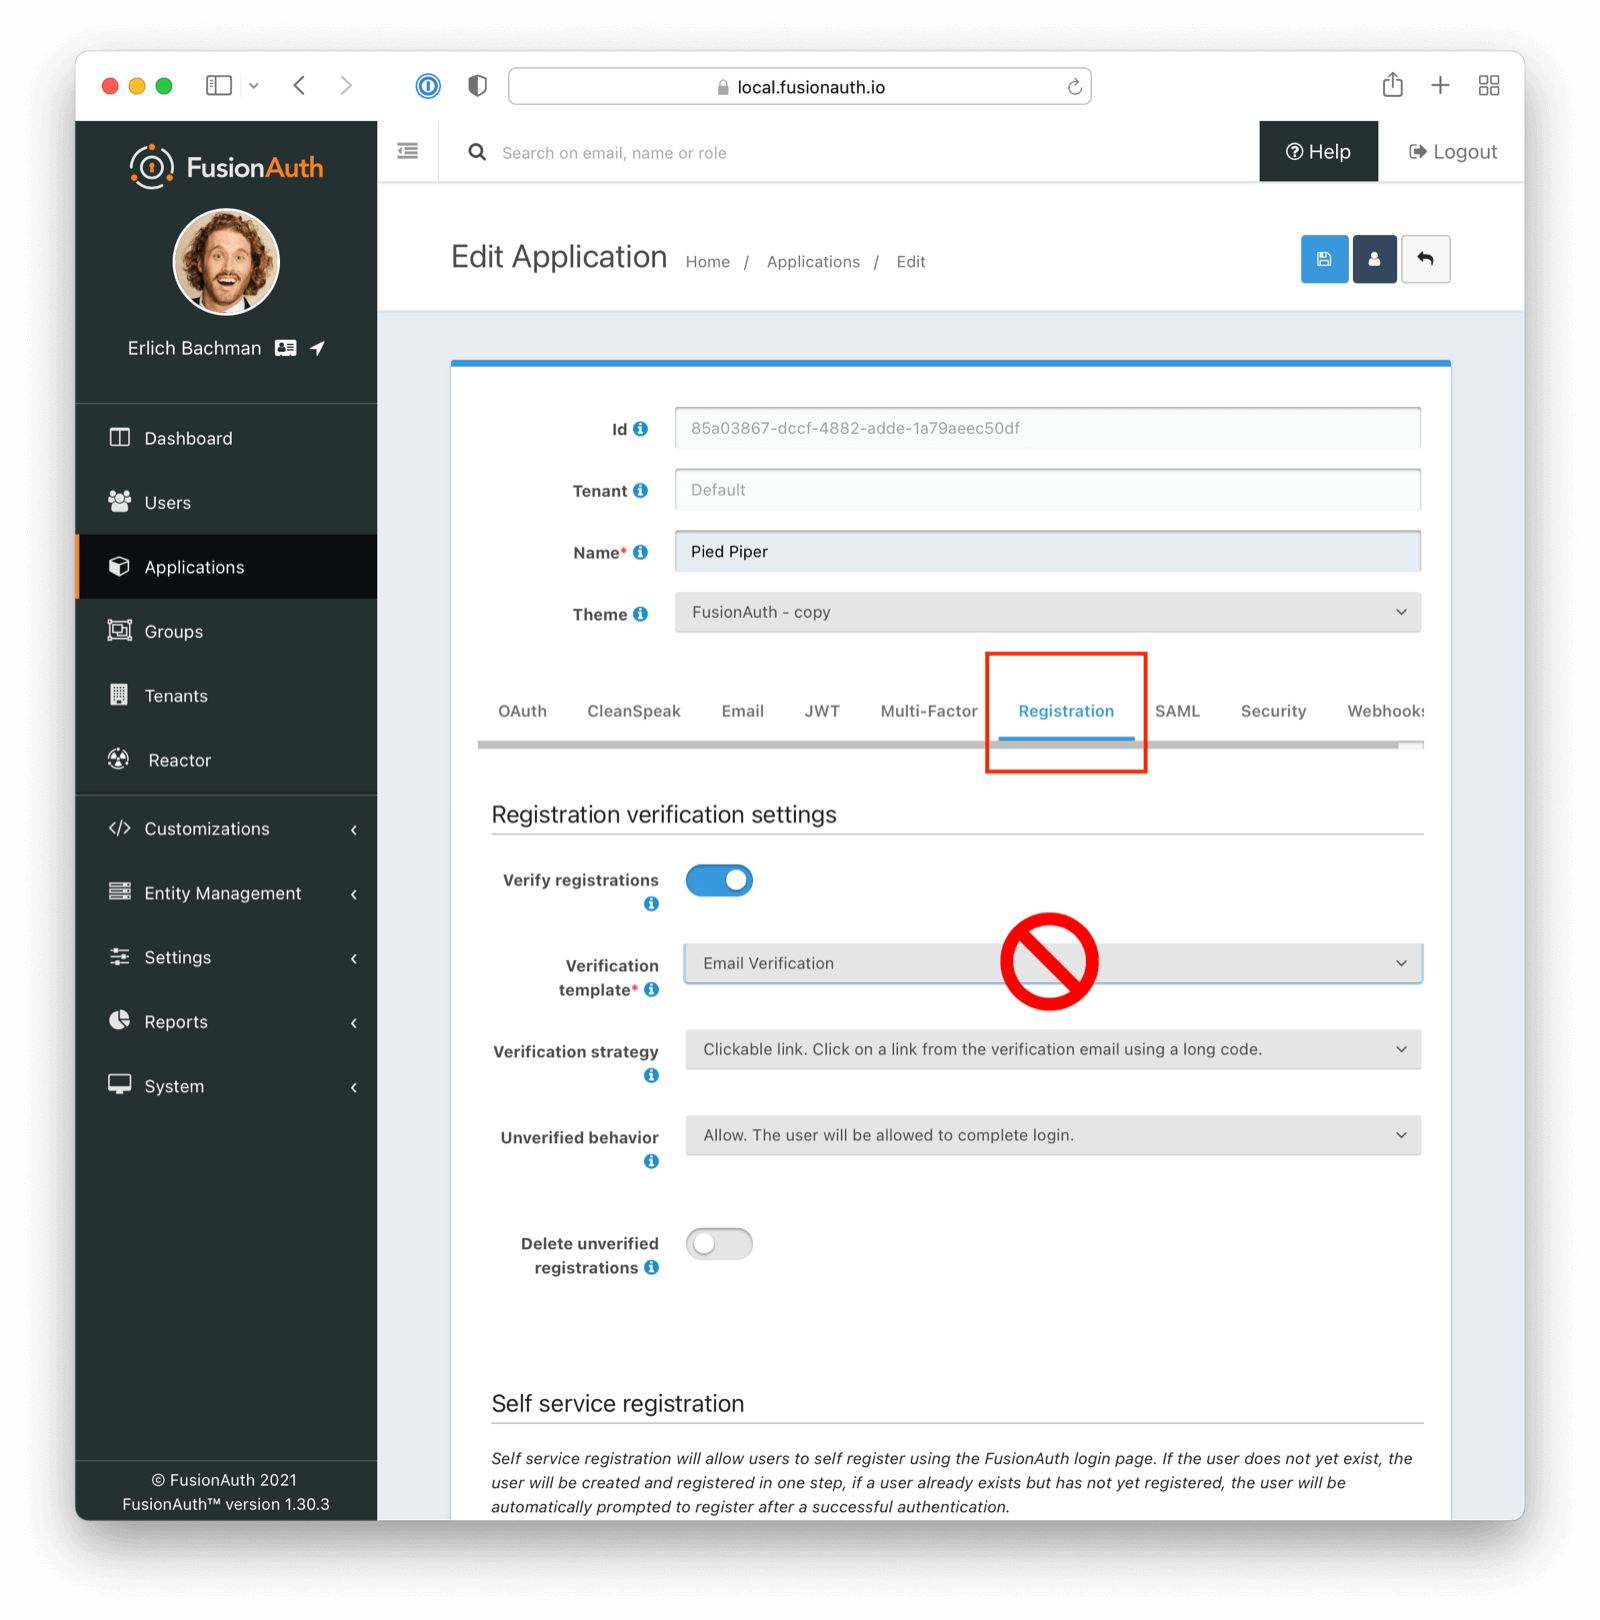
Check the Email Template#
Ensure you have selected the correct email template.
For Email Verification
If attempting to verify email addresses, ensure you have selected the appropriate template (Email Verification as opposed to Registration Verification in this instance)
For Application Registration
If attempting to verify application registration, ensure you have selected the appropriate template (Registration Verification as opposed to Email Verification in this instance)
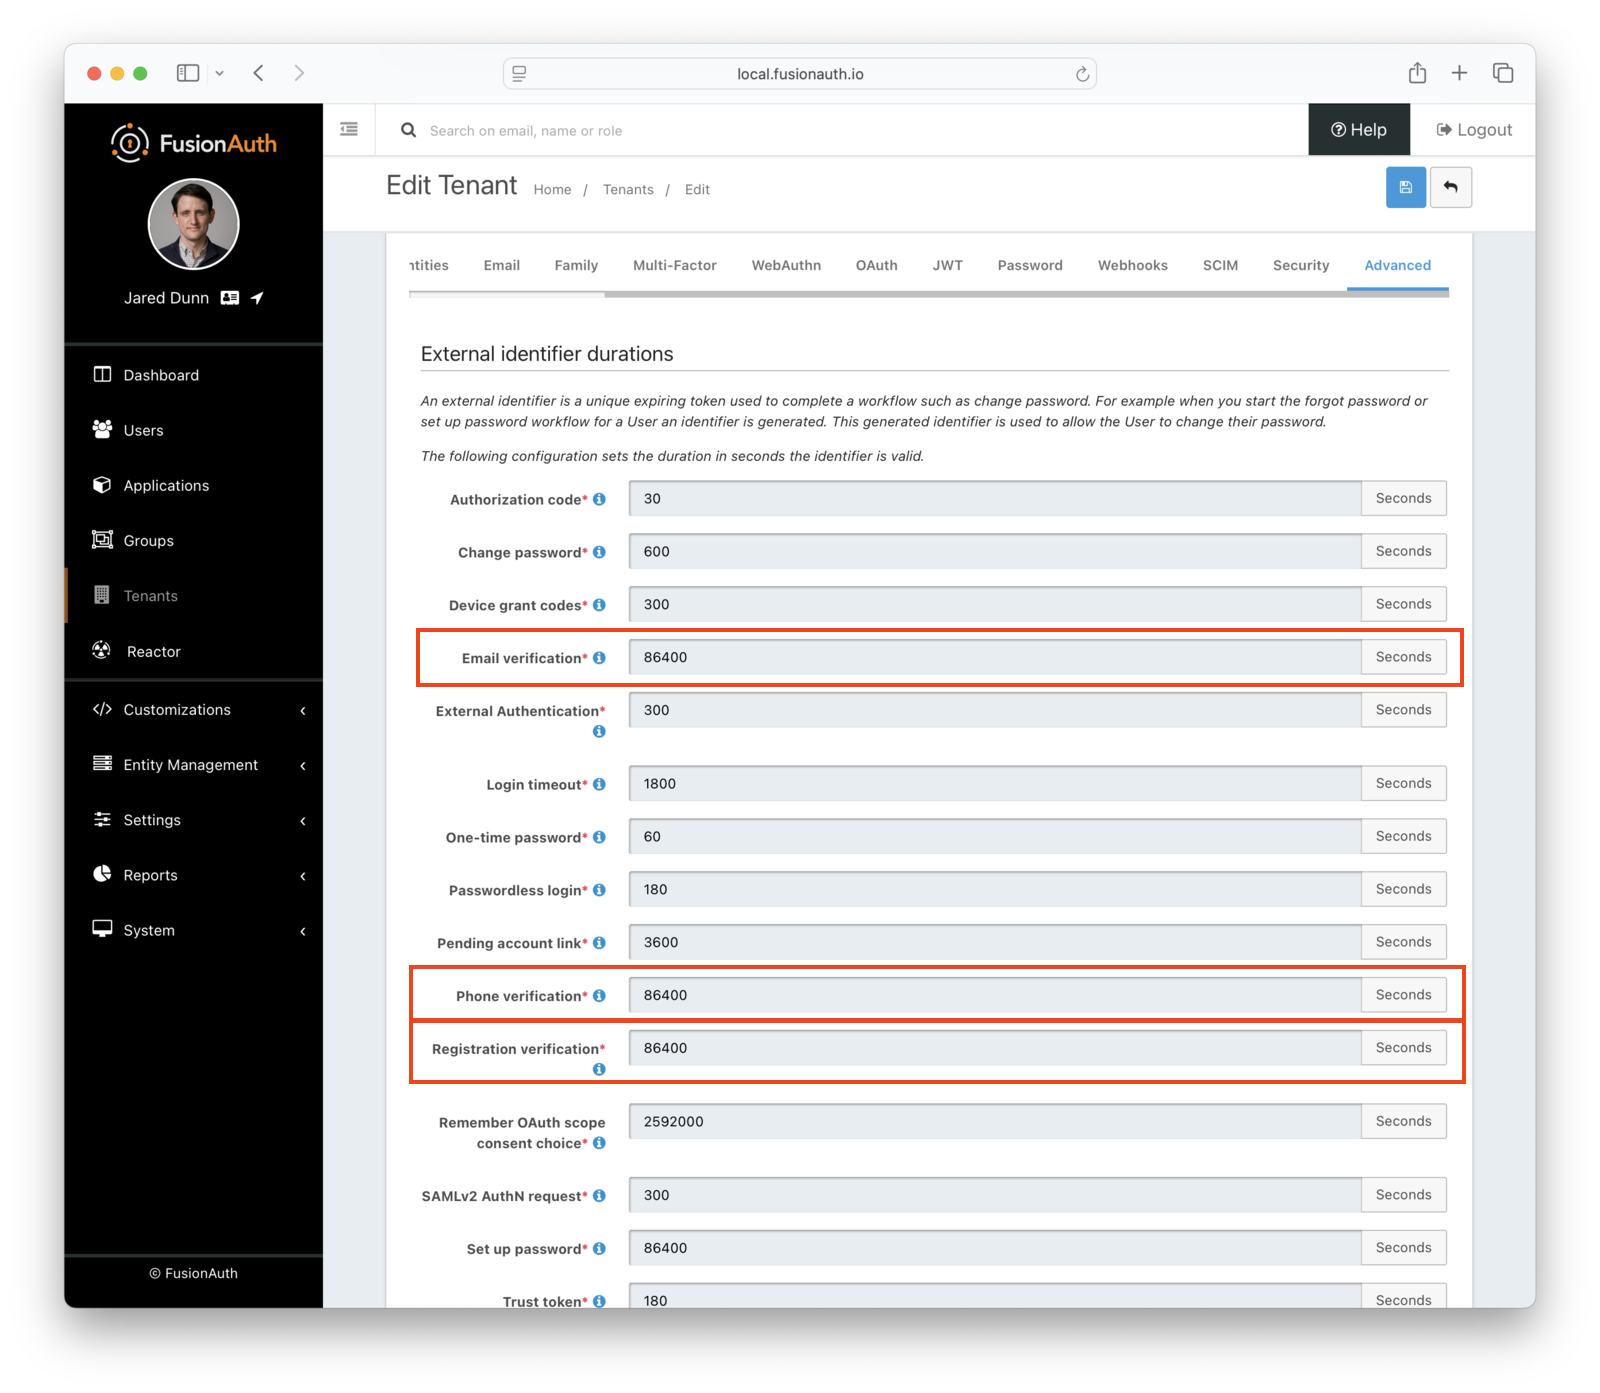
Check External Identifier Timeouts#
Ensure your external identifier timeouts are appropriate. Reasonable defaults are set, but they can be adjusted (Tenants -> Advanced Tab -> External identifier durations ), with particular attention paid to Email Verification, Phone Verification, and Registration Verification durations.
Next Steps#
Now that you've successfully set up gated registration verification, take the next steps to integrate this functionality into your application:
- Discover how to modify your theme to make the gate pages look like your application.
- Learn more about email templates and how to customize them.
- Have the user submit a passcode rather than click a link. With this option, the user will be prompted with a screen similar to the below image.