Identity Pre-Verification Using Phone Verification Form
As of version 1.62.0, FusionAuth can be configured to pre-verify users' identities, in the registration process, before user creation.
To enable pre-verification, do the following:
- Create or configure a Messenger
- Enable verification for the identity type(s) on the tenant
- Create an advanced registration form with the verification step
- Enable self-service registration in your app
Prerequisites#
This feature is only available in paid plans. To learn more, see our pricing page.
-
FusionAuth version 1.62.0 or greater. If you already have a FusionAuth instance, see the upgrade guide. To set up your own instance, see the installation guide.
-
A licensed paid plan. To buy a plan, visit the pricing page. To activate your instance, visit the Reactor page.
Difference Between Verification, Gating, And Identity Pre-Verification#
Verification: user created, attributes updated on user or identity
- Available to both hosted pages (Self-service registration Advanced forms) and API
- No automatic gating you must handle in your application code
- User already exists
Gating: hosted page concept, only enforced on hosted pages
- If you change your email, you won't run into the gating until you log in again
- Available on hosted pages (Self-service registration Advanced forms) and Self-service registration Basic
- User already exists
Identity Pre-verification: user not created until phone has been verified
- Available to both hosted pages and API
- Can add gating manually yourself via API (prevent interactions after login if not verified)
- User doesn't exist (only Identity does)
Phone Verification and identity pre-verification are not premium features. Both Gating and enforcing pre-verification with Advanced Registration Forms are premium features.
FusionAuth's built-in registration and identity verification flows update the verified and verifiedReason attributes on a user's registration or on a user identity. You can gate the user (or prevent them from continuing with authentication) based on these attributes when writing your application and integration code.
With paid FusionAuth plans, you can elect to have FusionAuth "gate" your users based on these verification attributes. Gating stops the user from receiving a JWT or essentially completing the authentication workflow. In this flow, FusionAuth enforces a "gate" for a user until they verify their phone or email. Gating happens after user creation.
Identity Pre-verification applies the same concept, but user identities must be verified before user creation.
Create Or Configure A Messenger#
Log in to the FusionAuth administrative user interface. You could do all of this configuration with the API or kickstart, but for this tutorial you'll use the UI.
We are using Twilio as an SMS service in this example. To set up the Messenger that will be used to send the SMS verification codes, navigate to Settings -> Messengers . Click Add Twilio Messenger from the dropdown in the upper right, and configure it using your Twilio account information as described in the Twilio messenger documentation.
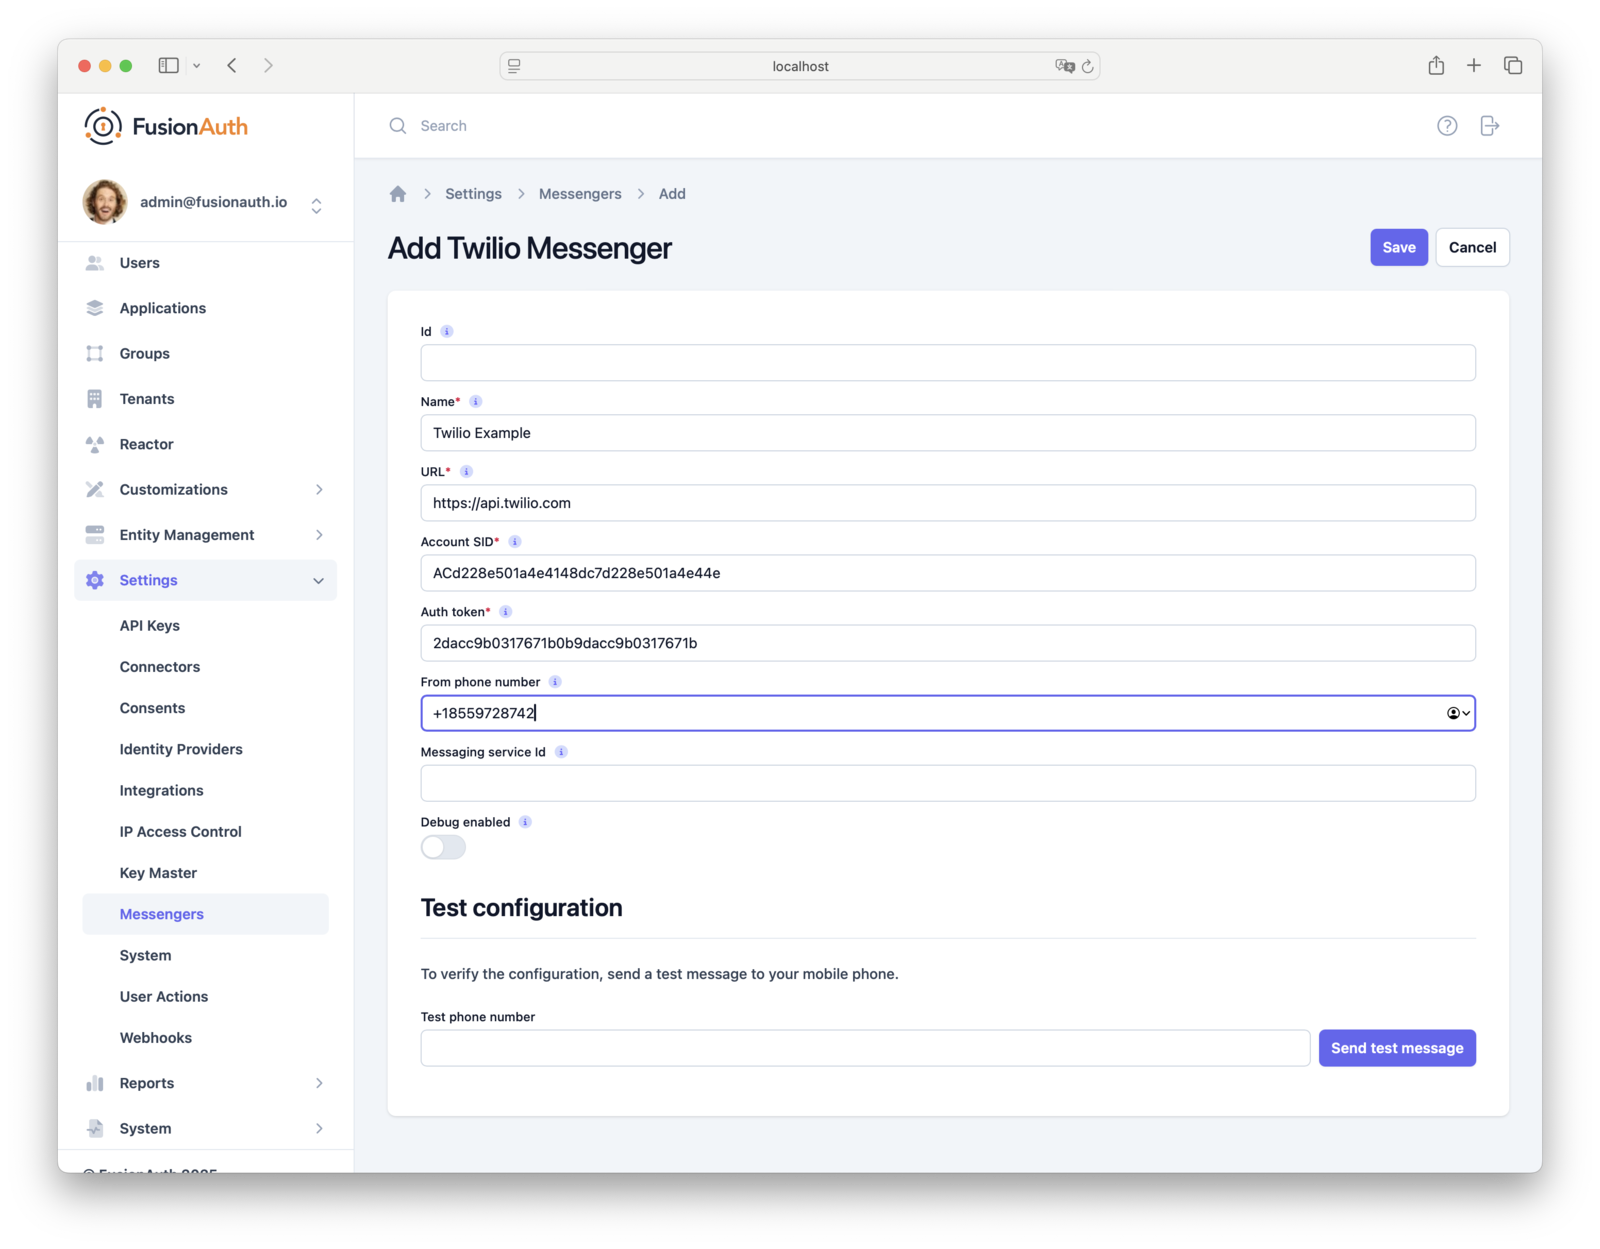
Enter your Twilio credentials (Account SID, Auth Token) and either a Messaging Service SID or From Number, then click Save .
Enter phone numbers in E.164 format (for example, +18559728742).
Twilio trial accounts can only send to verified recipient numbers and may restrict sender IDs by region. Ensure your From Number or Messaging Service is SMS-enabled for the destination country, and that geo-permissions are enabled in your Twilio console.
Enable Verification For The Phone Identity#
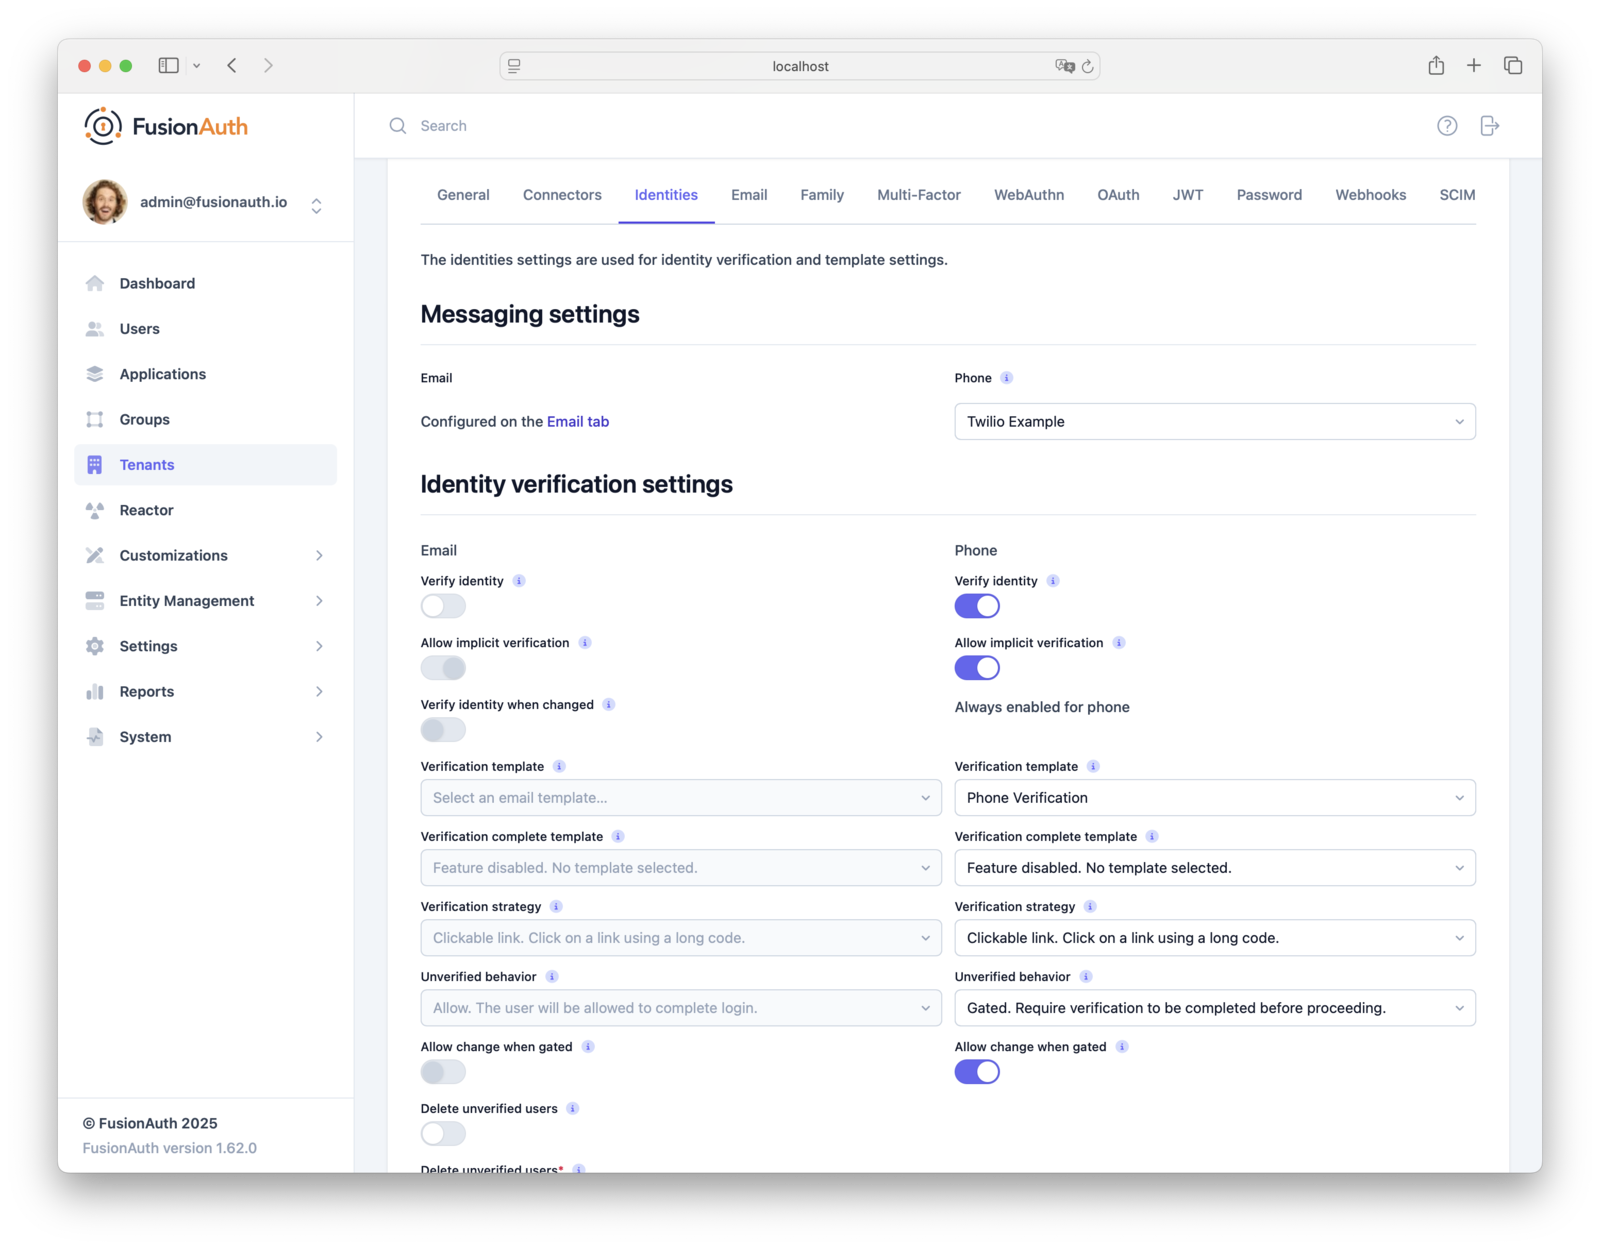
Enable identity verification in your tenant by navigating to Tenants -> Edit Tenant -> Identities tab with the following steps:
In the Messaging settings section:
- Select your earlier created Twilio messenger configuration in the Phone dropdown.
In the Identity verification settings Phone section:
- Enable the Verify identity toggle.
- Select the
Phone Verificationtemplate in the Verification template dropdown. - Set the Unverified behavior to
Gated(other values will be invalid). - All other fields can be left as default or changed based on your needs.
If you kickstarted your FusionAuth instance, without creating the message templates, they will be missing. Create the default message templates (including the Phone Verification template) using Retrieving Default Templates, then add them in Customizations -> Message Templates .
Since there are other scenarios where gating can be applied for existing users, and you need FusionAuth instead of your Application to handle Gate Accounts Until User Phone Verified ensure that the Unverified behavior value is Gated.
Create An Advanced Registration Form With The Verification Step#
Before you can use the phone identity pre-verification during registration, you need to create an Advanced Registration Form that includes a verification step for the phone number field.
Phone number form fields are created by default, but they are not set Required to true, which is a prerequisite for the verification step in the Advanced Registration Form if it's the only identity.
First, ensure that a mandatory phone number Form Field exists. By navigating to Customizations -> Form Fields and create a new Form Field with the Field key user.phoneNumber and Required set to true, if one does not already exist.
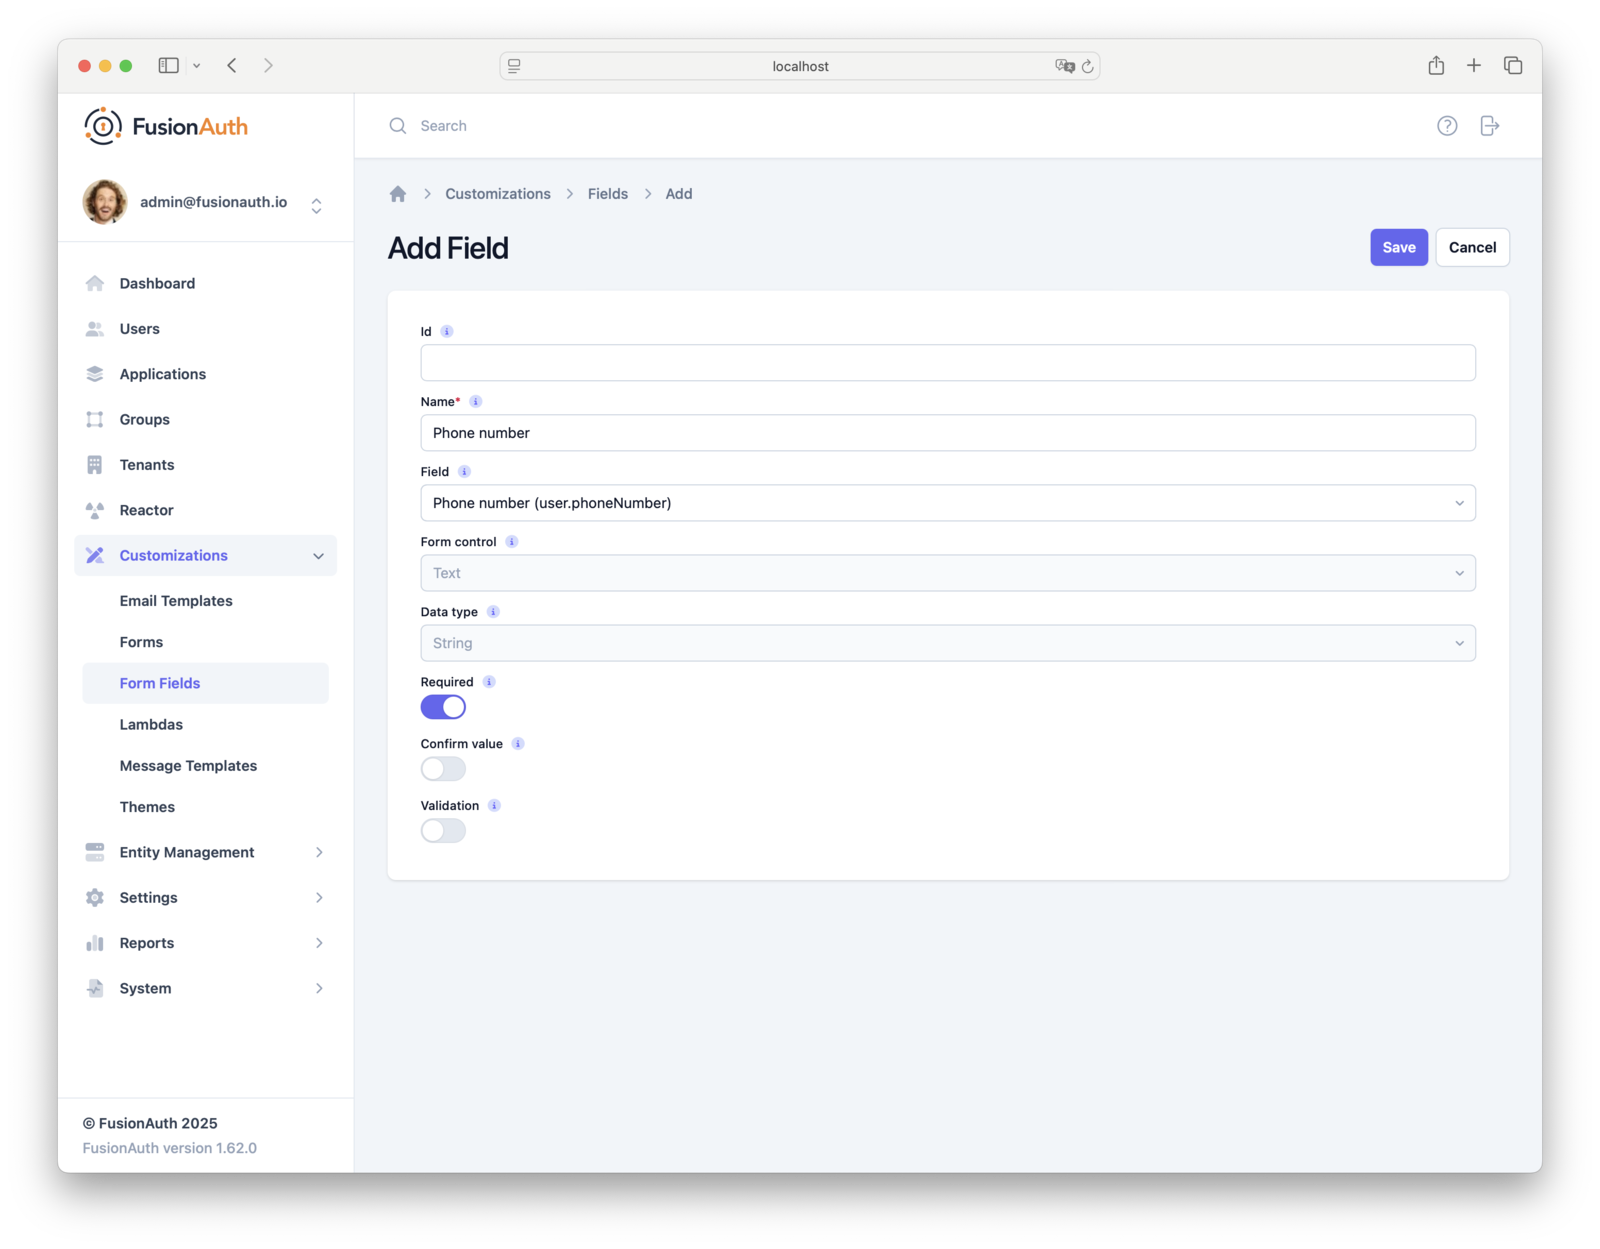
phoneNumber can be any valid phone number (in E.164, national, or international format) and FusionAuth will canonicalize the value. If no country code is provided, a US/NANP country code of 1 is assumed.
Phone verification only works with the user.phoneNumber form field. Do not use user.mobilePhone or a custom field (for example, user.primaryPhone) since it is not an identity type.
With the Phone number form field available, let's Create a Form for phone identity verification during registration.
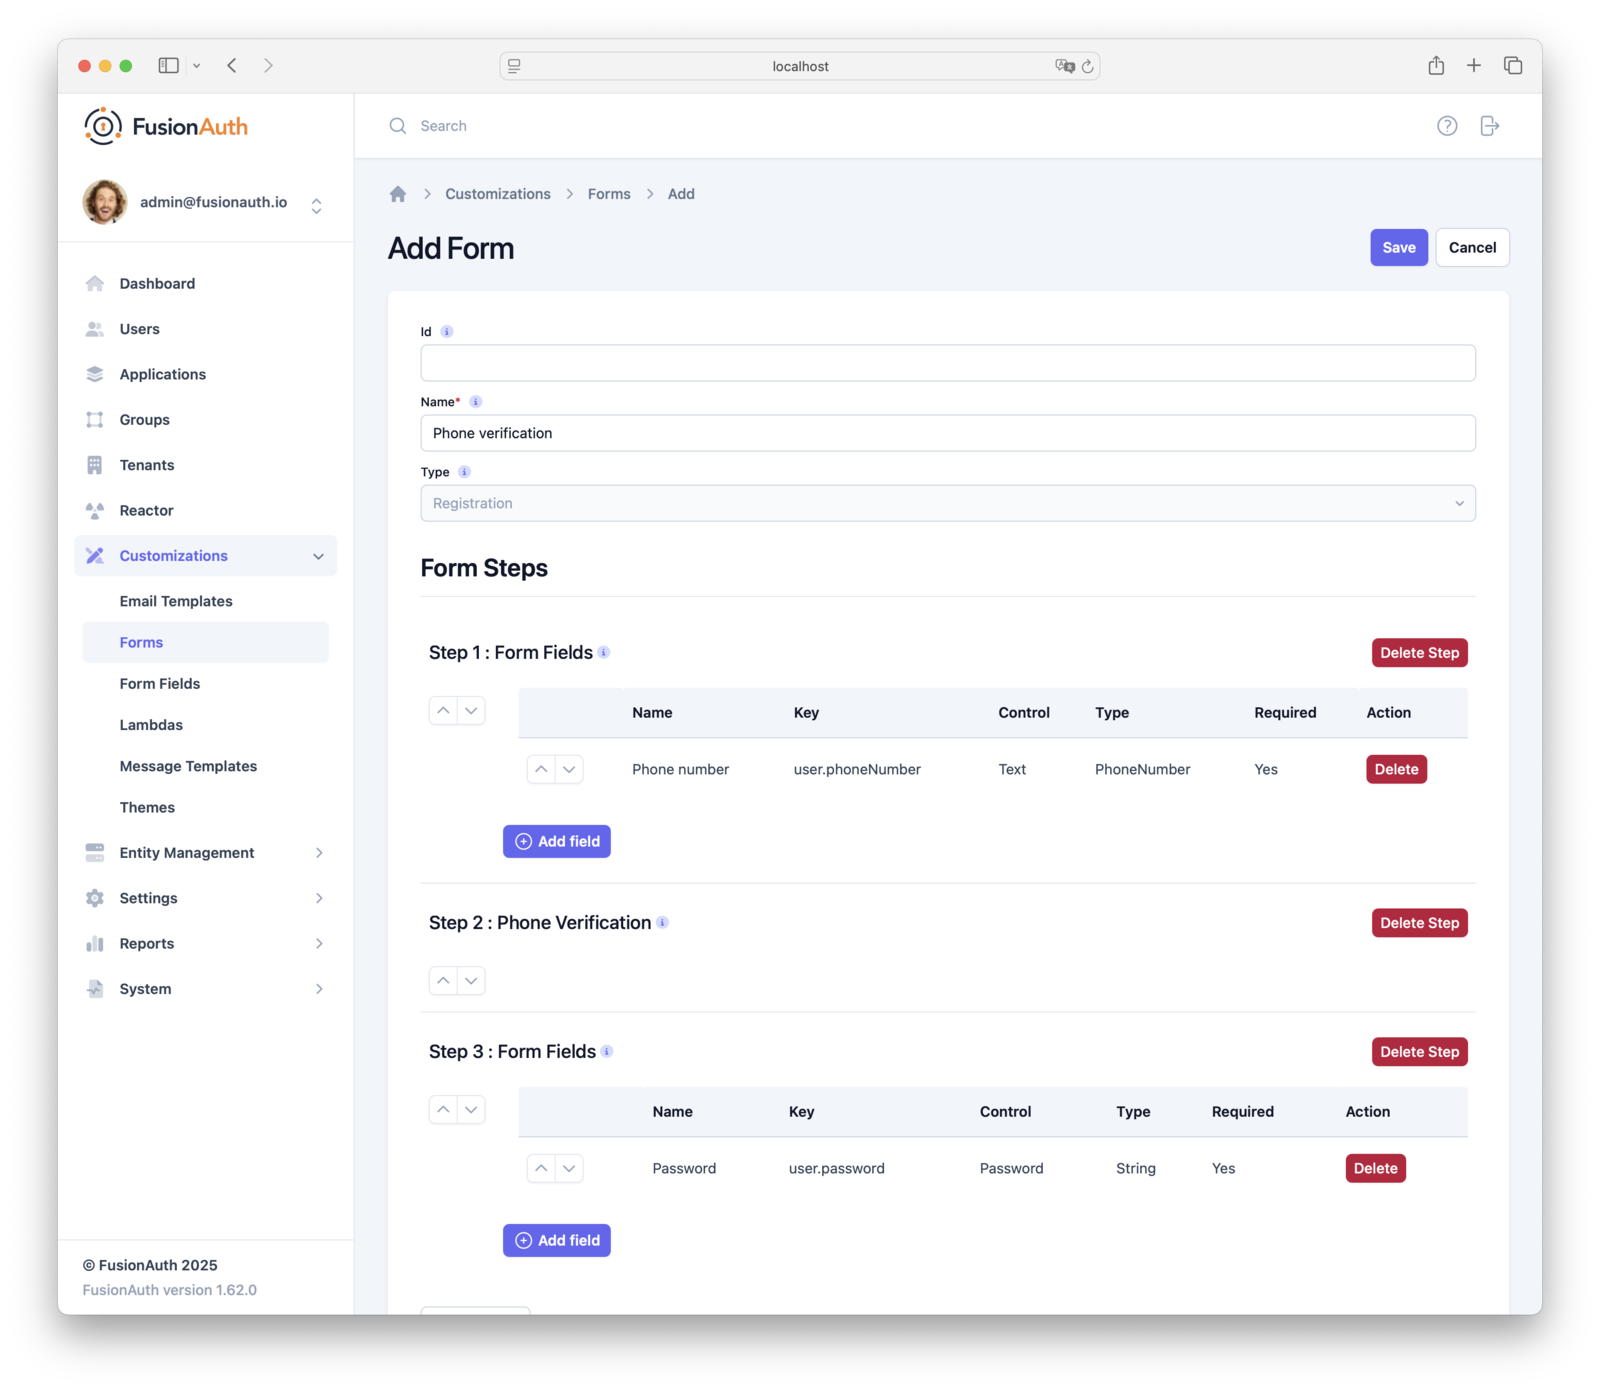
Navigate to Customizations -> Forms and click Add Form in the upper right. Give the form a Name of Phone Verification, then add the following components to the form:
- Add the first step by clicking Add Step -> Form Fields .
- Add the field by clicking Add field , selecting the Field
Phone number(the phone number field you created earlier), and clicking Submit . - Add the second step: Add Step -> Verification , selecting Phone Verification.
- Always add the password field as the final step: Add Step -> Form Fields , selecting the Field
Passwordand clicking Submit .
Enable Self-Service Registration In Your App#
With all the previous steps done, you can now enable Advanced Self-service registration by associating the created Advanced Registration Form with an Application, as described in Associate a Form With an Application.
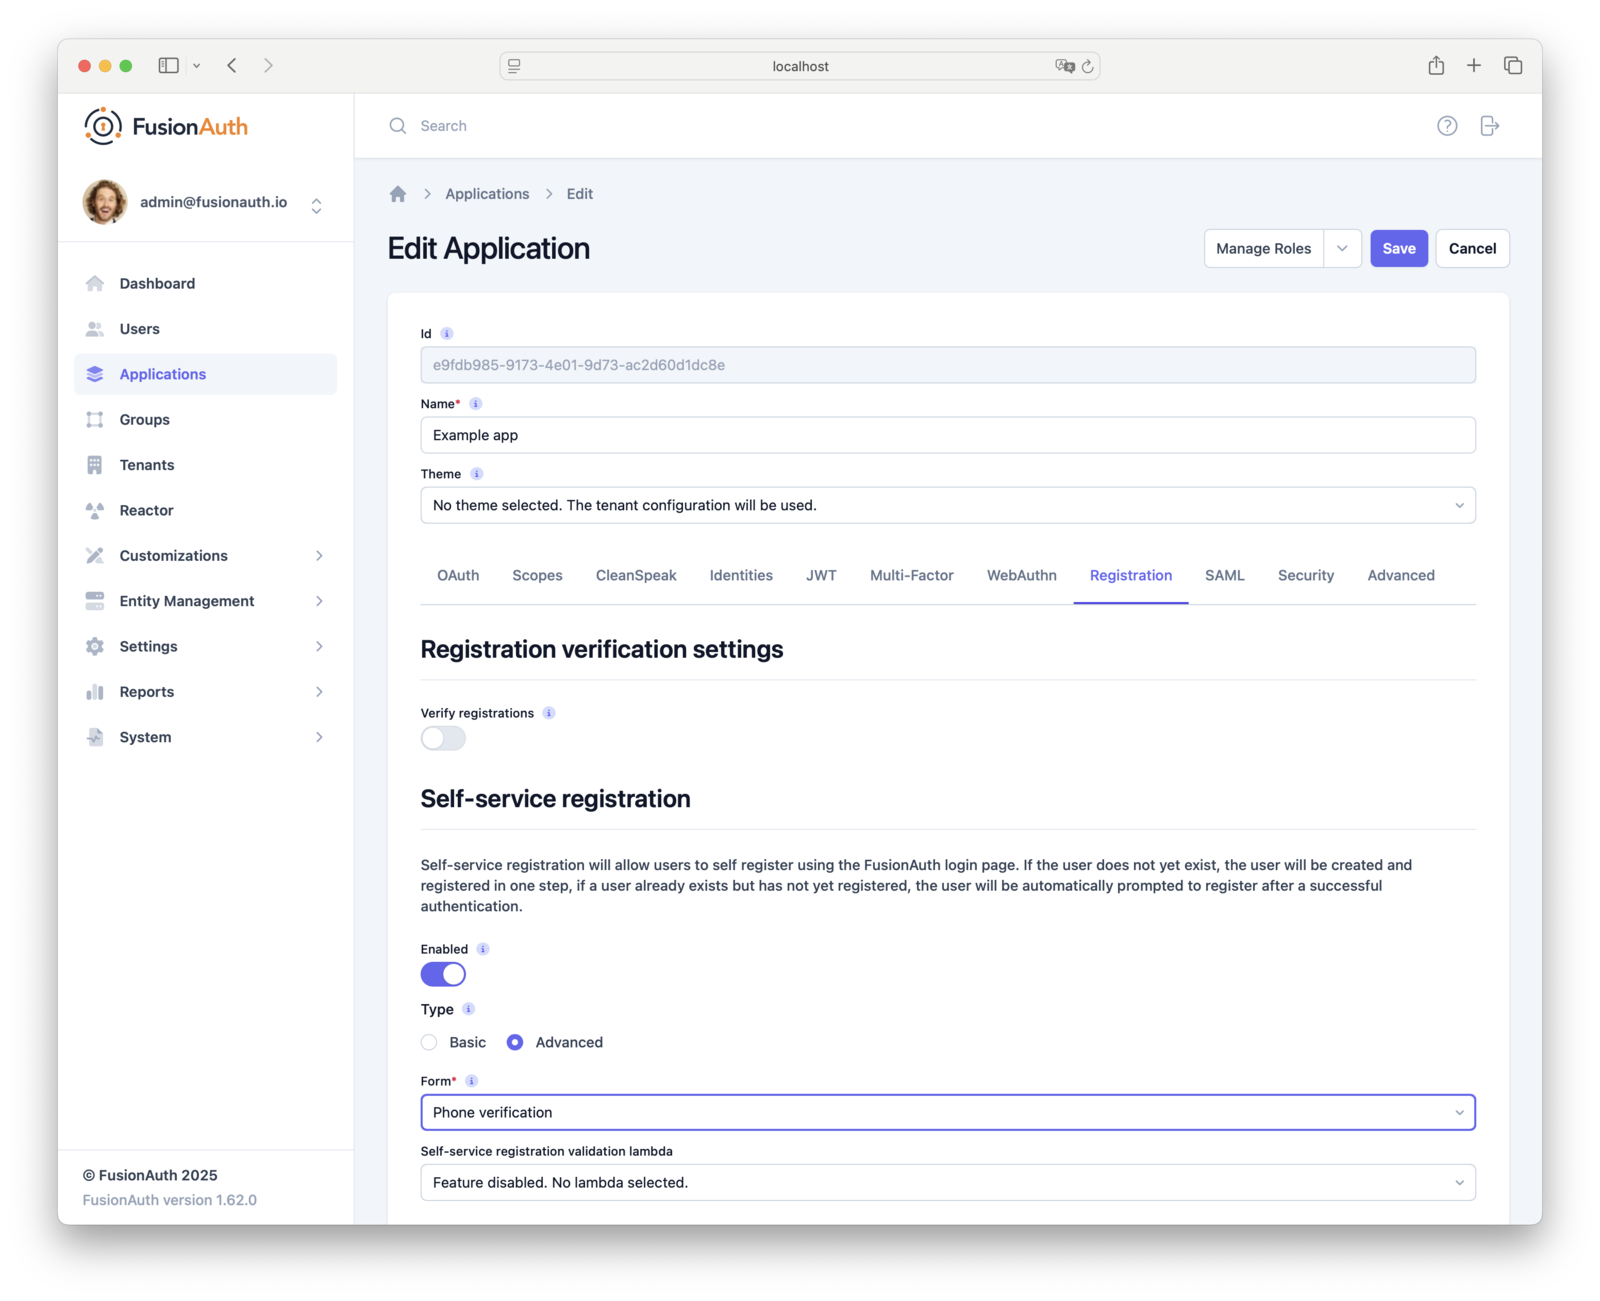
Navigate to Applications -> Your Application -> Registration tab for the Tenant you have enabled Identity verification for.
In the Self-service Registration configuration section:
- Enable the Self-service Registration Enable self-service registration toggle.
- Ensure the Registration type is set to
Advanced. - Select the earlier created
Phone Verificationform in the Advanced Registration Form dropdown. - Save the application.
Application registration verification is deprecated. When using identity pre-verification, do not enable Registration verification. Use Advanced Registration Forms with the Phone Verification step instead.
Test It Out#
To test the phone identity pre-verification during registration, navigate to the Self-service registration page for your application.
Follow these steps to validate the phone identity pre-verification flow:
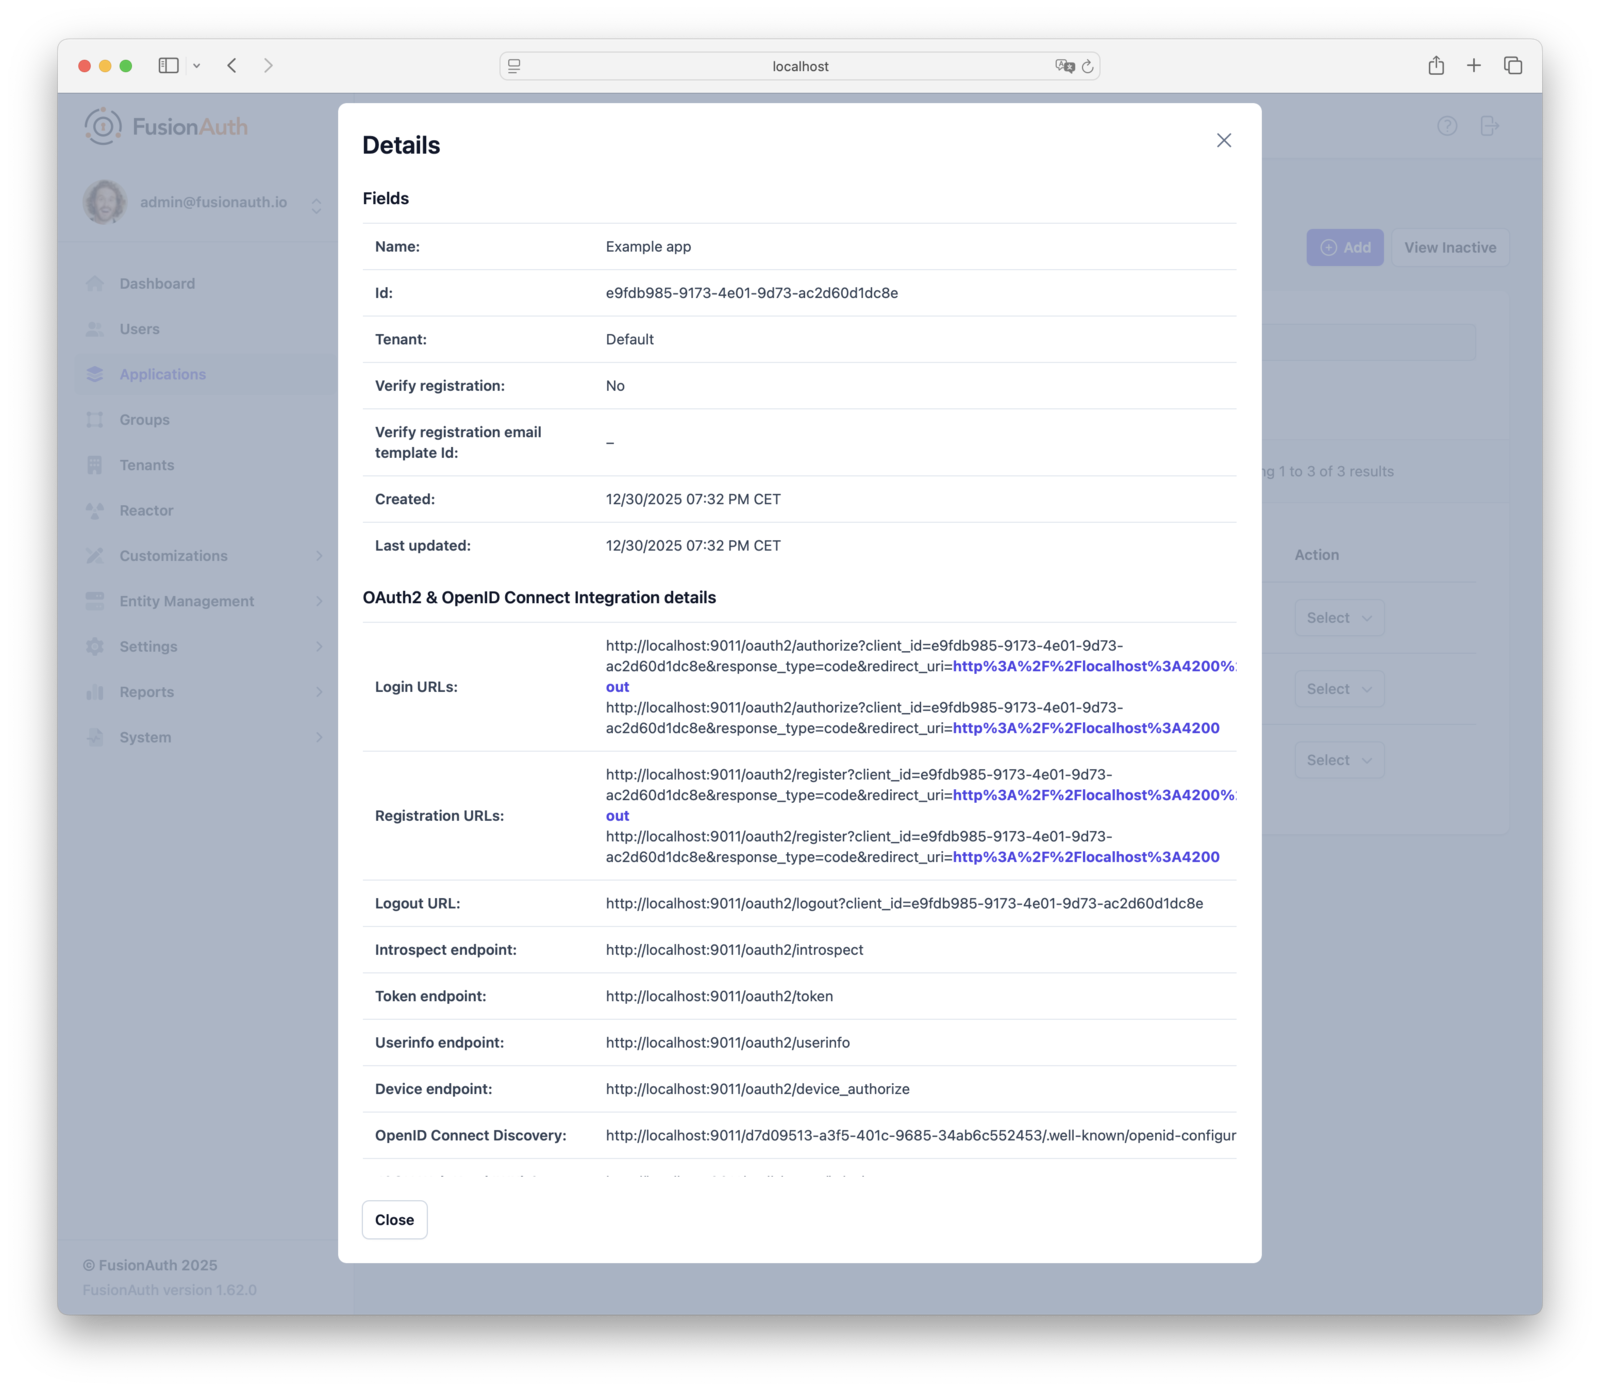
- Open your application's Self-service Registration page. You can find a direct link in the OAuth2 & OpenID Connect Integration details on the Applications -> Your Application -> View in the Details page.
- Enter a valid phone number and click Next to initiate pre-verification.
- You will receive a verification SMS. If using the
FormFieldstrategy, enter the code into the form. If usingClickableLink, follow the link from the SMS. - Complete the verification. After the successful verification, you will be directed to the last step of setting your password.
- Once you complete the password step, you will be directed to your application already logged in with a verified phone.
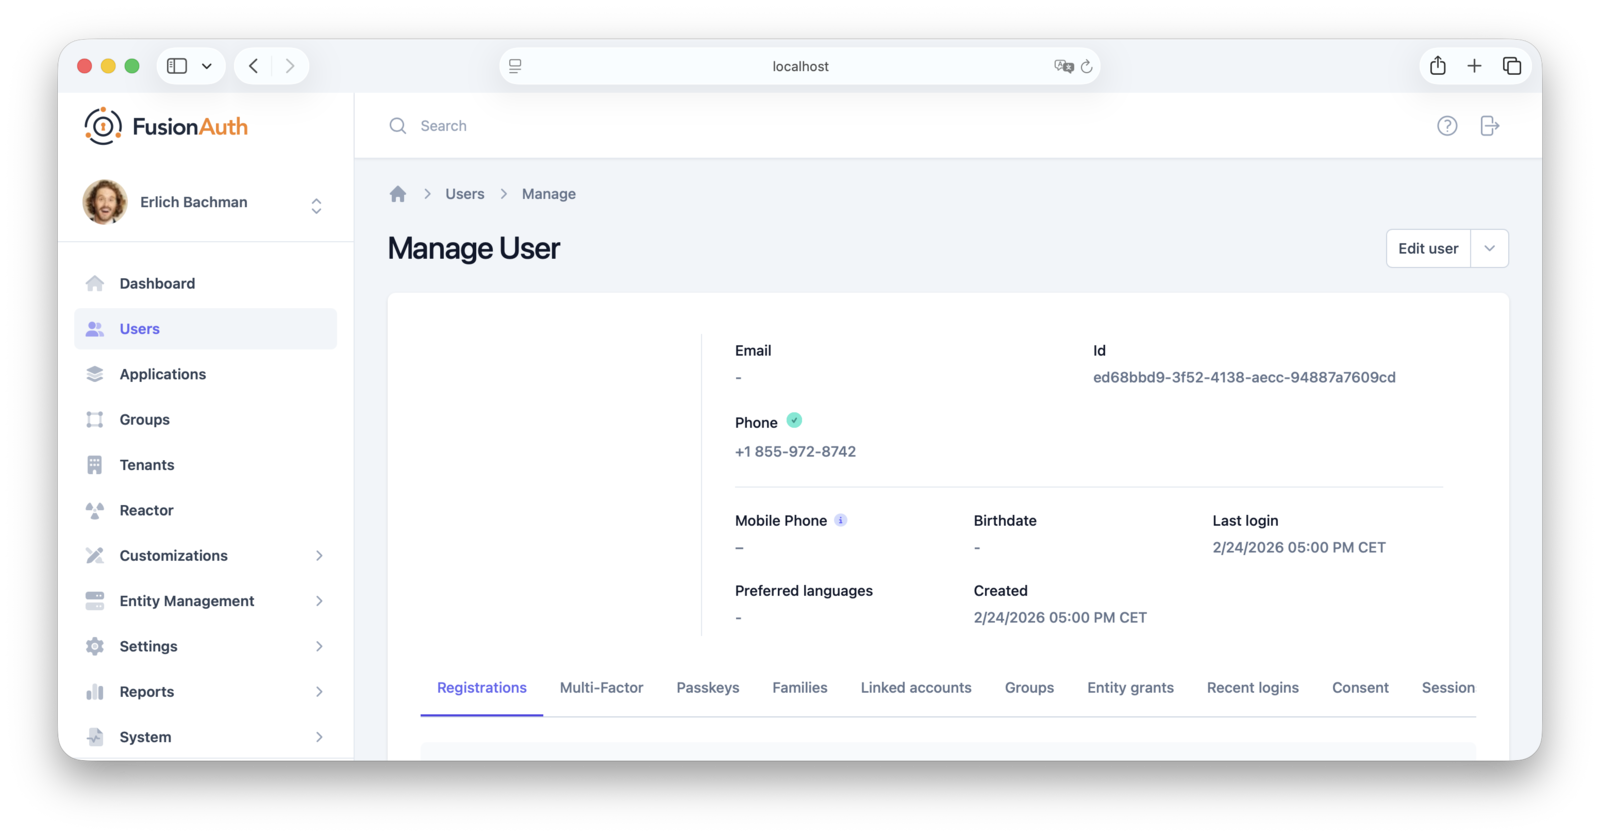
- Confirm the verification status by viewing the user in the admin UI by navigating to Users -> [select user] -> Manage . A verified phone number displays a green checkmark icon next to the number.
Common Questions#
Question: Why is my verification step not showing up in registration?
Answer: There are several reasons why this can happen:
- The tenant the user is created with does not have verification enabled (forms can be shared with multiple tenants, so there is no guarantee, when the form is created, which tenant the form will be used with).
- If the user.phoneNumber field is optional and the user chooses not to enter a value, then verification steps for those fields will be skipped.
- When registration is being completed for an existing user, to an application, verification steps are skipped because they only apply to new users. For existing users, see Gate Users Until They Verify Their Phone Number for more details.
Troubleshooting#
- No SMS received
- Verify the Twilio messenger is selected for Phone in Tenants -> Identities under Messaging settings .
- In Settings -> Messengers , confirm your Twilio credentials (Account SID, Auth Token) are correct and you have a valid From Number or Messaging Service SID.
- Check Twilio message logs for delivery errors (for example, invalid phone number, geo-permissions, or carrier filtering).
- Ensure the destination number is in E.164 format and that your sender (number or service) is SMS-enabled for the destination country.
- Verification step is missing on the form
- In Tenants -> Identities , confirm Verify identity is enabled for Phone .
- In Customizations -> Form Fields , confirm the field key is exactly user.phoneNumber and it is marked Required .
- In Customizations -> Forms , ensure the form includes the Phone Verification step between the phone number field step and the password step.
- In Applications -> Registration , confirm Registration type is
Advancedand the correct form is selected. - The verification step only runs for new users. If you are registering an existing user to an additional application, the step will be skipped.
- Code not accepted or expired
- Verification codes expire after a period of time. Request a new code and complete verification promptly.
- Avoid requesting too many codes in a short time; carriers and Twilio may rate-limit or filter repeated messages.
- Users are not Gated with an unverified phone.
- Identity pre-verification happens before user creation. Phone registration gating (post-creation) is a separate feature. See Gate Accounts Until User Phone Verified.
- Local testing tips
- When testing with a Twilio trial account, add your recipient numbers as verified callers in Twilio. For production testing, use a paid account and numbers that are SMS-enabled for your target countries.
How To Use Pre-Verification APIs#
You can perform identity pre-verification entirely via API when you are not using hosted pages with Advanced Registration Forms.
After you have completed identity verification, create the user by calling one of the following APIs and include the corresponding verificationIds from the Start Identity Verification for the verified identity:
Follow the Identity Pre-Verification Via API tutorial for more details.
Next Steps#
Now that you've successfully set up phone identity pre-verification, take the next steps to fully integrate this functionality into your application:
- Discover how to modify your theme to make the phone verification pages look like your application.
- Learn more about email/message templates and how to customize them.