Migrate From Akamai
This document will help you migrate users from Akamai to FusionAuth.
This guide is a low-level, technical tutorial focusing on calling APIs and preparing data when migrating users from Akamai. To understand how to plan a migration at a higher level, please read the FusionAuth migration guide.
Prerequisites#
To follow this tutorial, you need Docker.
Planning Considerations#
Akamai (previously Janrain) and FusionAuth have different words for the same concepts:
- Applications (for example, a website or mobile app) are called applications in FusionAuth and properties in Akamai. In Akamai, properties can have multiple clients for authentication (such as a login client and an administration client), which are used as API keys (called client Ids and secrets).
- User records are called users in FusionAuth and called profiles or entities in Akamai. Profiles are stored in an entity type, also called a schema. The default schema is called user.
- In Akamai, a registration flow is called a form. Every application has a flow called
standardto start with. Flows will be used to create example users for export testing in this guide.
Obtaining User Data#
Akamai and FusionAuth both support links to images (e.g. user profile photos), stored as URLs to files hosted on cloud storage. After migration, check that your photo storage host is still usable.
When you are migrating from another provider, you can do a bulk or slow migration.
Bulk Migration#
Bulk migration lets you import users at one point in time, making for a clean cutover. You can import password hashes, including hashes performed with a custom, non-standard algorithm, making a migration seamless to your users. Since 1.68.0, recovery codes included in the import are also hashed during import. For large imports containing users with recovery codes, this will increase import time. To avoid this, pre-hash recovery codes before import and provide twoFactor.recoveryCodeEncryptionScheme and twoFactor.recoveryCodeWorkFactor. You use the User Import API to perform this. You can also import refresh tokens, which helps if you want your users to be able to refresh access tokens transparently. When using the User Import API the recommended batch size per request is dependent on deployment scale (note: 100,000 users per request is a reasonable batch size for a production capable deployment). After completing a migration you should reindex of the Elasticsearch database as well.
A bulk migration is a good choice when you:
- want to migrate users all at once
- are migrating into a new FusionAuth instance
- have access to password hashes from a previous auth system
Slow Migration#
With a slow migration, you move users one at a time, when they log in. You keep the other system running and set up a connection between them. This means you don't have to have access to the underlying password hashes or other user information. With FusionAuth, you implement a slow migration using Connectors.
A slow migration is a good choice when you:
- don't have access to password hashes or other data from a previous auth system
- are okay running two different auth systems for a while
Migration Options in Akamai#
Here is how a bulk migration process might work:
- Export all user data from the Akamai API.
- Convert the user data into FusionAuth-compatible objects and import the data into FusionAuth.
Instead, if you are willing to perform a slow migration, also known as a gradual or online migration, you can allow your users to log in to Akamai via FusionAuth, and have FusionAuth transparently migrate their data. Slow migrations in FusionAuth use Connectors, a paid feature.
A slow migration would look like this:
- Export all user data from the Akamai API.
- Configure a FusionAuth Connector to call an intermediary web service whenever a user logs in.
- Write the intermediary web service that will call Akamai with the user's credentials and save the password to FusionAuth.
- Once you have migrated a large enough portion of your users, you can switch off the Connector and cancel your Akamai subscription.
This tutorial will cover all the bulk- and slow-migration steps.
Mapping User Attributes#
The attributes of the User object in FusionAuth are well documented.
If there is an attribute in your Akamai user which cannot be directly mapped to a FusionAuth attribute, you can place it in the user.data field. This field can store arbitrary JSON values and will be indexed and searchable.
Social Logins#
Akamai also provides integrations with other social login providers such as Twitter, Google or Facebook. Review the supported FusionAuth Identity Providers to ensure your social providers are supported.
If not supported explicitly, a provider may work with an OIDC or SAML connection. Otherwise, please open a feature request.
Migrating users with social logins such as Apple or Facebook requires that you have an existing user Id for that provider. What this unique user Id looks like depends on the particular social identity provider. The unique Id may be an email address, an integer, UUID, or a random string.
Configure the appropriate FusionAuth Identity Provider with the same values (client_id, etc) as the original user management system you are migrating away from.
Import users with the Import API, assigning each user with a social login a random password such as a UUID.
Your next step depends on whether the social login provider's unique identifier is available as part of your migration data. If you have the social login provider's unique identifier, for each user, use the Link API to create a link with the appropriate User Id, Identity Provider Id, and Identity Provider User Id.
- The User Id is the Id of the recently created FusionAuth User.
- The Identity Provider Id is found on the corresponding Identity Provider API documentation. Look for identityProvider.id.
- The Identity Provider User Id is the existing social provider user identifier exported or otherwise extracted from the original system.
You do not need to migrate the social network token, which may or may not be accessible. During the first login of a newly migrated user, FusionAuth finds the unique user in the social login provider based on the migrated Identity Provider User Id, and completes the login. During this process, FusionAuth stores a token on the Link, if the social provider returns one. Depending on the configuration of the social provider, users may see a prompt asking if they want to allow FusionAuth to have access to user data such as email address.
IdP linking strategies have been available since version 1.28.0. Before that version, users were linked on email.
If you do not have the social login provider's identifier, you need to decide if you want to transparently link the two accounts, which is easier for the end user, or if you want to ask the user to manually link the accounts, which is more accurate, but may be confusing.
To transparently link the accounts, choose a linking strategy of Link On Email or Link On Username, which will create the user if they don't exist. However, if the user has an email address at their social provider which differs from the email address that was used to sign up for your application and which you imported to FusionAuth, then two accounts will be created.
For example, if the user has a Google account richard@gmail.com, but signed up for your application with richard@fusionauth.io, then if you use the Link On Email strategy, two different accounts will be created, since FusionAuth is trying to match on email address and they don't. The same holds true for usernames with the Link on Username strategy.
To prompt the user to link the accounts, choose a linking strategy of Pending, which will prompt the end user to sign into FusionAuth after they sign into the social provider, authoritatively linking the two accounts.
Here's more information about IdP Linking Strategies.
Apple only returns a user's full name the first time the user logs in. Since you have users who have already used Apple to log in to your previous authentication gateway, Apple will not provide the user's name when they log in to FusionAuth now. The only solution is to import the user's name manually from your previous database into FusionAuth.
Other Entities#
There are often other important entities, such as connections or roles, that need to be migrated. There are usually fewer of these, so an automated migration may not make sense, but plan to move this configuration somehow.
Be aware that functionality may not be the same between Akamai and FusionAuth. This is different from user data; as long as you can somehow migrate a login identifier (a username or email) and a password hash, a user will be authenticated and successfully migrated. You can download FusionAuth before you begin a migration and build a proof of concept to learn more about the differences.
A partial list of what may need to be migrated for your application to work properly includes the following:
- In Akamai, a role is a string that can be assigned to a user. FusionAuth has roles that are configured on an application-by-application basis and made available in a token after successful authentication.
- With Akamai, you can use schemas to separate users to manage access to clients. FusionAuth has Groups.
Identifiers#
When creating an object with the FusionAuth API, you can specify the Id. It must be a UUID.
This works for users, applications, and tenants, among others.
Akamai User Structure#
Akamai has customers (that's you) called Registration Applications. As mentioned earlier, a Registration Application has properties (which are Applications in FusionAuth terminology). A Registration Application also has schemas, which contain users.
In FusionAuth, an instance can contain multiple applications and multiple users. Users can be organized into groups, but don't need to be. Users can belong to multiple applications.
Permissions work slightly differently in the two systems. FusionAuth allows the creation of roles and those roles can be assigned to users. However, Akamai has only roles, which are strings.
Bulk Migration#
This section walks you through migrating all users from Akamai to FusionAuth in one batch.
Export User Data From Akamai#
In this section, you export your Akamai users with the API.
- Clone or download the GitHub repository at https://github.com/fusionauth/fusionauth-import-scripts.
This repository has a directory called akamai. It contains JavaScript files to import users, as well as sample data.
- Clone or download the GitHub repository at https://github.com/fusionauth/fusionauth-example-docker-compose.
This repository has a Docker compose file to start a local instance of FusionAuth.
-
Log in to your Akamai account at https://console.janrain.com.
-
If you don't have existing users, or wish to create ones purely for testing, browse to MANAGE PROFILES -> user and click CREATE PROFILE to add some users.
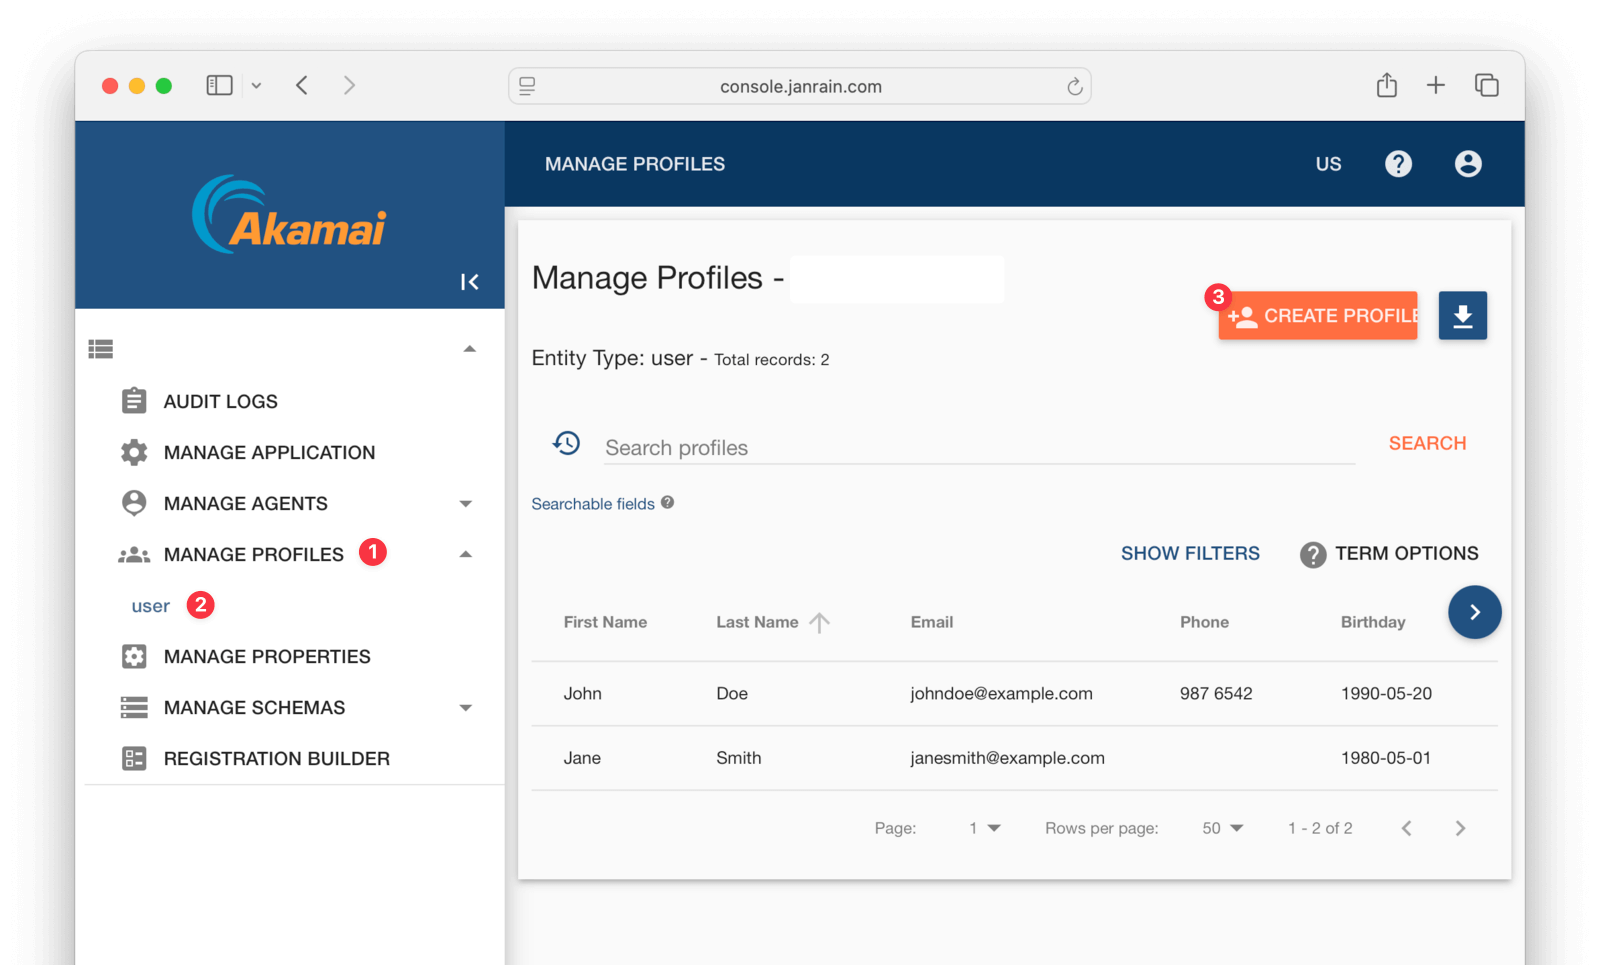
Akamai stores users in schemas. The default schema is called user, but you might have another one, like employee. If so, change references to user in any calls to Akamai for the rest of this guide.
If you want to add a lot of users, you can create each user with the API call below instead of using the console. You need to replace the parameters in the request with your own URL, client Id, and flow version. You can find these in the console under MANAGE PROPERTIES .
curl -X POST \
https://test-env.us-dev.janraincapture.com/oauth/register_native_traditional \
	-H 'Content-Type: application/x-www-form-urlencoded' \
	-d 'client_id=955jnefgf8mzdmjugdmy55tc2j9' \
	-d 'redirect_uri=http://localhost/redirect' \
	-d 'response_type=code' \
	-d 'flow=standard' \
	-d 'flow_version=20250503165259394537' \
	-d 'locale=en-US' \
	-d 'form=traditionalRegistrationForm' \
	-d 'displayName=Jane' \
	-d 'firstName=Jane' \
	-d 'lastName=Smith' \
	-d 'emailAddress=janesmith@example.com' \
	-d 'newPassword=p@ssw0rd3xamp!e' \
	-d 'newPasswordConfirm=p@ssw0rd3xamp!e'
To learn what properties a user can have, look at the user schema file in the downloaded repository, in the akamai/exampleData/1_akamaiExport directory.
You can export your own schema from the MANAGE SCHEMAS page.
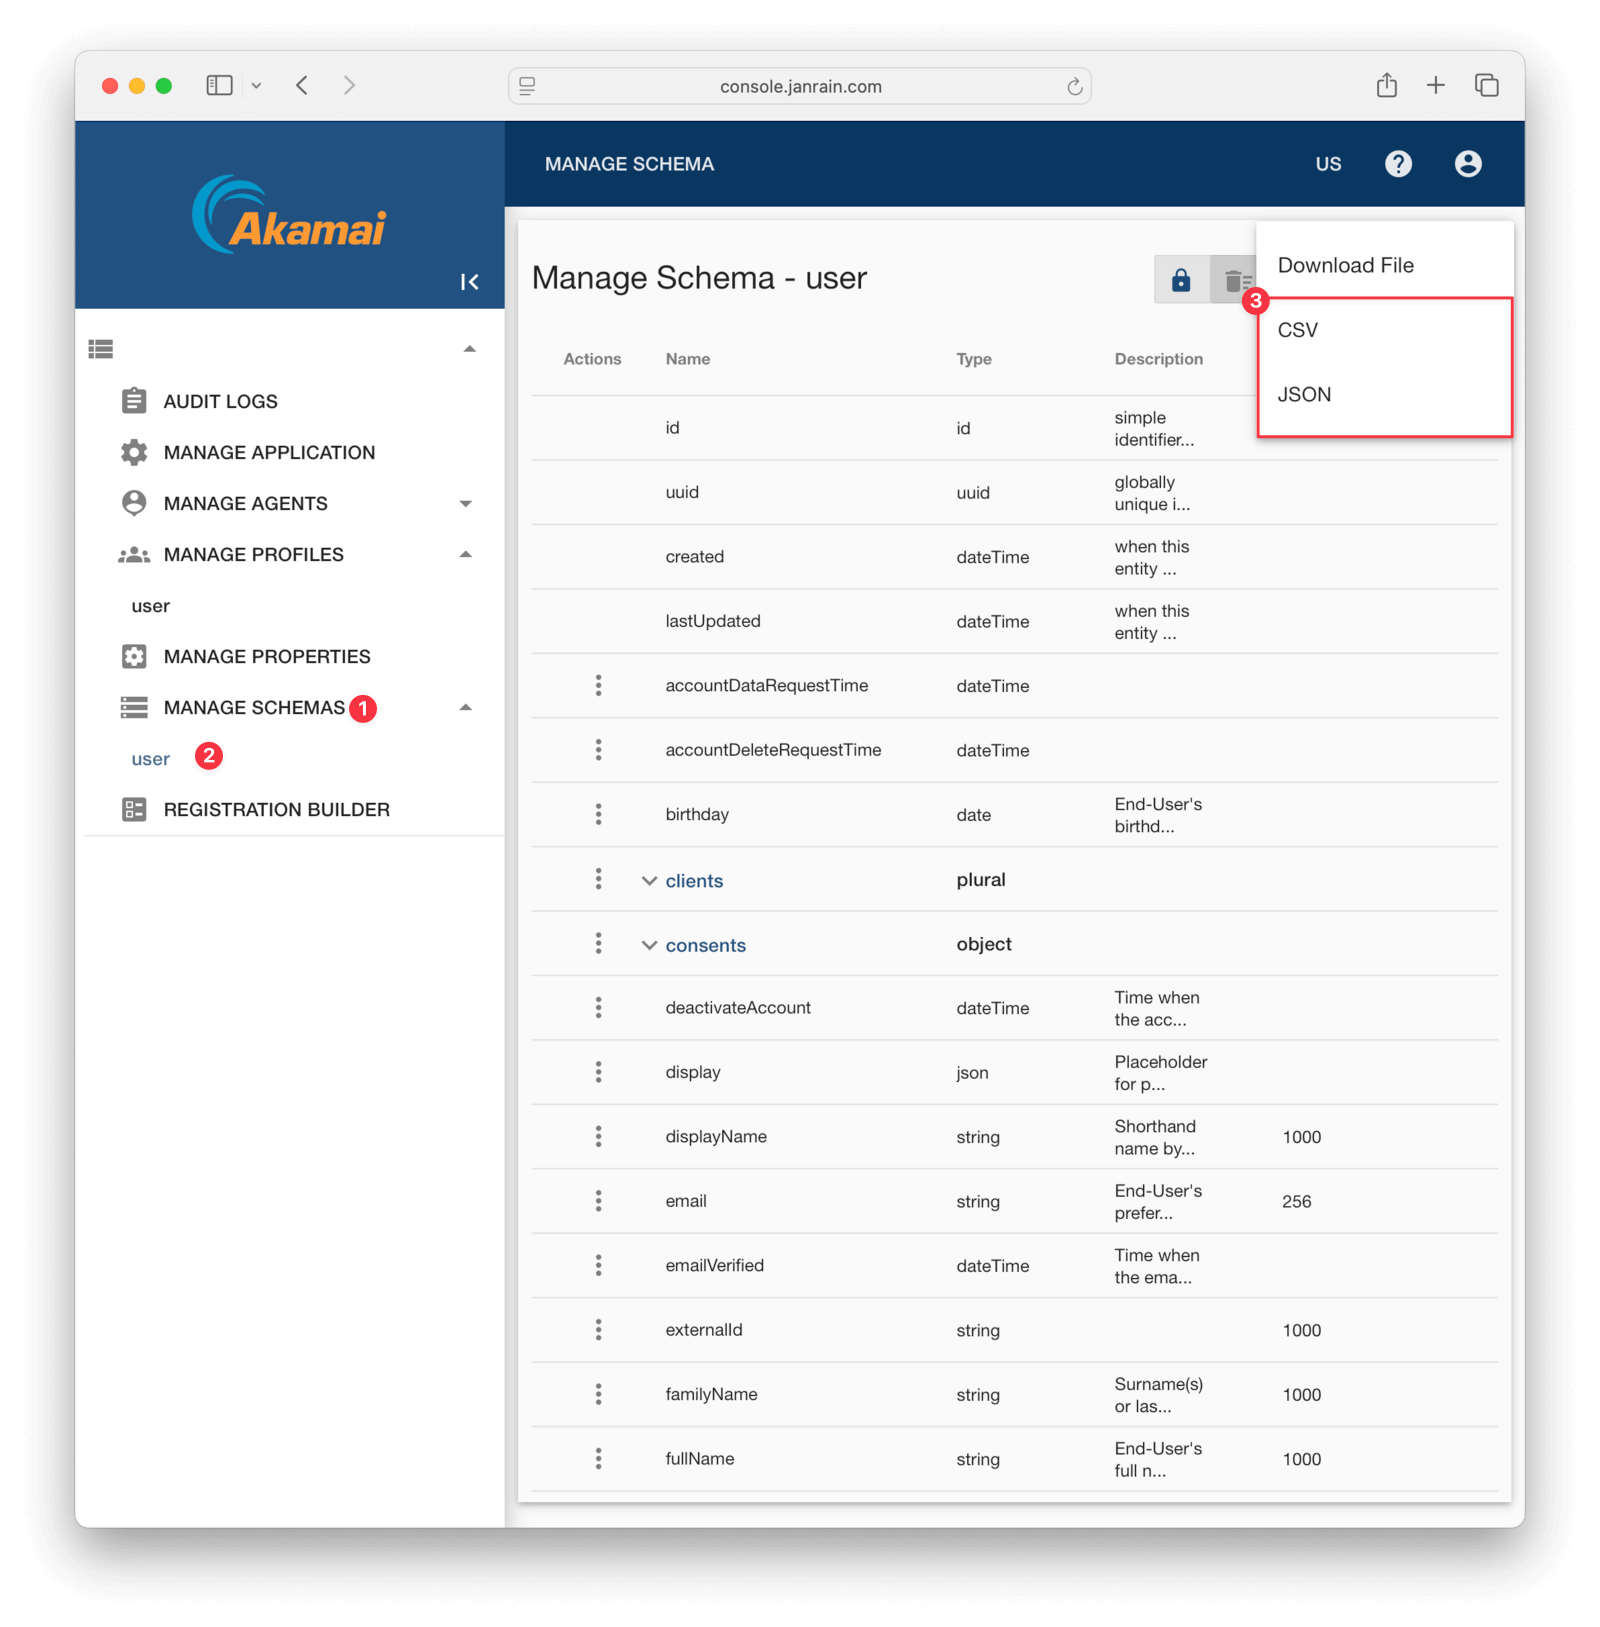
While you can export users from the Akamai web interface, it does not export all properties unless you modify the search setting. The problem is the setting documentation does not explain how to get lists of values for a user – like addresses and clients. It is therefore simpler to use the API to get all information for a user, and this is what you'll do in this tutorial.
To access the API, you need an API key.
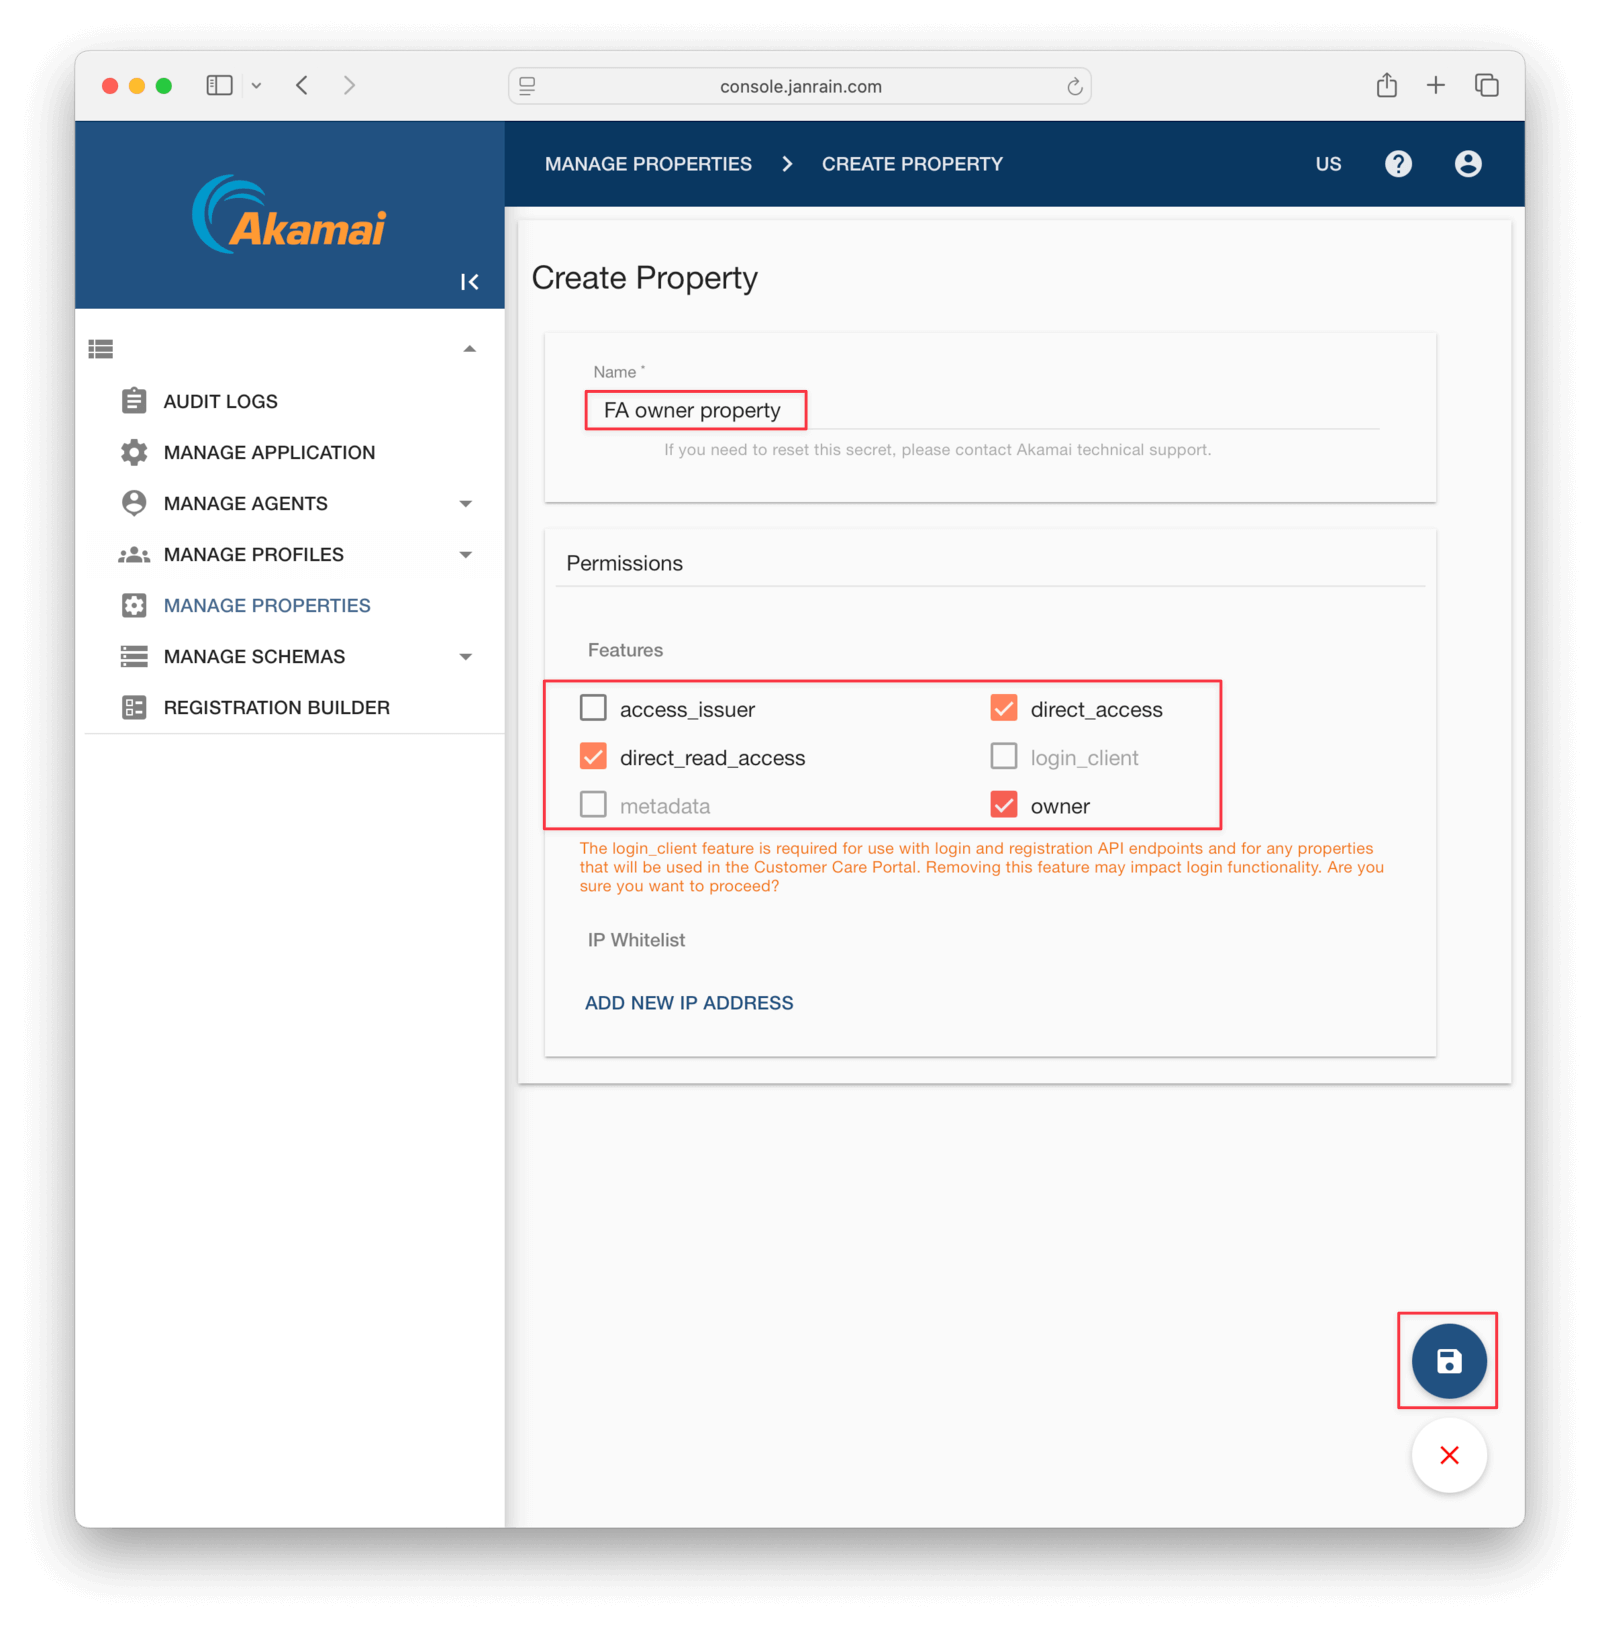
- Browse to MANAGE PROPERTIES in the sidebar and click CREATE PROPERTY .
- Give the property any name.
- For permissions, disable
login_clientand enableowner,direct_read_access, anddirect_access. - Save using the floppy disk icon at the bottom right.
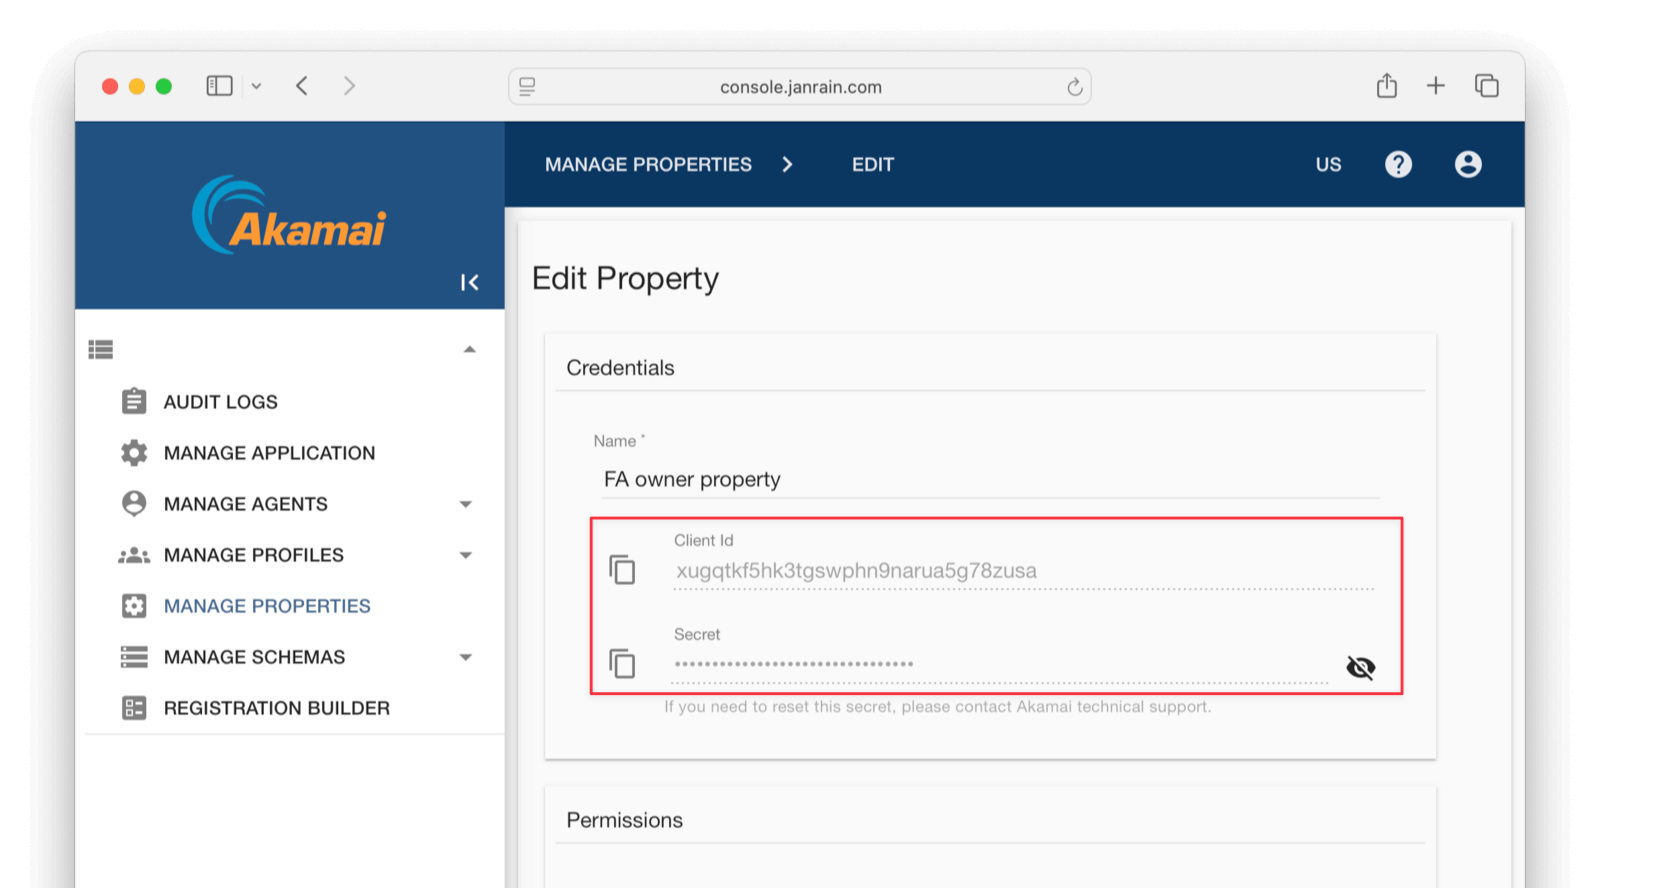
- Edit the property and note the client Id and secret values.
You're now done working with the Akamai console and have sample user data to test an export.
Export The Users With The API#
Open a terminal and run the code below to extract all your Akamai users to the users.json file. Replace the start of the URL with your own, which you can get on the MANAGE APPLICATION page, and use your client Id and secret from your property.
cd fusionauth-import-scripts/akamai/src

curl -X POST https://test-env.us-dev.janraincapture.com/entity.find \
  -u 'clientid:secret' \
  -d type_name=user \
  -d timeout=60 \
> users.json
If you get the error "error_description":"the provided client does not have authorization for this action", go back to the property in the console and add more permissions. If your schema is not called user, change it in the type_name parameter in the request.
If you have a large number of users, you might have to partition your extract requests. You can use filters to separate users into groups, for example, -d filter="gender='male'"
The users file should look like the abridged results below. Note that lists, like clients and roles, are kept in arrays, and the user's password hash is returned in the password sub-property using bcrypt.
{
  "result_count": 2,
  "results": [
    {
      "accountDataRequestTime": null,
      "accountDeleteRequestTime": null,
      "birthday": "1980-05-01",
      "clients": [
        {
          "clientId": "9a55jnetfgjf8mzdmjbugdmyr55tc2j9",
          "firstLogin": "2025-05-08 09:35:22 +0000",
          "id": 130,
          "lastLogin": "2025-05-08 09:35:22 +0000",
          "name": null
        }
      ],
      "familyName": "Smith",
      "fullName": "Jane Smith",
      "gender": "Female",
      "id": 129,
      "password": {
        "created": "2025-05-08 09:35:22.555420794 +0000",
        "type": "password-bcrypt",
        "value": "$2b$10$fGr0/0QnnDkv9VG0BtyaiOj9Fb5rNQTXkrCcidzQqR061kc6e5VBu"
      },
To see a complete users sample, look at akamai/exampleData/1_akamaiExport/users.json.
Create Roles For Your Users#
Next, you're going to start FusionAuth and import the roles your users have, so they are ready for the full import.
- Open a new terminal in the
fusionauth-example-docker-composedirectory and run the commands below to start FusionAuth.
cd light
docker compose up
After the containers are ready, FusionAuth will be running and accessible at http://localhost:9011. You can log in to the FusionAuth admin UI with admin@example.com and password. The container is called fa.
This configuration uses a bootstrapping feature of FusionAuth called Kickstart, defined in light/kickstart/kickstart.json. When FusionAuth starts for the first time, it will look at the kickstart.json file and configure FusionAuth to the specified state. In summary, the defined Kickstart sets up an API Key, an admin user to log in with, and a test application in FusionAuth.
- Back in the original terminal in the
fusionauth-import-scripts/akamai/srcdirectory, run the command below to import your user roles fromusers.json.
docker run --init  -it --rm --name "app" -v ".:/app" -w "/app" node:24.0.1-alpine3.21 sh -c  "npm install";
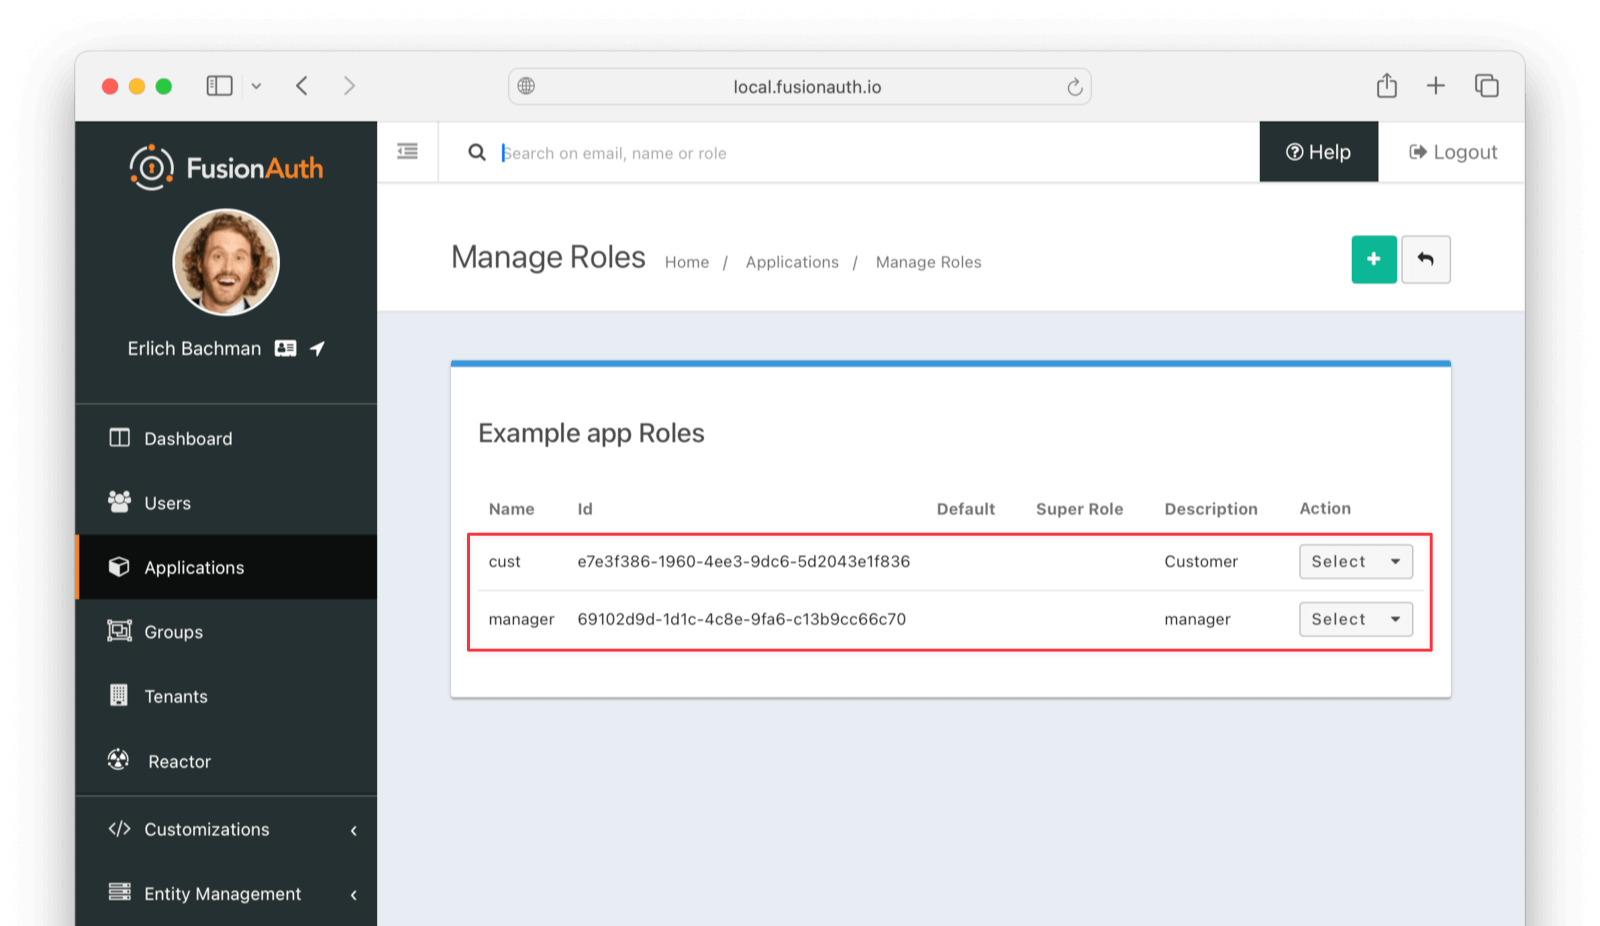
docker run --init -it --rm --name "app" -v ".:/app" -w "/app" --network faNetwork node:24.0.1-alpine3.21 sh -c "node 1_addRoles.mjs";- Check that the roles have been imported by browsing to http://localhost:9011/admin/application/manage-roles?applicationId=e9fdb985-9173-4e01-9d73-ac2d60d1dc8e.
If you don't have your own users.json file, copy the sample from exampleData/1_akamaiExport/users.json to src/.
The code in src/1_addRoles.mjs loops through every user and every role, and creates a random UUID for each role. It sends the roles and UUIDs to FusionAuth using the API key created in fusionauthDocker/kickstart/kickstart.json. When running this code against your real FusionAuth instance, alter the constants at the top of the file to use your URL and API key.
Note that both FusionAuth and the JavaScript files in this guide must use the same network, so that the JavaScript container has access to the FusionAuth container. In the Docker Compose file, that network is called faNetwork.
Prepare Users For Import To FusionAuth#
The next script, src/2_convertUserToFaUser.mjs, is the most complex. It maps the fields of users.json to FusionAuth fields. You may wish to alter this script to change which fields are ignored, or where they are mapped. For more information on the FusionAuth fields, see the import API documentation. For more information on the Akamai fields, see the user schema file in the exampleData/1_akamaiExport/userSchema.js.
The script will output users that are ready for import to FusionAuth to the faUsers.json file.
To run the script, use the command below in the terminal you have open in the src directory.
docker run --init -it --rm --name "app" -v ".:/app" -w "/app" node:24.0.1-alpine3.21 sh -c "node 2_convertUserToFaUser.mjs";The script uses stream-json, a JSON library that can incrementally read massive files with millions of users. It opens the users.json file for reading in the line new Chain([fs.createReadStream(inputFilename ), Pick.withParser({filter: 'results'}), new StreamArray()]);, and ignores top-level properties other than the results array of Akamai users. For more information, see the stream-json GitHub repository.
The processUsers() function calls getFaUserFromUser() to map the Akamai user to FusionAuth, and then saves the user to faUsers.json.
The getFaUserFromUser() function does a few things:
- Maps as many matching fields from Akamai to FusionAuth as possible.
- Extracts the bcrypt password strength (10), the salt, and hash from the Akamai password field.
- Stores all Akamai user details that don't map to FusionAuth in the JSON data field.
- Adds FusionAuth User Registrations (the link between a FusionAuth User and an Application) to users.
bcrypt stores all password components in one field, separated by $. However, FusionAuth requires these values to be provided as separate fields during import.
You will need to change the User Registrations Ids to match those of your application when doing a real migration. The roles here were imported into FusionAuth in the first script, and are matched on the value field.
Carefully read the getFaUserFromUser() function and make sure that the user information you need is imported correctly. If any information is not needed, you can comment out the related lines.
If you are uncertain about what a user attribute in FusionAuth does, read more in the user guide, as linked in the general migration guide previously recommended.
Save The User Details To FusionAuth#
Now you'll run the Node.js import script to import the users into FusionAuth.
In the terminal in the fusionauth-import-scripts/akamai/src directory, run the command below.
docker run --init -it --rm --name "app" -v ".:/app" -w "/app" --network faNetwork node:24.0.1-alpine3.21 sh -c "node 3_import.mjs";The script imports users individually. If this is too slow when running the production migration, wrap the importUsers() FusionAuth SDK call in a loop that bundles users in batches of 1,000.
If you experience an error running the script on your own users, you'll need to debug. Take the example data that works from exampleData/2_faImport/faUsers.json, and gradually swap out each field in that file for a field from a user in your file that fails import. This will show you which of your fields is problematic and needs adjustment.
Verify The Import#
Log in to the FusionAuth admin UI with admin@example.com and password password. Review the user entries for the test application to ensure the data was correctly imported.
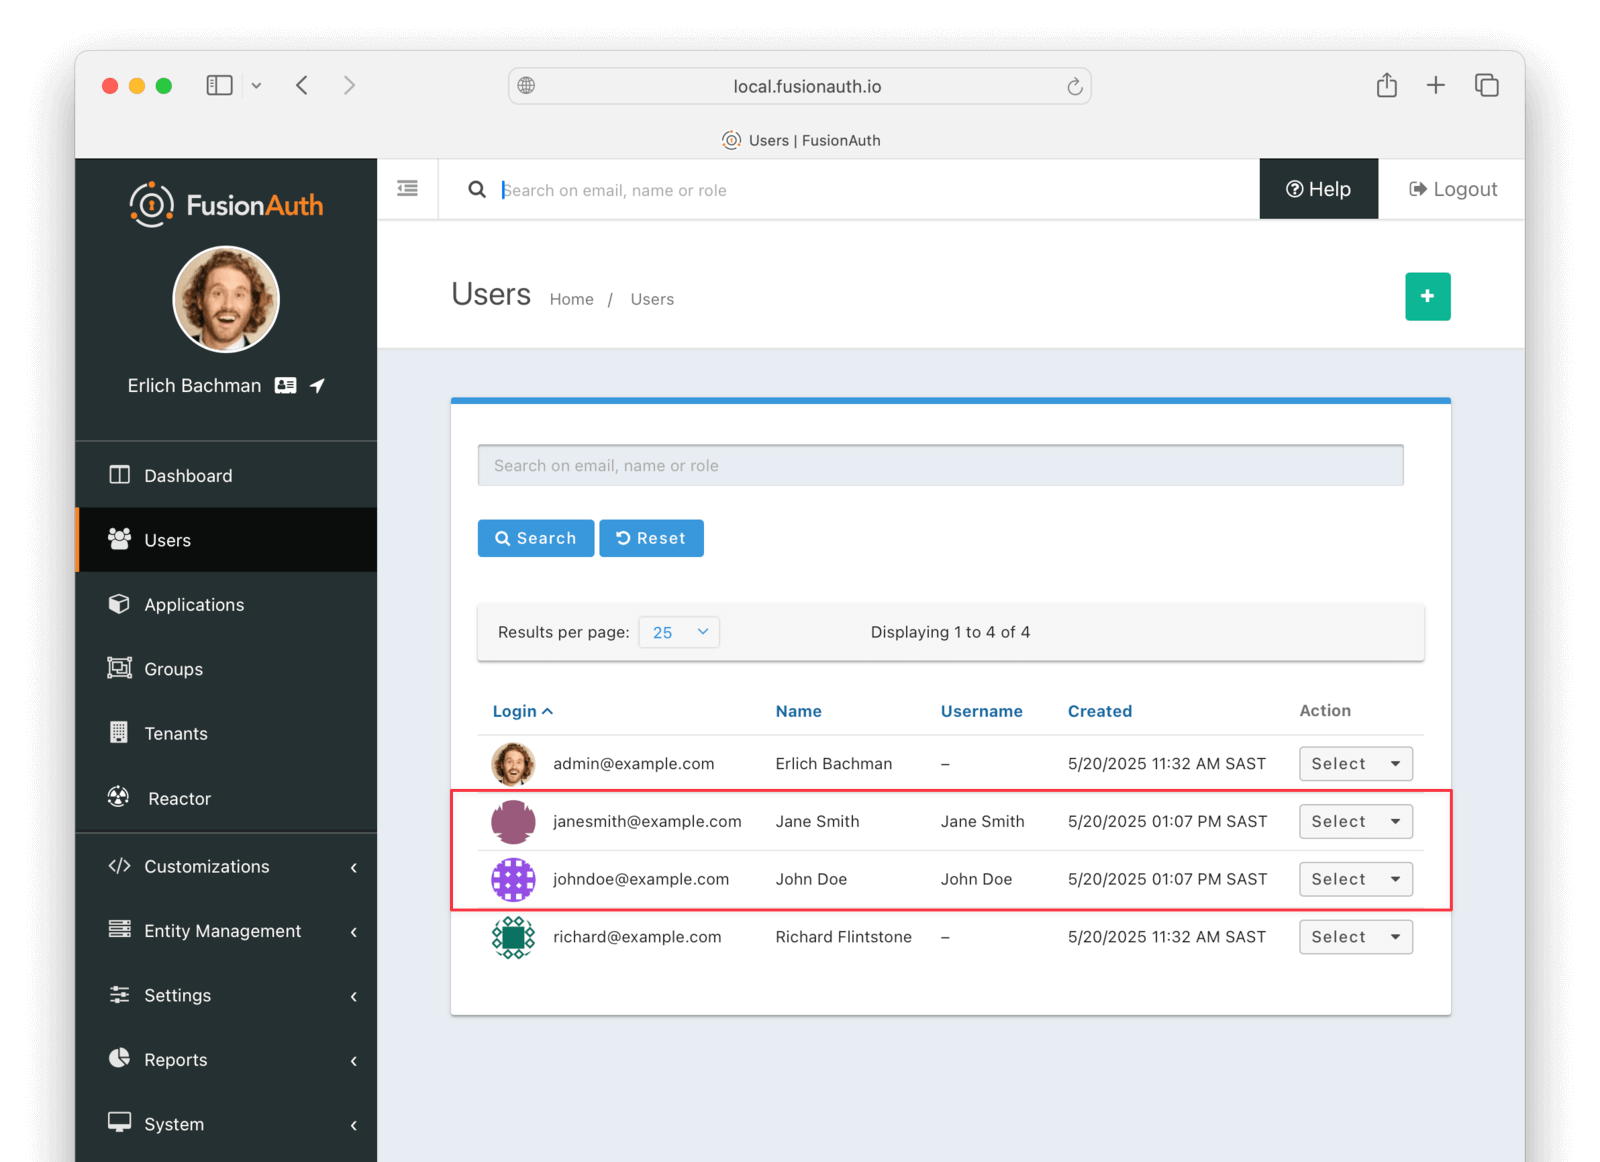
To manage a user, click Select to the right of their entry in the user list, and then select Manage from the dropdown. Review the details of the imported user's profile. In the Source tab, you can see all the user details as a JSON object.
Finally, check that passwords were correctly imported by logging out of FusionAuth and attempting to log back in with a username and password from the imported users.
Slow Migration#
This step of the tutorial is optional. In this section, you'll learn how to create a Connector for FusionAuth to import your users' passwords individually as each user logs in.
This feature is only available in paid plans. To learn more, see our pricing page.
If you don't need to do this, please skip to the What To Do Next section below.
Create A User With A Password#
To test the slow migration, you need a user in Akamai with a password you know. To create one, follow the instructions at the top of the Export User Data From Akamai section in the bulk migration tutorial above.
You can use either the console or the API request. The rest of this tutorial assumes you created a user called janesmith@example.com with the password p@ssw0rd3xamp!e.
If you did not complete the bulk migration tutorial earlier, you need to complete the first steps, which download the Git repository with the export scripts, export your Akamai users, and import their roles to FusionAuth. Follow the instructions from the Export User Data From Akamai section to the Create Roles For Your Users section.
If you did complete the bulk import tutorial, you need to delete the test user Jane from FusionAuth, so that you can import her again in this section. Browse to http://localhost:9011/admin/user, select the user Jane, and delete her.
Once you have a user available in Akamai, test if you can verify the user's email address and password with the curl command below. More information on this command is available in the Akamai documentation.
curl https://test-env.us-dev.janraincapture.com/oauth/auth_native_traditional \
     -H 'accept: application/json' \
     -H 'content-type: application/x-www-form-urlencoded' \
     -d client_id=9a55jnetfgjf8mzdmjbugdmyr55tc2j9 \
     -d flow_version=20250502165159394037 \
     -d flow=standard \
     -d locale=en-US \
     -d form=signInForm \
     -d redirect_uri=http://localhost \
     -d 'currentPassword=p@ssw0rd3xamp!e' \
     -d 'signInEmailAddress=janesmith@example.com'

# Example output:
# {"capture_user":{"accountDataRequestTime":null,"accountDeleteRequestTime":null,"birthday":"1980-05-01","clients":...},"sso_code": null, "stat": "ok", "access_token": "ksaxf732ruvsc2rw"}
Change the parameters in the command above to match your application:
- Set the request URL to your Akamai hostname found on the MANAGE APPLICATION page of your Akamai account.
- Create a
login_clientproperty (as you did anownerproperty in the Export User Data From Akamai section) by browsing to MANAGE PROPERTIES . Alternatively, use the default login property. Set the property's client Id in the command above. - Get your
flow_versionfrom MANAGE APPLICATION . - Verify that your form and field names match the defaults. If they differ, browse to REGISTRATION BUILDER and edit the
standardform to find your login form name.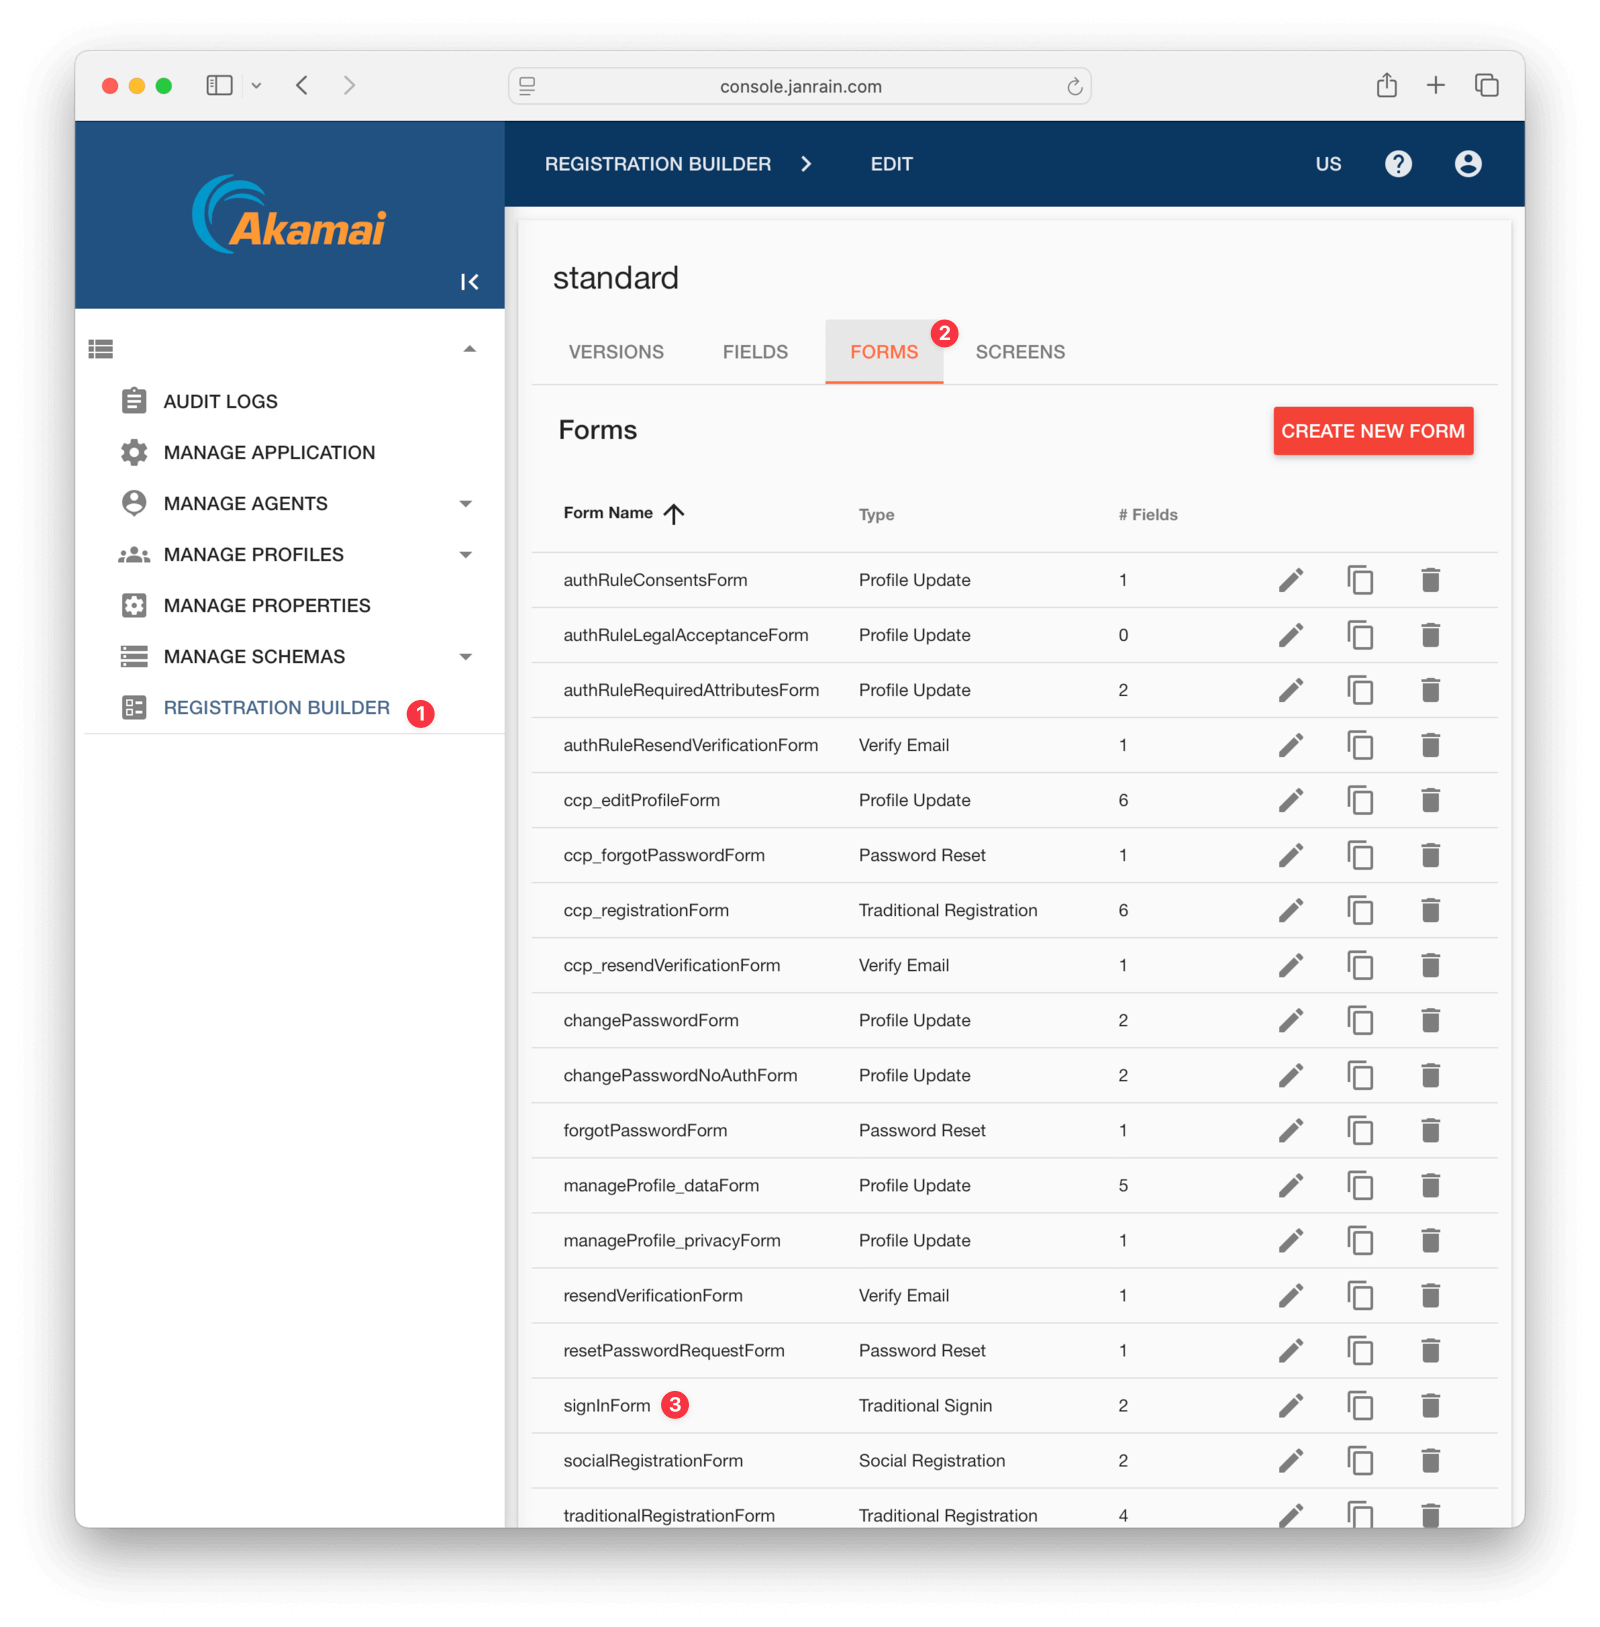
Note that the JSON response returns the user's details in the capture_user field.
Any HTTP response other than code 200 is an error. Even if the response is 200, you still need to check the stat: ok field. Akamai API error messages are very descriptive and should help you find the problem with your command quickly, for example:
{"stat":"error", "code":200, "error_description":"no such form 'sign'", "error":"invalid_argument", "request_id":"yc4qc2u8qsz27mkb"}Configure A Connector Between FusionAuth And Akamai#
This feature is only available in paid plans. To learn more, see our pricing page.
If you haven't done so already, activate your FusionAuth license by navigating to Reactor on the sidebar of the admin UI.
Now configure a FusionAuth Connector to point to an intermediary web service between FusionAuth and Akamai. The web service will expose an API endpoint that can be called from a FusionAuth Connector to retrieve the user's details to be imported into FusionAuth.
For a general overview of Connectors, please see this video.
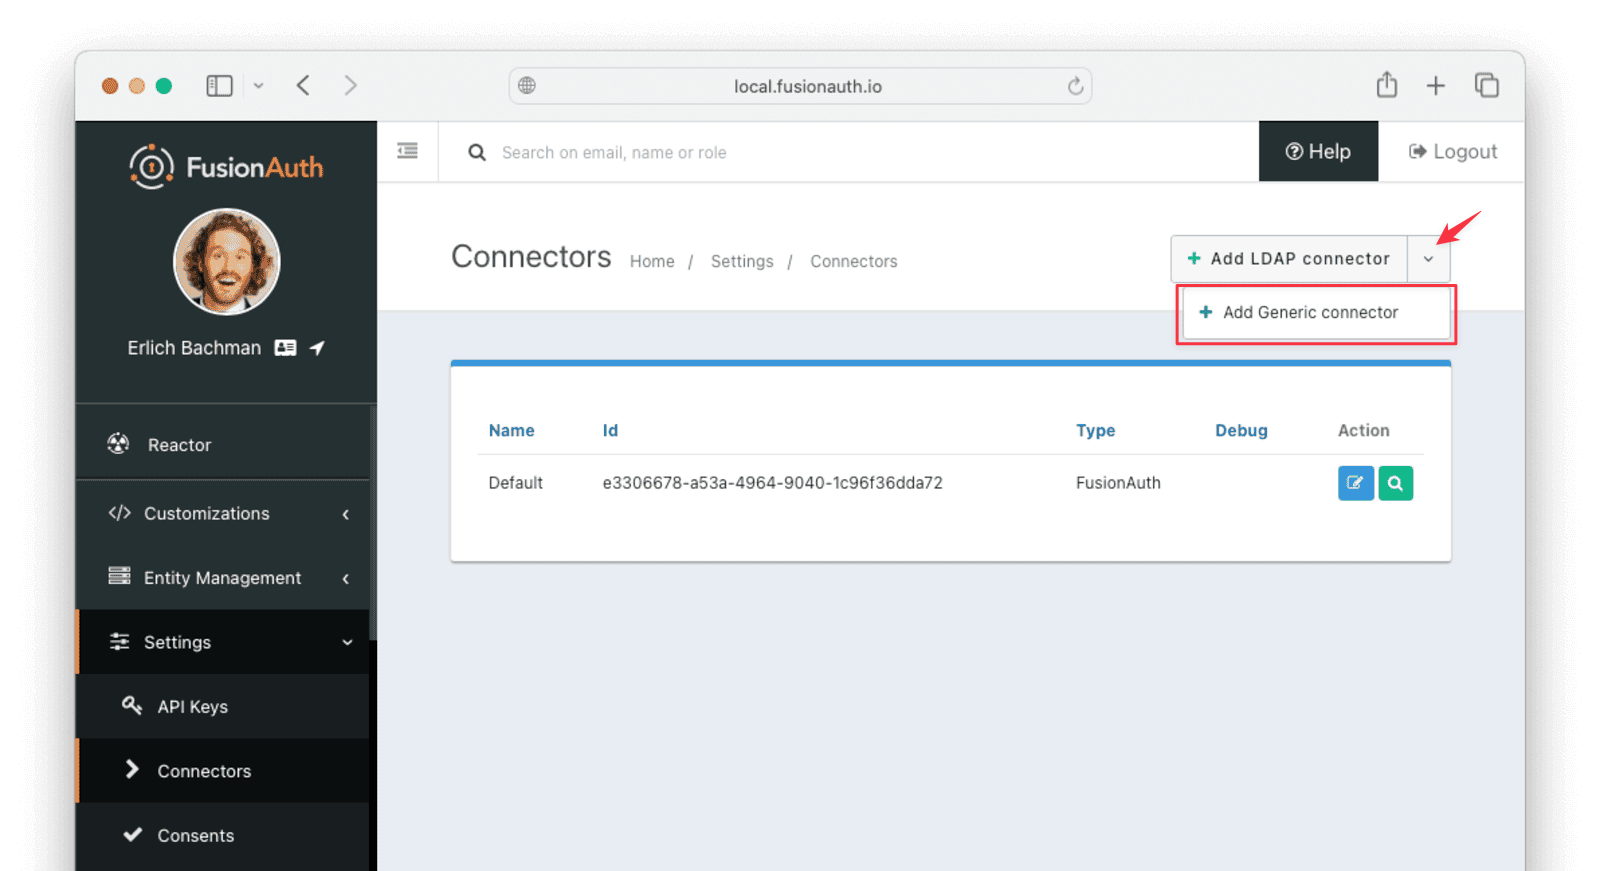
In your FusionAuth admin UI, browse to Settings -> Connectors .
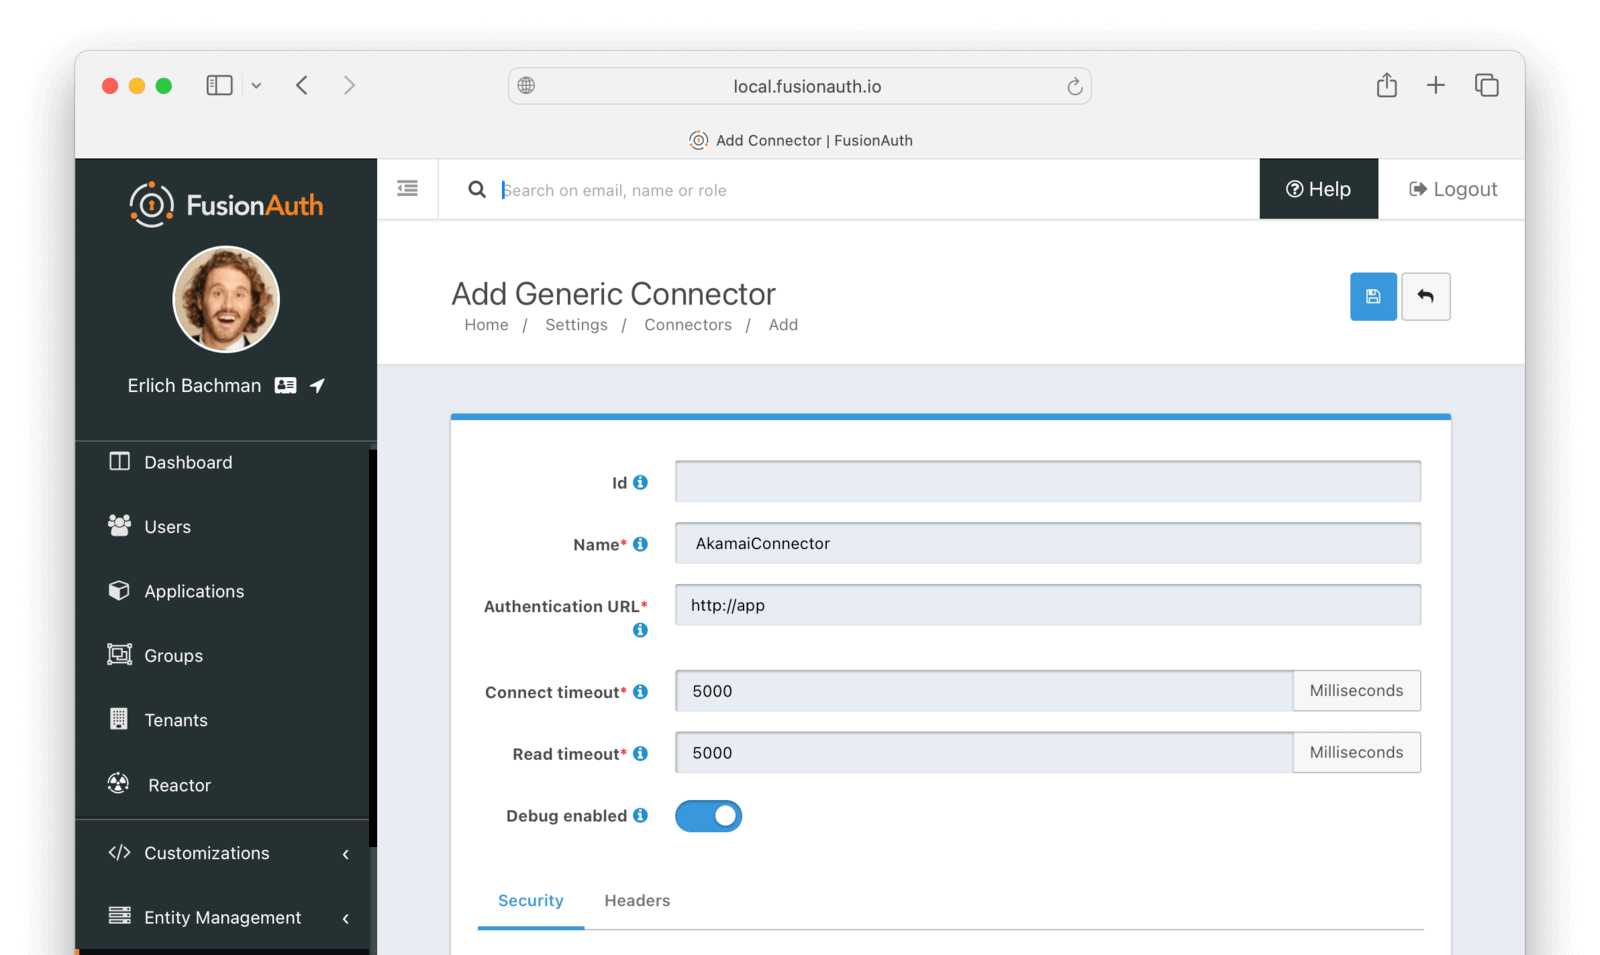
Click the dropdown button on the top right and select Add Generic connector .
Enter the field values below.
- Set Name to
AkamaiConnector - Set Authentication URL to
http://app. (This URL matches the Docker container you'll create later.) - Increase timeout values (for example, to
5000) to accommodate network latency when the API requests are being made. - Enable Enable debug logging
In production, you will want to add some authentication to the web service. You can add basic authentication using the Security tab in the Connector details page.
Now browse to Tenants and do the following.
- Select Edit on the default tenant.
- Navigate to the Connectors tab.
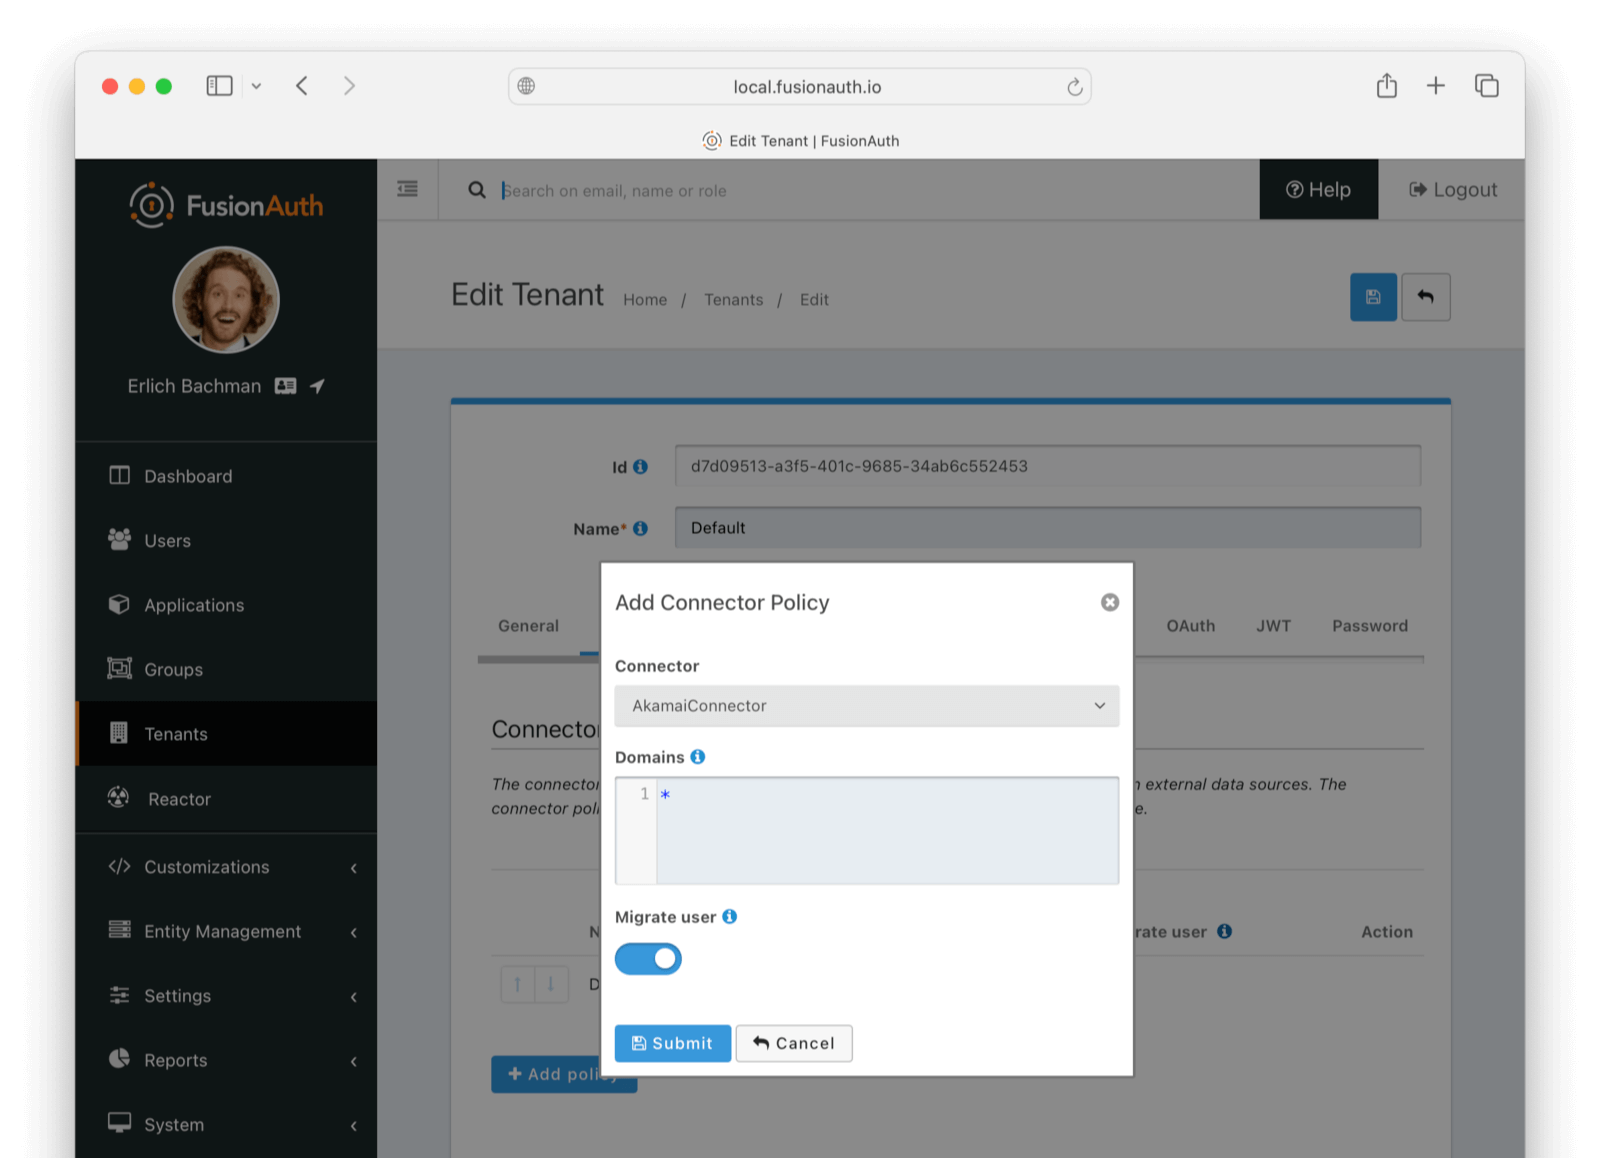
- Click Add policy .
- Select
AkamaiConnector. - Leave Domains with the value
*to apply this Connector to every user. - Enable Migrate to FusionAuth so that FusionAuth will no longer use Akamai for subsequent logins of the same user.
- Click Submit .
Move the AkamaiConnector policy to the top of the list. Use the arrow buttons to move the policy if necessary. With this configuration, all users are checked against this Connector the first time they are seen. If they log in, they’ll be migrated to the FusionAuth user database.
After configuration, the Connector entry form should look similar to this:
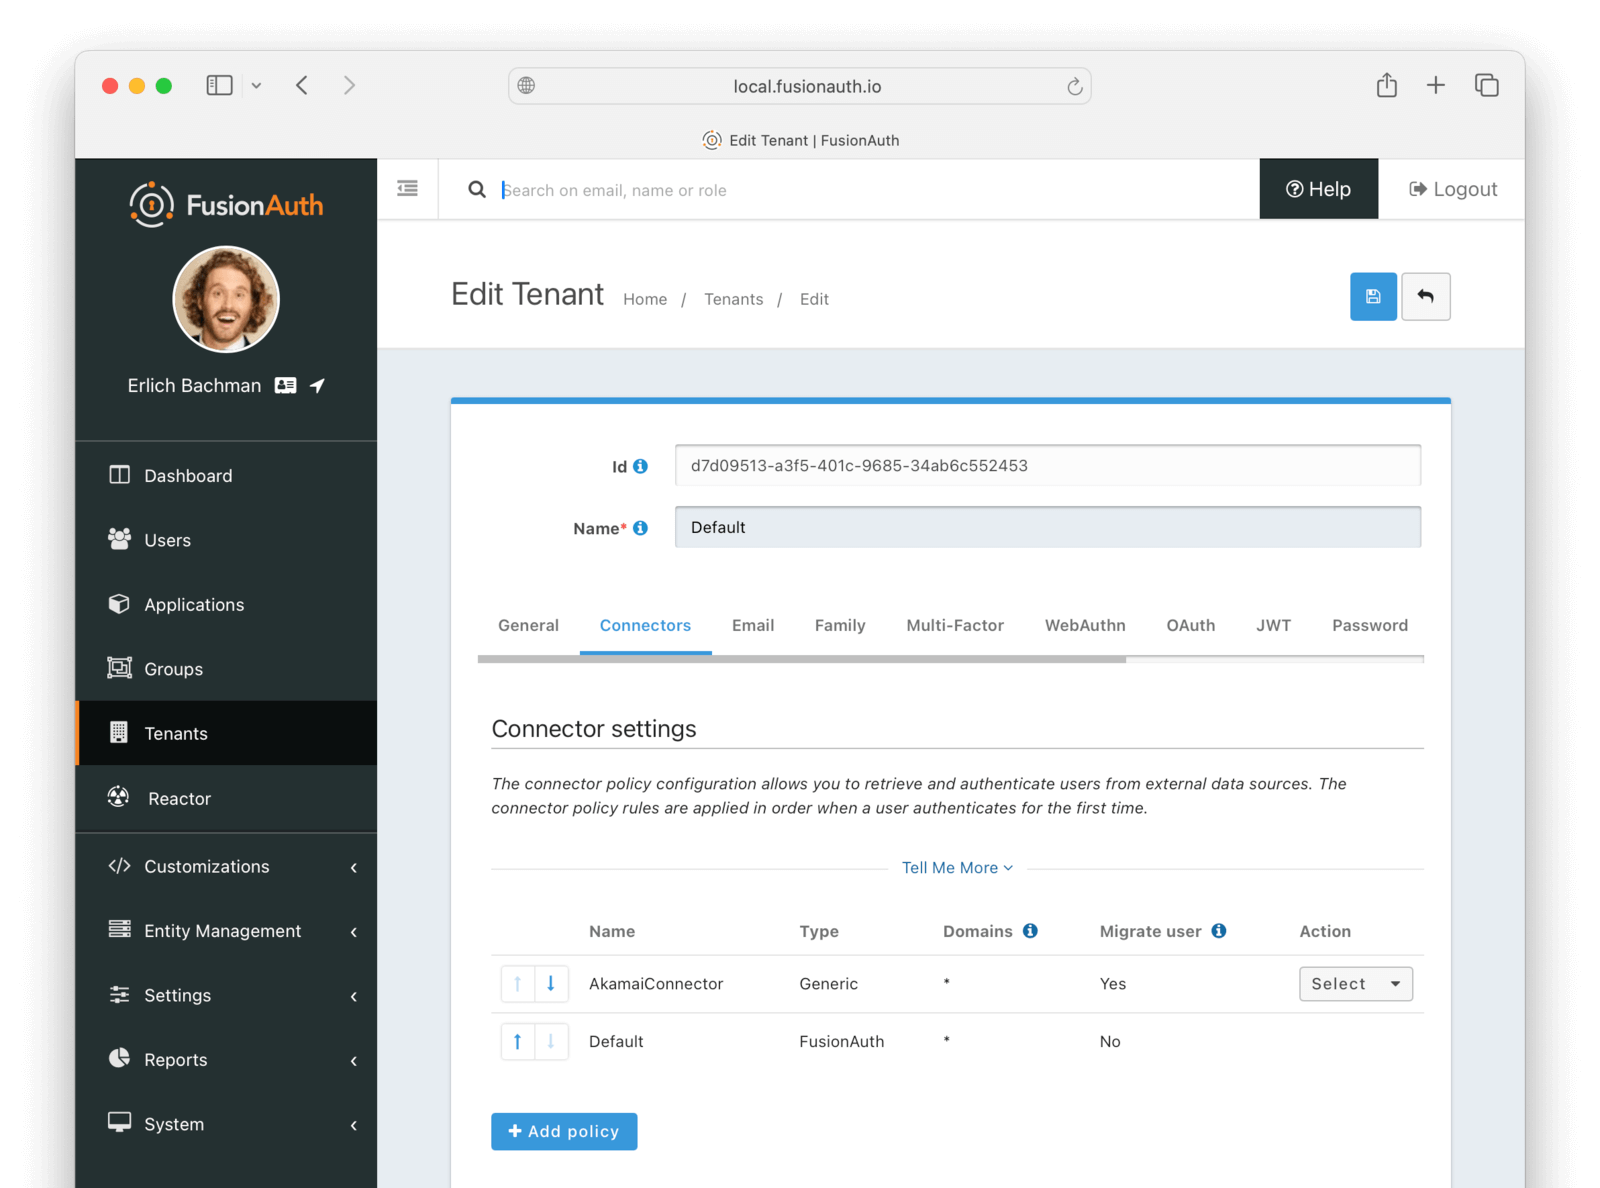
Save the changes by clicking the save icon at the top right.
Build An Authentication Intermediary Web Service#
The next step is to write the small service that forwards the user's login Id and password to Akamai and returns the user details that will be saved to FusionAuth if the login is successful.
Documentation on the inputs and outputs a Connector expects is here.
The Connector makes a POST request to the URL you specify, and expects a JSON object containing a user in return.
An example web service is in akamai/src/4_connectorService.mjs.
This JavaScript service has an Express HTTP POST handler that gets the login Id and password from the request and forwards them to Akamai by calling the following function.
await isLoginValid(email, request.body.password);- Edit the
isLoginValidfunction to set your personal Akamai details to match the curl command from the previous section, such asclient_idandflow_version.
A 404 is returned if the user login credentials are not valid.
If the credentials are valid, the user's details returned from Akamai are converted to a FusionAuth user in the function getFaUserFromUser(user). This is the same function that was used in the script 2_convertUserToFaUser.mjs, except the password is in plaintext, not a hash.
- Run the service with the command below.
docker run --init -it --rm --name "app" -v ".:/app" -w "/app" --network faNetwork node:24.0.1-alpine3.21 sh -c "node 4_connectorService.mjs";Note that the container is named app, which matches the URL entered for the connector service in FusionAuth earlier, http://app. When configuring your real import service for production, ensure both values match its new location.
Log In With A Test User#
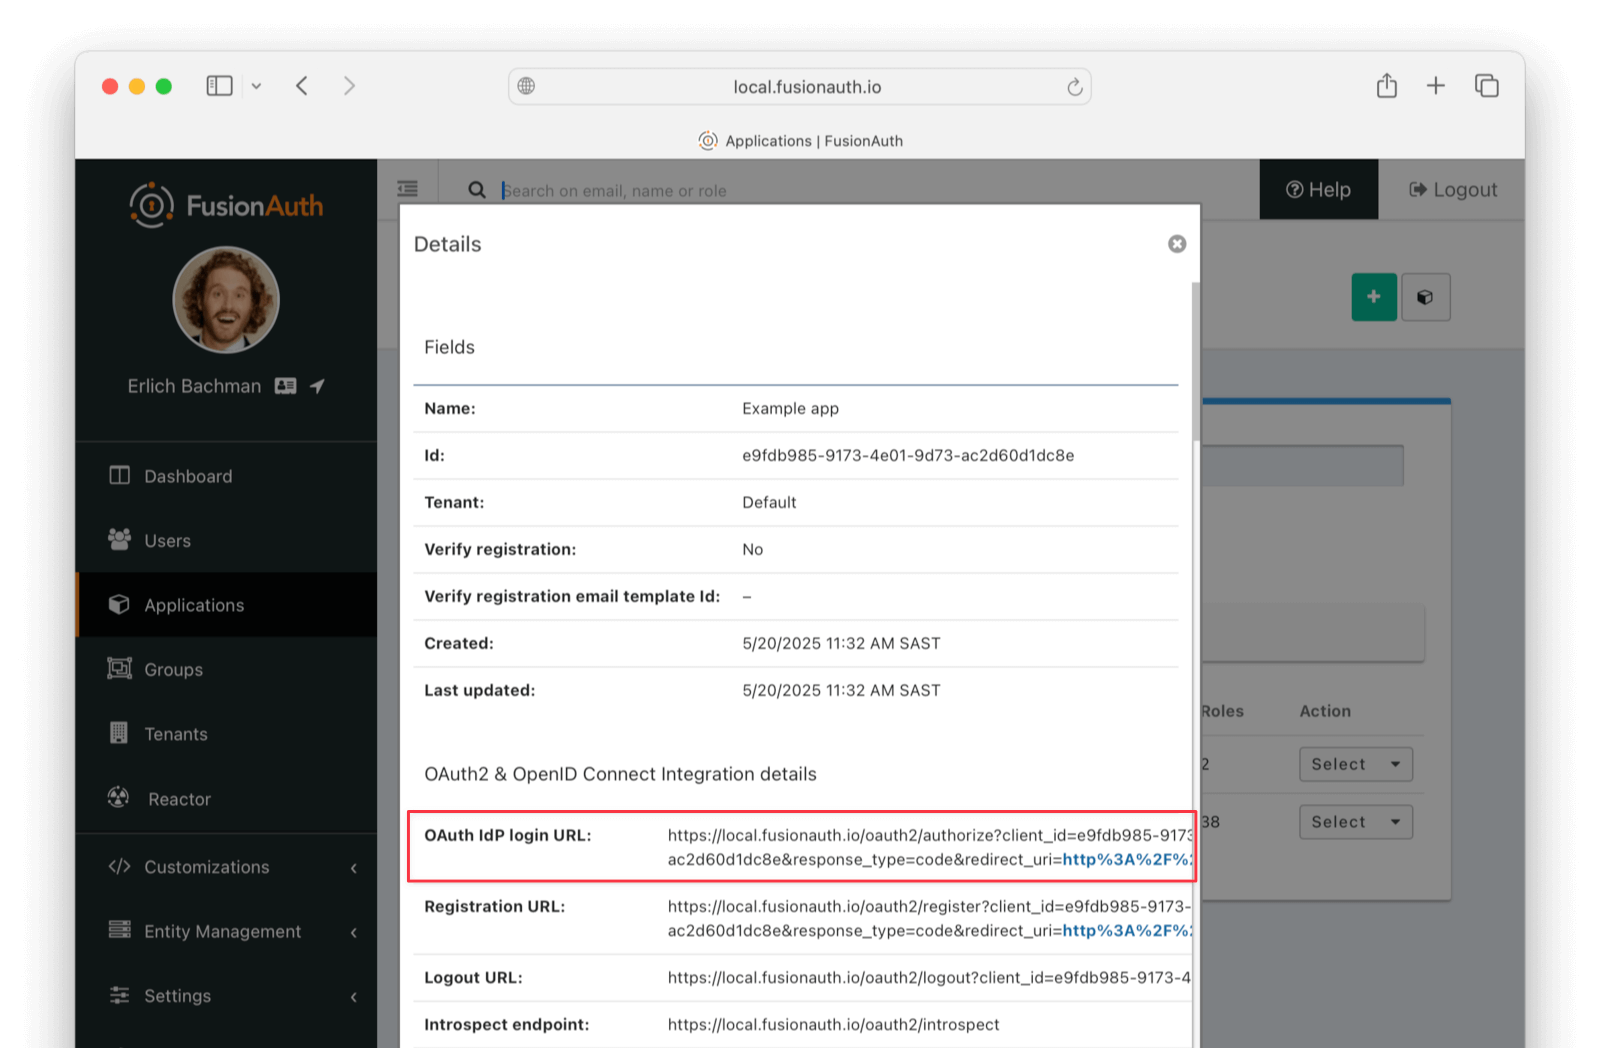
In the FusionAuth admin interface, browse to Applications and click the Select dropdown next to the "Example App" application, then select View . Copy the OAuth IdP login URL and open it in an incognito window in your browser. (If you don't use an incognito window, you need to log out of the FusionAuth admin session to prevent the active session from interfering with the test.) This URL is a login page for the "Example App" application, so that you can test the web service and Connector.
For this tutorial, the login URL should be http://localhost:9011/oauth2/authorize?client_id=e9fdb985-9173-4e01-9d73-ac2d60d1dc8e&response_type=code&redirect_uri=http%3A%2F%2Flocalhost%3A3000%2Fauth%2Fcallback.
Log in with the username and password for the user you created earlier, such as janesmith@example.com and p@ssw0rd3xamp!e. Your Connector service should show Request received in the terminal and the login request succeeding.
After a successful test login, the user will be redirected to a URL like https://example.com/?code=2aUqU0ZhQCjtz0fnrFL_i7wxhIAh7cTfxAXEIpJE-5w&locale=en&userState=AuthenticatedNotRegistered.
This occurs because you haven't set up a web application to handle the authorization code redirect yet. This is an important next step, but it's beyond the scope of this document. Consult the 5-minute setup guide for an example of how to do this.
If you log out and log in again with the same user, you'll notice that Request received will not show in the web service console. This is because FusionAuth is now using its own authentication service, as the original user password has been hashed and saved in the FusionAuth database.
The user has been successfully migrated, and Akamai is no longer needed for them.
Debug The Connector Service#
If you encounter errors in this process, try the following:
- View the System Event Logs in the bottom left of the FusionAuth web interface.
- Add
console.loglines to the4_connectorService.mjsfile to see where any errors are occurring. - Adjust the timeout values of the Connector to higher values to accommodate network latency between API calls.
Estimate The Slow Migration Timeline#
When using a slow migration, you can estimate how many accounts will be migrated in a given period.
You can calculate a timeline by knowing the following:
- How frequently the average user logs in
- What the distribution of your users' login behavior is
- What your migration goal is
Determining these values precisely is beyond the scope of this guide. However, a good rule of thumb is to determine how often your average user logs in to your application. Then you can use this formula to find out when a certain percentage of users have migrated: S = [(1 - (1 - P)^D)*100]%.
Breaking that equation down, you have:
Pis the probability of any single user authenticating in a given day. So if your users log in once a week on a business day, it is 0.2 (one out of five days). If they log in once a year, it is 0.0027 (one out of 365 days).Dis the number of days of the migration period.Sis the percentage of users who have migrated.
For P = 0.2 and D = 10, S = 89%. Therefore, if your users log in one out of every five days, in ten days almost nine out of ten will be migrated to FusionAuth.
For P = 0.0027 and D = 370, S = 63.7%; if your users log in once a year on average, in about a year, almost two thirds of accounts will be migrated to FusionAuth.
Using the above calculations should help you estimate the duration of a migration.
After this period, you may want to bulk migrate the rest of the users, or treat them as inactive and not migrate them. Plan to disable the Connector and remove the tenant's Connector policy after the slow migration is complete.
Learn more about general slow migration considerations.
What To Do Next#
Check what roles and features are used in Akamai for your real application and create similar permissions and roles in FusionAuth. Update the sample user conversion script to map the role names from Akamai to the roles in FusionAuth.
You now have your users migrated, or a plan to do so. Congratulations! What is next?
You need to migrate additional configurations, as mentioned in Other Entities. Since the type of configuration varies, it is hard to provide a full list of how to import these items, but the general pattern will be:
- Identify corresponding FusionAuth functionality.
- Configure it in your FusionAuth instance, either manually or by scripting it using the client libraries or API.
- Update your application configuration to use the new FusionAuth functionality.
Make sure you assign your users to the appropriate FusionAuth applications. You can do this either:
- As part of your import process by adding registrations at import time.
- After users have been migrated with the Registrations API.
You'll also need to modify and test each of your applications, whether custom, open source, or commercial, to ensure:
- Users can successfully log in.
- The authorization code redirect is handled correctly.
- Users receive appropriate permissions and roles based on the JWT.
- The look and feel of the hosted login pages matches each application's look and feel.
If your application uses a standard OAuth, SAML or OIDC library to communicate with , the transition should be relatively painless.
Additional Support#
If you need support in your migration beyond that provided in this guide, you may:
- Post in our forums and get support from the community.
- Purchase a support plan and get expert help from the Engineering Team.