Authentication With Magic Links & One-Time Passwords
Magic link authentication allows a user to prove their identity without a password.
Magic links authentication is provided by FusionAuth using a single-use, time-bound code, delivered by email or SMS. However, that is not your only option. If you need more customization, you can use the passwordless API to generate a code. Then you may deliver it by another method, such as a push notification.
This guide will cover the FusionAuth magic links authentication implementation including standard configuration, APIs you may use to build a custom experience, and system settings.
Here's a video showing the default magic links process in FusionAuth:
Magic Links And One-Time Passwords#
This feature in FusionAuth sends a secure, single-use, time-bound, code. By default, if a user enters an email address, this is sent via email. If the user enters a phone number, this is sent via SMS. When a user visits the link or enters a one-time code, they are logged in, as if by magic. The one-time code is also known as a one-time password or OTP.
The user don't need to provide any other credentials; ownership and access to the delivered code is considered proof of identity. This is also known as "magic link" or OTP login. It does not require a password, hence the general term "passwordless".
You are not required to use email or SMS as a transport mechanism, though it is quite common. If you are Using the API Directly, you can use push notifications, send it via Whatsapp, or deliver it via carrier pigeon. As long as the user can provide the value to FusionAuth, it will be validated and the user will be logged in.
Prior to version 1.41.0, magic links and codes were the only form of passwordless authentication supported by FusionAuth.
Therefore the user interface and API use the term passwordless, even though versions 1.41.0 and beyond support multiple kinds of passwordless authentication.
Built-in phone number/SMS passwordless logins are available in FusionAuth 1.59.0 and later.
When Does Using Magic Links Make Sense#
Magic link authentication eases a user's sign-in experience. Rather than having to remember which password they used, a user gives their email address or phone number and is sent a link or one time code. When they click through, they are authenticated.
In addition to being easier for users, a magic link login experience prevents them from reusing the same password across different sites or applications. No longer will you worry about another website's data breach causing illicit access to your system. In addition, password brute forcing is no longer a threat since the codes are one-time use.
Setting Up For Magic Links#
If you are planning to use magic links, you have two options. The first option you can use is the FusionAuth hosted login pages. FusionAuth's hosted login pages are customizable via themes to make each of the web pages look like your application. The other option is using the passwordless API. Let's look at each in turn.
In either case, you should:
- Configure your SMTP/Messenger server settings under Tenants -> Phone . If you are testing this flow out locally, you may want to use mailcatcher or a simple HTTP server as a mock messenger for SMS cases.
- Ensure your templates are set up correctly. You can use the default templates, but you may want to customize them. More on that in the Customizing Magic Link Authentication section.
- Create an application
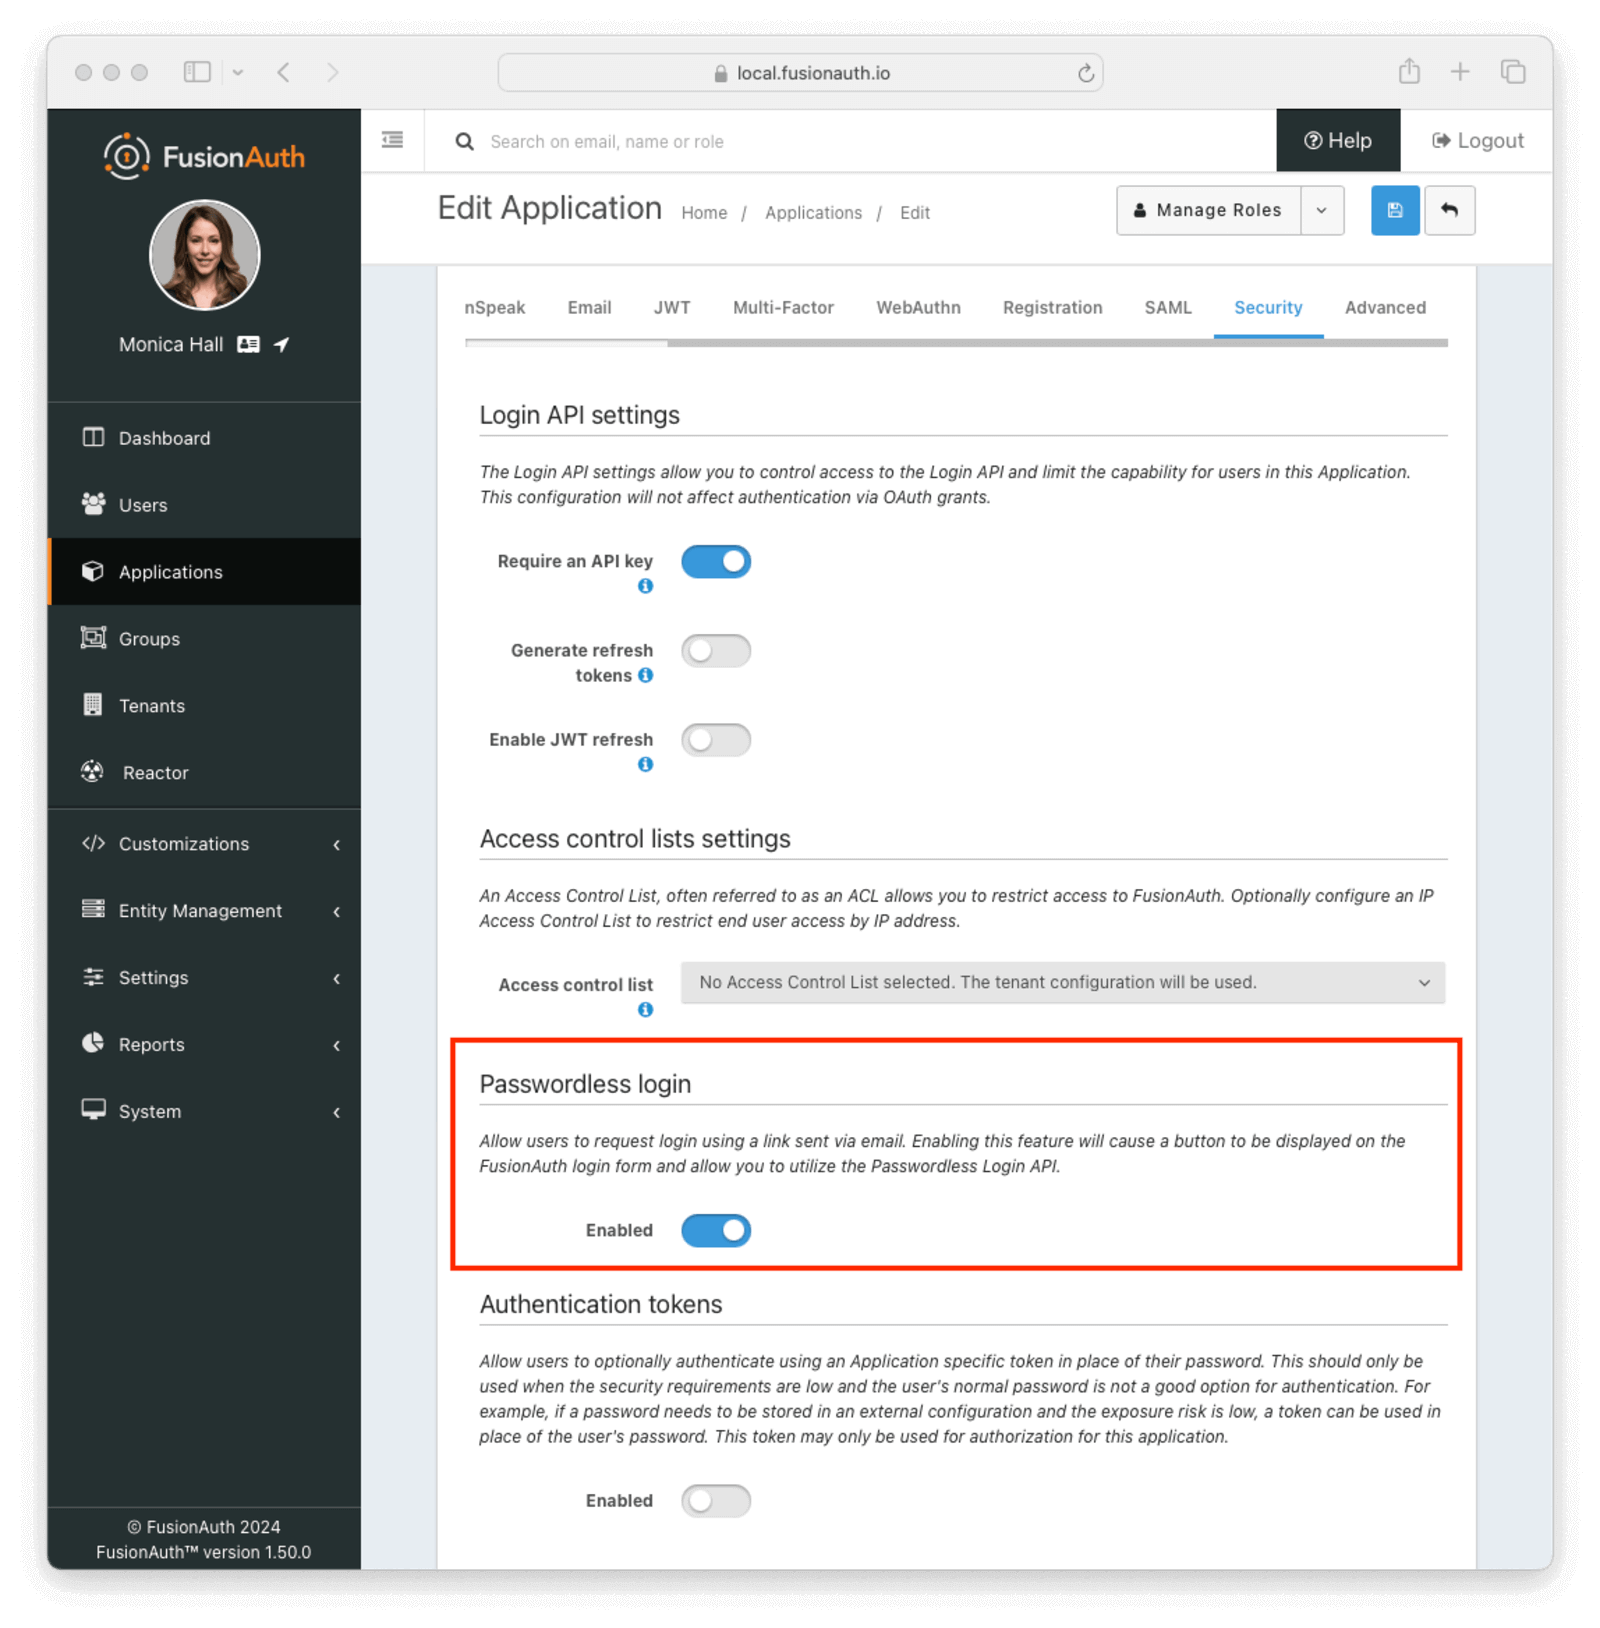
- Turn on Passwordless Login under the Security tab of the application configuration:
- Add a user and register them with your application. Make sure you register a valid email address or phone number
Since, by default, magic links authentication requires email or SMS delivery, ensure FusionAuth is correctly configured to send email or SMS messages.
Using the FusionAuth Hosted Login Pages#
Choose the FusionAuth hosted login pages approach if you want to use the Authorization Code grant.
As of version 1.41.0, FusionAuth supports multiple kinds of passwordless authentication, not just magic links.
To use this option:
- Go to your application configuration page in the administration UI
- Configure the OAuth redirect URL as you would with any application where users authenticate password (more on OAuth config here). Make sure the Authorization Code grant is an enabled grant
- Turn on Passwordless Login under the Security tab of the application configuration:
Now you're done with configuration.
To test out how your users would experience this:
-
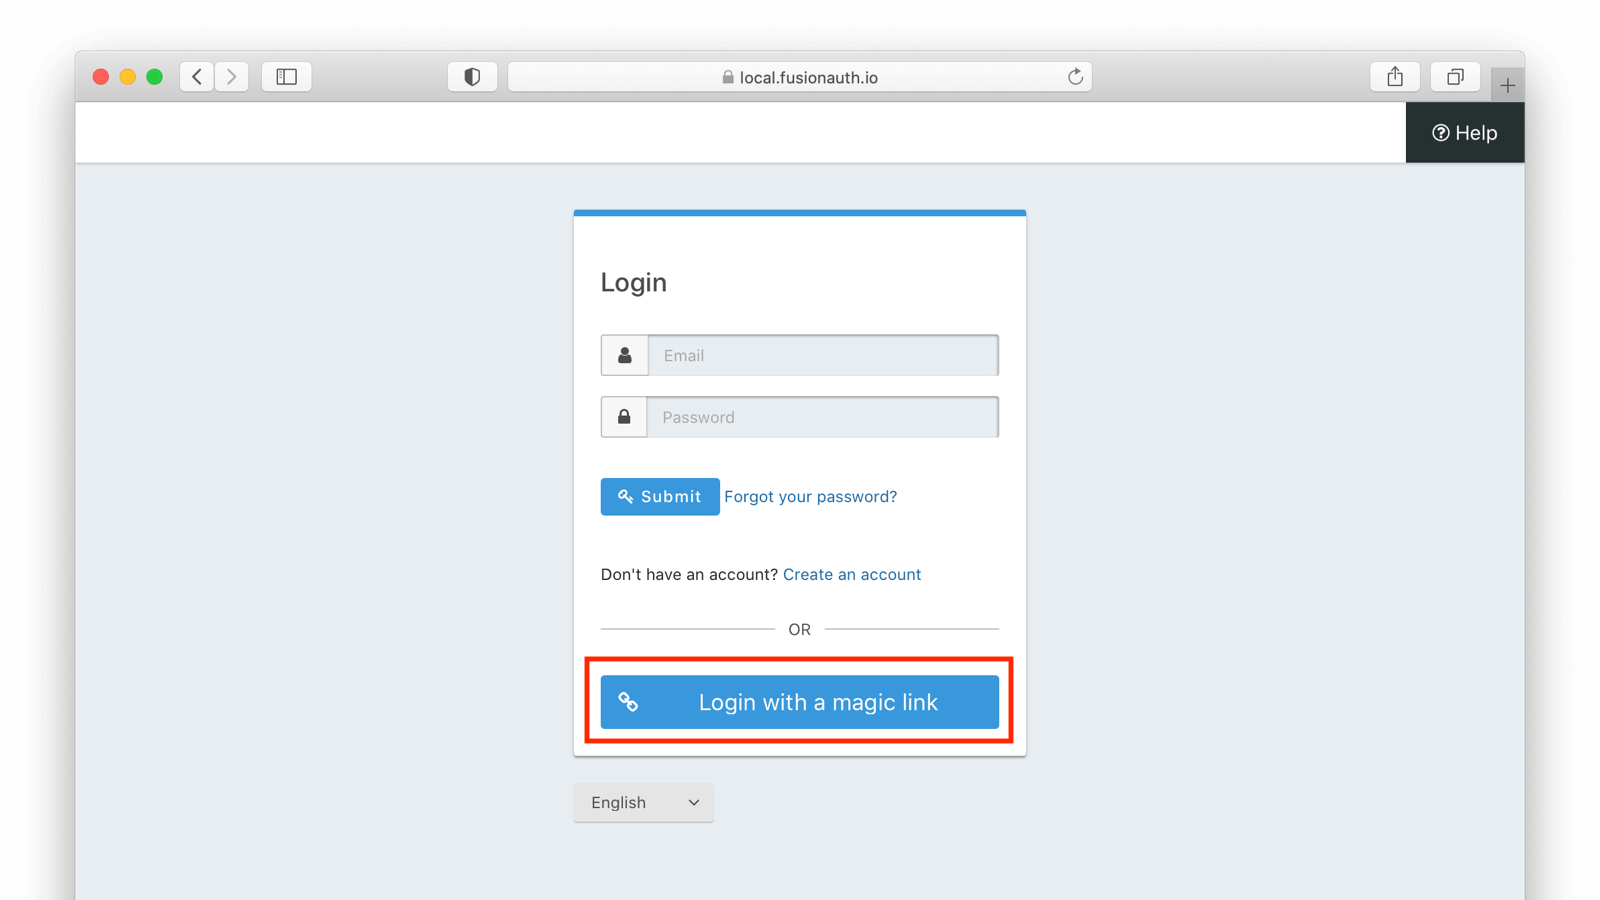
Go to your application login page and click the Login with a magic link button
-
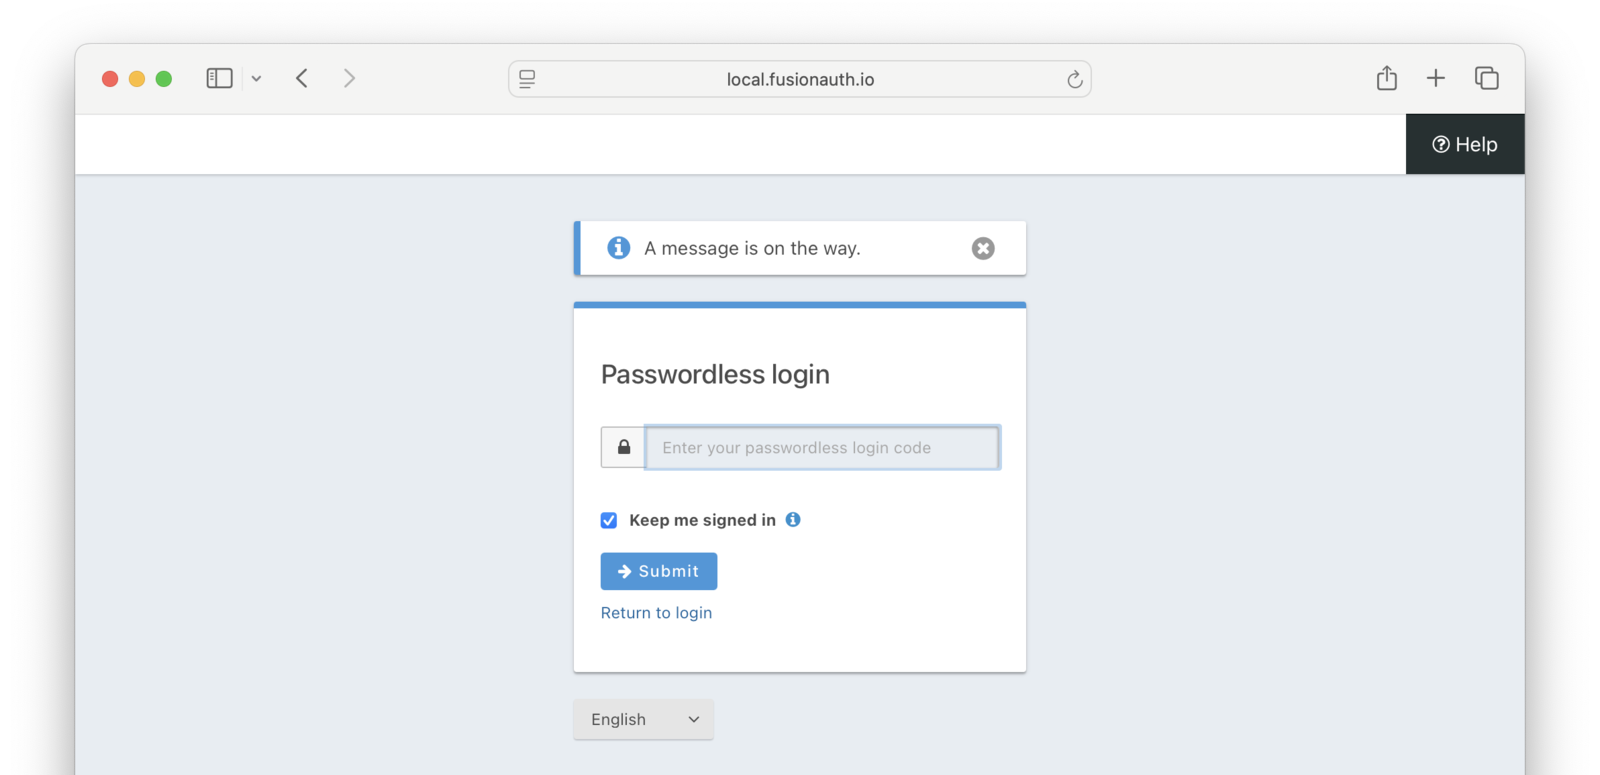
Enter the user's email or phone number

-
Go to the user's email or SMS inbox.
-
Click the link or enter the one-time code into the form.
As soon as the magic link is clicked or the one-time code is entered, the user has begun an Authorization Code grant. You can consume the authorization code using a library or your own code. Whatever you would normally do if someone signed in with a password, you can now do here. This means that you'll be provided with the same refresh tokens, user data, or JWTs that would be delivered if the user had signed in with a password.
If you are testing locally with an email server like Mailcatcher, you may need to copy the link from the email and paste it into your browser. Some email clients will not allow you to click on links that are not HTTPS.
To customize the look of the login pages, use themes. While editing the theme, you could remove the username/password form. This would force everyone to use magic links authentication.
Changing a theme modifies it for all applications in a tenant, so these changes can affect the FusionAuth admin UI (if the new application is in the default tenant) and other applications in the same tenant. If you want to hide the username/password form on an application by application basis, use separate tenants, add logic to your theme to hide parts of the HTML based on the client_id, or use application specific themes.
Limitations#
There are a few limitations when using the FusionAuth hosted login pages:
- This approach will only send the magic link or one-time code via email or SMS.
- This approach requires you to use the Authorization Code grant.
Using the API Directly#
While using the FusionAuth hosted login pages works for many, you may need more control or flexibility. You can use the passwordless API to authenticate a user with a one-time code. The API reference docs cover each of the API calls, but this guide will walk you through an implementation.
There are a couple of reasons you might choose this method of integration.
- You can customize every part of the user login experience.
- You can send the code using a different method such as a Slack direct message.
When using this option, you must set up an API key with the appropriate permissions. The minimum level of privilege required is the POST permission to the /api/passwordless/start endpoint.
Calling the API#
There are four parts to build your own magic link flow.
- You start the magic link login via an API call to FusionAuth
- Deliver the code to the user
- The user enters the code
- You complete the magic link login via an API call
Starting the login#
You start a magic link login by calling the /api/passwordless/start endpoint.
Start Magic Link Login API call
API_KEY=...
REQUEST_PAYLOAD='{...}'
curl  -H "Content-type: application/json" -H "Authorization: $API_KEY" https://local.fusionauth.io/api/passwordless/start -d "$REQUEST_PAYLOAD"
Here's an example request payload:
Start Magic Link Login Request JSON
{
  "applicationId": "10000000-0000-0002-0000-000000000001",
  "loginId": "jared@piedpiper.com",
  "loginIdTypes": [
    "email"
  ],
  "state": {
    "client_id": "10000000-0000-0002-0000-000000000001",
    "redirect_uri": "https://piedpiper.com/callback",
    "response_type": "code",
    "scope": "openid",
    "state": "CSRF123"
  }
}
The state property in the JSON is optional. If present, it is echoed back to your application at the end of the magic link login workflow. This allows anonymous users to interact with your application, then log in and have data from their anonymous session available.
For example, if you have a shopping site, you may want to allow a user to add items to their cart before they sign in. Once they have logged in, the state parameter can be used to associate their cart Id with the authenticated user. In this case, the state key might be set to a JSON object like this:
{ "cart_id" : 1234 }The call to /api/passwordless/start begins the authentication process, and returns a response with a code:
Start Magic Link Email Login Response JSON
{
  "code": "CynAUMCHLxCCAWyHXOVWPQd8ZY0a6U0e3YpYkT0MNxs"
}
Start Magic Link Phone Login Response JSON
{
  "code": "CynAUMCHLxCCAWyHXOVWPQd8ZY0a6U0e3YpYkT0MNxs",
  "oneTimeCode": "6258"
}
Possession of this one-time code authenticates the end user. Deliver this code to the end user using whatever method you'd like. If you want to use FusionAuth to deliver the code via email or SMS, see Sending the Code Using FusionAuth.
Sending the Code Using FusionAuth#
This is an optional API call. If you want to send the code via the email server or SMS messenger configured in FusionAuth, you may use the /api/passwordless/send API endpoint.
Using this API call allows you the benefits of FusionAuth locale-aware email or SMS templates and delivery capabilities without requiring you to use the FusionAuth login forms.
The User Enters the Code#
Once the user possesses the code, they must provide it to your application. You must build an interface for them to do so. For email use cases, the email message will often contain a link to a form where the user can enter the code, or the link will hit a back end endpoint that processes the code.
For phone number use cases, the typical pattern is for your application to present a form immediately after sending the code to the user. The code value can be available as a hidden field on a form, but the oneTimeCode value must be provided by the user.
Completing the Login#
When the user provides the code to you, call the /api/passwordless/login endpoint. You can pass other information such as IP address, but only the code is required.
Complete Magic Link Email Login Request JSON
{
  "code": "CynAUMCHLxCCAWyHXOVWPQd8ZY0a6U0e3YpYkT0MNxs"
}
Complete Magic Link Phone Login Request JSON
{
  "code": "CynAUMCHLxCCAWyHXOVWPQd8ZY0a6U0e3YpYkT0MNxs",
  "oneTimeCode": "6258"
}
If the code (and for phone numbers, oneTimeCode) is valid, your application will receive user data, a JWT, and other data based on the application configuration. If you send a state property in the JSON when starting the authentication process, it will also be included in the response, under the state key.
Complete Magic Link Response JSON
{
  "token": "eyJhbGciOiJIUzI1NiIsInR5cCI6IkpXVCJ9.eyJleHAiOjE0ODUxNDA5ODQsImlhdCI6MTQ4NTEzNzM4NCwiaXNzIjoiYWNtZS5jb20iLCJzdWIiOiIyOWFjMGMxOC0wYjRhLTQyY2YtODJmYy0wM2Q1NzAzMThhMWQiLCJhcHBsaWNhdGlvbklkIjoiNzkxMDM3MzQtOTdhYi00ZDFhLWFmMzctZTAwNmQwNWQyOTUyIiwicm9sZXMiOltdfQ.Mp0Pcwsz5VECK11Kf2ZZNF_SMKu5CgBeLN9ZOP04kZo",
  "state": {
    "client_id": "10000000-0000-0002-0000-000000000001",
    "redirect_uri": "https://piedpiper.com/callback",
    "response_type": "code",
    "scope": "openid",
    "state": "CSRF123"
  },
  "user": {
    "active": true,
    "birthDate": "1976-05-30",
    "connectorId": "e3306678-a53a-4964-9040-1c96f36dda72",
    "data": {
      "displayName": "Johnny Boy",
      "favoriteColors": [
        "Red",
        "Blue"
      ]
    },
    "email": "example@fusionauth.io",
    "expiry": 1571786483322,
    "firstName": "John",
    "fullName": "John Doe",
    "id": "00000000-0000-0001-0000-000000000000",
    "identities": [
      {
        "insertInstant": 1742936980069,
        "lastLoginInstant": 1742936980069,
        "lastUpdateInstant": 1742936980069,
        "primary": true,
        "type": "email",
        "value": "example@fusionauth.io",
        "verified": false,
        "verifiedReason": "Disabled"
      },
      {
        "insertInstant": 1742936980069,
        "lastLoginInstant": 1742936980069,
        "lastUpdateInstant": 1742936980069,
        "primary": true,
        "type": "phoneNumber",
        "value": "+13035551212",
        "verified": false,
        "verifiedReason": "Disabled"
      },
      {
        "displayValue": "johnny123",
        "insertInstant": 1742936980069,
        "lastLoginInstant": 1742936980069,
        "lastUpdateInstant": 1742936980069,
        "moderationStatus": "ACTIVE",
        "primary": true,
        "type": "username",
        "value": "johnny123",
        "verified": false,
        "verifiedReason": "Unverifiable"
      }
    ],
    "imageUrl": "http://65.media.tumblr.com/tumblr_l7dbl0MHbU1qz50x3o1_500.png",
    "insertInstant": 1742936980069,
    "lastLoginInstant": 1742936980069,
    "lastName": "Doe",
    "middleName": "William",
    "mobilePhone": "303-555-1234",
    "passwordChangeRequired": false,
    "passwordLastUpdateInstant": 1742936980069,
    "phoneNumber": "+13035551212",
    "preferredLanguages": [
      "en",
      "fr"
    ],
    "registrations": [
      {
        "applicationId": "10000000-0000-0002-0000-000000000001",
        "data": {
          "displayName": "Johnny",
          "favoriteSports": [
            "Football",
            "Basketball"
          ]
        },
        "id": "00000000-0000-0002-0000-000000000000",
        "insertInstant": 1742936980069,
        "lastLoginInstant": 1742936980069,
        "preferredLanguages": [
          "en",
          "fr"
        ],
        "roles": [
          "user",
          "community_helper"
        ],
        "username": "johnny123",
        "usernameStatus": "ACTIVE",
        "verified": true,
        "verifiedInstant": 1742936980069
      }
    ],
    "timezone": "America/Denver",
    "tenantId": "f24aca2b-ce4a-4dad-951a-c9d690e71415",
    "twoFactor": {
      "methods": [
        {
          "authenticator": {
            "algorithm": "HmacSHA1",
            "codeLength": 6,
            "timeStep": 30
          },
          "id": "35VW",
          "method": "authenticator"
        },
        {
          "id": "V7SH",
          "method": "sms",
          "mobilePhone": "555-555-5555"
        },
        {
          "email": "example@fusionauth.io",
          "id": "7K2G",
          "method": "email"
        }
      ]
    },
    "usernameStatus": "ACTIVE",
    "username": "johnny123",
    "verified": true,
    "verifiedInstant": 1742936980069
  }
}
The user is now authenticated. Your application has user data, pre-existing state if provided, and a JWT which can be used to represent the user to other resources. If you want to send the JWT to a client as a cookie, you can now do so.
Additional Magic Link Login Parameters#
JWTs are typically passed to other systems like an API server to enable access to protected resources (more about JWTs). If you are using magic link authentication and are not using the JWT, you can turn off its generation. Creating and signing the JWT requires server resources; turning JWT generation off will improve performance.
To do so, set the noJWT parameter to true when you call the complete API endpoint.
Common Failure Paths#
Every time you start a magic link or OTP login for a given user, all other codes for that user are marked invalid. Codes are also invalidated after a configurable time limit.
If a user provides a code that is invalid, if their account is locked, or if there is any other issue in the request, a status code in the 400 range will be returned. Please consult the passwordless API reference docs for more details about return status codes.
Two Factor Authentication#
You can use FusionAuth magic link and OTP authentication in combination with two-factor authentication (also called multi-factor authentication or MFA).
When two-factor authentication is enabled for a user, after the code has been provided they are prompted to provide an additional two-factor verification code.
Learn more about setting up two-factor authentication.
Two Factor Authentication With the API#
Two factor authentication also works when Using the API Directly. In that case, when you complete the magic link authentication, instead of getting the user data, you'll get a twoFactorId:
{"twoFactorId":"VnNILnXs_EDG-cjwokwITRApmAxCMkojeT3CUqqLhLc"}Your application must then prompt the user for their two-factor code, from SMS or an application like Google Authenticator. Note that this is an entirely different code than the one-time code returned when you started the magic link login. Pass the twoFactorId and the two-factor code to the /api/two-factor/login endpoint in order to complete the two-factor authentication.
If a user has previously completed a two-factor authentication and has decided to trust the device, you may have a twoFactorTrustId value. This can be passed to the /api/passwordless/login endpoint. If valid, this will skip the two-factor challenge.
Customizing Magic Link Authentication#
You can configure the FusionAuth passwordless implementation to meet your application's needs.
Templates#
If you are using the FusionAuth provided email or phone templates, whether you are using the standard FusionAuth user interface or the /api/passwordless/send API call, you will need to customize them.
Email Template Customization#
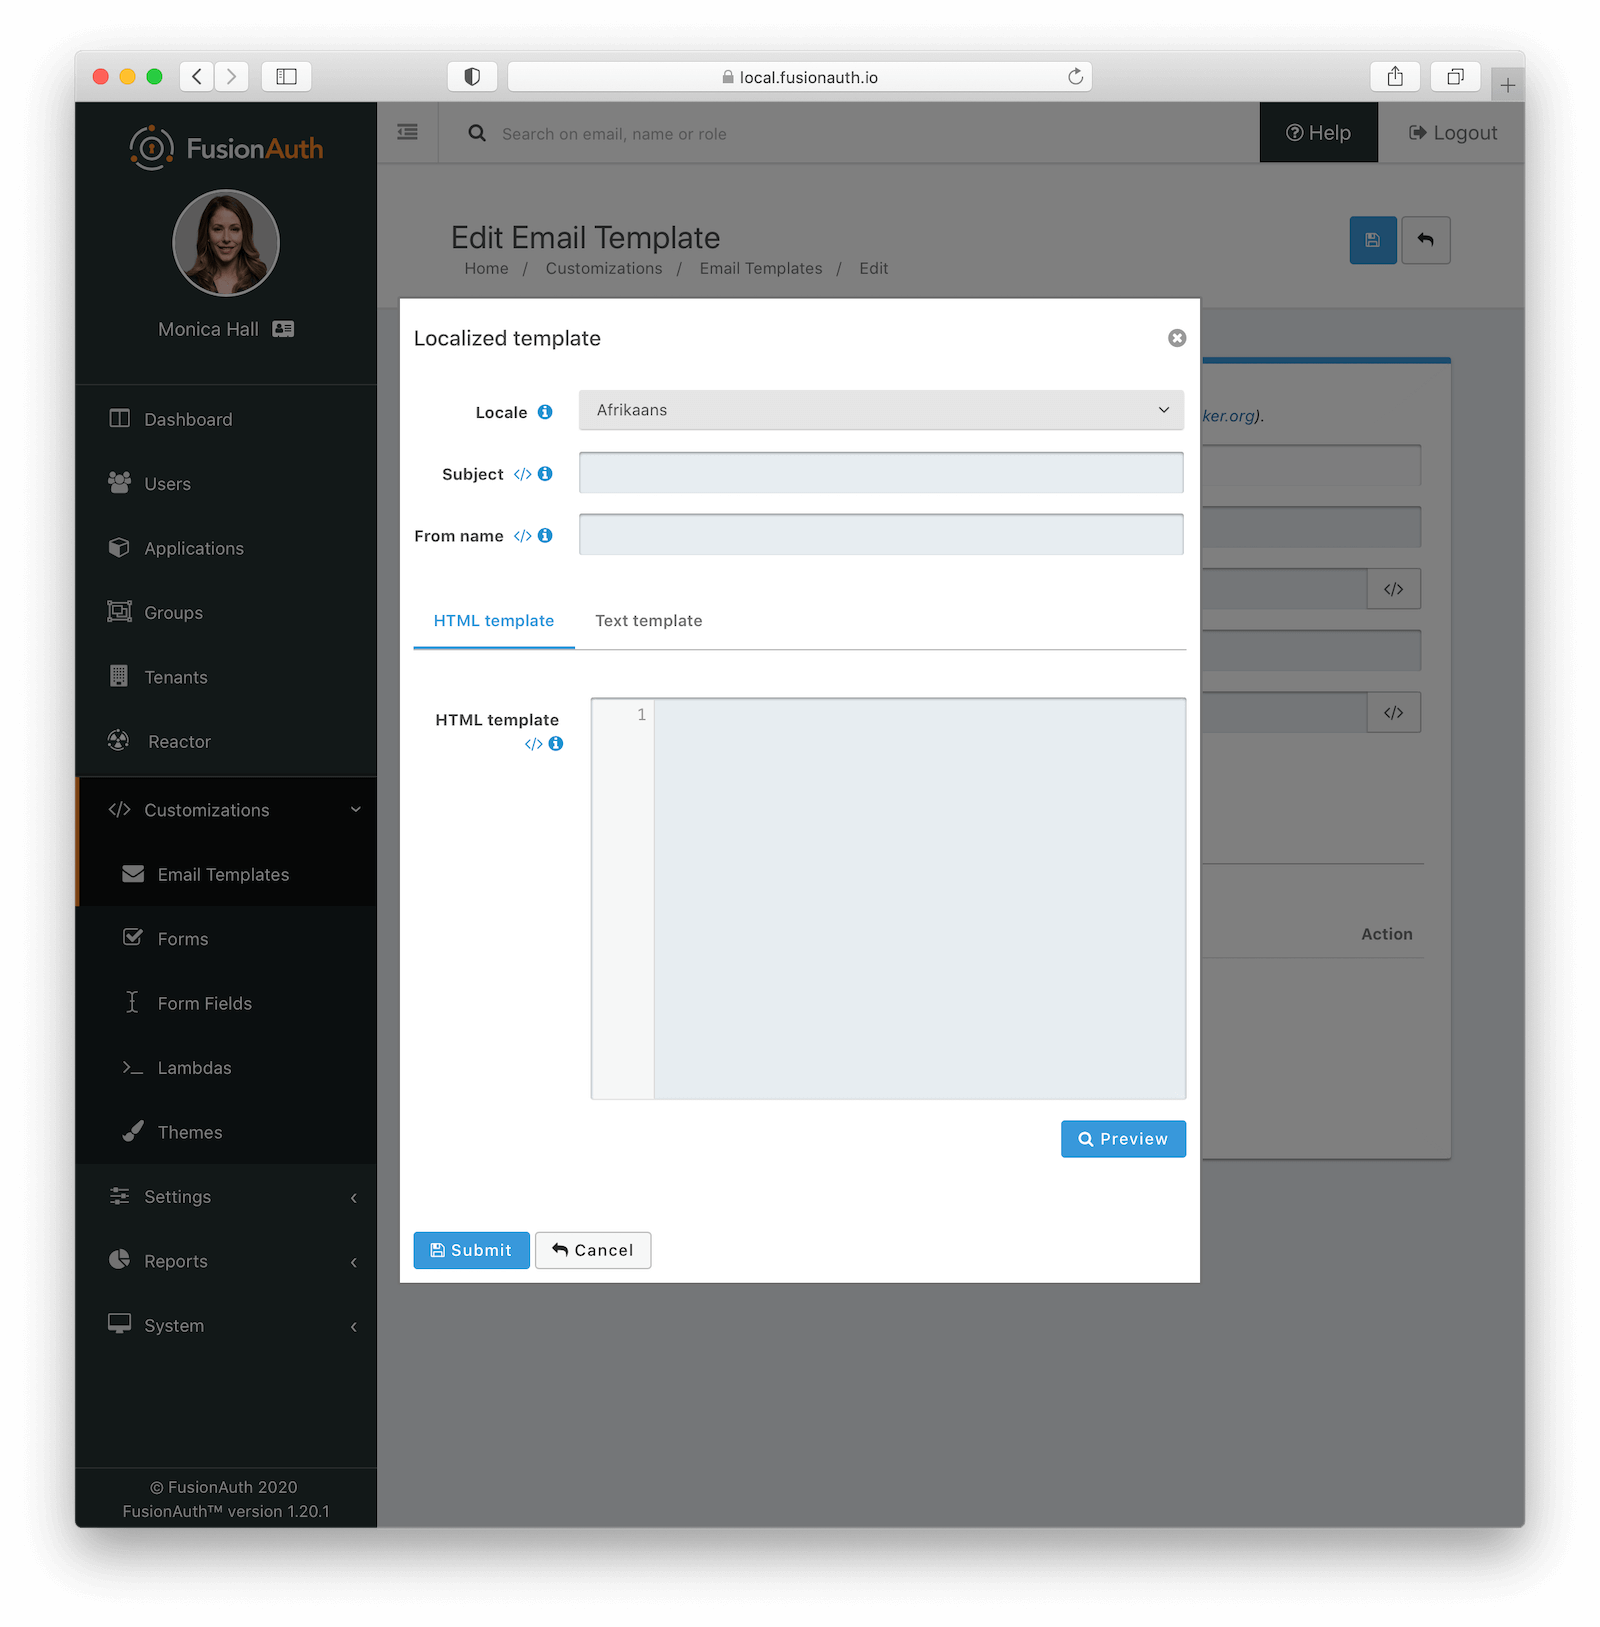
Since the template references "FusionAuth", start with duplicating the [FusionAuth Default] Passwordless Login template:

Configure the tenant identities template settings to use your email template.

When customizing, you can use any Apache FreeMarker built-ins within the template and in the subject. Make sure you modify both the HTML and text templates. Here are the default email templates:
Email HTML template
[#setting url_escaping_charset="UTF-8"]
You have requested to log into FusionAuth using this email address. If you do not recognize this request please ignore this email.

[#if oneTimeCode??]
<p>
  Login code: ${oneTimeCode}
</p>
[#else]
<p>
  [#-- The optional 'state' map provided on the Start Passwordless API call is exposed in the template as 'state' --]
  [#assign url = "http://localhost:9011/oauth2/passwordless/${code}?tenantId=${user.tenantId}" /]
  [#list state!{} as key, value][#if key != "tenantId" && value??][#assign url = url + "&" + key?url + "=" + value?url/][/#if][/#list]
  <a href="${url}">${url}</a>
</p>
[/#if]
- FusionAuth Admin
Email text template
[#setting url_escaping_charset="UTF-8"]
You have requested to log into FusionAuth using this email address. If you do not recognize this request please ignore this email.

[#if oneTimeCode??]
<p>
  Login code: ${oneTimeCode}
</p>
[#else]
[#-- The optional 'state' map provided on the Start Passwordless API call is exposed in the template as 'state' --]
[#assign url = "http://localhost:9011/oauth2/passwordless/${code}?tenantId=${user.tenantId}" /]
[#list state!{} as key, value][#if key != "tenantId" && value??][#assign url = url + "&" + key?url + "=" + value?url/][/#if][/#list]

${url}

[/#if]
- FusionAuth Admin
You can localize the email template as well:
Here is more information about email and message templates.
Customizing the Subject#
Here's an example of how to customize the subject with FreeMarker. The subject below shows how to customize the subject with the time the link expires.
[#setting time_zone = (user.timezone)!"US/Denver"]
[#setting time_format = "h:mm a"]
Expires at: ${((.now?date?long + timeToLive * 1000)?number_to_time)?string}
Message Template Customization#
The message template is used for SMS delivery. It is similar to the email template, but does not have an HTML version. You can customize it in the same way as the email template, but you will only have a text version. Additionally, you can use the oneTimeCode variable to include the one-time code in the message.
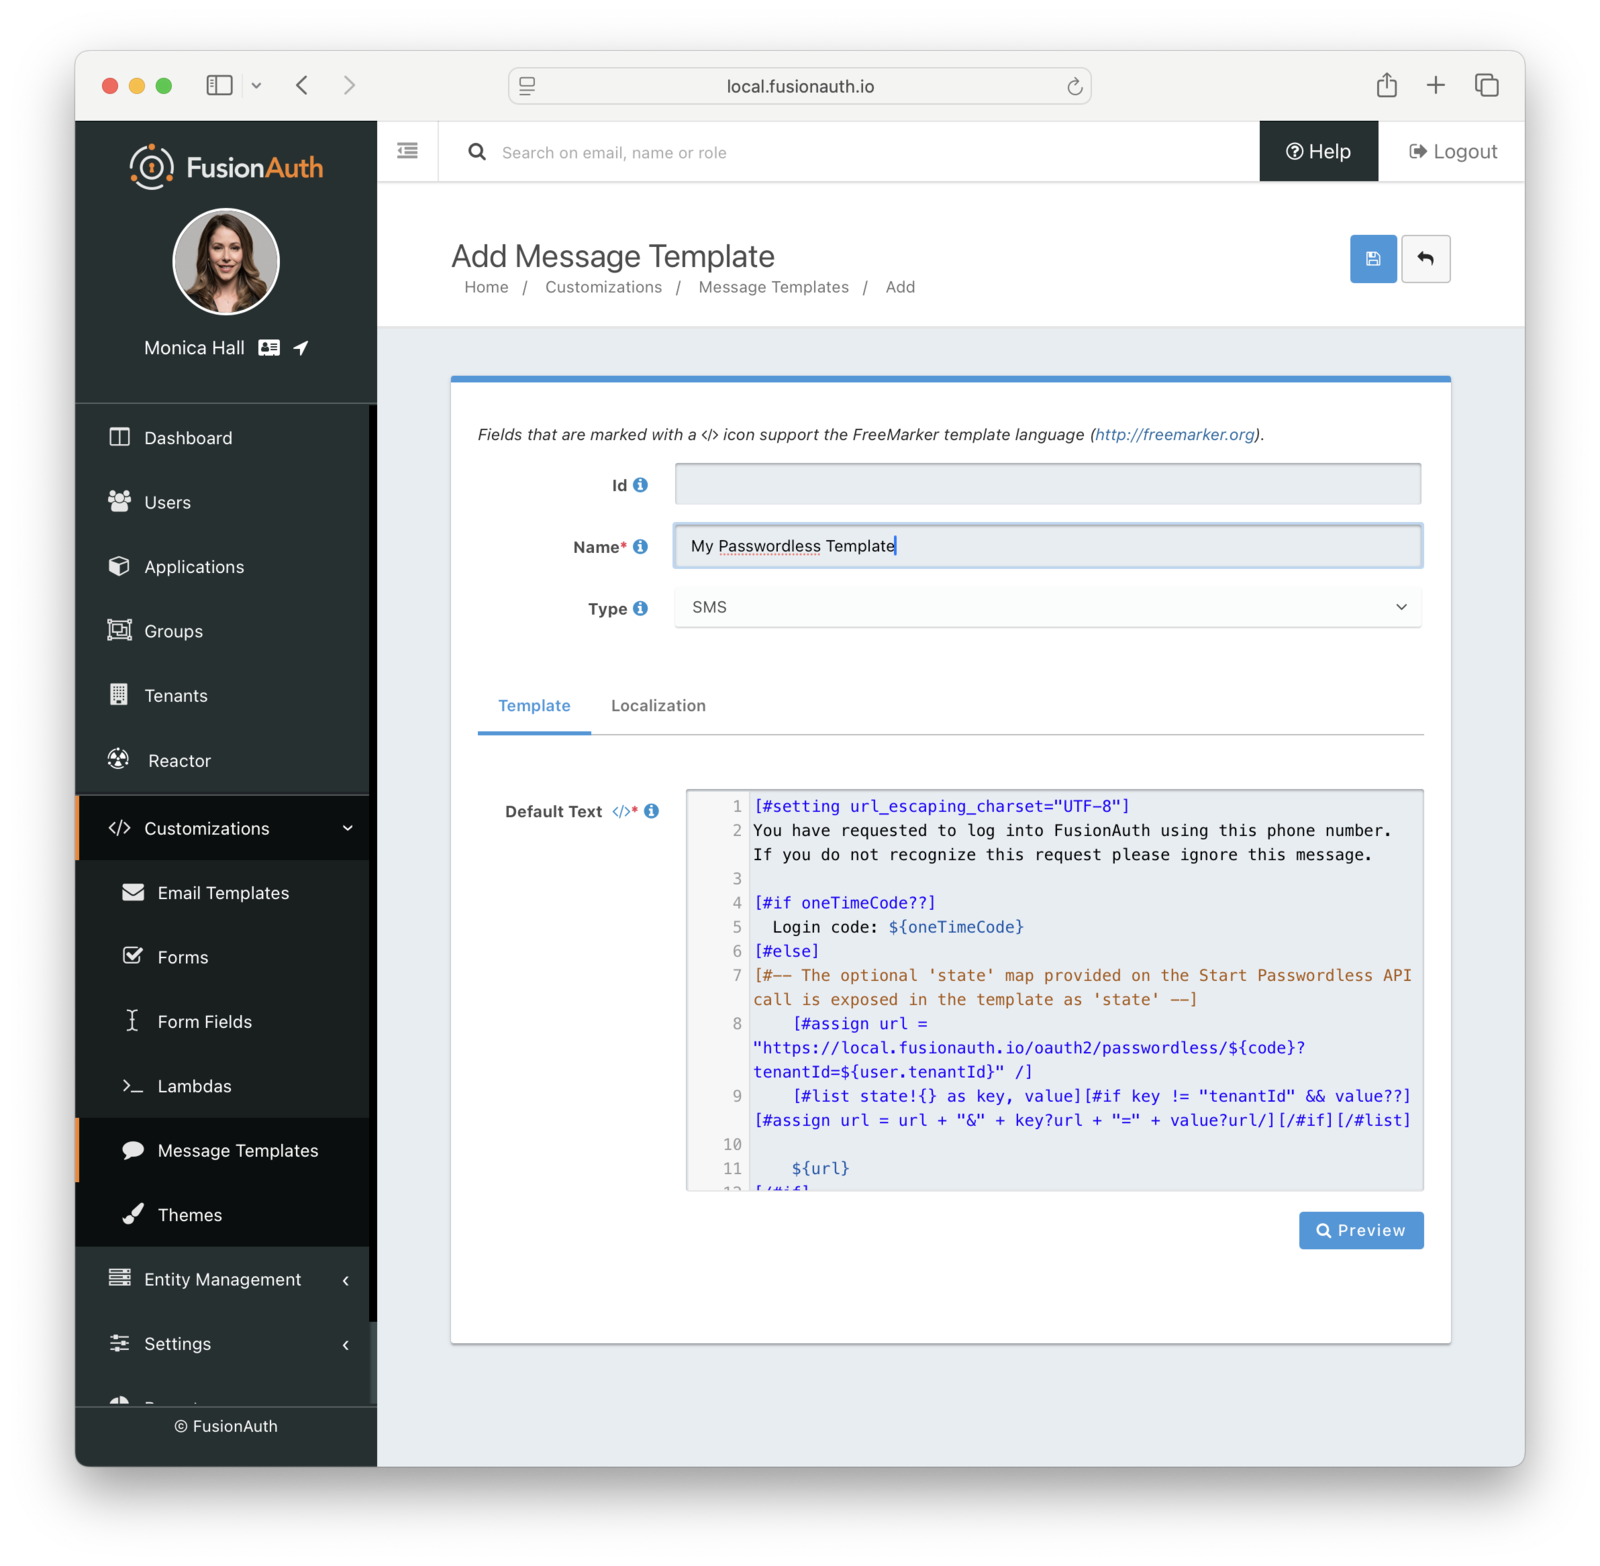
Here is the default message template:
[#setting url_escaping_charset="UTF-8"]
You have requested to log into FusionAuth using this phone number. If you do not recognize this request please ignore this message.

[#if oneTimeCode??]
  Login code: ${oneTimeCode}
[#else]
[#-- The optional 'state' map provided on the Start Passwordless API call is exposed in the template as 'state' --]
    [#assign url = "http://localhost:9011/oauth2/passwordless/${code}?tenantId=${user.tenantId}" /]
    [#list state!{} as key, value][#if key != "tenantId" && value??][#assign url = url + "&" + key?url + "=" + value?url/][/#if][/#list]

    ${url}
[/#if]

- FusionAuth Admin
One Time Code Customization#
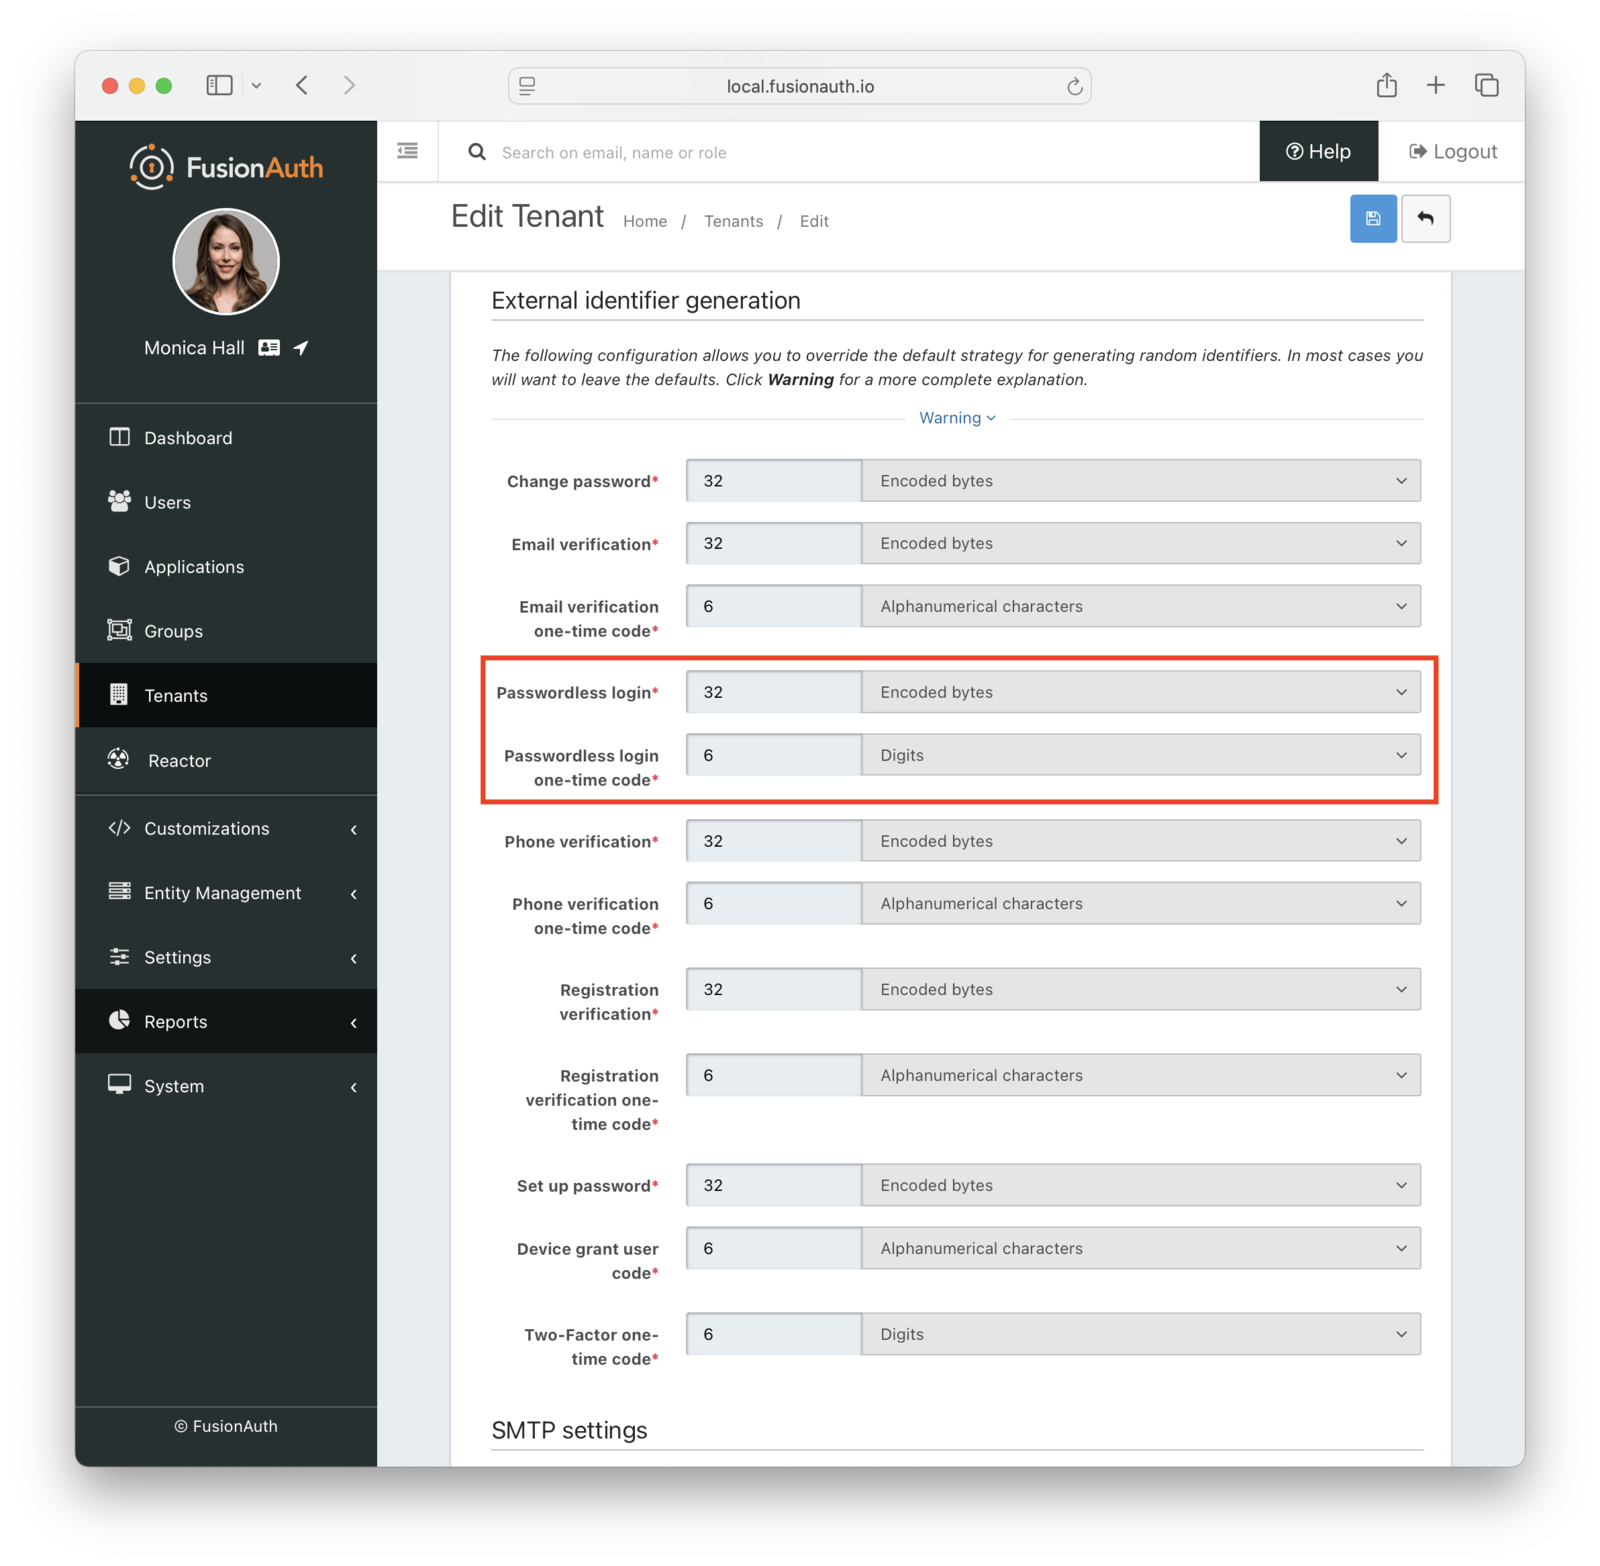
You can modify the lifetime of the code and one-time code delivered to users. By default it is 180 seconds; change this in the tenant settings:
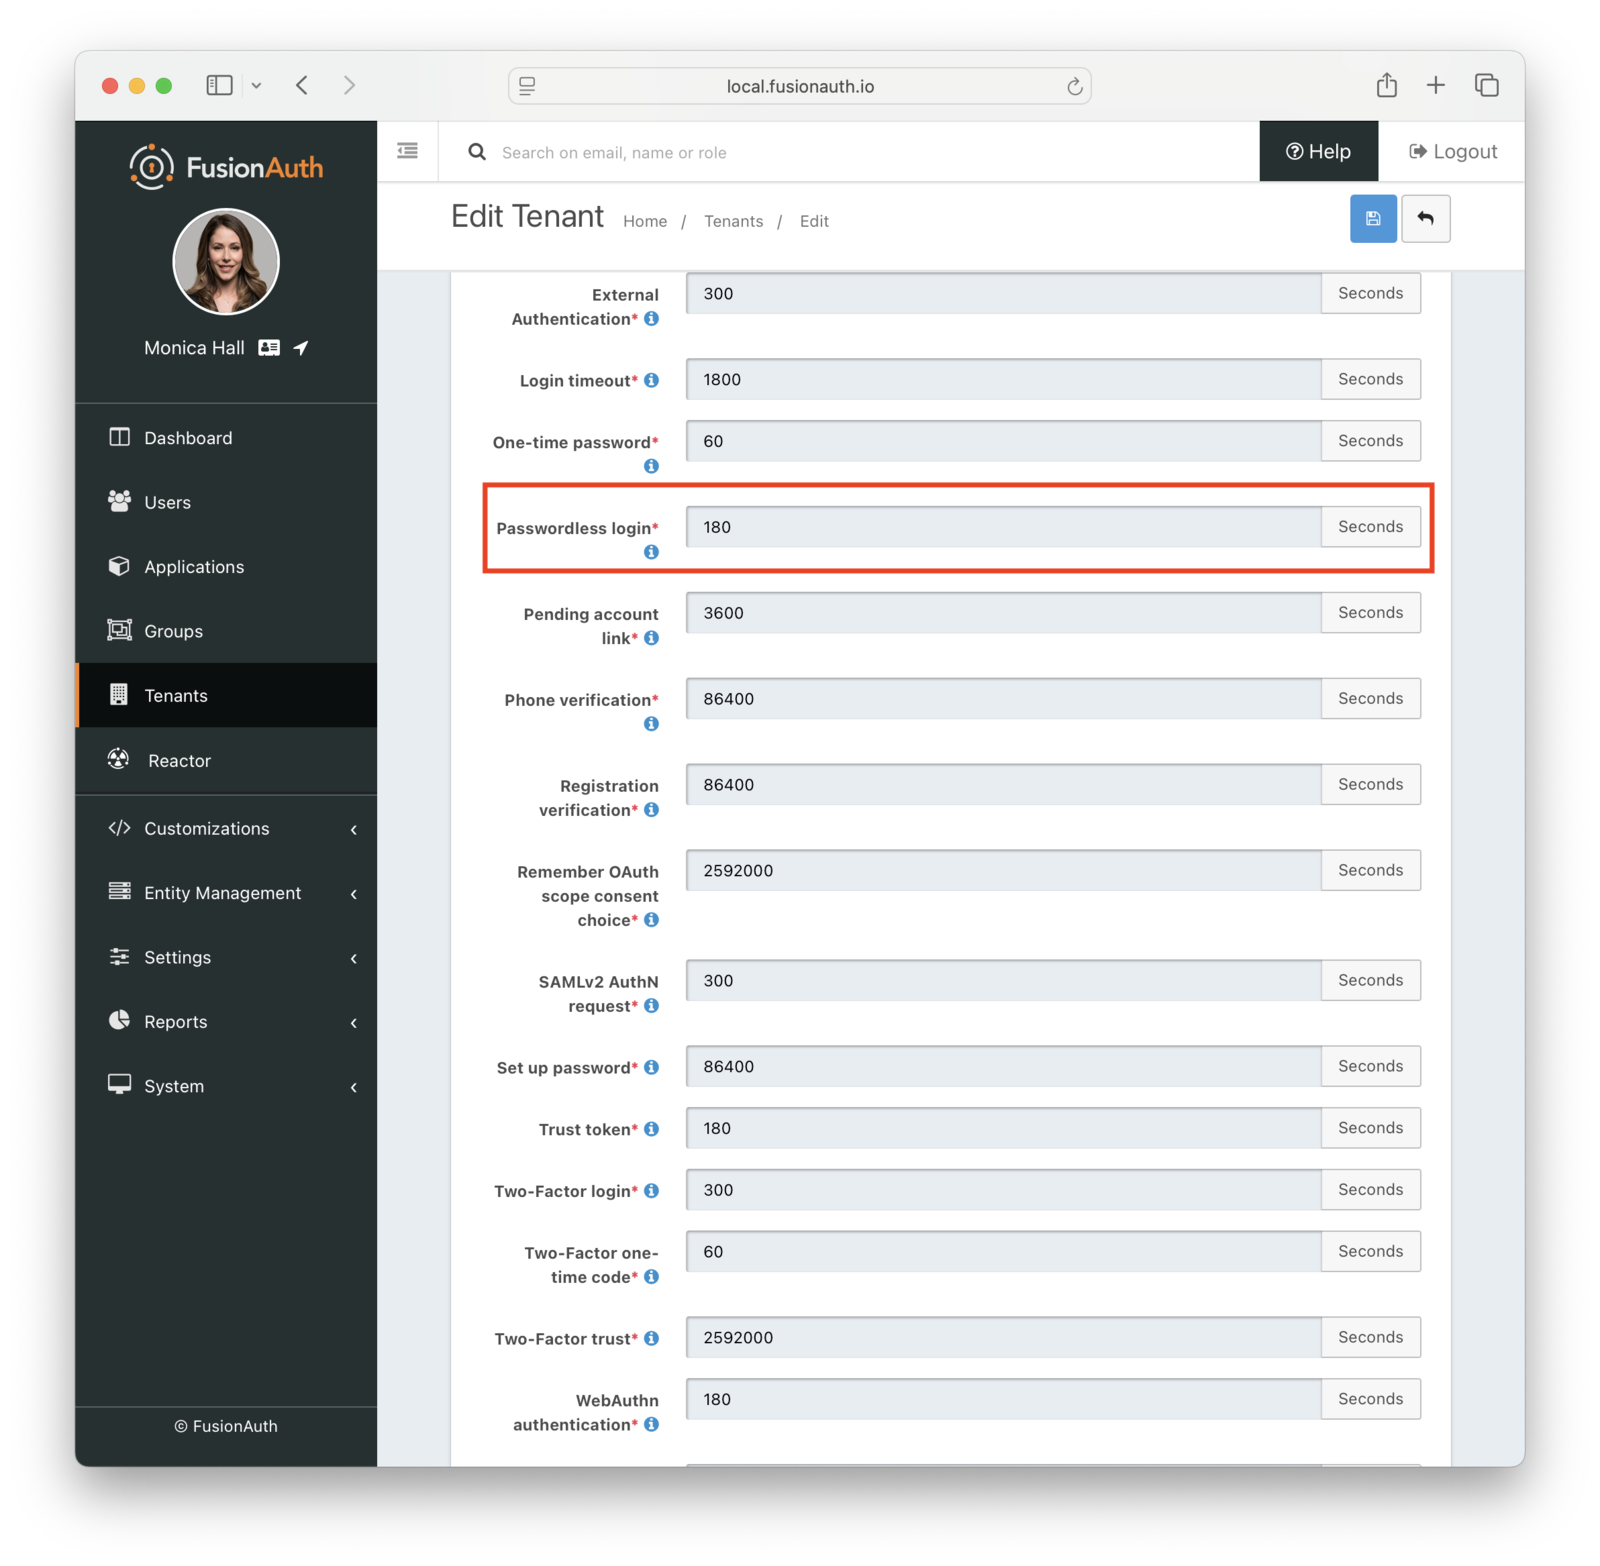
You can also change the types of the generated code and one-time code. For example, you may want your code to be only alphanumeric characters and one-time code to be numeric digits.
You may change your code length or generation strategy for security or user experience reasons. You may have requirements that specify a certain code length. If you deliver the code by text message, having a user enter a six digit alphanumeric code sent to them by SMS is a lot easier than a 64 byte string.
You have the following options for the code generation strategy:
- alphabetic characters
- alphanumeric characters
- bytes
- digits
Consult the tenant API documentation for length limits, which vary based on the strategy.
Security#
With magic link authentication, if the user's email account or phone number is hijacked, their account on your system is compromised. However, many organizations have security policies and protections around email accounts. It is often easier to protect and regularly change one email account password than to change all of a user's passwords. Email accounts are also more likely to have two-factor authentication enabled.
One way to increase the security of your magic link/OTP authentications is to decrease the lifetime of the code. This will help if the email or SMS message is compromised or accidentally forwarded.
There are no limits on how many passwordless requests can be made for a user, but only the most recent code is valid. Using any of the others, even if they have not yet expired, will display an Invalid login credentials message to the user.
If someone tries to log in with an email or phone number that is not present in the FusionAuth user database, they'll see the same notification as they would if the email or phone number existed. No email or SMS message will be sent.
If you use the passwordless API, follow the principle of least privilege, and limit calls to which the API key has access. If you are using the API key only for magic link passwordless login, don't give this key any other permissions.
What About Users' Passwords#
You can choose to disable passwords to enforce passwordless login. See the Password enabled tenant setting for more information.
Troubleshooting#
Magic Link Button Not Appearing on Login Page#
If the Login with a magic link button does not appear on your login page, check the following:
- Ensure that the application has Passwordless Login enabled under the Security tab.
- Ensure that the application and/or tenant has a valid email or phone template configured for Passwordless Login.
- Ensure that SMS and/or email is configured in the tenant settings.
Email#
If you are experiencing troubles with email deliverability, review the email troubleshooting documentation.
Invalid Links#
In some cases, email clients will visit links in an email before the user does. In particular, this is known to happen with Outlook "safe links". If the client does this when the email contains a passwordless one time code, that code may be invalid when the user clicks on it, as it has already been "used" by the client.
One option is to consult with your email client administrator. It may be possible to add the application's URL to an allow list.
In version 1.27, FusionAuth changed the link processing behavior to remedy this for some situations. Given the wide variety of email client behavior, it may still be present in other scenarios.
If your users' passwordless codes are being expired by an email client, please file a GitHub issue.