Starting with an unprotected Model Context Protocol (MCP) server, this guide demonstrates how to:
- examine a basic MCP server (
name-server) with aget_nametool - add FusionAuth OAuth configuration and token validation
- register an MCP client, such as Claude Desktop
- test the protected tool
Prerequisites#
This guide requires the following prerequisites:
- Docker Desktop or another Docker environment (ensure it's running)
- an MCP client such as Claude Desktop or Cursor
- Python
3.12or later (andpip) - Node.js version
20.18.1or later (ensure it's available in your path) - FusionAuth
1.67.0or later: earlier versions do not support theresourceparameter - an Essentials or Enterprise license, for custom OAuth scopes; if you have a paid plan, find your license key at account.fusionauth.io
Getting Started#
Clone the repository and navigate to the starter code:
git clone https://github.com/fusionauth/fusionauth-example-protected-mcp-server.gitcd fusionauth-example-protected-mcp-server/unprotected-local-mcpThis guide walks you through adding OAuth protection to an existing MCP server, built on the FastMCP python framework. If you prefer to skip ahead and see a working solution, navigate to the protected-local-mcp folder instead:
cd fusionauth-example-protected-mcp-server/protected-local-mcpConfigure Your FusionAuth License#
Before starting the services, add your FusionAuth license key to the Kickstart configuration.
Open kickstart/kickstart.json and replace the licenseId value of YOUR_LICENSE_KEY_HERE with your actual FusionAuth license key:
{
  "variables": { ... },
  "apiKeys": [ ... ],
  "licenseId": "YOUR_LICENSE_KEY_HERE",
  "requests": [ ... ]
}You can't complete this guide without adding in the license key.
If you are working through the guide, proceed. If you skipped ahead to use the working solution, skip to step 5.
Review The Project Structure#
The project is structured as follows:
fusionauth-example-protected-mcp-server/
unprotected-local-mcp/          # Starter code
├── docker-compose.yml
├── kickstart/
│   └── kickstart.json
├── mcp-server/
│   ├── Dockerfile
│   ├── requirements.txt
│   └── server.py
└── setup/
    ├── requirements.txt
    └── setup_clients.py
protected-local-mcp/            # Completed code with OAuth protection
└── ...
protected-remote-mcp/           # Remote deployment variant
└── ...
An Unprotected MCP Server#
Let's examine the unprotected MCP server, which allows access from any client that makes a request.
The MCP Server#
mcp-server/server.py implements a minimal MCP server with:
- a single
get_nametool that returns a hard-coded greeting - HTTP transport on port 8000
- no authentication
import logging

from fastmcp import FastMCP

logging.basicConfig(level=logging.INFO)
logger = logging.getLogger(__name__)

# Create a basic MCP server without authentication
mcp = FastMCP(
    name="FusionAuth MCP Server",
)


@mcp.tool()
def get_name() -> str:
    """Get a greeting with a name.

    This is a simple tool that returns a hardcoded greeting.
    In the guide, we'll add OAuth authentication so this tool
    returns the authenticated user's name from FusionAuth.
    """
    return "Hello, World!"


if __name__ == "__main__":
    import uvicorn

    mcp_app = mcp.http_app(stateless_http=True)
    uvicorn.run(mcp_app, host="0.0.0.0", port=8000)
Test The Unprotected Server#
Start the Docker stack:
docker compose up -ddocker compose up automatically runs the Kickstart configuration in kickstart/kickstart.json, which creates:
- a test user (
test@example.com/password) - an admin user (
admin@example.com/password) with access to the FusionAuth admin UI - an API key
It also installs your license key to enable advanced features.
This may take a few minutes, but after that you can test it. To test the unprotected get_name MCP server, run the following command:
curl -X POST http://localhost:8000/mcp \
  -H "Content-Type: application/json" \
  -H "Accept: application/json, text/event-stream" \
  -d '{
    "jsonrpc": "2.0",
    "id": 1,
    "method": "tools/call",
    "params": {
      "name": "get_name",
      "arguments": {}
    }
  }'
After you send the test query, you should see output similar to the following:
event: message
data: {"jsonrpc":"2.0","id":1,"result":{"content":[{"type":"text","text":"Hello, World!"}],"structuredContent":{"result":"Hello, World!"},"isError":false}}
If you see that output, congratulations, your MCP server example works! Unfortunately, the server currently accepts requests from any client, because there's no authentication.
Adding OAuth Protection#
Let's add authentication to protect the MCP server, starting with configuration and ending with a fully protected MCP server.
OAuth Protection For MCP Servers#
To protect an MCP server, you need to add:
- Token Validation: When a client sends a request, the MCP server must verify that the presented access token is valid.
- Scope Enforcement: MCP clients require specific scopes (permissions) to execute tools, and the MCP server must verify that the access token has the correct permissions for the tools being called.
- User Context: The MCP server may use the token to identify which user made the request, if functionality depends on which person is using the MCP client.
This guide uses the JWT validation API for token validation. This API verifies the token's signature and expiration using FusionAuth's public keys and returns the token claims, including scopes, if the token is valid.
If you try to use FusionAuth's introspect endpoint, it will return a 401. Introspection requires that the credentials used to call the endpoint belong to the same application that issued the token. Because the MCP server is a separate FusionAuth application for each MCP client, it cannot introspect the client's tokens. See this open GitHub issue for details. The /api/jwt/validate endpoint does not have this restriction.
Step 1: Add Configuration And Imports#
To configure the MCP server to connect to FusionAuth and import needed OAuth packages, replace the existing imports at the top of server.py with the following:
import os
import logging

from fusionauth.fusionauth_client import FusionAuthClient
from fastmcp import FastMCP
from fastmcp.server.auth import RemoteAuthProvider, AccessToken, TokenVerifier
from fastmcp.server.dependencies import get_access_token
from pydantic import AnyHttpUrl

logging.basicConfig(level=logging.INFO)
logger = logging.getLogger(__name__)

FUSIONAUTH_URL = os.environ.get("FUSIONAUTH_URL", "http://fusionauth:9011")
FUSIONAUTH_EXTERNAL_URL = os.environ.get("FUSIONAUTH_EXTERNAL_URL", "http://localhost:9011")
MCP_SERVER_URL = os.environ.get("MCP_SERVER_URL", "http://localhost:8000")
You also need to add the FusionAuth Python client to mcp-server/requirements.txt. Here's what that entire file should look like:
fastmcp>=2.0.0
fusionauth-client
uvicorn
In this code:
FUSIONAUTH_URLis the internal Docker network address (http://fusionauth:9011), which the MCP server container uses to reach FusionAuth.FUSIONAUTH_EXTERNAL_URLis the public localhost URL (http://localhost:9011), which browsers use during the OAuth flow.MCP_SERVER_URLis the public URL of the MCP server, used to construct OAuth redirect URLs.
Step 2: Implement Token Validation#
Add the following code just after the logger variable is declared:
class FusionAuthTokenVerifier(TokenVerifier):
    """Verifies tokens using the FusionAuth JWT validation endpoint."""

    def __init__(
        self,
        fusionauth_url: str,
        required_scopes: list[str] | None = None,
    ):
        super().__init__(required_scopes=required_scopes)
        self.client = FusionAuthClient(None, fusionauth_url)

    async def verify_token(self, token: str) -> AccessToken | None:
        try:
            response = self.client.validate_jwt(token)

            if not response.was_successful():
                logger.warning("Token validation failed: %s", response.error_response)
                return None

            claims = response.success_response.get("jwt", {})
            scopes = claims.get("scope", "").split() if claims.get("scope") else []

            return AccessToken(
                token=token,
                client_id=claims.get("sub", ""),
                scopes=scopes,
                expires_at=claims.get("exp"),
                claims=claims,
            )
        except Exception as e:
            logger.error("Failed to validate token: %s", e)
            return None
This code implements a token verifier that ensures that the MCP server responds only to authorized requests. To verify tokens, the MCP server:
- Calls the
/api/jwt/validateendpoint. A successful response confirms the token is valid and returns a set of claims. - Extracts scopes from the
scopeclaim in the JWT. The MCP server uses these to enforce per-tool access control. - Returns an
AccessTokenobject that is stored for future use.
The token stored by the MCP server is used by the get_name tool to get information from FusionAuth about the user who authenticated. In general the token will be exchanged for a different one and used for requests from downstream servers.
The MCP server should never forward the access token provided to downstream services. This is prohibited by the token passthrough section of the MCP security best practices document. How the MCP server properly accesses such resources is beyond the scope of this guide.
Step 3: Enable OAuth On The MCP Server#
Wire up authentication to the server by replacing the basic mcp = FastMCP(...) initialization with the following OAuth-enabled version:
token_verifier = FusionAuthTokenVerifier(
    fusionauth_url=FUSIONAUTH_URL,
    required_scopes=["get_name"],
)

auth = RemoteAuthProvider(
    token_verifier=token_verifier,
    authorization_servers=[AnyHttpUrl(FUSIONAUTH_EXTERNAL_URL)],
    base_url=MCP_SERVER_URL,
    scopes_supported=["openid", "profile", "get_name"],
)

mcp = FastMCP(
    name="FusionAuth MCP Server",
    auth=auth,
)
This code configures the MCP server's protected resource metadata, which advertises available authorization server details to MCP clients. This updated initialization does the following:
- Creates a token verifier with
required_scopes=["get_name"]: Only tokens containing theget_namescope can execute tools. The MCP server framework enforces this automatically before each tool call. - Sets
scopes_supportedonRemoteAuthProvider: This tells MCP clients which scopes to request during the OAuth flow. Includingopenidandprofileensures FusionAuth returns user profile data from the UserInfo endpoint. - Points
authorization_serversat FusionAuth's external URL: MCP clients use this to discover OAuth endpoints. - Passes
auth=authto the constructor: This enables OAuth protection on the MCP server using theRemoteAuthProvider.
All tool calls made to this MCP server require a valid access token with the get_name scope. Any client without such a token receives a 401 Unauthorized response.
Step 4: Access Authenticated User Information#
With authentication enabled, you can now access information about the authenticated user. The FastMCP framework provides a get_access_token() dependency that gives you the validated token in your tools.
Replace the entire get_name tool definition with the following implementation:
@mcp.tool()
def get_name() -> str:
    """Get the authenticated user's name from FusionAuth.

    Returns the name of the currently authenticated user. Requires a valid
    FusionAuth access token with the 'get_name' scope.
    """
    access_token = get_access_token()
    if access_token is None:
        return "Error: No access token found. Please authenticate first."

    client = FusionAuthClient(None, FUSIONAUTH_URL)
    response = client.retrieve_user_info_from_access_token(access_token.token)

    if not response.was_successful():
        logger.warning("UserInfo request failed: %s", response.error_response)
        claims = access_token.claims
        return f"Hello, {claims.get('preferred_username') or claims.get('email') or access_token.client_id}!"

    userinfo = response.success_response
    given = userinfo.get("given_name", "")
    family = userinfo.get("family_name", "")
    name = f"{given} {family}".strip() or userinfo.get("preferred_username") or userinfo.get("email") or access_token.client_id

    return f"Hello, {name}!"
Now, the get_name tool:
- Uses
get_access_token()to retrieve the stored, validated access token from the request context. - Calls FusionAuth's
/oauth2/userinfoendpoint to fetch the user's profile. - Returns a personalized greeting.
For a production MCP server, this method is where you'd access your database, services, APIs, or other functionality.
Step 5: Rebuild And Restart#
Rebuild the MCP server container with the new code:
docker compose up -d --build mcp-serverWait a few seconds for the container to restart. The MCP server now requires OAuth authentication.
Testing OAuth Protection#
Let's verify that the authentication works. Try calling the tool without authentication:
curl -X POST http://localhost:8000/mcp \
  -H "Content-Type: application/json" \
  -H "Accept: application/json, text/event-stream" \
  -d '{
    "jsonrpc": "2.0",
    "id": 1,
    "method": "tools/call",
    "params": {
      "name": "get_name",
      "arguments": {}
    }
  }'
You should see an authentication error similar to this one:
{"error": "invalid_token", "error_description": "Authentication failed. The provided bearer token is invalid, expired, or no longer recognized by the server. To resolve: clear authentication tokens in your MCP client and reconnect. Your client should automatically re-register and obtain new tokens."}This indicates that the tool is now protected and that you need a valid access token to call the get_name tool.
Let's get a valid access token for a user.
Registering MCP Clients As OAuth Clients#
The first step is to register anything that is going to be requesting a token as an OAuth client. Before MCP clients like Claude Desktop or Cursor can connect to your protected MCP server, you need to register them in FusionAuth.
Right now all MCP client registration needs to take place out-of-band and before the MCP client connects to FusionAuth. For example, you can do this registration on-demand using the API in a developer portal. For more information, see the issues for Dynamic Client Registration and Client ID Metadata Documents.
The Registration Process#
Each MCP client needs its own dedicated OAuth application in FusionAuth. This means if you want to support both Claude Desktop and Cursor, you register two separate applications. When an MCP client initiates the OAuth grant, it looks like this:
- The MCP client redirects the user to FusionAuth to log in.
- The user authenticates.
- The user approves the requested scopes.
- FusionAuth redirects the user back to the MCP client with an authorization code.
- The MCP client exchanges the code for an access token.
- The MCP client passes the token to the MCP server with each request.
For the OAuth grant to work, FusionAuth needs to know:
- which redirect URLs are allowed for each MCP client
- whether PKCE is required (many MCP clients use PKCE for security)
- which OAuth grants are enabled
- the resource URL, which is the MCP server
What The Setup Script Does#
The setup_clients.py script automates this registration process using the Python client library. To integrate pre-registration into a developer portal, you'd build similar functionality using the Python client library or one of the other client libraries.
You'll find setup_clients.py in the setup directory. Let's look at the key parts.
The script prompts you for a name for the client, then creates an OAuth application in FusionAuth. Run it once for each MCP client you want to register. It registers exact redirect URLs for a fixed callback port (default 3334):
def create_client_application(
    client: FusionAuthClient, client_name: str, port: int, mcp_server_url: str
) -> "dict | None":
    """Create an OAuth application in FusionAuth for an MCP client."""
    app_id = str(uuid.uuid4())

    relationship = "ThirdParty"

    redirect_urls = [
        f"http://localhost:{port}/oauth/callback",
        f"http://127.0.0.1:{port}/oauth/callback",
        f"http://localhost:{port}/callback",
        f"http://127.0.0.1:{port}/callback",
    ]
    pkce_policy = "Required"
    client_auth_policy = "NotRequiredWhenUsingPKCE"
    require_client_auth = False

    response = client.create_application({
        "application": {
            "name": client_name,
            "oauthConfiguration": {
                "authorizedRedirectURLs": redirect_urls,
                "authorizedResourceUris": [mcp_server_url+"/mcp"],
                "authorizedURLValidationPolicy": "ExactMatch",
                "clientAuthenticationPolicy": client_auth_policy,
                "enabledGrants": ["authorization_code", "refresh_token"],
                "generateRefreshTokens": True,
                "proofKeyForCodeExchangePolicy": pkce_policy,
                "requireClientAuthentication": require_client_auth,
                "relationship": relationship,
                "scopeHandlingPolicy": "Strict",
            },
        }
    }, app_id)

    if response.status in (200, 201):
        app_data = response.success_response["application"]
        result = {
            "name": client_name,
            "client_id": app_data["id"],
        }
        return result
    else:
        print(f"  Failed to create {client_name}: {response.status}")
        return None
This includes the following key configuration values:
authorizedURLValidationPolicy: "ExactMatch"requires the redirect URL to match one of the registered URLs exactly. This is more secure than wildcard matching. Pass--portto the setup script if port3334is already in use on your machine.authorizedResourceUrisis the list of MCP servers allowed.proofKeyForCodeExchangePolicy: "Required"enforces PKCE for security.clientAuthenticationPolicy: "NotRequiredWhenUsingPKCE"means that no client secret is needed when PKCE is used.scopeHandlingPolicy: "Strict"only allows scopes that are explicitly registered on the application.
The script returns the generated client Id and a full MCP configuration block to paste into common client configuration.
Run The Client Registration Script#
Install the dependencies and run the setup script:
cd setuppip install -r requirements.txtpython setup_clients.pyBy default, the script registers port 3334 as the OAuth callback port. If port 3334 is already in use on your machine, pass --port to use a different one:
python setup_clients.py --port 3335The script prompts you for a name for the MCP client. You need to run it for each client you want to register. You should see output similar to the following:
FusionAuth MCP Client Setup
========================================

Checking FusionAuth at http://localhost:9011...
FusionAuth is running.

Enter a name for this MCP client (e.g. Claude Desktop): Claude Desktop

  Creating Claude Desktop...
  Created Claude Desktop (Client Id: 9436b02d-9305-4772-a237-5fabcf6e7f6a)

  Configuring scope...

========================================
Setup complete!
========================================

  MCP configuration for Claude Desktop:
  Client Id: 9436b02d-9305-4772-a237-5fabcf6e7f6a

  Add this to your MCP client config:
  {
  "mcpServers": {
    "name-server": {
      "command": "npx",
      "args": [
        "mcp-remote",
        "http://localhost:8000/mcp",
        "3334",
        "--allow-http",
        "--static-oauth-client-info",
        "{\"client_id\":\"9436b02d-9305-4772-a237-5fabcf6e7f6a\",\"scope\":\"openid profile get_name\"}"
      ]
    }
  }
}


Test user credentials:
  Email: test@example.com
  Password: password
The script outputs the complete MCP client configuration for Claude Desktop, including the pre-registered client Id.
Your client Id will be different than the one above, which starts with 9436b02d.
It also outputs a test user that you'll use to log in to FusionAuth when prompted.
Configuring Your MCP Client#
Next, configure the MCP client to connect to the OAuth-protected MCP server. The script output this JSON:
{
  "mcpServers": {
    "name-server": {
      "command": "npx",
      "args": [
        "mcp-remote",
        "http://localhost:8000/mcp",
        "3334",
        "--allow-http",
        "--static-oauth-client-info",
        "{\"client_id\":\"9436b02d-9305-4772-a237-5fabcf6e7f6a\",\"scope\":\"openid profile get_name\"}"
      ]
    }
  }
}
This is set up for Claude Desktop with a pre-registered client running and the MCP server running over HTTP using the mcp-remote proxy, and would be added to ~/Library/Application\ Support/Claude/claude_desktop_config.json on macOS and %APPDATA%\Claude\claude_desktop_config.json on Windows.
Not every client will need this exact configuration. The important configuration parameters are:
- the location of the MCP server:
http://localhost:8000/mcp - the fact the MCP server is running over HTTP, not TLS
- the callback port:
3334 - the OAuth client information, including the
client_idand thescopevalues
The best way to set up your MCP client is to follow the instructions from its documentation. Here are instructions for some common MCP clients.
- ChatGPT
- Claude
- Claude Code
- Cursor
- MCP docs on connecting to local MCP servers; the mcp-remote proxy is useful for this situation
Testing The Protected Server#
Restart your MCP client, if needed, to load the new configuration. When your MCP client starts, it does the following:
- Discovers the OAuth configuration from the MCP server.
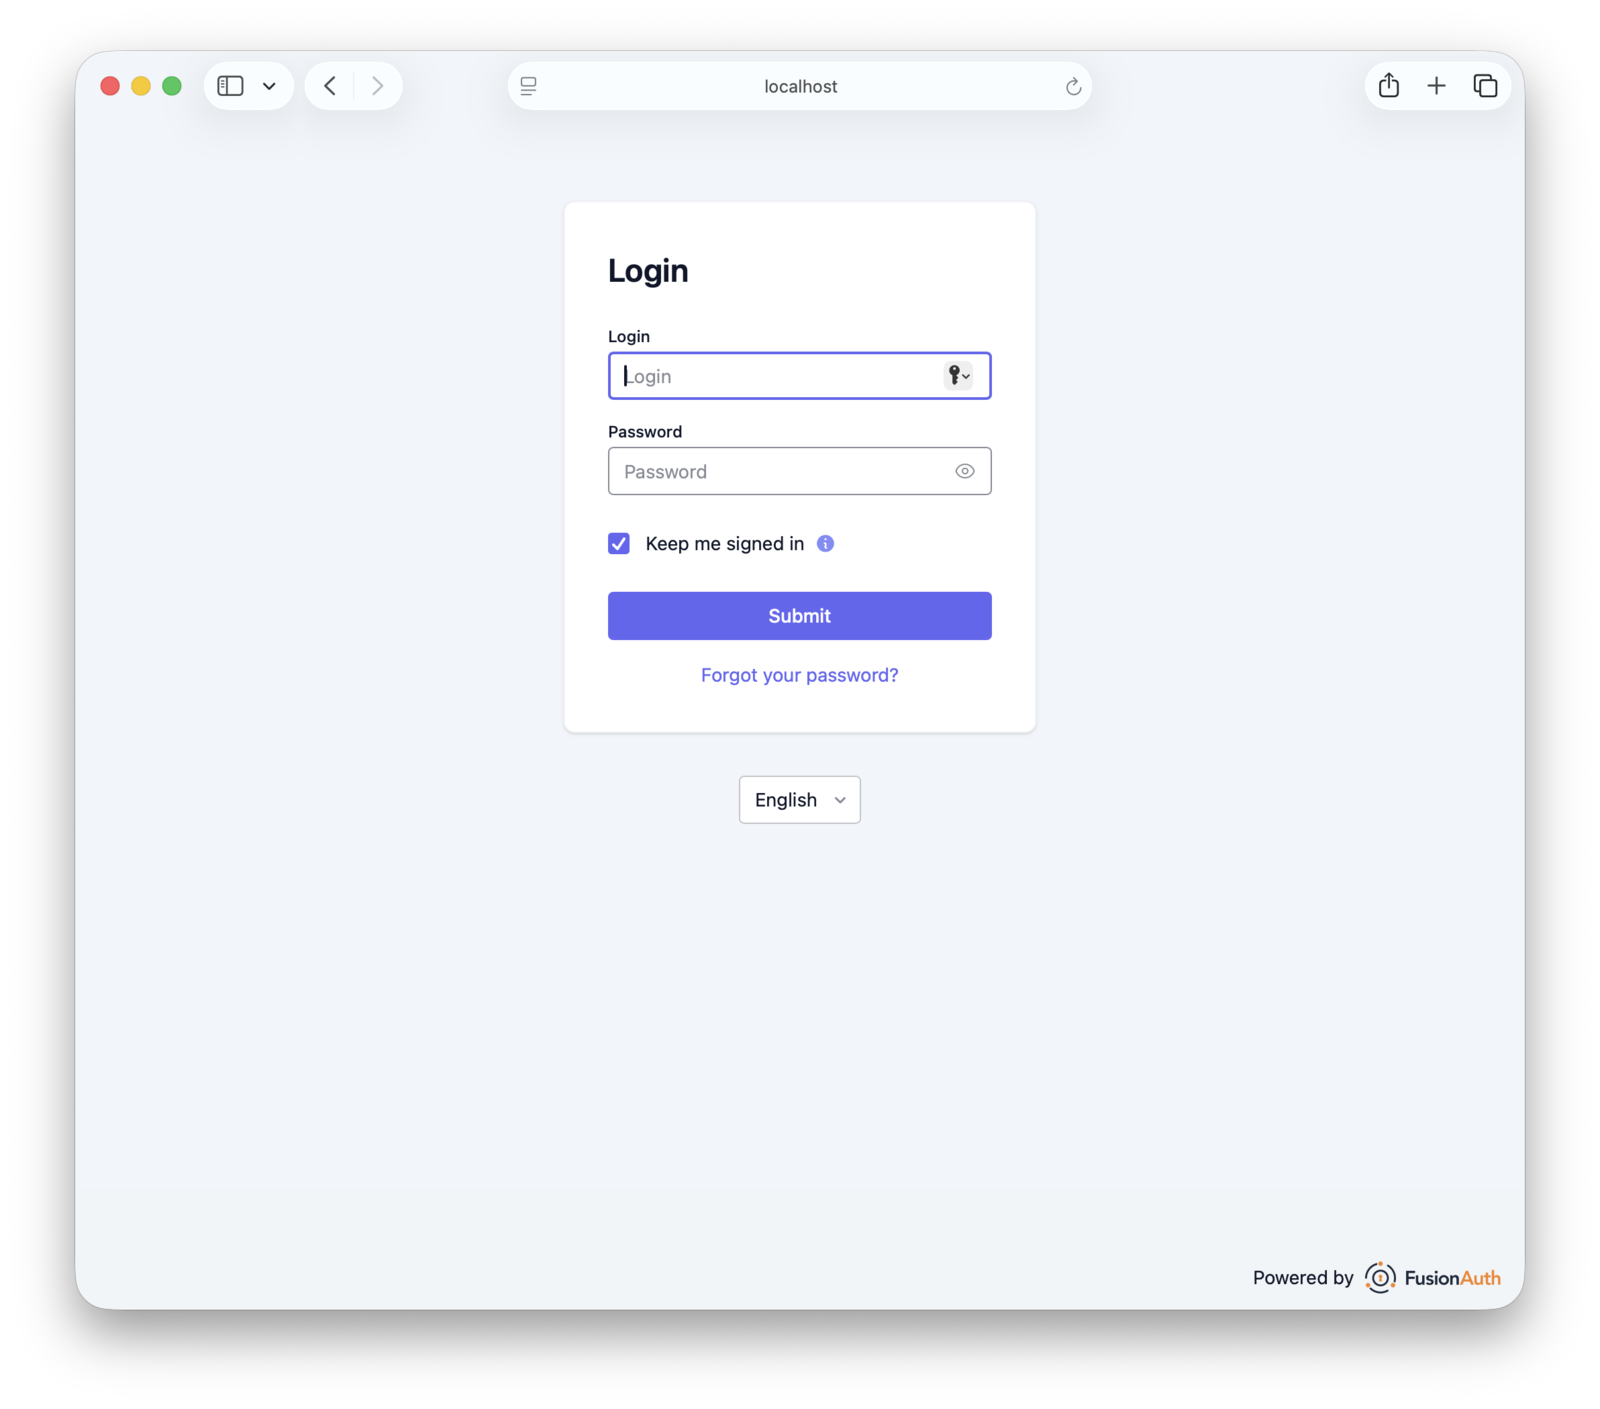
- Opens your browser to FusionAuth's login page.
- Asks you to authenticate; use the test user.
Log In#
When the browser opens, log in with the test credentials:
- Email:
test@example.com - Password:
password
If your MCP client uses a different port, pass --port to the setup script to register the correct port, or add the missing URL manually by logging into the admin UI and navigating to Applications -> [Your Client] -> OAuth -> Authorized redirect URLs in the FusionAuth admin UI. Once done, log out of the admin UI to keep your admin and test user sessions separate.
If you see a message about an "Incompatible Auth Server" or "Does Not Support Dynamic Client Registration", your MCP client is attempting to auto-register itself as an OAuth client using Dynamic Client Registration (DCR). FusionAuth does not support this.
Consent to Scopes#
You'll be prompted to consent to allow the application to access your name and profile details.
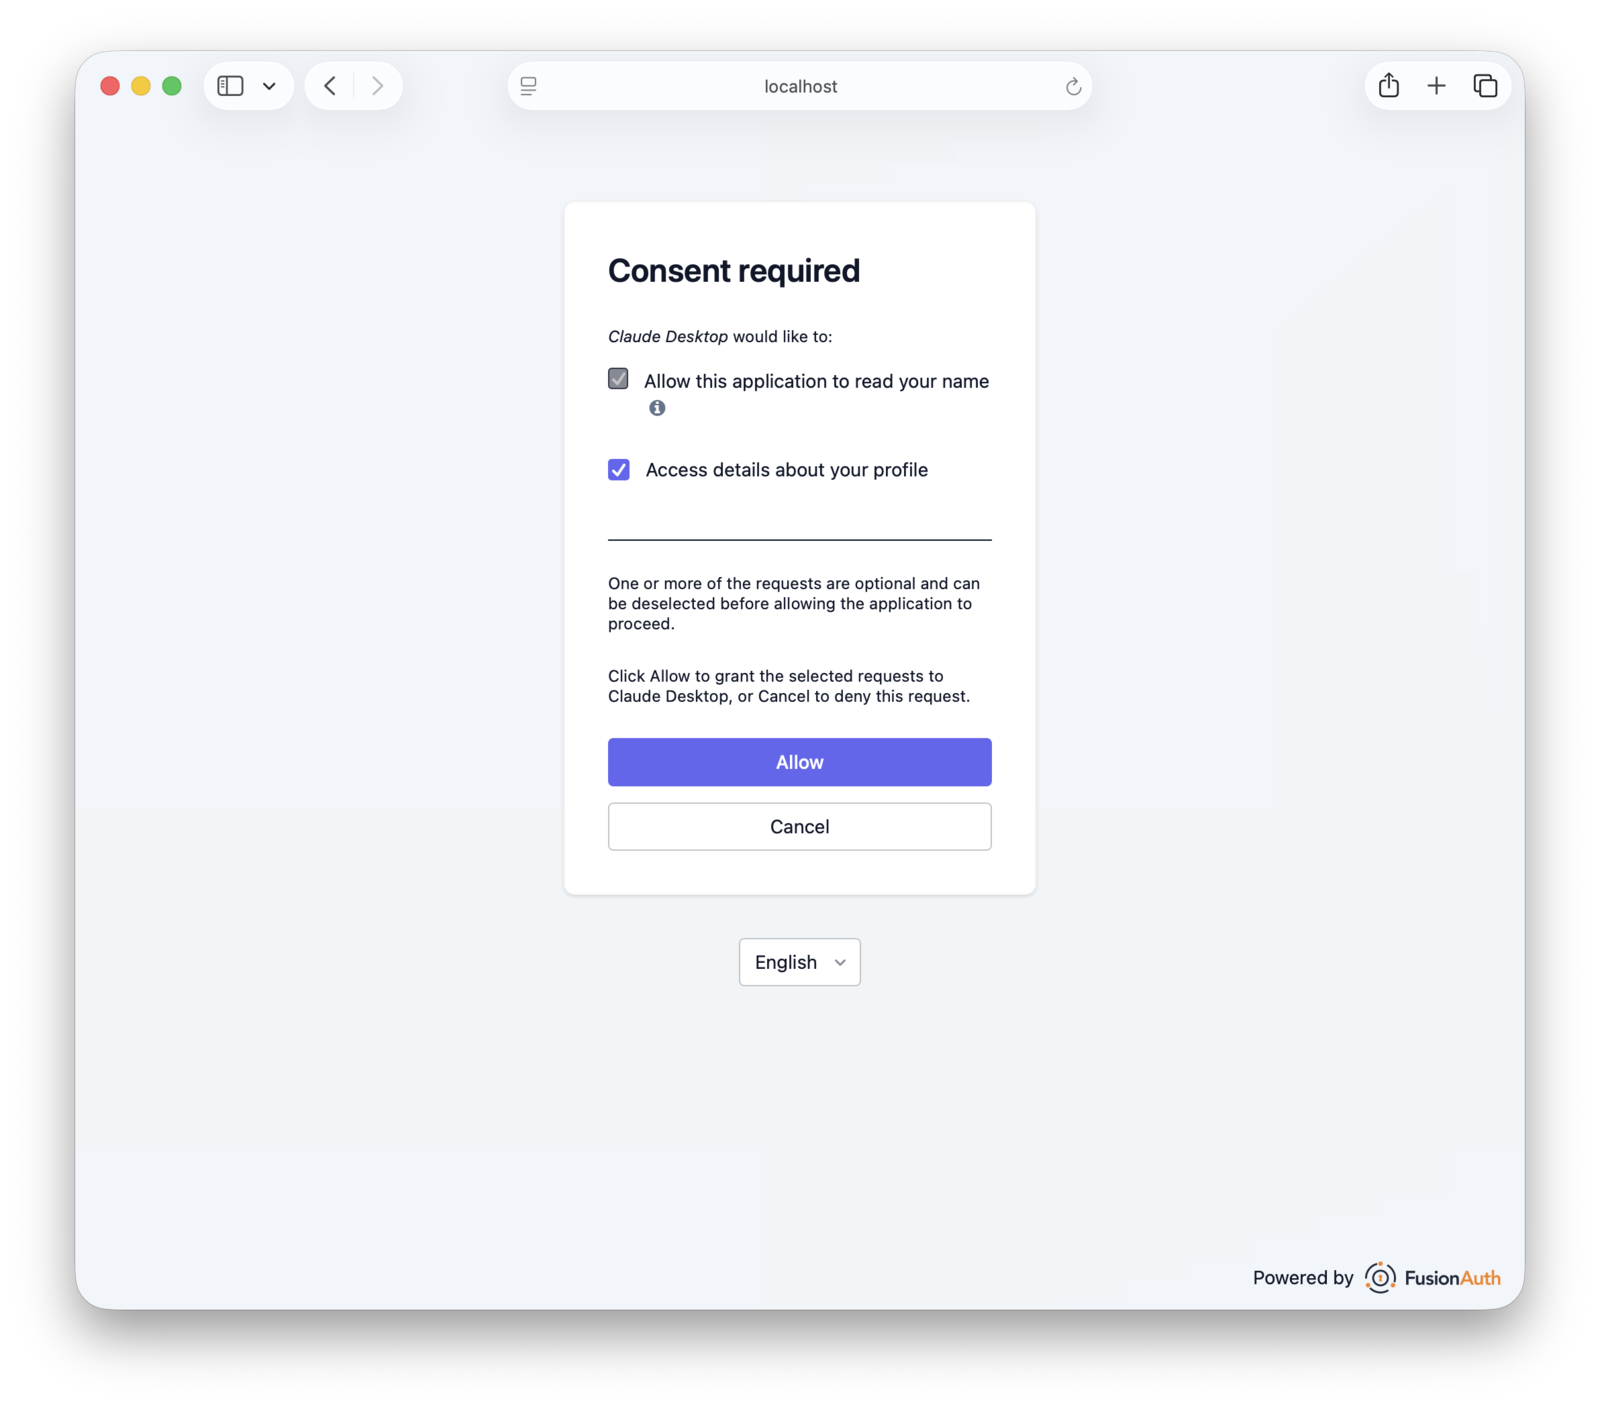
As a user, you can allow or deny some scopes, whereas others are required.
Authorization#
After you log in, FusionAuth directs you to an "Authorization successful!" page and redirects you back to the MCP client automatically. If your application is a desktop client, you may be prompted to close the web page.
If you see an "Invalid redirect_uri" error, your MCP client is using a port or callback path that wasn't registered by the setup script. OAuth clients redirect users back to a specific URL after authentication. If FusionAuth doesn't recognize the redirect URL, it rejects the request. The setup script registers exact redirect URLs for port 3334 by default.
Use The Protected Tool#
Once authorized, your MCP client has access to the MCP server's tools. Ask your MCP client:
call the get_name toolAnd you should see a response similar to:
The get_name tool returned "Test User"The MCP client validated the access token and executed the tool call. In this case, the call retrieved your first and last name from FusionAuth.
If you don't see the message, check the MCP server logs for any errors:
docker compose logs mcp-serverAdditional steps to take:
- verify that the token includes the required scopes;
- completely quit and restart your MCP client
- if you are using
mcp-remote, delete the~/.mcp-auth/directory to remove cached tokens.
Production Considerations#
This example demonstrates the core patterns for OAuth-protected MCP servers. For production deployments, you'll want some or all of:
- HTTPS: Use HTTPS for all endpoints, remove the
--allow-httpflag, and configure proper TLS certificates. - Token caching: Cache token validation responses to avoid calling FusionAuth's JWT validation endpoint on every request. Set the cache TTL to match token expiration.
- Refresh tokens: Configure your FusionAuth application to issue refresh tokens for long-lived sessions by enabling the refresh grant and requesting the
offline_accessscope.mcp-remotestores tokens in~/.mcp-authand handles token refresh automatically. Support for the refresh grant varies across other MCP clients, so check your client's documentation. - Multiple scopes: As you add more tools, create specific scopes for each set of tools and configure the token verifier to require the appropriate scopes.
- Monitoring: Log token validations and tool calls in the MCP server. In FusionAuth, use the login records API to track which users have authenticated against which MCP clients and when.
- Rate limiting: Implement per-user rate limits in the MCP server and return HTTP
429responses when limits are exceeded. - Preregistering clients at scale: If you need to onboard many MCP clients, automate registration by modifying the setup script to create many applications.
Deploying A Remote MCP Server#
For a production deployment, you would host the MCP server on a remote machine and connect to it over HTTPS. The MCP server code requires no changes. The only differences are infrastructure, configuration, and how MCP clients connect.
Infrastructure Requirements#
For a remote deployment you need:
- A server hosting your MCP server, accessible over the internet.
- A reverse proxy such as Caddy (which handles TLS certificates automatically) or TLS configured directly on your load balancer to serve HTTPS on the MCP server endpoint.
- A publicly accessible FusionAuth instance, since the OAuth browser redirect requires the user's browser to reach FusionAuth.
Server Configuration#
The protected-remote-mcp folder of the example repository contains a docker-compose.yml that runs only the MCP server, with no FusionAuth or database. Copy it to your server and set the following environment variables when starting:
MCP_SERVER_URL. Set this to your server's public HTTPS URL (e.g.https://mcp.example.com). The MCP server uses this to construct the OAuth metadata that MCP clients discover.FUSIONAUTH_URL. Set this to your FusionAuth instance's public URL. The MCP server uses this to validate tokens internally.FUSIONAUTH_EXTERNAL_URL. Set this to the same value. This is the URL that MCP clients use in their browser to complete the OAuth flow. In containerized deployments where FusionAuth is reachable internally at a different address, the two can differ.
If you are running docker on your remote server and the hostname of the MCP server is mcp.example.com and the hostname of the FusionAuth server is auth.example.com, you'd run this:
MCP_SERVER_URL=https://mcp.example.com \
FUSIONAUTH_URL=https://auth.example.com \
FUSIONAUTH_EXTERNAL_URL=https://auth.example.com \
docker compose up -d
Registering Remote MCP Clients#
Run the setup script from the protected-remote-mcp/setup directory. Make sure you point it at the remote FusionAuth instance and update the MCP server URL as well:
python setup_clients.py \
  --fusionauth-url https://auth.example.com \
  --api-key YOUR_API_KEY \
  --mcp-server-url https://mcp.example.com
Consult the documentation to connect your preferred agentic frameworks or other MCP clients. Since you added the MCP clients using the script, you'll want to set up pre-registered MCP clients. If your client needs a client secret, modify the setup script to print that out.
Supporting pre-registered clients is required by the MCP specification, so every MCP client should work.