Configure SMTP
On this page
Before you can use email templates and other email features in FusionAuth, you must first enable and configure a Simple Mail Transfer Protocol (SMTP) server.
FusionAuth doesn't include an SMTP server. Instead, you configure FusionAuth to connect to one ("bring your own SMTP server" or BYOSS). This design choice allows you to:
- use whatever email sending service you'd like (some are listed below, but FusionAuth will work with any providers with an SMTP API)
- send email from your own IPs with reputation you control
- skip configuring an SMTP server if you are not sending email from FusionAuth
Configure an SMTP Provider in FusionAuth#
To enable and configure the FusionAuth SMTP server, navigate to Tenants -> Edit -> Email .
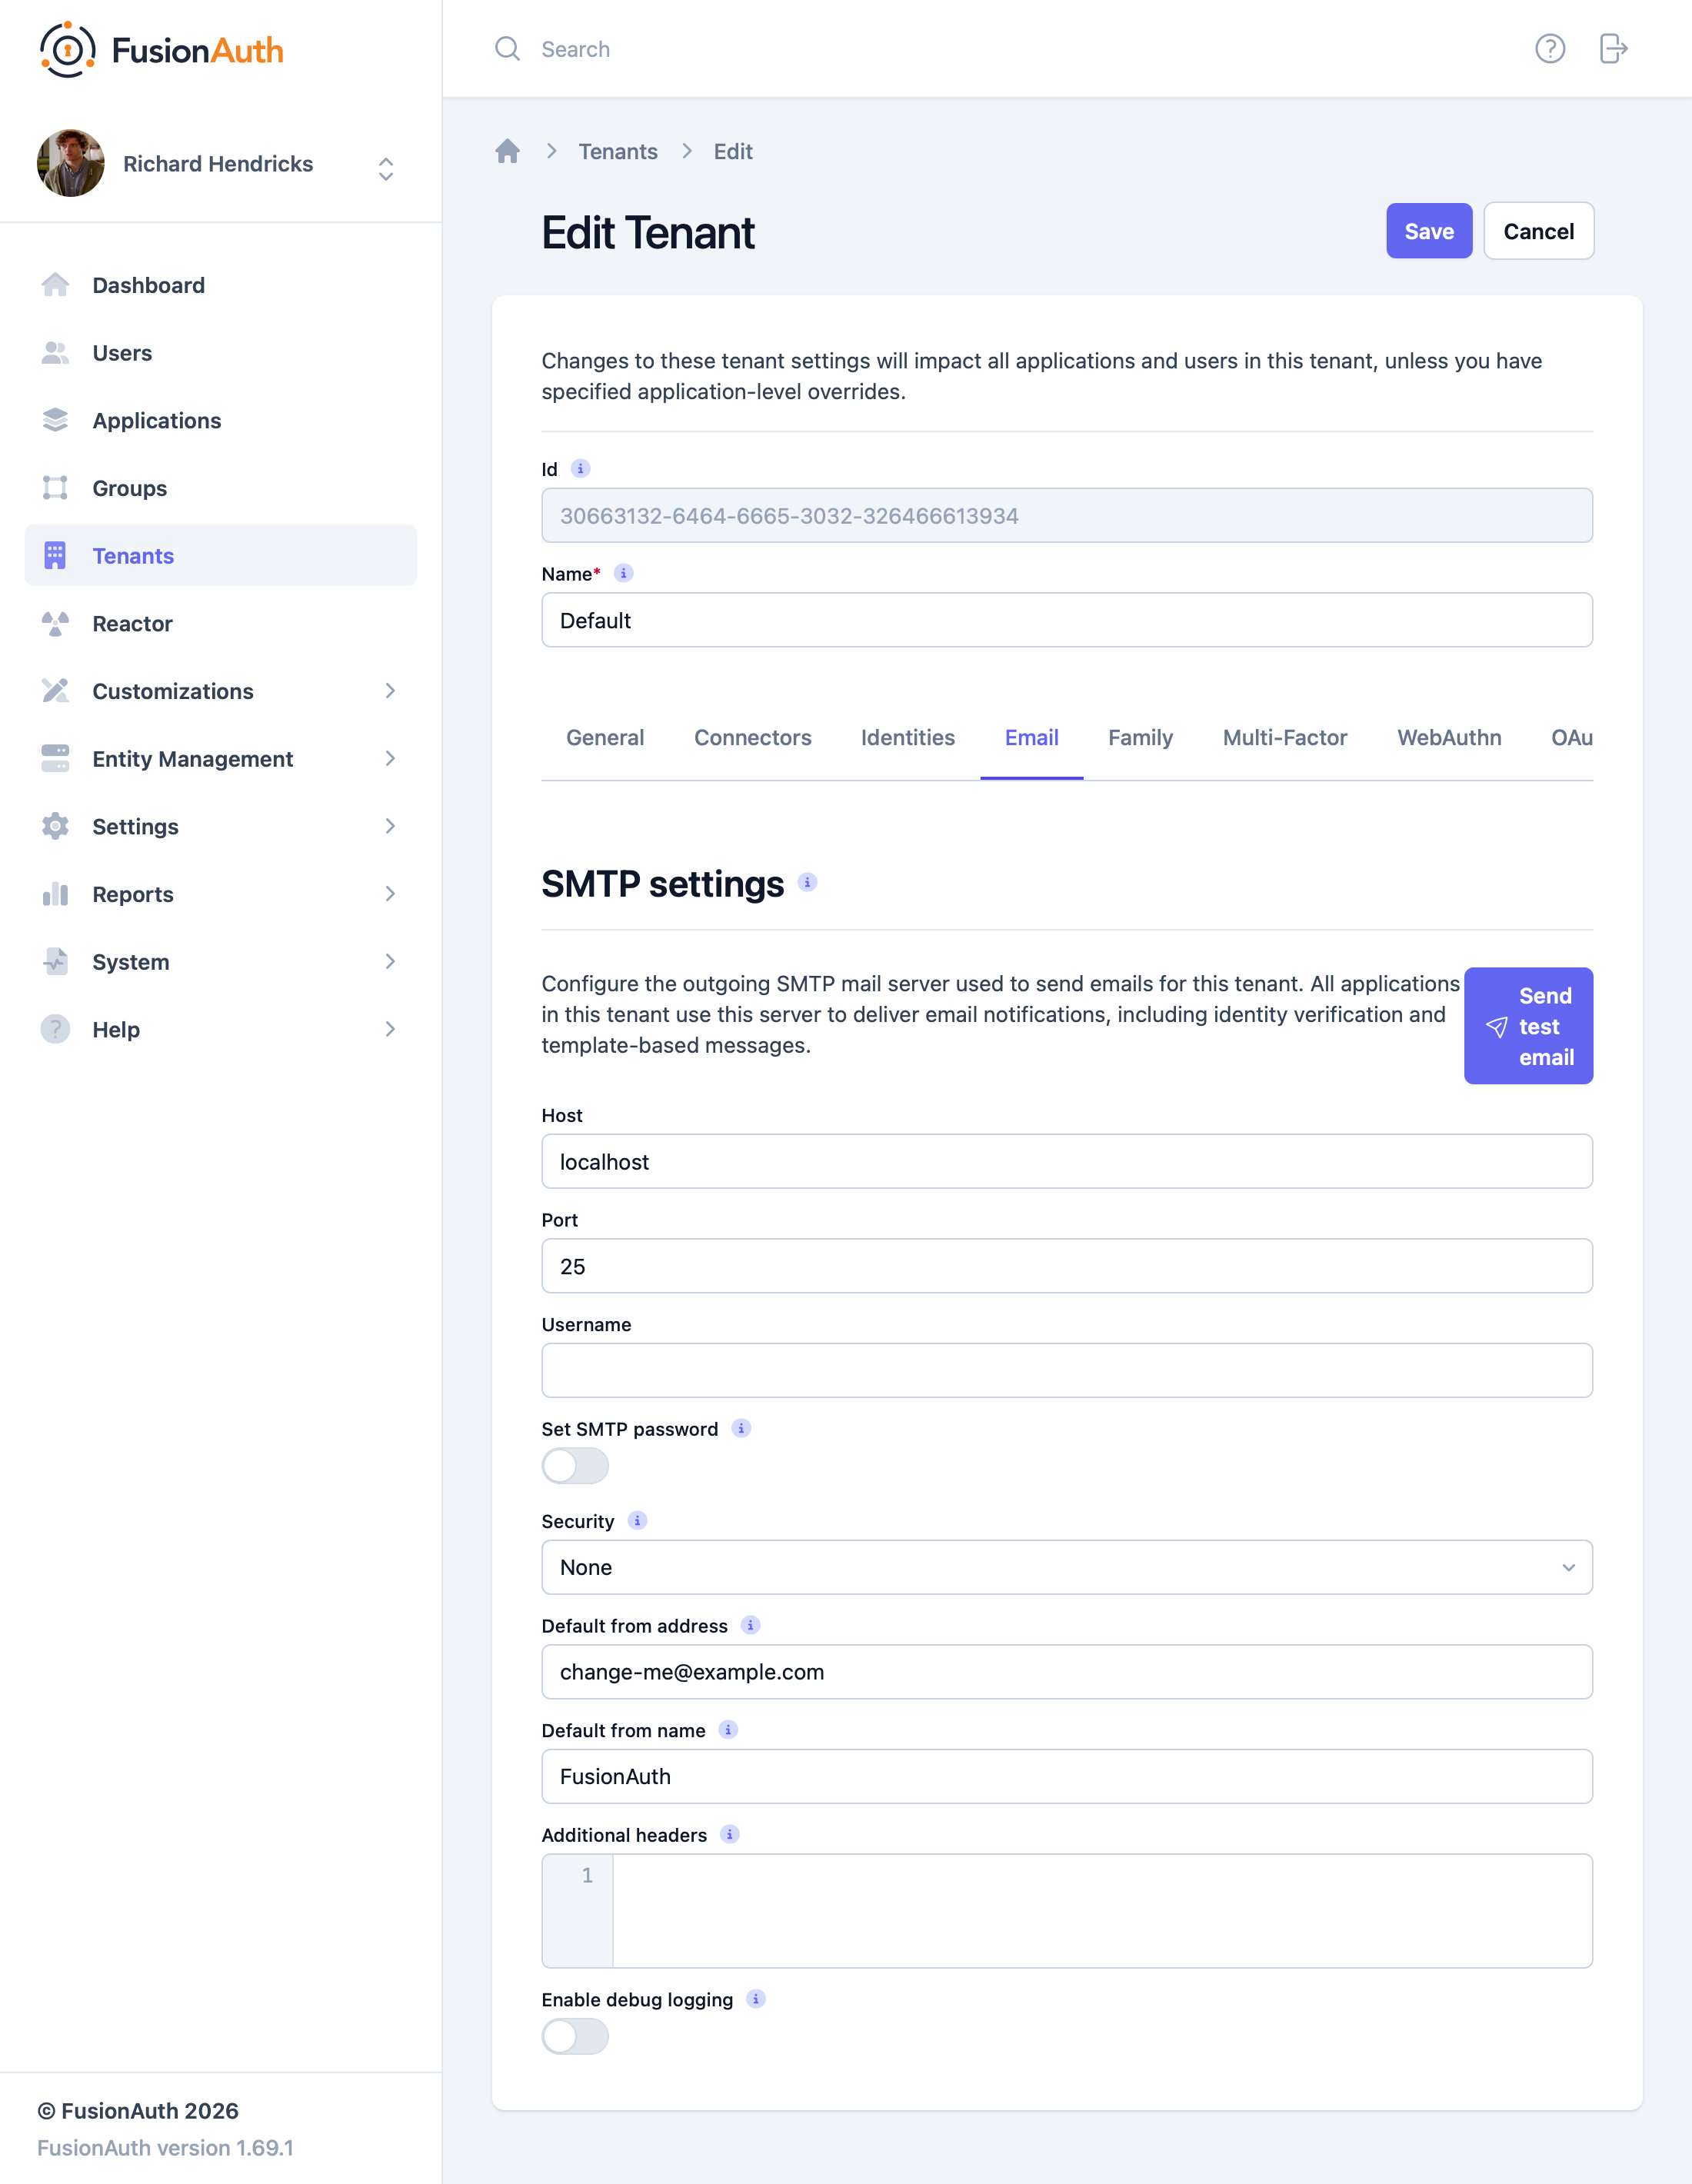
Enable email by clicking on the Enabled toggle, and save your settings once you have completed your configuration.
To avoid disrupting your application's current DNS records, you may want to point FusionAuth SMTP fields to a temporary subdomain. For example, if your application is hosted at myapp.com, you can create testemail.myapp.com, and point the SMTP service and FusionAuth there while testing.
Strict SMTP providers require you to have a trustworthy-looking domain and website before they activate your account.
There is a troubleshooting section below this one if you encounter errors while trying to send a test email.
The DNS records you need to add for SMTP will usually be of type TXT. A value of @ for the Host of a record means the domain itself, and is a common default value.
Be careful not to duplicate the domain name when entering DNS records. For example, if your host is myapp.com and the TXT record value the SMTP provider wants you to add is send.myapp, be sure the final value is send.myapp.com, and not send.myapp.myapp.com. Check the suffix your host attaches to the field.
If your DNS provider uses cPanel, alter your records at Domains -> Zone Editor .
SMTP Settings#
Below are descriptions of the SMTP settings you will configure in FusionAuth in the following section.
HostThe hostname of the SMTP server. This will be provided by your SMTP provider.
PortThe port of the SMTP server. This will be provided by your SMTP provider. Ports 25, 465, and 587 are well-known ports used by SMTP, but your provider may use a different port.
In most cases, you will use TLS to connect to your SMTP server and the port will be 587 or 465.
UsernameThe username used to authenticate with the SMTP server. This will be provided by your SMTP provider.
Change passwordWhen enabled, you may modify the password used to authenticate with the SMTP server. When the Password field is not displayed, the current password cannot be modified.
PasswordThe new password to use for outgoing SMTP mail server authentication. This field is only required when Change password is checked.
SecurityThe security type when using an SSL connection to the SMTP server. This value should be provided by your SMTP provider.
Generally, you will select None if using port 25, SSL if using port 465, and TLS if using port 587. Your provider may be different; follow your provider's instructions.
NoneSSLTLS
Default from addressThe default From Address used when sending emails if a from address is not provided for an individual email template. This is an email address (for example, jared@piedpiper.com).
Default from nameThe default From Name used when sending emails if a from name is not provided on an individual email template. This is the display name part of the email address (for example, Jared Dunn <jared@piedpiper.com>).
Additional headersOne or more line-separated SMTP headers to be added to each outgoing email. The header name and value should be separated by an equals sign, for example, X-SES-CONFIGURATION-SET=Value.
Enable debug loggingCreates event log entries to help debug SMTP and email delivery errors. Check System -> Event Log .
Providers#
AWS SES#
- Create an account at https://aws.amazon.com.
- In your account dashboard, search for SES and start the account setup wizard by clicking Get set up on the left sidebar.
- Add your email and domain.
- Verify your email when AWS emails you a link.
- Add the DNS records AWS SES gives you to your domain's DNS settings.
- After a few minutes, the SES Verify sending domain status should change from
Verification pendingtoVerified.
- Browse to SMTP settings in the AWS sidebar.
- Click Create SMTP credentials and note the created SMTP credentials.
- In your tenant's Email tab in the FusionAuth web interface, set the following values:
- Host:
email-smtp.eu-west-1.amazonaws.com(use your host from the SMTP settings page) - Port:
587 - Username: Your username from the SMTP credentials page
- Password: Your SMTP password from the credentials page
- Security:
TLS - Default from address:
me@myapp.com(use your verified domain)
- Host:
- Click Send test email to test that the settings work. You must send to an email address verified with SES. Use the address you gave when creating your SES account.
- Click the save icon at the top right.
SES is more complicated than the other SMTP services. If the troubleshooting section at the bottom of this article does not help you, please consult the SES documentation.
Brevo (Previously Sendinblue)#
- Create an account at https://app.brevo.com.
- If Brevo suspends your account for violating the terms of service, contact support on this page to activate it.
- Browse to https://app.brevo.com/senders/domain/list.
- Add your domain name.
- In your website domain manager, add the DNS records from the domain authentication page.
- Once you have entered the DNS records and saved, start the verification process on the Brevo page. It should take a minute.
- Browse to https://app.brevo.com/senders/list.
- Add sender:
me@myapp.com(use your domain name). - In Brevo, authenticate your email address.
- Add sender:
- Browse to https://app.brevo.com/settings/keys/smtp and note your SMTP settings.
- In your tenant's Email tab in the FusionAuth web interface, set the following values:
- Host:
smtp-relay.brevo.com - Port:
587 - Username: Your Brevo SMTP login from the settings page
- Password: Your SMTP key value from the settings page
- Security:
TLS - Default from address: Any address is allowed
- Host:
- Click Send test email to test that the settings work, then click the save icon at the top right.
Gmail#
As well as being a popular ESP, Gmail can be used by programs to send email through SMTP. Gmail is not recommended for production use, since it has a number of limits. However, it can be useful to test email functionality.
For Gmail, use application passwords or you may get a generic Unable to send email via JavaMail / Prime Messaging Exception error. The application passwords support article says you need to enable two-factor authentication, then create an app password on the security tab. However, there is no App password setting on the tab. You need to browse to https://myaccount.google.com/apppasswords manually to create one.
- In your tenant's Email tab in the FusionAuth web interface, set the following values:
- Host:
smtp.gmail.com - Port:
587 - Username: Your full Gmail address (including @gmail.com)
- Password: Your app password (including spaces)
- Security:
TLS - Default from address: Your full Gmail address
- Host:
- Click Send test email to test that the settings work, then click the save icon at the top right.
Mailchimp (Previously Mandrill)#
Mailchimp is currently integrating its transactional email marketing plugin, Mandrill, into its main brand. At the time of writing, you need to create an account with Mailchimp, then log in to Mandrill afterwards.
Mailchimp refused to provide FusionAuth with an account while writing this article. The steps below should work, but we were unable to send a test email to be certain.
- Sign up for an account at https://login.mailchimp.com/signup/?entrypoint=mandrill&locale=en.
- If Mailchimp suspends your account for violating the terms of service, click View issues at the top of the Mailchimp website, then Resolve at the bottom of the page to contact support.
- Log in to https://mandrillapp.com/settings/sending-domains and add your domain name in the text field at the bottom of the page.
- At the bottom of the page click View details for each record that needs to be verified.
- In your website domain manager, add the DNS records from the domain authentication page.
- Once you have entered the DNS records and saved, start the verification process on the Mailchimp page. It should take a minute.
- Browse to https://mandrillapp.com/settings/index and note your SMTP settings. Create a new API key at the bottom of the page.
- In your tenant's Email tab in the FusionAuth web interface, set the following values:
- Host:
smtp.mandrillapp.com - Port:
587 - Username: Enter anything
- Password: Your API key
- Security:
TLS - Default from address: Use an address at your domain
- Host:
- Click Send test email to test that the settings work, then click the save icon at the top right.
MailerSend#
- Create an account at https://app.mailersend.com.
- Browse to Email -> Domains and click Manage on the trial domain MailerSend created for you.
- Under SMTP , click Generate new user and then enter the SMTP name for the user.
- MailerSend will generate the user credentials and you can save them.
- In your tenant's Email tab in the FusionAuth web interface, set the following values:
- Host:
smtp.mailersend.net - Port:
587 - Username: Your username from the User page
- Password: Your password from the User page
- Security:
TLS - Default from address: Use your MailerSend trial, such as
fa@trial-o89qngkvfrwlwr32.mlsender.net
- Host:
- Click Send test email to test that the settings work, then click the save icon at the top right.
- To use your real domain, browse to Email -> Domains .
- Click Add domain .
- On the Domain verification page, you are given DNS records to add to your domain.
- In your domain manager website, add these records.
- Once you have entered the DNS records and saved, start the verification process at the bottom of the MailerSend page. It should take a minute and you will be emailed when verification is done.
- Click Generate new user for this domain and use the SMTP details in FusionAuth.
Mailgun (Sinch)#
- Create an account at https://signup.mailgun.com/new/signup.
- If you are only testing Mailgun, you can use the sandbox domain name Mailgun creates for you to send emails. If you have paid for an account, you should add and verify your company's real domain.
- Add your domain name under Sending -> Add new domain in the Mailgun dashboard at https://app.mailgun.com/mg/sending/new-domain.
- In your domain manager website, add the DNS records from the domain authentication page.
- Once you have entered the DNS records and saved, start the verification process on the Mailgun page. It should take a minute.
- If you are using an unpaid account, you need to add authorized email receivers. Browse to Domains -> Overview and ensure the sandbox domain is selected. Add the email address where you want to receive a test email from FusionAuth.
- Click the verification link in the email you receive to authorize your address.
- Browse to https://app.mailgun.com/mg/sending/domains. Click the gear icon to the right of your domain name and select Settings to browse to a page like https://app.mailgun.com/app/sending/domains/myapp.com/settings. Select the SMTP credentials tab.
- In your tenant's Email tab in the FusionAuth web interface, set the following values:
- Host:
smtp.mailgun.org - Port:
587 - Username: Your login name. If using an unpaid account you must use the sandbox domain.
- Password: Get this by pushing Reset password in Mailgun and copying the value you are given.
- Security:
TLS - Default from address: Use your Username value from above
- Host:
- Click Send test email to test that the settings work, then click the save icon at the top right. Enter your authorized email address for the test email, so you can test it arrives.
Postmark#
- Create an account at https://account.postmarkapp.com/sign_up and enter your domain name.
- Verify your email address.
- Browse to https://account.postmarkapp.com/signature_domains.
- Click DNS Settings above your domain name.
- In your domain manager website, add the DNS records from the domain authentication page.
- Once you have entered the DNS records and saved, start the verification process on the Postmark page. It should take a minute.
- To see your SMTP settings, browse to https://account.postmarkapp.com/servers, then click My First Server -> Default Transactional Stream -> Setup Instructions -> SMTP .
- In your tenant's Email tab in the FusionAuth web interface, set the following values:
- Host:
smtp.postmarkapp.com - Port:
587 - Username: Your username from the settings page
- Password: Your password from the settings page
- Security:
TLS - Default from address: Any address is allowed
- Host:
- Click Send test email to test that the settings work, then click the save icon at the top right.
While in the Postmark sandbox mode before account approval, you may not send emails to addresses outside your domain. These addresses will be shown in the Activity tab of your server on Postmark.
Resend#
- Create an account at https://resend.com.
- Browse to https://resend.com/domains.
- In your website domain manager, add the records from Resend at the link above.
- You need to set only the DKIM and SPF fields for testing. The DMARC field is optional and required only for your production server.
- Once you have entered the DNS records and saved, return to https://resend.com/domains and start the verification process. It should take a few minutes.
- Browse to https://resend.com/api-keys and create a key with sending access only.
- Browse to https://resend.com/settings/smtp and note your SMTP details.
- In your tenant's Email tab in the FusionAuth web interface, set the following values:
- Host:
smtp.resend.com - Port:
587 - Username:
resend - Password: Your API key
- Security:
TLS - Default from address: Use an email address at your domain
- Host:
- Click Send test email to test that the settings work, then click the save icon at the top right.
For an overview of all the records Resend asks you to set on your domain, please read their documentation. For more general information, read the Resend documentation on SMTP.
SendGrid (Twilio)#
- Create an account at https://signup.sendgrid.com.
- Verify your email address.
- Browse to https://app.sendgrid.com/settings/sender_auth/senders/new and create a new sender.
- Enter all company details and click Create .
- Verify your sender email address.
- Browse to https://app.sendgrid.com/settings/sender_auth and under Authenticate Your Domain , click Get Started .
- In your domain manager website, add the DNS records from the domain authentication page.
- Once you have entered the DNS records and saved, start the verification process on the SendGrid page. It should take a minute.
- To see your SMTP settings, browse to https://app.sendgrid.com/guide/integrate/langs/smtp.
- Create an API key.
- In your tenant's Email tab in the FusionAuth web interface, set the following values:
- Host:
smtp.sendgrid.net - Port:
587 - Username: apikey
- Password: Your API key from the settings page
- Security:
TLS - Default from address: Your verified sender created earlier
- Host:
- Click Send test email to test that the settings work, then click the save icon at the top right.
Send A Test Email#
Available since1.16.0
The first step is to ensure that you can send a test email. Navigate to Tenants -> Your Tenant -> Edit -> Email and send a test email. If it is received, FusionAuth can send emails via SMTP.
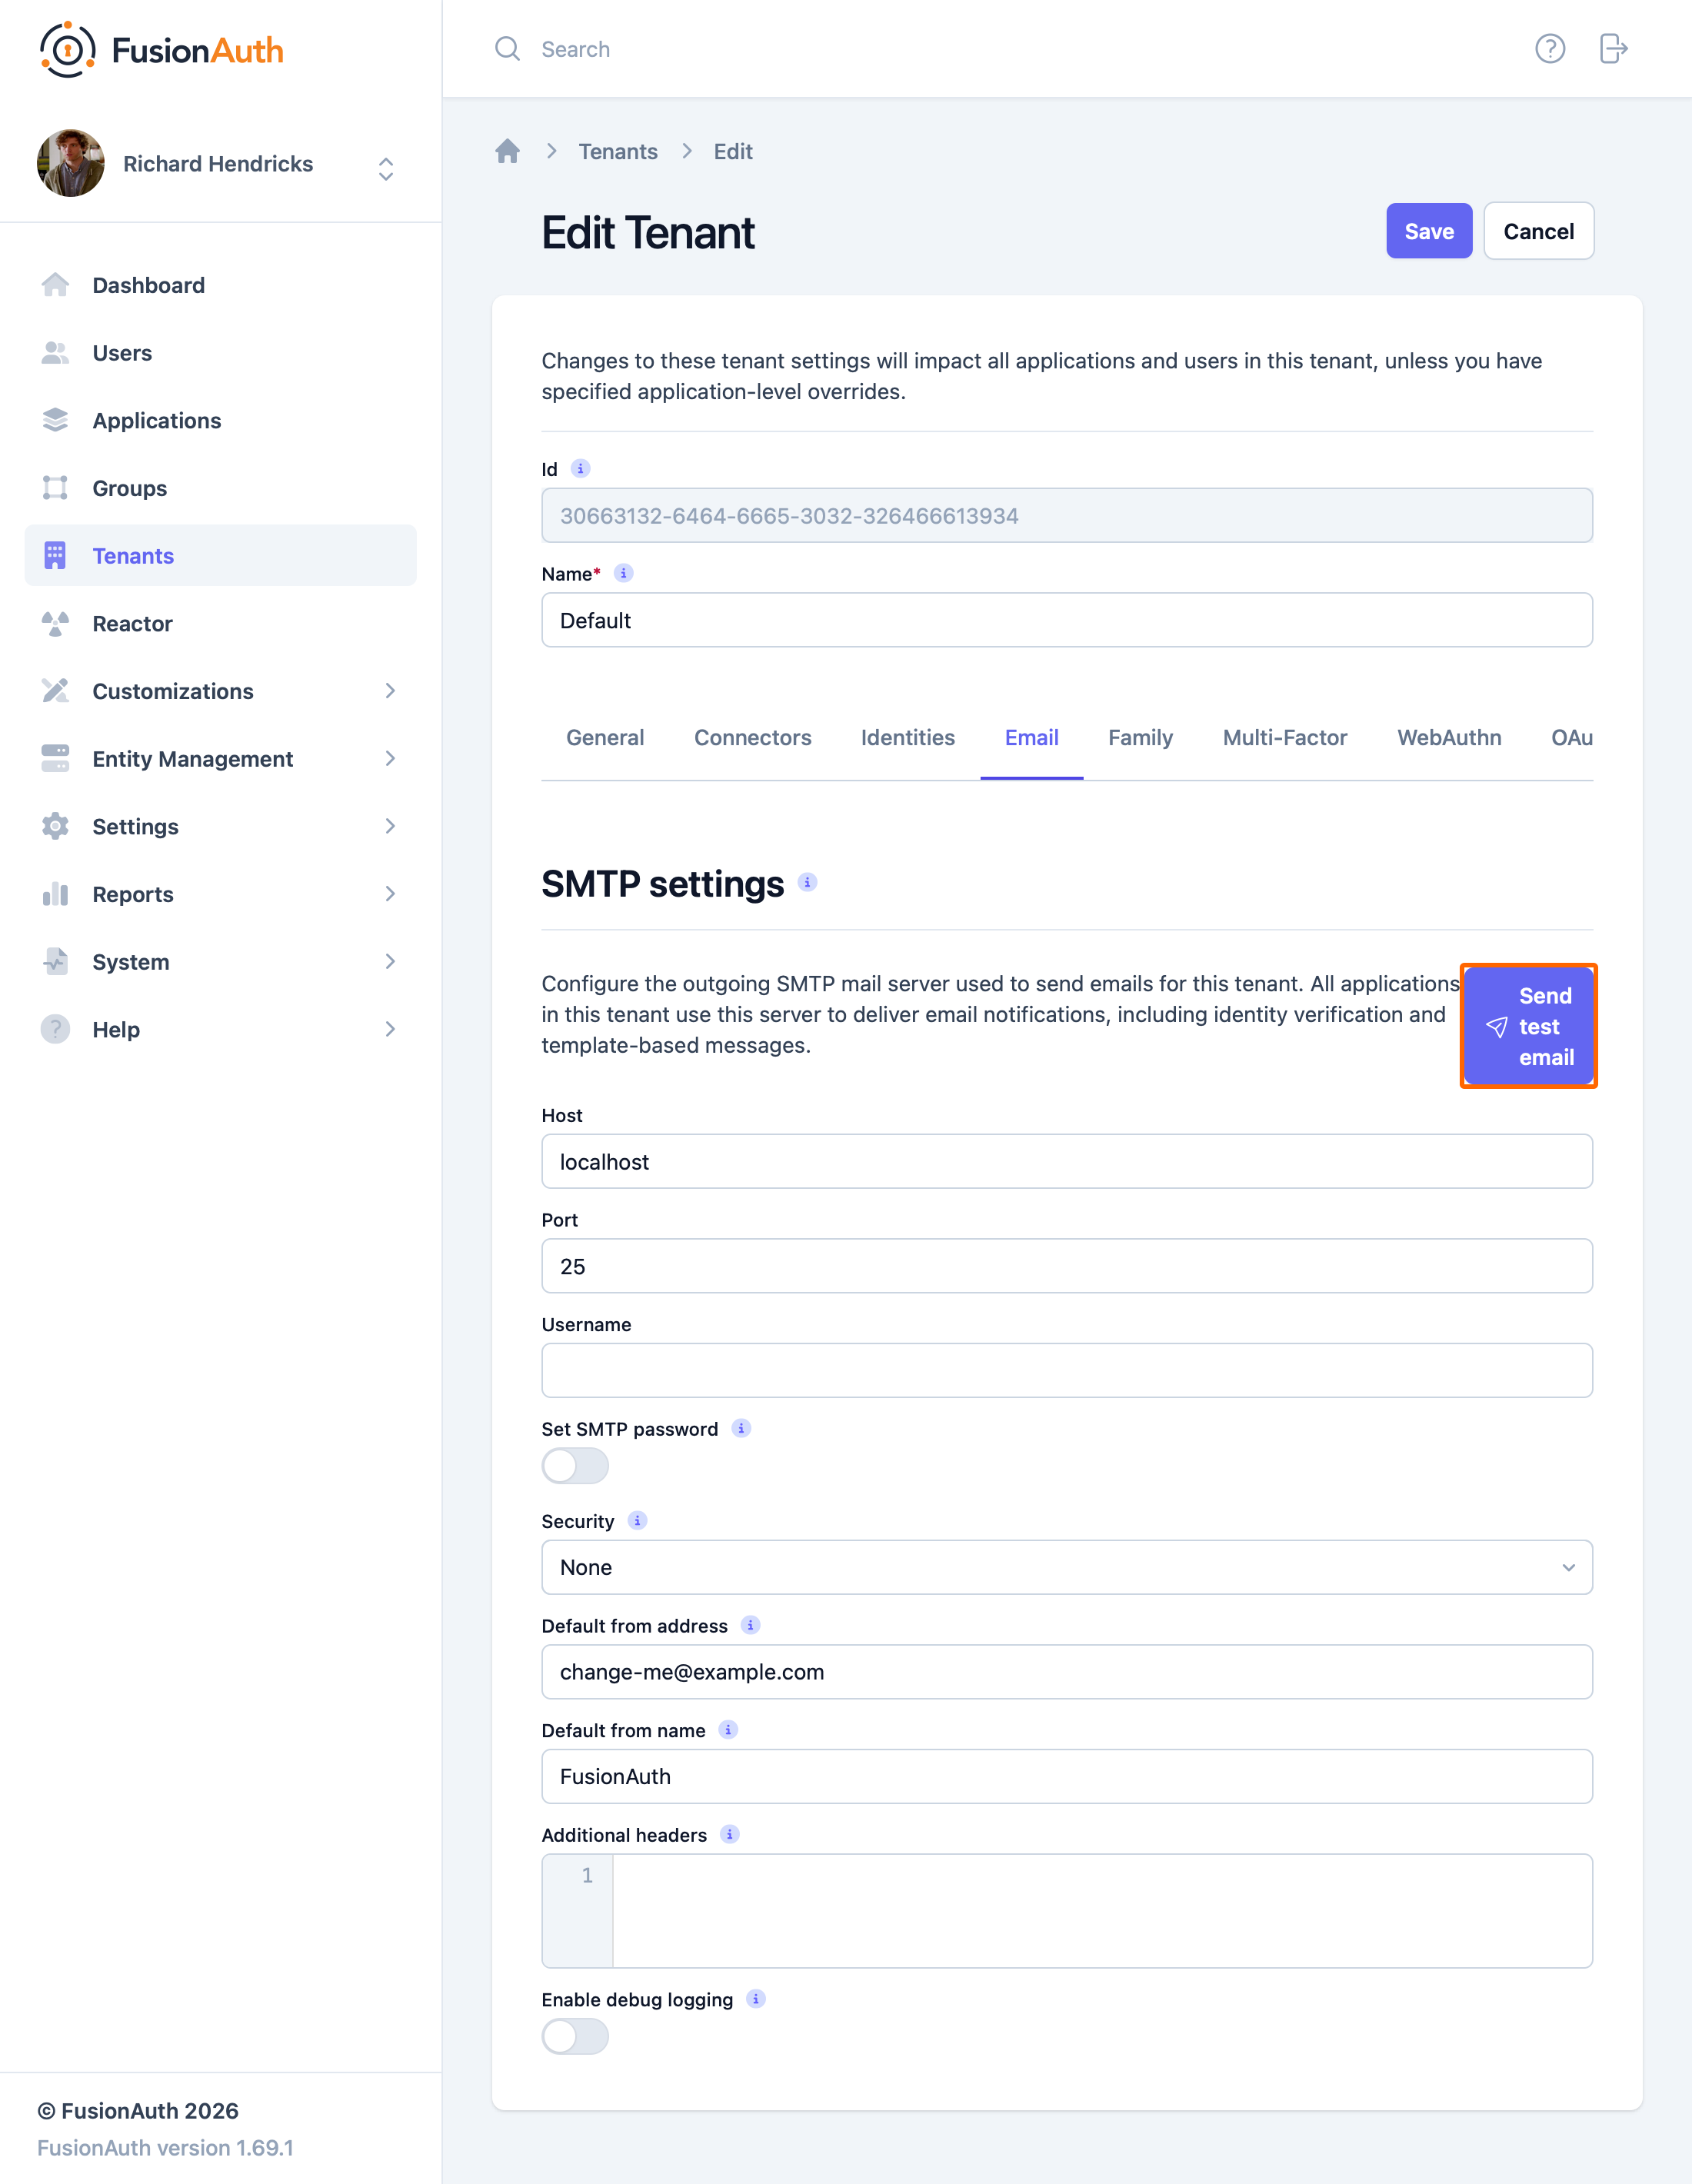
If sending a test email fails, a tool such as SWAKS can help debug SMTP issues. Using this tool removes FusionAuth from the equation.
Further Investigation#
If the test email succeeds, but you aren't receiving other emails, investigate further by following these steps:
- Send emails to different addresses at different providers and check the spam folder.
- Make sure that you are firing the event that you expect to send email correctly. For instance, if you are looking for email verification of users, make sure that is enabled.
- Test with a different FusionAuth function. Sending a password reset email is easy to do from the user details screen.
- Make sure the email template is correct, or use a default template.
Additionally, confirm that the template content matches up with the template type. Otherwise template variables will be missing. If this occurs, you may see a message like this in the Event Log.
Render Errors
---------------
html : freemarker.core.InvalidReferenceException: The following has evaluated to null or missing:
##> changePasswordId  [in nameless template at line 5, column 59]
Enable SMTP Logging#
To enable SMTP logging prior to 1.37.0 follow these steps:
- Enable debugging by navigating to Tenants -> Your Tenant -> Edit -> Advanced -> SMTP Settings -> Additional properties and add
mail.debug=true. - Save the tenant.
- Send an email.
- View the system logs by navigating to System -> Logs .
- Select
fusionauth-app.logand you will see verbose SMTP output.
To enable SMTP logging for version 1.37.0 or later follow these steps:
- Enable debugging by navigating to Tenants -> Your Tenant -> Edit -> Email -> Debug .
- Save the tenant.
- Send an email.
- View the Event Logs by navigating to System -> Event Logs .
- Select the Event Log that starts with
"Email debug information".
Doing this logs the full SMTP conversation, which can be verbose. You should remove this setting when you have finished troubleshooting.
Troubleshoot#
Below are some common errors you might get when configuring SMTP and how to fix them.
Authentication Error#
Unable to send email via JavaMail

Prime Messaging Exception
535 Authentication failed.
This error indicates that your username or password is incorrect. Re-enter them carefully with no excess whitespace and try again.
If the error looks like the one below, you need to set up a Google application password.
Prime Messaging Exception
535-5.7.8 Username and Password not accepted. For more information, go to
535 5.7.8  https://support.google.com/mail/?p=BadCredentials
Account Suspended#
Unable to send email via JavaMail

Prime Messaging Exception
502 5.7.0 Your SMTP account is not yet activated. Please contact us at contact@sendinblue.com to request activation.
Some providers automatically disable your account at registration. Contact support at your provider to have it activated.
Socket Timeout#
Error:

Unable to send email via JavaMail

Prime Messaging Exception
Exception reading response
Cause: SocketTimeoutException: Read timed out
You may need to change the port number. Try 587.
Domain Not Verified#
Unable to send email via JavaMail

Prime Messaging Exception
450 The resend.com domain is not verified. Please, add and verify your domain on https://resend.com/domains
You need to verify your domain with your SMTP provider by setting DNS records on your web host.
Be aware that DNS records take time to change. If you make a change to a record that your SMTP provider needs to validate, you may have to wait an hour to a day for caches to refresh before you can use the new value.
Email Address Not Verified#
Unable to send email via JavaMail

Prime Messaging Exception
554 Message rejected: Email address is not verified. The following identities failed the check in region EU-WEST-1: address/fa@simplelogin.com
Unable to send email via JavaMail

Prime Messaging Exception
421 Domain fa.dns-dynamic.net is not allowed to send: Free accounts are for test purposes only. Please upgrade or add the address to authorized recipients in Account Settings.
This error is only likely if you use AWS or Mailgun, which require your sender address to be verified when testing until your service leaves the testing sandbox. To fix this error, send the FusionAuth test email to the same address that you verified when creating the SES service in AWS or add the address to the list of authorized recipients in Mailgun.
Email Doesn't Arrive#
Try the following:
- Wait longer.
- Check that you entered the receiver email address correctly.
- Email an address that is authorized and verified by your SMTP provider, such as the one on your authenticated domain that you used to register your account. Check if the provider has an authorized recipient section and add the address there.
- Check if your SMTP provider received the request and the status is not
Bounced. - Check your spam folder in your email client, or other folders if you have filters enabled.
- Disable webhooks in FusionAuth, in case a failed webhook is causing complications.
SMTP Best Practices#
This section lists some recommendations by SMTP providers for transactional emails. Your primary aim should be to keep your sender reputation high to avoid emails being marked as spam.
- Ensure that you add all SPF, DKIM, DMARC, and MX records to your DNS records.
- For extra trustworthiness and brand building, set up Brand Indicators for Message Identification (BIMI), which enables email inboxes to display a brand's logo next to the company's authenticated email messages.
- Send emails only to people who have requested to receive them. Always first send a confirmation link to confirm their address is valid.
- Follow your SMTP provider's documentation to configure analytics for your emails (click tracking).
- Track your emails and adjust your sending based on feedback from ESPs and recipients. Don't send emails to recipients who have unsubscribed or complained of spam. Monitor the results of email sending on your SMTP provider's analytics web page.
- Send as few emails to users as possible to avoid emails being marked as spam. Keep your email content as short as possible to avoid wasting your users' time.
- Always include a link to unsubscribe in your emails.
- Always test new email templates by emailing them to yourself on a test FusionAuth server before enabling them in production. Check that fields are populated correctly.
- Send multipart emails using both text and HTML or text only. ESPs do not trust HTML-only email and block images by default. Preview how your emails look with tools like Litmus.
- Too many links and images trigger spam flags at ESPs. Misspellings and spammy words ("buy now!", "Free!") are spam flags, as are ALL CAPS AND EXCLAMATION MARKS!!!!!!!!!!!!!
- Don't use URL shortening services for links. Use your domain's full URL.
- The domains in the from field,
return-path, andmessage-idshould match the domain you are sending from. - Send transactional and marketing emails through different IP addresses, as marketing email is more likely to be marked as spam. FusionAuth uses only transactional email.
- For similar reasons, send your transactional email and your marketing email through different subdomains. Your domain and your IP address both have reputations with ESPs.
- Do not use a
noreplyemail address as your sender. Instead, route all customer replies to your support team.
Shared IP Addresses#
Most SMTP providers allow you to send through an individual IP address dedicated to your account or an IP address (or pool of addresses) shared by multiple SMTP accounts. If you are sending low volumes of email (less than 5000 per day), a shared IP address is a good choice. Shared addresses are less expensive than dedicated addresses. The address is already known and trusted by ESPs, so your emails are unlikely to be sent to spam folders.
If an SMTP account starts sending spam and decreases the address's reputation, the SMTP provider will take action, either canceling the client's account or moving them to a lower-reputation IP address pool.
Mailgun recommends one dedicated IP address for every million messages sent per month.
Related
API documentation for the FusionAuth Create an Email Template API.
API documentation for the FusionAuth Delete an Email Template API.
Learn about the APIs for creating, retrieving, updating and deleting email templates as well as sending emails to users.
API documentation for the FusionAuth Preview an Email Template API.